
 IJN 1st class Destroyers built 1940-44: Yūgumo, Makinami, Hayanami, Hamanami, Okinami, Hayashimo, Kazagumo, Takanami, Kiyonami, Suzunami, Kishinami, Kiyoshimo, Makigumo, Naganami, Ōnami, Tamanami, Fujinami, Asashimo, Akishimo. +16 cancelled.
The Yūgumo-class destroyers (Yūgumo-gata kuchikukan) were nineteen wartime destroyers built for the Imperial Japanese Navy between 1940 and 1944. The were also called Destroyer Type-A (Kō-gata Kuchikukan) from their plan name and were essentially an improved version of the previous Kagerō class that was praised as a new milestone in Japan. The initial plan was even more ambitious with a total of 38 destroyers, for the 1939, 1941 and 1942 years. They were the last “standard” IJN destroyers built in WW2, with the next class represented by the over-ambitious Shimakaze only built as a prototype, and the massive Akizuki class being essentially substitutes for AA cruisers. They saw fierce fighting, all major battles, and none survived the war. This was the end of a lineage started with the Fubuki class all the way back in 1924.
![]()
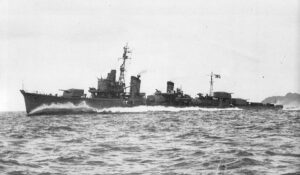
IJN Kiyoshimo in May 1944, colorized by Irootoko Jr.
Development
As the war was looming close, the IJN wanted to smply repeat the Kagerō class in even more impressive numbers. They were a repeat of the preceding Kagerō class, with minor improvements, notably to increase their anti-aircraft capabilities. The first 11 were ordered as part of the 1939 4th Naval Armaments Supplement Programme. The following 16, also called by some authors the Hayanami sub-class were ordered as ships #340 to #355 in the 1941 Rapid Naval Armaments Supplement Programme, with eight canceled before even being laid down. Another eight ships called the “Kai-Yūgumo” or “improved-Yūgumo” sub-class were planned as #5041 to #5048 under the 1942 (Modified) 5th Naval Armaments Supplement Programme, and were also canceled. Instead, the IJN judged it was more urgent to answer en masse to the USN ASW threat with cheaper, simplified escorts, several being built for the cost and time of a single Yūgumo.
In 1941 it was also recoignized that the versatile design of the Kagero/Yugumo classes were not perhaps the most efficient AA escorts, and it was planned a specialized, larger type that became the Type B destroyer, or Akizuki class, armed with four pairs of dual purpose 100 mm and more AA, less torpedoes.
On the other hand, some planners of the IJN though the allies answer would be slower after the destruction of their assets (basically after Pearl Harbor, the IJN planned a “mop up operation”, clearing out after the Netherlands East Indies, the Indian Ocean, and down south, after taking the Carolines and New Guinea, neutralizing Australia as well as taking the Aleutians to prevent any action from Alaska in the north. As a results, the resources would be there to start the last evolution of the Japanese destroyer lineage, the “C type”, a new “game changer” immensely superior to US destroyers buiolt (the Fletchers) or planned (Sumner-Gearing). The latter had even more torpedoes than any previous types, at the same time inaugurating quintuple tubes and renewing with three torpedo tubes banks like the old Fubukis. On the long run, if built as planned FY1944, they would succeed to the Fubukis and their successors. In 1946 there would have been even a “Super Shimakaze” class.
The Yūgumo class was no just a simple repeat of the Kagerō class. They were 45 tons heavier, a few feet longer and had a completely reshaped bridge. The Yūgumo class also had a newly shaped forward slope on the bridge, intended to reduce wind resistance, improve stability. However they shared the same powerplant, same armament, albeit they were often upgraded early in their career with radars and extra AA.
Yards
The Yūgumo-class vessels were built by only three different shipyards, for more uniformity and a better organization, but there were still as a result some minor differences between ships depending on the builder and local circumstance, especially as the war progresses, resources started to be scarce.
Maizuru Naval Arsenal: Yūgumo, Makinami, Hayanami, Hamanami, Okinami, Hayashimo.
Uraga Dock Company: Kazagumo, Takanami, Kiyonami, Suzunami, Kishinami, Kiyoshimo.
Fujinagata Shipyards: Makigumo, Naganami, Ōnami, Tamanami, Fujinami, Asashimo, Akishimo.
Kawasaki Dockyard Co. and Sasebo Naval Arsenal were not selected for them.
Naming:
The case of Akigumo. Despite her name, Akigumo (秋雲, “Autumn Clouds”) was not a Yugumo, but a Kagero class destroyer. This was not obvious at first, and historians postwar classed her as a Yugumo after some indications and reasonable assumptions. Arguably the classes were very much alike and the names differed. This originated in the IJN photographer Shizuo Fukui, which maintained she was a Yugumo class, and this was repeated later by many authors, as furthermore she was assigned to destroyer division 10, made only of Yugumo class ships. But not only this was debunked by Rear Admiral Takama Tamotsu given his personal photos and records, but later was found in archives that the naval command just ran out of “-Kaze” (wind) names.
As for the Yūgumo proper, they all had either “-gumo” (“cloud”) or “-nami” (“wave”). The last ships started a new serie of “-shimo” (“frost”) and the next cancelled batches of 1943 started a seri of “-giri” followed by replacement for destroyers sank earlier in this war, thus having “-kaze”, “-same”, “-shio” suffixes again. In any case, Japan continued its very unique tradition of natural phenomenons. Perhaps the only close equivalent would be the French “Bourrasque” class destroyers, made of known geographic winds.
Design of the class
Hull and general design
 Being near-sisters of the Kagero retired nothing to their impressive capabilities, armament and speed. They were still at the top of their game and superior on paper to the US Gearing class destroyers. Only on paper as the later conceded a single gun, but had the same number of torpedoes and a similar, if not superior speed on a relatively similar tonnage. They ended as superior ships for their radars, and better fire control system, notably for their 5-in/38 guns. The Yūgumo class measured 119.17-meter (391 ft) overall in lenght versus 118.5 m /388 ft 9 in for the Kagero, with the exact same beam of 10.8 meters (35 ft 5 in) and a similar draft at least on paper of 3.76 meters (12 ft 4 in).
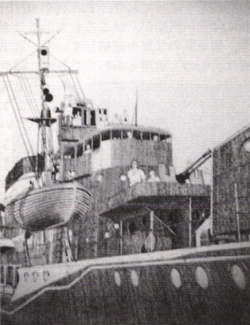
The displacement was a bit heavier at 2,110 metric tons (2,080 long tons) on standard load, up to 2,560 metric tons (2,520 long tons) at deep load versus 2,000 long tons (2,032 t) and 2,500 long tons (2,540 t) for the Kagero. Their crew amounted to 228 officers and enlisted men but it rose during the war to match the extra AA mounts that were installed, and radars. Being so close to the Kagero, they had about the same roll and general behaviour due to their metacentric height, but seaworthiness was better due to the changes made in the bow and stem, while the bridge adopted a different design, being better “streamlined” than the bridge shape of the preceding Asashio and Kagero class which was faceted. The silhouette was almost identical, including for the reloads for the forward torpedo launcher relocated in front of the launcher, differing from the Asashio class.
Powerplant
The Yugumo were a repeat of the Kagero in that matter, with two Kampon geared steam turbines driving each their own propeller shaft. Steam came from three Kampon water-tube boilers. The turbines were rated at a total of 52,000 shaft horsepower (39,000 kW) like the Kagero class, for a designed speed of 35 knots (65 km/h; 40 mph). This was less than the Fletcher class, but in general performances they were heavenly matched. The turbines and boilers were placed in separated compartment in order to mitigate ASW damage. The reshaped prow was supposed to gave them an egde and regain 36 knots, but the nominal figure remained the same, albeit on trials (not documented) they probably reached in excess of 36 knots and more. Another energy-related modifications concerned their interior layout, wich changed onboard generators from DC to AC current in order to just provided more supply to expected anti-aicraft guns addons in the future.
Armament
Their main armament was a repeat of the Kagero class, but with a twist: They featured six 5″/50 cal. guns now mounted in the new “Type D” turret providing them a 75-degree elevations, versus 55-degrees for the “Type C” of the previous designs. This have them a true dual purpose nature, with enough elevation to really performed in the antiaircraft role, that became more vital as the war progressed. The main battery thus comprised six Type 3 127-millimeter (5 inches) guns in three twin-gun turrets with the same superfiring pair aft, single turret forward of the bridge, with a considerable distance between them. This “D” mount elevating to 75° did nothing to alleviate the slow rate of fire, slow traversing speed, and absence of high-angle fire-control system. However this are conflicting infos about replacing their No. 2 gun turret with anti-aircraft guns.
12.7 cm/45 3rd Year Type naval gun
The 12.7 cm/50 Type 3 naval gun was a dual purpose model and standard weapon for Japanese destroyers from 1928 and until 1944 except for the Akizuki and Matsu classes. These were now true true dual-purpose, with a modified mount, albeit having still bag propellant, they now had powered ramming. Rate of fire of ????? rounds per minute, training speed of only 6° per second. However up to the last days of 1945, they lacked radar-assisted fire control and fuses, severely limiting their AA capabilities as well. As AA guns they were slow, and only were used as long range, when an enemy formation was seen approaching. They were given special “shotgun” or “beehive” types ammunitions that spread a lot shrapnel on a large area at the incoming aircraft. These new DP guns had another advantage, in later upgrades this alleviate the need for sacrificing a turret (unlike on the Kagero class) in order to add extra AA, albeit there were increases of these anyway.
The Type 3 gun was of built-up construction with 3, then 2 layers, breech ring and breech bush (Welin interrupted screw breech) and still used powder bags, whereas the shell was fuzed manually on the loading tray before ramming by hand with the pusher-type shell hoist and manually insterted powder bags.
Model C:
Adopted by the Shiratsuyu, Asashio, and Kagerō-class, elevation to 55°, depression to −7°.
Mount weight: Type A/B 18.5 tonnes (18.2 long tons; 20.4 short tons)
Round: 23 kg (51 lb) HE, illumination, incendiary shrapnel (sankaidan) for AA use, flat-nosed ASW (1943). 1945: HE developed with added charge for 23,025 metres (25,180 yd).
Propellant: 7.7 kg (17 lb) 30 DC.
Muzzle velocity:
-Common Type 0 HE 23 kg (51 lb)/1.88 kg (4.1 lb): 910–915 m/s (2,986–3,002 ft/s)
-Common Type 1 HE 23 kg (51 lb)/1.88 kg (4.1 lb): 910–915 m/s (2,986–3,002 ft/s)
-Illumination 23 kg (51 lb): 750 m/s (2,500 ft/s)
-ASW 20.9 kg (46 lb)/4 kg (8.8 lb): 250 m/s (820 ft/s)
-HE 1945 LG type 27.9 kg (62 lb)/2.2 kg (4.9 lb): 910–915 m/s (2,986–3,002 ft/s)
⚙ specifications 12 cm/45 3rd Year |
|
| Weight | 4,205 kilograms (9,270 lb) |
| Barrel length | 6.483 metres (21.27 ft)/ barrel 6.265 metres (20.55 ft) |
| Elevation/Traverse | -7° +40° or more and 120°/120° |
| Loading system | Welin interrupted screw, Hydro-pneumatic recoil |
| Muzzle velocity | 910–915 m/s (2,986–3,002 ft/s) |
| Range | 18,400 metres (20,100 yd)/40° |
| Crew | 6 |
| Round | 20.3 kg (45 lb) 120 x 550 mm.R., sep. loading cased charge |
| Rate of Fire | 5–10 rpm |
Torpedoes
The torpedo armament was now eight Type 93 torpedoes in two quadruple launchers like on the Shiratsuyu, Asashio and Kagero classes. They also kept all eight reloads stored in separate deckhouses on the centerline of the ship for “B” mounts and two separate abaft the funnel for “A” mount forward. 16 depth charges was the standard, versus 18 on previous classes, and it was decided to increase this to 36, but to compensate for this extra weight, a set of four torpedo reloads was removed, leaving 12 total (4 spares only).
The eight 24 in (610 mm) torpedo tubes in two quadruple centerline mounts were all equipped with the Type 93 “Long Lance” torpedoes. The containers with eight spare torpedoes behind the mounts made possible a reloading underway at speed within a minute, using winches and rails. So this made the Asashio’s torpedo battery surpassing U.S. destroyers at the time.
These Type 92 launchers, derived initially from the twin tube Type 89 launcher of the Takao-class heavy cruisers had been fitted with shields as weather and splinter protection, notably from strafing fire, but not shrapnel of large size. They were for example not immunte to 0.5 in cal. heavy amchien gun fire, that most US aircraft carried. This was a compromise in weight. The initial shields in Duralumin were lighter but corroded, while in demand for the aircraft industry. On the Asashio they were in “NiCrMo” steel, heavier but easier to produce, from recycled air chambers of obsolete torpedoes. They only measured 3 mm (0.12 in) in thickness to save weight, and thus even unable to protect against 0.3 inches or 8 mm fire.
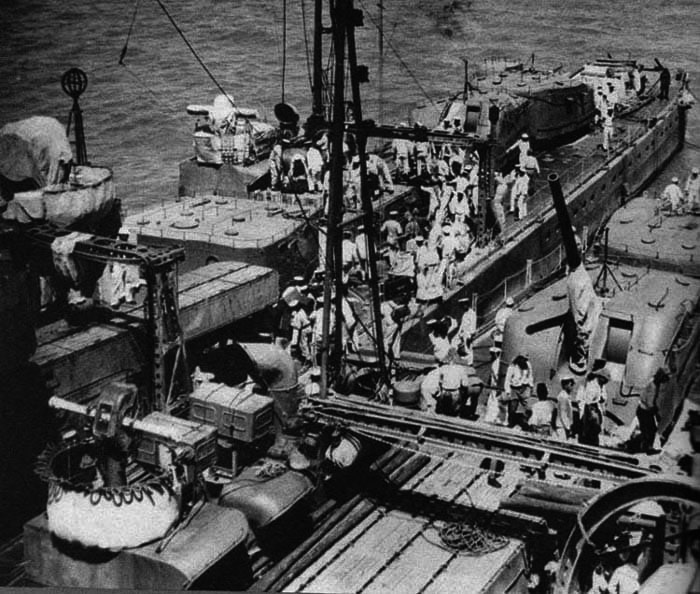
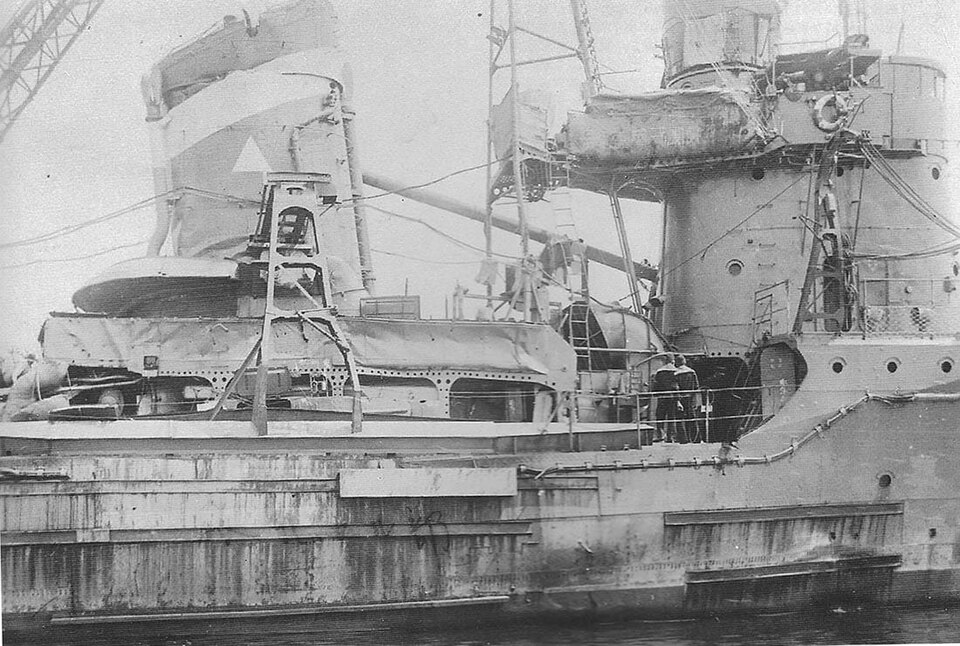
Murasame and Samidare showing their rear deck details, prewar
These Type 92 launchers were traversed by electro-hydraulic gears to 360° in 25 seconds. There was a backup manual system using handwhels and a reduction, but this took up to two minutes for the same revolution. The eight reloads as seen above used systems of cranes and winches, rails and chariots to help the reloading process. Intensive drills ensure the best reloading times. The spare torpedoes were stored externally in canisters. Each tube could be reloaded separately in 23 seconds through an endless wire and winch, all manual. The Type 93 torpedo benefited of large stockpiles available and they remained extremely potent until 1945.
Type 93 (1933)
The Type 93 entered service in 1933 (model 1) and the ships were possibly rearmed in 1935-36 or never, it’s not strictly confirmed. The Type 90 could have been installed instead when available.
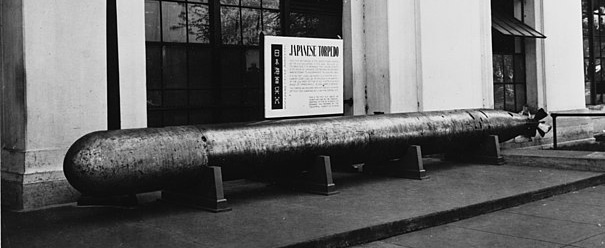
61 cm Type 93 torpedo found on the Mutsuki, Fubuki, Akatsuki classes, and all oxygen fuelled from the Hatsuhara and beyond. The Designer was Rear Admiral Kaneji Kishimoto, and Captain Toshihide Asakuma, and this started in 1928 (just as the last Mutsuki class ships were completed), then went on until 1932. The Type 93 became the nororious “secret weapon” unleashed by IJN destroyers and cruisers in WW2, which caused extebsive damage during the Solomons campaign expecially. The defective US Type 14 torpedo was in stark contrast with this. The Type 93 torpedo was dangerous to its user however but its effectiveness outweighed the risks anyway, claiming 23 Allied warships, 11 cruisers, 11 destroyers, and a fleet aircraft carrier and among these, 13 hits were fatal.
⚙ specifications Type 93 |
|
| Weight | 2.7 tonnes (6000 lb) |
| Dimensions | 9 metres (29 ft 6+5⁄16 in) x 610 mm (2 ft 1⁄64 in) |
| Propulsion | Oxygen-enriched air |
| Range/speed setting | 2,000 m (24,000 yd) at 48–50 kts or 40,400 m (44,200 yd) at 34–36 kts |
| Max speed | 96 km/h (52 kn) |
| Warhead | 490 kg (1080 lb) |
| Guidance | Straight course |
AA Defence
As built, the Yūgumo had only four Type 96 25 mm (1 inch) anti-aircraft guns. They were located in two twin-mounts forward of the aft smokestack. This of course was later augmented (see later) to reach an average of 20 by the time of the battle of Leyte Gulf. From 1943 already triple-mounts replaced dual mounts aft with another twin installed forward of the bridge on a platform, like the Kagero class. They also received a Type 22 radar. Naganami was the onl one sporting a captured M2 Browning/50 heavy machine gun from the grounded USS Darter from 25 October 1944. The six survivingships sported twelve additional single-mount plus the Type 13 radar and it seems only Kiyoshimo sported an extra four Type 93 13mm machine guns.
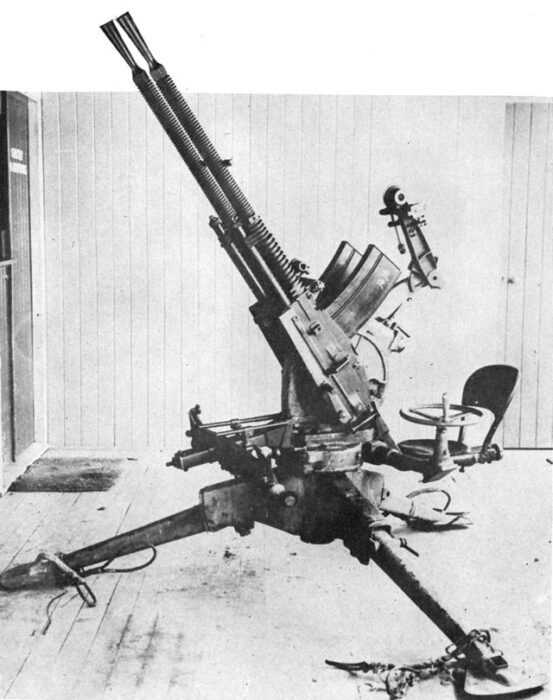
25 mm Type 96

The type 96 25 mm AT/AA gun became the standard of the IJA and IJN, automatic cannon developed as variant of the French Hotchkiss 25 mm, dual-purpose and developed as AA on single, twin and triple mounts. Development worked on 1935. 25 mm Hotchkiss design evaluated and order placed for several mounts types for evaluation at Yokosuka Naval Arsenal. Led to the Type 94 and Type 95 and then the main model produced at Yokosuka Arsenal, the Type 96.
Elements made with castings and not forging for larger production, Rheinmetall supressor, new mounts designed.
Air-cooled gas operated with multiple rings (Hotchkiss patent).
Twin-mount in 1939, followed by triple mount in 1941 and single mount in 1943.
Issues of the designed revealed in combat:
Slow elevation and traverse, ineffective sights, excessive vibration, limited magazine cap., blinding Flashes.
The 1944 single mount needed a single operator and a loader but had a better spiderweb sight.
Tech specifications 25 mm Type 96 |
|
| Barrel Lenght | 1.5 m (4 ft 11 in) L/60 |
| Barrel weights: Single | 785 kg (1,731 lb) |
| Barrel weights: Twin | 1,100 kg (2,400 lb) |
| Barrel weights: Triple | 1,800 kg (4,000 lb) |
| Crew: | 3, 7 and 9 respectively |
| Shell | 25×163mm |
| Exact caliber | 25 mm (0.98 in) |
| Action | Gas operated |
| Elevation/Traverse | -10°/+85° – 360°, manual |
| Rate of fire | 200–260 rpm (cyclic) |
| Muzzle velocity | 820 m/s (2,700 ft/s) |
| Effective range | 6.8 km (4.2 mi) at 45° with HE shell |
| Maximum firing range 85° | 3 km (9,800 ft) effective, 5.5 km (18,000 ft) max. |
| Feed system | 15-round box magazine |
| Production | 33,000 all variants 1935-45 |
13.2 mm Type 93 heavy machine gun
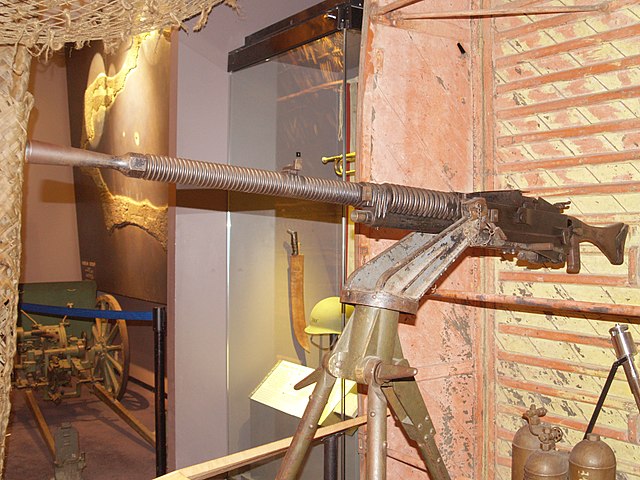
The Type 93 13 mm (0.55 inches) heavy machine gun (九三式十三粍機銃), Type Ho 13 mm AA machine cannon was a license-built version of the French Hotchkiss M1930 machine gun. It was widely used for heavy ground support and organic for AA defence, until gradually replaced when possible by the 25 mm Type 96. They were still in use, on twin mounts, on many IJN cruisers and destroyers before WW2 but gradually replaced when possible, notably by single 25 mm mounts due to unsufficient range and firepower.
The common twin mount in 1941
Tech specifications Type 93 heavy machine gun |
|
| Barrel Lenght | 140 centimeters (55 in) total, 988 millimeters (38.9 in) barrel alone |
| Mass | 42 kilograms (93 lb) (empty) |
| Fully loaded | ? |
| Shell | 13.2×99mm Hotchkiss |
| Exact caliber | 13.2 mm |
| Barrel type | A tube with progressive RH parabolic twist, 9 grooves |
| Action | Gas-operated fully automatic |
| Elevation/Traverse | -15 / +85°, 360° traverse, manual |
| Rate of fire | 450 rounds/min Max |
| Muzzle velocity | ? |
| Effective range | 1,000 meters (3,300 ft) |
| Maximum firing range 45° | ? |
| Feed system | Classic box magazine holding 30 rounds |
| Sight | Spiderweb anti-aircraft iron sight |
Depth Charges
This class carried like the previous destroyer some thirty-six depth charges in two racks at the stern, including the four launchers.
The single Type 81 depth charge launcher at the stern could allow dropping the standard Type 95, 30.5″ by 17.7″ (77.5cm by 45cm). 220 lb (100 kg) charge, Type 88 explosive (ammonium perchlorate and ferrosilicate). Fuse using a water inlet. 100 feet (30m) and 200 feet (60m) settings (after the revelations of a US Congressman).
Later increased to 324 lb (147kg), Type 97 explosive (70% TNA/30% HNDA), 300 foot (90m) setting.
-1944 Type 2: 230 lbs (105kg) Type 97 explosive settings 98, 197, 292, 390, 480 feet (30m, 60m, 89m, 120m, and 145m).
-1945 Type 2: 357 lbs (162kg) explosives.
Upgrades
1943: Yugumo, Akigumo, Kazegumo, Makinami, Naganami, Onami received an extra twin 25mm/60 Type 96 AA mount forward and Type 2, 2-go radar
1944: Akigumo, Kazegumo, Naganami, Tamanami, Fujinami, Kishinami, Hayanami, Hamanami saw the removal of two twin 25mm/60 AA mounts, and removal of 8 spare torpedoes in exchange of four triple 25mm/60 Type 96 AA mounts*.
Mid-1944: Most survivors were given twelve extra singke 25mm/60 Type 96 and four single 13.2mm/76 to boot as well as the Type 3 radar. Later one even allegedly lost her aftermost (3rd) main gun turret and a twin 25mm/60 AA for a twin 127mm/40 Type 89, better overall dual purpose mount, and four single 13.2mm/76 AA HMGs.
*The removal of their twin 5-in/50 No 2 turret was apparently never performed.
Also:
-Makigumo and Kazagumo (No. 117 and 118) had a Kagerō-style rear mast, as opposed to the one typical for Yūgumo
-Naganami (No. 119) and subsequent ships had a modified main column on the rear mast
-Hayanami and Hamanami (No. 340 and 341) had a separate platform added for the 22-GO Radar
-Okinami (No. 342) had additional anti-fragmentation protection to the bridge, and the E27 Type-3 radar detector added
-Kiyoshimo (No. 347) had an increased anti-aircraft armament to the total of 4 triple-mount and a single dual-mount 25mm cannons supplemented by a number of Type 93 machine guns.
-From late 1943, destroyers of the class had 22-GO radar added, with photographs from 1944 suggesting the 13-GO air search radar supplemented it.
Sensors
The Yugumo made a difference also from previous designs by having a stronger tripod foremast incorporated early in design phase, capable of mounting the new Types 13 and 22 radar sets that were coming into service in late 1941 and early 1942. They were the first IJN destroyers designed with radars in the initial development phase.
Type 3 Sonar
The Asashio class ships were the first to be equipped with sonar. This was the Type 93 sonar coupled with the Type 93 hydrophones as integrated. They were inferior however to allied designs.
The Type 93 model 3 sonar was a derivative of Model 1, used on destroyers since 1933. It used a retractable quartz projector for transmission and reception and had a nonretractable sound dome measuring 1.9m by 0.65m (6’3″ by 2’2″).
Specs
Frequency: 17.5 kHz
Receiver gain: 120 decibels
Pulse repetition interval: 2, 4, or 8 seconds
Power: 2 kW
Ranges: 1640-3300-6600 yards (1500m-3000m-6000m)
Accuracy: 3 degrees
Resolution: 10 degrees
Weight: 4400 lbs (2000 kg)
Type 22 radar
The Asashio class received by late 1944 (Kasumi, Michishio, Asagumo, and Yamagumo) a Type 22 and a Type 13 radar. The Type 22 radar wasa availble from November 1943, and by late 1944, it started to be replaced by the Type 13 radar.
The early Type 22 General Purpose Radar looks like characteristically like a 2910 lb (1320 kg) drum topped with a twin cornet amplificators, mounted mid-way top the mast.
Type 22 radar Specs:
Wavelength 10 cm, pwd 10 microsecond, PRF 2500 Hz, scan rate 5 rpm, PP 2 kW
Range: 20 nautical miles (35 km) aircraft group, 10 nm (17 km) single, 13 nm(24 km) battleship.
Subject to land clutter. Horn and A scope display, accuracy 220 yards (200m)/3 degrees res. 1600 yards (1500 m)/40 degrees
300 sets produced installed on destroyers from the summer 1942. Generalized in 1944.
Type 13 radar
Vertical 240 lb(110 kg) bedframe antenna, developed 1941, introduced mi-1943, with vertical dipole transmitter and Yagi mattress receiver. 1000 sets produced. Air defense, range 100 km (group), and single aircraft 50km.
Specs:
Wavelength 200 cm, pw 10 ms, PRF 500 Hz PP 10 kW
Range: 30-60 nautical miles (50-100 km)
Appearance
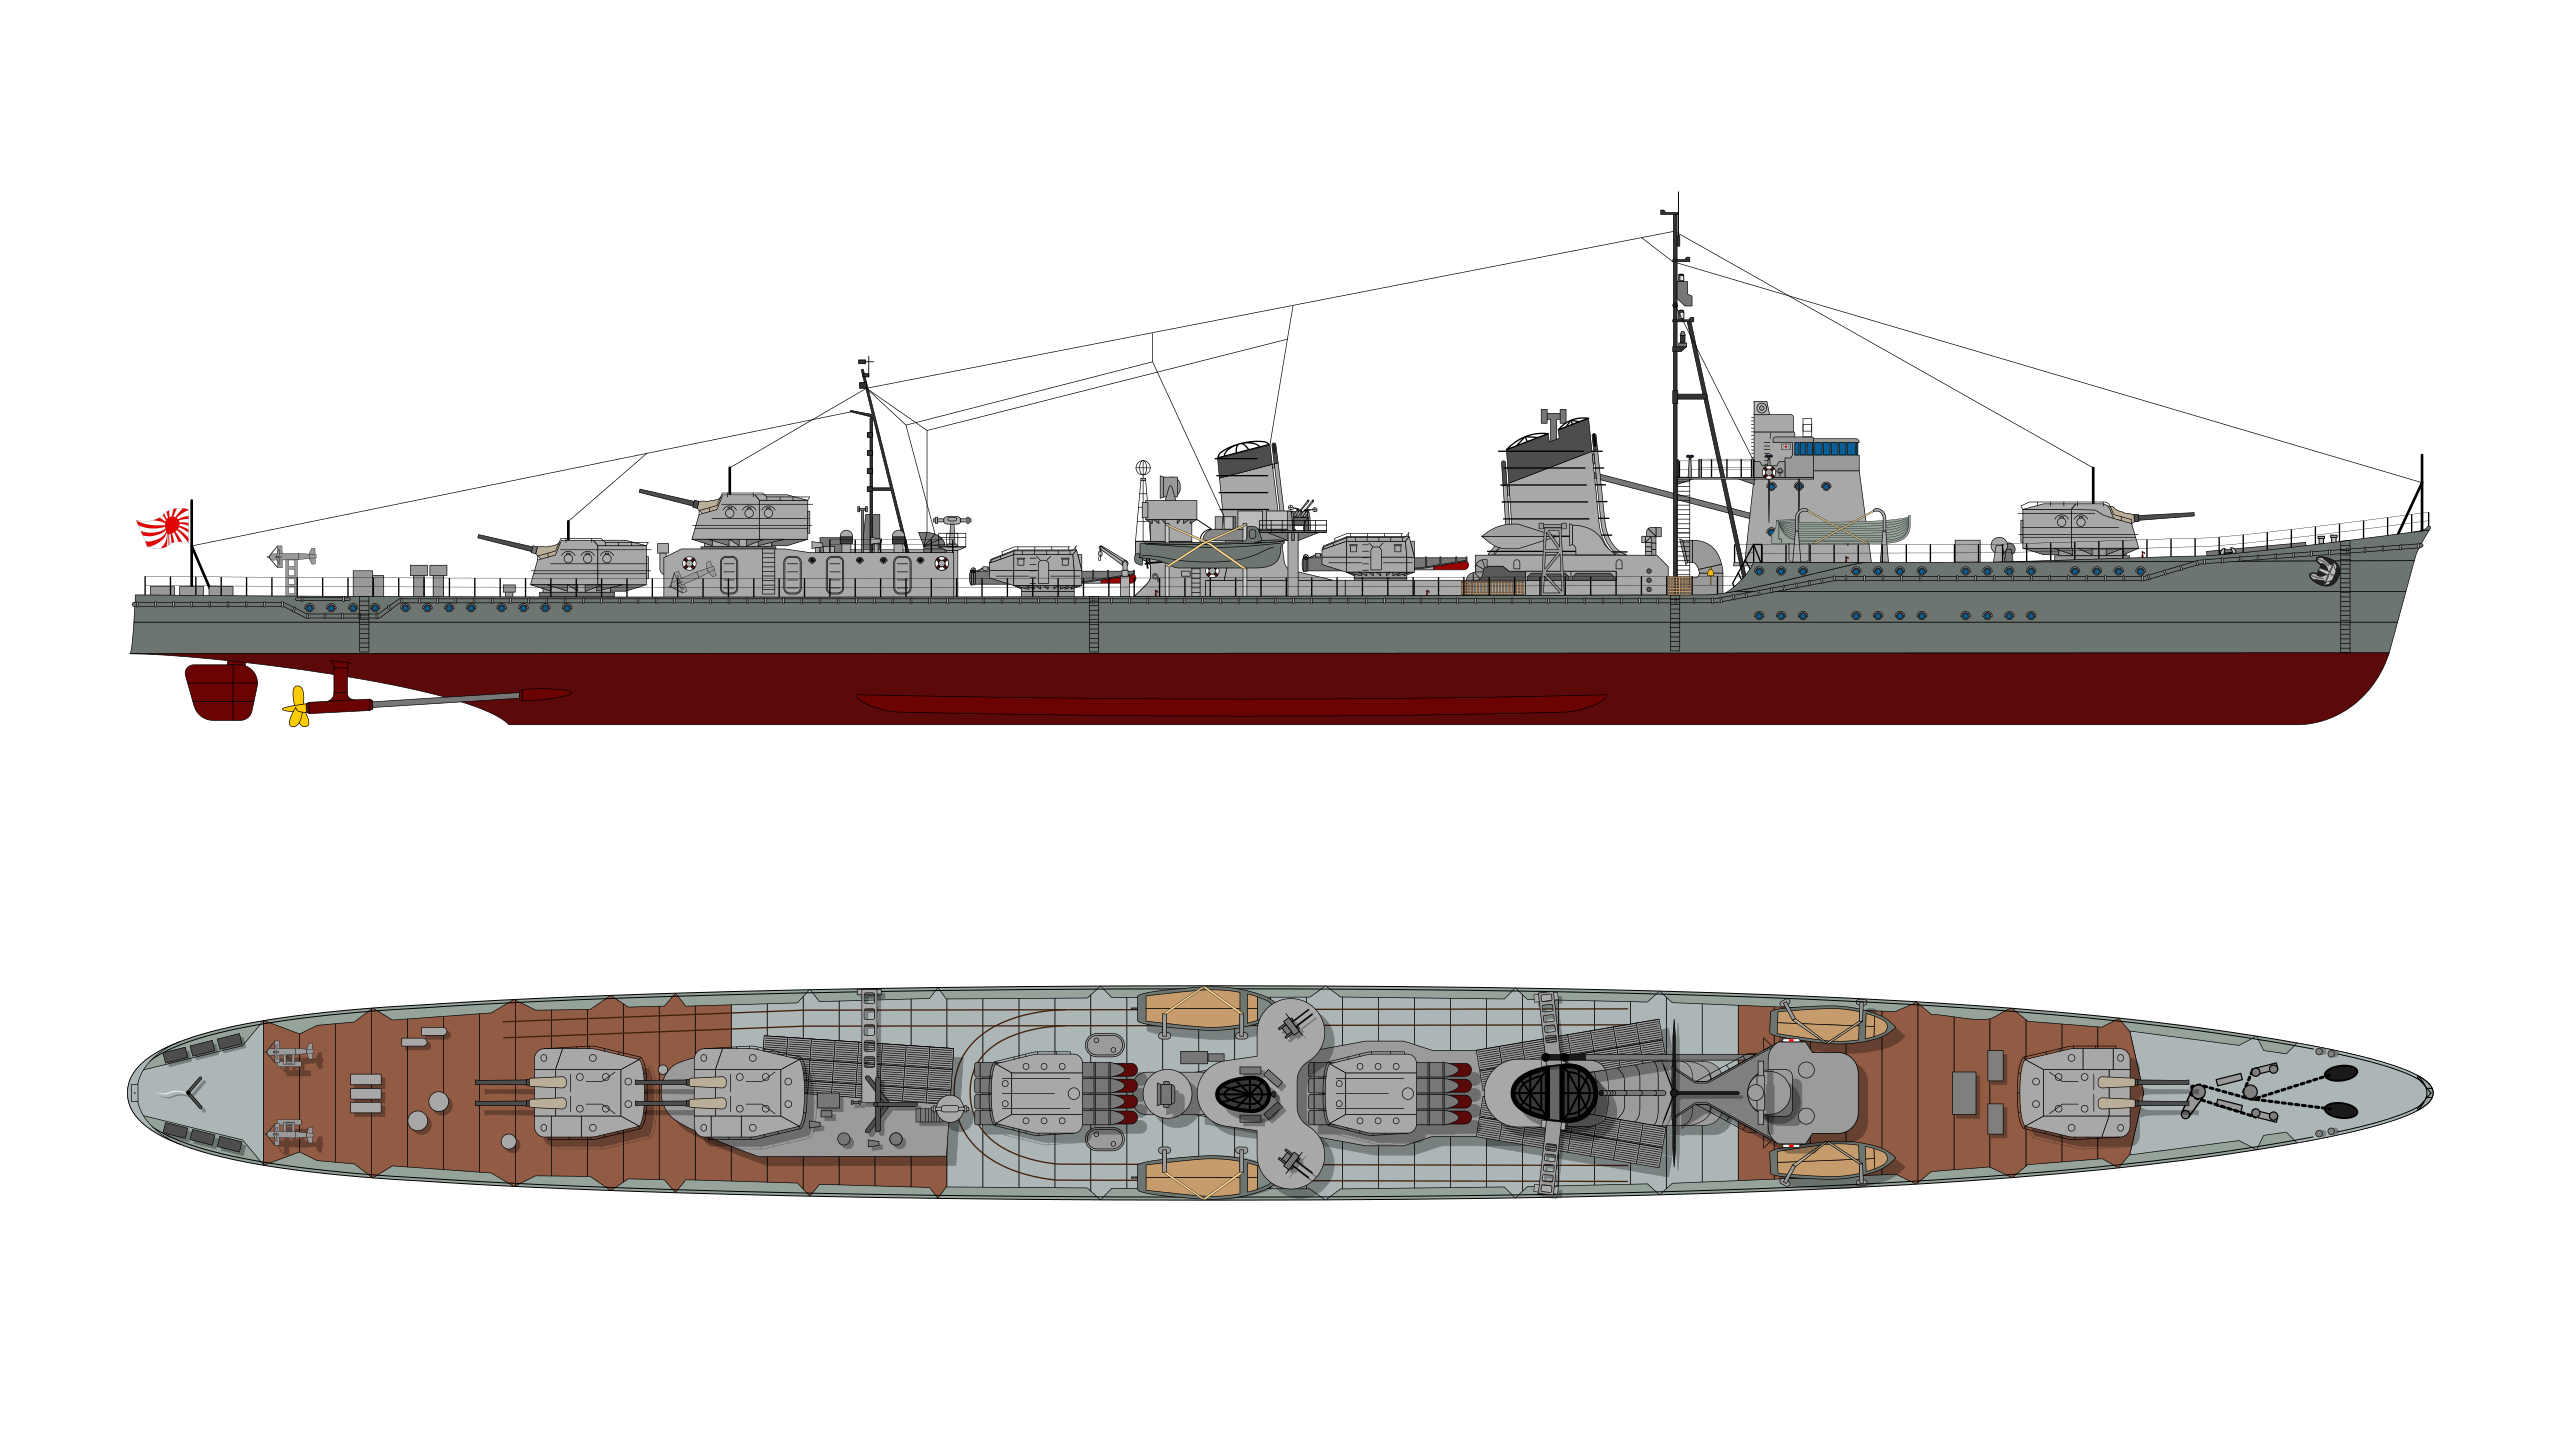
CC profile and outline.
To come
Author’s profile
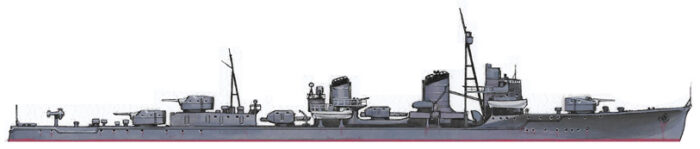
Author’s old profile
⚙ Kagero class specifications |
|
| Displacement | 2,000 long tons (2,032 t) standard, 2,500 long tons (2,540 t) battle condition |
| Dimensions | 119 x 10.8 x 3.76 m (390 ft 6 in x 35 ft 5 in x 12 ft 4 in) |
| Propulsion | 2 shaft Kampon impulse turbines, 3 × Kampon WT boilers 52,000 shp (39,000 kW) |
| Speed | 35.5 knots (65.7 km/h; 40.9 mph) |
| Range | 5,000 nautical miles (9,300 km) at 18 knots |
| Armament | 2×3 127mm/50, 4x 25 mm, 2×4 (16) 610 mm Type 93 torpedoes, 18× DCs |
| Sensors | See notes |
| Crew | 240 |
Irootoko’s Gallery
IJN Tone refulling, wit IJN Amanami in the background (CC)
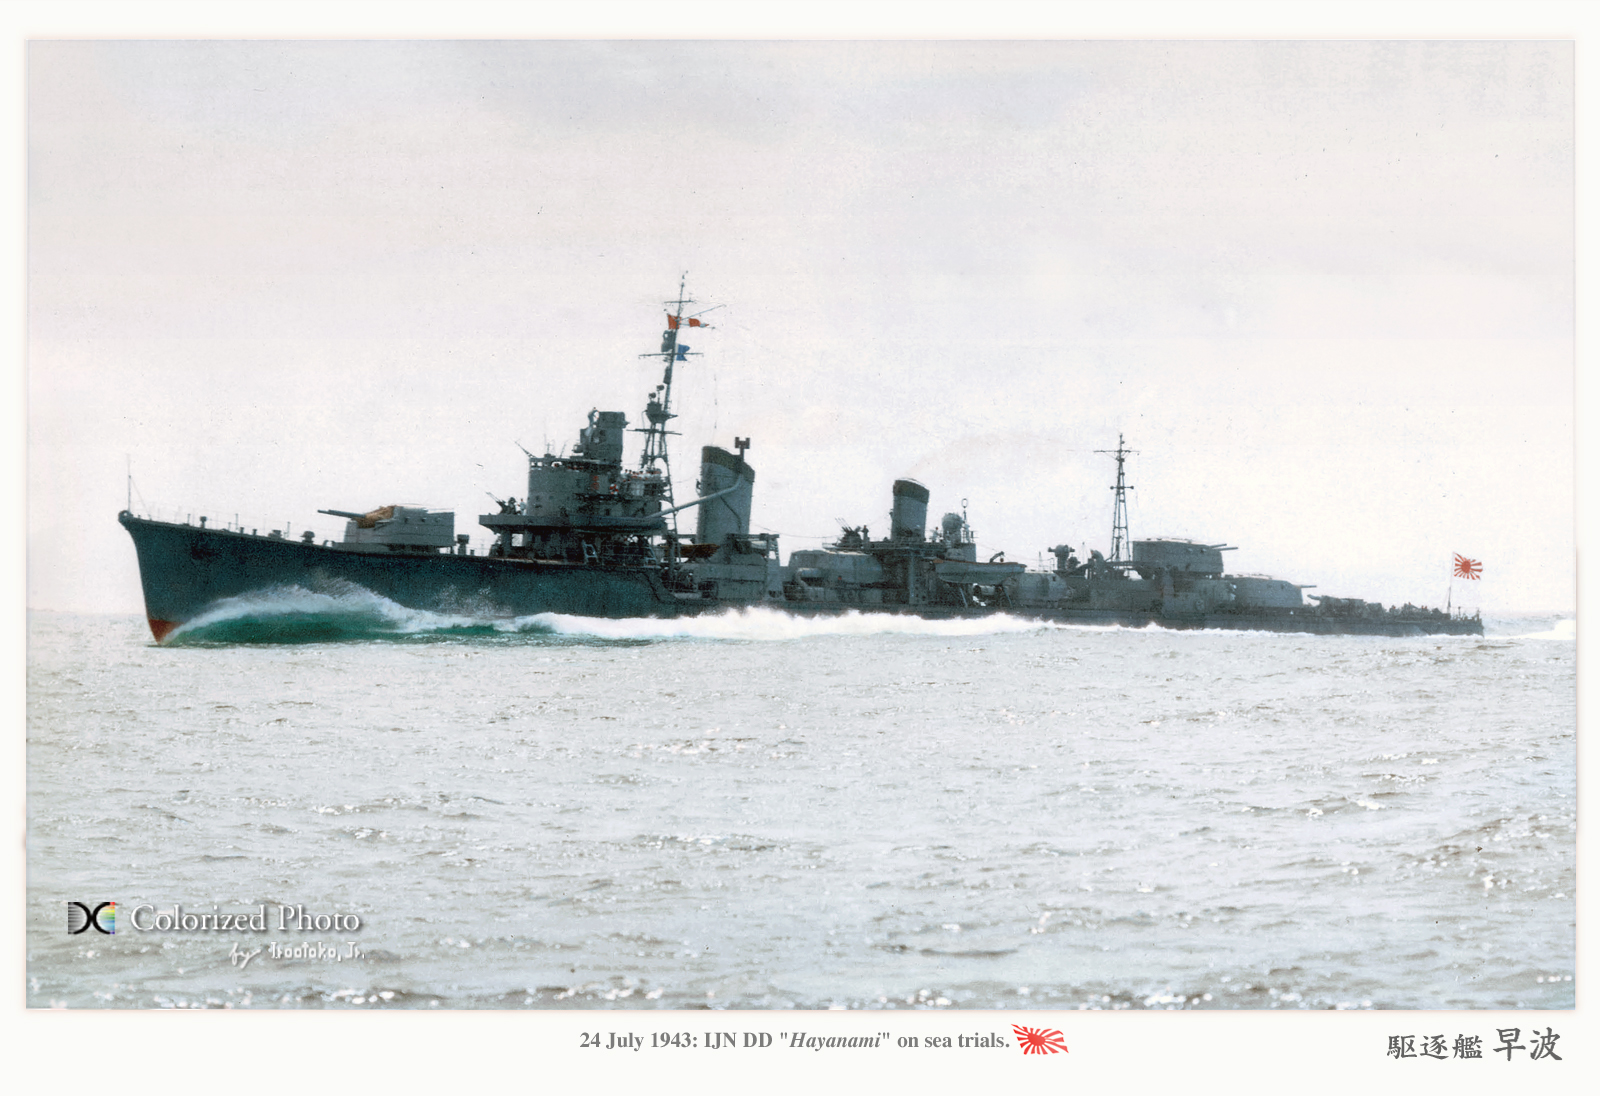
Hayanami on trials July 1943
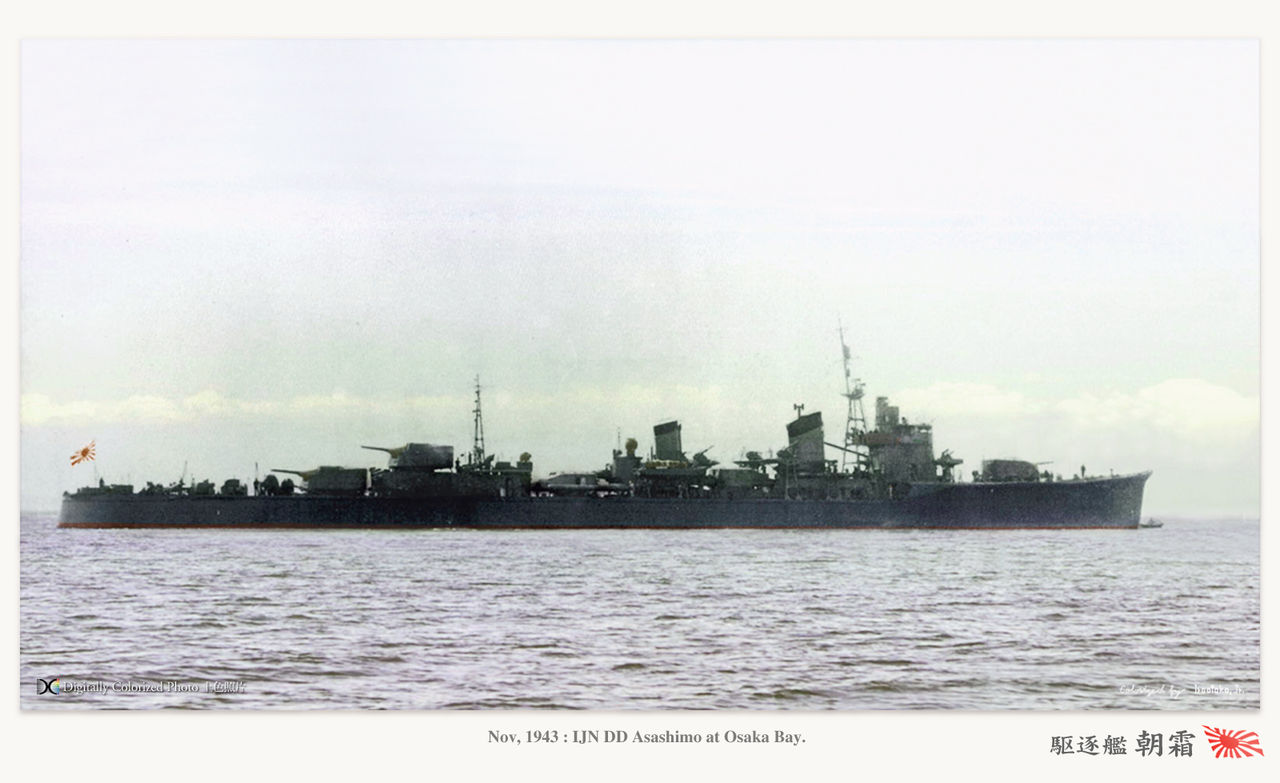
Asashimo in November 1943
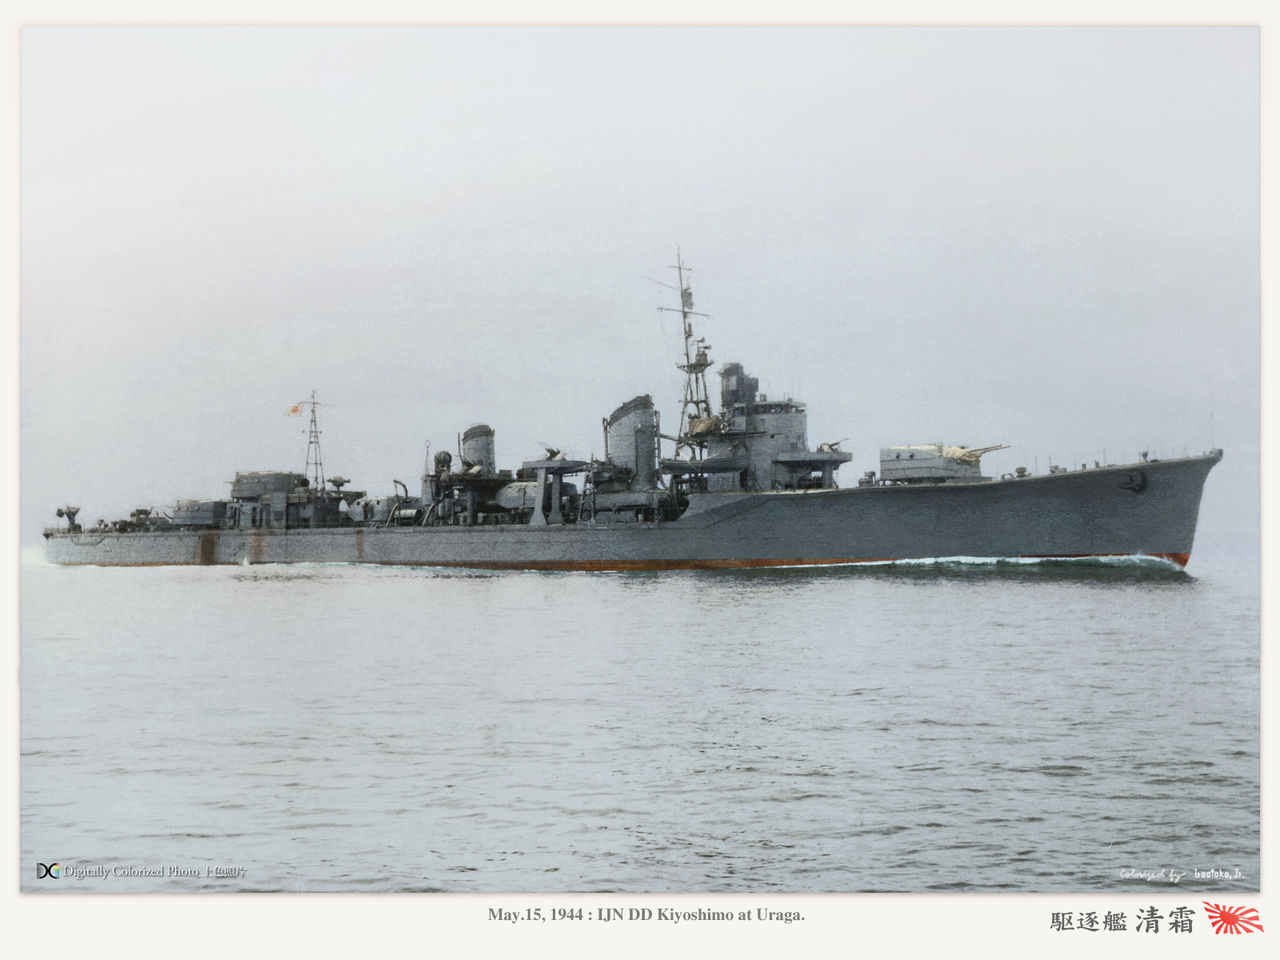
Kiyoshimo at Uraga NyD in May 1944
Career of the Yugumo class
 IJN Yūgumo (1941)
 IJN Yūgumo (夕雲, Evening Clouds) was laid down as hull 116 in Maizuru Naval Arsenal on 12 June 1940, launched on 16 March 1941 and completed on 5 December 1941, two days before the start of the Pacific war. She missed early operations of 1942 following Pearl Harbour, training in home waters, like all the remainder of the class, but had a rich career, taking part in the battles of Midway, Eastern Solomons, Santa Cruz Islands. She also took part in troop transport runs to Guadalcanal on 7 and 10 November 1942. She made also troop transport runs to Buna in Papua New Guinea on 17 and 22 November. She also took part in troop evacuation runs from Guadalcanal 1 and 4 February 1943. On the 7th she took part in a troop evacuation run to the Russell Islands, then troop transport runs to Kolombangara 1 and 5 April 1943. On 29 July 1943, Yūgumo was evacuating 479 soldiers from Kiska in the Aleutians. Back south, she made a troop evacuation run to Kolombangara on 2 October 1943. On the night of 6–7 October 1943, she was performing a troop evacuation run to Vella Lavella but also took part in the Battle of Vella Lavella. At least she had an occasion to shine: She charged U.S. destroyers and badly damaged USS Chevalier with a torpedo (she sank later). However she was sunk herself by gunfire at one torpedo or two from her victim, USS Chevalier and USS Selfridge. It all happened 15 nautical miles (28 km; 17 mi) northwest of Vella Lavella. She went down with 138 killed, with PT boats rescuing 78 survivors, 25 otherhs managing to reach friendly shores in an abandoned U.S. lifeboat. Commander Osako went down with his ship. For the full logs.
IJN Makigumo (1941)
 IJN Makigumo (巻雲) was laid down as N°117 at Fujinagata Shipyards on 13 December 1940, launched on 5 November 1941 and completed on 14 March 1942. Like her sister Yugumo she missed early 1942 operations, training in March, April and May, but still taking part in the battle of Midway, albeit in Yamamoto’s distant cover force. In early June 1942 just after the battle she picked up down US aviators from an SBD, Ensign Frank W. O’Flaherty and AMM1c Bruno Gaido, interrogating them and then thowing them back so sea attached to weights around the feet. Her crew views it as as payback for the losses at Midway. After the Battle of the Santa Cruz Islands on 27 October Makigumo and Akigumo sank the already madly damaged USS Hornet. The following day, Makigumo rescued another downed US airman, ARM3c Michael “Mick” Glasser from USS Enterprise but he was transferred to Truk and then to Japan for interrogation and be kept as POW until 1945.
On 1 February 1943 she was taking part in a troop evacuation run to Guadalcanal and when dodging a PT boat attack, she ran in prepared mines, struck oneand sank. Yūgumo approached and rescued 237 survivors including Cdr. Isamu Fujita, scuttling her with a torpedo. It happened 3 miles (4.8 km) SSW of Savo Island. Full logs.
IJN Kasagumo (1941)
 Kazagumo (風雲) was ordered as hull 118 at Uraga Dock Company and laid down on 23 December 1940, launched on 26 September 1941 and completed on 28 March 1942. She trained in April-May and was ready to take part in the Battle of Midway. But unlike the others she was part of the escort force for the Kido Butai under Admiral Nagumo. When the carriers were attacked, she did her best with her AA and assisted in rescuing survivors. Next in the Battle of the Eastern Solomons she again was part of Nagumo’s Strike Force.
At the Battle of the Santa Cruz Islands she was in the Vanguard Force, performed troop transport runs to Guadalcanal on 7–10 November 1942. She took part in the Naval Battle of Guadalcanal when assigned to the Bombardment Force and rescue survivors from IJN Kinugasa. She made two more troop transport runs on 17 November to Buna on 22 November via the Admiralty Islands. She also made another run to Wewak from Rabaul.
She was part of the troop evacuation runs to Guadalcanal on 1-4 February 1943 and the evacuation to the Russell Islands on 7 February. On 17–24 February, she escorted a troop convoy from Palau to Wewak. And same later from Palau to Hansa Bay on 6–12 March. She was in a troop transport run from the Shortlands to Kolombangara on 1 April, then to Buka 2–3 April, when damaged by a mine in Kahili Bay, 3 April. After temporary repairs by the tender Hakkai Maru at Rabaul on 17–18 April she departed for, repaired and seeing the addition of AA and radars from 29 April–9 June 1943.
Next, she took part in a troop evacuation run to Kiska 29 July, another to Kolombangara on 28 September and the Battle of Vella Lavella in which Kazagumo clashed with USS Selfridge, Chevalier, and O’Bannon, but the presence of Yūgumo in her scopes prevented her to fire her torpedoes. Yūgumo was sunk by gunfire and torpedoes and hit Chevalier, O’Bannon colliding wiht her destroyer. Samidare then destroyed Selfridge with a torpedo. Kazagumo then joined Akigumo and Isokaze, spotted and finished off Chevalier and O’Bannon, after torpedo missing. She was then back to the troop convoy. O’Bannon and Selfridge survived. A banquet was held for Kazagumo’s crew members. She was soon back to transport runs, notably with aircrew from Truk to Kavieng on 31 October-1 November and troop transport to Bougainville on 6 November 1943. In December she was refitted with 13 and 22 radar sets and in 1944, operated alongside the aircraft carriers Shōkaku and Zuikaku, and the battleship Fusō into May 1944. On 8 June while escorting Myōkō and Haguro from Davao to support the Biak troop transport, whe was torpedoed and sunk by USS Hake at the mouth of Davao Gulf and rescued 133 survivors.
IJN Naganami (1942)
 Naganami (長波, “Long Waves”) was ordered to Fujinagata Shipyards, Osaka, laid down on 5 April 1941, launched on 5 March 1942 and completed on 30 June 1942. She spent the first months training, and escorted HAKUSAN MARU from Yokosuka to Kiska and back then on 31 August she was assigned to Desdiv 31, Desron 2, Second Fleet and in September escorted KONGO and HARUNA from Kure to Truk and patrolled north of the Solomons. Mid-October saw her escorting them to a bombardment of Henderson Field and then MYOKO and MAYA. On 26 October for the Battle of Santa Cruz she escorted Admiral Kondo’s Advance Force. On 3-5 November she escorted SUZUYA and MAYA from Truk to Shortlands and on 2 days later she made a troop transport run to Guadalcanal, damaged by near-misses (several casulalties). At the time of the Naval Batttles for Guadalcanal she was in escort of transport convoy and became on the 16th flagship of Comdesron 2 (Rear Admiral Tanaka Raizo). On 30 November 1942 at the Battle of Tassafaronga, she led a supply-drum transport run to Guadalcanal when engaged by a combined USN group and possibly torpedoed USS Pensacola or USS Northampton.
She later led several supply drum runs into 1943 and became flagship for Rear Admiral Koyanagi Tomiji. In April she escorted CHUYO and UNYO and in May Yamato, the abovce, and Myoko, Haguro between Truk and Yokosuka and back or the Paramushiro. In July she made evacuations in the Aleutians and other escort missioned until the end of the year, under Cdr. Mori Takuji and later Tobita Kiyoshi into early 1944. In July she was in a troop transport mission from Kure to Okinawa, then to Lingga. Probably afterwards in refit (logs missing). On 23 October 1944, at the Battle of Leyte Gulf, escorted Admiral Kurita’s 1st Diversion Attack Force and later assisted in the rescue of Maya’s survivors, transferred to Musashi. She escorted the damaged Takao back to Brunei and chased down USS Darter. On 10 November she was in troop convoy TA No. 3 aoff Ormoc, in what became the Battle of Ormoc Bay. She was sunk the Task Force 38 on 11 November west of Leyte, with a explosion breaking her in two. Hamanami, Wakatsuki and Shimakaze and all three transports also were lost to air attacks.
Her wreck was found in November 2017 by Paul Allen’s RV Petrel. Full logs
IJN Makinami (1941)
 Makinami (巻波, “Overflowing(rolling) Waves”) was assigned the hull number 120 when ordered to Maizuru Naval Arsenal and laid down on 11 April 1941, launched on 27 December 1941 and commissioned on 8 August 1942. She was assigned to operate with Naganami and from September 6-10, she escorted the battleships Kongō and Haruna from Kure to Truk, then spending a month patrolling around Truk. On October 13-14, she escorted Kongō and Haruna for their bombardment mission on Henderson Field, then for Myōkō and Maya. She was a carrier escort at the battle of Santa Cruz and on November 3-5 escorted Maya and Suzuya to the Shortlands. From November 7-10, she made two troop transport runs to Guadalcanal and escorted troopships at the naval battle of Guadalcanal. Enroute, seven transport were sunk so Makinami managed to rescue 1,020 survivors from Arizona Maru. She then escorted a large convoy to the Shortland, on the 24th.
On 30 November she was part of eight Japanese destroyers in a supply drum mission, dropping off supplies when they were caught by a cruiser force, opening fire. Kagerō lost track and sailed away, Makinami followed her and did not took part of the main torpedo spreads crippling the cruisers. USS Northampton turned northwest however, putting her right in Makinami’s and Kagerō’s path, also turning northwest with their torpedoes loaded. They noticed her and launched their long lances to her port side, eviscerating the cruiser. She burned firecely and sank over 3 hours, taking 50 men down.
Makinami engaged other supply drum missions until December, and by January 1943. On February 1, she started a cycle of evacuations of Guadalcanal, but was crippled by near misses leaving her dead in the water. She was towed to Truk for emergency repairs,then to Maizuru, docked until September 15, 1943.
Once complete, she sailed out for Shanghai, and from September 24 to October 5, escorted a large troop convoy to Rabaul, and back. On October 17-26, she escorted the combined fleet until the force returned to Truk. On November 6, she escorted a troop transport run to Bougainville and towed her crippled sister Naganami for repairs. On the 19th she was in a troop transport run to Garove Island, and later to Buka.
She met her fate at the Battle of Cape Saint George.
On the night of 24–25 November she was in a troop evacuation run to Buka, when ambushed by the flotilla of young Captain Arleigh Bruke, recently congratulated by hs actions at the Empress Augusta Bay. By radar, his Fletchers detected Makinami and Ōnami. USS Charles Ausburne led USS Claxton, USS Dyson increased for a run through poor weather, closing to firing range undetected, launched their torpedoes. Ōnami, broke apart and sank. Makinami was hit once. This hit disabled all electrical power, leaving her dead in the water, with a 20-degree list to port. Later USS Charles Ausburne sank Yūgiri. Makinami was left drifting until spotted later by USS Spence and USS Converse, and was finished off by gunfire until she sank. 29 men managed to survive on a lifeboat and reach a firendly shore.
Takanami (1942)
Takanami (高波 “Tall Wave”) was laid down as hull 121 at Uraga Dock Company on 29 May 1941, launched on 16 March 1942 and commissioned on 31 August. On the night of October 13–14 she escorted Kongō and Haruna during for their bombardment raid on Henderson Field and on the 15–16th, Myōkō and Maya for the same. On 30 November 1942, she was in a supply transport run to Guadalcanal, went caught in the Battle of Tassafaronga, where she was sunk by gunfire from USS New Orleans and Minneapolis south-southwest of Savo Island. She however managed to fire off her torpedoes, bloxing the bow of USS Minneapolis clean off with one torpedo hitting New Orleans, and ignited “A” turret magazine which detonated, blowing off also her entire bow. Both survived but were unavailable for almost a year. Takanami sank with 197 men, 48 survivors reached Guadalcanal, 19 were later made POWs.
Ōnami (1942)
Ōnami (大波 “Rough Waves”) was ordered as hull 122 at Fujinagata Shipyards, laid down on 15 November 1941, launched on 13 August 1942 and commissioned on 29 December 1942. On the night of 24–25 November 1943, why leading a troop transport and evacuation run to Buka Island she was caught in the Battle of Cape St. George, an US destroyer ambush. She was torpedoed by USS Charles Ausburne, Claxton or Dyson at approx. 55 miles (89 km) east-southeast of Cape St. George, blowing up and sinking with all hands, notably the unit flag commander of ComDesDiv 31, Captain Kiyoto Kagawa. Her was posthumously promoted two ranks, a rare case in IJN history.
Kiyonami (1942)
 Kiyonami (清波 “Clear Wave”) was laid down as hull 123 at Uraga Dock Co. on 15 October 1941, launched on 17 August 1942 and completed on 25 January 1943. She was assigned to the 31st destroyer division with Naganami and Makinami, seeing her first escort mission with the auxiliary cruisers Bangkok Maru and Saigon Maru from Yokosuka to occupied territories until March 1943. And the following months were also in escorting duties.
On July, 9, Kiyonami departed with a Japanese troop transport run (destroyer flotilla Yukikaze, Hamakaze, Yūgure, Mikazuki led by Jintsū). On the 12th, they were intercepted by USS Honolulu, USS Saint Louis and HMZNS Leander and ten destroyers. Jintsū fired her searchlights and was blasted off by the allied cruisers but Kiyonami and other destroyers remained undetected and entered a torpedo formation, Kiyonami, Yukikaze, Hamakaze, and Yūgure firing all their torpedoes. Leander was so badly damaged this was over or her in this war. Kiyonami and others then retreated to reload in 10 minutes, and sailed back, however they were detected, and Yukikaze escaped all shells landing at her. Kiyonami fired her torpedoes with others, claiming USS Gwin, blowing off thebow of USS Saint Louis, blasting off the bow of Honolulu. Kiyonami retreated without any damage. On 20 July in another troop transport run to Kolombangara she was spotted and sank by Army B-25s while stpped, rescuing the crew of Yūgure, 42 miles NNW of Kolombangara. 60 men survived but were stranded at sea for days. Only one made it alive out of 241 men, and none from Yūgure’s 228.
Tamanami (1942)
 Tamanami (玉波 “Jade Wave”) was ordered as hull 124 to Fujinagata Shipyards, Osaka, laid down on 16 March 1942, launched on 20 December 1942 and completed on 30 April 1943. She was immediately relegated to destroyer division 11 (DesDiv 11) for training between Kure and Hashirajima and the first fleet for several months. On June 8, she was anchored off Hashirajima whenIJN Mutsu suddenly had a magazine explosion, sinking in harbor. She assisted rescuing survivors but found none. On June 23 she left Hashirajima to rescue survivors from Sagara Maru. On the 28th she practiced towing with Nagato, managing 12 knots with her. From July 10-15, Tamanami escorted several seaplane tenders from Yokosuka to Truk. She was in a transport run to Nauru and back to Truk and troop convoy to Palau and back. From September 18-25, she escorted the combined fleet to counterattack US carrier raids, seeing no combat. From October 14-19, she Junyō to Truk, and spent November operating with heavy cruisers. By December she was back to Kure. She spent early 1944 in escorting duties between Truk and Yokosuka. On February 15 she escorted Musashi. On March 22 to April 2 she escorted a troop convoy from to Saipan and back on April 20. On May 10-16, she escorted Musashi and carriers to Tawitawi. On June 19-20 1944 she escorted Kurita’s vanguard at the battle of the Philippine Sea, renamining undamaged. On June 23-29, she escorted oil tanker Kokuyo Maru from Okinawa to Singapore.
On July 7, she escorted Kokuyo Maru from Singapore to Manila. USS Mingo, on patrol, spotted them, took position but Tamanami deected her and showered her with depth charges. In returned, Minfo manoeuvered skillfully and sent torpedoes her wat, but she spotted and evaded them. One hour in the chase and Mingo retook a position, sent four torpedoes, with three making ther mark. In a spectacular end, the destroyer disintegrated and sank in a minute will all hands.
Suzunami (1942)
Suzunami (涼波 “Breaking Waves”) was ordered as hull 126 at Uraga Dock Com. on 27 March 1942, launched on 26 December 1942 and commissioned on 27 July 1943. She had the shortest career in her class: On 11 November 1943, barely trained and in her first important mission, she is sunk in by TF 38/58 carrier air raid on Rabaul, New Britain. She took apparently a direct bomb hit while loading torpedoes, near the mouth of Rabaul Harbor, blew up and sank as the bomb probably hit an ammunition magazine. 148 went down, including Commander Kamiyama.
IJN Fujinami (1943)
 Fujinami (藤波 “Purple Wave”) was ordered as hull 127 at Fujinagata Shipyards and laid down on 25 August 1942, launched on 20 April 1943 and commissioned on 31 July 1943. She was damaged by a dud aerial torpedo during in Rabaul during TF38/58 air raid on 5 November 1943, resukting in a dead and nine wounded. She took part in the Battle of Philippine Sea in June 1944 but remained unscaved. At the Battle of Leyte Gulf in October she escorted Kurita’s 1st Diversion Attack Force. Under afirce air attack she sustained some damage on 24–25 October between near-misses and strafing. At the Battle off Samar on 25 October she was detached to assist the crippled heavy cruiser IJN Chōkai, rescued survivors and scuttled her with a torpedo. She also picked up survivors of the escort carrier Gambier Bay and the commanding officer Tatsuji Matsuzaki restrained his men from firing on them, and wes even seeing to saluting them by respect for their heroic stance. On the 27th while underway to assist IJN Hayashimo, she was taken as target from USS Essex’s air group’s Helldivers and Avengers, some 80 miles (130 km) north of Iloilo. She was lost with all hands including Chōkai’s surviving sailors. Tatsuji Matsuzaki, captain from 31 July 1943 to 27 October 1944 went down with them. TROM Note
Hayanami (1942)
 Hayanami (早波 “Early Waves”) was ordered as hull 340 at Maizuru Naval Arsenal and laid down on 15 January 1942, launched on 19 December 1942 and commissioned on 31 July 1943. She took part in a series of training missions in August and on the 20th Captain Nakahara Giichiro made her his flagship, leading destroyer division 32 (Hayanami, Fujinami, Suzunami, Tamanami). On 15–20 October 1943 DesDiv 32 covered transport runs from Saeki to Truk and from Truk to Ponape on 22-24 and 26–28 October. From 3-5 November she Kurita’s cruiser force to Rabaul and during the US air raid she managed to dodged all attacks, maneuvered through the port. She made another troop transport run, and escorted the damaged cruisers Maya and Noshiro to Truk and the cruiser Agano later as well. In December, Desdiv 32 escorted the fleet in the Marshall islands, and then tanker convoys to Surabaya and Balikpapan.
By January 1944, she rescued men from the sinking Akebono Maru, and escorted three oil tankers to Truk, most being sunk by US submarines underway. For next three months she escorted ships between Palau and Saipan, and on 15 April Captain Orita Tsuneo took command of the ship and of DesDiv 32. On 12-15 May she escorted ships between Lingga and Tawi-Tawi and on 7 June in another mission her group was spotted by USS Harder (which sank Minazuki). Hayanami sdetected her and approached for depth charge attack but was hit “down the throat” by three torpedoes at close range, two hitting. She sank in a minute with 208 men, 45 rescued by Urakaze.
Hamanami (1943)
 Hamanami (濱波 “Beach Waves”) was laid down as hull 341 at Maizuru Naval Arsenal on 28 April 1942, launched on 18 April 1943 and commissioned on 15 October 1943. She took part in the battles of the Philippine Sea, Leyte Gulf and Samar, at first assigned to 1st Diversion Task Force. On 26 October, she assisted and scuttled the crippled cruiser Noshiro. On 11 November 1944 she escorted troop convoy TA No. 3 from Manila to Ormoc when caught by TF 38 air groups underway in Ormoc Bay, west of Leyte and she was corned by well drilled combos of Avengers and Helldivers, her AA gunners strafed by Hellcats. She was soon hit and sank with 63 killed and 42 injured. Asashimo rescued 167 including Captain Oshima Ichitaro at the head of ComDesDiv 32 and Captain Motokura. The Three transports and their escorts (Shimakaze, Wakatsuki and Naganami) were also destroyed that day. On 20 January 2018, her wreck was located by RV Petrel under 325 meters (1,066 ft) in Ormoc Bay missing her bow.
Okinami (1943)
 Okinami (沖波 “High Seas Waves”) hull 342 laid down at Maizuru Naval Arsenal on 5 August 1942, launched on 18 July 1943, commissioned on 10 December 1943. After training for months and escorts close to home waters, she escorted a large troop convoy to Saipan and Guam. On 29 February 1944, troopship Sakito Maru was torpedoed by USS Trout she assisted her, while Asashimo depth charged and sank Trout. Okinami helped to rescue 1,720 survivors and was back home on March 16.
From March 20-28 she escorted another troop convoy from Yokosuka to Truk, and then escorted the troop transport Sanyo Maru to Saipan, then a tanker convoy to Balikpapan and then to Saipan and back to Balikapapan, Tawitawi on May 15. On May 16-19 she sailed to Davao and back to Tawitawi. On June 10, she departed Tawitawi in escort of Yamato and Musashi protecting a troop transport run. On the 13th Ozawa’s fleet arrived with a carrier escort. On June 19-20, she took part in the battle of the Philippine Sea and she was under moderate carrier attacks, undamaged. On July 8-16, Yamato and Musashi transported ground troops to Lingga with Okinami as escort. She remained anchored with them until October 18 and escorted Kurita’s fleet to Brunei for Operation Shō Gō. On October 22, she was part of centerforce witnessing submarine attacks sinking several cruisers, she followed the carrier raids at the battle of the Sibuyan Sea on October 24, and survived with only strafing damage, which injured 34 sailors to varying degrees. On the 25th, Okinami served in the battle off Samar, but contributed nothing of note to the battle, and assisted Suzuya, rescuing 416 survivors, then escorted Kumano to Manila for the 28th, ending the battle of Leyte Gulf.
From November 1-2, Okinami escorted a troop convoy from Manila to Ormoc. On 5 November 1944 near misses and strafing from air attacks caused 28 casualties. On 13 November 1944 anothher air raid on Manila focused on her and she sank after a direct bomb hit and several near-misses. She went down in in shallow water 8 miles (13 km) west of Manila with 14 crewmen killed, 19 wounded. The crew later took part in the bloody battle of Manila.
Kishinami (1943)
 Kishinami (岸波 “Shore Waves”) was ordered as Hull 343 at Uraga Dock Company, laid down on 29 August 1942, launched on 19 August 1943, commissioned 3 December 1943. She assisted in sinking USS Trout on 29 February 1944 in her first important mission. At the Battle of the Philippine Sea, she was assigned to the Van Force. In the Battle of Leyte Gulf she was assigned to the 1st Diversion Attack Force. She rescued survivors from IJN Atago, including Vice Admiral Takeo Kurita. Later she took moderate damage from near misses and strafing on 24–25 October. She ran aground on a reef on the 28th off Brunei however. She managed to free herself but her top speed fell to 12 knots. She limped to Singapore by mid-November for long repairs, and by 2 December 1944, she departed Manila in escort of Hakko Maru back to Singapore. On 4 December, she was torpedoed and sunk by USS Flasher, west of Palawan. 90 members of her crew were killed, including Commander Mifune. 150 survivors were rescued by Yurishima plus CD-17. Down with the ship was also Ensign Susumu Nagumo, son of the Vice Admiral. On 10 January 1945, she was officially stricken.
Asashimo (1943)
![]() Asashimo (朝霜 “Morning Frost”) was laid down as hull 344 at Fujinagata Shipyards on 21 January 1943, launched on 18 July 1943 and commissioned on 27 November 1943. On 29 February 1944, she escorted a large convoy to Truk, when her spotters detected USS Rock in a night surface approach of the convoy. USS Rock fired four torpedoes from her stern tubes at Asashimo but missed. Illuminated by searchlight and under fire from main artillery she made a crash dive. For four hours Asashimo mutiplied attacks. Later Rock surfaced and inspected damaged, being forced to return to Pearl Harbor. Asashimo howevere the same night managed to sink USS Trout. This was in the escort of the same convoy Matsu No. 1 on 29 February 1944 carrying the 29th Infantry Division of the Kwantung Army from Manchuria to Guam (4 large transports, 3 Yūgumo-class DesDiv 21). Trout badly damaged the 7,126-ton Sakito Maru. 2,200 died, a large part of the 18th Infantry Regiment. After attacks, it seems the submarine sank because one of her Mk. 18 electric torpedoes made a circular run as for USS Tang. Asashimo took part in the Battle of the Philippine Sea. In the Battle of Leyte Gulf, she rescued survivors from IJN Atago on 23 October. At the Battle of Ormoc Bay, she survived Convoy TA no. 4. On 26 December 1944, she assisted scuttling Kiyoshimo, rescuing 167 crewmen and the Comdesdiv2 commander.
Asashimo (朝霜 “Morning Frost”) was laid down as hull 344 at Fujinagata Shipyards on 21 January 1943, launched on 18 July 1943 and commissioned on 27 November 1943. On 29 February 1944, she escorted a large convoy to Truk, when her spotters detected USS Rock in a night surface approach of the convoy. USS Rock fired four torpedoes from her stern tubes at Asashimo but missed. Illuminated by searchlight and under fire from main artillery she made a crash dive. For four hours Asashimo mutiplied attacks. Later Rock surfaced and inspected damaged, being forced to return to Pearl Harbor. Asashimo howevere the same night managed to sink USS Trout. This was in the escort of the same convoy Matsu No. 1 on 29 February 1944 carrying the 29th Infantry Division of the Kwantung Army from Manchuria to Guam (4 large transports, 3 Yūgumo-class DesDiv 21). Trout badly damaged the 7,126-ton Sakito Maru. 2,200 died, a large part of the 18th Infantry Regiment. After attacks, it seems the submarine sank because one of her Mk. 18 electric torpedoes made a circular run as for USS Tang. Asashimo took part in the Battle of the Philippine Sea. In the Battle of Leyte Gulf, she rescued survivors from IJN Atago on 23 October. At the Battle of Ormoc Bay, she survived Convoy TA no. 4. On 26 December 1944, she assisted scuttling Kiyoshimo, rescuing 167 crewmen and the Comdesdiv2 commander.
On 6 April 1945, she escorted Yamato on Operation Ten-Go towards Okinawa and accompanied her to the bottom on the massive air raid of 7 April, courtesy of TF 58, her loss in particular attributed later to USS San Jacinto. She was caught astern of the Yamato task force after engine issues, 150 miles (240 km) southwest of Nagasaki. She went down with all 326 crew members plus Commander Hisao Kotaki from DesDiv 21. Hamakaze sunk but Suzutsuki survived.
Hayashimo (1943)
![]() Hayashimo (早霜 “Early Frost”) was ordered as hull 345 to Maizuru Naval Arsenal, laid down on 20 January 1943, launched on 20 October 1943, commissioned on 20 February 1944. Never assigned to a division she had a few months escorting aircraft carriers in occupied ports and by May 1944 she escorted the fleet to Tawi-Tawi before Operation A-Go on 19-20 June. In the Battle of the Philippine Sea, Hayashimo became an AA escort, witnessing the loss Hiyō to the USS Belleau Wood’s Avengers with torpedoes. Hayashimo was later attacked by two US aircraft and managed to repell them with gunfire and return to Okinawa. In July, Hayashimo took part in a troop transport mission to Singapore. On 15 August, she was transferred to the newly reformed destroyer division 2 (Hayashimo, Akishimo, Kiyoshimo) as flagship, under Captain Shiraishi Nagayoshi and stayed two months operating off Singapore.
Hayashimo (早霜 “Early Frost”) was ordered as hull 345 to Maizuru Naval Arsenal, laid down on 20 January 1943, launched on 20 October 1943, commissioned on 20 February 1944. Never assigned to a division she had a few months escorting aircraft carriers in occupied ports and by May 1944 she escorted the fleet to Tawi-Tawi before Operation A-Go on 19-20 June. In the Battle of the Philippine Sea, Hayashimo became an AA escort, witnessing the loss Hiyō to the USS Belleau Wood’s Avengers with torpedoes. Hayashimo was later attacked by two US aircraft and managed to repell them with gunfire and return to Okinawa. In July, Hayashimo took part in a troop transport mission to Singapore. On 15 August, she was transferred to the newly reformed destroyer division 2 (Hayashimo, Akishimo, Kiyoshimo) as flagship, under Captain Shiraishi Nagayoshi and stayed two months operating off Singapore.
In October, she led desdiv 2 to Manila, Brunei before starting Operation Sho-Go. On the 23rd, heavy cruisers were sunk or crippled by US subs before the start of the battle of Leyte Gulf and she attacked USS Dace wirthout success. Under US carrier attacks the next day she remained undamaged and fell on the unfortunate but brave Taffy 3. Hayashimo fired salvos against the escort carriers but made no hit. But their air groups caused near misses, contaminated her fuel supply, destroyed her gyro compass and communications. Still at 12 knots with Akishimo the next day she was attacked by more aircraft, taking a torpedo hit that struck and torn her bow and she veered uncontrollably, ran aground. Okinami loaded Hayashimo with 12 tons of fuel and the next day, Fujinami and Shiranui were detached to assist Hayashimo but were eviscerated by US aircraft in turn. Hayashimo had her steering room flooded, rudder destroyed. Captain Nagayoshi ordered the 200 survivors to evacuate. She was left 40 miles (64 km) southeast of Mindoro. She was further damaged later and laiid postwar on shallow waters, inspected by US navy and later blasted.
Akishimo (1943)
![]()
Akishimo (秋霜 “Autumn Frost”) was laid down as hull 346 at Fujinagata Shipyards, laid down on 3 May 1943, launched on 5 December 1943 and commissioned on 11 March 1944. She was at the Battle of Leyte Gulf of 23–26 October 1944 as part of the 1st Diversion Attack Force. On 23 October, she rescued 769 survivors from Maya. On 24 October, she assisted Myōkō. The next day she collided with the Shimakaze, a more cent, much larger experimental destroyer, but damage was light. On 26 October, she rescued 328 survivors from Noshiro.
On 10 November 1944, Akishimo escorted troop convoy TA No. 4 from Manila to Ormoc when caught by an US Army air atack by B25 Mitchell, taking a direct bomb hit. She lost her bow, had 20 killed and 35 injured. She returned to Manila at 16 knots and Cavite Navy Yard on 11 November for emergency repairs. But on 13 November a new air raid struck her alongside Akebono at Cavite pier with several direct bomb hits. She erupted in an uncontrollable fire that raged until the following day, reaching ammunitions and causing a large detonation. She rolled over on starboard. There were 170 survivors, 15 killed, 25 wounded.
Kiyoshimo (1944)
![]()
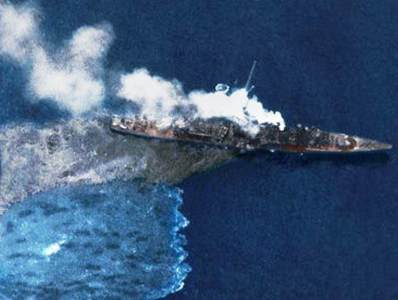
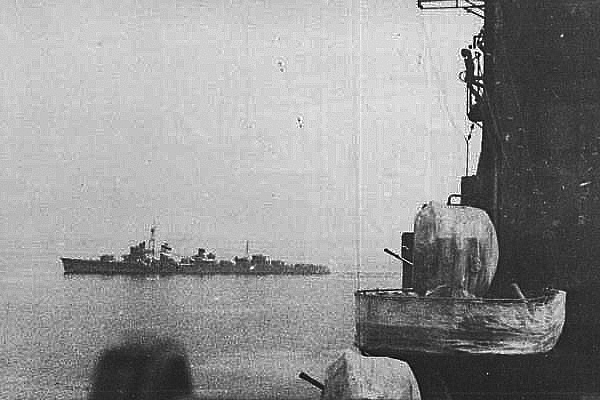
IJN Kiyoshimo (清霜 “Clear Frost”) or hull 347 was laid down at Uraga Dock Company at 16 March 1943, launched on 29 February 1944, commissioned on 15 May 1944. Kiyoshimo took part in training exercises until August 1944 and was assigned to the 2nd destroyer division with Hayashimo and Akishimo under Lt Cdr. Kajimoto Shizuka. From 18-20 October, Kiyoshimo escorted Admiral Kurita and his fleet to Brunei before the battle of Leyte Gulf. She departed on the 22nd, and survived the submarine attacks that claimed cruisers but was herself near-missed by air attacks in the Sibuyan Se. While escorting Musashi, she was photographed in the background by US carrier aircraft and took nine hours to sink after taking 17 bomb and 19-20 torpedo hits. Kiyoshimo herself took a direct bomb hit, several near misses and was down to 21 knots without radio. Hamakaze was also badly damaged also but they assisted Musashi’s survivors and withdrew.
On the 27th, Kiyoshimo was repaired at Cavite naval yard and sailed to Brunei. She carried Admiral Hayakawa to Manila, escorted Takao for repairs to Singapore, and herself was drydocked for repairs on 8 November. On 26 December 1944, with the San Jose bombardment force, she was crippled by two direct bomb hits by Army bombers off Mindoro. A PT Boat, PT-223, then finished her off by torpedoes some 145 miles (233 km) south of Manila. 82 were killed, 74 injured. Asashimo rescued 169 survivors and that counted ComDesDiv 2 Captain Shiraishi Nagayoshi, Lieutenant Commander Kajimoto.
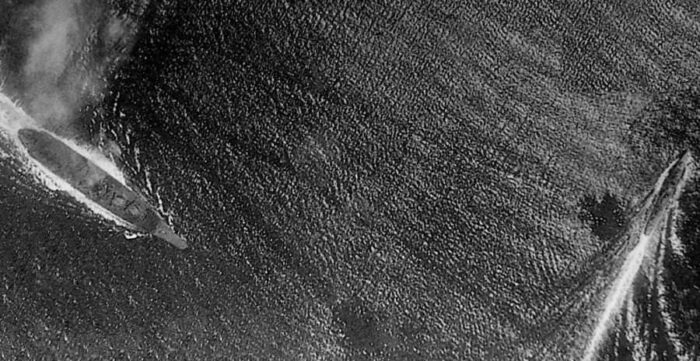
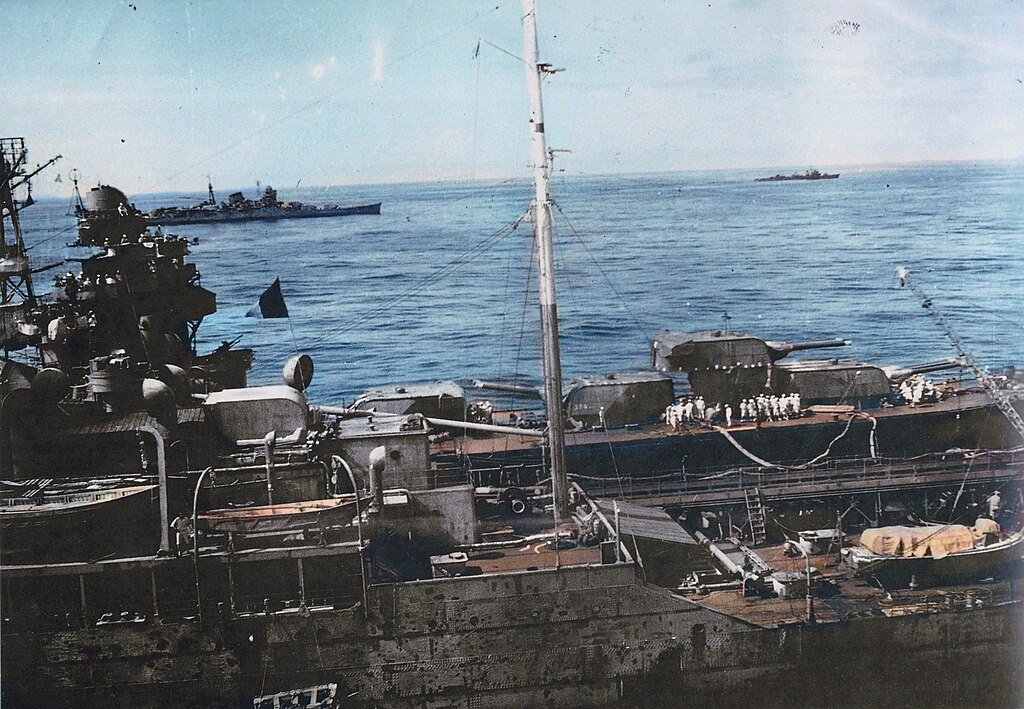
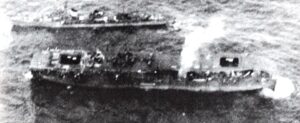
Kiyoshimo to the right and Musashi to the left during the battle of Leyte Gulf, 24 October 1944
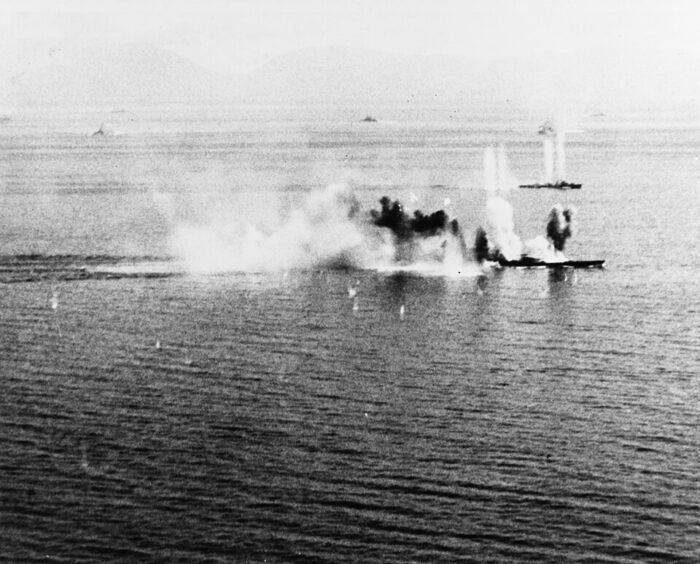
A famous photo of Musashi down by the bow during her final battle. Kiyoshimo is the nearest destroyer behind Musashi
(Cancelled 11 August 1943)
Note, the first are “regular” Yugumo class. The starred are Kai-Yugomo class (improved). They would have had more AA notably.
Umigiri 海霧 348
Yamagiri 山霧 349
Tanigiri 谷霧 350
Kawagiri 川霧 351
Taekaze 妙風 352
Kiyokaze 清風 353
Satokaze 里風 354
Murakaze 村風 355
Yamasame* 山雨 5041
Akisame* 秋雨 5042
Natsusame* 夏雨 5043
Hayasame* 早雨 5044
Takashio* 高潮 5045
Akishio* 秋潮 5046
Harushio* 春潮 5047
Wakashio* 若潮 5048
Read More/Src
Books
Chesneau, Roger, ed. (1980). Conway’s All the World’s Fighting Ships 1922–1946. Greenwich, UK: Conway Maritime Press.
Jentschura, Hansgeorg; Jung, Dieter & Mickel, Peter (1977). Warships of the Imperial Japanese Navy, 1869–1945.
Whitley, M. J. (1988). Destroyers of World War 2. Annapolis, Maryland: Naval Institute Press.
“Rekishi Gunzō”., History of Pacific War Vol.64 Mutsuki class destroyer, Gakken (Japan), May 2008
Collection of writings by Sizuo Fukui Vol.5, Stories of Japanese Destroyers, Kōjinsha (Japan) 1993
Model Art Extra No.340, Drawings of Imperial Japanese Naval Vessels Part-1, Model Art Co. Ltd. (Japan), October 1989
Daiji Katagiri, Ship Name Chronicles of the Imperial Japanese Navy Combined Fleet, Kōjinsha (Japan), June 1988
The Maru Special, Japanese Naval Vessels No.41 Japanese Destroyers I, Ushio Shobō (Japan), July 1980
Vessel Model Special. Volume 92: All about Yugumo-class Destroyers.
“Rekishi Gunzō”., History of Pacific War Vol.51 The truth of Imperial Japanese Vessels Histories 2, Gakken (Japan), August 2005
Collection of writings by Sizuo Fukui Vol.5, Stories of Japanese Destroyers, Kōjinsha (Japan) 1993
Model Art Extra No.340, Drawings of Imperial Japanese Naval Vessels Part-1, Model Art Co. Ltd. (Japan), October 1989
The Maru Special, Japanese Naval Vessels No.41 Japanese Destroyers I, Ushio Shobō (Japan), July 1980
Links
combinedfleet.com/yugumo_n.htm
web.archive.org bosamar.com/ yugumo
combinedfleet.com kiyosh_t.htm
combinedfleet.com yugumo_c
on navypedia.org/
pwencycl.kgbudge.com Yugumo_class
combinedfleet.com yugumo
combinedfleet.com yugumo c
combinedfleet.com yugumo n
blog.livedoor.jp irootoko_jr
en.wikipedia.org Yugumo class destroyer
secretprojects.co.uk/ projects japanese destroyers ww2
Model Kits
General Query, Yugumo class kits on scalemates
scalemates.com fujimi yugumo class destroyer
commons.wikimedia.org
Videos
 Latest Facebook Entry -
  X(Tweeter) Naval Encyclopedia's deck archive
 Instagram (@navalencyc)


 French Navy
 Royal Navy
 Russian Navy
 Armada Espanola
 Austrian Navy
 K.u.K. Kriegsmarine
 Dansk Marine
 Nautiko Hellenon
 Koninklije Marine 1870
 Marinha do Brasil
 Osmanlı Donanması
 Marina Do Peru
 Marinha do Portugal
 Regia Marina 1870
 Nihhon Kaigun 1870
 Preußische Marine 1870
 Russkiy Flot 1870
 Svenska marinen
 Søværnet
 Union Navy
 Confederate Navy
 Armada de Argentina
 Imperial Chinese Navy
 Marinha do Portugal
 Mexico
 Kaiserliche Marine
 1898 US Navy
 Sovietskiy Flot
 Royal Canadian Navy
 Royal Australian Navy
 RNZN Fleet
 Chinese Navy 1937
 Kriegsmarine
 Chilean Navy
 Danish Navy
 Finnish Navy
 Hellenic Navy
 Polish Navy
 Romanian Navy
 Turkish Navy
 Royal Yugoslav Navy
 Royal Thai Navy
 Minor Navies
 Albania
 Austria
 Belgium
 Columbia
 Costa Rica
 Cuba
Cuba Czechoslovakia
 Dominican Republic
 Haiti
Haiti Hungary
 Honduras
 Estonia
 Iceland
 Eire
Eire Equador
 Iran
Iran Iraq
Iraq Latvia
 Liberia
 Lithuania
 Mandchukuo
 Morocco
 Nicaragua
 Persia
 San Salvador
 Sarawak
 Uruguay
 Venezuela
 Zanzibar
 Warsaw Pact Navies
 Bulgaria
 Hungary

 Bundesmarine
 Dutch Navy
 Hellenic Navy
 Marina Militare
 Yugoslav Navy
 Chinese Navy
 Indian Navy
 Indonesian Navy
 JMSDF
JMSDF North Korean Navy
 Pakistani Navy
 Philippines Navy
 ROKN
ROKN Rep. of Singapore Navy
 Taiwanese Navy
 IDF Navy
 Saudi Navy
 Royal New Zealand Navy
 Egyptian Navy
 South African Navy


 Ukrainian Navy