
 Turkish Navy vs
  Royal Navy
Foreword
It was Churchill personal quest to attack the “soft underbelly” of the entente powers, reminds something ? Fortunately for the allies, this bloody campaign was halted in early 1916 instead of the campaign of Italy that lasted two solid years on a far bigger scale. Indeed at that time Turkey was seen very much as the “sick man” of Europe and an apparent easy target. Ousting Turkey from the war would have also allowed the control of the black sea, and opening a second front against the Austro-Hungarian Empire, then the south of the German Empire. It was all about underestimating the resolve of the Turks to hold their ground.

Graphic map of the Dardanelles
The latter, after the regime change, aimed at modernizing the fleet and ordered several dreadnoughts to the UK, in addition to the battleships already acquired from Germany. The seizure of these ships at the outbreak of war (already paid) ulcered the Turkish government, but soon the unexpected support of two recent German ships together with the well trained crews of Admiral Souchon presented whole new possibilities and convinced Turkey to enter the war together with the Central powers, with ambitions over an arch-enemy, Russia, and in the middle east, targeting French and British interests.
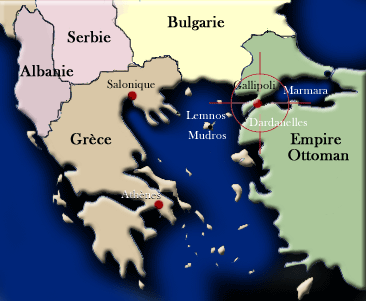
Path to the campaign
Resentment against Great Britain, which had strategic interests in the Middle East, was greatly aided by the Kaiser’s privileged relations with Sultan Mohammed and Mustafa Kemal. It began with the closing of the Dardanelles strait to allied trade in October 1914. On the 28th, the Yavuz Sultan Selim and Midilli made a coastal raid against Russia, attacking Sevastopol and Odessa, and sinking several ships. The answer was Russia’s declaration of war to the Turks on November 2, followed by the British on the 6th. A Turkish offensive was launched in December in the Caucasus, stopped by the Russians, but at the price of an obvious drain on the numbers Opposed to the Germans in the west. As a result, the Tsar formally requested the help of Great Britain in January. Sir Winston Churchill, who had already studied the contingencies of a capture of the Dardanelles, considered opposition feeble, which can be taken by a bold combined naval operation. He therefore found the pretext sought for the operation.

Combined allied fleet en route to the Dardanelles
The campaign’s preparations
Vice-Admiral Carden, in charge of the Mediterranean squadron, was contacted on 11 January by Churchill to drawn a precise plan for the attack of the Dardanelles. Carden developed a strategy based on a battleship/minesweeper/submersible triptych. Like the Crimean campaign 60 years earlier, the fleet had to muzzle the forts covering the area, allowing minesweepers to clear waters. Submarines then had to cross the strait defenses as far as possible, entering the Marmara Sea and disrupt Turkish traffic, blockading Constantinople, and sink the fleet if attempting an outbreak against the allies.
On January 13th, the operation was approved by the council of war and Carden received 14 pre-dreadnoughts battleships (the most modern being kept the Grand Fleet), but also the very modern Queen Elizabeth, and the battlecruiser HMS Inflexible. France was solicited also as a major player in the Mediterranean, and sent a squadron of four pre-dreadnoughts (Gaulois, Bouvet, Suffren, Charlemagne) together with destroyers. Russia for its part mobilized a single cruiser, the Askold. The whole system was complemented by many light vessels for a combined fleet of 90 ships. The allies settled at Lemnos, but at the time of the operations, they rejoined Imbros, not far from the strait, and still far enough from Turkish fire range. Land forces were also set up and trained in Egypt for an amphibious operation under the command of Army Corps Commander John. S. Keyes, which included several Royal Marines contingents, the 29th Regular Infantry Division, and a strong contingent of New Zealanders and Australians (the famous ANZACs).

French troops at Lemnos, 1915.
First operations (19 Feb. 1915)
In fact, a “live test” was carried out long before any formal declaration of war. That was the action of November, 3, 1914 performed by the battle cruisers Indomitable and Indefatigable assisted by French battleships Vérité and Suffren. Each battleship had to aim at a fort in particular. The fort of Sedd-ul Bahr was put out of action after 10 minutes of bombardment. After these encouraging results, Carden was allowed to continue the development of his plan. On the other hand, surprise was lost and the Turks received a stronger support from German artillery experts, with better lookouts and training.
The first phase began on 19 February 1915 at 7:30 am. Four destroyers advanced alongside the HMS Cornwallis, the first to open fire, soon joined by HMS Vengeance,had to silence forts Oranhiye Tepe and Kum Kale on the southern tip of the entrance to the Strait (see map below). Both had Krupp 240 mm guns with a very effective sight control.
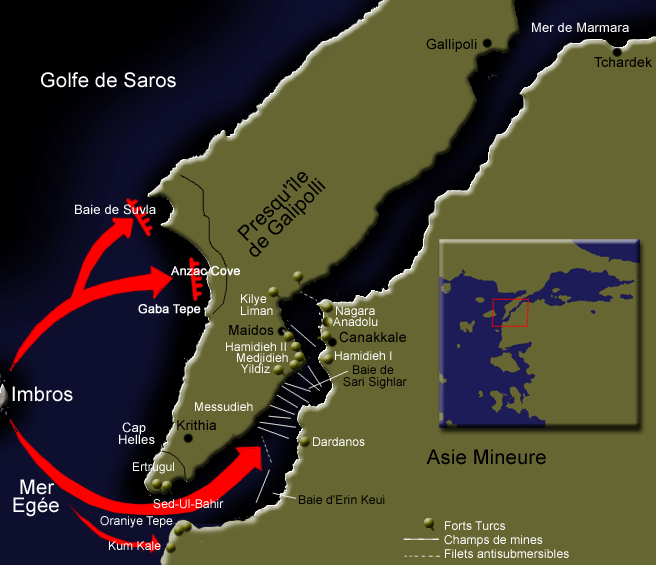
Map by the author of the Dardanelles landing zones and defenses.
As can be seen on this map, the bulk of the Turkish defenses were staggered in depth, which gave them a perfect defense of the passes of the strait as well as the north coast of Galipolli. These forts totaled 80 heavy pieces including 6x 355 mm cannons, 6x 150 mm Howitzer, and the remainder 240 and 280 mm artillery pieces. No less than 10 minefields (370 mines, later increased) barring the bottom of Erin Keui Bay and Sari Sighlar Bay, the narrowest passage. Two anti-submersible nets barred the entrance and exit of it, all under crossing fire from the forts, of which only the most important ones appears on the map.
February 19-21 bombardments
On the 19th of February, three English battleships and the Suffren, firing at 10,000 meters for a quarter of an hour, temporarily silenced the forts of Kum Kale, Oraniye Tepe, Ertrugul and Sed-Ul Bahir, which had already been badly damaged. But the expected results were delayed. The offensive resumed on the 21st, stopped because of the weather and resumed on the 25th, but the Turks had evacuated the defense forts at the entrance of the strait to concentrate on the forts of the pass between Dardanos and Canakkale. In any eventuality, the Royal Marines landed and finally took the forts, encountering little resistance. But the bombardment was to resume from 26 to 31 February and concentrated on Erin Kui Bay on the 1st of March.
HMS Canopus firing
Minesweepers in action
After the bay was cleaned of artillery threats, minelayers entered the fray, English as well as French. The British ones were requisitioned converted trawlers, with a crew composed partly of civilians and officers. They had a shearing machine behind the mines submerged a few yards below the surface, and these were brought up to the surface and gunned or blasted. The operation lasted between the fall of February and early march, and on March, 4th, HMS Queen Elizabeth big guns were brought to bear on Gaba Tepe, in the Gulf of Saros, the forts of the interior defenses which range was inferior to the battleship. On March, 8, at night, the small Turkish minelayer Nusret layed a new minefield parallel to the coast in Erin Keui Bay.
The Turks observed that the British ships leaving the bay were turning to the port while aiming straight into specific area where a minefield could be wisely placed. On the night of March, 13, the cruiser HMS Amethyst, leading 6 minesweepers, cleared the first minefield of the bay. But at night this was still a perilous task, and the Turkish forts, alerted, added to the confusion. A total of four minesweepers were literally riddled by fire, and the Amethyst barely escaped destruction after being hit by a large caliber. Churchill received these first reports, and had Carden relieved of his command, replaced by Rear-Admiral John de Robeck. The latter had in view a general offensive of the whole fleet in order to close the action before the Turks were ready for a better defense.
March, 18 general offensive
The high point of the offensive against the Dardanelles took place from March 18: Rear-Admiral John de Robeck, bearing his mark on the Vengeance, mobilized no less than three battleship rows comprising successively the Queen Elisabeth, Nelson, Agamemnon and Inflexible (Bearing the mark of Carden), in the second line the 4 French battleships (including the Suffren bearing the mark of Rear Admiral Guépratte) and the Vengeance, Irresistible, Albion and Ocean in the third line, flanks being protected by HMS Majestic, Prince George, Swiftsure and Triumph, with the Canopus and Cornwallis in reserve. The objective was to silence the defenses surrounding the first 5 minefields. The Royal Navy thus used wisely its numerous old pre-dreadnoughts, of little use for the Grand Fleet.
Rolling Thunder
From 11 am to 1:25 pm, a continuous rolling fire succeeded in silencing or destroying the Turkish forts. The task was not easy. The artillery pieces were well protected by massive concrete works (Built under German supervision), while more than 50 lighter guns were remarkably hidden in the foothills of the coast, leaving only embrasures covered with branches, only revealed by their brief muzzle blast. Torpedo tubes and searchlights were also hidden for night offensives, while fake batteries were prominently displayed. Moreover, crew were trained for accurate and fast-firing, and lower batteries offering little frontal surface, were hardly destructible. In most cases only debris obstructed embrasures and interfered with Turkish fire. The cannons themselves could only be neutralized by an assault of naval companies. On the 17th, the Nusret had returned to the bay and layed the last available mines, which will cause havoc and compromise the whole operation.
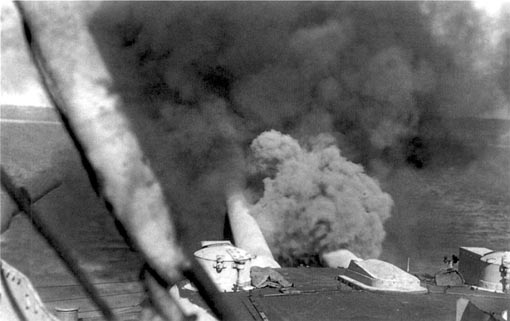
Suffren and other battleships are badly damaged
The bombardment on both sides was severe, but Turkish firing revealed itsel not as precise. The fort of Rumelia-Medjidieh had held particularly long. The Suffren, Gaulois, Agamemnon and Inflexible suffered severe hits. For the anecdote, an orchestra played on the rear deck of the Suffren for more than an hour, before the intensity of the fire became too dangerous to go on. Later, a 240 mm shell would destroy a 164 mm barbette, entering through the casemate’s sighting window, decapitating the firing officer, and then enter the loading room setting fire to 200 kgs powder B charges. The ensuring ball of fire would burn alive all the servants inside the barbette. The fire control room had been devastated later by a shell, all internal communications cut off.
Worse, a flaming 164 mm charge fell into the powder bunker, where 6 tons were stored. Unfortunately the six servants evacuating the room failed to open the valves to drown it. Battery’s chief Lannuzel however stayed inside to check the filling, and drowned. Another large caliber exploded in the chimney, destroyed the fans and obturated the cooling ducts. In a few minutes the heating chamber’s temperature exceeded sixty degrees, men collapsed at their post. On her side the Bouvet’s marble (extractor of burnt gases from the gun barrel) broke down, servants were asphyxiated. On the Inflexible, the turrets’s servants had also been killed. De Robeck decided to remove the battleships and to commit his second line assisted by the Swiftsure and Majestic.
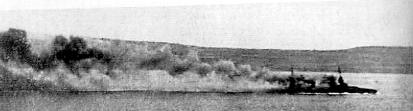
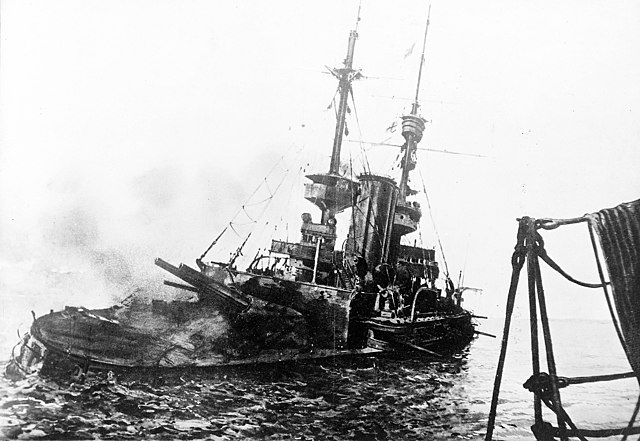
The Bouvet sinking
The Bouvet is lost, the Inflexible almost followed
Retiring after two hours of almost uninterrupted fire the Bouvet was the last to depart, preceded by the Suffren, Gaulois and Charlemagne. While veering to starboard (right) she struck a mine laid by the Nusret. Its unprotected hull was blown open and torn along its length and the flood was severe and fast. In 45 seconds, the ship began to roll on its side, and capsized from the rear, then sank vertically prow in the air. She sank with 23 officers and 619 sailors. 47 survivors would be gathered by British destroyer Mosquito, while under Turkish fire. She was not the first loss: At about 4 pm HMS Inflexible also hit hard turned to starboard when retiring, but also came into the same minefield as the Bouvet. The explosion killed 60 and injured a hundred, many trapped by the automatic closure systems in the flooded compartments (a bit like on the Titanic). Thanks to its modern protection however, the battlecruiser was able to retire at a slow speed from the bay and managed to run aground on a sand bank on the island of Tenedos, sparing the crew and allowing future repairs.

Battleship Bouvet in the Dardanelles
Battleships Irresistible and Ocean are lost
The battleship HMS Irresistible, in turn, hit a mine when also veering to starboard (the configuration of the bay and radius of these mastodons left no other choice). Her machinery compartments were flooded, but the leaks were contained also by the crew’s plugs and multiple partitioning. However, pressure inside these flooded partitions and uncontrolled infiltration made certain its capsize at some point. As the crew was preparing to evacuate, the HMS Ocean approached to take her in tow. The shallows of the shore made the operation dangerous, and at about six o’clock the Ocean struck a mine in turn, blasting her rudder.
Now she became uncontrollable and also began to fill up. The two ships, immobilized, were at the mercy of Turkish artillery, which against all expectations had cased fire, deprived of ammunitions. Then “naval dust” came to rescue the large crews, then evacuated the zone in haste with the falling evening. Thinking the ships still afloat could possibly be recovered by the Turks, a destroyer was sent to torpedo them at night. After searching for them for four hours, she saw nothing: Both battleships had sunk. The results of the day had been a triumph for the Ottoman Empire, causing the Royal Navy the worst losses in its history since Trafalgar !
HMS Irresistible sinking in the Dardanelles

Landings at Gallipoli
The landings: 25-28 April 1915
This crushing naval failure did not cost De Robeck post, as Churchill, fully assuming his responsibilities, had to explain himself to a raging House of Commons. Henceforth, instead of persevering in this direction, the HQ would try to take the forts on by troops landed on a shore seeming defenseless. On February 22, 70,000 men were assembled under the command of Sir Ian Hamilton, forming the MEF (Mediterranean Expeditionary Force). Preparations lasted a month. The Turks who expected this offensive judiciously chose the most favorable points for an amphibious operation and fortified them with lines of trenches, barbed wire, machine gun nests, mortars and casemates supported by Howitzers. A first disembarkation was planned on Cape Helles, the troops had to cross 11 km and reach the plateau of Kilitbahir which commanded the peninsula, and later the town of Krithia and the Achi Baba hill on which heavy artillery pieces were to be placed for support.

ANZAC cove
On D-Day, April 25th, three battleships landed the first wave, followed by those carried by the destroyers Usk, Ribble, Chelmer, Scourge, Foxhound, Colne and Beagle, assisted and covered by the HMS London, Prince of Wales and Queen, the Majestic and Triumph, the Bacchante in the rear, troops taking place on boats. An error had been made at the site of the landing which took place further north, in a place now called “Anzac Creek.” In spite of the numerous troops disembarked, Turkish lines held firm, inflicting terrible losses on the 29th Division and Commonwealth troops, advancing a meter at a time. The firing of the battleships was not very accurate, despite seaplanes observations from the Ark Royal and balloons from Manica which corrected the fire. The first lines would finally be taken in the evening.
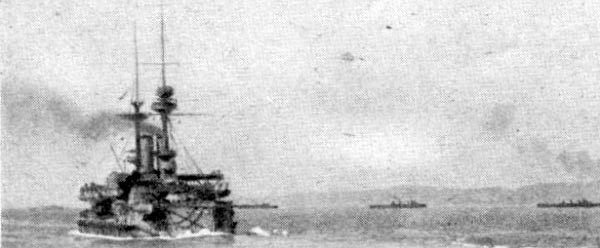
HMS Majestic leaving Mudros harbor to cover landings on April, 25.
Ships of the line’s fire was found ineffective and the troops felt the same sense of helplessness than their brothers in arms stucked in trenches on the western front. The situation differed according to the beaches. At the beaches V, W, and X, farther south of Cape Helles, the artillery preparation had been considerable, but not on “Anzac Cove” conceived as a surprise. The troops, mostly Australian, arrived in front of intact enemy lines. The artillery support only came after, but was restrained by safety concerns when the troops advanced inward. Another landing took place on the beach “S”, at Kum Kale, French troops supported by the Cornwallis, who took the village and held it in spite of Turkish counter-attacks.
Unfortunately, losses of the British Forces were such that the French were ordered leave the village and reinforce the MEF stuck on the west coast of the peninsula. Naval support was not effective against entrenched positions, but much more on Turkish troops moving on open ground to counterattack on the 27th and 28th. The Queen Elizabeth proved its worth by stopping the first offensive with a single salvo, While the second was literally annihilated by 381 mm shrapnells provided for the operation. She also showed precision when on the 27th she sank at long indirect range off Gaba Tepe a Turkish transport crossing the strait, spotted by a balloon.
The failure of Land operations
Faced with obstinate resistance by the Turks masterfully commanded by general Helmuth von Sanders, the offensive never reached its original objectives. The troops disembarked at Cape Helles and never came to the sight of Krithia, while those of “Anzac Cove” advanced only a few kilometers, the interior heights remaining to the enemy. Their situation was untenable because the terrain configuration made Turkish weaponry very effective ion the open, crossing fire covering the whole area. Trenches were dug but all assaults were doomed. Many superior officers lost their lives there. Troops were only supplied by night, but the evacuation of the wounded remained problematic.

Queen Elisabeth at Lemnos, 1915
It was not until May 1st that combined forces managed to form a shallow bridgehead. But the forehead remained frozen. On May 6, Hamilton decided to land in Suvla Bay and launch an attack on Kereves-Dere and Achi Baba. This will be a bloody failure, despite a new attempt with fresh troops on the 15th. More seriously, the support of the navy was now compromised: On May 12, the Turkish TB Muavenet managed to torpedo HMS Goliath, sending it to the bottom. Later, the 25th, the HMS Triumph was sunk by U21. Two days later, the same submarine also sank HMS Majestic. In the face of such losses the Admiralty decided to withdraw all battleships still in support, starting with the Queen Elizabeth that sailed to Egypt wisely. From now on only cruisers and destroyers will provide cover, as well as some “improvised monitors” made with requisitioned local ships and artillery pieces.
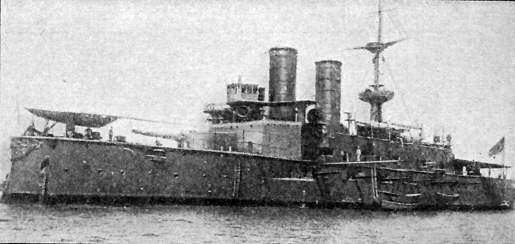
Turkish Battleship Messudieh. This old ironclad has been rebuilt but was still considered merely as a glorified coast guard.
Trying to Unlock the front
The last attempt to break the deadlock was carried out on 6th August: There were plans for two attacks south, on Cape Helles and Sari-Bari. The latter is led by the Anzac and totally failed. The second met with little resistance but negligence and nonchalance of the officers prevented any progresses, leaving time for the Turks to fortify their positions and send reinforcements. When Hamilton arrived, it was too late. This last failure further aggravated first Lord of the Sea’s point -Winston Churchill- while Hamilton was replaced by Munro. The latter was seconded by Kitchener, and the two came to the conclusion that the lack of effective support, with continuous fire by large Turkish pieces and the coming winter compromised any progresses.
The final decision to withdraw troops came when the situation in the Balkans deteriorated rapidly. Allied troops, some 100,000 men, were evacuated without much losses from October 1915 to January 1916, but soon disembarked at Salonica to support the Greek front. The largest amphibious operation of the First World War ended for the Allies as a crushing failure: Constantinople was secured, the government and population’s resolve highest than never, while the allies lost 7 battleships and left 250,000 men on the ground, dead and wounded.
Submarine’s revenge
And so were gone the troops, the big guns of the fleet, and with them any hope to secure the Dardanelles. But that did not bring an halt to the operations against the Turks in this area. The amphibious operation failure was compensated by the success of one of the branches of this plan, left aside until now: Submersibles. Despite the difficulties, English and French subs attempted to cross the Straits defenses. On December 13, 1914, the British submarine B13 succeeded in crossing all minefields, the two nets, and reached the bay of Sari Sighlar, south of Cannakale. She caught the old Messoudieh, anchored as a battery, and torpedoed her. The battleship sank in ten minutes, carrying more than 600 men with it. However miraculously most left the ship which hull still emerged, perforating it get out. The exploit of the B11 went on as she managed to come back through. Captain Holbrook was the first to receive the Victoria Cross for this feat.

Australian submarine AE2
On French side, submarine Saphir also passed through the defenses on 15 January, but ran aground on Nagara, and was scuttled. The British E15 attempted the same in April 17, but ran aground on Sari Sighlar after being caught by the strong currents. She was destroyed by fort Dardanos gunfire, the crew taken prisoner without being able to scuttle it. On 26 April the Australian submarine AE2 was the first to cross the Strait entirely, reaching the the Marmara Sea, but a week rampage ended without tangible results, partly because of torpedoes detonator shortages. On the 29th she was spotted and sunk by the Turkish torpedo-boat Sultanhissar.
On 27th of April, another submarine, Commander Boyle’s E14, also crossed the Marmara Sea, fired all his torpedoes, firing her gun, and sinking a large tonnage. She returned back, Boyle received the Victoria Cross. Trade in the sea of marmara was interrupted for some time. Boyle would made later two further crossings without any hindrance, still inflicting losses on Turkish traffic, despite the installation of a new net in Erin Keui Bay. On May, 23, E11 did the same, sinking 11 ships, including three in the same port on the coast of Thrace. On August, 8, during a new attempt she sank the battleship Hayredin Barbarossa, a 1890s ex-German ship armed with three double 280mm turrets. There were also individual exploits of loners, such as Lieutenant Lyon, swimming to the coast from the E2, and managing packed TNT on a railway bridge. He never came back. Lt. Hugues did the same from E11. He derailed a train and won the D.S.O. On July, 17, E7 attacked a coastal railway by gunfire, stopped and destroyed two trains.

British submarine B11
There were also brave but unlucky attempts like the case of the E7, entangled in the first net, and the French Mariotte on July 27. The Joule was sunk on the 1st of May by a mine. The Turquoise story was edifying: She succeeded in crossing the strait on 28 October, penetrated into the Marmara Sea, sank some ships, but upon her return ran aground at the foot of a fort and was captured intact. The Turks towed her, renamed and put back into service in Turkish colors. The submarine also bring with it documents detailing allied operations and a rendezvous with the British submarine E20. When the latter arrived at the appointed time without knowing it, she was torpedoed by the U14 in ambush. In the end, the allies had sunk two Turkish battleships, a destroyer, 5 gunboats, 9 troop carriers, 7 suppliers and 200 steamers and various ships, literally emptying the Sea of Marmara.

Turkish Battleship Heyreddin Barbarossa, sunk by E11
The hard lessons of the Dardanelles were not lost. If no other similar amphibious operation was undertaken in WW1 (apart from a 1918 project in the Baltic), new concepts were born that would bore fruit during the Second World War. Allied losses has been imputable to the forts but mines and submersibles. Fortunately the ships sunk were of little use in a modern battle line. Amphibious support seemed to be the only suitable task of those big guns battleship, a foretaste of their growing use in WW2. For the last few years, ultra-modern ships equipped with single, double or triple-caliber turrets for coastal support benefited from all the advances in terms of range, accuracy, and enhanced shells. Many monitors were indeed built to serve in the Adriatic by the Italians and the British in the Channel.
Epilogue
This campaign was also the occasion for a raising fame blue-eyed Turkish officer, Mustafa Kemal, to show his brillance as a commander and leader in the field. To this day the Dardanelles campaign is cherished by the memory of both the Turks which saw it as a brillant victory, and the Australians, which blood spilled on these bone-dry shores helped shaping a national identity. Memorials and cemeteries of all sides involved are still maintained with care, and veterans of the Anzacs visited these battlefields in the 1950-70s, followed by a trail of documentaries and Peter Weir’s movie in the 1981 starring a young Mel Gibson, “Gallipoli“.
 Latest Facebook Entry -
  X(Tweeter) Naval Encyclopedia's deck archive
 Instagram (@navalencyc)


 French Navy
 Royal Navy
 Russian Navy
 Armada Espanola
 Austrian Navy
 K.u.K. Kriegsmarine
 Dansk Marine
 Nautiko Hellenon
 Koninklije Marine 1870
 Marinha do Brasil
 Osmanlı Donanması
 Marina Do Peru
 Marinha do Portugal
 Regia Marina 1870
 Nihhon Kaigun 1870
 Preußische Marine 1870
 Russkiy Flot 1870
 Svenska marinen
 Søværnet
 Union Navy
 Confederate Navy
 Armada de Argentina
 Imperial Chinese Navy
 Marinha do Portugal
 Mexico
 Kaiserliche Marine
 1898 US Navy
 Sovietskiy Flot
 Royal Canadian Navy
 Royal Australian Navy
 RNZN Fleet
 Chinese Navy 1937
 Kriegsmarine
 Chilean Navy
 Danish Navy
 Finnish Navy
 Hellenic Navy
 Polish Navy
 Romanian Navy
 Turkish Navy
 Royal Yugoslav Navy
 Royal Thai Navy
 Minor Navies
 Albania
 Austria
 Belgium
 Columbia
 Costa Rica
 Cuba
Cuba Czechoslovakia
 Dominican Republic
 Haiti
Haiti Hungary
 Honduras
 Estonia
 Iceland
 Eire
Eire Equador
 Iran
Iran Iraq
Iraq Latvia
 Liberia
 Lithuania
 Mandchukuo
 Morocco
 Nicaragua
 Persia
 San Salvador
 Sarawak
 Uruguay
 Venezuela
 Zanzibar
 Warsaw Pact Navies
 Bulgaria
 Hungary

 Bundesmarine
 Dutch Navy
 Hellenic Navy
 Marina Militare
 Yugoslav Navy
 Chinese Navy
 Indian Navy
 Indonesian Navy
 JMSDF
JMSDF North Korean Navy
 Pakistani Navy
 Philippines Navy
 ROKN
ROKN Rep. of Singapore Navy
 Taiwanese Navy
 IDF Navy
 Saudi Navy
 Royal New Zealand Navy
 Egyptian Navy
 South African Navy


 Ukrainian Navy