
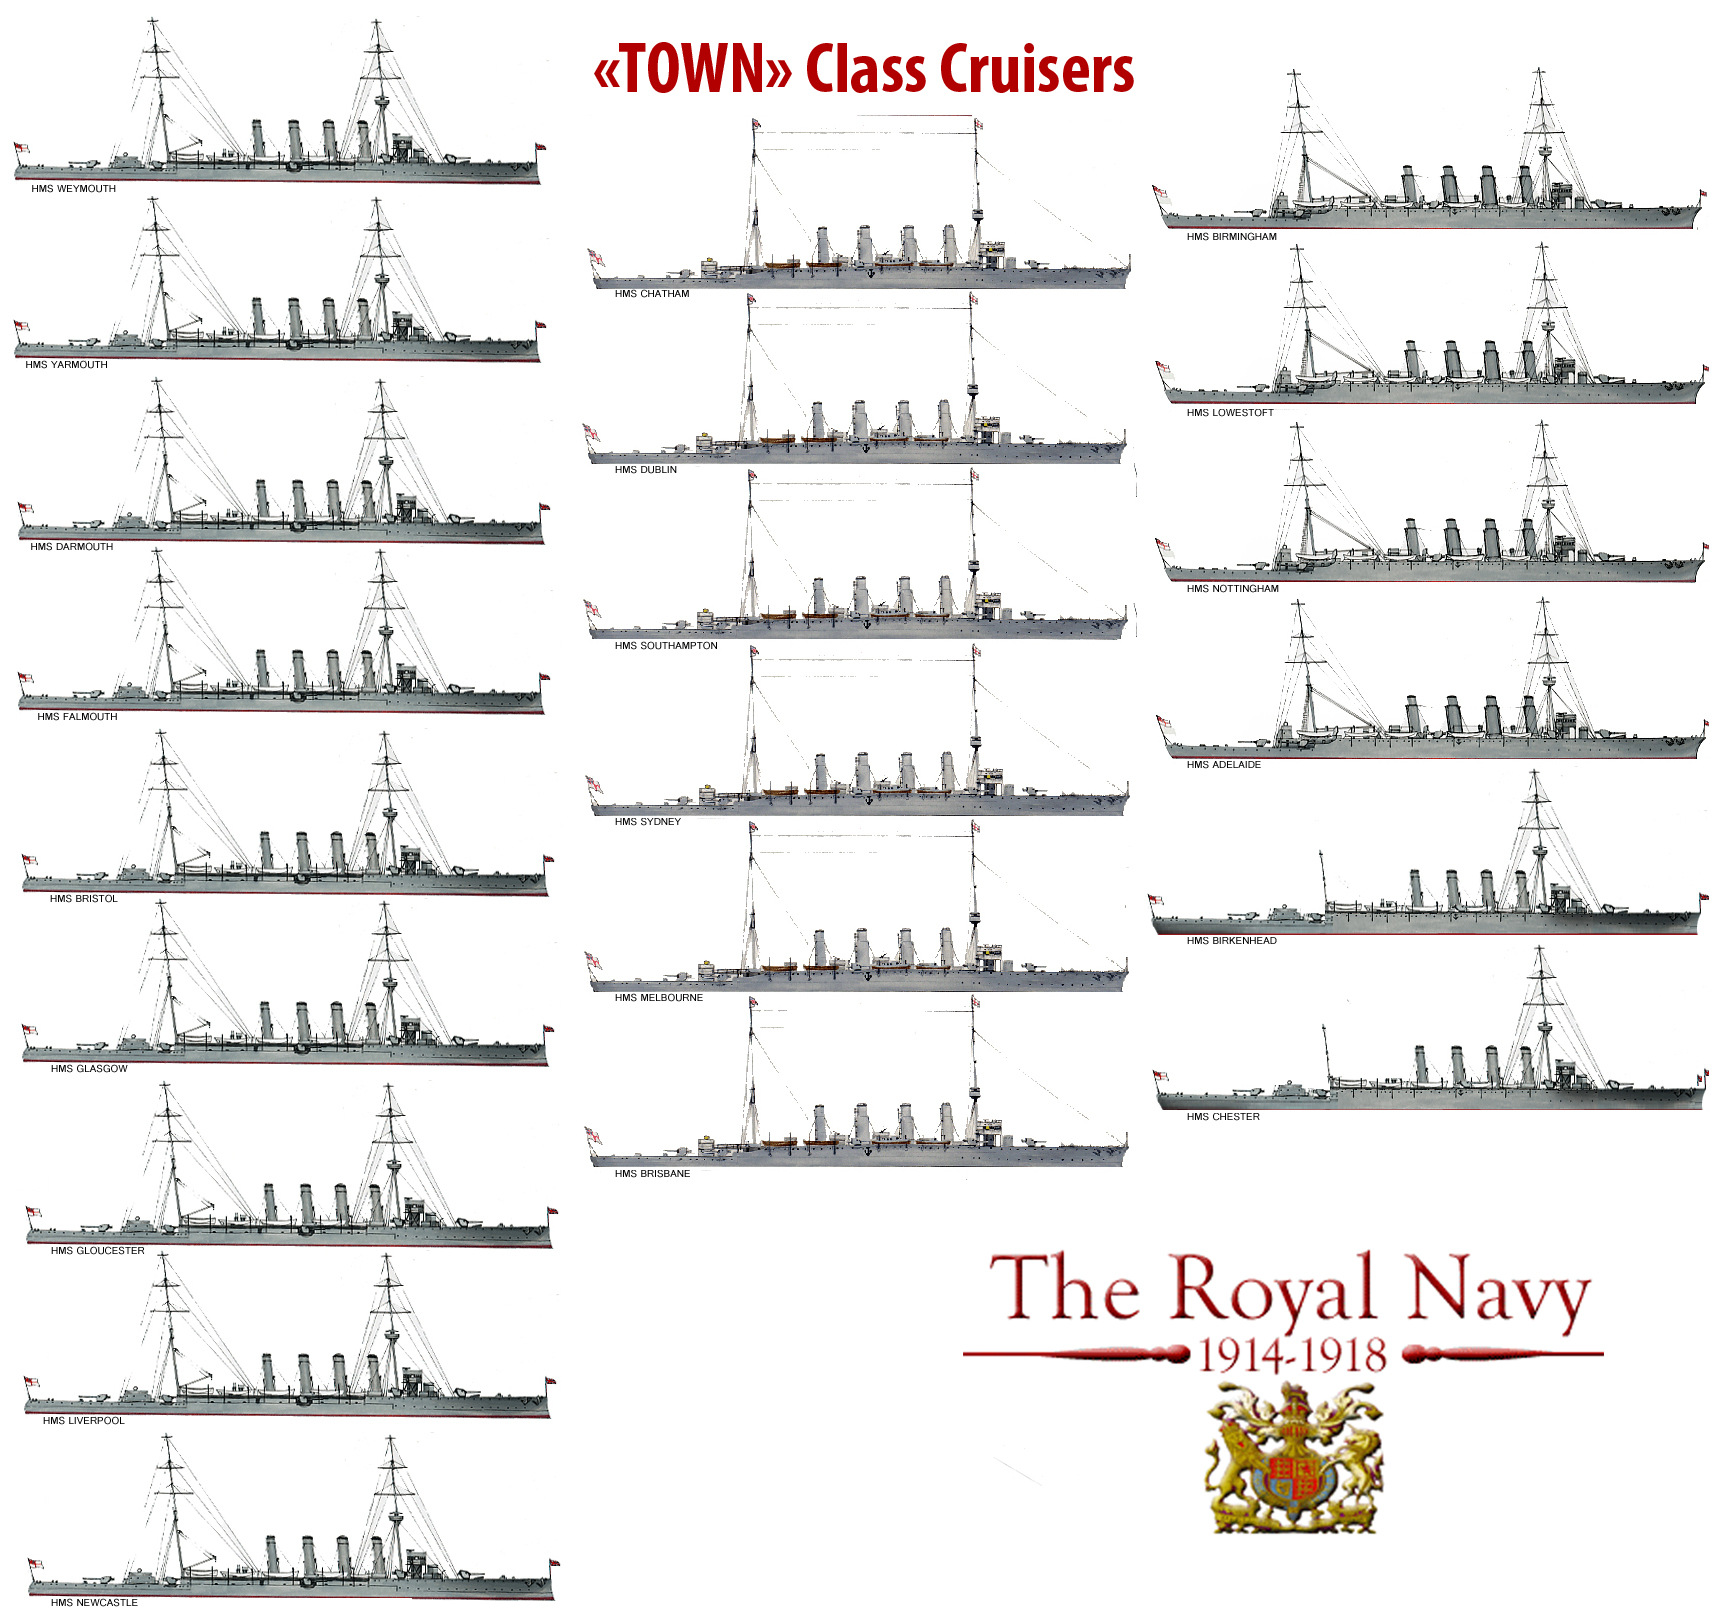
Town class cruisers (WWI)
 United Kingdom (1917)
Sub-classes Bristol, Weymouth, Chatham, Birmingham, Birkenhead: 21 protected cruisers
WW1 RN Cruisers
Blake class | Edgar class | Powerful class | Diadem class | Cressy class | Drake class | Monmouth class | Devonshire class | Duke of Edinburgh class | Warrior class | Minotaur classIris class | Leander class | Mersey class | Marathon class | Apollo class | Astraea class | Eclipse class | Arrogant class | Highflyer class
Pearl class | Pelorus class | Gem class | Forward class | Boadicea class | Blonde class | Active class | Bristol class | Weymouth class | Chatham class | Birmingham class | Birkenhead class | Arethusa class | Caroline class | Calliope class | Cambrian class | Centaur class | Caledon class | Ceres class | Carlisle class | Danae class | Cavendish class | Emerald class
The battle-hardened WW1 Town class Cruisers
Some of these made it through WW2 as well, and they are less well-known than the 1936 namesake class designed to answer to the Mogami, but they were perhaps the most involved British cruisers of the Great War, seeing most battles and operating far and wide throughout the Empire. They were conceived as long-range cruisers for enough firepower to deal with most ships below the level of a battleship, using their speed as an active protection, and safeguarding the Empire trade links. The second class cruisers, spawn sub-classed of the general same design, Bristol (5), Weymouth (4), Chatham (3, plus 3 RAN), Birmingham (3 +1 RAN) and Birkenhead (2). Some saw at least four battles, spent hundreds of shells, destroyed dozens of enemy ships, and just two however were sunk, by U-Boats. In fact The “new” interwar town class cruisers saw about the same level of commitment in WW2 as their forebearers in the great war.
Bristol class Cruisers (1909-1910)
The first of the serie (Bristol, Glasgow, Gloucester, Liverpool, Newcastle) were laid down in February to April 1909 at John Brown, Clydebank, Fairfield Shipbuilding, Govan, William Beardmore, Dalmuir, Vickers, Barrow-in-Furness and Armstrong Whitworth, Elswick. They were launched from September 1909 (Glasgow) to February 1910 (Bristol) and completed in the fall of 1910.
Design
The Bristol class were suitable for a variety of roles, notably trade protection, fleet duties and were 138.1 m long overall by 14.3 m with a roughly 5,000 tons displacement (4,800 long tons exactly, 5,300 long tons fully loaded. They were able to top 25 knots (46 km/h; 29 mph) thanks to steam turbines fed by twelve Yarrow three-drum boilers, the whole rated a 22,000 shaft horsepower (16,000 kW). Only HMS Bristol had Brown-Curtis turbines with two propellers, the others used Parsons turbines mated of four shafts.
Speed trials with force geating shown speeds in excess of 27.012 knots (50.026 km/h; 31.085 mph) on the Bristol and it appeared its two-shaft layout was successful at passing power efficiency at lower speeds as well. All had mixed-heating boilers with about 1353 tons of coal and 260 tons of oil for a 5,070 nautical miles (9,390 km; 5,830 mi) radius of action at 16 knots (30 km/h; 18 mph). As second-class cruisers, and not scouts, they were considered still as “protected cruisers”, with an armoured deck 2 inches (51 mm) thick over the magazines and machinery, down to 1 inch (25 mm) over the steering chamber down to 19 mm elsewhere. The conning tower was 6 inches (150 mm) thick, gun shields 3 inches (76 mm).
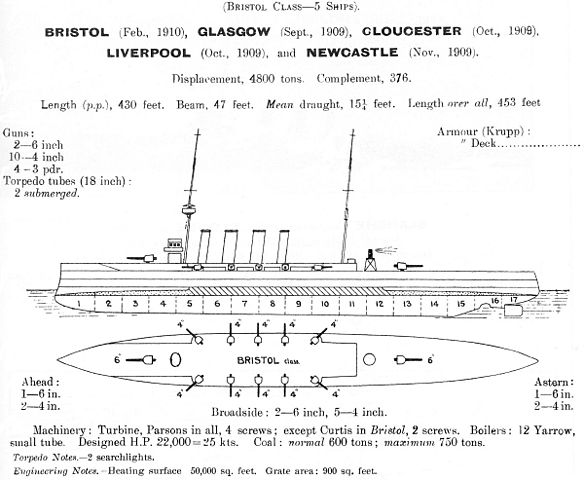
The original, planned unshielded 4-inch (102 mm) guns to deal with Königsberg class light cruisers, was soon dropped for ten 105-millimetre (4.1 in) BL 4-inch Mk VII guns instead, all shielded and in waist mountings. These models outranged the 4-in, but to deal with heavier ships at longer ranges, they also possessed two BL 6-inch (152 mm) Mk XI naval guns fore and aft. To complete this, Four Vickers 3-pounder (47 mm) saluting guns were added and two 18 inch (450 mm) torpedo tubes underwater, with seven reloads. Their crew comprised 480 officers and men, the officers according to Fisher’s directives being accommodated in the forward part of the ship, near the bridge, where the action was at all time. In wartime, the class received a complementary single anti-aircraft QF 3 inch (76 mm) 20 cwt gun.
Bristol Specifications |
|
| Dimensions | 462 ft x 48 x 14 ft (140.8 x14.6 x4.9 m) |
| Displacement | 4,800–5,440 long tons (4,880–5,530 t) |
| Crew | 480 wartime |
| Propulsion | 2 shafts Parsons steam turbines 12 × Yarrow boilers 22,000 shp (16,000 kW) |
| Speed | 25 kn (46 km/h; 29 mph) |
| Range | 4,140–5,830 nautical miles (7,670–10,800 km; 4,760–6,710 mi) @10 knots (19 km/h; 12 mph) |
| Armament | 2 BL 6-inch (152/50 mm) Mk XI guns, 10 BL 4-inch (101.6 mm) Mk VII guns, 4 single QF 3-pdr 47 mm (1.9 in) guns, 2 × 21 in (533 mm) TTs |
| Armor | Deck: 0.75–2 in (19–51 mm), Conning Tower: 4 in (102 mm), Gun Shields: 4 in (102 mm) |
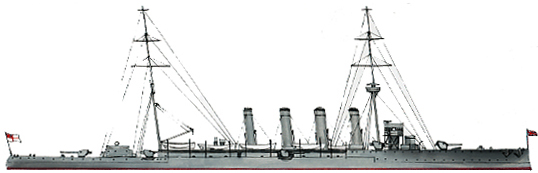
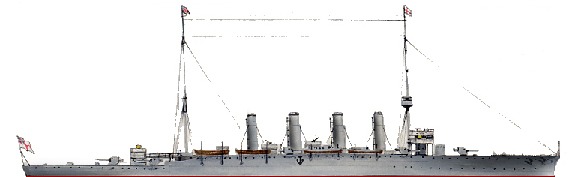
Rendition of the Bristol class cruisers by the author
The Bristols in action
Due to their large metacentric height they were stable even in the case of a flooding above the armoured deck, but they rolled quite a lot which made them poor gun platforms. it was also observed the gap between the bottom of the gun shields and deck allowed shell splinters to pass through and multiply leg injuries. In addition of their unpopular arrangements, they were very cramped, giving only 12.5 square feet (1.16 m2) living space to each seaman. The Bristiol’s armament considered too light for ships of 5000 tons and the 4-in side guns in addition to roll, were often immersed in high seas, which all but hampered their firing capabilities in the North sea.
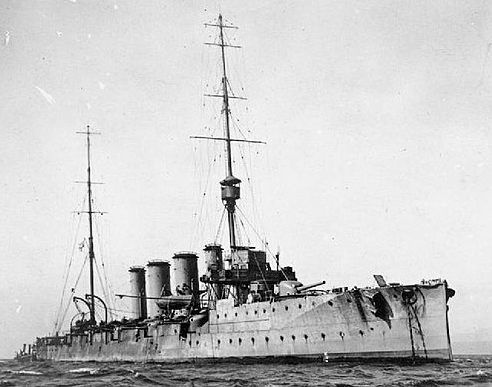
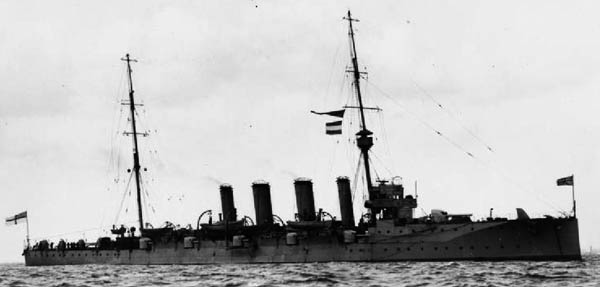
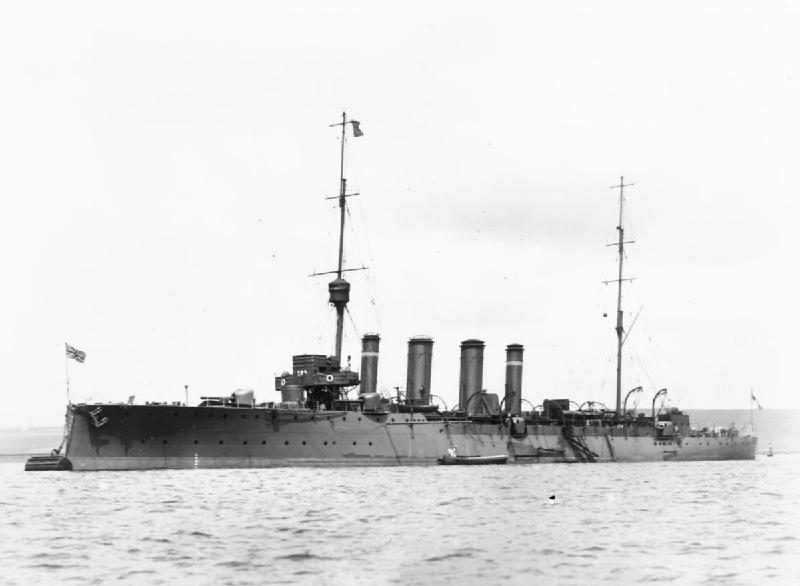
HMS Bristol
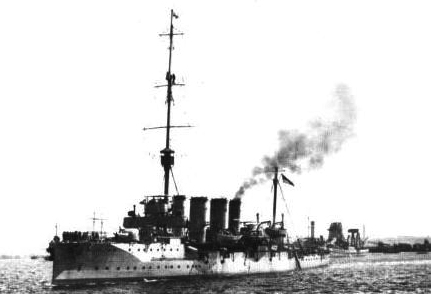
HMS Bristol in 1910
HMS Bristol spent part her early career in reserve but was transferred to the 4th Cruiser Squadron operationg between North America and the West Indies Station (The Caribbeans) in mid-1914, and deployed during the Mexican Revolution to protect British interests. Soon she was called to guard Allied shipping lanes on the American coast North to South from German commerce raiders. Whn the war erupted she spotted and catch a fast German light cruiser in the West Indies. They fought inconclusively but the British cruiser would play her part in the Battle of the Falkland Islands by sinking colliers servicing Von Spee’s German East Asia Squadron. She went home for a refit in mid-1915 and sailed to the Adriatic Force, taking part later in 1917 to the Battle of the Strait of Otranto in 1917. Bristol was sent escorting convoys off West Africa (early 1918) and later back to patrolling the east coast of South America, until after the end of the war. Placed in reserve in mid-1919, she was sold for scrap in 1921.
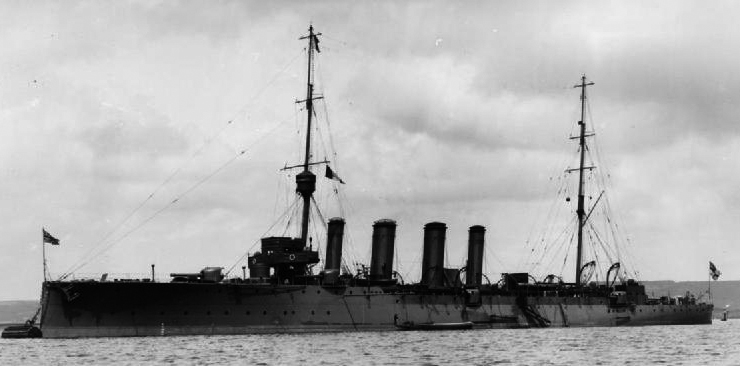
HMS Glasgow
HMS Glasgow 1909
When the war broke out, HMS Glasgow (Captain John Luce) patrolled off the coast of South America under on 16 August 1914, and captured the German merchantman SS Santa Catherina. On 1 November 1914, she participated in the Battle of Coronel, with the cruisers HMS Good Hope and HMS Monmouth, facing Von Spee’s German East Asia Cruiser Squadron and their powerful armoured cruisers Scharnhorst and Gneisenau. While she hit without much harm the German cruisers, she escaped herself with moderate damage, a feat of the captain considering authors estimates about 600 shells were fired at her, the lone survivor of the fight, perhaps save by her speed, low profile, poor visibility and rough seas.
The next month, she was found pitted against the same dreadful squadron, this time in the battle of the Falkland Islands, but this time with the reassuring presence of the battlecruisers HMS Invincible and HMS Inflexible. This time the result was less one-sided and the whole German squadron was eliminated from the game. HMS Glasgow did her part, targeting and hitting (and sinking) the SMS Leipzig. The SMS Dresden, escaped only to be spotted and catch later by HLS Glasgow and HMS Kent. In nad shape, seeing no prospect of victory, her captain decided to scuttle her after a short desperate engagement off Mas a Tierra.
A sailor from Glasgow then noticed a pig swimming in the water, jumped, swam to the unfortunate beast, and having being nearly drowned by the frightened animal, succeeded in rescuing him and both were hauled ono the ship. The crew adored this mascot, quickly named ‘Tirpitz’. After a year on board, the animal was “discharged” and transferred to the Whale Island Gunnery School, Portsmouth. Glasgow sailed in the Mediterranean in 1915, and from 1917 was posted to the 8th Light Cruiser Squadron operating in the Adriatic Sea. She then sailed to the South Atlantic and joined HMS Amethyst for patrols off the Brazilian coast, looking for for German raiders. In this they missed SMS Möwe, one of the most innocent-looking but most succesful of them all (more on this ship soon). The Glasgow served as training sip until being paid off in 1922 and sold for scrap in 29 April 1927.
HMS Gloucester
HMS Gloucester 1909
She was launched at William Beardmore, Dalmuir. From entering commission, Gloucester served with the 1st Battle Squadron of the Home Fleet and then was transferred to the Mediterranean 2nd Light Cruiser Squadron. When the war erupted, her first major action was the pursuit of Goeben and Breslau. Indeed the German squadron was found “trapped” between neutral and hostile nations, both with the French and Royal Navies at Admiral Souchon‘s heels. At first the british cruisers was ordered by Admiral Sir Archibald Berkeley Milne to prevent these for joining thir most obvious ally, the Austro-Hungarian Navy. On 4 August however, Britain was still not at war with the Germany and could only shadow the ships that just shelled the French port of Philippeville on the North African coast. The German ships were able to break contact and head for Messina to recoal. On the 6th, they sailed full spead ahead due Eat, towards Constantinople, trailed by HMS Gloucester, radioing their next moves.
When Souchon ordered the Breslau to turn around and face the British cruiser, Captain Howard Kelly decided to attack her and force the Goeben to turn too for supporting her. A daring move, and the British cruisere opened fired first with her 6-in gun at a range of 11,500 yards (10,500 m) and when down to 10,000 yards (9,100 m), he turned to broadside the Breslau. This forced eventually Souchon to turn too open fire. The Goeben armament out-range with ease kelly’s ship so he turned back and retired, having just met his objective. He fired ten times ad hit the Breslau once. But he did’nt change the outcome, both ships were soon “home”, and now had the Turkish flag flying on their poops. Gliucester was now part of the squadron blockading the Dardanelles, for several months but in November, the cruiser was ordered to the Indian ocean to hunt for German commerce raiders.
She went home to the 2nd LCS of the Grand Fleet and sailed to the East African coast, searching for SS Kronprinz Wilhelm. She patrolled with the 3rd Light Cruiser Squadron in the South Atlantic, and later landed 100 Royal Marines in Galway Bay because of a rumor that the Kronprinz Wilhelm helped the Irish during the Easter Rising in April 1916. Crucially also, Glucester took part in the Battle of Jutland on 31 May–1 June 1916, as part of the force thet screened Vice-Admiral David Beatty’s battlecruisers. She spotted and signalled german ships and after turning north, discovered the main body of the German High Seas Fleet. She briefly engaged the disabled light cruiser SMS Wiesbaden, but retired after a while with the rest of the Grand Fleet. She spent the rest of the wr with the 2nd Battle Squadron, then joined the 8th Light Cruiser Squadron in the Adriatic, and the Indian Ocean, hunting for the SMS Wolf, then back in the Adriatic until November 1918. Places in reserved she was paid off in March 1920 and later sold.
HMS Liverpool
HMS Liverpool towing crippled HMS Audacious
built in Vickers, Barrow-in-Furness she was commissioned in 4 October 1910. She served first with the 1st Battle Squadron of the Home Fleet, then with the 2nd Light Cruiser Squadron in 1913 and in 1914, the 5th Light Cruiser Squadron. She fought at the Battle of Heligoland Bight, on 28 August 1914, under orders of William Goodenough and assisted surviving crews from SMS Mainz and have them repatriated to Rosyth, incuding the son of Admiral Alfred von Tirpitz. The cruiser manoeuvered with Battleship HMS Audacious when she struck a mine off the coast of ireland, and assisted her, but the ships eventually capsied and sank, fortunately just with one killed on board, the rest of the crew being evacuated.
In 1915, Liverpool hunted for the armed merchant cruiser Kronprinz Wilhelm on the West African coast. After Boiler repairs she was sent to deployed to the Mediterranean, based at Brindisi. She hunted the destroyer Wildfang to Cattaro, and later during the Battle of the Otranto Straits, she was unfortunatley inactive as her captain G.H. Vivian ordered her reduced state of readiness and boiler maintrenance routine when the events occurred. She served there and in the Aegean Squadron in January 1918, and after the end of the war and the black sea access was granted she sailed to assist the White Russians, she transported delegations to Novorrossisk and made contact with Russian General Denikin. Back home she was retired, paid off in 1921 and sold.
HMS Newcastle
HMS Newcastle 1909
This cruiser was launched at Armstrong Whitworth, Elswick in November 1909, and until 1914 was stationed in the Far East, on the China and Pacific station. She had covered in operations during the Shanghai Rebellion in 1913, a consequence of the Xinhai Revolution two years earlier. She shelled Yap, and then was ordered to sail to Valparaíso for the hunt of the armed merchant raider SMS Prinz Eitel Friedrich. By late January 1916, HMS Newcastle captured the steamer SMS Mazatlan, operating covertly as the American SS. Edna. In 1917 she served with the East Indies squadron, without notable incident. In 1918 she was patrolling off the coast of South America, but again no particular event was noted and back home, the cruiser was paid off, and sold for scrapping on May 1921, to Thos W Ward yards (Lelant) in May 1923.
Weymouth class Cruisers (1910-1911)
Compared to the Bristols, the Weymouth (four ships in “-mouth”) had a quite heavier main armament (eight 6 in guns) and hull redesigns for a better seaworthiness internal space modifications to make these more roomy. Compared to the previous serie, their beam was slightly larger at 48 feet 6 inches (14.78 m) instead of 14.3 m and the same draught draught, while Displacement was much highr, at 5,250 long tons (5,330 t) normal, 5,800 long tons (5,900 t) fully loaded. They had the same powerplant, but Yarmouth herself had Brown-Curtis turbines and two-shaft arrangement, while all the others had four-shaft and Yarrow turbines, all for 25 knots.
Protection was unchanged, the main gun armament was more uniform with eight BL 6 inch Mk XI guns and a new arrangement with three mounted on an enlarged forecastle while the lower deck waist guns had this time a bulwark for high seas. Two submerged Torpedo tubes were now of the 21-inch (533 mm) mark and there were as previous ships four 3-pounder saluting guns. Later in the war, a single 3 in (76 mm) AA gun was added in 1915, and at the end of the war, director control equipment were added on a new tripod foremast.

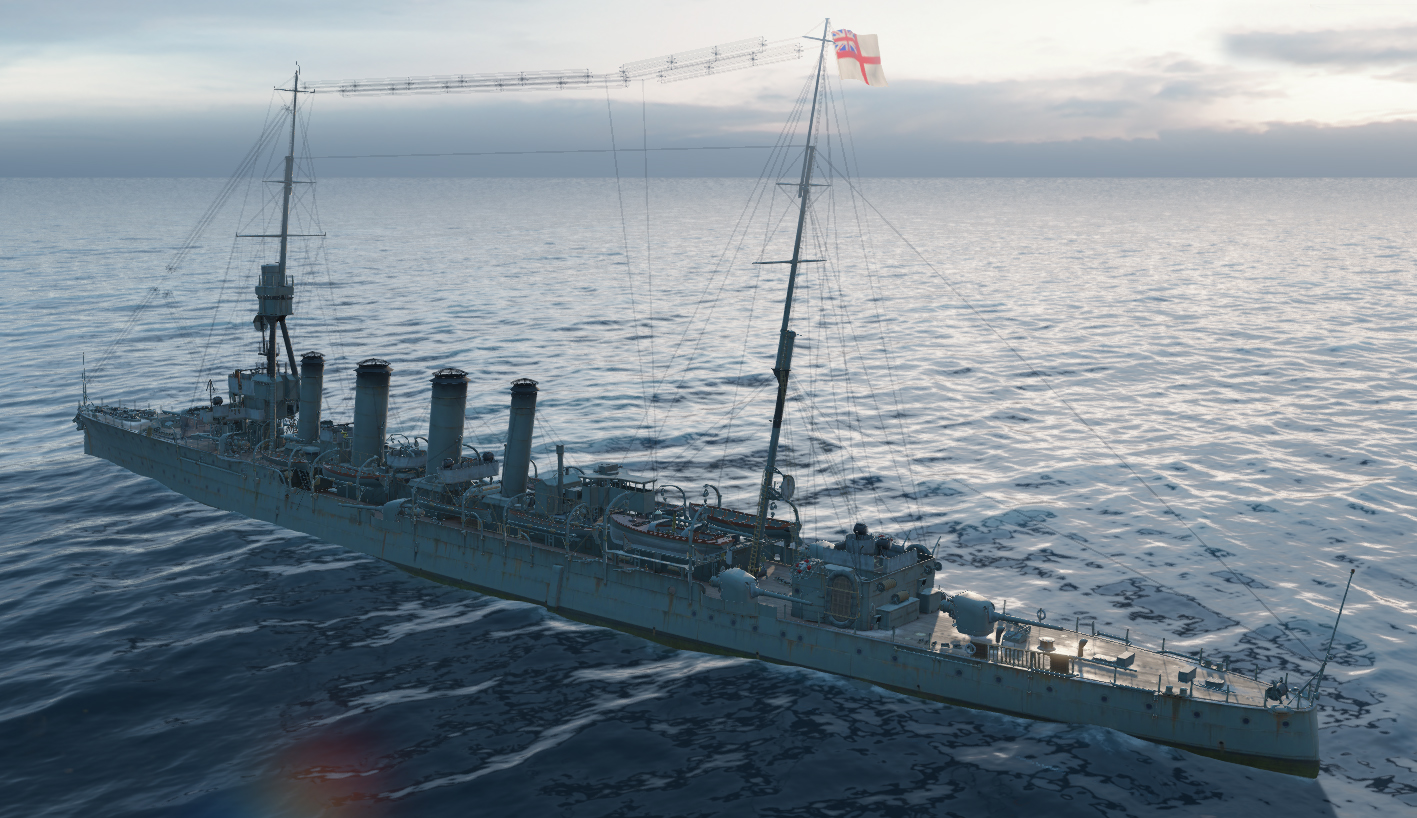
wow’s panoramic view of the Weymouth class bridge and deck details.
Yarmouth Specifications |
|
| Dimensions | 453 ft x 47 ft 6 in x 15 ft 6 in (138.1 x14.5 x4.72 m) |
| Displacement | 5,275 long tons (5,360 t) |
| Crew | 475 wartime |
| Propulsion | 2 shafts Parsons steam turbines 12 × Yarrow boilers 22,000 shp (16,000 kW) |
| Speed | 25 kn (46 km/h; 29 mph) |
| Range | 5,610 nautical miles (10,390 km; 6,460 mi) at 10 knots (19 km/h; 12 mph) |
| Armament | 8 single BL 6 in (152 mm) Mk XI guns, 4 single QF 3-pdr 47 mm (1.9 in) guns, 2 × 21 in (533 mm) TTs |
| Armor | Deck: 0.75–2 in (19–51 mm), Conning Tower: 4 in (102 mm) |
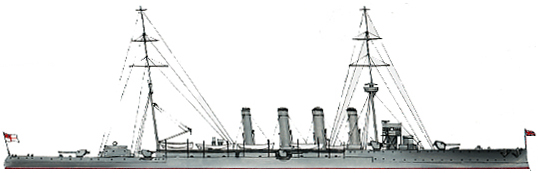
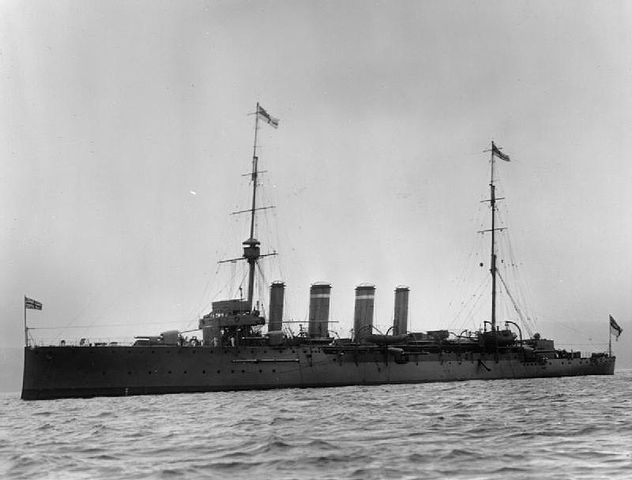
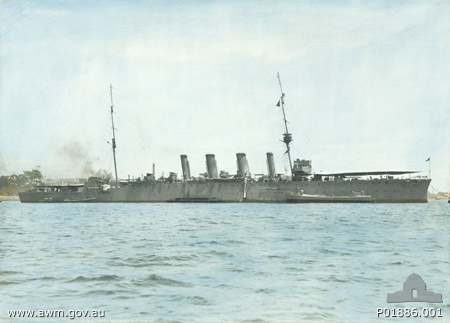
HMS Weymouth class general appearence
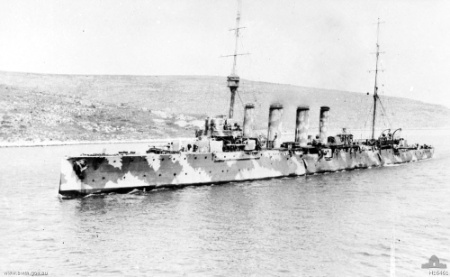
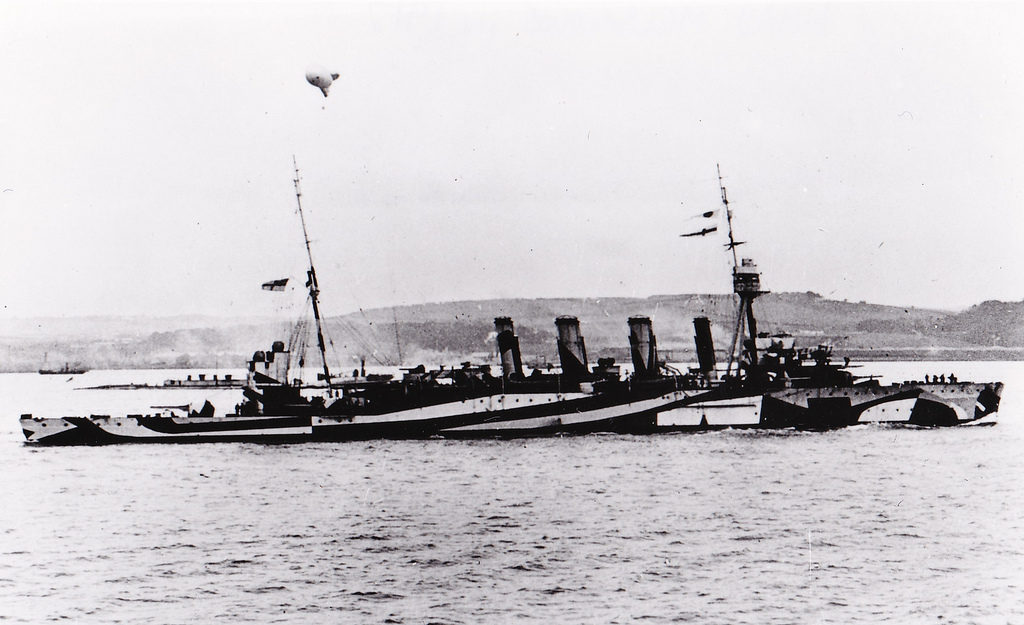
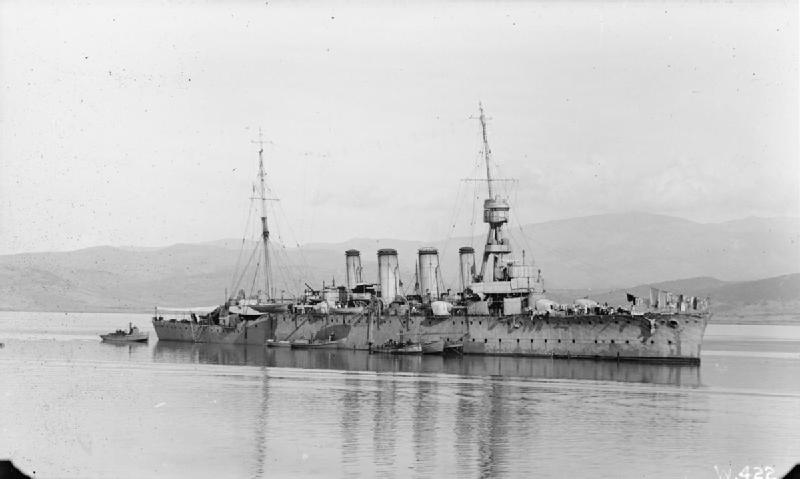
Camouflaged Weymouth Skyros Island, Greece, 1915
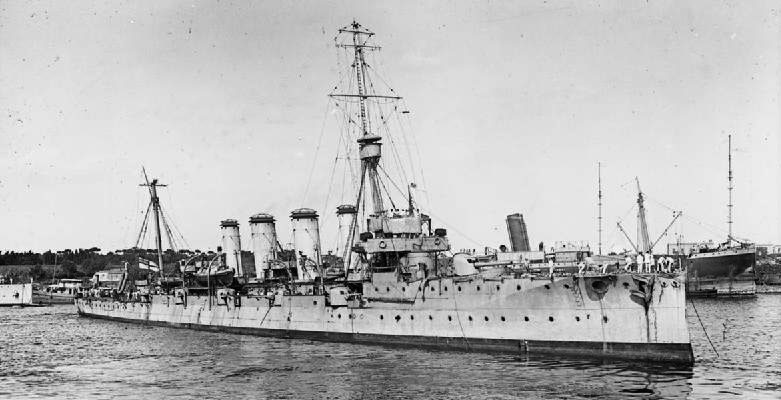
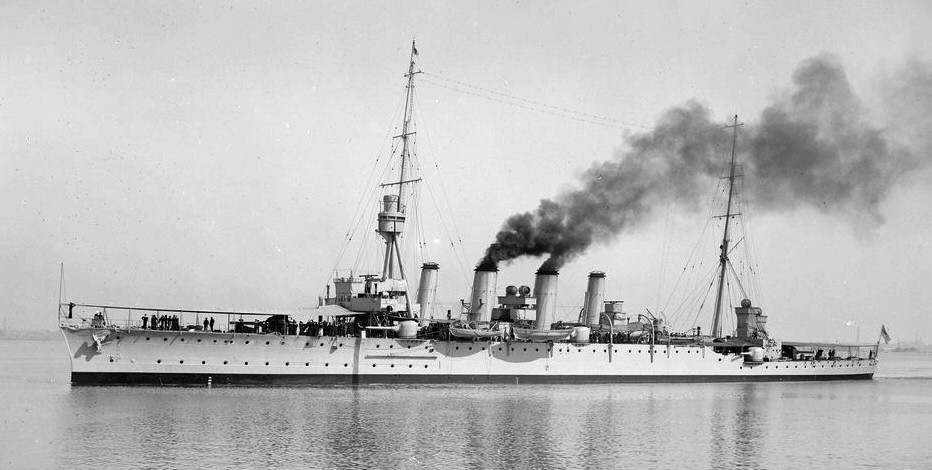
HMS Weymouth
HMS weymouth was launched at Armstrong Whitworth, Elswick on 18 November, completed in October 1911, and after commission joined the 3rd Battle Squadron (Atlantic Fleet), then transferred to the 2nd Light Cruiser Squadron, based in the Mediterranean by 1913. When the war broke out, she sailed to the Indian Ocean, chasing for the SMS Emden. By February 1915, she was sent to patrol the East African coast, trying to catch SMS Königsberg. The latter ended trapped in the Rufiji River and was later sunk. She then sailed to the Adriatic in December 1915 and the next year joined the 6th Light Cruiser Squadron with the Grand Fleet. Next year she was back in the Mediterranean with the 8th Cruiser Squadron based in Brindisi. Austro-Hungarian submarine SM U-31 manage to torpedo her 2 October 1918 but she was towed, repaired and ended the war to be sold after being paid off and placed into reserve on 2 October 1928 to the broker yard Hughes Bolckow.
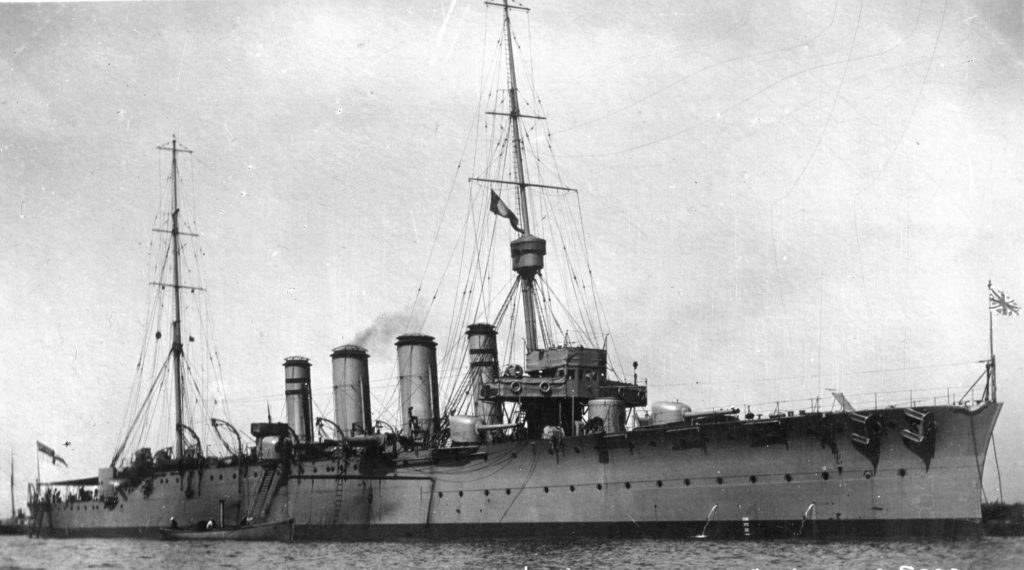
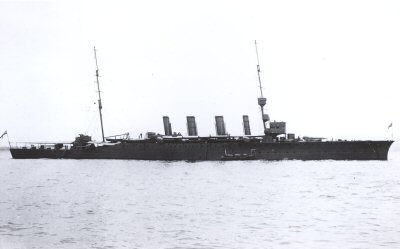
HMS Yarmouth, Zeppelin killer
This second cruiser was launched on 12 April 1911 from London & Glasgow Co. Yard. She was posted at the China Station when the war broke out and was sent later in the year ttok part in looking for the cruiser SMS Emden, missed her but captured two German colliers instead. Back home waters in December she joined the 2nd Light Cruiser Squadron, Grand Fleet. In February 1915, she went to the 3rd Light Cruiser Squadron, taking part in Pay 1916 to Battle of Jutland, and went of it unscaved. By 28 June 1917, she was taken in hands for a RNAS (Royal Naval Air Service) test campaign, completely rebuilt with a full take-off deck over the forward deck, mated on a pivot over the front turret. Flight Commander F. J. Rutland was the first in History to take-off wit his Sopwith Pup from such platform. Another flight took place in August by Flight Sub-Lieutenant B. A. Smart. After managing to gain altitude he succeeded in shooting down a Zeppelin L 23 near Bovbjerg. The cruiser was sold for scrap in 1922

Flight Commander Rutland’s Sopwith Pup taking off from HMS Yarmouth’s platform, June 1917.
HMS Dartmouth, the Adriatic warrior
HMS Dartmouth first served after completion in Vickers Barrow shipyard, with the Atlantic Fleet, 3rd Battle Squadron until 1913. She cruised the Mediterranean and was attached to the Second Light Cruiser Squadron (Devonport) for fleet Manoeuvres and then sailed to the East Indies Squadron, until the war broke out. By then, she sailed from Bombay (then in drydock for maintenance), jinog other ships to catch the SMS Königsberg after having escorted a convoy from Karachi to Mombassa.
In October HMS Chatham spotted the Königsberg in the Rufiji delta, and Dartmouth soon tried to engage the cruiser and her support steamer, only to discover they were too far upstream. By November, a collier was cuttle to block any retreat from the Rufiji River while Dartmouth sailed to the Cape of Good Hope, quite depleted after the Battle of Coronel. By January 1915, she was part of the 2nd Light Cruiser Squadron, Grand Fleet and steamed to the South Atlantic to hunt the SMS Karlsruhe, which had unknowingly has been recently lost (internal explosion near Barbados). By February, HMS Dartmouth covered the Gallipoli landings off the Dardanelles but suffered in March a boiler explosion, killing 15, but resume doperation off the West coast of the Gallipoli as pat of the naval attacked by the battleship that ended in failure and tragedy.

Wow’s rendition of the Weymouth class
She was foundered escorting the badly damaged HMS Inflexible to Tenedos. At the end of April, she missed the Anzac Cove and Cape Helles landings, sent in a diversionary false landing at Bulair. In May 1915, she joined the 8th Light Cruiser Squadron at Brindisi, but reccuring boiler problems had her speed reduced to a mere 16 knots in June, so decision was made to sent her at Malta for and overhaul. In December 1915 she intervened after an Austrian raid on Durazzo, as part of an international force with the cruiser Quarto and French destroyers and later Weymouth and Nino Bixio. The Battle off Durazzo saw her hitting SMS Helgoland quite badly.
In May 1917, she was also fighting in the Battle of the Otranto Straits. HMS Dartmouth under orders from Admiral Alfredo Acton left Brindisi with two Italian destroyers, joining the pursuit of the retreating Austro-Hungarian cruiser force, with the Aquila and HMS Bristol hard on their heal already. Dartmouth was hit by Austro-Hungarian cruisers in chase counter-fire and had to break and return to safety, but she was torpedoed en route by German submarine UC-25. She listed but her crew managed to save her, some abandoning the ship, and the small team succeeded in having her maintained afloat hard on pumps, just enough to be taken in tow, back to portwhere she was drydocked and repaired but was out too late to take part in any other major operations. She was sold and broken up in 1922.
HMS Falmouth, hard as nails
Built at William Beardmore, Dalmuir, launched in 1910 and completed in September 1911, Falmouth first served with the 2nd Battle Squadron, North Atlantic Fleey, and then reserve 2nd Light Cruiser Squadron, Second Fleet, Nore Command in June 1913 She was then transferred to the 5th Cruiser Squadron, Second Fleet, and when the war broke out, she joined the 1st Light Cruiser Squadron, Grand Fleet. She was present in the Battle of Heligoland Bight, as an observer, but in December she was with the 1st LCS (Vice-Admiral David Beatty’s battlecruisers) in hot pursuit of the German counterparts just making it from their raid on Scarborough, Hartlepool and Whitby. Falmouth then met an half-flotilla of torpedo boats led by a light cruiser, but she was unable to engager them. She served with the 3rd LCS, as flagship of Rear-Admiral Trevylyan Napier. She also was present at the Battle of Dogger Bank in January 1915. She did participate however one year after to the Battle of Jutland, 31 May–1 June 1916, as part of David Beatty’s 3rd LCS. Falmouth and her squadron encountered first the screen of the Grand Fleet at 17:33, and later engaged several german ships in rather poor vibility at 7,000 yards (6,400 m), without much results. She shelled the SMS Wiesbaden, torpedoed but missed her, then engaged two destroyers, then duelled with the SMS Lützow and SMS Derfflinger and even tried to torpedo the latter, but also narrowly missed. She escaped with only her voice tubes to the spotting top cutoff by a single 6-in shell. About 20:10 she spotted five cruisers, of the German 4th Scouting Group, and engaged them at 9,600 yards (8,800 m), hitting SMS München, slowing her down. In all she had spent 175 shells, a record for any British cruiser in that battle.
The last part of the war was quieter for her, but she took part in her last trip, this time on 19 August 1916, when the Grand Fleet was headed for home after a hot alert of a German sortie deciphered by Room 40, and ambushing U-66, at about 16:05, fired two torpedoes at her. She was crippled, badly damaged and listing, but the armed trawler Cooksin went on her side to try to evacuate the crew, but a small safety team charged with the pumps and Makaroff hardware to cope with the damage. They amazingly suceeded in that attempt, the ship being able to steam by night at 2 knots (3.7 km/h; 2.3 mph) assisted by a pair of tugboats. At noon however, fate showed how foolish it is to try sometimes to deny it, as U-63 spotted her and launched two more torpedoes at her. The eight escorting destroyers around failed to spot the U-boat. This was the coup de grace, but the unfortunate cruiser , amazingly was again saved by her dedicated team, and by pure miracle she stayed another 8 hours afloat, enough to join Flamborough Head, Yorkshire, to sink. Just one crewmember was lost, but one sailor later due to his injuries… This fierce, agressive boldness in action at Jutland and amazing survivability (four torpedo hits) ensured the Falmouth reached the golden book of the Royal Navy.
Chatham class Cruisers (1911-1912)
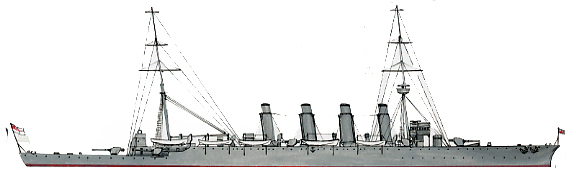
General appearance of the Chatham class cruisers (author’s illustration)
These six protected cruisers had been ordered to be split between the Royal Navy and tthe Australian Navy, one programmed to be even built in an Australia yard. Ordered under the 1910–1911 Programme the five British Yards ones were completed in 1912 and 1913, but HMAS Brisbane laid down in 1913 was only completed in 1916. Of course the Chathams were improved in many ways: Amour scheme was improved, and completed their usual deep armoured deck inside the ship over machinery and magazines, by an additional vertical belt, 2-inch (51 mm) of nickel-steel on top of 1-inch (25 mm) of high-tensile steel, covering from 8.25–10.5 feet (2.51–3.20 m) above the waterline and 2.5 feet (0.76 m) below. The way they were built also participated in the load bearing structure of the ship, which could be decreased in other ways. Also the thin armoured deck of the previous classes was held as watertight deck, 3⁄8 inch (9.5 mm) thick down to 1 1⁄2 inches (38 mm) over the steering gear. The extension of the forecastle also allowed two more guns to be raised on it (and above the water), therefore more accurate firepower in rough seas.
They were also slightly longer at 458 feet (139.6 m) larger at 49 feet (14.9 m) and with a greater draught of 16 feet (4.9 m) while displacement rose to 5,400 long tons (5,500 t) normal and 6,000 long tons (6,100 t) fully loaded. Their metacentric height was reduced, so they were seaworthy and were considered good gun platforms. However Officer’s accommodation were back to the rear of the ships in this class, perhaps because of insisting officers. As usual in this serie, ony one ship, the HMS Southampton, tried a two-shaft layout (rather than four-shaft) rated at 25,000 horsepower (19,000 kW) for 25.5 knots (47.2 km/h; 29.3 mph). Like the prevous class, the armament was uniform, eight 6 in guns in single mountings but upgraded to the BL 6 inch Mk XII model, shorter and lighter but also with a small loss of range of 600 yards (14,000 yards (13,000 m) but they were accurate and easier to handle fast, especially in rough weather, slighlt faster to load. In addition larger magazines allowed a total of 200 rounds (150 in earlier ships). As the former cruisers, wartime addition was a single 3-inch AA gun in 1915 and later a tripod mast to support a new director control. Also dollowing the success of the HMS Yarmouth Four of the class, Dublin, Southampton, Melbourne and Sydney were given the same type of platforms to operate aircrafts for reconnaissance and interception (especially enemy blimps and airships). They had also quite an active career.
Chatham class Specifications |
|
| Dimensions | 457 ft x49 ft x16 ft (139.3 x14.9 x4.9 m) |
| Displacement | 5,400 long tons (5,487 t) |
| Crew | 475 wartime |
| Propulsion | 4 shafts, 3 Parsons steam turbines, 12 Yarrow boilers= 25,000 shp (19,000 kW) |
| Speed | 25.5 kn (47.2 km/h; 29.3 mph) |
| Range | 4,460 nautical miles (8,260 km; 5,130 mi) at 10 knots (19 km/h; 12 mph) |
| Armament | 8x BL 6 in (152 mm) Mk XI, 4x QF 3-pounder 47 mm (1.9 in), 2× 21 in (533 mm) TTs |
| Armor | Deck: Belt: 2 in (51 mm), deck: .375–1.5 in (9.5–38.1 mm), Conning Tower: 4 in (102 mm) |
HMS Chatham
Built at HM Dockyard, Chatham and completed in december 1912, she was first assigned to the Atlantic 2nd Battle Squadron, then the 2nd Light Cruiser Squadron in the Mediterranean in July 1913. She was there when the war broke out, she searched for the German battlecruiser Goeben and cruiser Breslau, off Messina on 3 August and later resumed operations in the Red Sea in August 1914. By September she was sent to search for SMS Königsberg off East Africa together with the Weymouth and Dartmouth under Sidney R. Drury-Lowe command. Unfortunaely she ran aground at Zanzibar was lightly damaged, but sent for repairs at Mombasa until 15 October and missed the hunt. She later intercepted the German steamer Präsident upriver from the coastal town of Lindi in German East Africa and after inspection found it was supplying Königsberg and disabled the ship. She also spotted and try to sink the Somali upstream on the Rufiji River, but was unable to clse up. By November Chatham hit her and eventually the fire destroyer the Somali, and in 10 November she scuttled the collier Newbridge to trap the Königsberg and left for the Mediterranean in 1915.
She covered the Allied landings at Gallipoli, shelled Achi Baba Nullah on Cape Helles, covered the action at Suvla Bay as flagship of Rear-Admiral John de Robeck, and afterwards of Admiral Weymss during the evacuation from. by 1916 she joined the 3rd Light Cruiser Squadron of the Grand Fleet but struck a mine off the Norfolk coast in May and was towed to Chatham for repairs only to be placed in reserve when emerging in 1918. She joined postwar New Zealand Division until 1924, sold for scrap on July 1926.
HMS Dublin
Built at William Beardmore, Dalmuir, a Scottish engineering and shipbuilding conglomerate based in Glasgow, and completed in March 1913, the HMS Dublin was first assigned to the 1st Battle Squadron and later the 1st Light Cruiser Squadron operating in the Mediterranean by the sumer of 1913. Reassigned to the 2nd Light Cruiser Squadron until the war nearly broke out, she was found tracking the Goeben off Messina on 4 August 1914 and after coaling two days after at Malta, she joined Rear-Admiral Ernest Troubridge’s squadron she joined the Goeben in the prospect of a torpedo night attack, but the battlecruiser changed course due north and the idea of a daylight attack was too risky and she was left. Dublin however was soon seen assisting HMS Implacable’s landing assault on Gallipoli, in April 1915 and sailed in May 1915 to Brindisi. later one despite an escort of French and Italian destroyers, she was hit by Austro-Hungarian Navy submarine U-4 in June but returned at slow speed to Brindisi and after several month had to return to the UK for extensive repairs. She served there with the 2nd Light Cruiser Squadron with Southampton, Birmingham and Nottingham and the Grand Fleet and participated in the Battle of Jutland on 31 May 1916, firing 117 6-inch shellsduring the night action. She also attacked and sank a destroyer but sustained severe damage with three Kia and 27 wounded (five 5.9 in hits from SMS Elbing, eight 4.1 in hits from Stuttgart) and repairs delayed her until 17 June. The rest of the year and until mid-1917 there was nothing really notable, but on 3 May 1917 where she was operating with HMAS Sydney and four destroyers from Rosyth she spotted Zeppelin L 43 and opened fire at extreme range on uyet unsighted target but spotted first the track of a torpedo and then spotted a submarine was sighted, and another one shile other torpedoes were fired, and later a third u-boat, engaging her with guns and depth-charges while the Zeppelin covered them by trying to bomb the the stern of Dublin, an attempt which the Dublin foiled by fast-turning to starboard. After a postwar carrer with the 6th squadron, Africa Station until 1924, Dublin served with the 3rd squadron in the Mediterranean and then joined the Nore reserve, was paid off, and broken up nest year.
HMS Southampton

HMS Southampton was was built in John Brown & Co, Clydebank shipyard, launched on 16 May 1912 and completed in November the same year. After comission she was assigned to the 1st Battle Squadron as flagship in July 1913. However she was found actively participating in the Battle of Heligoland Bight, and the Battle of Dogger Bank early 1915. Of course in May 1916 she also took part in the Battle of Jutland flying colors as flagship of 2nd Light Cruiser Squadron; She torpedoed and sank the German light cruiser SMS Frauenlob. In 1917, she joined the 8th Light Cruiser Squadron. She was sold for scrap in July 1926 at Pembroke Dock.
HMS Sydney: Executioner of SMS Emden
Sydney near Rabaul in 1914
The Australian cruiser had a long and eventful career: She was built at London & Glasgow, Govan, completed in June 1913. She sailed to Albany, Western Australia and arrived on 19 September 1913. She was to operate off the eastern Australian coast until March 1914, then joined other Australian submarines AE1 and AE2 in Singapore. They jointly sailed back to Sydney in May, and the cruisers was patrolling the coast when the war broke out. She then joined Admiral George Patey flying his colors on the battlecruiser HMAS Australia. They had to protect the Australian Naval and Military Expeditionary Force, sent to capture German colonies in the area, Rabaul, Anguar Island. In the fall of the year, Sydney and Melbourne escorted the first convoy bound to Egypt. Another convoy was later bound tor Colombo. And the defining moment in the cruiser’s carrer arrive: Her duel with SS Emden, off the Cocos Islands. Hell in paradise.
On the morning of 9 November indeed the communications station at Direction Island (Cocos or Keeling Islands) was captured by a small party from German light cruiser SMS Emden, after a long rampage against allied shipping and diversion to allow Von Spee’s quadron to proceed in other waters (See emden’s odyssey). But the station had the time to sent a warning, intercepted by a nearby troop convoy ecorted by HMAS Sydney, which was ordered to sail towards the islands. However the call has been also intercepted by Emden’s operators so the crew pepared to the cruiser’s venue, sailing out at sea for the grand finale, and opening fire first at 6 nautical miles (11 km; 6.9 mi). The Australian ship soon replicated with two salvoes, and then spent 670 rounds of ammunition, claming around 100 hits, destroying the cruiser’s funnels, foremast, wireless and steering gear. Soon the German cruiser’s engine room were set alight, and she was reduced to a complete stop, what left of power being used to beach her on North Keeling Island. HMAS Sydney then turned her attention to the collier Buresk, which scuttled herself, so the Australian cruiser returned to the Emden left stranded, but still flying her war pavillon. The latter was bring dow ater a clear radio warning followed by two salvos to surrender. The entente cruiser was also hit back during the nearly one-sided engagement,
sixteen times with three KiA and thirteen wounded whereas 134 German were KiA or badly wounded, the rest being captured apart from the shore party that captured the schooner Ayesha, escaped and started an amzing trip home. German prisoners were later delivered at Valletta, Malta, and the Ausralian cruiser sailed to North America and West Indies Station.
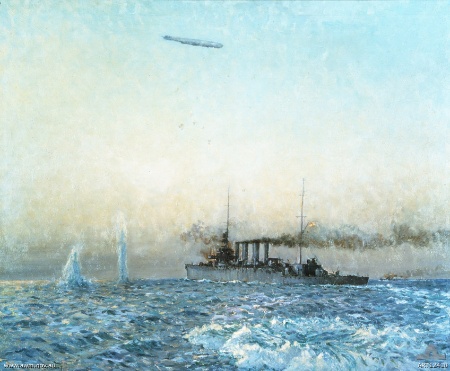
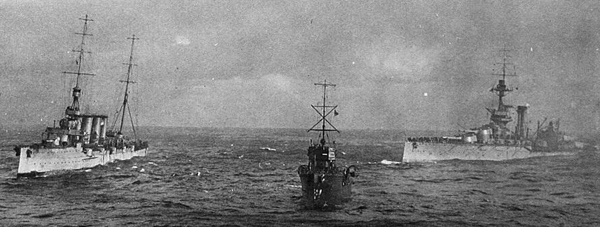
Sydney’s duel against Zeppelin L43 in 1918
Next, in 1915-1916, Sydney patrolled along the American west coast and in the fall of the year was in refit back home as Greenock. She later joined the 5th Battle Squadron at Scapa Flow and later 2nd Light Cruiser Squadron at Greenock and patrolling with the Dublin and four destroyers Nepean, Pelican, Pylades and Obdurate she took part in an unusual duel with Zeppelin L43, which also targeted the Austrlian cruiser but missed her, until eventually the airship was driven off by anti-aircraft fire. In the summer of 1917, Sydney returned in drydock at Chatham, was fitted a new tripod mast, fire direction system, and the very first revolving aircraft launch platform, later lauching a Sopwith Pup several times with success until the fall of 1917, later a Sopwith Camel tested up to the summer of 1918, which operated for the account of the 2nd Light Cruiser Squadron heading to Heligoland Bight, chasing the two German aircraft, shooting down one and later ditching at sea near a destroyer. The Sydney was present for the German High Seas Fleet reddition on 21 November 1918. She sailed from UK in April 1919, receiving the battle honour “Emden 1914”, and later in 2010 retroactively “Rabaul 1914” and “North Sea 1917–18”. She was paid off at Sydney on 8 May 1928. Her tripod can be seen today at Bradleys Head near the eponym city.
HMS Melbourne
HMAS melbourne camouflaged in 1918, apparently the only Australian cruiser to receive a dazzle livery.
The cruiser upon completion sailed to Fremantle, arrived on 10 March 1913 and in the summer of 1914, she was touring the country, but soon she started war operatio, in the Pacific at the heels of the German East Asia Squadron. She took part in the capture of German colonies and later in November escorted a convoy to Egypt. She sailed to Gibraltar, and then headed for the Azores in search of the German cruiser SMS Karlsruhe. While there on 12 December she was ordered to Bermuda (West Indies Station) for western Atlantic patrols, from Canada to Brazil. She joined the 2nd Light Cruiser Squadron (British Grand Fleet, Scapa Flow) in the summer of 1916, and for one year served there apart an interruption in drydock for her porpulsion system major overhaul. She walso was fitted with an aeroplane platform in November 1917, operated in 1918 off the Heligoland Bight. She also was present at the surrender of the German High Seas Fleet, and after stayling in Portsmouth until 7 March 1919, she sailed home via Suez, Singapore, and Darwin, paid off on 5 August 1919 but recommissioned in 1920, when she was recommissioned twice until 1928 in UK.
HMS Brisbane
Colored photo of the Brisbane (Imperial War Museum)
Building a large cruiser with no previous experience was a challenge for the HMA Dockyard, Cockatoo Island. This is why perhaps the HMAS Brisbane was only laid down in 25 January 1913, launched 30 September 1915 and completed in October 1916. So her wartime career was rather short. In December 1916 she departed for the Mediterranean, joined Malta in February 1917, to received complement fittings not available in Australia at the time. She served from Colombo, patrolling the Indian Ocean and trying to spot the German raiders Wolf and Seeadler. In Feruary she was equipped with a Sopwith Baby seaplane for reconnaissance until June. She served from October 1917 in the western Pacific, visiting the Solomon Islands, Nauru, the Gilbert Islands, and Fiji. From January until October 1918 she was in Australian, but departed oce more for the eastern Mediterranean, but the war ended when she was in between. She was based in Murdos and later visited the Dardanelles. She was later refitted from December 1918 at Portsmouth, with a tripod mast and other modifications. After April 1919, she went back home and went subsequently off and in commission, served with China Squadron, visited Japan, was refitted visited Hawaii and sailed to UK a last time in April 1935, oddly the last coal-fuelled cruiser in the British Empire navy.
Birmingham class Cruisers (1913)
General appearance of the Birmingham class cruisers
These cruisers were part of the 1911–1912 Programme and were all commissioned in 1914. Three ships completed by a fourth for Australia, HMAS Adelaide, later built in Sydney slowed sown because it was reliant on materials and parts from the UK, heavily delayed, to such a point Adelaide was completed in 1922. The Brimingham were closely based on the Chatham class with a revised armament by mounting two guns side-by side on the forecastle (which by the way had increased flare to reduce spray), for nine BL 6 inch Mk XII guns total. The light artirllery was left unchanged. They were capable of 25.5 knots. in 1915, a 3-inch AA gun was added and two received a new director control. Being in service so late, Adelaide enjoyed these additions upon completion, but was completely overhauled and refitted in 1933 loosing some coal-fired boilers and a funnel, one 6-inch and more 4-inch AA guns added. She participated actively in WW2, with less 6-in and 4-in guns and depth charge throwers placed instead, while a radar was fitted.
Birmingham class Specifications |
|
| Dimensions | 457 ft x49 ft x16 ft (139.3 x14.9 x4.9 m) |
| Displacement | 5,400 long tons (5,487 t) |
| Crew | 475 wartime |
| Propulsion | 4 shafts, 3 Parsons steam turbines, 12 Yarrow boilers= 25,000 shp (19,000 kW) |
| Speed | 25.5 kn (47.2 km/h; 29.3 mph) |
| Range | 4,460 nautical miles (8,260 km; 5,130 mi) at 10 knots (19 km/h; 12 mph) |
| Armament | 8x BL 6 in (152 mm) Mk XI, 4x QF 3-pounder 47 mm (1.9 in), 2× 21 in (533 mm) TTs |
| Armor | Deck: Belt: 2 in (51 mm), deck: .375–1.5 in (9.5–38.1 mm), Conning Tower: 4 in (102 mm) |
HMS Birmingham
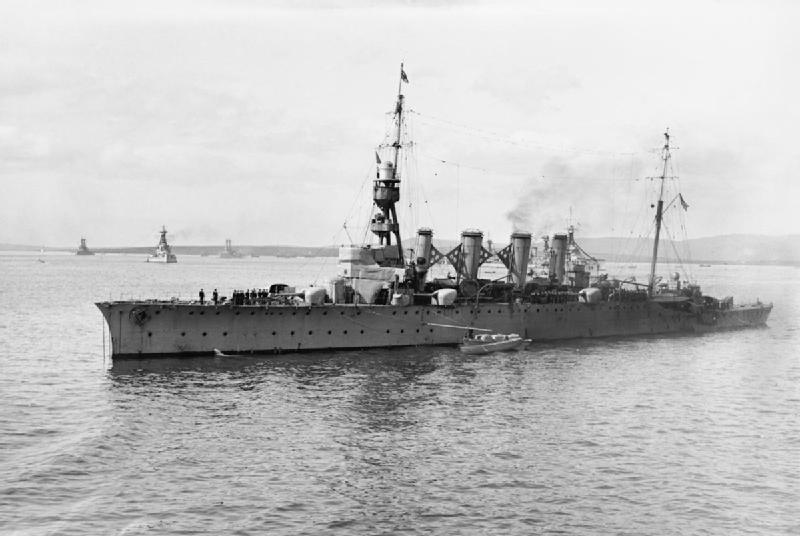
HMS Birmingham in 1916
Completed on 30 January 1914, the cruiser joined the 1st Light Cruiser Squadron (Grand Fleet), visiting Kiel in June. Three month later she was patrolling, and spotted on 9 August the U-15 stranded on the surface in heavy fog after engine failure, off Fair Isle. The British cruiser fired a stopping shot but missed but while the U-boat attempted to dive, she rammed her and cutting her in two. UIt was the first U-boat lost in ww1. Birmingham was also later credited to sink by the bottom two German merchant ships and fought in the Battle of Heligoland , and Battle of Dogger Bank in January 1915. The next month she joined the 2nd Light Cruiser Squadron. She was also thrown into the in the Battle of Jutland as part of the 2nd Light Cruiser Squadron, sustaining damage during night gunfights. When the war ended she was part of the 6th Light Cruiser Squadron until 1920, and transferred to the Nore until 1922. The navy once studied her reconversion as a minelayer, and she was recomissioned to serve in the Africa Station, 6th Light Cruiser Squadron and other stations from 1923 to 1931 and later sold for BU.
HMS Lowestoft
Lowestoft off Kaloni, Lesbos (Aegean islands)
From Chatham NyD, launched on 28 April 1914 and completed in April 1914, HMS Lowestoft joined 1st Light Cruiser Squadron, Grand Fleet. When the war broke out, she sank a German merchant ship and at the end of the month she was involved in the Battle of Heligoland Bight. By January 1915 she also took part in the Battle of Dogger Bank. In February 1915, she joined the 2nd Light Cruiser Squadron, and in 1916 the 8th Light Cruiser Squadron which operated in the Mediterranean. She served well after the war, joining various squadrons in and out of commission until sold for BU on 8 January 1931 in a demoliton yard at Milford Haven.
HMS Nottingham
HMS Nottingham in 1914.
Forever associated with the Robin Hood geste, HMS Nottingham was launched at HM Dockyard, Pembroke Dock on 18 April 1913 and completed in April 1914. First assignment was the 1st LCS, Grand Fleet. The irony was in June, she and seven other royal Navy ships paid hommage to the Kaiser in a massive naval international review at Kiel. Soon into the war, the British cruiser was launched against German patrols in the Heligoland Bight with destroyers and cruisers of the Harwich Force, plus a backup flotilla of submarines. During the battle of Heligoland, she helped sinking the light cruiser SMS Mainz, and was not hit herself once. Later, she was escorted David Beatty’s squadron hot on the heels of the German squadron that just raided Scarborough, Hartlepool and Whitby. However the flotilla turned back before she was able to score any hit. Later during the the Battle of Dogger Bank, helped to sink the armoured cruiser SMS Blücher, and escorted back HMS Lion. She was transferred to the 2nd Light Cruiser Squadron in March, but was still attached to Beatty’s battlecruiser squadron. In June, she was provisionally sent to the 3rd Cruiser Squadron for patrols in the North sea, and escaped an ambush by German U-boats. She was back with the 2nd LCS and active at the Battle of Jutland. Covering the Battlecruisers, she repelled an attack by German torpedo boats, and after the turn and south run, she was engaged at long range and bad weather by eleven German battleships. She engaged the crippled SMS Wiesbaden, but had to escape again German battleship and placed herself at the trail of the Grand Fleet. She later engaged at nightfall three German torpedo boats, and by night met the light cruisers of German 4th Scouting Group, esxhanged fired but was not hit a single time. During the battle she has spent 136 six-inch shells and one torpedo.
Her other notable war feat was the Action of 19 August 1916. It was deciphered by Rooom 40 that the Hochseeflotte was to bombard Sunderland, sending a screen of vanguard Zeppelins and submarines. The plan indeed consisted in dragging the Grand Fleet into an array submarine ambushes, thus correct the balance before going into aother decisive naval battle later. This ambush trapped the Nottingham, which spotted the U-52 in the mist about 06:00 the following morning, but thought it was a fishing boat. She was torpedoed twice, knocking out all power, and a third time, 25 minutes later, sinking slowly enough to allow her crew to evacuate, being rescued by two despatched destroyers from Beatty’s squadron. The ship lost 36 crew members.
HMS Adelaide, the “HMAS Longdelayed”
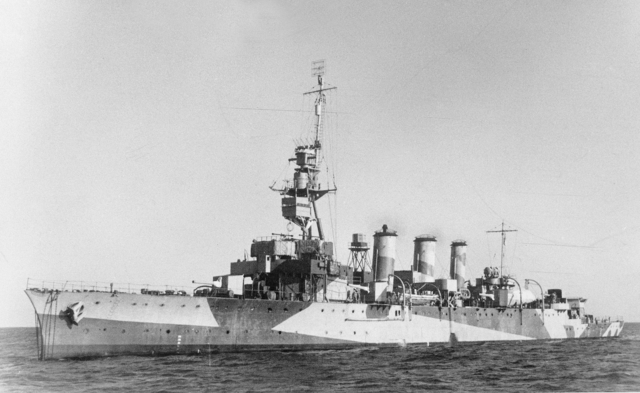
HMAS Adelaide in 1943, in her last armament configuration.
HMAS Adelaide was the sold “Town” class cruiser which never saw WW1. She was laid down by HMA Naval Dockyard at Cockatoo Island, Sydney on 20 November 1915, launched on 27 July 1918 but not completed until 31 July 1922. The main reason was that the war almost cut parts shipping, wartime shortages, many machinery part forgings that could not be made in Australia, lost in transport (sunk by enemy action), and in addition, wartime modifications on the light of experience. In the end the press inronically called her “HMAS Longdelayed”. She was eventually completed in 5 August 1922 at a cost of 1,271,782 pounds, well above most ships of the class. Because of this, she was also the second cruiser of the class to see service in WW2. Her armament was the product of wartime experience and she had nine BL 6 inch Mk XII naval guns, a QF 3-inch AA gun, an Ordnance QF 12-pounder 8 cwt field gun, four QF 3-pounder Hotchkiss saluting guns, ten .303-inch machine guns and two broadside 21-inch torpedo tubes, plus two depth charge chutes.
From 1922 to 1939 the ship served with the RAN, she had been on trials off Jervis Bay, and performed exercises with the Australia Station until April 1924, she joined Royal Navy’s Special Service Squadron and visited New Zealand, Fiji, Hawaii, Canada and USA, and crossed the Panama Canal to join the Caribbean, visited eastern Canada and headed to Portsmouth. In January 1925, she cruised back to home through Mediterranean and halted at Ceylon, and Singapore. In 1927, HMAS Adelaide was called sailed to the Solomon Islands after the murder of a district officer and police by Kwaio natives on the island of Malaita and landed an officer and sixteen sailors to help the authorities. She then escorted a landing party in October and provided support in what the press called “the Malaita massacre” heading back to Australia in November. With budget constraints, she was placed into reserve in June 1928 but recommissioned after her 1938-39 modernisation, with a conversion from coal/oil fuel firing to oil, two boilers and a funnel being removed. She had One 6-inch gun, field gun, AA gun, and both torpedo tubes removed and in place three 4-in AA guns, a new Fire-control equipment were fitted. She was however paid off later, pending her replacement by the new HMAS Perth, her crew preparing to the trip in the UK. But with the war looming in Europe, this never happened and the crew was back to the ship, in service again by the 1st of September.
Wartime carrer:
HMAS Adelaide served in the home waters, doing convoy escort missions and in September 1940, she carried the French official Henri Sautot to Nouméa (New Caledonia) as a governor by Free French leader Charles de Gaulle, denying Vichy France its control. The island will prove vital during the pacific campaign later. While back from it, she collided later with the merchant ship SS Coptic without gravity and later patrolled off the coast, to prevent any action by nearby Vichy sloop Dumont d’Urville. She later operated around Australia and New Guinea waters. Later she was anchored at Garden Island in May-June 1942, for a refit, her anti-aircraft artillery being reinforced by six American 20 mm Oerlikon guns and during her second refit of June-September 1943 another 6-inch gun removed, only two 4-in guns left but four hydraulic depth charge throwers in place. She was in Sydney Harbour during a Japanese midget submarine attack and afterwards header for Fremantle, making convoy escorts in the Indian Ocean and in n November 1942 joined the HNLMS Jacob van Heemskerk and two Australian corvettes as escorts when spotting a ship, approached and hailed, which claimed to be the Norwegian merchantman Taiyang but was discovered to be the German blockade runner Ramses. before a boading party could reach her, she was scuttled and Adelaide opened fire, sinking her and recovered the crew. She was refitted at Williamstown Naval Dockyard in June-September 1943, and was back in Sydney by October 1944. Operations from Fremantle went on until the fall of 1944, and she was briefly decommissionned on 26 February 1945 and later used as naval base tender as HMAS Penguin. Decommissionned on 13 May 1946 she was sold for BU in 1949.
Birkenhead class Cruisers (1914)
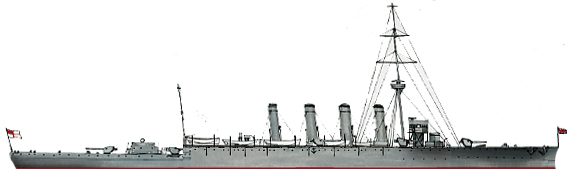
General appearance of the Birkenhead class cruisers (Author’s illustration)
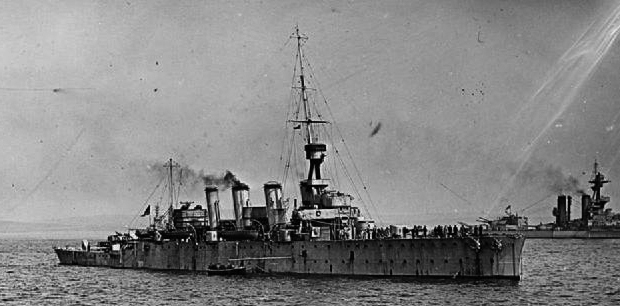
HMS Birkenhead in 1916
The Greek Navy soon after the war and following the Turkish naval expansion after the Balkan war placed an order to the Coventry Syndicate (Cammell Laird, Fairfields, John Brown and Coventry Ordnance Works) for two light cruisers and four destroyers. The light cruisers were laid down at Cammell Laird, named Antinavarchos Kountouriotis and Lambros Katsonis. They were based on the Chatham/Birmingham class design with a specific armament by the Coventry Ordnance Works. Indeed they had ten QF 5.5 in/50 (140 mm) Mark I guns firing a relatively light, easy to handle 82-pound (37 kg) shell up to 13,100 yards (12,000 m) better for quick firing, and it was planned to fit two 12-pounder 76 mm (3.0 in) AA guns, and the usual two broadside underwater 21-inch torpedo tubes. But the war broke out as the ships’s construction was ongoing and early in 1915 the British Admiralty decided to took over the contract, renamed the Birkenhead class. They proved to be successful ships, fitted with 5.5 in guns of the type fitted later to the the battlecruisers HMS Hood, Furious and HMS Hermes, and Vickers 3-pdr guns. When the war ended, both ships were proposed back to the Greeks, but the latter declined, and after a short carrer both were sold for BU in 1921 as surplus.
Birkenhead class Specifications |
|
| Dimensions | 446 ft x50 ft x16 ft (135.9 x15.2 x4.9 m) |
| Displacement | 5,185 long tons (5,235 t), 5800 ton fully loaded |
| Crew | 475 wartime |
| Propulsion | 4 shafts, 3 Parsons steam turbines, 12 Yarrow boilers= 25,000 shp (19,000 kW) |
| Speed | 25.5 knots (Birkenhead) 31,000 hp (oil fired boilers), 26.5 knots Chetster |
| Range | 4,460 nautical miles (8,260 km; 5,130 mi) at 10 knots (19 km/h; 12 mph) |
| Armament | 10x BL 5.5 in/50 (145 mm) Mk XI, 2x QF 3-pounder (47 mm) (1.9 in) AA, 2× 21 in (533 mm) TTs |
| Armor | As Chatham class |
Active Carrer
Completed in July 1915 and like her sister, the new cruiser was versed to the 3rd Light Cruiser Squadron, Grand Fleet. In 6 September she assisted a distressed accomodation ship HMS Carribean in heavy weather off Cape Wrath, off Scapa Flow. Heading there with several tugs and yachts, she rescued all but 15 of Caribbean’s crew. Both cruisers will also took part in the Battle of Jutland. Birkenhead survived the battle, and spent the rest of the war without notable incident or event. She was sold for scrap in October 1921. The HMS Chester on her part did missed the 1914 and 195 major battles of the north sea, but participated in the battle of Jutland and fought with casualties included John ‘Jack’ Cornwell, a 16 year old cadet who was awarded the highest honour. So a very short career, spanning from the end of 1915 to 1921, six years in all. Would the Greek government had accepted to purchase them, they would most probably have seen service in WW2. But they were in surplus.
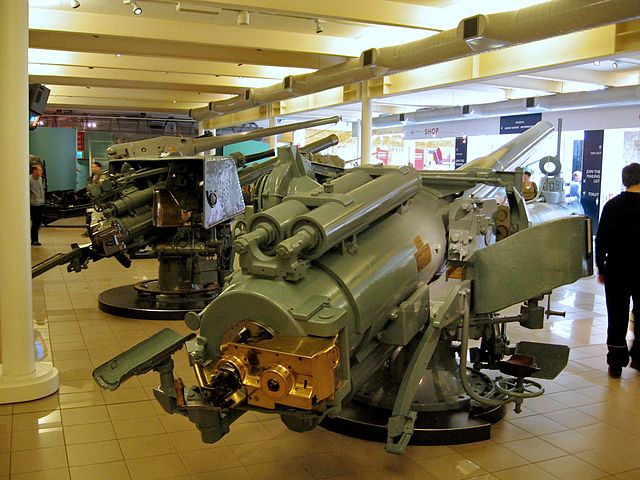
HMS Chester’ BL5.5 inch /50cal MkI Naval Gun, Imperial War Musem
Sources/Read More
https://en.wikipedia.org/wiki/Town-class_cruiser_(1910)
https://commons.wikimedia.org/wiki/Category:Town_class_cruiser_(1910)
https://forum.gallipoli-association.org/forum_posts.asp?TID=562&title=town-class-cruisers-1910
https://uae.souq.com/ae-en/articles-on-town-class-cruisers-1910-of-the-royal-navy-including-hms-bristol-1910-hms-liverpool-1909-hms-glasgow-1909-hms-southampton-19-by-hephaestus-books-paperback-15697737/i/
Conway’s all the world’s fighting ships 1906-1921
 Latest Facebook Entry -
  X(Tweeter) Naval Encyclopedia's deck archive
 Instagram (@navalencyc)


 French Navy
 Royal Navy
 Russian Navy
 Armada Espanola
 Austrian Navy
 K.u.K. Kriegsmarine
 Dansk Marine
 Nautiko Hellenon
 Koninklije Marine 1870
 Marinha do Brasil
 Osmanlı Donanması
 Marina Do Peru
 Marinha do Portugal
 Regia Marina 1870
 Nihhon Kaigun 1870
 Preußische Marine 1870
 Russkiy Flot 1870
 Svenska marinen
 Søværnet
 Union Navy
 Confederate Navy
 Armada de Argentina
 Imperial Chinese Navy
 Marinha do Portugal
 Mexico
 Kaiserliche Marine
 1898 US Navy
 Sovietskiy Flot
 Royal Canadian Navy
 Royal Australian Navy
 RNZN Fleet
 Chinese Navy 1937
 Kriegsmarine
 Chilean Navy
 Danish Navy
 Finnish Navy
 Hellenic Navy
 Polish Navy
 Romanian Navy
 Turkish Navy
 Royal Yugoslav Navy
 Royal Thai Navy
 Minor Navies
 Albania
 Austria
 Belgium
 Columbia
 Costa Rica
 Cuba
Cuba Czechoslovakia
 Dominican Republic
 Haiti
Haiti Hungary
 Honduras
 Estonia
 Iceland
 Eire
Eire Equador
 Iran
Iran Iraq
Iraq Latvia
 Liberia
 Lithuania
 Mandchukuo
 Morocco
 Nicaragua
 Persia
 San Salvador
 Sarawak
 Uruguay
 Venezuela
 Zanzibar
 Warsaw Pact Navies
 Bulgaria
 Hungary

 Bundesmarine
 Dutch Navy
 Hellenic Navy
 Marina Militare
 Yugoslav Navy
 Chinese Navy
 Indian Navy
 Indonesian Navy
 JMSDF
JMSDF North Korean Navy
 Pakistani Navy
 Philippines Navy
 ROKN
ROKN Rep. of Singapore Navy
 Taiwanese Navy
 IDF Navy
 Saudi Navy
 Royal New Zealand Navy
 Egyptian Navy
 South African Navy


 Ukrainian Navy