
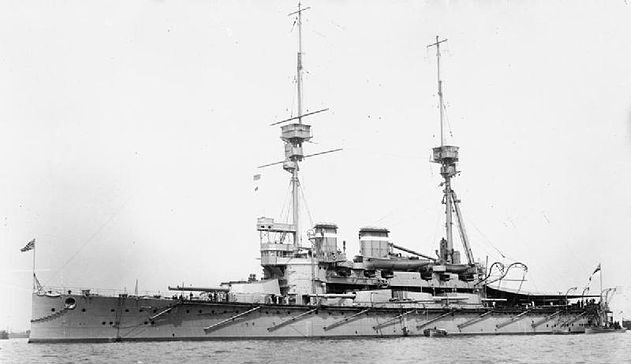
 United Kingdom (1908-1920): HMS Nelson, Agamemnon
WW1 RN Battleships
HMS Dreadnought | Bellerophon class | St. Vincent class | HMS Neptune | Colossus class | Orion class | King George V | Iron Duke class | HMS Agincourt | HMS Erin | HMS Canada | Queen Elizabeth class | Revenge class | G3 classMajestic class | Centurion class | Canopus class | Formidable class | London class | Duncan class | King Edward VII class | Swiftsure class | Lord Nelson class
Invincible class | Indefatigable class | Lion class | HMS Tiger | Courageous class | Renown class | Admiral class | N3 class
Last of their kinds and advanced semi-dreadnoughts
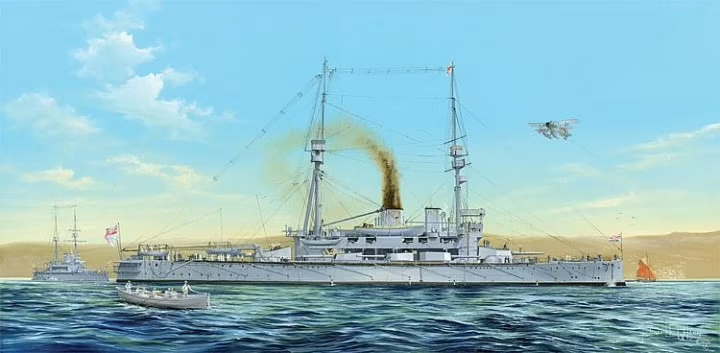
The Nelson class was infortunate as the last pre-dreadnoughts Battleships built by Great Britain. They were launched in June and September 1906, while HMS Dreadnought was completed (she was commissioned in December 1906), but started in May 1905 (October 1905), and still, were commissioned one solid year after, in June and December 1908, showing one one hand, the urge of Admiral Jackie Fisher to push his project forward, and the doubts in the admiralty with their own pre-dreadnoughts.
This “parallel project” could be seen as the admiralty’s guarantee to have two new battleships if HMS Dreadnought did not delivered all its promises. This also doomed them in a sense, making them irrelevant to take part in the Grand fleet after a few years, facing the Kaiserliches Marine, but still, they were part of the Channel Fleet when the First World War began in August 1914. They were only transferred to the Mediterranean Sea in early 1915 to participate in the Dardanelles Campaign, and stayed there (Aegean Squadron 1916, then occupation of Cantontinople in 1918). Sold in 1920 for Nelson, this made her career just spanning twelve years. Agamemnon was turned into a taret ship and managed to survive until 1927.
Design Development (1901-1905)
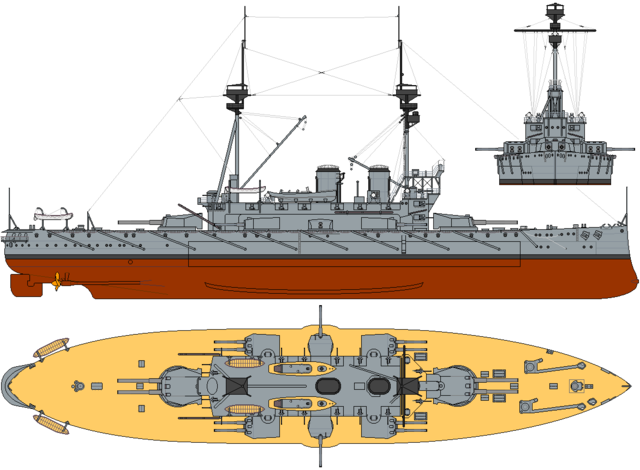
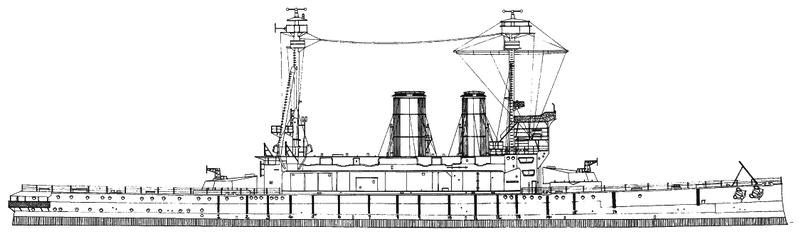
2-view color profile – CC
Following the pioneering naval gunnery developments by Captain Percy Scott in the early 1900s, reports were written, and examined with great interest by the admiralty:
-Expected battle ranges of 6,000 yards (5,500 m): This was enough to force the spotters waiting for the shells to arrive before applying corrections.
-Shell splashes from smaller weapons tended to obscure splashes from the bigger guns.
-Either smaller-calibre guns would have to hold their fire, losing their faster rpm advantage.
-Longer-range torpedoes expected in service, discouraging closing ranges (and thus secondary fire).
-In conclusion of all this, more heavy guns and uniform calibre were needed.
Philip Watts (Director of Naval Construction in early 1902) and Vice-Admiral William May (3rd Naval Lord, Controller of the Navy) conducted studies shown in addition that despite their high rate of fire the 6-inch (152 mm) had still an impact way smaller than 12-inch (305 mm). Greater damage at greater range was a force multiplier. A Battleship had a real chance to obliterate it’s opponent’s smaller guns before they could even open fire, but thicker armour was required in response.
HD Illustration
The Board of Admiralty in its 1903–1904 Naval Programme wanted no more than 14,000 long tons (14,000 t) battleships designs, like the earlier Duncan class to use its drydocks at Chatham, Portsmouth and Devonport (they were were enlarged anyway), which severely constrained the new design. Preliminary design work for the Nelson class started in mid-1902. A displacement and dimensions close to the preceding King Edward VII class was required. A conference in November to discuss the way forward was held, as there were still doubts in the admiralty about their configuration, between the studies seen above and Fisher’s own ideas. Participants agreed in the end to increase armour to a 12 inches, and displacement to 16,500 long tons and eliminate the mixed three-calibre gun configuration of the King Edward VIIs (which proved unpopular in the end). It was chosen, based on the small displacement, a mix of 12-inch and 9.2-inch (234 mm) guns; Director Philip Watts meanwhile proposed a “Cuniberti-style” all-10-inch (254 mm) guns project, which was ruled out.
The Admiralty approved the new 16,350-long-ton design, on the base she was armed with four 12-inch and twelve 9.2-inch guns, a seemingly much better arrangement than the previous KE VII, on 6 August 1903. In October however it was revoked as the new ship could not be docked at Chatham. Too late to revise the design in time according to the 1903–1904 timetable, the Admiralty instead ordered three extra King Edward VII-class vessels. Philip Watts refined the design in between to to have her entering the Chatham docks, and this implied first, dropping two of the 9.2-inch guns, down to ten. As it was, the nex design was eventually approved on 10 February 1904. A planned third was cancelled due to the repurchase of the Swiftsure-class battleships.
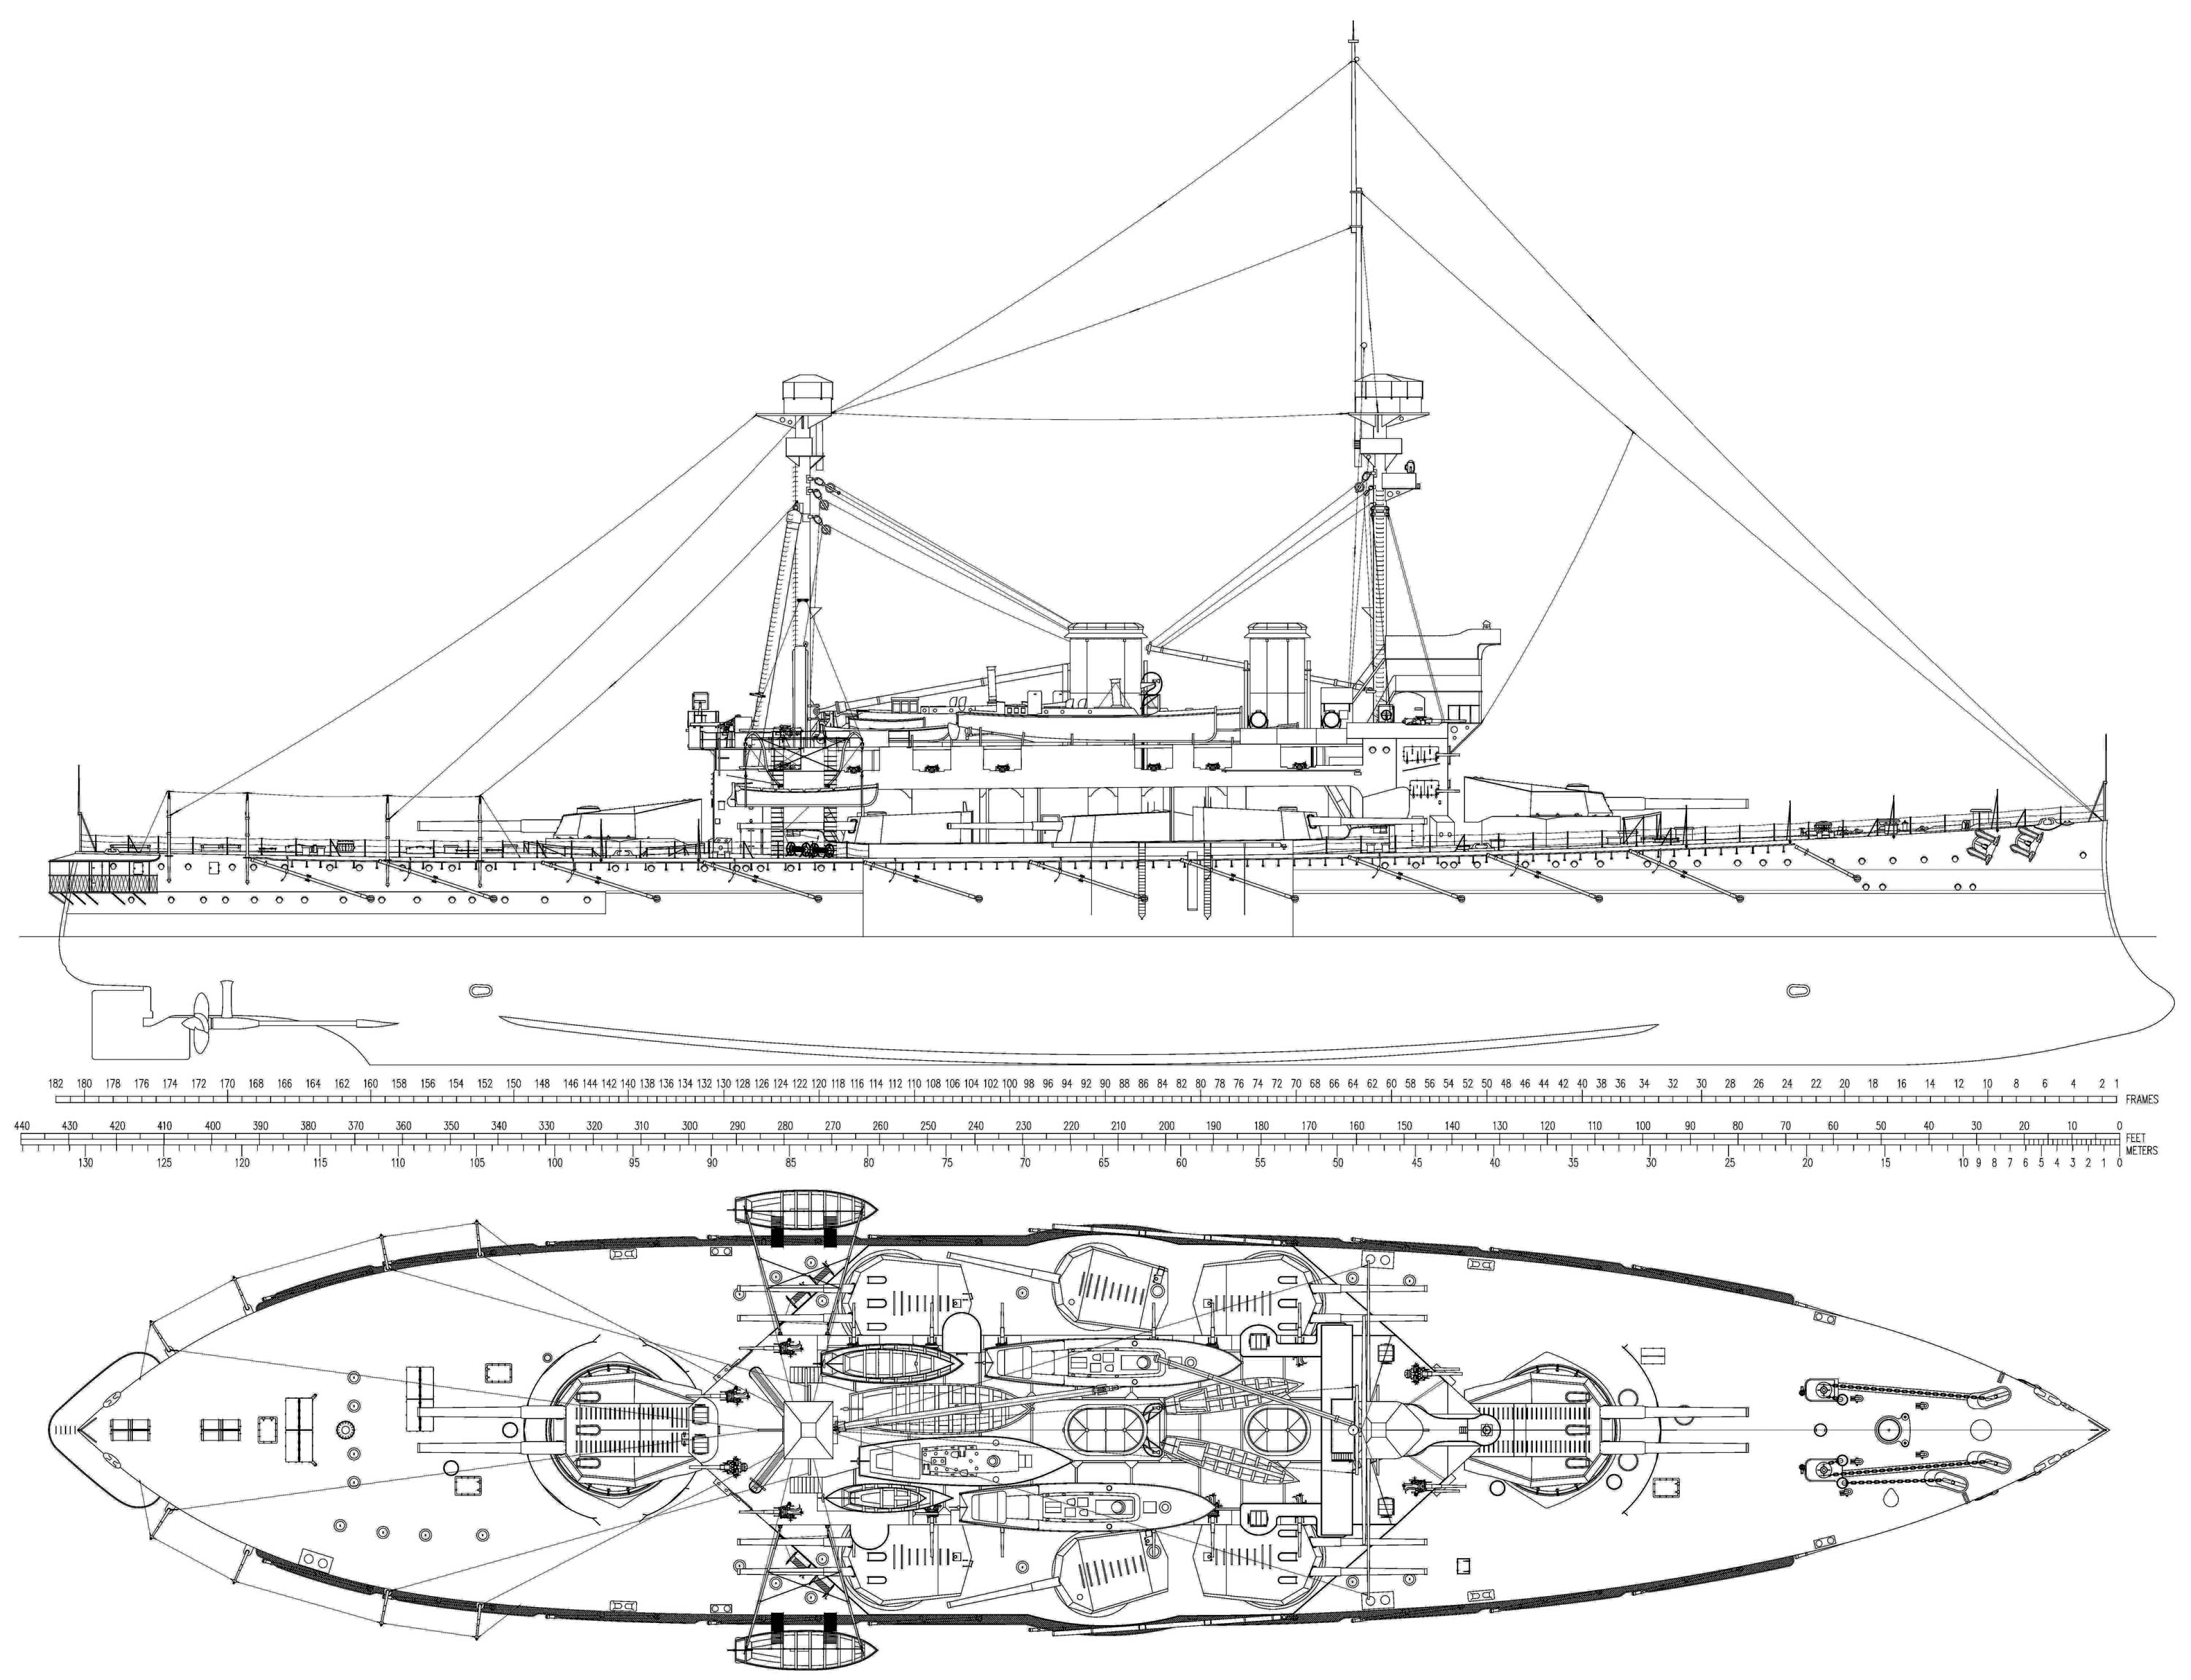
Hull construction
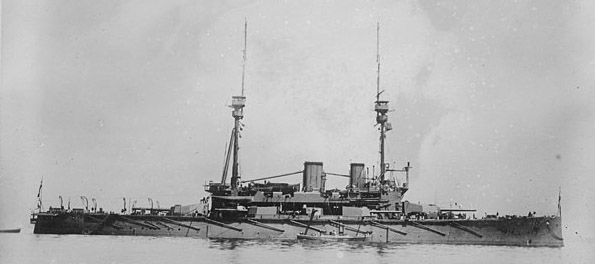
The Lord Nelson-class measured 443 feet 6 inches (135.2 m), which was shorter than the KE VII class (435 feets or 138.3 m), for a greater beam ar 79 feet 6 inches (24.2 m) versus 75 feets or 22.9m, and larger deeply loaded draught figure of 30 feet (9.1 m) versus 25 ft 8in (7.82 m). They displaced a bit less standard at 15,358 long tons (15,604 t), but were heavier when fully loaded, at 17,820 long tons (18,106 t) – versus 17,500.
The Lord Nelson had a metacentric height of 5.27 feet (1.6 m) deeply load and proved to be good seaboats and steady platforms with predictable roll, excellent agility and helm response. Of course they bled speed when steered hard over, about 60% at full speed, but this hardly was a surprise. Their crew comprised 749–756 men in peacetime, and up to 800 men in wartime. They carried six main service boats, including two picket steamboats stored on the main battery roof.
Design wise, they were less “symetrical” ship than previous classes, with a slightly higher freeboard for better seekeeping. Their two funels were close together and of different lenght, and closer to the bridge and foremast.
The lack of casemate guns in the hull was another sure way to identify them. The central superstructure was tall, with a narrow utility base level, cutout to allow the side large turrets to swing around. Above was the battery deck, with all their 3-in guns placed high enough to possess a good range. They had two masts, the aft being a tripod, and two booms to handle the service boats. Seven projectors for night fighting also including two smaller ones for morse communication.
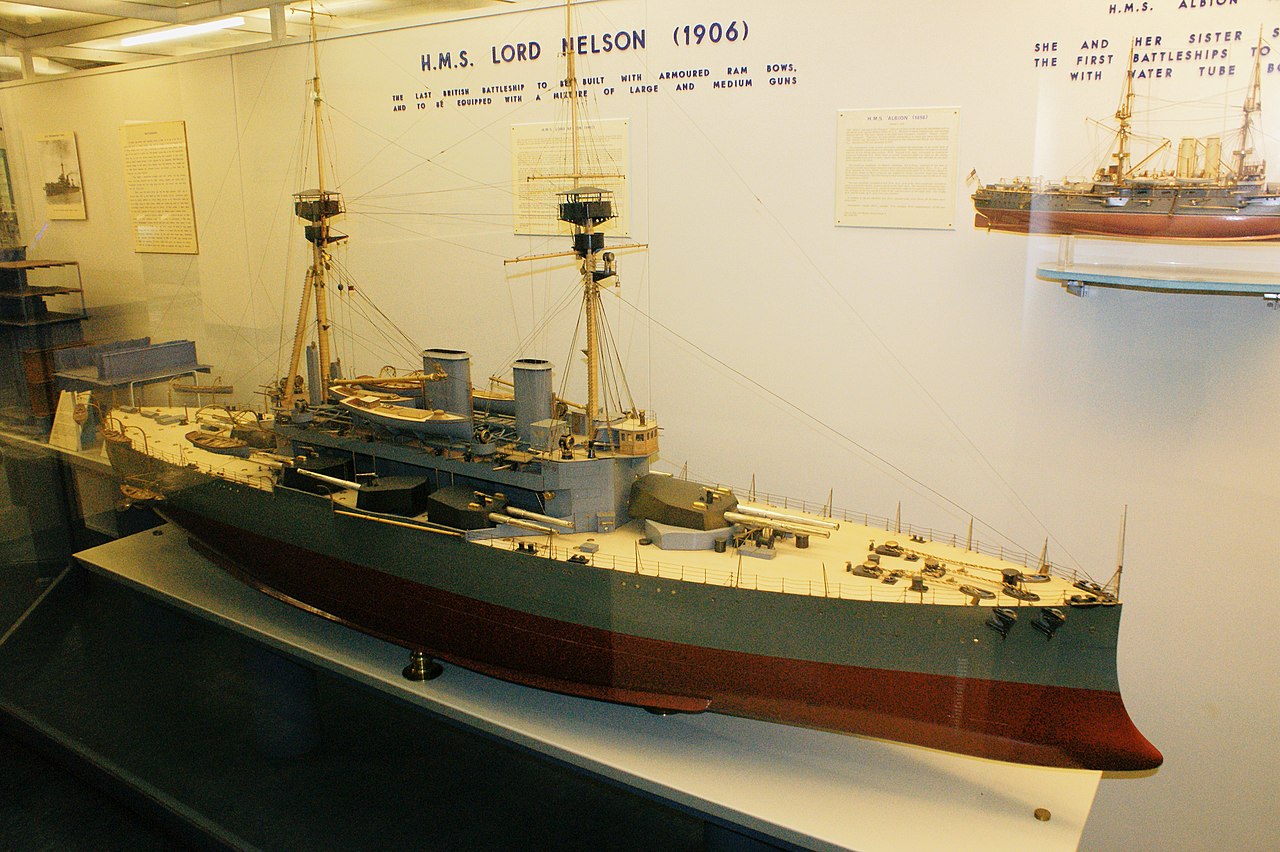
Yard Model of Nelson
They had two small ovale conning towers fore and aft. There were two command brigde, one enclosed in the bridge with four portholes and enclosed between the supports for the open bridge above. This was the “weather bridge”. The open bridge was located just above, overhanging by at least two meters. Above it was located an extra flying bridge with a signals device. Before WWI the open bridge was enclosed in a small structure. Also customary also there the classic “officer’s galley” at the poop.
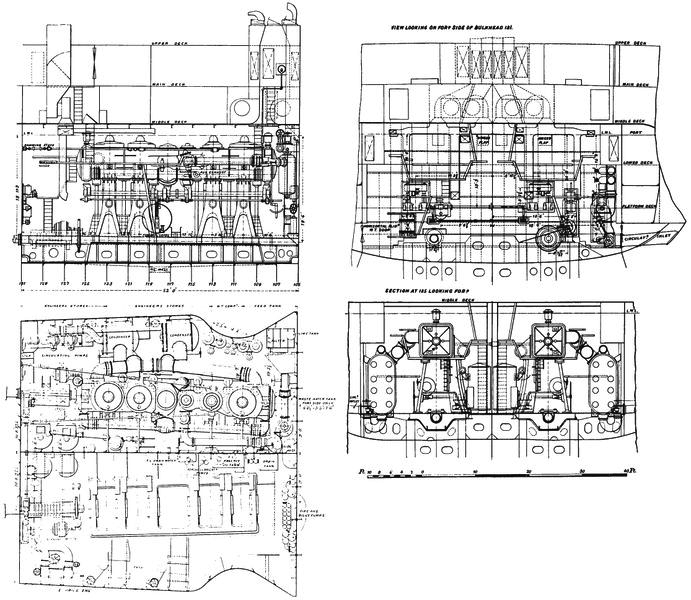
Powerplant
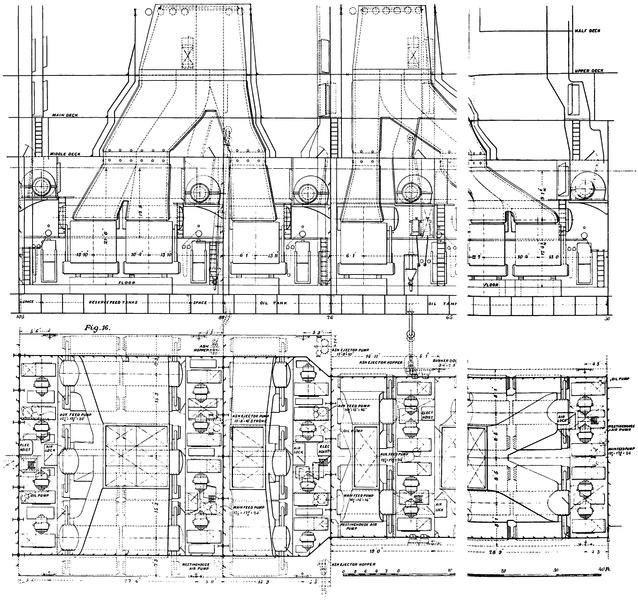
In this field, although they still had the same VTE engines, the Nelson class innovated: Their four-cylinder inverted vertical triple-expansion steam engines were nothing new. They drove four-bladed, 15-foot (4.6 m) propeller screws and steam came from fifteen water-tube boilers working at 275 psi (1,896 kPa; 19 kgf/cm2). Their exhausts were trunked into two funnels amidships.
This powerplant was rated for 16,750 indicated horsepower (12,490 kW), and a designed speed of 18 knots (33 km/h; 21 mph). On trials, they delivered more, reaching 18.5–18.7 knots (34.3–34.6 km/h; 21.3–21.5 mph). But the novertly was that they were the first fitted with built-in fuel oil sprayers in the boilers to increase burn rate, and it was done in a systematic way, with large quantities of fuel oil. So it was “mixed” in a sense.
They had onboard 2,170–2,193 long tons (2,205–2,228 t) of coal in peacetime (in wartime extra compartments were filled to the brim, doubling this figure) plus 1,048–1,090 long tons (1,065–1,107 t) of fuel oil. The latter was stored in tanks in their double bottom. With a cruising speed of 10 knot their normal range was 5,390 nautical miles (9,980 km; 6,200 mi) on coal alone, but 9,180 nmi (17,000 km; 10,560 mi) with both and more potentially in wartime.
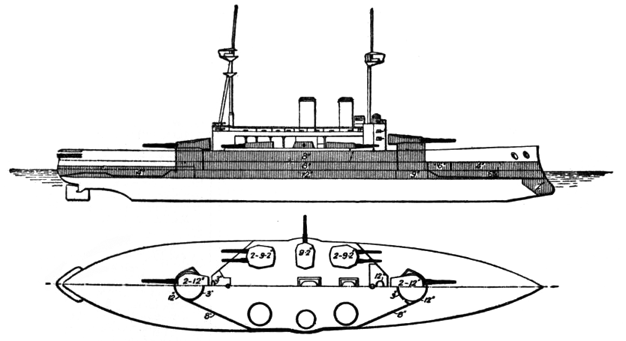
Armament
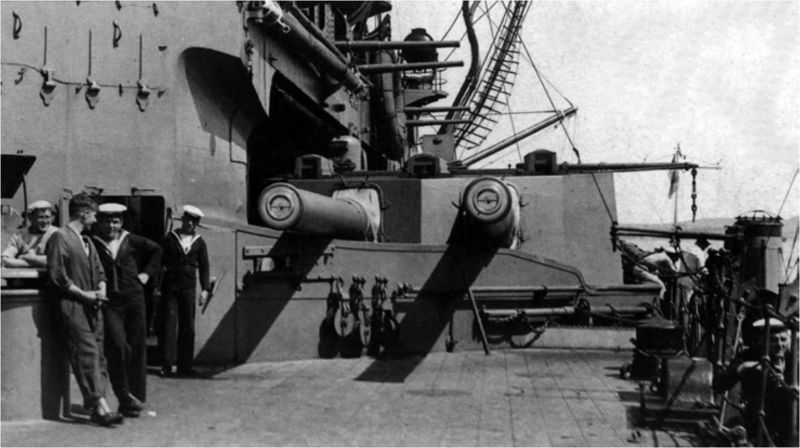
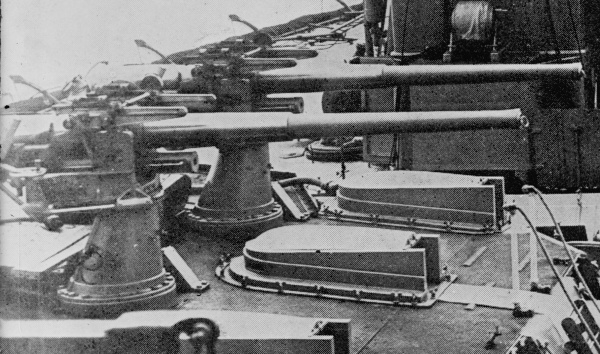
 The main artillery was the same as before, two twin main turrets with 12-in guns, but of a new model. The real game changer was their secondary armament composed or turreted 9.2 in guns. Very ambitious at the start, it was to comprise three twin turrets, but due to Chatham dockyards limitations at the time, the designer reduced this by given them central turrets with a single gun instead. Both wings turrets were still twin. The other big point was the total absence of casemate guns, as they were reported useless in conclusions of recent reports.
Thirdly, athough there was debate to adopt a single light gun caliber, 3-in, those who wanted extra defence against light vessels won and obtained two calibers. So in a sense, the Nelson class were still not even “semi-monocaliber”, certainly not as radical as HMS Dreanought. The complete alimination of casemate 6-in guns was resisted by some members in the staff that still feared torpedo and destroyer attacks, obtaining the guarantee of better performances for the new 3-in guns and still a score of lighter, faster-firing 3-pdr (47 mm or 1.9 in).

HMS Agamemnon’s 12-inch gun replacement at Malta, 1915
For accuracy, the Nelsons had two main military masts, one being a pole forward, with three tops, one fitted with a single projector (six more located on the battery roof), a signal top, and above, like for the aft mast, the main spotting top, covered and fitted with telemeters and long range optics. The aft mast was tripod to compensate for the boom’s load. A smaller boom was fitted to the foward mast as well.
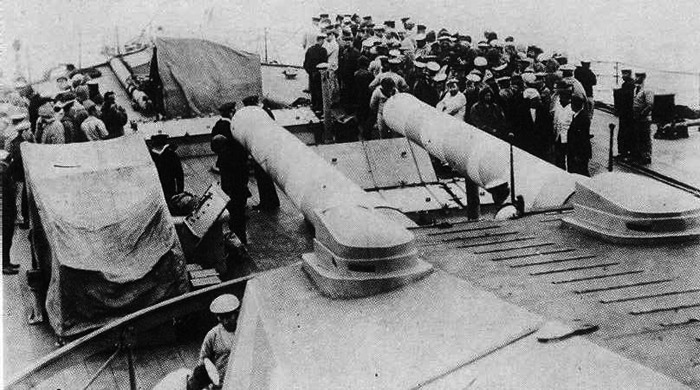
Main: 2×2 12-in Mark X
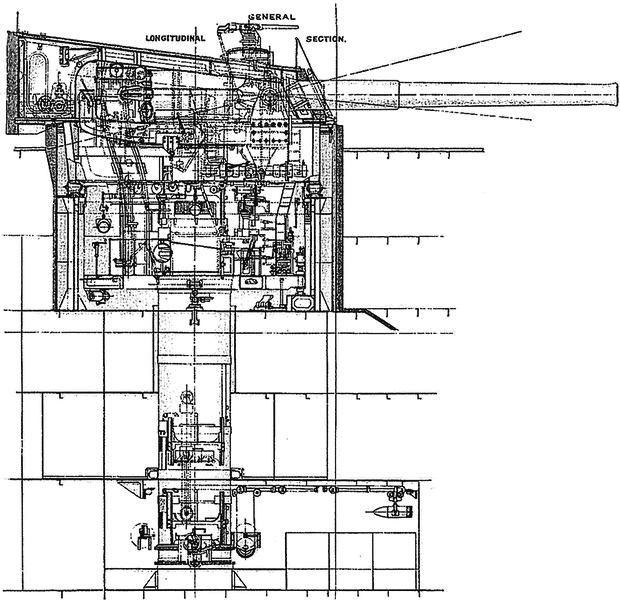
These 45-calibre breech-loading (BL) 12-inch Mark X guns had a maximum elevation of +13.5° for a 16,450 yards (15,042 m) range, fired 850-pound (386 kg) shell at 2,746 ft/s (837 m/s) and two rounds a minute (1.5 for other sources). They carried 80 shells per gun.
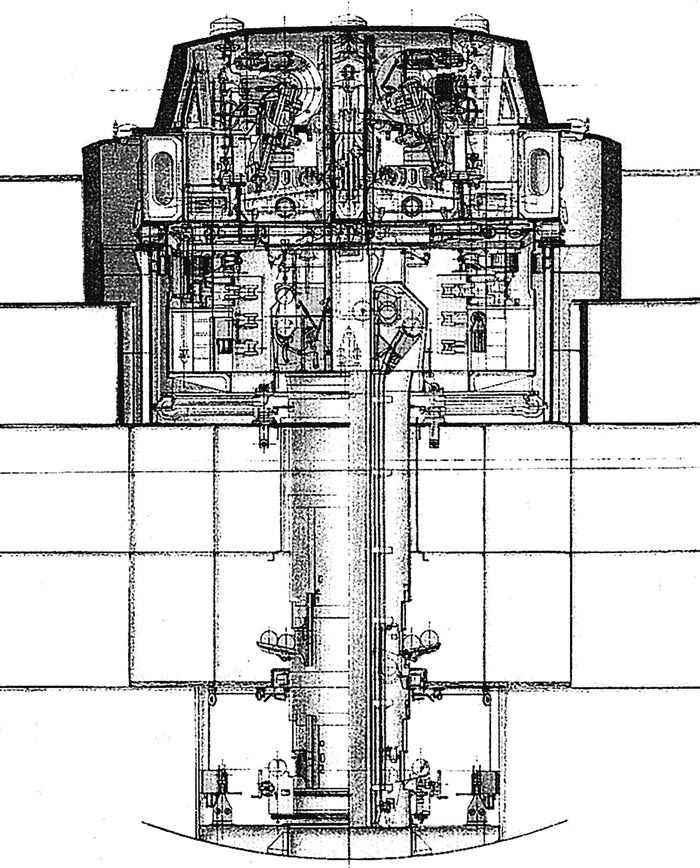
Secondary: 4×2, 2×1 9.2 in Mark XI
Secondary guns
Ten 50-calibre BL 9.2-inch Mk XI guns mounted in four twin-gun turrets at the corners of the superstructure and two single-gun turrets amidships. An elevation of +15° gave them a range of 16,200 yards (14,800 m). They fired a 380-pound (172 kg) shell at 2,875 ft/s (876 m/s) and max rpm of four a minute, twice as fast as their main arrillery, which was the point. They very similar range made their ideal range at around 15,000 yards.
Tertiary: 24x 3-in+12x 3pdr
QF-12 pdr 18 cwt Guns (hms dreadnought)
HMS_Agamemnon_12-pdr_gun_crew_aiming-Salonika_1916_IWM
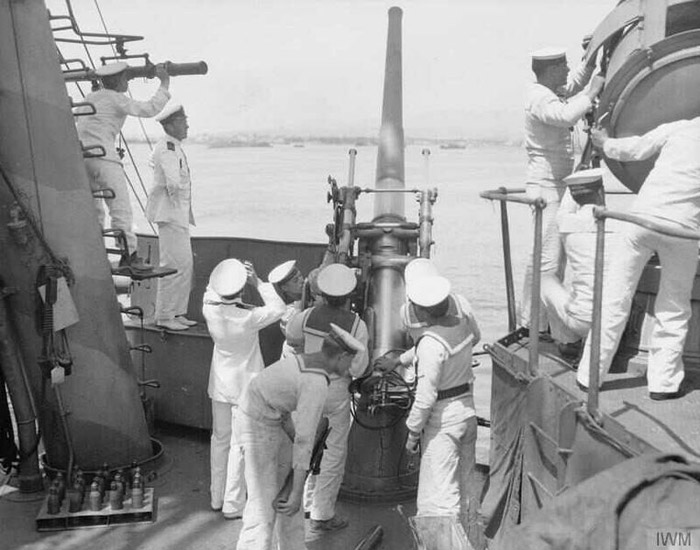
HMS_Agamemnon_12-pdr_gun_crew_Salonika_1916_IWM
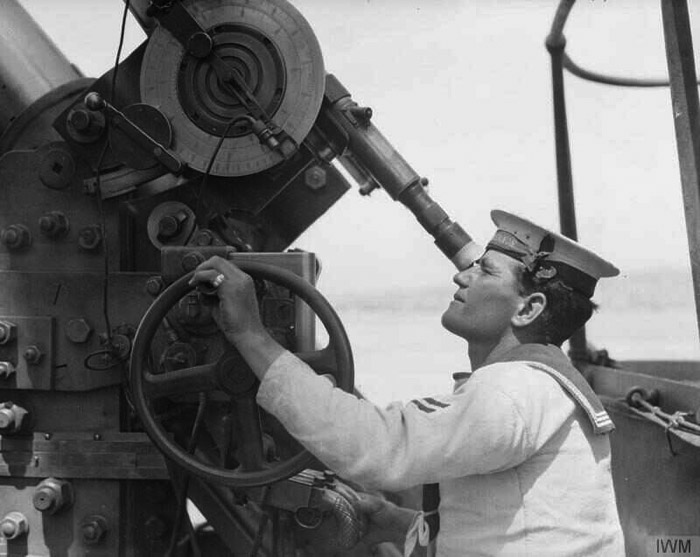
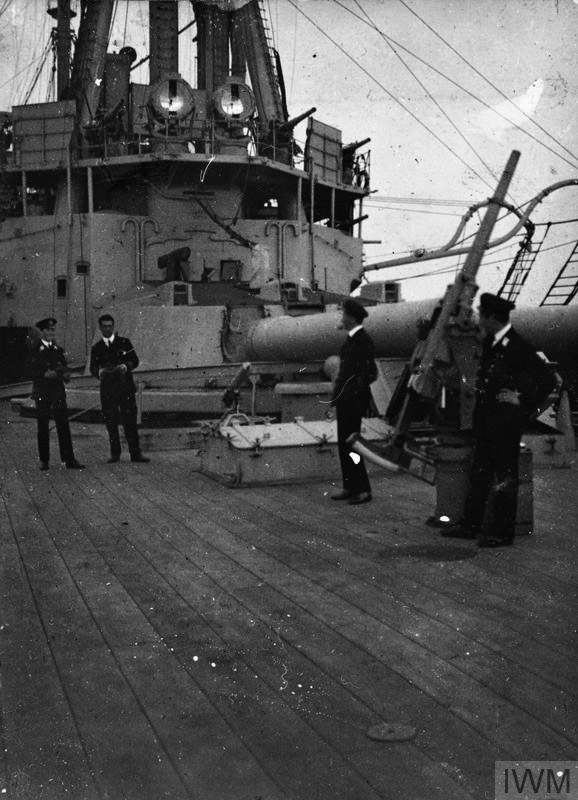
-The twenty-four 3-in or 12-pdr were the main light defense against Destroyers. It was theorized that the relatively high rate of fire of the 9.2 in guns should be enough to repel destroyers at long range, dealt with at closer range by the numerous light guns, starting with the Vickers-Armstrong QF 12-pounder 18 cwt (76 mm) naval guns just introduced in 1906. They became widespread on Britsh dreadnoughts afterwards, often placed on the turret’s roofs. These guns fired a 12.5 lb (5.66 kg) at 2,600 ft/s (790 m/s) with a rate of fire of 20 rd/min, up to 9,300 yards (8,500 m) at +20° elevation. They were all located in a semi-covered battery deck (open above them), seven on each broadside, four in the forward bridge structure in casemates, two aft.
Agamemnons’s 3-pounder AA gun in WWI
-The twelve QF 3-pdr Hotchkiss (47 mm) were a much older ordnance, a “classic one” shared by all pre-dreadnoughts or the Royal Navy and widespread in cruisers as well. They fired a much smaller HE round, but at 30 rpm, 571 m/s (1,870 ft/s) and max range of 5.9 km (3.7 mi) or even 4.5 km (2.8 mi) on the late mount, allowing a +80° elevation for AA fire. These were by default the AA guns on board and for maximal arc of fire, were placed on the battery roof fore and aft.
Torpedoes: 5x 18-in
Like all previous pre-dreadnoughts and HMS Dreadnought herself, the Nelson class had the mandatory 18-inch (450 mm) torpedo tubes. They were five of them, submerged, two on each broadside aft of the citadel, and one in the stern, with 23 torpedoes in storage. They were likely of the Mark VI type (1904), capable of 28.5 knots (52.8 km/h; 32.8 mph) on 4,000 yd (3,700 m) or much faster setting at 41 knots over 1,000 yd (910 m).
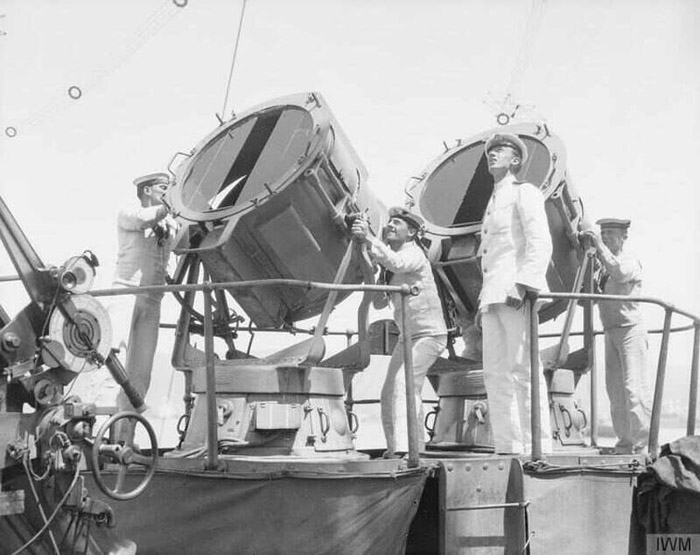 HMS Agamemnon’s projectors
Armor protection
The Lord Nelsons’ scheme still was in line with the previous King Edward VII class, albeit thicker but with thinner deck armour as a result of reports. Krupp cemented armour (KCA) for vertical armour.
Naval historian R. A. Burt later pinted out their waterline belt could be submerged deeply load, and the thin barbette armour below the upper deck as critical weak points, exposing their magazines to plunging fire at long range. If committed at Jutland they could have well met the same fate as the ill-fated Beatty’s Battlecruisers.
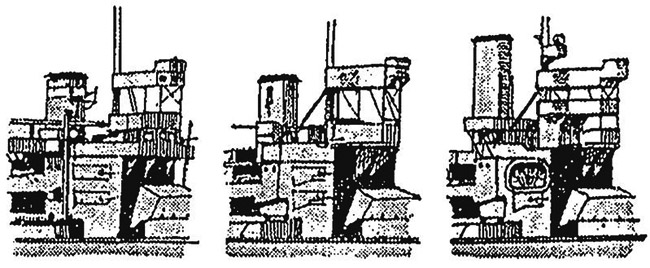
Various bridge configurations of the class
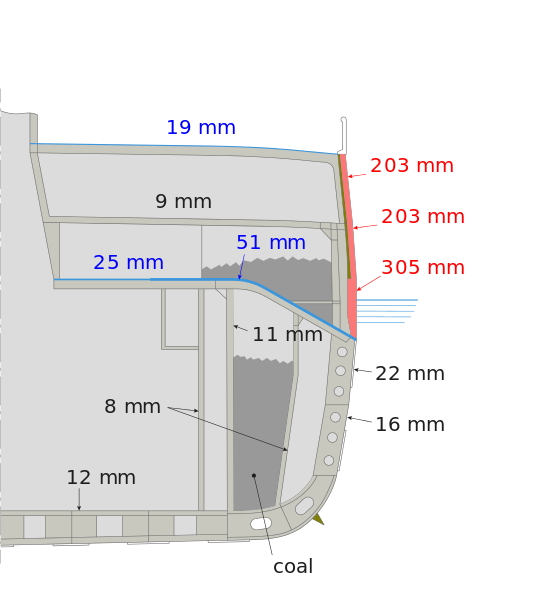
Details of the scheme
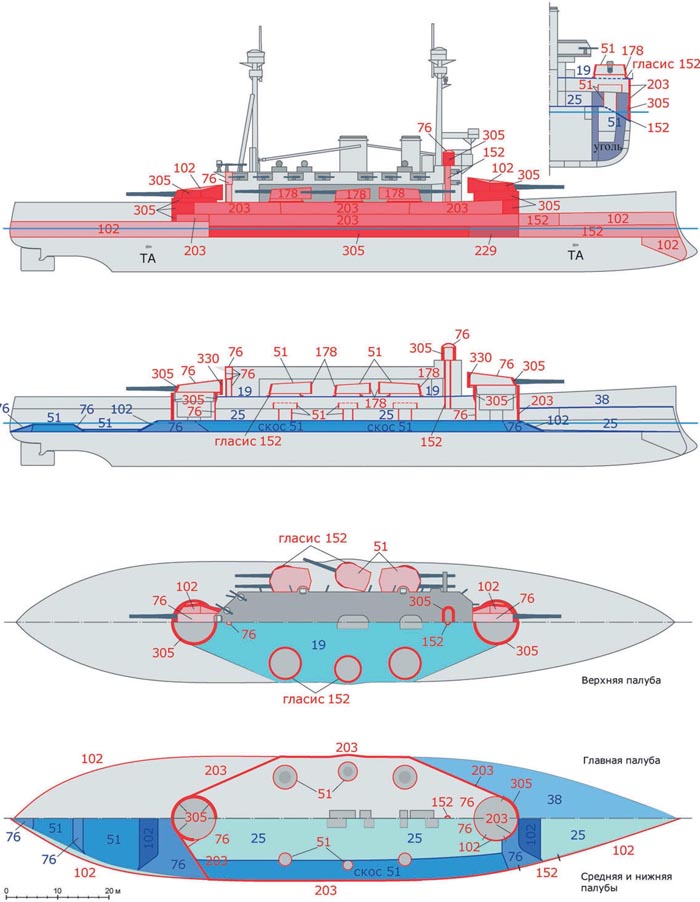
- Waterline main belt (7 ft high): 12-in, down to 6 in lower edge.
- WL belt 190 feet (57.9 m) long amidships, but from the rear of the forward barbette
- Aft belt 4 inches (102 mm) to stern
- Forward belt 9 inches (229 mm) and 6 in the bow.
- Strake downwards, ram bow 2-inch (51 mm)
- Middle strake 8-inch (203 mm) to the bow (4-6 in in)
- Bulkhead aft and fwd 8-inch.
- Upper strake 8 inches thick, oblique bulkheads on side armour
- Main gun turret 12 in fwd, roofs 3-4-in
- Main gun barbettes 12 in external faces
- Lower main barbette (below deck) 8 in (aft barbette 12 in)
- Main Barbettes inner faces 3-4 in fwd, 3 in aft
- 9.2-in gun turret 8-in faces, 7 in sides, 2-in roof
- 9.2 in gun turrets barbettes 6-in
- Ammunition hoists tubes 2-inch
- Citadel upper strake 0.75 inches (19 mm)
- Main armored deck fwd citadel to bow 1.5 inches (38 mm)
- Middle armored deck (citadel floor) 1 inch (25 mm), 2 in slopes
- Lower armored deck 4 in sloped upwards
- Lower deck fwd citadel 1 in, 2 in aft (3 in slope to steering gear)
- Forward conning tower 12 in, 3-in roof
- Aft conning tower 3-in.
The Nelson’s lifts
For ASW protection, the Lord Nelson class innovated, as they were fitted with unpierced watertight bulkheads, for all main compartments. Lifts were just introduced onboard Liners (like the famous “Olympic class”) and were all the rage. Some in the design team though this would be a good idea. Access was therefore possible using lifts only, not hatches or doors. In service this feature proved unpopular, for it was very unpractical especially in the engine and boiler rooms, raising concens about a single lift to save all men in case of rapid flooding. The Lord Nelson class was therefore the first and last Battleship in the RN to use personal lifts. It was abandoned for all following battleships.
Modifications
Modifications were minor:
-In 1909 aleady, 3-pounders were cut out ot just four in Agamemnon, two on Lord Nelson.
-In 1910–1911, a rangefinder was installed on the forward turret’s roof on both sister ships, plus another on the spotting top of Agamemnon.
-In 1912, Lord Nelson’s spotting top was modified to receive the same rangefinder.
-In 1913–1914 Lord Nelson received an additional rangefinder to the bridge.
-In 1914-15, remaining 3-por were removed, plus rooftop and bridge rangefinders.
-In 1915, two 12-pounders were removed and replaed by two 3-pdr AA Hotchkiss guns
-In 1916–1917, four 12-pdr were removed in Agamemnon, two on Lord Nelson.
-In 1918, two more removed from Lord Nelson’s aft superstructure.
In 1919, the Admiralty led by Beatty wanted a dedicated radio-controlle target ship, and chosed for it HMS Agamemnon, the most modern of any British pre-dreadnoughts. The challenge was to create a radio-controlled target for realistic gunnery drills, for 15-inch (380 mm) shells on armour plates. Test however performed at 25,230 yards (23,070 m) had the plates of another vessel completely destroyed, confirming the admiralty the same fate awaited any of its early dreadnoughts.
To avoid sinking her, next no above 6-inch tests were made. Agamemnon was modified with a wireless equipment, disarmed, internal openings plated over, internal equipment removed and 1,000 long tons (1,016 t) of ballast added low in the ship. She was even tested by having her listed. Displacement in 1921 when complated was 14,185 long tons, with a metacentric height of 8.56 feet (2.6 m). See below her career for more.
General assessment: Near-Dreadnoughts ?
In this “the admiratly vs. Fisher” hypothetical match, without the insight of today’s naval warfare evolution, and on paper, it was not certain that HMS Dreadnought was that superior to a Nelson class:
The main difference with the previous King Edward VII was the “near-monocaliber” configuration of the Nelsons, which was revolutionary: The 6-in guns were dropped entirely for the first time and the main armament was much more powerful, and “near-monocaliber”: Originally with, in addition to the two main twin turrets fore and aft, six twin with 9.2 in guns, in the wings.
The interesting point here is the comparison between the two calibers: The new generation 12-in Mk.X range was 22,860 m (25,000 yd, max), compared with the 9.2 in 9.2″/50 (23.4 cm) Mark XI guns which was 14,630 m (16,000 yards) max. The rest of the armament, like HMS Dreadnought, only comprised small 3-in (76 mm) guns. This was the closest to the dreadnought type, and in thuth, the class could have been “near-dreadnoughts” rather than “semi-dreadnoughts”.
The difference of caliber meant water plumes were close between the 12 and 9.2 in, but still distinguishable unlike heavier guns such as the 10-in caliber (254 mm), adopted by the Japanese on their Kashima class. The weight and size of the 9.2 in and their superior rate of fire was also one reason. At 6,000-16,000 yards was the true ideal “envelope” in which the Nelson class would shine: HMS Dreadnought’s could fire a broadside of eight 12-in guns out of ten, while the Nelsons could fire nine (ten originally), with a better rate of fire, of 5 rpm on paper, versus 1.5 for the 12-in, meaning at the top edge of thir envelope the Nelsons could trade at least two volleys to one for Fisher’s ship, but this was linked to accuracy. And HMS Dreadnought was much faster and could stay out of range at will, using its reserve of four knots (21 knots versus 18), quite valuable in calm weather.
Overall, the Nelsons was a brave and potent “readguard action” of the pre-dreadnoughts, certainly the most edgy transitional, most advanced of all comparable types around the world. If range was to fall close enough for them, they could be deadly indeed against any dreadnought. Unfortunately the war decided otherwise and they were deployed against two small naval powers practically brought to impotence: The Austro-Hungarian and Turkish Ottoman fleets. Their only “duels” were against immobile mud-and-stone forts. Their potential was thus never verified and would stay on paper, left to historians to debate with (or in video games).
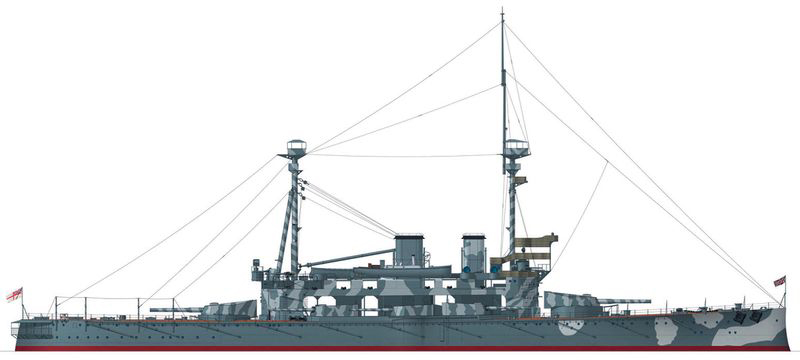
Depiction of HMS Agamemnon in 1915 with her incomplete port camouflage (wikimedia cc RU)
Author’s old illustration
⚙ Nelson class specifications |
|
| Dimensions | 135,2 x 24,2 x 9,1 m (443 x 79 x 30 ft) |
| Displacement | 15,358t – 17,820t FL |
| Crew | 750-800 peace/wartime |
| Propulsion | 2 shaft 4 cycl. TE engines, 15 WT boilers, 16.750 ihp |
| Speed | 18 knots top speed (33 kph, 21 mph) |
| Range | 9180 nmi@ 10 knots |
| Armament | 2×2 12-in, 10x 9.2 in, 24x 12-pdr, 12x 3-pdr, 5x 18-in TTs |
| Armor | Belt 8-12 in, Decks 1–4 in, Barbettes: 3–12 in, Main turrets 12 in, Secondary 7–8 in, CT 12 in, Bulkheads 8 in |
Read More/Src
Brown, David K. (2003). Warrior to Dreadnought: Warship Development 1860–1905 (reprint of the 1997 ed.). Caxton Editions
Buxton, Ian (2008). Big Gun Monitors: Design, Construction and Operations 1914–1945 (2nd, revised and expanded ed.). Naval Institute Press.
Gardiner, Robert. Conway’s All the World’s Fighting Ships 1860–1905
Burt, R. A. (1988). British Battleships 1889-1904. Annapolis, Maryland: Naval Institute Press.
McBride, Keith (2005). “Lord Nelson and Agamemnon”. In Jordan, John (ed.). Warship 2005.
van der Vat, Dan (1986). The Ship That Changed the World: The Escape of the Goeben to the Dardanelles in 1914.
On worldnavalships.com/
wiki.wargaming.net/ru
navyingallipoli.com
maritimequest.com/
battleships-cruisers.co.uk
historyofwar.org
worldwar1.co.uk
maritimequest.com
9.2 in Mk11 on navweaps
Model kits
scalemates general query – Nelson
scalemates general query – agamemnon
Hobby Boss kit on Scalemates
Kombrig 1:350 model
Review of the Hobbyboss 1:350 Kit
Peacetime and WWI service
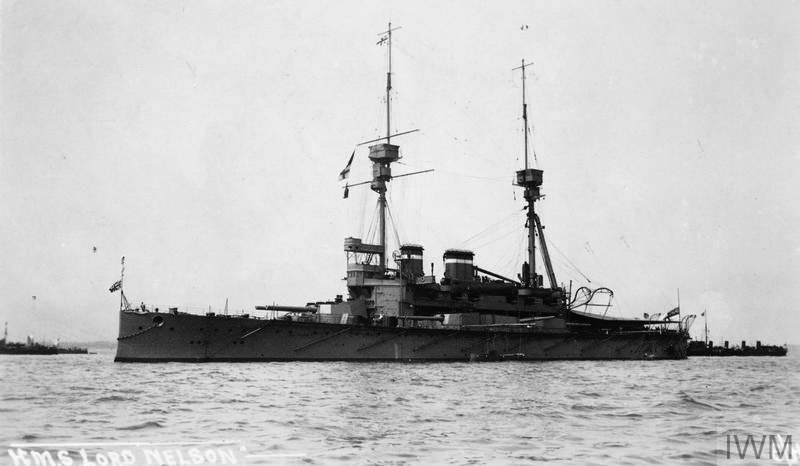
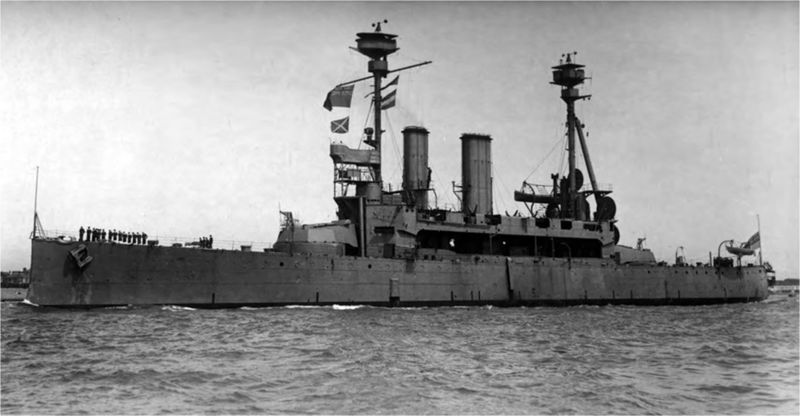
 HMS Lord Nelson

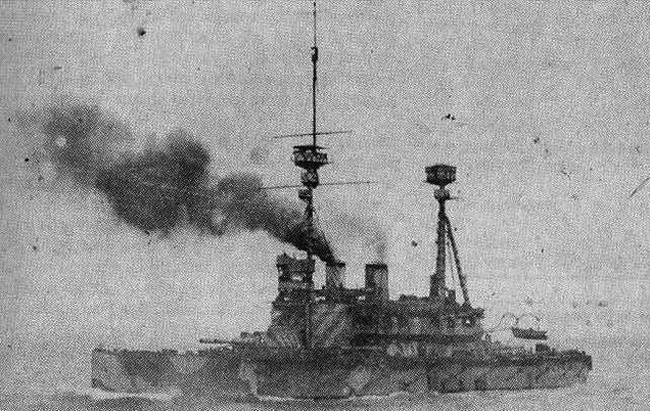
HMS Nelson’s sea trials, 1906
HMS Lord Nelson was commissioned, while in reserve, on 1 December 1908, at Chatham Dockyard. She was first assigned to the Nore Division, Home Fleet, with a small crew. Full commission on 5 January 1909 saw her relieving HMS Magnificent as flagship of the Nore Division, Home Fleet. In April she went into the First Division and in January 1911, Second Division, then in May 1912, 2nd Battle Squadron after the reorganisation. Temporarily attached in September 1913 to the 4th Battle Squadron, these years were altenated with fleet exercizes and gunnery drills, and minor overhauls, without noticeable events. She stayed all this time in home waters. In April 1914, she relieved HMS Queen as Flagship for the Channel Fleet.
In August 1914, HMS Lord Nelson became flagship, Channel Fleet in Portland. She escorted Sir John French’s British Expeditionary Force to France. On 14 November 1914 she was in the coast guard fleet in Sheerness. When any risk of German invasion was eliminated, she was back in Portland Harbour in December, patrolled the Channel until February 1915.
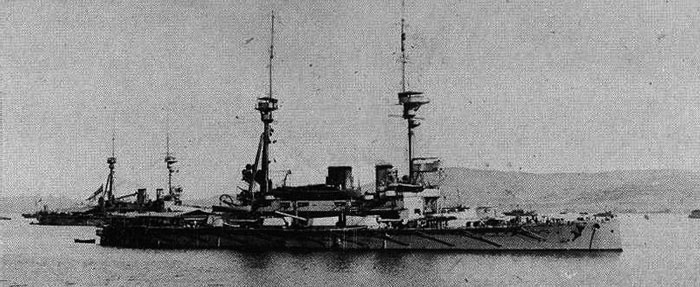
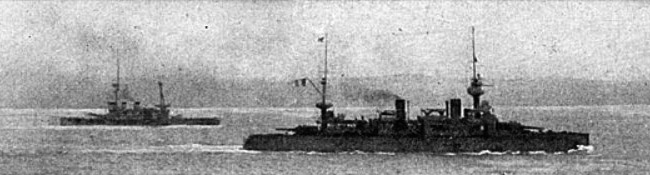
HMS_Lord_Nelson_andAgamemnon_anchored_in_Dardanelles_1915
In February 1915 she was reassigned to the new fleet mustered for operations in the Mediterranean, and the Dardanelles. She left Portland on 18 February and arrived in Mudros after just eight days, starting the bombardment of the the inner forts and in April, covered allied landings. On 7 March however while exchanging fire with several forts, she was hit in return. Damage was mostly light. The antiquated nature of some of the forts artillery was a matter for joke: On a stone cannonball, which landed harmlessely on deck, was kept as a souvenir by Flag Officer Arthur Baker.
The superstructure and rigging were shattered however at some places, and the waterline was hit below, flooding two coal bunkers but not cuasing significant listing. She retired to Malta for repairs and was soon back for the main attack on the Narrows forts, on 18 March 1915. 6 May saw heavy exchanged with several Ottoman batteries, as part of the Second Battle of Krithia.
She eventually relieved HMS Queen Elizabeth as flagship, British Dardanelles Squadron, on 12 May 1915, for Vice-Admiral Rosslyn Erskine-Wemyss. On 20 June 1915 she shelled docks and shipping at Gallipoli at long range in blind ballistic fire, helped by the precise spotting of a kite balloon. Thanks to the like of fighters of the Ottomans, the shelling was unempeded and very efficient, causing great damage. Lord Kitchener soon came on board and made Lord Nelson as his provisional headquarters for the winter. On 22 December 1915, the battleship also hoisted the flag of Vice-Admiral John de Robeck, which replaced Wemyss.
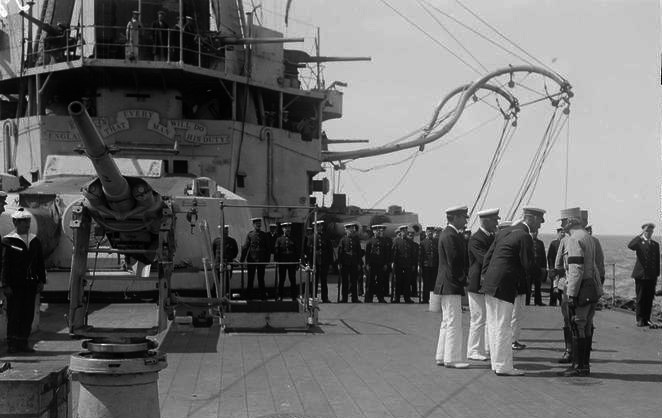
Admirals_and_Generals_on_HMS_Lord_Nelson_at_Gallipoli_1915
The failure of the Dardanelles Campaign saw in January 1916, Lord Nelson becoming flagship of the Eastern Mediterranean Squadron, helpinf the re-embarkment of allied troops back to Greece, the Levant or home. Lord Nelson became in August 1917 the flagship of the newly created Aegean Squadro, dispersed throughout the area.
This force protected allied-held islands and made sorties to cover the progression of the British Army at Salonika. They stand guard also against any sortie of the ex-Goeben/Breslau (Yavuz and Midilli) from the Dardanelles. The battleship saw little action and spent the remainder of the war alternating between Salonika and Mudros with her sister ship Agamemnon. She really were the best pair of Britsh battleships in the area, after the Queen Elisabeth class was sent to the Home fleet. Main base was however Salonika (Mudros for Agamemnon).
Battleship_HMS_Lord_Nelson_IWM
Her role during the war was still significant, in blockading the Dardanelles and deter any breakout in the Eastern Mediterranean by the Ottomans. Even being a pre-dreanought, slow compared to the Yavuz, she still was well armed, and would have probably engaged the Battlecruiser without hesistation, with little room for the latter to be steathy.

HMS_Raglan_and_Lord_Nelson_WWI
On 12 January 1918, Rear-Admiral Arthur Hayes-Sadler replaced de Rocbeck, and hoisted his flag in turn on HMS Lord Nelson, based in Mudros. He was carried to Salonika for a conference. This however had quite some consequences, as apparently German/Ottoman intel noted her departure and choose this moment to attack. The well-awaited only raid of the war in the aegean by the two ex-german ship was done with Nelson absent. They sortied on 20 January and this conducted to the Battle of Imbros. She was underway, but never arrived in tome to intercept Goeben before she regained shelter. Knowing Midili has been sunk, and Yavuz damaged, there was little chance for another raid, and the admiral order the battleship to reire for a short refit at Malta, in October 1918, until the end of the war.
HMS Lord Nelson would have the honor to be part of the British squadron heading for Constantinople in November, after the armistice, and became flagship of the same squadron, now on the Black Sea. This enable her to take part later in the Russian civil war: In April 1919, she evacuated Grand Duke Nicholas and Grand Duke Peter in exile to Genoa.

Nelson in Novorossisk, Black sea, 1919
At last, Lord Nelson was back home in May 1919. Placed in reserve until August, it was decided to sell her, which was done on 4 June 1920 to Stanlee, Dover, resold to Slough Trading Co. and to German scrappers, towed there and BU from January 1922.
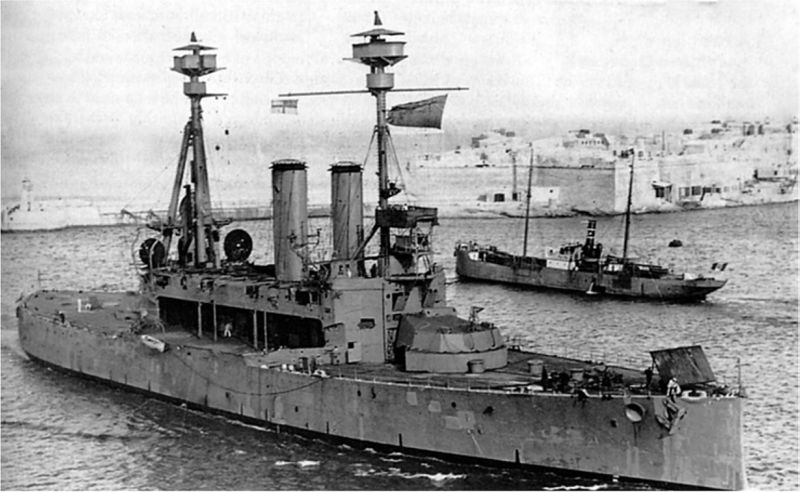
HMS Agamemnon

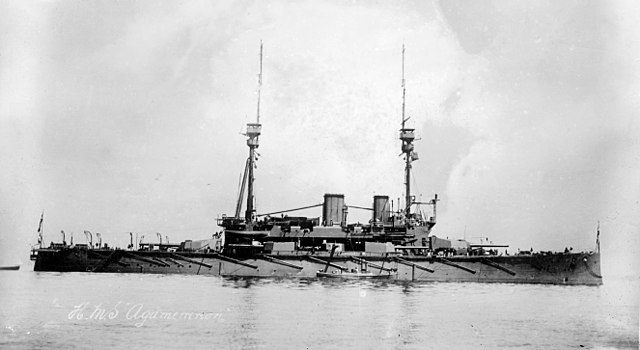
HMS Agamemnon, Spithead 1909
HMS Agamemnon was commissioned on 25 June 1908 at Chatham, Nore Division. On 11 February 1911 she scraped an uncharted rock in Ferrol, Spain. She had her bottom hull daage repaired here, and was temporarily attached in September 1913 to the 4th Battle Squadron. Between 1908 and 1914 she alternated between fleet exercizes, but from 1911 with the tension growin in the Mediterranean, and Balkans, she made a sortie to Gibraltar.
In August 1914, Agamemnon was in the 5th Battle Squadron, Channel Fleet (Portland) like her sister ship. After escorting the British Expeditionary Forc to France she was sent to Sheerness as guardship againt a possible invasion. When the risk was over she was sent back to the Channel fleet on 30 December, patrolling the area until February 1915.
At that date, she was, like her sister ship, sent to the Dardanelles. She arrived at Mudros later and participated in the second day of bombardment of Turkish forts at the entrance, and bombardment of the inner forts later, but was hit by seven 9.4-inch (240 mm) shells on 25 February. She however onlu had a hole above the waterline (limited flooding) and three dead.
Suffren and Agamemnon in February 1915
She then covered the landings of 4 March, followed by on-demand shelling on 6 March. Fort Hamidieh shelled her in return accurately the following day of bombardment and she took eight hits of veay heavy caliber, with one at least estimated to be of 14-inch (356 mm). Although her armor did its job, one blasted a large gush in her quarterdeck, destroying both wardroom and gunroom. Lighter shells also fell on her later that day, but mostly her superstructure was damaged. Her vitals had nothing and she was still operational.
This allowed her to not retire for repairs, which were done on-board, and continue with the 18 March bombardment. This day a 6-inch (152 mm) howitzer shell landed 12 hits on the Battleships, in 25 minutes: Five hit her armour and, being HE types, only “splashed”. Seven however hit outqide her armoured area and did considerable structural damage. The blast of one temporarily had one of her 12-inch (305 mm) guns out of action.

Agamemnon taing aboard Bouvet’s survivors.
On 25 April, she covered the main landings. After patrolling the area to cover minesweepers and netlayers she return bombarding Ottoman field batteries. She was hit once on 28 April and another on 30 April, but withour serious damage, while providing intense and accurate fire support, notably repelling a Turkish counterattack on 1 May 1915. She also took part like her sister to the Second Battle of Krithia.
At late, the battleship was ordered to retire to Malta for complete repairs and a refit. She was back in June 1915 for more bombardments, but did not took damage this time. But it’s well before that she was wearing her quite unique camouflage (well visible in some photos below). On 2 December she joined the protected cruiser Endymion and monitor M33 that were destroying the Kavak bridge cutting reinforcements to the Gallipoli Peninsula.
HMS Irresistible’s survivors on HMS Agamemnon quarterdeck in March 1915
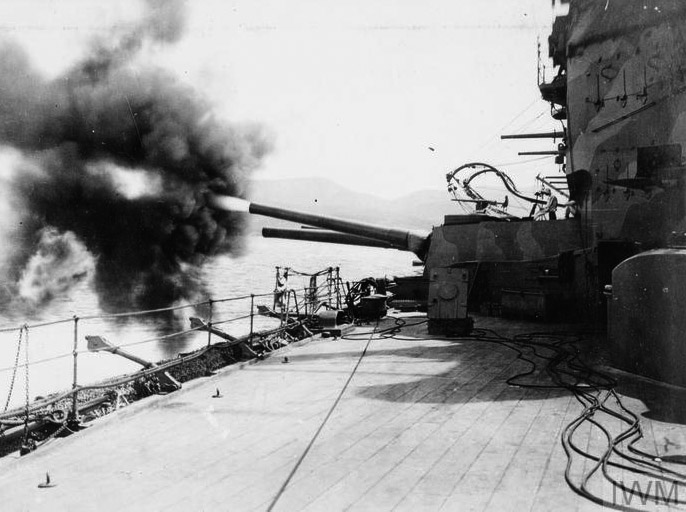
HMS Agamemnon firng her 9.2 in guns on Sedd el Bahr, 4 March 1915
Agamemnon in May, showing her camouflage.
The Dardanelles Campaign ended by January 1916 and Agamemnon was now part of the Eastern Mediterranean Squadron, and ‘Aegean Squadron’ (August 1917), dispersed to protect the occupied aegean islands, but also supporting troops at Salonika, and guarding against a possible sortie of Yavuz and Midilli. Agamemnon’s main base was at Mudros but she alternated with Salonika. While on one patrol, she manage to damage the Imperial German Navy Zeppelin LZ-55 (LZ-85) on 5 May at Salonika, firing her 12-pdr guns. The Zeppelin was forced to crash-land.
HMS Agamemnon off Salonika
On 20 January 1918 when Yavuz and Midilli were at last attempting their breakout in the Aegean, HMS Lord Nelson was absent in Salonika, while Agamemnon was in Mudros. When hearing the news, her capatined urged warming up her machinery, for her to steam away asap but she missed the battle of Imbros. Midilli was sunk,, Yavuz made it back into the Dardanelles. On 30 October the Armistice of Mudros was signed on board Agamemnon, while anchored in Lemnos.
Agamemnon was part of the British squadron that went to Constantinople in November 1918 following the armistice. She returned to the United Kingdom in March 1919, where she paid off at Chatham Dockyard and went into reserve on 20 March
In September 1918, Admiral David Beatty wanted a large target to be provided for Grand Fleet’s realistic gunnery practice, inactive since Jutland in 1916. The goal was not to pummel the pre-dreadnought chosen with 15-inch (381-mm) shells, but rather with 6-inch or smaller. HMS Hibernia was suggested at first, but as soon as the more modern Agamemnon became available, she was selected.
Agamemnon was modified at Chatham as a proper target ship between 6 December 1920 and 8 April 1921. Her armament was retired entirely, and she was entirely rewired for remote radio control. Still, if the guns were retired, the turrets remained aboard. The torpedo equipment was retired, as the flying deck, sea cabins, main derrick and boat equipment, her lower conning tower, as well as her masts or crew amenities. Every bit that was unnecessary was removed and plated over. She received also a particular ballast to protect her when hit close to the waterline. Her crew of 153 was order to maintain and operate her in between firing sessions.
Agamemnon’s started service even before full completion, on 19 March 1921, when exposed to poisonous gas, to determine its effect on a battleship. The gas had a color marker enabling to see where it could penetrate. However she was not sealed against gas before trial, so the results were itigated. On 21 September, a strafing aircraft hit her decks and superstrctures to evaluate air attack damage. They showed this could harass the crew at best, but compromise her. However as a result, protection for bridge personnel was enhanced on future ships, like the new “Nelson class” in construction.
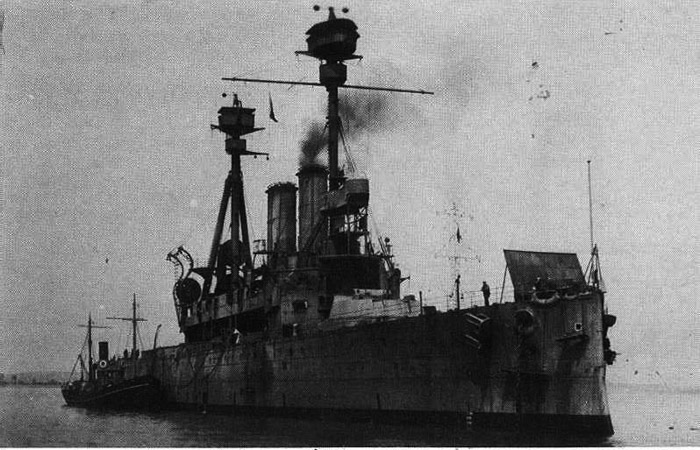
HMS Agamemnon as target ship 1924-1925
In the end, the target ship was subjected as intended to 6-inch (152-mm), 5.5-inch (140-mm), and 4.7-inch (120-mm) rounds. She was fired upon by the battlecruisers Renown and Repulse, moving under radio control. It confirmed that damage to their upper works could harm their direction capacity, but not fundamental fighting capabilities when backup existed. All these results went on a comprehensive report, also helping to design the next generation of vessels.
HMS Agamemnon was eventually relieved as target ship by HMS Centurion, a dreadnought, in December 1926. She was stricken and put on the disposal list, sold to J Cashmore of Newport on 24 January 1927, and BU at Newport.
Agammenon as a target ship
 Latest Facebook Entry -
  X(Tweeter) Naval Encyclopedia's deck archive
 Instagram (@navalencyc)


 French Navy
 Royal Navy
 Russian Navy
 Armada Espanola
 Austrian Navy
 K.u.K. Kriegsmarine
 Dansk Marine
 Nautiko Hellenon
 Koninklije Marine 1870
 Marinha do Brasil
 Osmanlı Donanması
 Marina Do Peru
 Marinha do Portugal
 Regia Marina 1870
 Nihhon Kaigun 1870
 Preußische Marine 1870
 Russkiy Flot 1870
 Svenska marinen
 Søværnet
 Union Navy
 Confederate Navy
 Armada de Argentina
 Imperial Chinese Navy
 Marinha do Portugal
 Mexico
 Kaiserliche Marine
 1898 US Navy
 Sovietskiy Flot
 Royal Canadian Navy
 Royal Australian Navy
 RNZN Fleet
 Chinese Navy 1937
 Kriegsmarine
 Chilean Navy
 Danish Navy
 Finnish Navy
 Hellenic Navy
 Polish Navy
 Romanian Navy
 Turkish Navy
 Royal Yugoslav Navy
 Royal Thai Navy
 Minor Navies
 Albania
 Austria
 Belgium
 Columbia
 Costa Rica
 Cuba
Cuba Czechoslovakia
 Dominican Republic
 Haiti
Haiti Hungary
 Honduras
 Estonia
 Iceland
 Eire
Eire Equador
 Iran
Iran Iraq
Iraq Latvia
 Liberia
 Lithuania
 Mandchukuo
 Morocco
 Nicaragua
 Persia
 San Salvador
 Sarawak
 Uruguay
 Venezuela
 Zanzibar
 Warsaw Pact Navies
 Bulgaria
 Hungary

 Bundesmarine
 Dutch Navy
 Hellenic Navy
 Marina Militare
 Yugoslav Navy
 Chinese Navy
 Indian Navy
 Indonesian Navy
 JMSDF
JMSDF North Korean Navy
 Pakistani Navy
 Philippines Navy
 ROKN
ROKN Rep. of Singapore Navy
 Taiwanese Navy
 IDF Navy
 Saudi Navy
 Royal New Zealand Navy
 Egyptian Navy
 South African Navy


 Ukrainian Navy