

 United Kingdom (1936-39)
HMS Southampton, Newcastle, Sheffield, Glasgow, Birmingham, Liverpool, Manchester, Gloucester, Belfast, Edinburgh
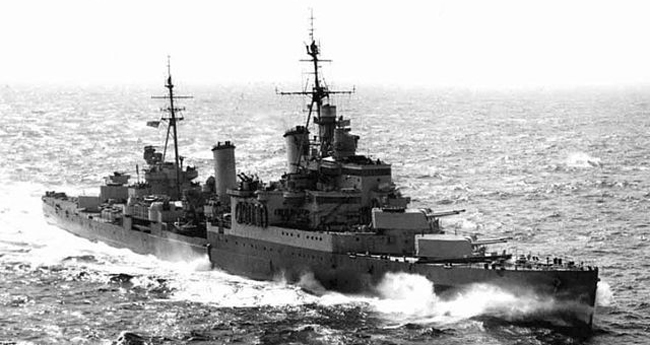
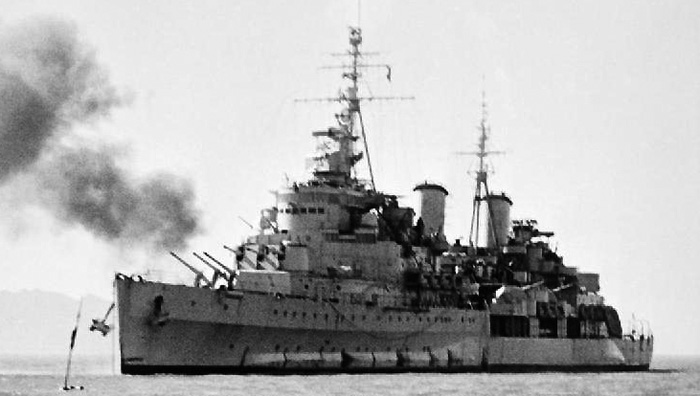
The new battle-hardened “Town class”.
The “Town” class, or officially “Southampton” after the first cruiser launched, was the subject of quite lengthy preliminary studies, resulting both from the experience gained with the Washington class cruisers and future developments of the 1930 Treaty of London and its confirmations of 1935.
Design development of the Town class
Unlike the famous “town” of WW1, the 1936 version was designed under the constraints imposed by the London Naval Treaty of 1930 (see later). The main result of this was to cap the construction of heavy cruisers of all signatory nations (as defined by the 1922 treaty of Washington, 8 inches for “heavy cruisers”). Therefore only “light cruisers” (armed with 6-in guns) would be allowed from then on, regardless of the tonnage, which was still ruled by Washington, 10,000 tonnes standard. The Town class, like the County class seemed an homogenous group of ten ships, but it was in reality split among three sub-classes, the Southampton, Gloucester and Edinburgh. If the first two seemed quite similar, the last were very different.
The 1930 London Conference
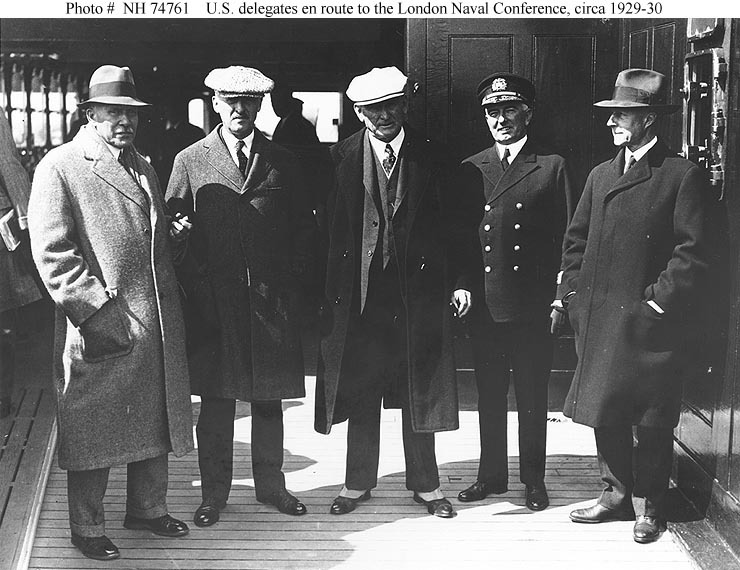
The second most important treaty of the interwar in naval matters, was the 1930 London conference. It was basically a post-Washington treaty, an agreement between the same signatories, United Kingdom, Japan, France, Italy and the United States, signed on 22 April 1930. The treaty’s main objective was to address a loophole in the 1922 Washington Naval Treaty, by regulating submarine warfare and limiting some details in surface naval shipbuilding. Ratifications were made on 27 October 1930, entering into effect, but largely ineffective.
-For submarines, it obliged the signatory to cap their standard displacement to 2,000 tons (with some exception like the French Surcouf then in completion) and their artillery to 155 mm (6 in). -Destroyer tonnage was also capped to 1850 tonnes, max. caliber to 5 in, and their global tonnage defined for UK, Japan and the US.
-Merchant vessels compliance to international law reaffirmed
-Small surface combatants, gunboats, sloops and non-Torpedo armed ships were also capped for their main artillery to 6-in guns max.
-For cruisers, the importance of the treaty was considerable, as it clearly defined the difference between light and heavy cruisers based on the caliber, 6-in to 8-in. As a result, it capped the global tonnage of heavy cruisers (built first by all signatories): UK in particular was permitted 15 heavy cruisers for a total tonnage of 147,000 tonnes (U.S. 18, 180,000 tonnes, Japan 12, 108,000 tons). Light cruisers, more importantly were not limited in numbers, but by a global tonnage limit, of 192,200 tons for the British Navy (US 143,500 tons, Japan 100,450 tons ).
The Town class cruisers, by their numbers and capabilities were just as important for the Navy than the County class. They served on all fronts, from the Mediterranean, north and south atlantic, arctic, north sea, bay of biscay, red sea, african coast, indian ocean and far east. Four were lost in action out of ten, none by surface action, all by torpedoes and aviation bombs. Edinburgh was finished off by destroyers however.
Consequences for the Royal Navy
The result of this was for the Royal Navy to consider the Surrey class project, an eight guns follow-up of the York class. There was no limitations in the number of light cruisers available, but instead starting a serie of Arethusa-class ships for example (6x 6-in), around 5,000 tonnes standard, which could have provided as far as 38 cruisers. There was no need for such a number, and instead, it was found more judicious to built nineteen 10,000 tons cruisers, the larger size offering more capabilities in global armament (like AA), better equipment (like aviation facilities), better range and better protection. Already, twelve of these light cruisers has been built for the RN and Commonwealth, between the Leander and Arethusa class.
And there was still the option to carry more 6-in guns for the larger dimensions. A triple turret for example was easier to use on such large ship for weight and stability reasons. Also, the improvements in accuracy with better fire control systems and ballistic computers allowed to use this light artillery with as much efficience and range closer to the the 8-in guns as before, in addition to a faster rate of fire, making them able to deliver twice as much firepower as a heavy cruiser. It was also discussed the fact that range was only important on paper, and in reality, conditions at sea often reduced visibility and negated the small range avantages 8-in cruisers had on 6-in cruisers, notably considering the immune zone.
This also fitted a view that targeting superstructures of a ship was now more important than trying to sink it, as they were mostly unprotected and contained sensitive targeting and communication systems. Torpedoes were to be used at close range after the ship has been rendered blind and impotent. So the Town-class cruisers were “light cruisers” according the London Treaty, but equal in size and effective power than heavy cruisers. These ships made up for their smaller calibre guns by carrying more, and so was the path followed by other signatories as well, the USN Brooklyn class, the Japanese Mogami and Tone class (started with 8-in guns), or the French with the Bertin and La Galissonnière class, and the Italians with their final Condotierri class. Even non-signatory nations like USSR chose this path as well with their Chapayev class. The Town class was a new standard, followed during wartime by the cheaper Crown colony class (one turret less), and the Swifsture and Tiger class (1943).
Design development
The underlying idea was to build light cruisers compliant with the new limitations on heavy cruisers, was to use and make the most of a large number of 6-in guns in an engagement with other cruisers, regardless of the type. Some nations even forced this new tendency is clear as far as possible, when seeing contemporaries like the Brooklyn class, and the Japanese Mogami class, which all had the advantage of an extra turret, so 15 guns in all, and fast than the usual 8-9 8-in guns. This generation of late interwar “light cruisers” were one and a half time larger than previous ones, and had a capacity of “saturation fire” rather than a smaller volume with shells with greater penetrating power, mostly intended to defeat instead the cruiser’s citadel. The originality of the triple mounting, universally adopted, was the use of a shorter turret to avoid visual interference for telemetry.
Powerplant
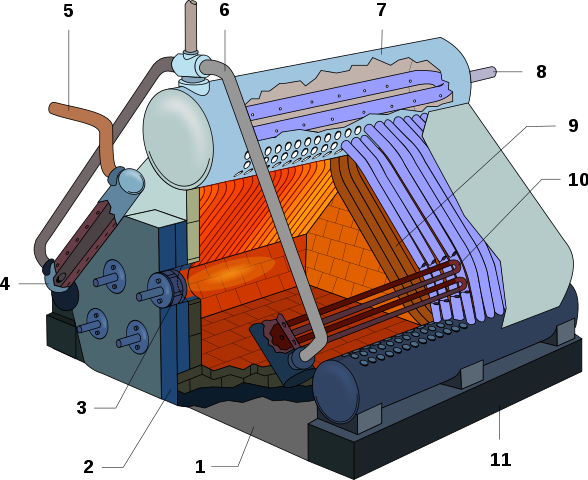
HMS’s Belfast boilers cutaway
The Southampton class opted for a relatively classic combination of four Parsons turbines, each driving a propeller shaft, coupled with four admiralty 3-drum boilers. This powerplant was rated for 75,000 shp (55,900 kW), but it was revised and more powerful on the following Gloucester and Edinburgh sub-classes: at 82,500 shp (61,500 kW). This allowed a top speed of 32 knots (36.8 mph; 59.3 km/h) for the first and slightly beter 2.25 kn (37.1 mph; 59.7 km/h) on the Gloucester and Edinburgh classes. The Range was 5,300 nmi (6,100 mi; 9,800 km) at 13 knots (15 mph; 24 km/h) and its capacity 1,943 long tons (1,974 t) of fuel oil. Compartmentation was made in order to separate the boilers and turbines rooms. Tactical diameter was 780 yards at 18 knots.
Armament
Main artillery: 12x 6-in/50

The true centerpiece of the new design was the triple turret, housing the brand new BL 6-inch Mk XXIII gun. The British approach to shell interference in flight was to have the centre gun mounted 30 inches or 76 cm behind the two outer guns, in addition to have them all three separated in width by more than a meter. This extra space inside the turret also was beneficial to the gunners, giving them more room to work in, as well as ensuring all three guns were independent, each with their own mount. The turret roofs also had cutouts at the front for extreme elevation. Aviation was now recognised as a major threat, and this feature was originally intended to give them some anti-aircraft capability, but in practice, there was no way the turret would be trained or manually loaded quickly enough for effective AA fire. Instead, the Royal Navy solved the solution by designing the Auto Barrage Unit (ABU): These were time-fuzed shells fired when the target aircraft reached a set range. Also the design introduced the HACS AA fire control system and Admiralty Fire Control Table for surface fire control (main artillery).
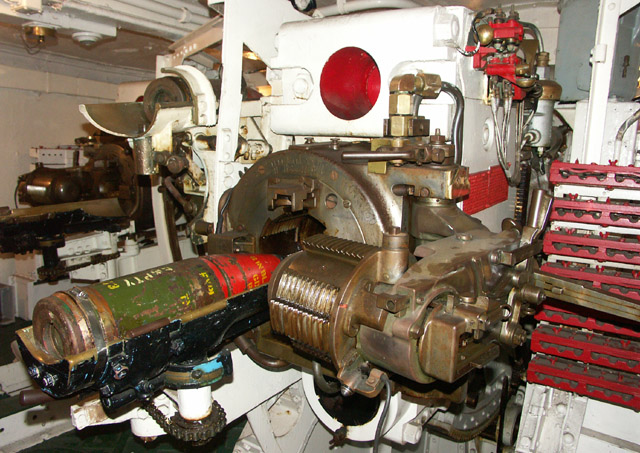
This piece of ordnance replaced the BL 8 inch Mk VIII used on earlier Washington Naval Treaty cruisers. It was composed of a A-tube and 4.5-metre jacket and was loaded with a manually operated Welin breech block. Shells were propelled by powder charges in cloth bags, each containing 14 kg (30 pound) of cordite, or flashless (NQFP) powder. There was no upper cordite hoist. Total weight of the projectile was 51 kg (112-pound). Barrel life was circa 1100 EFC with standard cordite, 2200 with NQFP. Rate of fire depended of the crew, but could be up to eight rounds per gun and per minute, so 24 per turret, or 96 rounds a minute for the whole ship. This has to be compared to the Country-class heavy cruisers for example, which with four rpm on average, could sent 32 shells for the same time. The entire gun weighted 7 tonnes, with a barrel length of 300 inches (7.6 meters), an exact caliber of 152.4 mm. It fired HE or AP shells at a muzzle velocity of 2760 feet per second (840 m/s) at a maximum of 25,480 yd (23,300 m) at 45° elevation.
The triple Mk XXIII mount used a “long trunk” ammunition hoist system. It reduced the crew, and increased loading speed. It was described by a gunnery officer onboard HMS Bermuda (Crown colony class) for a well trained crew: “…a loading cycle of four and a half to 5 seconds was attained at low elevation, another two to three seconds being required with the guns elevated for long range. The time would lengthen as fatigue set in, but was creditable…” Read more: http://www.navweaps.com/Weapons/WNBR_6-50_mk23.php
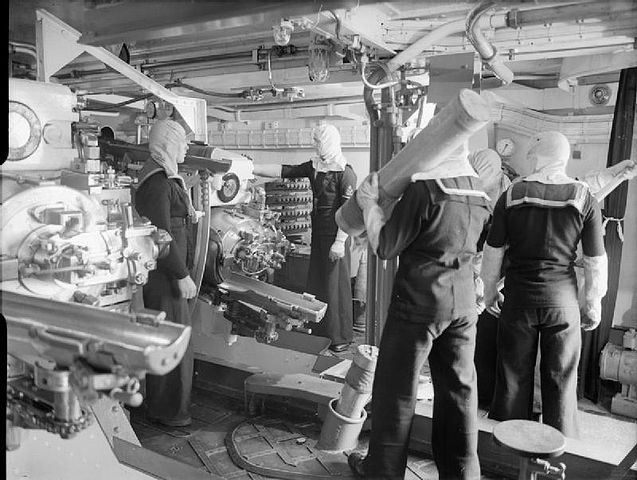
Gunner and loaders inside HMS Jamaica’s turret
Dual Purpose artillery: 8x 4-in/45
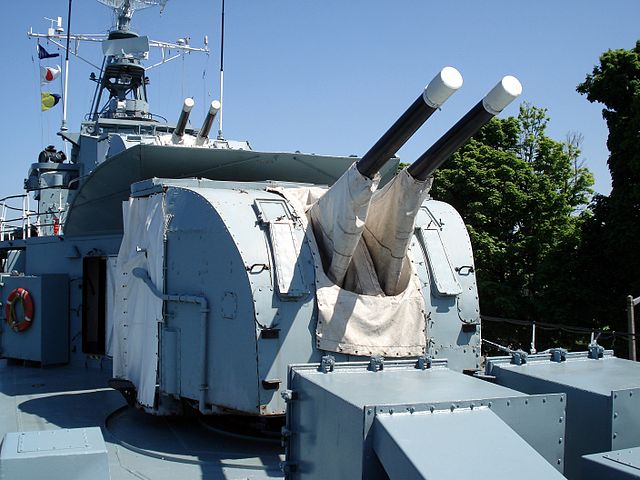
A 4-in Dual Purpose twin gun on HCMAS Haida
The secondary armament was also new compared to the previous simple 4-in/45 Mark V AA, four twin Mk XIX 4-inch turrets were installed. They were converted to Remote Power Control (RPC) during the war. Over 2555 QF 4-inch naval gun Mk XVI had been produced, and they equipped a large number of destroyers, cruisers, CVs and battleships over the years. The barrel & breech weight together 4,495 lb (2,039 kg) and the barrel length was 180 inches (4,572 mm) for the 45 cal. It fired a Fixed QF 35 pounds (15.88 kg) HE shell, or a 38.25 pounds (17.35 kg) S.A.P. with a 9 pounds (4.08 kg) charge. The exact caliber was 101.6 mm. It used a vertical sliding-block breech, and the recoil was hydropneumatic, ith a course of 83 cm (33 in). Elevation was up to 80° (for the mark XIX) and rate of fire of 15–20 rpm at a muzzle velocity of 2,660 fps (811 m/s) at a maximum of 19,850 yards (18,150 m) at 45° and with a 39,000 feet (11,890 m) ceiling at 80°. The Edinburgh class had six of them instead of four.
Light AA artillery: pom-pom and Vickers HMG
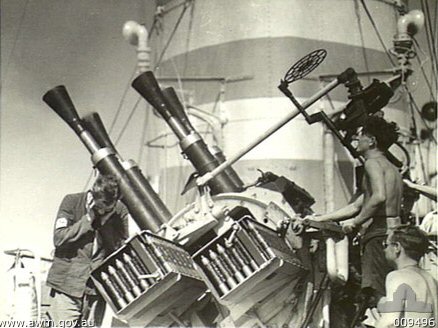
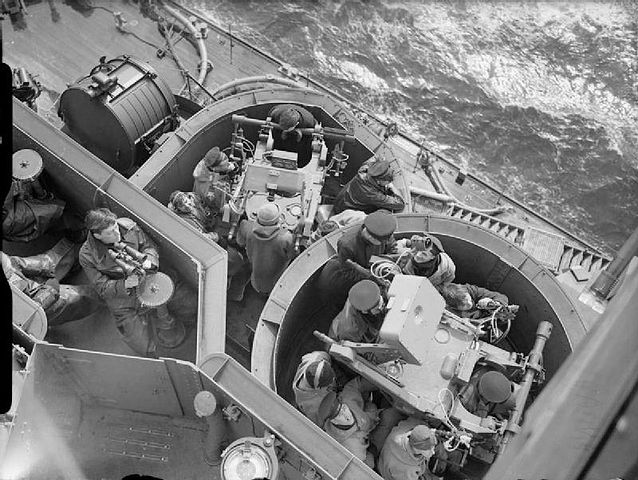
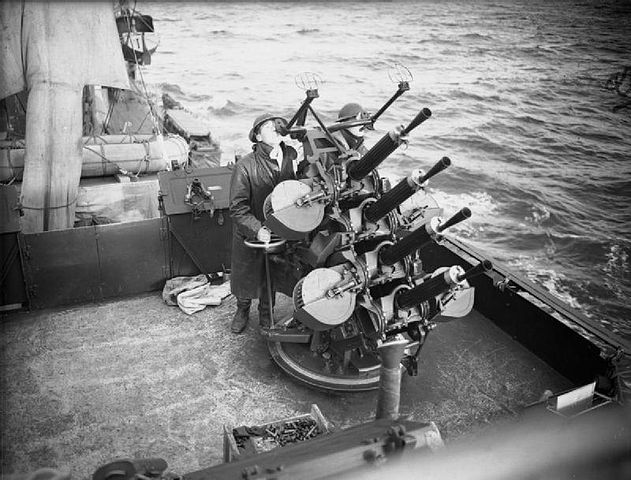
Two quadruple QF 2-pounder (40 mm) Mark VIII pom-pom guns were installed on either side of the forward bridge, on raised platforms for the best possible arc of fire. At the time of their introduction, they were hampered by the use of the Mark III director. It controlled the gun mounting through “follow the pointer” control, using eye aiming through a simple ring sight. But not effective against fast-flying aircraft. Their action was more a disturbance than anything else. Some had the chance to be upgraded at the end of the war with the Mark IV, using a combination of gyroscopes in a gyro rate unit, coupled to an optical rangefinder, and a Type 282 radar to determine the range, speed and direction of the target, later coupled in turn to an on-director computer, and ultimately the RPC system, or remote power control. But still, the director’s mount was not stabilized. The Edinburgh class has octuple mounts. By 1944-45 to make room for more AA, the “X” turret was often removed.
Mark IV director
The second AA weapon system was the quadruple Vickers .50 machine gun mounted in quad tandem mounts, and located on the aft bridge, on either side on raised platforms. This system proved insufficiently powerful at short-range against modern aircraft. It was superseded by the Oerlikon 20 mm cannon, and replaced on all Town class crusers. The quad mount featured a 200-round magazine per barrel providing 700 rpm and per gun, at an effective range up to 1,000 yd (910 m). After 20 seconds of continuous fire, reloading could take a further 30 seconds. Also of notice, the ships carrying four 3-pdr saluting guns. How low-velocity these 37 mm ordnance pieces were meant to fire blank shots when saluting, but could also fire more useful smoke shells to obscure the ship.
Torpedo Tubes
The Town-class cruisers also carried the usual complement of torpedo tubes for close quarter combat: Two triple banks of 21-inch (533 mm) torpedo tubes, installed amidship on the deck, on either side, under the aft superstructure supporting the dual purpose 4-in guns, in between the aft funnel and the aft bridge and tripod mast. It was of the Mark IX, and there were a ful reload for each bank, so 12 torpedoes in all. The Mark IX carried a 750 lbs. (340 kg) TNT warhead at setup ranges, of 10,500 yards (9,600 m) at 36 knots or 13,500 yards (12,350 m) at 30 knots. They were propelled by a Burner-cycle engine producing 264 hp at circa 41 knots. Note, it is not known of the Town-class carried the star or doube star variants of the type, which figures are better.
On board Aviation
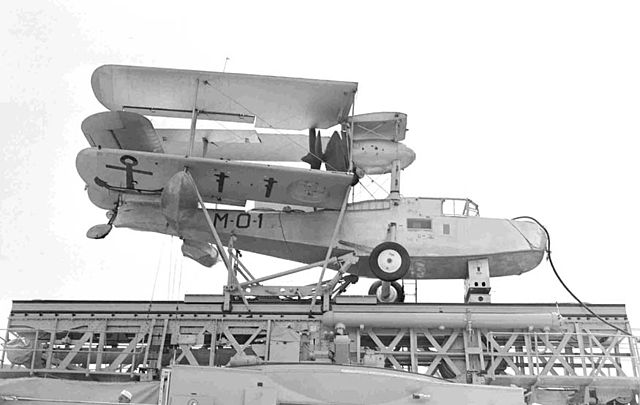
The Town-class cruisers carried two Supermarine Walrus for reconnaissance, liaison, and artillery spotting. They were not launched by an athwarthship catapult (not fitted on Sheffield before May 1938) and housed in one of the two sheds on either side of the forward bridge. These sheds were hangars, with shared facilities for maintenance. The larger Edinburgh class had a dedicated catapult behind the hangar and enough space for a third plane.
Supermarine Walrus Mark 2, author’s illustration. Designed by R. J. Mitchell which created the spitfire, this was a sturdy model derived from the company’s expertise with seaplanes and floatplanes, notably through the Schneider cup. It was just introduced in 1935 so relatively recent when chosen for the Town class. Top speed: 135 mph (217 km/h, 117 kn) at 4,750 ft (1,448 m), altitude: 18,500 ft (5,600 m), range 600 mi (970 km, 520 nmi) at cruise. Biplane, propelled by a Bristol Pegasus VI 9-cylinder air-cooled radial piston engine, 750 hp (560 kW) in a pusher configuration. Armed with two .303 in (7.7 mm) Vickers K machine guns nose and behind wings, and six 100 ibs (45 kgs) or two 250 ibs (110 kgs) bombs/depth charges.
Protection
It was limited to a protective box over the ammunitions spaces, of one inch to 4-1/2 inches, the belt was 4-1/2 inch thick with a main waterline part going in between the innermost barbettes and an upper belt protecting the funnel trunks. Internal bulkheads were 2-1/2 inch thick, and turrets rings bulkheads 2 inches, and trunks 1 inch thick. The ring bulkheads extended downwards for two decks, so that only ‘Y’ turret reached the platform deck. The belt did not covered the 6-in ammo rooms. There was a 1-1/2 inch strake above the machinery space and 1-1/4 to 1-1/2 inch over the steering gear room.
Construction: Specific sub-classes
The Southampton class was divided into three sub-classes, the Southampton (Southamtpon, Newcastle, Sheffield, Glasgow, Birmingham) launched in 1936 and completed in 1937, the Gloucester (Liverpool, Manchester, Gloucester) launched in 1937 and completed in 1938-39 and Edinburgh (Belfast, Edinburgh) launched in 1938 and completed in August and July 1939. The latter were very different, 7 meters longer, 1,900 tons heavier, with a modified propulsion and catapults for 3 aircraft (against 2 on the others), resulting in this ungainly profile, with the funnels shifted to the rear, and a reinforced AA and triple TT banks, plus improved armor. This was arguably the best designed cruiser in the Royal Navy so far.
The idea behind the new design was also to use new 6-in quadruple turrets. This would have gave them a 16 gun broadside to deal with Japanese cruisers, but technical difficulties in wartime eventually killed the project and the Edinburgh class was completed in a conventional way.
Southampton class (1936)
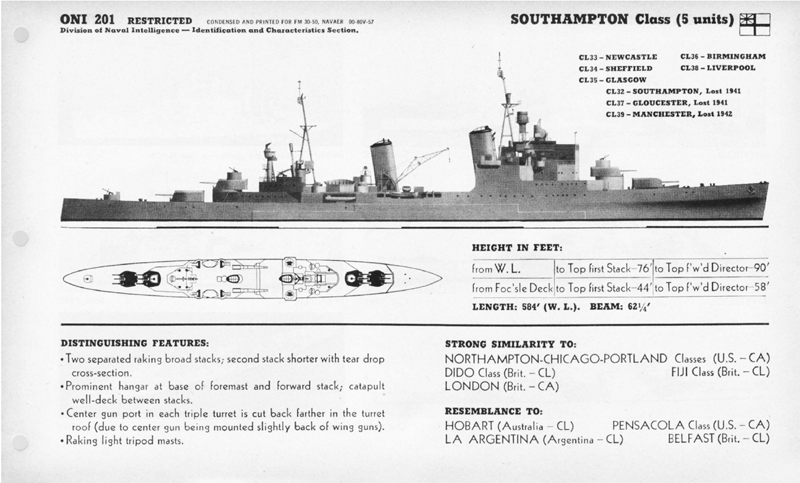
ONI recoignition plate of the Southampton class
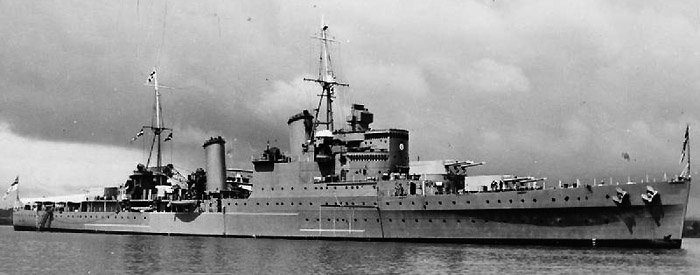
Basic description as above. This sub-class was to comprise all ten ship, but as they were built, modifications conducted to one sub-class, and then another to improve some points. Five units were built of this sub-class, with just one loss: HMS Southampton herself, the lead ship. As for many other Royal Navy ships, aviation and submarines were the cause of most losses, not conventional naval warfare. HMS Southampton was laid down in November 1934 at John Brown, HMS Glasgow in Scotts, April 1935 and Sheffield at Vickers on January 1935. Newclastle was the first started, in October 1934 (At Vickers-Armstrong on the Tyne). They were launched respectively in January 1936 (Newcastle), March (Southampton), June (Glasgow), July (Sheffield) and September (Birmingham). For completion and commission dates, see the individual career section.
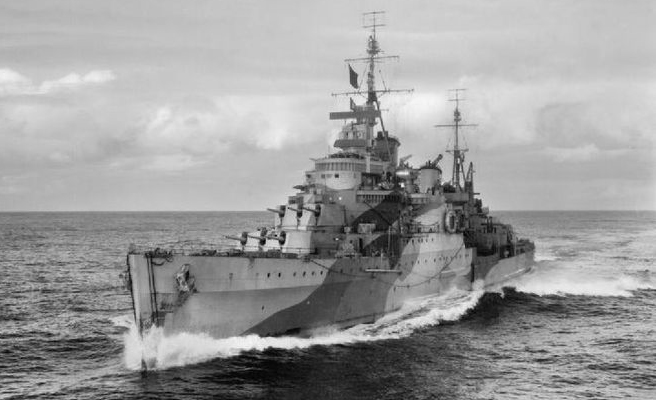
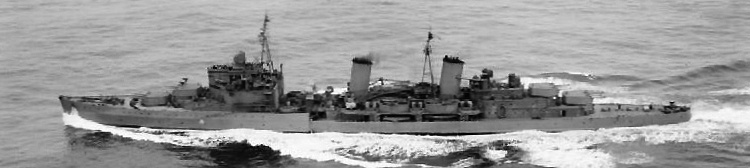
HMS Sheffield in May 1941, during the Bismarck hunt, she played a leading role in keeping in touch, but was almost sunk by a Swordfish attack…
The HMS Southampton in Crete in 1941. This was one many British victims of the Stukas of the Luftwaffe.
*Note: Both are 25 years old author’s renditions
Southampton specifications |
|
| Dimensions | 180 m long, 18.9 m wide, 6.3 m draft (full load). |
| Displacement | 8,940 t. standard -11,540 t. FL (13,175 t Edinburgh class) |
| Crew | 630 |
| Propulsion | 4 shafts Parsons turbines, 4 Admiralty 3-drum boilers, 75,000 shp. |
| Speed | 32 knots, Range 10,000 nautical at 14 knots. |
| Armament | 4×3 x 152 mm/6-in/50 Mk.XXIII, 4×2 x 102 mm/4-in/45 MK XVI AA (4×2), 2×4 x 40 mm AA pompom, 2×3 533 mm/21-in TTs, 3 seaplanes. |
| Armor | Belt 4-1/2 in, Bulkheads 2-1/2 in, ammunition magazines and citadel 4-1/2 in, turrets 1 in, trunks, ring bulkheads 1-2 in. |
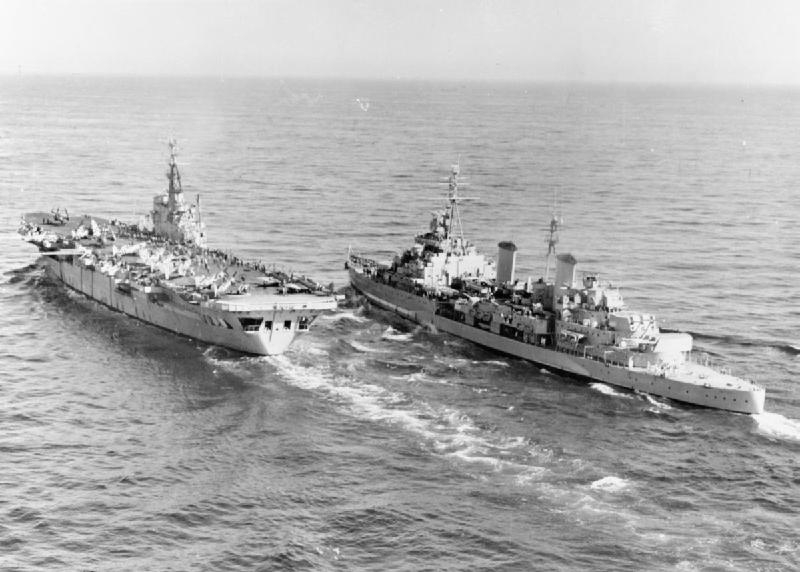
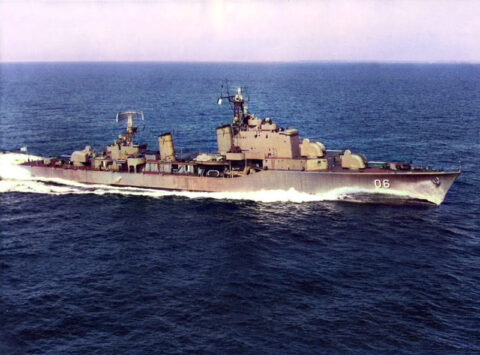
Belfast and HMS Ocean in 1952 off Korea. The latter served until 1966. Four of the class were completely modernized and rebuilt in the 1950s.
Gloucester class (1937)
Gloucester class HD blueprint
The Gloucester class looked very similar in appearance, but they were slighlty larger and improved in many ways. The biggest difference was the better turret protection, It was doubled, at 4 inch. Also the deck over the machinery spaces was thicker at 1-1/4 inch. This offered better protection against plunging fire. The redesigned deck had that intermediate layer above the magazines and machinery area.
Also was added a second director control tower, which served the main armament, and added a second channel of fire for long range gunnery. The extra armour weight was balanced by extra beam, increased of 0.8 inches. Also to compensate for this, propulsion power was raised considerably, up to 82,000 shp to maintain speed. There was also more electrical power at hand, which proved useful when increasing AA and added new radars and FCS.
The first laid down was HMS Liverpool, at Fairfield in February 1936, followed by Manchester at Hawthorn Leslie in March, and Gloucester was last in September at Devonport. She was also the last launched and last completed, but despite of this, most authors still make her the lead ship.
This sub-class paid a heavy price to the war, with two of three sunk: Gloucester and Manchester, relatively early in 1941-42.
Goucester specifications |
|
| Dimensions | 180 m long, 18.9 m wide, 6.3 m draft (full load). |
| Displacement | 9,100 t. standard -11,350 t. FL (wartime 12,190 t) |
| Crew | 800 |
| Propulsion | 4 shafts Parsons turbines, 6 Admiralty boilers, 80,000 shp. |
| Speed | 32.5 knots, Range 10,000 nautical at 14 knots. |
| Armament | Same. Also like the previous class, four 3-pdr Saluting guns |
| Armor | Belt 4-1/2 in, Bulkheads 2-1/2 in, ammunition magazines and citadel 4-1/2 in, turrets 1 in, trunks, ring bulkheads 1-2 in. |
Edinburgh class (1938)
Blueprint of the type
The Edinburgh class were really different beasts. They were the first to reach effectively 10,000 tonnes standard (10,550 exactly) and reached up to 13,175 tonnes and even 14,900 tonnes for the Belfast. They differed so much from the previous Southampton/Gloucester, many authors considered them a separate class entirely. Their general composition, armour scheme, armament, powerplant, was the same however, but the hull was stretched-out and the fore funnel pushed back in order to free the main bridge and offer a roomier hangar for seaplanes. Three were carried as a result and the catapult deck space was also free from interference. The hull was longer at 187 m or 613ft 6in, and larger at 19,30 m or 63ft 4in on the Edinburgh and even wider on HMS Belfast at 20.22 m or 66ft 4in. Both sister-ships also differed by their draught, 6.48 and 7.06 m (21ft 3in and 23ft 2in) respectively. This reflected the fact HMS Belfast was heavily modified.
Differences included also the new 6-in mounts, allowing 45° fire, and if ramming was still by hand, there was an endless chain shell and cordite hoists were received direct to the gunhouse without break in the working chamber, allowing a far greater rate of fire. The after turrets were raised also, to the same level as A,B turrets, notably for visibility in heavy weather. The shell rooms for the main guns were above the magazines, so that their crowns were formed by the lower deck and al the ring bulkheads extended to this level.
AA armament was extended, but 4-in ammo magazine were still not well protected. Box protection over the ammunition spaces was dropped in favor of an extended belt, now at the waterline up to the outer barbettes level. Horizontal protection was also increased, of 3in over the ammunition spaces, and 2in over the machinery spaces, extended further aft and up to 2in over the steering gear. Tactical diameter when manoeuvring was now larger, at 640 yards at 12 knots. The hull of this class was lengthened indeed in order to create the next iteration was to have quadruple turrets and shell and charge loaded in one operation, but the project was cancelled in January 1937 as the admiralty setup a 8,000 tonnes limit for future cruisers. The main gain of these ships were indeed limited to the “long trunk” Mk XXIII turret design reducing the crew requirements for better rpm and an extra dual purpose turret and extra seaplane.
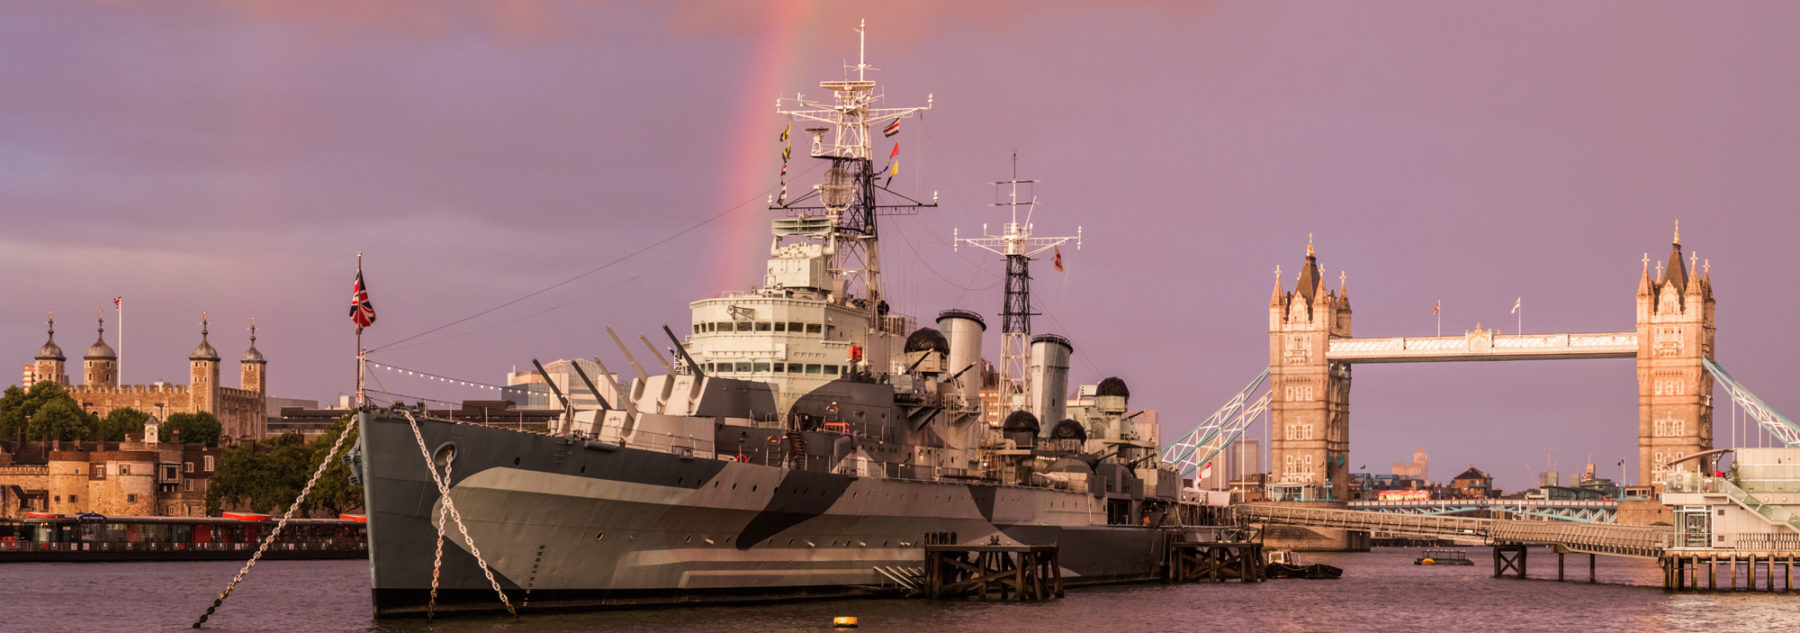
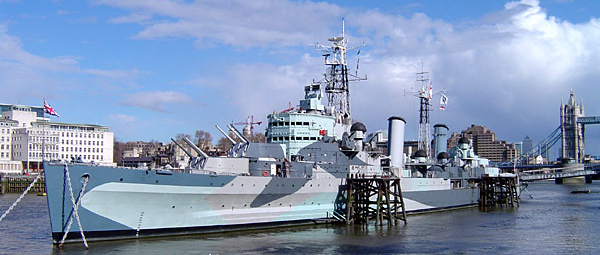
HMS Edinburgh and Belfast were both laid down in December 1936, at Harland & Wolff and Swan Hunter respectively. Both were launched in March 1938, and completed in the summer of 1939, just weeks before WW2 started. They were the last completed British interwar cruisers and Belfast is now the last British cruiser of her generation to be visited, a major tourist attraction in London.
The HMS Edinburgh in the Barentz sea, 1941
Edinburgh specifications |
|
| Dimensions | 187 m long, 19.3 m wide, 6.5 m draft (full load). |
| Displacement | 9,400 t. standard -11,650 t. FL (wartime 12,330 t) |
| Crew | 800 |
| Propulsion | 4 shafts Parsons turbines, 4 Admiralty 3-drum boilers, 82,500 shp. |
| Speed | 32.5 knots, Range 10,000 nautical at 14 knots. |
| Armament | 4×3 152 mm/6-in/50 Mk.XXIII (4×2), 4×2 x 102 mm/4-in/45 MK XVI AA (4×2), 2×8 x 40 mm AA pompom, 2×3 x 533 mm/21 in TTs, 3 seaplanes, see notes. |
| Armor | Belt 4-1/2 in, Bulkheads 2-1/2 in, turrets 2-4 in, ring bulkheads 1-2 in. |
Links/sources
https://en.wikipedia.org/wiki/London_Naval_Treaty
https://en.wikipedia.org/wiki/Town-class_cruiser_(1936)
https://forum.worldofwarships.eu/topic/33603-royal-navy-ships/
https://www.world-war.co.uk/Southampton/southampton_class.php
Colledge, J. J.; Warlow, Ben (2006) [1969]. Ships of the Royal Navy: The Complete Record of all Fighting Ships of the Royal Navy (Rev. ed.). Chatham Publishing.
DiGiulian, Tony (2017). “Britain 6″/50 (15.2 cm) BL Mark XXIII”. navweaps.com.
Brown, David K. (1995). The Design And Construction Of British Warships 1939–1945, Vol 1 Major Surface Vessels. Naval Institute Press.
Otter, Ken (2001) [1999]. HMS Gloucester: The Untold Story (2nd ed.). Durham, UK: G.A.M. Books.
Raven, Alan & Roberts, John (1980). British Cruisers of World War Two. Naval Institute Press.
Waters, Conrad (2019). British Town Class Cruisers: Design, Development & Performance; Southampton & Belfast Classes. Seaforth Publishing.
And same editor/author: Cruiser Birmingham: Detailed in the original builders’ plans.
Watton, Ross (1985). The Cruiser Belfast. Anatomy of the Ship. Conway Maritime Press.
Wingate, John (2004). In Trust for the Nation: HMS Belfast 1939–1972. Imperial War Museum.
McCart, Neil (2012). Town Class Cruisers. Liskeard, UK: Maritime Books.
The model’s corner
Belfast 1942 Trumpeter 1:350
Belfast 1942 Airfix 1:600
HMS Sheffield L’Arsenal 1:700
BELFAST 1943 JSC 1:400
HMS Belfast 1942 Super Detail Set FlyHawk Model 1:350
Article Belfast 1943 1/700 Claudio Matteini
Conrad waters original plans
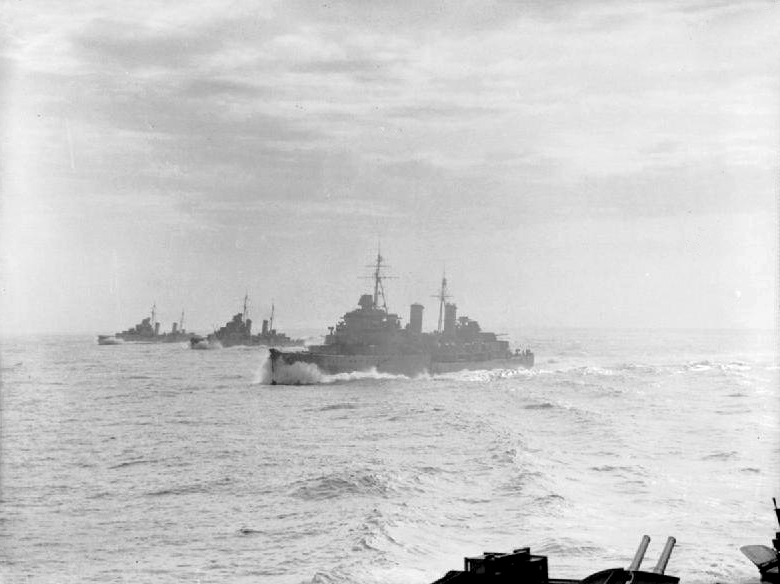
The Town class in action
During the conflict, all the ships saw heavy action on all seas during their career. HMS Southampton was sunk off Malta in May 1941, Manchester was very badly in the same area by Italian MAS and later scuttled. Gloucester was sunk by the Luftwaffe, and HMS Edinburgh was torpedoed in the North Atlantic on April 20, 1941, escorting one of the first convoys to Murmansk (PQ17), by U456. Her team at first saved her, and she was towed to Murmansk, but her fate was sealed by the arrival of three German destroyers off the Isle of Bear, warned by a reconnaissance aircraft from Norway. She fought a homeric duel but was torpedoed eventually and sank slowly, allowing most of her crew to evacuate. The four losses for ten ships showed the level of commitment of the class. By examining the way they were lost, no issue could be brought against them.
HMS Liverpool
HMS Southampton
Initially called HMS Polyphemus, and renamed before launch, HMS Southampton was commissioned on 6 March 1937, one day after HMS Newcastle, but despite of this she is for Historian the lead ship of her class. HMS Southampton in 1939 was the flagship of the 2nd Cruiser Squadron, Home Fleet. On 5 September 1939, she intercepted the German merchant Johannes Molkenbuhr off Stadtlandet off Norway, scuttled before being boarded while the destroyer Jervis picked her crew and the ship was torpedoed by the destroyer HMS Jersey.
On 16 October 1939, Southampton was damaged at anchor off Rosyth during a German air raid, hit by a 500 kg bomb, dropped from only 150 metres (490 ft) by a Ju 88 of I/KG.30. It went through three decks and exited the hull, detonating in the water just close to the hull. Miraculously, there only was minor structural damage and electrical systems shutdown. Repairs were quick and she was deployed in the task force hunting down the battleships Scharnhorst and Gneisenau after they destroyed the Rawalpindi. She served with the Humber Force until February 1940, before joining 18th Cruiser squadron at Scapa Flow. Off Norway in April she was damaged during a German air attack, her main battery director out of action. After repairs she patrolled the south-coast of England and back to Scapa Flow for October 1940 after the danger of an invasion was out.
On 15 November, HMS Southampton headed for the Mediterranean where she was needed. She took part in the battle of Cape Spartivento on the 27 and the next month she escorted a convoy in the Red Sea and shelled Kismayu in Italian East Africa. By January 1941, she was with the 3rd Cruiser Squadron for Operation Excess south-east of Malta. On the 11, she was teaming with HMS Gloucester when attacked by 12 Stuka from II Gruppe, Sturzkampfgeschwader 2. She was hit by at least two bombs and burnt rapidly. 81 men were trapped in the inferno but the rest evacuated and she was sunk by a torpedo fired from Gloucester, four from hms Orion to finish her off. Admiral Cunningham observed in a letter to Sir Dudley Pound that their great hangar structure was an easy target, which also contain easily flamable aviation gasoline.
HMS Newcastle
Initially called HMS Minotaur and renamed before launch, HMS Newcastle was in reality the very first ship of the class commissioned, on 5 March 1937. She first was affected to the 2nd Cruiser Squadron, but under refit when the war started. After this, she joined the 18th Cruiser Squadron, Home Fleet at Scapa Flow by mid-September 1939, first to patrol the Western Approaches, she then, the Northern Patrol. She was one of the rare ship of the class clashing with German surface vessels/ This happened off Brest, she engaged and badly gamaged two German destroyers, and during these operations she was supplied by sea, staying on station for a continuous 126 days.
On 23 November 1939, she spotted Scharnhorst and Gneisenau, but both escaped in bad weather before she could engaged them. She was sent in the Mediterranean to join Vice-Admiral James Somerville force and by 27 November 1940 she fought at Cape Spartivento. She was back westwards to hunt for blockade runners in the South Atlantic before returning to the Mediterranean for Operation Vigorous, making the dangerous trip from Alexandria to Malta in June 1942. Four days underway, she was torpedoed by the German E-boat S-56 on 15 June. Her bow was badly damaged but she limped back to Alexandria at 4 knots, temporarily repaired with additional wooden bulkhead strengthened by concrete. She was further patched up when heading for India, stopping at Ceylon, then went back south to South Africa before crossing the south Atlantic towards Brazil, and heading north to stop in a drydock at the Brooklyn Navy Yard in New York. Her bow was fully repaired by March 1943 and she sailed to Plymouth, and then headed for the Eastern Fleet at Ceylon, taking charge as flagship of the 4th Cruiser Squadron. She shelled many Japanese-held islands, bringing support to the British 14th Army in Burma.
After the war ended, she was extensively modernised in 1951-52. This consisted in a new bridge (see the Belfast for idea), received new New Mk.5 twin 40 mm AA and Type 275 radar. She was sent to participate in the Korean War as a flagship, providing naval gunfire. She was also deployed in the Malayan Emergency, shelling Malayan Communist positions in the summmer of 1955 and December 1957. She was sold for BU two years afterwards.
HMS Sheffield
HMS Sheffield was commissioned on 25 August 1937. Her interwar career had no notable anecdote and when the war broke out she was with the 18th Cruiser Squadron. She was deployed to the Denmark Straits, one of the possible exit to the Atlantic for German raiders. By April 1940, she participated in the Norwegian Campaign. Afterwards, she was posted in the anti-invasion force guarding the channel to counter a possible invasion in the summer of 1940 and was detached later to join Force H in Gibraltar. She took part in the battle of Cape Spartivento.
In 1941, she she took part in Operation Grog (the shelling of Genoa) against Vichy convoys, and covering air reinforcements convoys to Malta. In May 1941, HMS Sheffield was part of the force coming from Gibraltar in the great hunt for the battleship Bismarck. She narrowly escaped in bad weather a friendly torpedo attack by Swordfish from the Ark Royal, dodging eleven torpedoes some prematurely exploding. Admiral Sir John Tovey was later appealed at what happened, believing the planes failed to score any hit on the “Bismarck”, but on 12 June, HMS Sheffield spotted one of the Bismarck’s tankers, KMS Breme, which was sunk. The Breme was armed, but the fight was unequal. In October 1941 she sank the supply ship Kota Penang.
In 1942 she was detached to take part in the difficult Arctic convoys. She hit a mine off Iceland on 3 March 1942, and only emerged from repairs by July 1942. She went back for more Arctic convoys, until sent at the end of the year to support the Allied landings in North Africa, Operation Torch. By December 1942 she was back in the northearn threater, and with HMS Jamaica formed “Force R” (Rear-Admiral Robert Burnett). There she covered Convoy JW 51B, attacked by a strong German surface force: This was the Battle of the Barents Sea). Ultimately the Germans withdrew, Sheffield sinnking the German destroyer KMS Friedrich Eckoldt. By February 1943, she was sent in the Bay of Biscay and in the Mediterranean to participate to the landings at Salerno (Operation Avalanche). Back in the Arctic, she was part of the force that catch and sank KMS Scharnhorst off the north coast of Norway by December 1943.
In 1944, HMS Sheffield escort the task force trying to sink the German battleship Tirpitz until August 1944. She was being refitted in Boston and in Great Britain until the war ended.
It was already a well-filled career, but it was not over. Refitted until May 1946, she was in action in the West Indies and home waters and Mediterranan. In 1954 she was the flagship of the 8th Cruiser Squadron. She was further modernized in 1954 and in 1956 to 1957, like her sister ships: New enclosed and enlarged bridge, lattice foremast a dnew radars, NBC installed and revised light AA with eight twin Bofors Mk 5, two single Bofors Mk 7. She took part in the movie Battle of the River Plate. In reserve in January 1959, and latter refitted for possible use as a GFS monitor. She was the flagship of the Reserve Fleet, accommodation ship until September 1964. She was expected to be preserved, but a commission judged her state too deteriorated compared to Belfast in 1966 and she was BU in Faslane, Rosyth in 1967.
HMS Glasgow
HMS Glasgow was commissioned on 9 September 1937 and joined the 2nd Cruiser Squadron, Home Fleet. After a period of fleet exercises and escorting the Empress of Australia and Empress of Britain carrying the Royal famlily to Canada and the United States in June 1939, she was under the command of Captain Frank Pegram when the war broke out. She first sailed to Grimsby to patrol off the Norwegian coast, searching for German commerce raiders and blockade runners. She was attacked by the Luftwaffe on 9 October 1939, but despite the high altitude bombing was severe she was not damaged. After the Scandinavian coast, she operated off the coast of Norway searching for the SS Bremen, sailing back hom from Murmansk. On 12 February 1940, she captured a German trawler and by April 1940, was attacked off Bergen by several Ju 88 and Heinkel He 111s. Two near misses at 15 feet (4.6 m) left a hole and scattered splinters in her side. The messdecks were lightly flooded and there was also some underwater damage. The blast also disabled the forward ‘A’ turret and two crewmembers were KiA, five wounded. Glasgow, later teamed up with HMS Sheffield and six Tribal-class destroyers to ferry troops near Harstad and later Royal Marines at Namsos. On 23 April she landed the 15th Infantry Brigade in Åndalsnes and 29 April evacuated the Norwegian Royal Family, Cabinet and some of the gold reserves to Tromsø, and to the United Kingdom in May. Later she rammed accidentally HMS Imogen ion heavy fog in July 1940 off Duncansby.
Next, HMS Glasgow was sent to the Mediterranean, as a convoy escort, with the 3rd Cruiser Squadron of Alexandria. She escorted the force that air attacked Taranto in November, ad with Berwick, HMAS Sydney and HMS York, she landed 3,400 british troops in Piraeus, and later covered a supply convoy to Malta. By December she was attacked by Italian aviation in Suda Bay (Crete) and hit by two torpedoes (by two SM.79s). The torpedoes struck far forward and aft, but she was able to return to Alexandria, partially repaired and replaced by HMS Southampton.
She was sent to the Indian Ocean in February 1941, East Indies Fleet based in Aden. She was signalled the rampage of Admiral Scheer and on 22 January, the German pocket battleship was sighted by her Walrus, urging deployment of the Task Force, but too late. In March, HMS Glasgow teamed with HMS Caledon, two auxiliary cruisers and two destroyers to escort troopships to Somaliland, covering the landing with naval gunfire. By December 1941, Glasgow she sank by error HMIS Prabhavati underway to Karachi. In 19 March 1942, she escorted convoy WS-16 to South Africa and in April she was patched at Simonstown before heading to Brooklyn Navy Yard in May. She received there additional 20 mm Oerlikon cannons and later back in UK, her radar suite was upgraded to the type 271, type 284 FCR, type 285, 282 and 281 air warning radars at Portsmouth. She was sent to the 10th Cruiser Squadron at Scapa Flow in 3 September and detached to the arctic convoys from January and February 1943. She intercepted German blockade runner Regensburg in the Denmark Strait and later covered escort groups in the Bay of Biscay.
At Devonport she had her aircraft facilities removed and additional 20 mm guns added, and was fitted the new FCR Type 283 as well as IFF VHF radio-telephone. By December 1943 she participated in Operation Stonewall, interception of German blockade runners and later with HMS Enterprise engaged German destroyers in the Battle of the Bay of Biscay. Anchored in Glasgow and Plymouth she was attacked by German glider bombs.
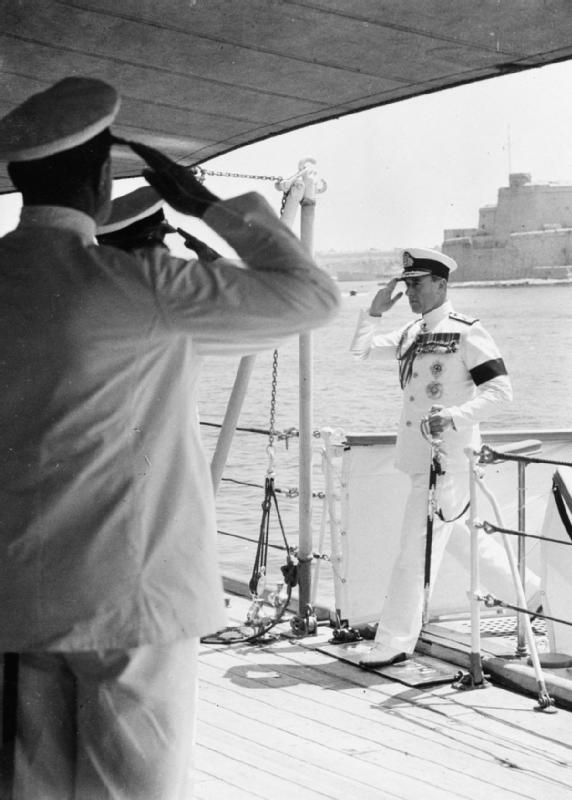
Earl Mountbatten in Malta, boarding Glasgow in 1952
On 6 June 1944, HMS Glasgow took part in Operation Neptune, the naval cover force of the Normandy landings. She was closed to USS Texas, USS Arkansas, and the French cruisers Montcalm and Georges Leygues, taking part in Support Force C, Omaha Beach. Later she covered the 7th US Corps attack on Cherbourg, and duelled with the Querqueville batteries, hit and damaged, but later repaired before being prepared for the East Indies as flagship. She was prepared before leaving in a river Tyne drydock, in July 1944. Her aft ‘X’ main turret was removed and a powerful AA armament installed to fend off kamikaze attacks. She had two quad 40 mm Bofors guns installed and a new radar system, with a single aerial air warning, Type 281B, surface warning Type 293 and main Type 274 gunney radar plus YE homing beacon to serve as radar picket. All this was ready on 29 June 1945 but july saw the crew training with the new equipment and she was sent in August 1945. When she arrived the war was over. She would served until 1947 in the Indian Ocean, and was in sent in reserved at Portsmouth, refitted and re-commissioned in September 1948. She was a flagship, West Indies Station, was refitted at Chatham in 1951 and became flagship of the Mediterranean Fleet (Malta) carrying Admiral Earl Mountbatten of Burma. She participated the newt year to world tour until 1954. She paid off at Portsmouth in November 1956 but briefly recommissioned for the Suez crisis, decomm. again and BU in 1958.
HMS Birmingham

The last of the first serie, sub-class Southampton, was commissioned on 18 November 1937. HMS Birmingham served with the 5th Cruiser Squadron, China Station in 1938. She was in Malta to be refitted when the war broke out, and sailed to join the the Home Fleet in March 1940. She served with the 18th Cruiser Squadron, patrolling off the coast of Norway and later teamed with Manchester and Cairo to escort troopships to Norway. On 26 April she sank the German patrol boat Schiff 37 and in May, Birmingham, she evacuated 1,500 troops from Åndalsnes. She was in refit by December 1940. The next year, and until April 1941 she escorted troopships to the Middle East, and via the Cape of Good Hope. By May 1940 she tried to located the Bismarck and Prinz Eugen. She later patrolled Iceland-Faroes passage and escorted the convoy WS-9A to South Africa. Refitted in Selborne dry dock (Simon’s Town) she received the new Mk 284 and 291 radars and extra AA.
In February 1942 she joined the Eastern Fleet and later the Mediterranean fleet, 4th Cruiser Squadron (Rear Admiral Tennant). She took part in Operation Harpoon and Operation Vigorous. In March 1942 she was attacked by Ju 87 from Sturzkampfgeschwader 3 and several Cant 1007 floatplanes, taking near misses. After some repairs, she was in September back in the Indian Ocean for Operation Stream against Madagascar. In November, she escorted a convoy with 10th Infantry Brigade and in April 1943, she was back home for a refit.
Back in the Mediterranean, by 28 November she was torpedoed by U-407 off Cyrenaica, her the keel struck below “B” turret. The blast killed seventy and her bow was nearly cut off. But she managed to reach Alexandria for temporary repairs. By June 1944, she sailed for the United States for permanent repairs, and during work, her ‘X’ 6 inch turret was removed for additional Bofors 40 mm gun (16) and 27 Oerlikon 20 mm cannons. By November 1944, she was back in home waters and the 10th Cruiser Squadron at Scapa Flow and by May 1945, she joined Dido and several destroyers to occupy ports in the Baltic, reaching Copenhagen on 9 May. Prinz Eugen and Nürnberg surrendered and were captured. Relieved by Devonshire and she was back home for a modernization.
On 1948, she served with the South Atlantic Command, East Indies Fleet (4th Cruiser Squadron) until 1950 and was completely modernized until 1952 in the same way other cruisers of the class. She operated afterwards with the Far East Fleet (5th Cruiser Squadron) and participated in the Korean War, firing 1,051 6-in shells in cover of operations. She evacuated thousands of friendly Koreans from islands off the north-west coast and later returned home to be sent in 1955 to the Mediterranean Fleet as flagship, 1st Cruiser Squadron. She also took part in the movie “Battle of the River Plate” and in 1957 took part in a large exercise off the Turkish Black Sea ports, urging a strong protest from the Russian government. She was paid off at Devonport in 1959 and BU.
HMS Gloucester

The first of the second sub-class bearing her name was commissioned in 31 January 1939, after Manchester and Liverpool. She has been built at HM Dockyard, Devonport. On trials, she was the slowest of all the cruisers of that class. Gloucester became flagship of the 4th Cruiser Squadron (CS), China Station, until September 1939. By November, she teamed with the French aviso Rigault de Genouilly to patrol the Indian Ocean between Madagascar and the Seychelles, searching for the KMS Admiral Graf Spee. In December, she joined Force I at Simon’s town, South Africa, patrolling the South Atlantic, before joining the 7th Cruiser Squadron in Alexandria by May 1940. As Italy joined the war she teamed with Liverpool to shell Tobruk and covered several convoys to Malta. On 7 July, she was attacked by a SM.79 torpedo-bomber, hitting her bridge and killing all the staff including the captain. Lower ranke officers took control of the ships, which was steered by a transmission chain and remained in action at the Battle of Calabria, detached to escort the aircraft carrier Eagle. She Repaired by August, and joined the 3rd Cruiser Squadron, for Operation Hats, fall of September. She spent the rest of the year escorting convoys and by January 1941 participated in Operation Excess. With HMS Southampton she was attacked by Ju 87 “Stuka” from StG 2, and her sister ship was hit by three bombs, caught fire, and as her crew was unable to save her, she was scuttled by torpedoed from HMS Orion.
On 27 March 1941, HMS Gloucester was in the 7th CS, heading for Suda Bay in Crete. In the ensuring battle of Matapan, the Italian 3rd Cruiser Division opened fire first at 08:12 while the 7th CS turned around to observe the Iachino’s attempt to pincer the British cruisers between his 3rd Cruiser Division and the Vittorio Veneto. However the Italians were unable to hit Gloucester and Orion, which laid smoke screens and turned southwards, trying to lure Iachino on the approaching Mediterranean Fleet. The 7th CS kept up the pursuit as iachino retreated back, and Vittorio Veneto was later damaged, while Pola was later caught on Orion’s radar, crippled and soon assisted by Zara and Fiume. All three were butchered at night by Cunningham’s battleships. After Matapan, Gloucester covered another convoy to Malta, attacked Tripoli, and took part in the action to counter the German invasion of Crete. Gloucester and Fiji were attacked by fifty “Stuka”s of VIII. Fliegerkorps at 06:30 on 22 May, but only took near-misses. Later, both cruisers were detached to provide AA support for the destroyers Kandahar and Kingston. They were attacked by “Stuka”s of StG 2. and between 15:30 and 15:50, Gloucester was hit several times. She later sank, just as HMS Fiji. Some of her crew, only 85, swam to shore to become PoWs.
HMS Liverpool
After commission on 2 November 1938, Liverpool was sent in the East Indies, but her departure was slowed down by engine defects. As WW2 broke out she was in the 4th Cruiser Squadron, before joining the 5th Cruiser Squadron (China Station), later intercepting the Japanese passenger SS liner Asama Maru on 21 January 1940, trigerring a diplomatic incident, but because of reports signalling German sailors in the United States coming back home to Germany. The interception happened 35 miles (56 km) east of Niijima (Honshū). Her crew boarded, identified and too, under custody some 21 of the ship’s passengers they believed coming from the scuttled liner SS Columbus. Later the NYK Line dismissed Captain Watanabe because of “misconduct” while Government condemned the operation, later diffuse by an agreement.
In April 1940, HMS Liverpool was flagship of Rear-Admiral Arthur Murray’s force in the Red Sea, with HMAS Hobart. This force was deployed in case of war with Italy, and meanwhile she ferried Australian troops to Suez. By June, she was in the Mediterranean to join the 7th Cruiser Squadron. Soon at war with Italy, she shelled positions near Tobruk with Gloucester and four destroyers. Later three Italian destroyers were spotted by a Sunderland west of Zante and the British cruisers broke their support for Operation MA.3 to engage the destroyers, sighted 60 miles (97 km) south-west of Cape Matapan. Fire started at 14,000 yards (8.0 mi), and Espero was sunk while the two surviving destroyers reached Benghazi. The action depleted ammunitions, criticised by the admiralty. Admiral Andrew Cunningham, commander-in-chief of the Mediterranean Fleet, blamed this to inexperience, but MA.3 to Malta was cancelled, so this was a strategic victory for the Italians in a sense.
Operation MA.5 followed in July and the cruiser force was detached to Taranto to intercept an italian fleet, spotted on 9 July off Calabria. During the battle, Liverpool and Neptune commenced firing at 15:22. After Warspite hit Giulio Cesare, Italian fleet disengageed. Italian aviation attacked HMS Liverpool on 12, while underway to Alexandria. There were several wounded, included the cruiser’s commander. Later the cruiser covered the convoy AN.2 from to the Aegean and back (AS.2) attacked by Italian aviation on the 29. HMS Liverpool was hit by an unexploded bomb. In
August, HMS Liverpool joined the 3rd Cruiser Squadron with Kent (Rear-Admiral Edward de Faye Renouf). On 28 September, she covered Operation MB.5 to Malta, screening the Valiant and Warspite and were attacked along the way by Savoia-Marchetti SM.79s. Another convoy escort took place 8 October (MF.3) and back (MF.4), meeting Italian destroyers en route. She also covered operation against the island of Leros. On 14 October, she was attacked by Italian SM.79s, taking a torpedo hit in her forward section. There was an electrical short circuit to make the ruptured gasoline tank explode at 19:20. “A” turret was blasted, the bow destroyed and fire spread. She was taken in two by HMS Orion, and screened by Calcutta and Coventry, later to see her bow separated, but she reached Alexandria on 16 October, deploring the loss of 3 officers and 27 crewmen KiA, 35 wounded. Commander Welby took command as she was patched with a false bow. She steamed to the United States for more permament repairs, her bow reconstructed at Mare Island Naval Shipyard, Vallejo (California); Loosing the bow seemed to be a “habit” of this class, just like the New Orleans. Her AA was bolstered by adding nine 20 mm Oerlikon cannons. By November she headed for home waters and receive there a radar upgrade.
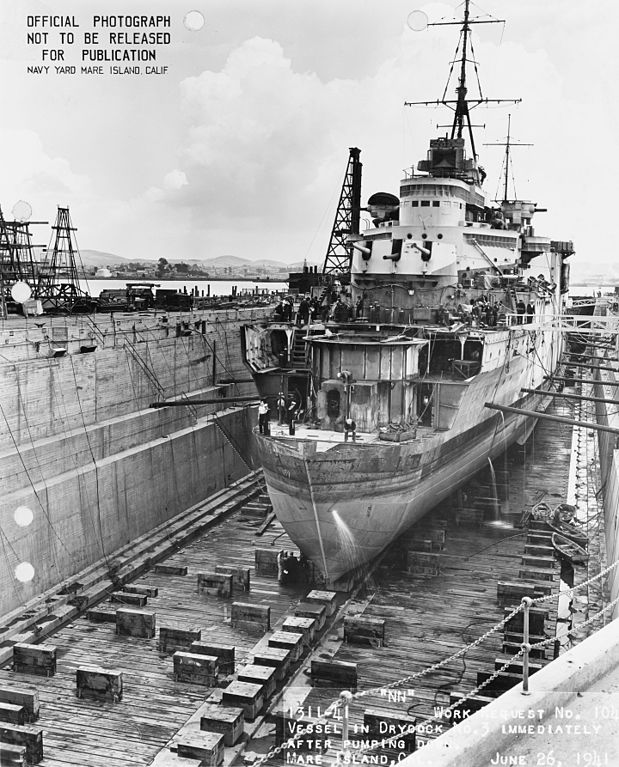
HMS Liverpool fitted with a new provisional bow at Mare Island Arsenal, 26 june 1941.
She was back in action with the 18th Cruiser Squadron at Scapa Flow, then deployed with the Arctic convoys and by mid-May 1942, HMS Liverpool protected the damaged cruiser Trinidad underway from repairs in Russia, back to UK. She was off Bear Island in the Barents Sea, to rendezvous with Trindad, which arrived on 14 May, repeatedly attacked. She sank the next day. Rear-Admiral Burrough’s group itself was later attacked. On 25 May, HMS Liverpool escorted PQ 16 to Murmansk with Nigeria, Kent, and Norfolk, and the return convoy QP 12 on 26 May. She was sent to the Mediterranean in June 1942 for Operation Harpoon with convoy WS.19. She was attacked underway by 38 Axis aircraft. She was badly hit, her starboard side engine room, partially flooded, and almost dead in the war, as her steering was down. She could still steam at 4 knots (7.4 km/h), but was taken under tow by the destroyer Antelope. Italian aircraft later focused on HMS Liverpool and on 17 June, the cruiser was damaged by more near misses. She was temporarily repaired at Gibraltar, to be in UK by August, drydocked at Rosyth. She emerged in July 1943, refitted with the removal of “X” turret and aircraft facilities, extra AA and new radar suite.
When this was completed however, this was October 1945 and the war has ended. She joined the 15th Cruiser Squadron, Mediterranean Fleet as flagship and was decommissioned in 1952 at Portsmouth Naval Dockyard. Plans were drawn up for her modernisation, prioritary with HMS Belfast however rationalisation apparent in Duncan Sandys’ 1957 Defence White Paper curtailed this and she was sold in 1958 for BU.
HMS Manchester

HMS Manchester was commissioned in 4 August 1938. She served with the 4th Cruiser Squadron in the East Indies. She served betwween Aden and the red sea and the China sea, and through the Indian ocea. When the war broke up, she was with Gloucester, heading for Colombo, and in September, joined the sloop Rochester to escort an Indian troop convoy and later an Anglo-French convoy into Suez and back to Colombo. She was ordered home on 10 November, arrived at Malta to embark Vice-Admiral Geoffrey Layton as flagship of the 18th Cruiser Squadron. She arrived in Portsmouth on the 25th, drydocks to repait, maintenance and other defects corrected, plus she was refitted with degaussing equipment and her aft high-angle director-control tower was fitted.
After this was done, she headed on 22 December for the Home Fleet at Scapa Flow and took part in the Northern Patrol. By February 1940 she helped capture the 4,709 grt Wahehe, remained on duty until early April. She was attacked by the Luftwaffe on 16 March, but was not damaged. She then took part in the Norwegian campaign, still as flasghip of the 18th CS with Southampton, Calcutta and four destroyers. They escorted 43 troopships (ON-25) to Norway but the convoy turned back after intelligence reports. She later teamed with Sheffield and Glasgow and seven destroyers to attack a Königsberg-class cruiser reported in Bergen by the the RAF. However yet again, the Admiralty cancelled the operation. Bombers from KG 26 and KG 30 later attacked the British forced and sank the destroyer Gurkha while both Southampton and Glasgow were near-missed. Manchester and Southampton patrolled off Fedjeosen by night and the following day headed back for Scapa. On 12 April, Captain Herbert Packer took command of HMS Manchester.
She escorted the Convoy NP-1 to Narvik and latter she was land a force to occupy Namsos on the 14. For this operation she teamed with HMS Birmingham and Cairo. She would carry out another escort mission to Namsos and back (FP-1). She landed troops at Åndalsnes and Molde on the 22 and later covered destroyers in a minelaying mission off Trondheim. She was attacked by the Luftwaffe, had near-misses but her own crew hit none of the attackers. On 10 May, Manchester and Sheffield assisted Kelly torpedoed by an E-boat. On 26 May, the 18th CS was now composed of Manchester, Birmingham and Sheffield, operating in the channel for anti-invasion duties. Vice-Admiral Frederick Edward-Collins too command on 15 June, and Vice-Admiral Lancelot Holland on 12 November. A Type 286 search radar was installed dduring a refit in November 1940.
On 15 November, she sailed to Alexandria via Gibraltar, to load 1,400 men and supplies, with Force H, Operation Collar. New, the Italian interception attempt gave the Battle of Cape Spartivento. The cruisers repelled the Italians, as well as attacked from the Regia Aeronautica. HMS Manchester would fire 912 shells during this battle, but failed to score a single hit. She was later back from Mediterranean, to Scapa Flow on 13 December, and started a refit at Jarrow from 11 January to 17 April 1941. During this refit, her hull was reinforced and 40 mm Bofors AA gun were added on ‘B’ turret plus five 20 mm Oerlikons, plus a Type 284 gunnery radar installed on the DCT roof atop the bridge, plus splinter plating for the secondary armament and torpedo tube, and ASDIC. HMS Manchester was torpedoed during a convoy escort mission, but survived and was repaired in the United States, received more Oerlikon guns and four Bofors. She took part in Operation Pedestal in August 1942 with a modernized radar suite from April-May 1941, a Type 279 early-warning radar, Type 284 main FCS, two Type 285 gunnery radars (DP guns), Type 273 surface-search rada nad two Type 282 gunnery radars for the 40 mm AA.
HMS Manchester met her fate during Operation pedestal: Transferred to the 10th CS, she departed Greenock on 4 August, escorting the aircraft carrier Furious. Off the coast of Portugal she met the rest of the fleet, and refuelled at Gibraltar. She then departed to join Force X on 10 August. As HMS Eagle was sunk by an U-Boat, the first casualty of the convoy, the night of 13/14 August, hell broke loose. As the convoy passed a recent mine-free channel off the Tunisian coast, 40 min. after midnight, the convoy was attacked by two German E-boats. They were driven off, but this was the turn of Italian MAS boats off Kelibia later, MS 16 and MS 22. One of the torpedo fire struck the cruiser in the aft engine room. Her her rudder was jammed hard to starboard and electrical power was shut for the while aft end of the ship. She stopped but later the port outer shaft was still survceable and safety teams worked hard to have it back on line. Meawhile, the cruiser was gradually flooded, and she listed 11-degree. The main radio room and four-inch magazine were flooded, and at around 01:40 “Emergency Stations” was ordered, preparinh to abandon ship. Captain Drew trie to lighten the ship, but he will try to reach Zumba Island by dawn in three hours, to beach her. Eventually steam had been restored to the port outer turbine, while the rudder was unjammed and electrical power was restored to the steering gea around 02:02. Not infomed of this, the captain decided to abandon ship 45 minutes later. Preparations were made for scuttling her with explosive charges, and final evacuation started at 02:50. Manchester will sank at 06:47. Part of the crew ended in Italian and French PoWs. The admiralty asked for an enquiry after the event, it was asked to court martial captain Drew in 1943, and he was sanctioned after the Royal Navy’s longest-ever court martial, as it was estimated he could have saved the ship.
HMS Edinburgh
HMS Edinburgh was commissioned on 6 July 1939, and soon she joined the 18th Cruiser Squadron at Scapa Flow, Home Fleet for the northern patrol between Iceland and the Faroe Islands. However, she was to be sent to the 2nd Cruiser Squadron, Humber Force when the Luftwaffe attacked Rosyth on 16 October 1939. She only had light damage. Edinburgh, Southampton, Mohawk were damaged and sixteen Royal Navy crew died. Saling on 23 October, she escorted convoys bound to Narvik and after the loss of Rawalpindi, searched for KMS Scharnhorst, with little luck. By 18 March 1940, she was refitted in the Tyne, until 28 October. Back to the 18th Cruiser Squadron, she escorted WS4B to Freetown and back to Scapa Flow on 12 November. In december, she hunted down a reported German surface raider in the North Atlantic, with Hood, Edinburgh, and 4 destroyers. All were back for Chistmas. She escorted convoy WS7 to the Middle East in January and back on 15 April. She also covered mine-laying operations off the Danish coast and Operation Claymore, a raid to occupy the Lofoten Islands in May 1941. During the hunt of Bismarck, she was on patrol in the Bay of Biscay. She interpected the supply ship Lech on 22 May and was placed in an interception course if Bismarck headed for Brest.
On 1 June, she she relieved Hermione on the Denmark Strait patrol and escorted WS 9B to the Middle East, via Gibraltar. HMS Edinburgh later took part in Operation Substance, via Malta on 24 July. She was attack when underway home by a German torpedo bomber, but escape. By August 1941 she escorted WS10 to Simonstown in South Africa and was back to Malta for Operation Halberd, arriving on 28 September. She departed Gibraltar on October 1941, and joined the Iceland Forces Patrol in November 1941. In December, she covered a first Arctic convoy and after refit in January-March 1942, resumed her Iceland-Faroes patrol, followed by Baltic convoy escort of QP4 and PQ13 and back to Scapa Flow. In April, she escorted the convoy PQ 14 to Murmansk, with losses en route caused bt U-boats. Edinburgh was one of the few surviving ship, only seven vessels that made it into Murmansk on 19 April 1942.
HMS Edinburgh became flagship of Rear-Admiral Stuart Bonham Carter, commanding QP 11, 17 ships departing from Murmacnsk on 28 April 1942. Tow days later, U-456 (Kapitänleutnant Max-Martin Teichert), seet in ambush, spotted, fired and hit Ediburgh her starboard side. The torpedo struck her, just forward of the compartment in which a gold reserve was stored. Edinburgh started to list heavily, but the crew closed watertight bulkheads and contained the flooding. Soon after, U-456 managed to fire a second torpedo, which struck Edinburgh’s stern. Her steering gear was destroyed,and there was now little to do to prevent her sinking. She was however taken in tow, returning to Murmansk escorted by Foresight and Forester and the minesweepers Gossamer, Harrier, Niger, and Hussa, harrassed along the way by German torpedo bombers. Ultimately she was attacked off Bear Island by three large German destroyers, Hermann Schoemann, Z24 and Z25 and cast off the tow, to try to sail in circles. She managed to fire managed to straddle KMS Hermann Schoemann, later scuttled. HMS Edinburgh’s escorts managed menawhile to repel Z24 and Z25. However torpedoes were fired, and the British cruiser could do little to dodge them. She was hit by one actually targeting another ship, which struck her amidships, opposite to the first hit. The crew managed to patch her but it was already too late. The crew abandoneded ship, rescued by Gossamer and Harrier, but the ship lost in previous attacks some 56 officers and ratings. The minesweepers were particularly heroic during this action, and scared the destroyers; Scuttling by gunfore failed, even after 20 shots, and dropping Depth charges alongside. Foresight launched her last torpedo to finish her off.
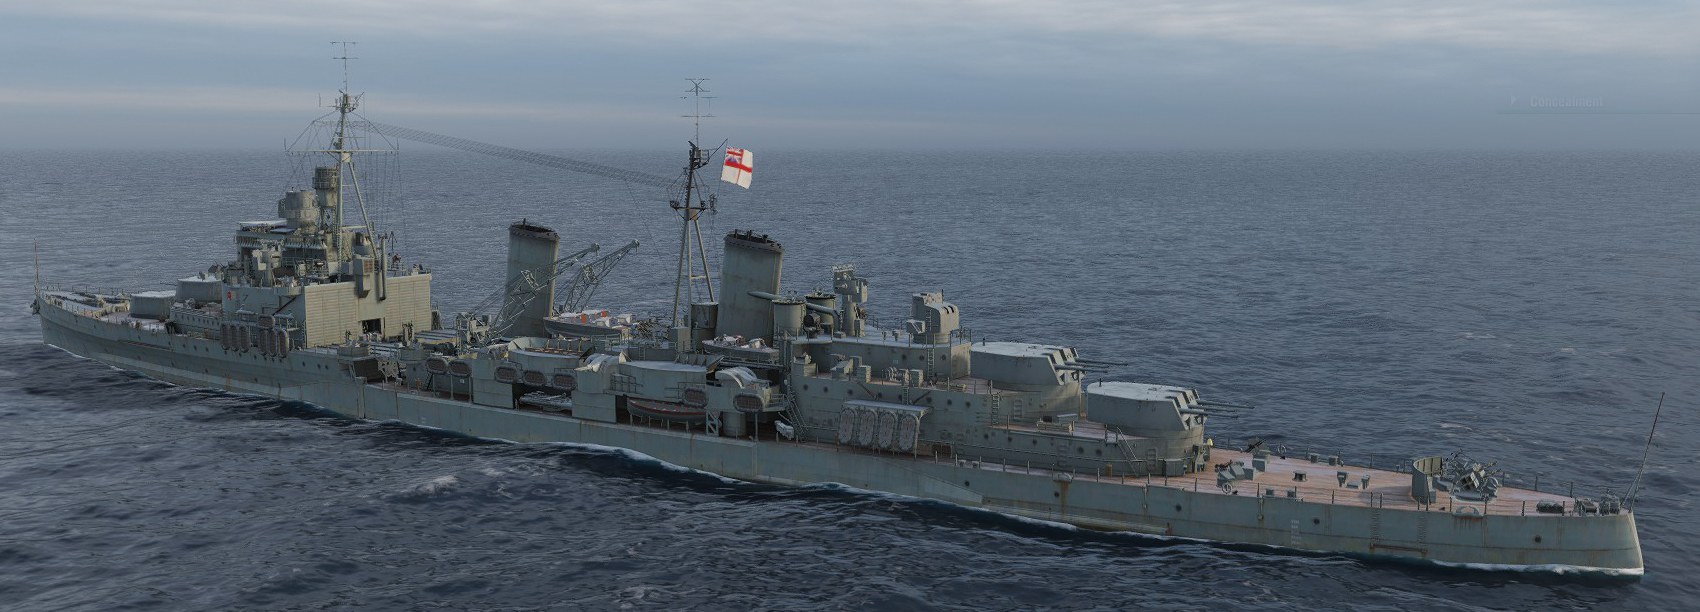
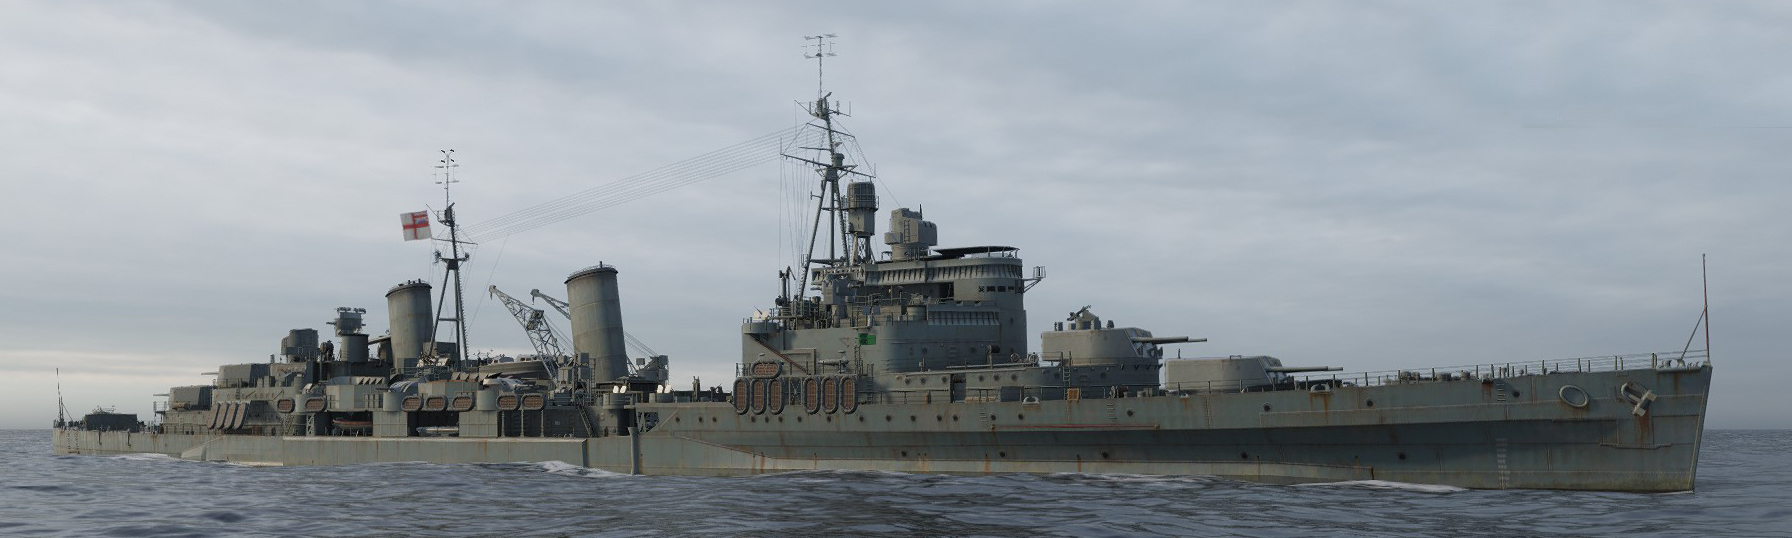
wow’s renditions of the HMS Edinburgh
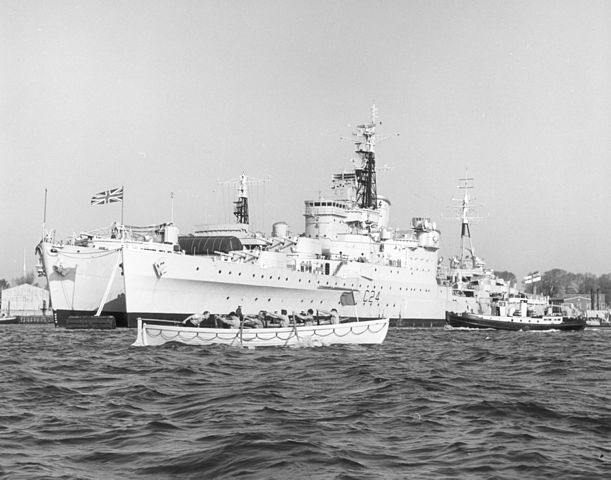
HMS Belfast
The famous cruiser, the only one still on display on the Thames, and the living embodiement of the Royal Navy in WW2, was commissioned on 5 August 1939, after Edinbugh. She had been built at Harland and Wolff, Belfast, the namesake city and same Irish yard that built the Titanic. She costed £2,141,514 and was launched on St. patrick’s day, Christened by Anne Chamberlain, the PM’s wife. The tenth Town-class cruiser was initially part of the British naval blockade but in November 1939, she struck a German mine, but was salvaged and towed for repairs, which kept her more than two years out of action. HMS Belfast was back into the fray in November 1942, with improved AA and new radar suite, plus improved armour, for a large displacement and dimensions. She saw action in the Arctic convoys as her sister ships, until December 1943. She was present at the Battle of North Cape, assisting in the end of Scharnhorst. By June 1944, the cruiser took part in Operation Overlord, covering the landings.
In June 1945, as many other British cruisers, she was redeployed on the Far East theater. She arrived to the British Pacific Fleet shortly before the end of the War. But this was not over, as she was modenrized and took part in the Korean war in 1950–52. She was the last to be completely rebuilt and modernized in 1956-1959 and was commissioned in various theaters until her reserve in 1963, and decommission in 1967. At that stage, properity has return and there were efforts to preserve her.
Soon the idea came to convert her as a museum ship. This was acted by a joint committee comprising the Imperial War Museum, and National Maritime Museum, headed by the Ministry of Defence. After examination in June 1968 it reported that preservation was practical. In 1971, the government acted against public funding and instead, urged the formation of the HMS Belfast Trust, a private crowd funding campaign. Its efforts were successful, and the government transferred the ship’s property to it July 1971. For toruristic purpose she was sent to London and moored on the River Thames, close to Tower Bridge. She was opened to the public in October 1971, attached to the Imperial War Museum in 1978. Belfast is still a popular attraction, with 327,000 visitors in 2019. There had been proposals to restore her to her 1942 appearance but it was judged too far costly. So the current Belfast is a bit of a mixbag, 1959 appearance with her 1942 camouflage.

Belfast shelling Korea in 1951
 Latest Facebook Entry -
  X(Tweeter) Naval Encyclopedia's deck archive
 Instagram (@navalencyc)


 French Navy
 Royal Navy
 Russian Navy
 Armada Espanola
 Austrian Navy
 K.u.K. Kriegsmarine
 Dansk Marine
 Nautiko Hellenon
 Koninklije Marine 1870
 Marinha do Brasil
 Osmanlı Donanması
 Marina Do Peru
 Marinha do Portugal
 Regia Marina 1870
 Nihhon Kaigun 1870
 Preußische Marine 1870
 Russkiy Flot 1870
 Svenska marinen
 Søværnet
 Union Navy
 Confederate Navy
 Armada de Argentina
 Imperial Chinese Navy
 Marinha do Portugal
 Mexico
 Kaiserliche Marine
 1898 US Navy
 Sovietskiy Flot
 Royal Canadian Navy
 Royal Australian Navy
 RNZN Fleet
 Chinese Navy 1937
 Kriegsmarine
 Chilean Navy
 Danish Navy
 Finnish Navy
 Hellenic Navy
 Polish Navy
 Romanian Navy
 Turkish Navy
 Royal Yugoslav Navy
 Royal Thai Navy
 Minor Navies
 Albania
 Austria
 Belgium
 Columbia
 Costa Rica
 Cuba
Cuba Czechoslovakia
 Dominican Republic
 Haiti
Haiti Hungary
 Honduras
 Estonia
 Iceland
 Eire
Eire Equador
 Iran
Iran Iraq
Iraq Latvia
 Liberia
 Lithuania
 Mandchukuo
 Morocco
 Nicaragua
 Persia
 San Salvador
 Sarawak
 Uruguay
 Venezuela
 Zanzibar
 Warsaw Pact Navies
 Bulgaria
 Hungary

 Bundesmarine
 Dutch Navy
 Hellenic Navy
 Marina Militare
 Yugoslav Navy
 Chinese Navy
 Indian Navy
 Indonesian Navy
 JMSDF
JMSDF North Korean Navy
 Pakistani Navy
 Philippines Navy
 ROKN
ROKN Rep. of Singapore Navy
 Taiwanese Navy
 IDF Navy
 Saudi Navy
 Royal New Zealand Navy
 Egyptian Navy
 South African Navy


 Ukrainian Navy
in the paragraph talking about the vickers .50 there is a grammar mistake of ould instead of could
Well spotted, fixed, thanks !