
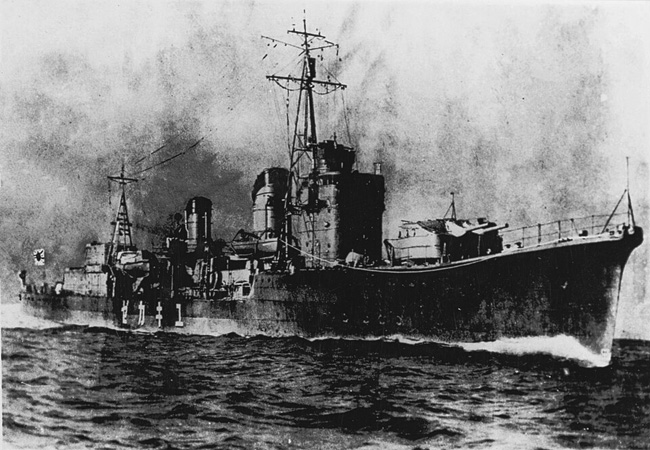
 IJN 1st class Destroyers built 1938-41: Kagerō, Shiranui, Kuroshio, Oyashio, Hayashio, Natsushio, Hatsukaze, Yukikaze, Amatsukaze, Tokitsukaze, Urakaze, Isokaze, Hamakaze, Tanikaze, Nowaki, Arashi, Hagikaze, Maikaze, Akigumo
The Kagerō-class destroyers (Kagerō-gata Kuchikukan) were a group of nineteen 1st Class destroyer of the Imperial Japanese Navy, also called the Shiranui-class destroyers in some publications as IJN Shiranui was launched before Kagerō. This series was called Destroyer Type-A (Kō-gata) from their plan name. Derived from the previous Asashio, already deemed the best IJN destroyers ever to that point, they improved on the recipe and were arguably better. They were among the deadliest destroyers afloat when introduced in service in 1940, well armed overall and festooned with nearly twenty “Long Lance” torpedoes and advanced reloading systems. Key destroyers for Japanese operations after Pearl Harbour, they soon became frontline escorts for the best of the IJN battle fleet, reflected by their heavy losses in the Pacific war.
Development
After Japan in 1937 tore down the London Naval conference on tonnage limitation, the Naval Staff prepared new requirements for larger destroyers teailore for fleet operations and notably to operate with heavy cruiser, and a maximal speed or more than 36kts, endurance of 5000nm at 18kts, armament like the 1927 “special type” destroyer (of six main guns guns), on hull dimensions not exceeding the Fubuki class, making no compromise about the final tonnage but one, a speed more realistically limited to 35kts. Attention was paid instead to stability, with increased beam, boyancny and strenght for the hull as well as more moderated superstructures.
Welding started to be used, but framing of the plating wwas still riveted after the Fourth fleet incident. It was just afterwards prohibited to use welding in tensile elements of the hull. The Hull shaped was also improved, especially the aft section in order to aim at propulsion efficiency. The Asashio class already inaugurated a new 52,000hp machinery and it was made lighter on the next Kagero with three boilers of a more advanced type working at 30kgf/cm2, 350°С located in three successive individual boiler rooms, with smoke ducts still in two unequal funnels. Amatsukaze received new boilerswith better specs at 40kgf/cm2, 390-400°С for an optimized burn rate and more range. The turbines were placed one after another in a common engine room and the armament repeated that of the Asashio class with a max. 55° elevation aand two qyad TT banks, always with spare torpedoes and quick reload.
15 ships were ordered under 3rd Supplementary Programme of 1937, three more on the 4th one in 1939. So after the success of the Asashio class, which reconciled the admiralty with an “ideal design”, geztting rid of any compromises and arguably much better than the 1920s Fubuki series, the Kagerō class were the next of a new standardized, mass produced class intended for wartime operations, which new seems more likely everyday. The Programm Type A was to be roughly similar in design with the Asashio, but slightly larger for extra buoyancy and stability, and incorporating improvements gained from operational experience. There was a heavier main battery and even a much heavier torpedo armament making them in 1940 the most fearsome “standard” destroyer design in the world. The first fifteen in the class were ordered in 1937 as part of the 3rd Naval Armaments Supplement Programme. The final four were ordered in 1939 under the 4th Naval Armaments Supplement Programme. The final ship in class, IJN Akigumo, was mistakenly assimilated by many authors as part of the succeeding Yūgumo class due to many fictitious destroyers listed in Japanese budgetary records to conceal the budget allocated to the top-secret Yamato-class battleships at the time. But unlike the fake destroyers, Akigumo was real.
The Kagero class were built at the following yards:
Maizuru Naval Arsenal: Kagerō, Oyashio, Amatsukaze, Nowaki, Arashi
Uraga Dock Company: Shiranui, Hayashio, Tokitsukaze, Hamakaze, Hagikaze, Akigumo
Fujinagata Shipyards: Kuroshio, Natsushio, Urakaze, Tanikaze, Maikaze
Kawasaki Dockyard Co.: Hatsukaze
Sasebo Naval Arsenal: Yukikaze, Isokaze
Naming:
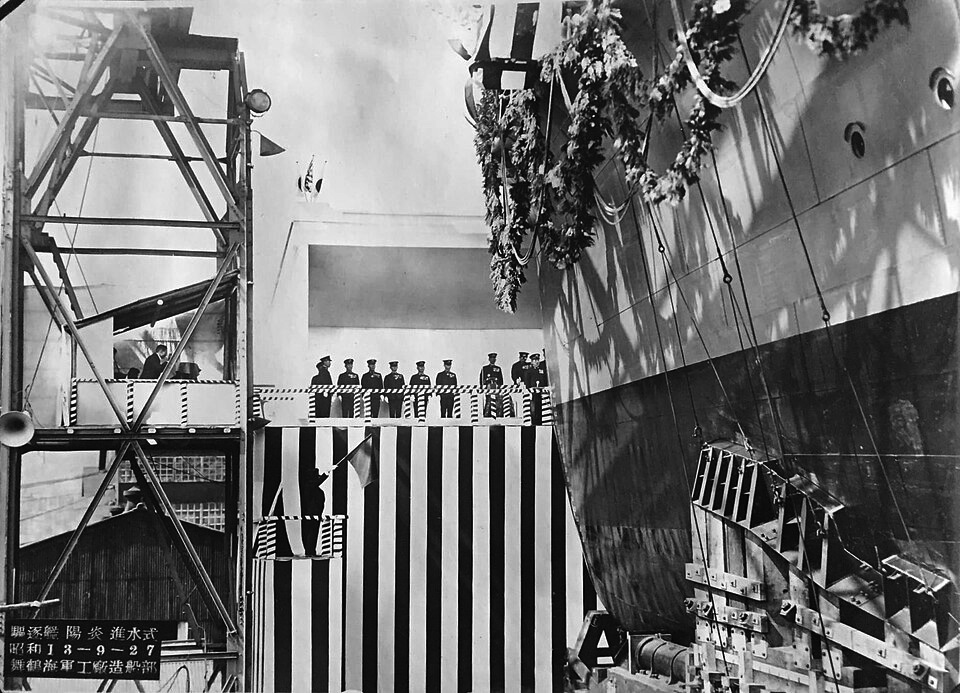
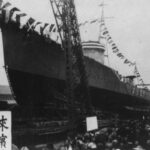
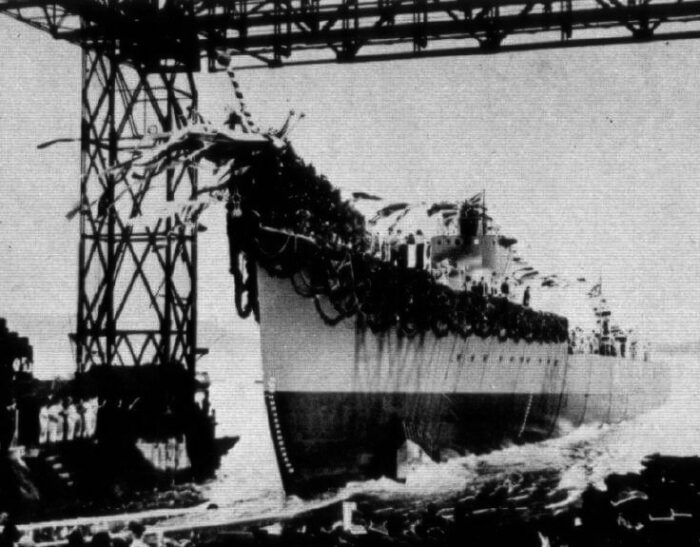
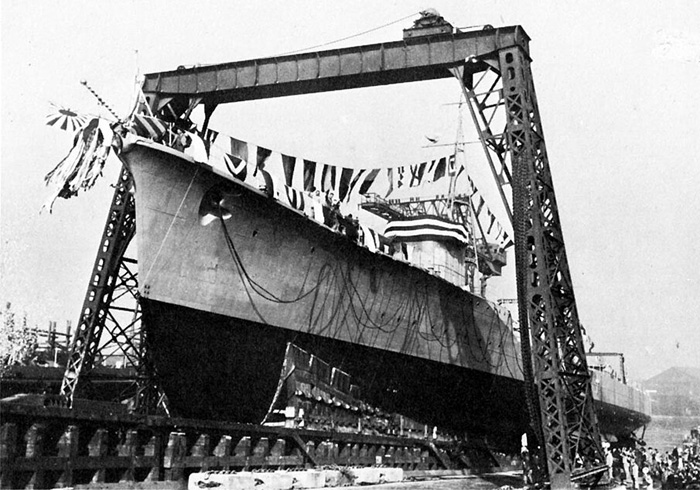
Launching of the lead ship, IJN Kagero, in great regalia in 1938.
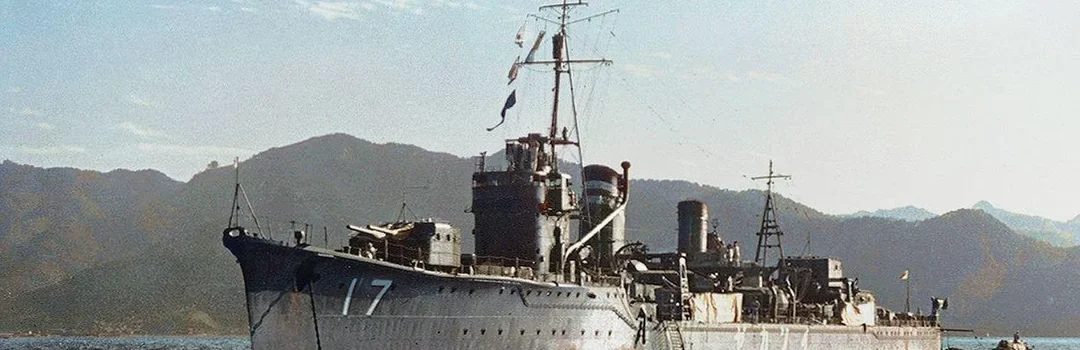
As usual, poetic traditions had them named after natural phenomenons: Respectively they were “Mirage, Phosphorescent Light, Black Current, Father Current, Swift Tide, Summer Tide, First Wind, Snowy Wind, Heavenly Wind, favorable wind, Wind on the Sea, Wind on the Beach, Beach Wind, Valley Wind, Autumn Gale, Storm, Clover Wind, Dancing Wind, and Autumn Clouds”.
Design of the class
Hull and general design
The Kagerō class used a similar but slightly enlarged hull and bridge compared to the preceding Asashio class. They had however almost an identical silhouette, making the job difficult for intel. The main visual difference resided in the reloads for the forward torpedo launcher. They were located in front of the launcher, instead of to the rear. The ships measured 118.5 meters (388 ft 9 in) overall for a beam of 10.8 meters (35 ft 5 in) and draft of 3.76 meters (12 ft 4 in). This was a bit longer than the Asashio class (118.3 m/388 ft 1 in oa), but especially they were beamer (10.3 m/33 ft 10 in), for the same draft. They displaced 2,065 metric tons (2,032 long tons) standard, 2,529 metric tons (2,489 long tons) deep load, a displacement and beam slightly larger for greater stability and buoyancy reserve.
plansssss
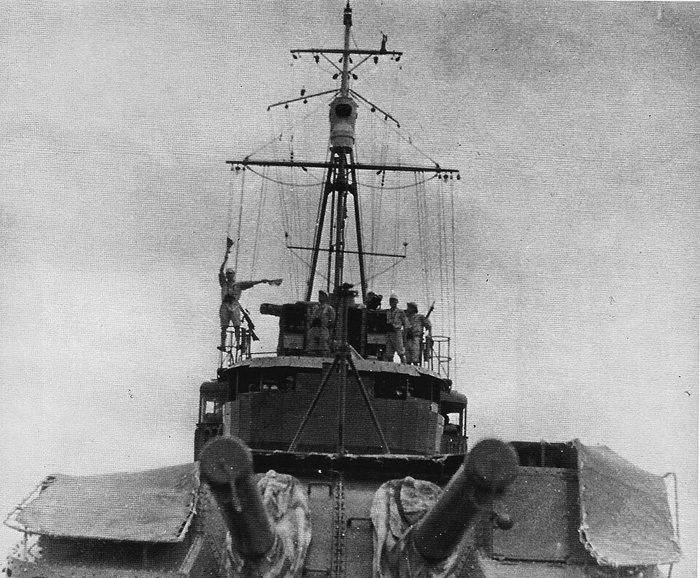
The general silhouette was very much the same apart the point seen above. The bridge, notably had the same shape, with a rounded face, streamlined, on two levels. There was some sort of “semi-open” bridge with large windows, and the helmsman post below dotted with portholes, stubby glassed wings. Therw as structure aft and above of the enclosed bridge aon the roof for the fire control main tower. A setp lower was an open deck for observer and the tripod mast was anchored at its tail, supporting a watchtop and later rudimentary radars. There were two raked funnels, one main, with two boilers truncated there, and an aft smaller one (single boiler exhaust). In between was located the first 4-tube torpeo bank, with its reload spares located on either side of the forefunnel.
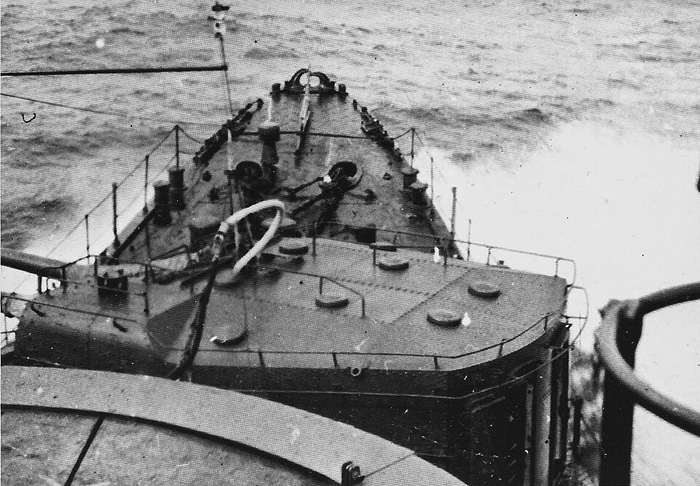
Around the admidship funnel was located some AA and a main seazrchlight projector. Two service boats undervaits were located either side. Then came the aft TT bank, with its four reload tubes located on the starboard side alongside the quartedeck structure supporting “B” superfiring turret while “C” on on deck aft. Two paravanes on hinged supports were located further aft on the poop deck, and then the two DC racks. The prow had the standard rounded chin, raised deck and flare, but the deck arrangement was peculiar with the forward deck portholes located half a deck below the portholes aft. Electric lighting was present in 2/3 of the hull. Like for past design, the extra lenght made for elongated and well polish stern lines to negate turbulences, but the shafts, struts and propellers were identical to past classes. The crew of a Kagero class destroyer amounted to 240 officers and enlisted men at the start of the war, a bit more as flagship, and more in 1944-45 between the radar operators and extra AA gunners. The two main service motor launches were abaft the forward bridge under davits.

Powerplant
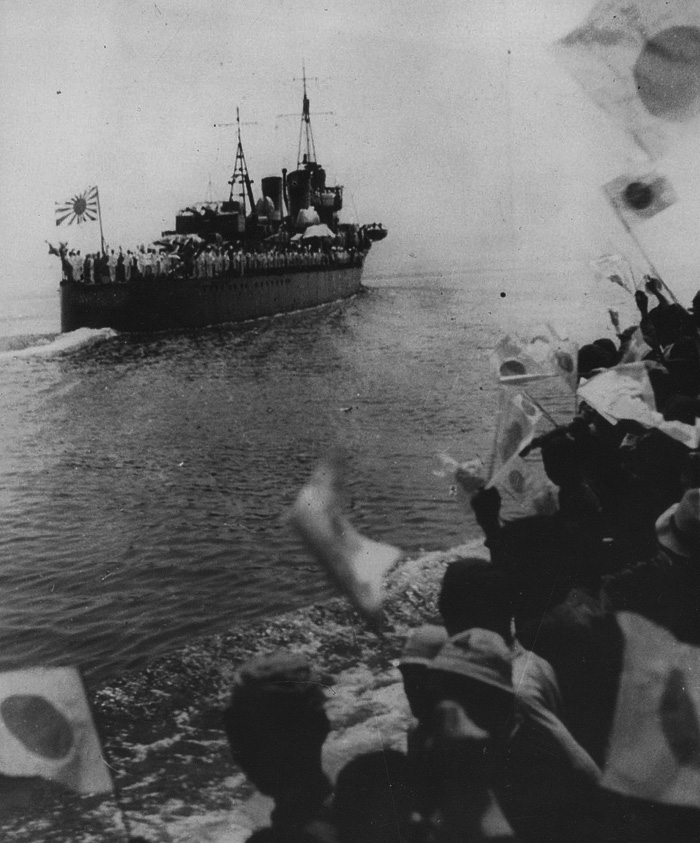
Hamakaze departing, in the propaganda movie “Eighty-eight Years of the Sun”.
The Kagero class destroyers were powered by two propellers, driven by two Kampon geared steam turbines, using steam provided by three Kampon water-tube boilers. These turbines were rated for 52,000 shaft horsepower (39,000 kW) which was similar to the previous Asashio class, for a designed speed of 35 knots (65 km/h; 40 mph), more realistic than the 38 knots of the 1926 “special type”. But with their well refined hull shapes, they were proved capable of exceeding 35.5 knots on sea trials.
The Kagero class had a baseline range of 5,000 nautical miles (9,300 km; 5,800 mi) at 18 knots (33 km/h; 21 mph). But on trials they proved to have a range of 6,053 nautical miles (11,210 km; 6,966 mi) if needed. Amatsukaze had an experimental boiler system built up a higher steam pressure. Top speed was 35.5 knots but she had a superior fuel economy and longer range. This engine design was later recycled into the single “super destroyer” Shimakaze in 1942.
Armament

As built, the Kagerō class was essentially identical as the Asashio class with a main battery of six 5-inch 12.7 cm/50 Type 3 naval guns in three twin-gun turrets. For stability reaosns there was asingle deck turret “A” forward, and a superfiring pair “X-Y” aft. These mounted were semi dual purpose, with a 55-degree elevation. But the best asset was their eight 610 mm (24 inches) torpedo tubes furing the fearsome oxygen-fueled Type 93 “Long Lance” torpedo. The two quadruple traversing mounts enabled to keep the ship’s lenght reasonable. The mounted were also lightly armoured (see below). There were reload tubes close to the funnels fore and aft. Their anti-submarine suite initially comprised 16 depth charges on two 8-DC racks aft, but it was increased to 36 as the war progressed.
As for the anti-aircraft armament they had two twin-mount Type 96 AA guns forward of the second smokestack. But more were installed as the war progressed. In 1942–1943, triple mounts were installed, plus a single additional twin mount forward of the bridge on a platform. In 1943-1944, the superfiring “X” turret was removed, replaced by two more triple mounts. In late 1944 additional guns, mostly single mounts, were installed, notably Isokaze and Hamakaze had seven single mounts, Yukikaze 14 single mounts, plus four Type 93 13 mm machine guns.
Hamakaze had a radar Type 22 set installed in late 1942 and later the others get one while in maintance back in Japan in repair or refit. From mid-1944 they also obtained a type 13 radar.
12.7 cm/45 3rd Year Type naval gun
The 12.7 cm/50 Type 3 naval gun was a dual purpose model and standard weapon for Japanese destroyers from 1928 and until 1944 except for the Akizuki and Matsu classes. These were taunted as true dual-purpose, but this remains a nominal capability due to their bag propellant and hand ramming requiring a fixed elevation up to 55° and rate of fire of 5–10 rounds per minute, training speed of only 6° per second. Somewhat useful in 1930 these were hopeless against 1942 aircraft. To the last days in 1945, they lacked radar-assisted fire control and fuses, severely limiting their AA capabilities as well.
The Type 3 gun was of built-up construction with 3, then 2 layers, breech ring and breech bush (Welin interrupted screw breech) and still used powder bags, whereas the shell was fuzed manually on the loading tray before ramming by hand with the pusher-type shell hoist and manually insterted powder bags.
Model C:
Adopted by the Shiratsuyu, Asashio, and Kagerō-class, elevation to 55°, depression to −7°.
Mount weight: Type A/B 18.5 tonnes (18.2 long tons; 20.4 short tons)
Round: 23 kg (51 lb) HE, illumination, incendiary shrapnel (sankaidan) for AA use, flat-nosed ASW (1943). 1945: HE developed with added charge for 23,025 metres (25,180 yd).
Propellant: 7.7 kg (17 lb) 30 DC.
Muzzle velocity:
-Common Type 0 HE 23 kg (51 lb)/1.88 kg (4.1 lb): 910–915 m/s (2,986–3,002 ft/s)
-Common Type 1 HE 23 kg (51 lb)/1.88 kg (4.1 lb): 910–915 m/s (2,986–3,002 ft/s)
-Illumination 23 kg (51 lb): 750 m/s (2,500 ft/s)
-ASW 20.9 kg (46 lb)/4 kg (8.8 lb): 250 m/s (820 ft/s)
-HE 1945 LG type 27.9 kg (62 lb)/2.2 kg (4.9 lb): 910–915 m/s (2,986–3,002 ft/s)
⚙ specifications 12 cm/45 3rd Year |
|
| Weight | 4,205 kilograms (9,270 lb) |
| Barrel length | 6.483 metres (21.27 ft)/ barrel 6.265 metres (20.55 ft) |
| Elevation/Traverse | -7° +40° or more and 120°/120° |
| Loading system | Welin interrupted screw, Hydro-pneumatic recoil |
| Muzzle velocity | 910–915 m/s (2,986–3,002 ft/s) |
| Range | 18,400 metres (20,100 yd)/40° |
| Crew | 6 |
| Round | 20.3 kg (45 lb) 120 x 550 mm.R., sep. loading cased charge |
| Rate of Fire | 5–10 rpm |
Torpedoes
The torpedo armament was now eight Type 93 torpedoes in two quadruple launchers like on the Shiratsuyu-class as revised. They also kept all eight reloads stored in separate deckhouses on the centerline of the ship for “B” mounts and two separate abaft the funnel for “A” mount forward. 16 depth charges was the stabdard, versus 18 on previous classes, and it was decided to increase this to 36, but to compensate for this extra weight, a set of four torpedo reloads was removed, leaving 12 total (4 spares only).
The Asashio dropped the Hatsuharu’s three triple torpedo tubes banks initially as designed, but kept the same arrangement of two quadruple mounts to reduce top weight in the final draft. These were of the new Type 92 mounts keeping the Fubuki original capacity without compromising too much stability. They had one spare for each pre-loaded, so sixteen in all.
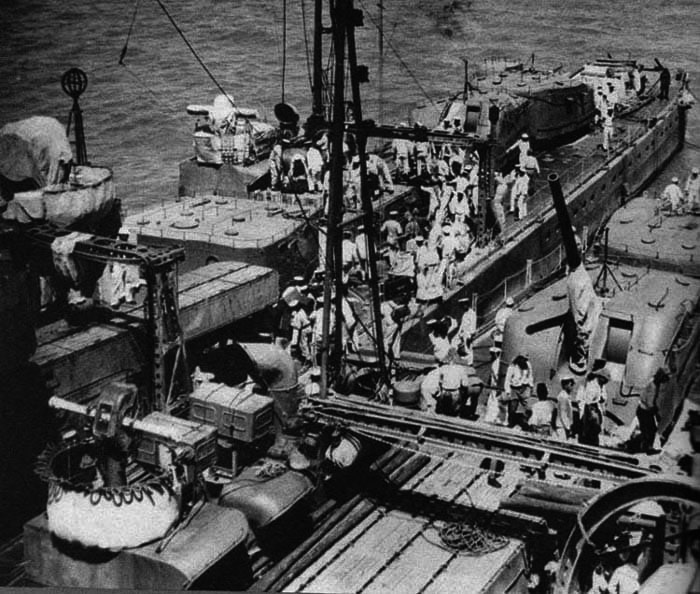
The eight 24 in (610 mm) torpedo tubes in two quadruple centerline mounts were all equipped with the Type 93 “Long Lance” torpedoes. The containers with eight spare torpedoes behind the mounts made possible a reloading underway at speed within a minute, using winches and rails. So this made the Asashio’s torpedo battery surpassing U.S. destroyers at the time.
These Type 92 launchers, derived initially from the twin tube Type 89 launcher of the Takao-class heavy cruisers had been fitted with shields as weather and splinter protection, notably from strafing fire, but not shrapnel of large size. They were for example not immunte to 0.5 in cal. heavy amchien gun fire, that most US aircraft carried. This was a compromise in weight. The initial shields in Duralumin were lighter but corroded, while in demand for the aircraft industry. On the Asashio they were in “NiCrMo” steel, heavier but easier to produce, from recycled air chambers of obsolete torpedoes. They only measured 3 mm (0.12 in) in thickness to save weight, and thus even unable to protect against 0.3 inches or 8 mm fire.
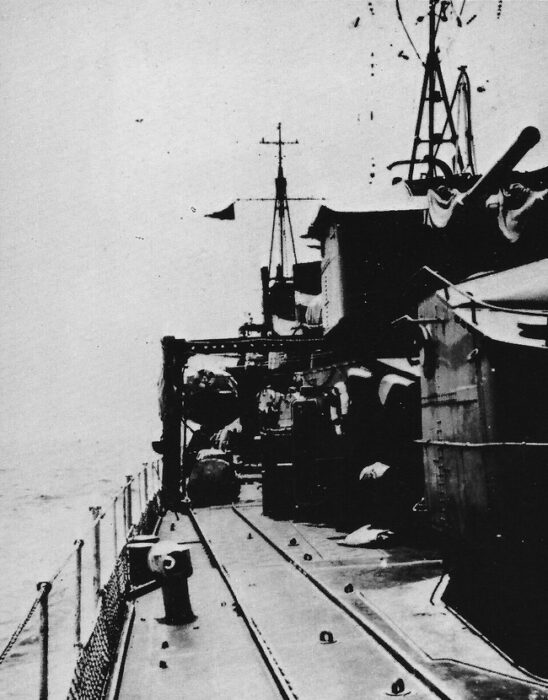
Murasame and Samidare showing their rear deck details, prewar
These Type 92 launchers were traversed by electro-hydraulic gears to 360° in 25 seconds. There was a backup manual system using handwhels and a reduction, but this took up to two minutes for the same revolution. The eight reloads as seen above used systems of cranes and winches, rails and chariots to help the reloading process. Intensive drills ensure the best reloading times. The spare torpedoes were stored externally in canisters. Each tube could be reloaded separately in 23 seconds through an endless wire and winch, all manual. The Type 93 torpedo benefited of large stockpiles available and they remained extremely potent until 1945.
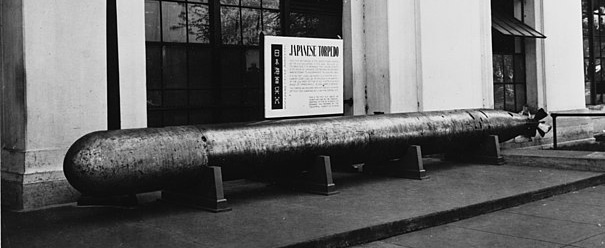
Type 93 (1933)
The Type 93 entered service in 1933 (model 1) and the ships were possibly rearmed in 1935-36 or never, it’s not strictly confirmed. The Type 90 could have been installed instead when available.
61 cm Type 93 torpedo found on the Mutsuki, Fubuki, Akatsuki classes, and all oxygen fuelled from the Hatsuhara and beyond. The Designer was Rear Admiral Kaneji Kishimoto, and Captain Toshihide Asakuma, and this started in 1928 (just as the last Mutsuki class ships were completed), then went on until 1932. The Type 93 became the nororious “secret weapon” unleashed by IJN destroyers and cruisers in WW2, which caused extebsive damage during the Solomons campaign expecially. The defective US Type 14 torpedo was in stark contrast with this. The Type 93 torpedo was dangerous to its user however but its effectiveness outweighed the risks anyway, claiming 23 Allied warships, 11 cruisers, 11 destroyers, and a fleet aircraft carrier and among these, 13 hits were fatal.
⚙ specifications Type 93 |
|
| Weight | 2.7 tonnes (6000 lb) |
| Dimensions | 9 metres (29 ft 6+5⁄16 in) x 610 mm (2 ft 1⁄64 in) |
| Propulsion | Oxygen-enriched air |
| Range/speed setting | 2,000 m (24,000 yd) at 48–50 kts or 40,400 m (44,200 yd) at 34–36 kts |
| Max speed | 96 km/h (52 kn) |
| Warhead | 490 kg (1080 lb) |
| Guidance | Straight course |
AA Defence
The Asashio’s anti-aircraft capability was considerably beefed-up. Initially they had two twin-mount Type 96 AA guns placed forward of the second smokestack, and these were the first destroyers to inaugurate these. As the war progressed, Type 96 were added wherever possible, notably by 1942-1943, twin-mounts were replaced by triple-mounts. An extra twin-mount was added forward of the bridge on a raised platform as well. From 1943-1944, surviving ships saw even the landing of their superfiring “X” turret in exchange of two more triple-mounts. After 1944, the ships all had between eight and twelve additional single 25 mm mounts. IJN Kasumi also received two extra Type 93 13mm machine guns.
As designed, the Shiratsuyu class were fitted with two water-cooled and license-built Vickers 40-millimeter “pom pom”, of WWI vintage. They were heavy and slow-firing, short-ranged for 1930s standards. This on completion they were given instead two single Type 93 13mm machine guns. However as war approached, and from 1942 when possible, they were replaced by new 25 mm (0.98 in) Type 96 anti-aircraft guns. Many more were added in wartime (see later)
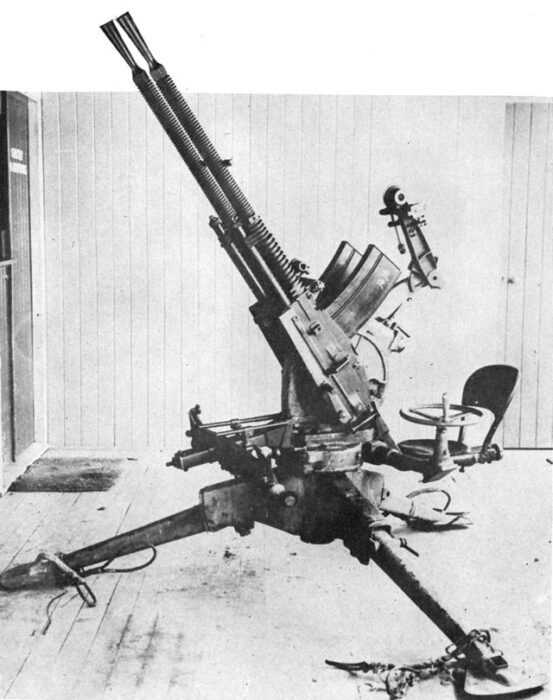
25 mm Type 96

The type 96 25 mm AT/AA gun became the standard of the IJA and IJN, automatic cannon developed as variant of the French Hotchkiss 25 mm, dual-purpose and developed as AA on single, twin and triple mounts. Development worked on 1935. 25 mm Hotchkiss design evaluated and order placed for several mounts types for evaluation at Yokosuka Naval Arsenal. Led to the Type 94 and Type 95 and then the main model produced at Yokosuka Arsenal, the Type 96.
Elements made with castings and not forging for larger production, Rheinmetall supressor, new mounts designed.
Air-cooled gas operated with multiple rings (Hotchkiss patent).
Twin-mount in 1939, followed by triple mount in 1941 and single mount in 1943.
Issues of the designed revealed in combat:
Slow elevation and traverse, ineffective sights, excessive vibration, limited magazine cap., blinding Flashes.
The 1944 single mount needed a single operator and a loader but had a better spiderweb sight.
Tech specifications 25 mm Type 96 |
|
| Barrel Lenght | 1.5 m (4 ft 11 in) L/60 |
| Barrel weights: Single | 785 kg (1,731 lb) |
| Barrel weights: Twin | 1,100 kg (2,400 lb) |
| Barrel weights: Triple | 1,800 kg (4,000 lb) |
| Crew: | 3, 7 and 9 respectively |
| Shell | 25×163mm |
| Exact caliber | 25 mm (0.98 in) |
| Action | Gas operated |
| Elevation/Traverse | -10°/+85° – 360°, manual |
| Rate of fire | 200–260 rpm (cyclic) |
| Muzzle velocity | 820 m/s (2,700 ft/s) |
| Effective range | 6.8 km (4.2 mi) at 45° with HE shell |
| Maximum firing range 85° | 3 km (9,800 ft) effective, 5.5 km (18,000 ft) max. |
| Feed system | 15-round box magazine |
| Production | 33,000 all variants 1935-45 |
13.2 mm Type 93 heavy machine gun
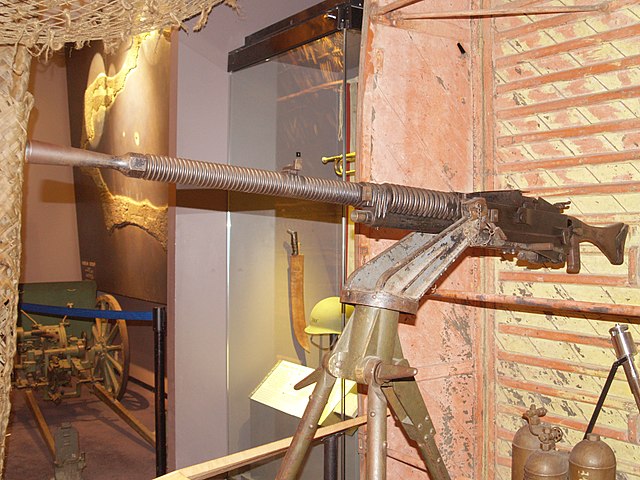
The Type 93 13 mm (0.55 inches) heavy machine gun (九三式十三粍機銃), Type Ho 13 mm AA machine cannon was a license-built version of the French Hotchkiss M1930 machine gun. It was widely used for heavy ground support and organic for AA defence, until gradually replaced when possible by the 25 mm Type 96. They were still in use, on twin mounts, on many IJN cruisers and destroyers before WW2 but gradually replaced when possible, notably by single 25 mm mounts due to unsufficient range and firepower.
The common twin mount in 1941
Tech specifications Type 93 heavy machine gun |
|
| Barrel Lenght | 140 centimeters (55 in) total, 988 millimeters (38.9 in) barrel alone |
| Mass | 42 kilograms (93 lb) (empty) |
| Fully loaded | ? |
| Shell | 13.2×99mm Hotchkiss |
| Exact caliber | 13.2 mm |
| Barrel type | A tube with progressive RH parabolic twist, 9 grooves |
| Action | Gas-operated fully automatic |
| Elevation/Traverse | -15 / +85°, 360° traverse, manual |
| Rate of fire | 450 rounds/min Max |
| Muzzle velocity | ? |
| Effective range | 1,000 meters (3,300 ft) |
| Maximum firing range 45° | ? |
| Feed system | Classic box magazine holding 30 rounds |
| Sight | Spiderweb anti-aircraft iron sight |
Depth Charges
The Asashio carried sixteen depth charges in a single rack at the stern. This was increased to thirty-six after late 1942.
The single Type 81 depth charge launcher at the stern (16 depth charges) could allow dropping the standard Type 95, 30.5″ by 17.7″ (77.5cm by 45cm). 220 lb (100 kg) charge, Type 88 explosive (ammonium perchlorate and ferrosilicate). Fuse using a water inlet. 100 feet (30m) and 200 feet (60m) settings (after the revelations of a US Congressman).
Later increased to 324 lb (147kg), Type 97 explosive (70% TNA/30% HNDA), 300 foot (90m) setting.
-1944 Type 2: 230 lbs (105kg) Type 97 explosive settings 98, 197, 292, 390, 480 feet (30m, 60m, 89m, 120m, and 145m).
-1945 Type 2: 357 lbs (162kg) explosives.
Upgrades
In 1943-1944, survivors saw the removal of their superfiging “X” 5-in/50 turretn replaced by three triple 25mm/60 Type 96 and a twin 25mm/60 Type 96 AA mounts plus 2 DCT for a total of 36 depht charges. By mid-1944, the two twin original 25mm/60 type 96 AA were removed as well as the 8 spare torpedoes to free weight, and a supplementary triple 25mm/60 96-shiki was installed forward of the bridge, plus fourteen single 25mm/60 and four single 13.2mm/76 Type 93, displacement rising to 2000t standard and 2635t fully loaded, top speed down to 29kts. A far cry to the 36 knots of the Fubukis. Later in 1944 A 2-shiki 2-go and 3-shiki 1-go radars were installed on all ships still in service.
So, by 1943, the twin 25mm/60 was retired and two triple Type 96 installed, by late 1943 “X” twin main gun was retired to installed in place two triple extra 25mm/60 Type 96 and two DCT (36 total) installed a the poop. Later that years and in earmy up to mid-1944 a Type 2 mod 2 1-go radar was installed, and by 1944 four single Type 96- thenup to ten of the same plus four single 13.2 mm Type 93 HMGs.
Sensors
Type 3 Sonar
The Asashio class ships were the first to be equipped with sonar. This was the Type 93 sonar coupled with the Type 93 hydrophones as integrated. They were inferior however to allied designs.
The Type 93 model 3 sonar was a derivative of Model 1, used on destroyers since 1933. It used a retractable quartz projector for transmission and reception and had a nonretractable sound dome measuring 1.9m by 0.65m (6’3″ by 2’2″).
Specs
Frequency: 17.5 kHz
Receiver gain: 120 decibels
Pulse repetition interval: 2, 4, or 8 seconds
Power: 2 kW
Ranges: 1640-3300-6600 yards (1500m-3000m-6000m)
Accuracy: 3 degrees
Resolution: 10 degrees
Weight: 4400 lbs (2000 kg)
Type 22 radar
The Asashio class received by late 1944 (Kasumi, Michishio, Asagumo, and Yamagumo) a Type 22 and a Type 13 radar. The Type 22 radar wasa availble from November 1943, and by late 1944, it started to be replaced by the Type 13 radar.
The early Type 22 General Purpose Radar looks like characteristically like a 2910 lb (1320 kg) drum topped with a twin cornet amplificators, mounted mid-way top the mast.
Type 22 radar Specs:
Wavelength 10 cm, pwd 10 microsecond, PRF 2500 Hz, scan rate 5 rpm, PP 2 kW
Range: 20 nautical miles (35 km) aircraft group, 10 nm (17 km) single, 13 nm(24 km) battleship.
Subject to land clutter. Horn and A scope display, accuracy 220 yards (200m)/3 degrees res. 1600 yards (1500 m)/40 degrees
300 sets produced installed on destroyers from the summer 1942. Generalized in 1944.
Type 13 radar
Vertical 240 lb(110 kg) bedframe antenna, developed 1941, introduced mi-1943, with vertical dipole transmitter and Yagi mattress receiver. 1000 sets produced. Air defense, range 100 km (group), and single aircraft 50km.
Specs:
Wavelength 200 cm, pw 10 ms, PRF 500 Hz PP 10 kW
Range: 30-60 nautical miles (50-100 km)
Appearance
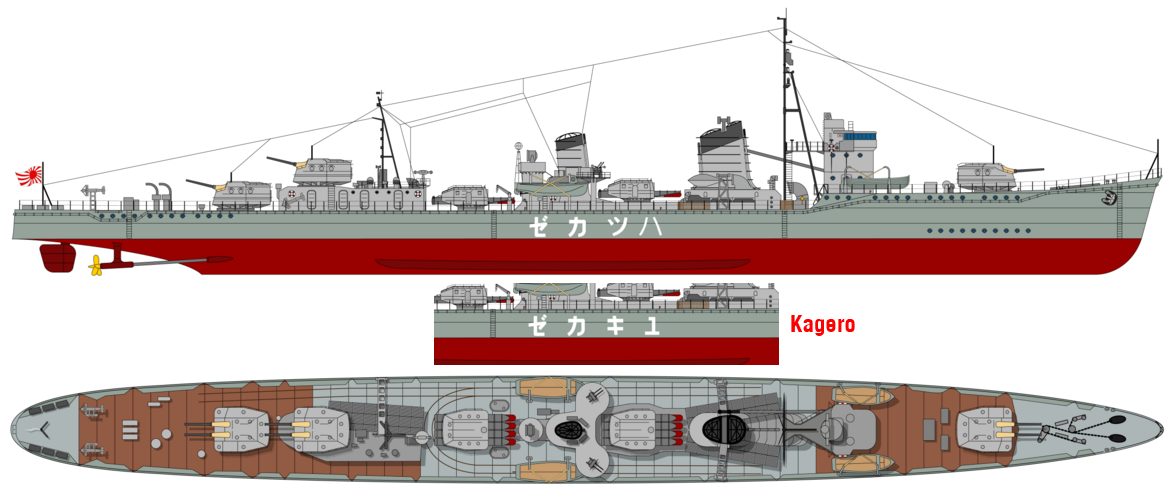
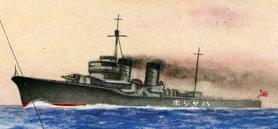
Graphic reconstruction of Kagero class, Hatsukaze, seen from the side (outline) and from above (drawing) with an insert of Kagero’s Kanjis. The overall appearence is that of the original design, without radars and/or massive anti-air armament. Dated 9 June 2020 from pwencycl.kgbudge.com/K/a/Kagero_class.htm (By Marc Moreno, The pacific War Encyclopedia, released as CC)
Note the hull had a slightly greener, darker tone. The superstructures were in medium grey. Amidship Kanjis identified the destroyer in large white letters, as it was the new recoignition system after prow numbers had been dropped. This also showed the decks, with the relatively limited wooden sections fore and aft, and steel-covered sections amidships and aft. The main guns mufflers were in canvas color, the “long lance” tips were painted red.
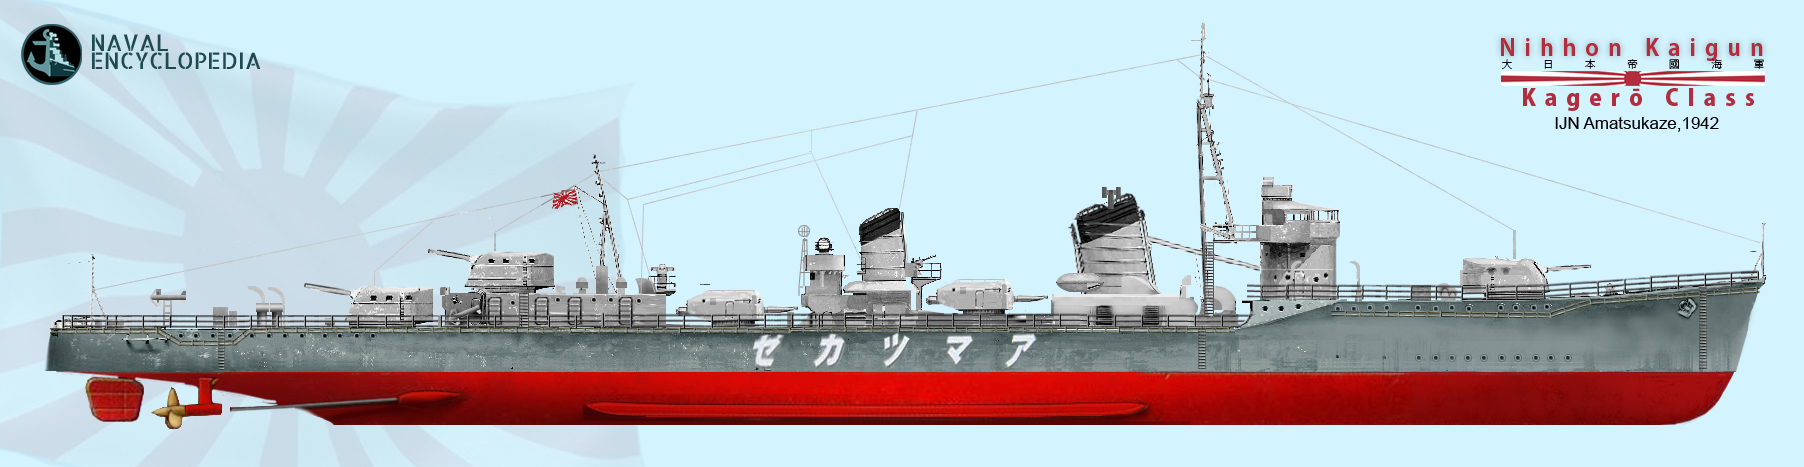
Author’s profile and poster of the IJN Amatsukaze 1942

Author’s old profile
⚙ Kagero class specifications |
|
| Displacement | 2,000 long tons (2,032 t) standard, 2,500 long tons (2,540 t) battle condition |
| Dimensions | 118.5/116.2 x 10.8 x 3.76 m (388 ft 9 in x 35 ft 5 in x 12 ft 4 in) |
| Propulsion | 2 shaft Kampon impulse turbines, 3 × Kampon WT boilers 52,000 shp (39,000 kW) |
| Speed | 35.5 knots (65.7 km/h; 40.9 mph) |
| Range | 6,053 nautical miles (11,210 km; 6,966 mi) |
| Armament | 2×3 127/50, 4x 25 mm, 2×4 (16) 610 mm Type 93 torpedoes, 18× DCs |
| Sensors | See notes |
| Crew | 240 (Kagerō, 1939) |
Assessment on the Asashio class
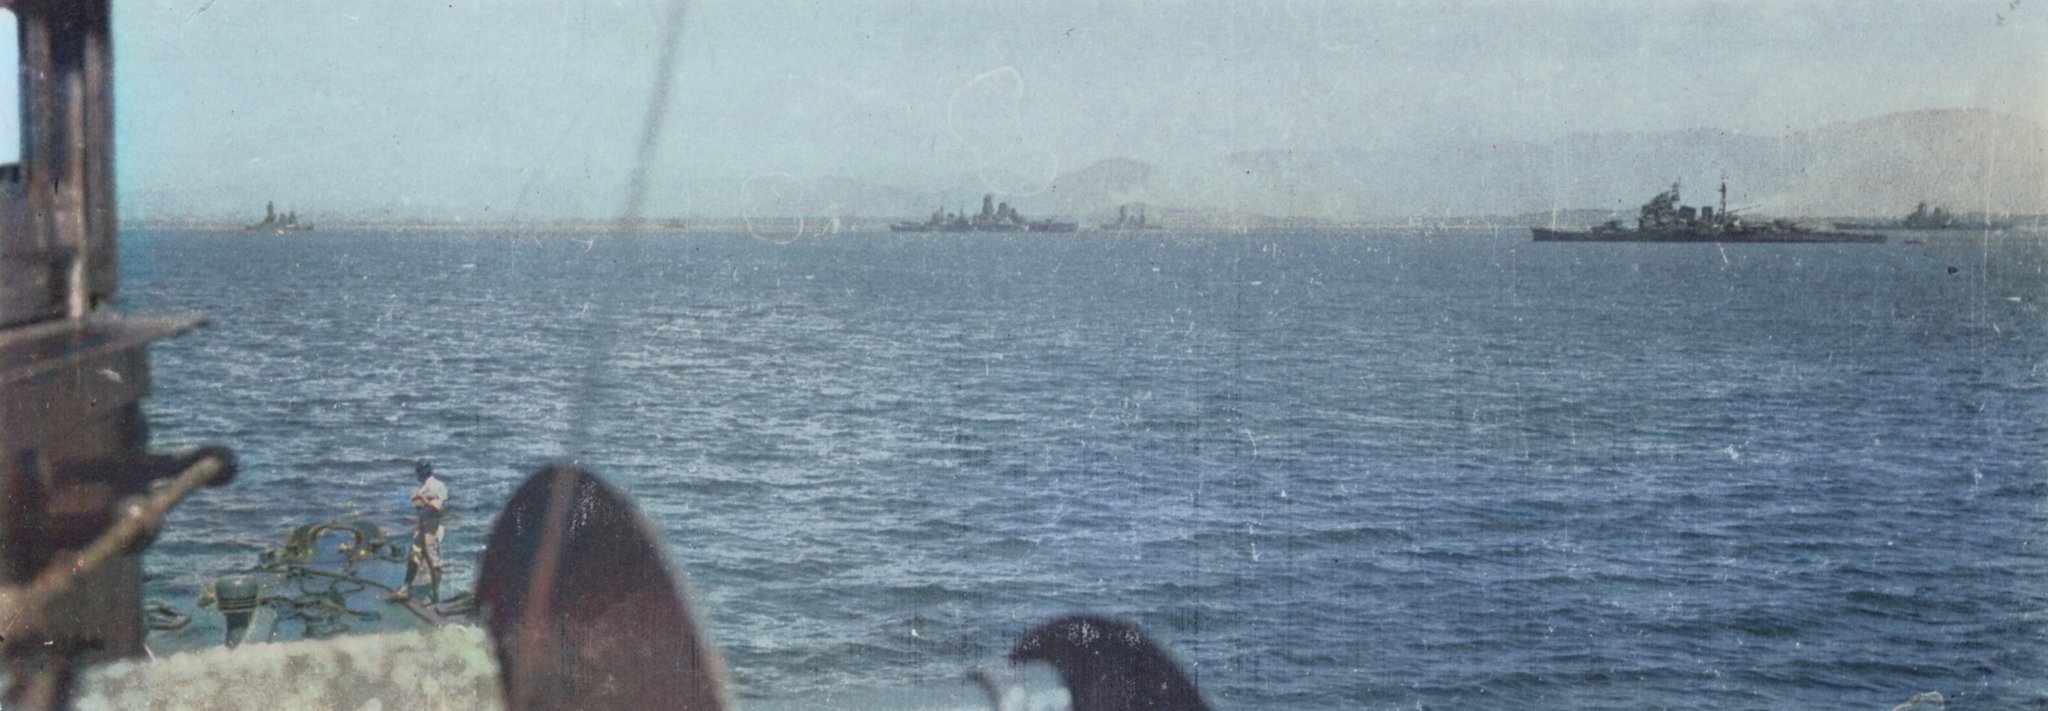
A view of the Japanese fleet anchored in Brunei shortly before the battle of Leyte Gulf, taken from Isokaze on 21 October 1944 (bridge and bow visible). The view shows, from left to right, the battleship Fuso, the heavy cruiser Mogami, the battleship Yamato, the battleship Yamashiro, the heavy cruiser Chokai, and the battleship Musashi. Every one of these ships besides Yamato and Isokaze was sunk over the next 5 days, many of which with most or all hands lost.
The Kagero class represented the pinnacle of Japanese Destroyer development when WW2, even streamlining the issues found on the previous Asashio class, already judged almost perfect by the IJN staff. They were also considered postwar (very little info circulated on them in 1939-40 in the West) probably the best “standard” destroyers of their time. Compared to the fearsome british commonwealth Tribal class, they conceded two guns, but compensated for their massive artillery. They were also on par, of not superior to the Fletcher class, albeit the latter had arguably a safer (single turrets) main 5-in/38 artillery with a better fire control, they were below their level in terms of torpedoes.
Their ten tubes were not even reloading and performances of the Mark 14 could not be compared to the superlative “Long Lance”. In short, these were the finest IJN destroyers of WW2, since the next Yūgumo-class, larger still, were a copie of the firsts, with extra AA. Both the near-sisters that were the Kagerō and Yūgumo-class, with the earlier Asashio, carried the bulk of IJN frontline operation in the pacific. They were the tip of the spear, and arguably the Kagerō class were more valuable than the Yūgumos at the start of operations, given that by December 1941, the crews already had better experience.
They were certainly not spared the most vicious fighting of the Pacific, being in the thick of every decisive engagement that counted. Statistically more were sunk by classic naval action or aviation rather than the now ageing 2nd class 1919-24 destroyers relegated to escort of auxiliaries or convoys preyed by Submarines for the most.
The fiercest of the class: Amatsukaze
IJN Amatsukaze had a fantastic career with one notably legendary action, worth a full development there. For a start, she differed from her sisterships in having an experimental boiler system building up a higher steam pressure for a top speed of 35.5 knots but much longer range. It was however only adopted on a single experimental destroyer in 1942-43.
Amatsukaze was praise in history books for her role in the naval battle of Guadalcanal, and amazing survival story after being blown in half, and final stand. Captain Hara survived the war, gained fame with the destroyer Shigure and light cruiser Yahagi at Ten Go. In 1961, he published his autobiography “Japanese Destroyer Captain”.
There was also “25-Year-Old Captain’s Naval Battle Chronicles: Destroyer Amatsukaze” written by Captain Tomoyuki Morita her last captain.
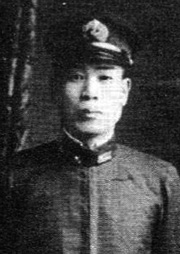 Left: Tameichi Hara, Amatsukaze’s captain throughout all of 1942. From her commission from October 26, 1940 she worked out until the spring of 1941, when Captain Tameichi Hara took command. He would later become a superstar in Japan. On November 25, Amatsukaze a 200 ships Combined Fleet in Yokosuka, before escorting IJN Jintsū in escort for troopship for the invasion of the Philippines. Amatsukaze then escorted the light carrier Ryūjō to escort Palau when the Attack on Pearl Harbor took place on December 7, 1941.
Next she was posted at Legaspi from December 12 to 19. On the 20th, she joined the Philippines invasion force at Davao and launched high speed motorboats with elite Marine troops spearheading the invasion while standing off the port’s defenses. These 200 SNLF elite “commandos” attacked the shore and took control of sme batteries. Amatsukaze fired in support at the enemy and hit also a British oil tanker, which ended a total wreck. She then spotted an enemy submarine, and slowed to 8 knots for her hydrophones locating her, ande attacked twice with depth charges until spotting a oil spill (unconfirmed kill).
Java Sea campaign:
Amatsukaze was at Davao when attacked by B-17 bombers and was then unable to move, but never hit. She spent her time in patrol and transit between naval facilities, and by January 9, 1942, she left Magnaga Bay, to meet the Menado invasion force on the 11th. She escorted the invasion force, arrived at the Banka anchorage on the 17th, departed with the Kendari invasion force on the 24th, protected the Ambon invasion force on the 29th. At Hitulama anchorage (30th) she repariated casualties from Ambon and was in escort missions until February 20 with the Timor invasion force.
Battle of the Java Sea:
On February 26, she came under air attacks, but remained unscaved. An IJN spotting plane informed them about the coming ABDA (5 cruisers) preying on their troop convoys. Amatsukaze joined the cruisers Haguro and Nachi, which launched their floatplane to shadow ABDA. By 6:00 on the 27th, Captain Hara in the vanguard spotted two heavy cruisers, three light cruisers, nine destroyers, ordering the destroyers to close to point blank range to launch torpedoes, done at 6,000 meters (6,600 yd). Amatsukaze had near misses and was blinded by smoke from Tokitsukaze (hit) and fired his torpedoes still, simultaneously with six other destroyers (56 “Long Lances” raced to target, all but one missing). HNLMS Kortenaer was the only one to taje a hit, credited to Haguro.
Later that night, Amatsukaze was in chase when stumbling up four US destroyers, USS Paul Jones, Alden, John D. Ford, and John D. Edwards, which broke off from the main formation, with no torpedoes left. Amatsukaze started to fire but kept her searchlights off abd fled, outnumbered (no hit). Haguro and Nachi continued the Battle of the Java Sea but Amatsukaze saw no further combat and on the 28th, spotted the hospital ship Op Ten Noort, rescuing survivors from sunken Allied warships. She halted her, and soon started to speak with her captain and his Japanese captors. He escorted her to Bawean Island as a war prize. Amatsukaze radioed the position of around 100 Allied survivors, later rescued.
On 1 March, Amatsukaze was in escort of Op Ten Noort to Bandjermasin when signalled, and co-attacked two enemy submarines later sunk after a 24-hour chase. At 1:10, USS Perch was the first located, trying to ambush Java Sea invasion convoy. She rushed at 26 knots, opened searchlights, fired 32 rounds from 2,735 yards (2,500 meters), hitting her at least three times, forcing her to dive and with Hatsukaze closed on her and dropped depth charges, crippling Perch. She wa slatter finished off by depth charges and gunfire from Ushio and Sazanami.
At 22:25, Amatsukaze spotted the surfaced Dutch K-10. She hit her by gunfore and depht charge her after she made for a crash dive. K-10 survived, limped to Surabaya, but scuttled in harbor.
On 2 March, Amatsukaze delivered Op Ten Noort, turned into the prison ship Tenno Maru. She refueled and returned in patrol in the Java Sea. Jintsū was later attacked by an enemy submarine, USS S-38 (missed), but she crash dived. Captain Hara later noted a flickering light though his binoculars, a sailor lighting a cigarette on the deck of an enemy submarine. Speeing up to 30 knots her engaged the sub with ginfire as the latter manoeuver and launch tiorpedoes but missed. Amatsukaze blasted her, noting six main gun hits. She crashe dived and she launched depth charges later claimed a kill on probably the same S-38. But the lattr engaged Jintsū) and later resurfacing, was attacked by an enemy destroyer. Hara decided to ban smoking on deck due to the experience. Patrols went on for the rest of the month.
On March 31, Amatsukaze was part of the bombardment on Christmas Island, as the Japanese tried to take the island for its rich phosphate ore deposits. On April 1, Amatsukaze saw Naka’s bow blown off by a torpedo from USS Seawolf while underway to Singapore, as assisted her. From April 25 to May 3, Amatsukaze was in Kure for maintenance, and on May 21-25, rushed from Kure to Saipan. She was tasked with escorting a troop convoy at the Battle of Midway on 4-7 June but saw no combat. On the 7th, Amatsukaze assisted the sinking of Akagi.
On August 16, Amatsukaze escorted the fleet to Truk, and was ordered to join the Guadalcanal campaign. On the 24th she escorted a decoy aircraft carrier force at the Battle of the Eastern Solomons, evaded land-based/carrier-based air attacks. She assisted the sinking carrier Ryūjō, credited to USS Saratoga. She rescued Ryūjō survivors and the crew of a Zuikaku bomber. She was in patrol duties off Truk in September, then trie to find US seaplane base in October, then she joined Kondō’s carrier force to the Battle of the Santa Cruz Islands. On the 26th, Amatsukaze was attacked by airplanes but undamaged. The US lost USS Hornet and USS Porte. Amatsukaze returned to Truk for R&R.
Naval battle of Guadalcanal
At Truk she joined a large Japanese task force sent to shell Henderson Field: IJN Hiei, Kirishima, with Admiral Abe, Nagara and eleven destroyers, including Amatsukaze. They departed on November 9, 1942 and the destroyers in vanguard went trhough a rain squall, which broke up the formation left the destroyers in small clusters, with Amatsukaze operating with Yukikaze and Teruzuki, center left. On the 13th by 1:25, they spotted two heavy cruisers, three light cruisers, eight destroyers.
By 1:48 Hiei and Akatsuki illuminated USS Atlanta, anf fired at point blank range (Akatsuki lost). Amatsukaze’s group were in the midst of it, with Yukikaze and Teruzuki rushing to engage them but Amatsukaze blocked by Ikazuchi and Inazuma, preparing a counterattack on Atlanta. Amatsukaze engaged USS Cushing, sank by Nagara before she could make hits. Teruzuki finished her off.
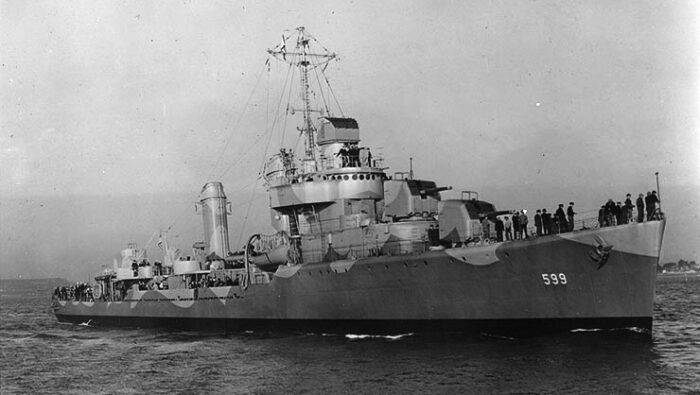
Destroyer USS Barton, sunk by two of Amatsukaze’s torpedoes. Captain Hara ordered Amatsukaze to charge at full speed to engage and sink more, sailed passed Hiei into firing range, and spotted US destroyers illuminated by star shells from Nagara, alread firing on Hiei: USS Fletcher, Monssen, Aaron Ward, and Barton. From 5,000 meters (5,500 yd), Amatsukaze closed the range and launched all eight type 93 torpedoes. Hara’s training paid off: Aaron Ward and Monssen dodged them, but Barton had to slow down to avoid colliding adn received two of them, one hitting the engine room and the other hitting the boiler room. She blew in half and sank in minutes with the loss of 168 men.
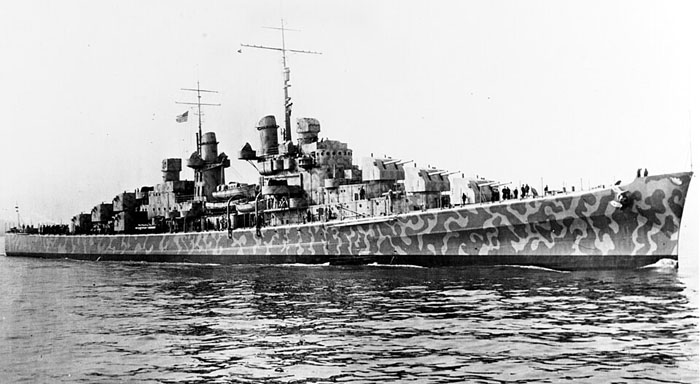
The light cruiser USS Juneau anchored off New York City on 11 February 1942, sunk by Amatsukaze and I-26
Amatsukaze retreated closer to Hiei to reload the torpedoes, a well driled manoeuver of a few minutes. She then sailed again, spotted Yūdachi under fire from USS Juneau so she closed the range, launched four, and three minutes later, one hit Juneau’s port side. Despite being a cruiser, she was no match for the sheer power of these heavy torpedoes, the detonation broke her keel. She lost all power, but still sailed at 13 knots, trying withdraw. But Amatsukaze was on the hunt, but in the night she lost track of the cruiser. Juneau was finished off by I-26 the following moirning at the exact spot she was already hit, and the broke in tow and sank with all bu 10 men rescued. On board were all five of the Sullivan brothers, chaning the recruitment Survivor Policy in the United States Navy.
Amatsukaze return to protect Hiei, but underway she nearly collided with a mysterious “ghost ship”, the submarine tender Jingei then found another silhouette in the dark. She open her searchlight revealing the crippled heavy cruiser USS San Francisco, already crippled by Hiei and Kirishima. Still afloat she was finished off by Amatsukaze’s last four torpedoes and her main guns, destroying her remaining port side secondary battery and set alight her bridge, killing officers and crew. The torpedoes were duds due to the activated safety, within 500 meters (550 yd) to prevent friendly fire. However her shelling was spotted by fellow cruiser USS Helena which start to makr barking her fifteen 6-inches main guns. Amatsukaze had to flee below a smokescreen. But in the third salvo her fire director station was blasted, as her radio room. And then three more hits severing her hydraulics system, jamming her guns and steering, loosing 43 men with many more wounded. She was saved at the last minute by Asagumo, Murasame and Samidare, charging Helena, taking her attention away. Murasame the claimed to have sunk Helena (she survived). Amatsukaze had her engines intact and the crew repaired her rudder, still under a smokescreen in emergency. She still could see a firce fighting with USS Monssen with Asagumo, Murasame, and Samidare. Amatsukaze withdrew at 20 knots until daylight, fended off an attack by US planes, and made it to Truk on the 14th, welcomed by sailors in the port. She sank one destroyer and (almost) two cruisers by herself, not a bad night work.
In Truk, funeral proceedings for 43 men was done a well as extra repairs to preceed to Kure, from November 18. Tameichi Hara was interviewed and reassigned to Shigure meanwhile on January 10, 1943, replaced Tanaka Masao. The destroyer was overhauled, received extra AA and a basic spotting radar. In February 1943 she left Kure in escort of IJN Kumano to Truk (10th), the escorted a troop run to Wewak, towing the disabled Harusame back to Truk. From March 19 to April 3, she escorted a tanker convoy to Palau, then engaged in a series of escorting missions for large troop convoys, from Palau Wewak and Hansa Bay until late this month in July. On August 1, she returned to Kure, was docked for maintenance, and received a Type 22 radar. On August 16-23 she escorted Yamato to Truk, in September 18-25, tried to counterattack US carrier raids. By October 21-27, she escorted Hoyo Maru to Eniwetok for the Marshalls, on November 2 she carried an aircrew to Rabaul, assisted the damaged tanker Nissho Maru. On the 11th she escorted convoys to Palau and back and ended by escorting light carrier Chitose and supplier Irako from Truk to Yokosuka on December.
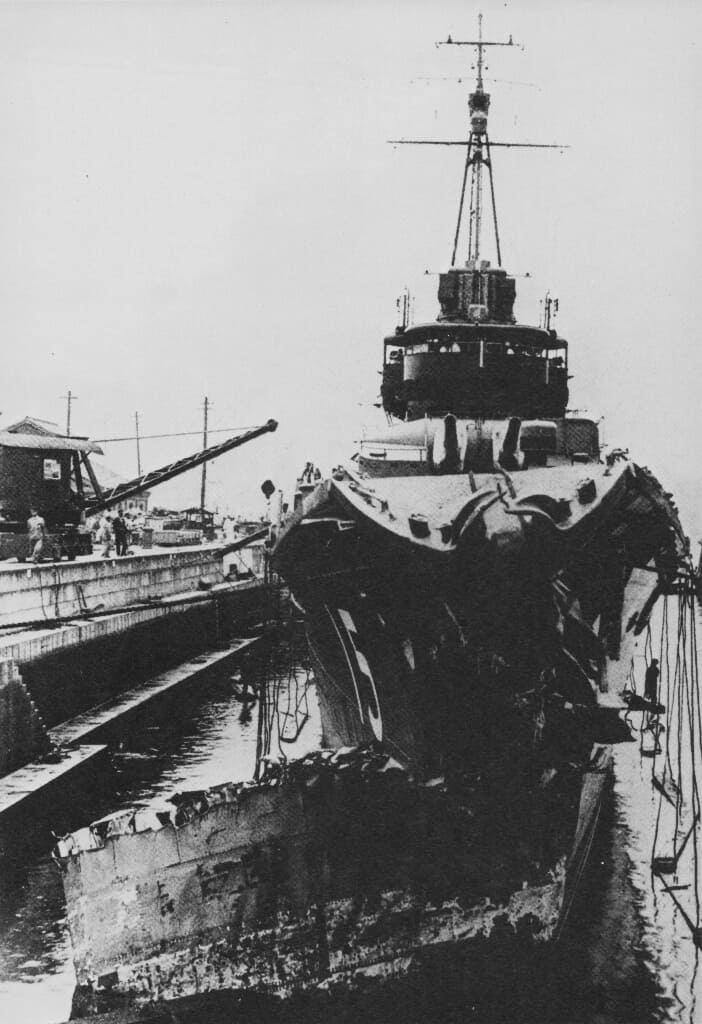
On January 11, 1944, she was in the South China Sea, escort high speed oil tankers to Singapore, until ambushed by the submarine USS Redfin. She sailed there to investigated but she crashed dived, so she turned away to joined back the convoy, while Redfin turned and launched four torpedoes. One hit Amatsukaze to the port side (between the first and second compartments) which caused a magazine explosion. She tipped by the bow almost broke in half and the forward half rapidly sank with 80 men trapped inside incl. Captain Furukawa Bunji.
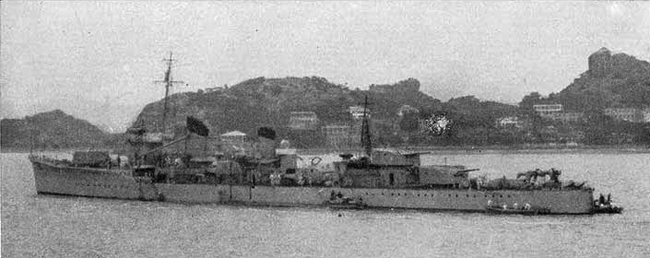
Amatsukaze underway in escort showing her new bow after repairs.
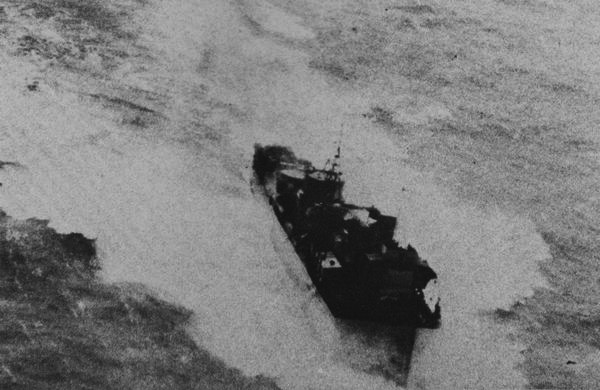
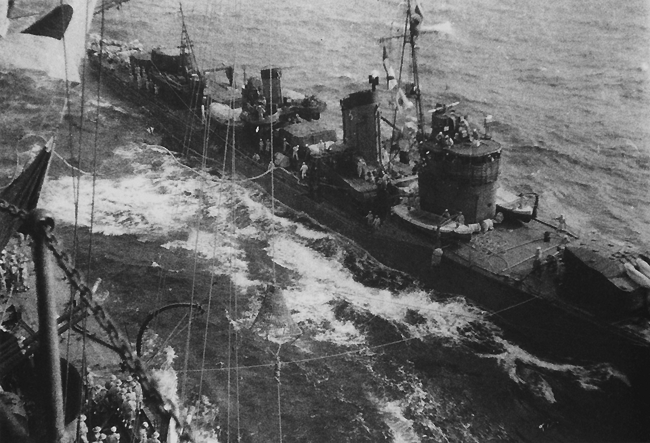
Her back half stayed afloat so she was presumed sunk by the rest of the convoy, left adrift for six days, until engine was flooded and she lost power, radio the crew new stuck in the middle of the ocean. On the 16th she was spotted by a Japanese patrol plane pompting IJN Asagao to the site, finding her and towing the aft section for emergency repairs in Singapore from the 24th in drydocked, stuck there for ten months. On November 15, she was at last ready with a false bow, making her 72.4 meters (237 ft 6 in) long and only her aft turrets, and a single quadruple torpedo tube mount, but still capable of 12 knots, and after further repairs to 20 knots. She still performed in local patrol and escorts until February 10, 1945, and when Kasumi docked in Singapore captain Tomoyuki Morita was transferred from Kasumi to Amatsukaze. It was planned to send her back to Japan for full repair, escorting along the way the convoy HI-88J, last convoy from Singapore to Japan, departing on March 19 with seven troop ships. However two days later Sarawaka Maru hit a mine and sank. On the 27th, the convoy was spotted by a B-24 bomber. More air attacks came and Asogawa Maru sank, followed by USS Bluegill in ambush badly damaging Honan Maru, so Amatsukaze tried to chase down the submarine. Ultimately the convoy was gutted, Amatsukaze dodging torpedoes, and even claimed a B-25 bomber. She arrived at Hong Kong, halfway closer to Japan. But a raid of 50 aircraft rampaged the port but left the half DD unscaved, so she departed with Kine Maru and Tokai Maru, her last journey. The next day allied aircraft came and sank both troop ships, so Amatsukaze rescued survivors and went back to Hong Kong.
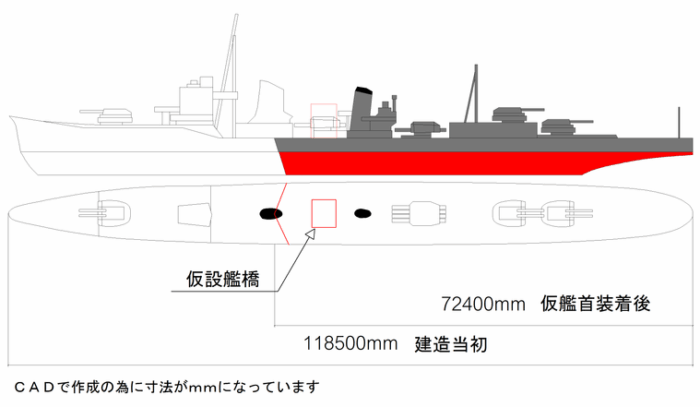
Amatsukaze remaining half with drawing lines showing (in red) the new bow and bridge built to keep her serviceable. The new bow was nowhere near as efficient as the oldest one and she could only reach 20 knots at best instead of 35 knots.
The day after she departed Hong Kong with the sub chasers CD-1 and CD-134, until spotted and attacked by land-based aircraft. She dodged the first two waves while CD-1 and CD-134 were sunk and on the third wave she took a bomb hit between her aft turrets, including her AA, managing to shoot down 3 aircraft, damage 2 more. The last wave meant tow more direct bomb hits, fllowing the machinery room and destroying the radio room, setting her on fire. Damage control put out the fires but left her “sink” in order to avoid more air attacks. But a final wave resulted in a bomb in her wardroom, plus 5-in rockets, so she was again on fire, dead in the water. More work by the crew managed to sail her at 6 knots, so she could be beached off China while she took four more hits, and several rockets. The next day, Chinese pirates tried to raid her hulk, repelled by machine gunfire. The crew attempted to refloat her after temporary repairs and on the 10th, she was scuttled. In 2012, her wreckage was found by a Chinese engineering ship, 30 tons salvaged, sold as scrap metal.
The luckiest Destroyer of the IJN: Yukikaze
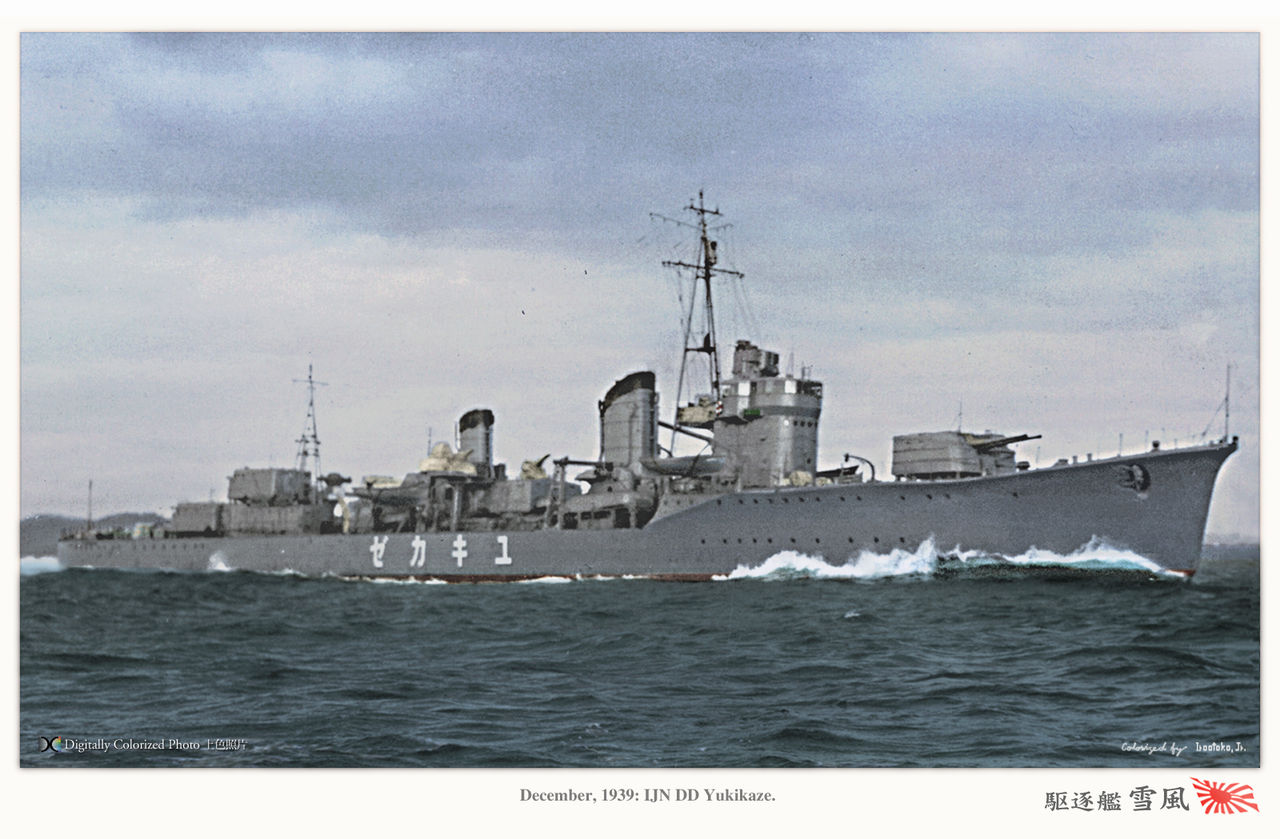
Yukikaze colorized by Irootoko Jr. on sea trials in 1939
Yukikaze was laid down on August 2, 1938, launched on March 24 1939, and completed on January 20 1940. Upon commissioning, she was appointed at DesDiv 16 (Kuroshio, Hatsukaze, Yukikaze) and sent in patrol duties and visits to foreign harbors, but on 11 October 1940, she was part of the 2,600 year anniversary Japanese navy fleet review. Her division was reorganized and she ended in DesDiv 15 with sisters Amatsukaze and Tokitsukaze, Yukikaze now flagship under Captain Shibuyu Shiro command, CO being Tobida Kenjirō. On 7 December 1941 she led the division escorting Ryūjō for the raid on Davao. By January of 1942, she convered the escort invasion convoys to Legaspi, Lamon Bay, Menado, Kendari, and Ambon. On February 20, for Timor, on the 27th, she took part in the battle of the Java Sea, leading a torpedo attack that failed. She still rescued some 40 survivors. Commander Tobida interrogated Captain Thomas Spencer, gunnery chief on the destroyer HMS Electra, sunk by Asagumo. Yukikaze and Tokitsukaze located S-37 and attacked, she was badly damaged and sent to Australia for repairs. Off Bandjarmasin on 2 March, Yukikaze and Tokitsukaze attacked another sub, no kill. Same later that night. She later escorted the invasion force for New Guinea and was back to Davao. From 26 April to 2 May she was drydocked for maintenance, and sailed to Kure-Saipan. She escorted troop transports for the invasion of Midway Island but on June 6, the battle was over and Yukikaze joined the main body force and assisted Mogami, hit.
Next she took part in the Guadalcanal campaign under command of captain Ryokichi Kanma. She became aircraft carrier escort at the battle of Santa Cruz on October 26. She remained undamaged after two aircraft attacks. Meanwhile USS Hornet and USS Porter went down and other ships crippled. She was bacl to Truk on October 30.
Naval Battle of Guadalcanal:
Yukikaze at her most notable action, the first naval battle of Guadalcanal. The force sent to bombard Henderson Field, was intercepted at dawn on the 13th. This started with illumination and a point black fearsome exchange at point blank range in which both Akatsuki and Atlanta were sunk. Yukikaze charged the US formation now scattered thanks to Admiral Callaghan, with Nagara and Harusame she engaged the lead destroyer USS Cushing. Cushing answered to Yukikaze, no hits scored but she lost a gunner to stray AA fire. But she managed to cripple Cushing and left her dead in the water aflame. Next she spotted and engaged the destroyer USS Laffey, escaping a point blank range duel with Hiei. Yukikaze hit Laffey thrice, destroyed her “B” 5-inch gun turret, while the destroyer took two 14-inch shells from Hiei which decapitated her bridge and superstructure. Yukikaze sent four torpedoes, one hit Laffey aft, blowing her stern. She was latter abandoned, while Yukikaze sent another torpedo which blew up Laffey her turret 4 magazine. She sank quickly.
Next was USS O’Bannon which nearly collided with the sinking Laffey, and was engaged by Yukikaze and she lost her lighting and power. Yukikaze later managed to ambush USS Sterett, and hit her with eleven 5-inch shells. She lost her aft guns and torpedo tubes and was on fire, 28 killed, 13 injured, but she managed to escape the battle to fight another day after long repairs. Meanwhile, a point-blank range gunfight saw Hiei crippled by USS San Francisco and Yukikaze attempted to assist her. It was now clear enough for aircraft from Henderson Field and USS Enterprise to arrive and score several bomb hits. Yukikaze came under attacks and took a near-miss which cracked a boiler. Yukikaze eventually moored aside Hiei for assistance. Later she departed, passed by the damaged Amatsukaze and helped finishing off USS Juneau, being driven off by USS Helena. She offered help to Amatsukaze, but her crew refused, both crews then saluted each other, exchaninging greetings, then continued on their way. Admiral Abe transferred his flag to Yukikaze with many Hiei survivors. Yukikaze withdrew to Truk, on the 18th.
Newt, Yukikaze escorted the aircraft carrier Hiyō on December 5-10 and Zuihō and Zuikaku on January 18-23. In 1943, retreat from Guadalcanal was decided and on February 1-4, Yukikaze took part in the first and second evacuations of troop. She transported the 17th army. Yukikaze took part in the final evacuation on February 7-8, successful with few allied attacks. Only Makigumo and I-1 were lost for 10,652 troops saved. That was the Japanese Dunkirk.
Maikaze, damaged, was escorted and assisted by Yukikaze to Truk on February 10-14 as the transport ship Gokoku Maru from Rabaul to New Britain and back.
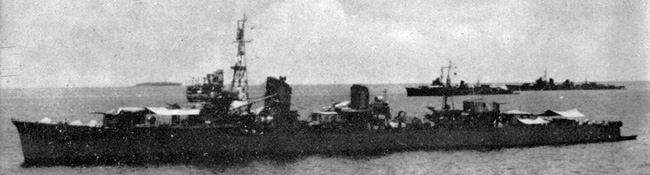
Yukikaze in Rabaul
Battle of the Bismarck Sea:
Yukikaze was soon in the hearth of action again, as Lae needed supplies to face the New Guinea assault. The 51st army division and its heavy artillery arrived on eight troopships escorted by eight destroyers including Yukikaze and Tokitsukaze. Via the Bismarck Sea on March 1,they were spotted by recce at 15:00. At the dawn of March 2, B-17s attacked, sank the Kyokusei Maru and damaging two more. Yukikaze to assist in rescuing survivors. The next day, a second wave scattered the force, leaving ships vulnerable. The third wave attacked and sank a troop ship and destroyer Arashio, fatally wounding Shirayuki and Tokitsukaze. Yukikaze evacuated the latter’s while Shirayuki was also evacuated and scuttled.But more B-17s and B-25s attacked until all six troop ships were sunk as well as Tokitsukaze. Yukikaze tried to rescue as many survivors as they could until scattterred by another wave of B-17s which claimed Asashio.
The battle lasted for March 2-4, leaving just four destroyers afloat, Yukikaze being the only one completely undamaged. Loaded with crewds of survivors she ferried them to Rabaul, on March 5th. Next she escorted a troop transport run to Kolombangara on March 7. In April, Yukikaze she did the same to Kolombangara, Rekata, Finschhafen, and Tuluvu. On May 3-8, Yukikaze was drydocked, refitted followed by a transport run to Nauru and back.
Battle of Kolombangara:
On July 9, Yukikaze was in another transport run to Kolombangara (four destroyer and 1,200 ground troops) and thanks to her radar she was placed as lead ship of the flotilla (Hamakaze, Kiyonami, Yūgure) as well as the cruiser Jintsū and DD Mikazuki. En route thy were reported by allied coastwatchers. Admiral Ainsworth depated with the cruisers USS Honolulu and USS Saint Louis, HMNZS Leander and 10 destroyers. Past midnight on the 13th, they were spotted 10,400 yards (9,500 meters). Jintsū illuminated the approaching US fleet with her searchlights. Honolulu, Saint Louis, and Leander concentrated on her allowing Yukikaze and other destroyers to pass unseen. Mikazuki assisted Jintsū but Captain Kanma of Yukikaze decided to make a surprise toirpedo attack from 5,250 yards (4,800 meters) and at 1:20, firing a full spread which hit four minutes later on the cruiser Leander amidships (23 killed, orced to retire). She latter was unable to continue servicen stuck in repairs to the end of the war. Jintsū was completely destroyed by Honolulu and Saint Louis, and had the final blow from USS Taylor. Kanma withdrew the ships to reload and return for another attack, in 18 minutes back at 1:50 to 4,900 yards (4,500 meters). This times the allies concentrated on Yukikaze (light damage from straddles, near misses, no hit). At 2:18 there was a second torpedo hit on USS Honolulu, which lost her bow, cut clean off. A third badly damaged Saint Louis and another hut USS Gwin (scuttled).
It was a victory and the destroyer transports made it to Kolombangara and landed their troops. On July 19, Yukikaze was in anothe troop run to Kolombangara but Kiyonami and Yūgure were sunk by land-based bombers. Next she made another run to Kolombangara on the 23rd and sailed to Truk, in escort. From August to September 3, she had a major refit with extra AA addded and the type 22 and type 13 radar. She was in escorting duties and by December 10, Ryokichi Kanma was replaced by Terauchi Masamichi.
Philippine Campaign:
Yukikaze escorted high speed tankers from Moji to Singapore on 11-20 January 1944, but they were ambushed by USS Redfin which crippled Amatsukaze beyond repair. Since Hatsukaze and Tokitsukaze had been sank, Yukikaze unit, DesDiv16, was disbanded. Yukikaze was reassigned to DesDiv17 (Urakaze, Isokaze, Tanikaze, Hamakaze). She escorted the light carrier Chitose and convoy HI-32 to Moji and then to Saipan and Yokosuka. She escorted Zuihō to Guam in February-March and on April 20 to May 1st, escorted warships from Kure to Lingga. On May 22nd, she hit a reef while off Tawitawi, more damage than any enemy action for her entire career…
After repairs Yukikaze took part in Operation A-Go, a planned decisive Philippines battle and it was vital to keep it to preserve the last supply lines open for Japan to its Empire. Yukikaze escorted oil tankers, protecting them from submarine attack but this enraged commander Masamichi, as he would prefer his ship in the thock of action and sunk in battle instead. Fortunately for the crew, orders were orders. On June 17, Yukikaze repelled in such missions USS Cavalla. Two days later, air raids only claimed damage on USS South Dakota. Yukikaze’s crew saw submarine attacks sinking the jewels of the fleet, Taihō and Kido Butai veteran Shōkaku (by Cavalla). Aircraft from USS Belleau Wood sank Hiyō, and those from USS Wasp attacked Yukikaze’s group. Both oil tankers Gen’yo Maru and Seiyo Maru were crippled and Yukikaze saved the latter’s crew before scuttling her, others doing the same with Gen’yo Maru. Surviving the giant battle completely undamaged, Yukikaze escorted the last two oil tankers to Kure on July 2, and entered herself the drydock until August 15. She left on September 25th, escorting Fusō and Yamashiro to Lingga.
Battle of Leyte Gulf:
At that stage, many of the Kagero class had been sunk, Yukukaze after what she went though, was already a lucky veteran. But nothing could prepare her for the moth of all naval battles, the final Japanese showdown for the Philippines, a last gamble where the IJN better all its last remaining cards (even Yamato and Musashi). On October 20, 1944, Yukikaze was at Brunei to meet up with the rest of the Japanese fleet for Operation Sho-Go. They mission was to sneek in, engaging and sinking undefended American troop convoys in Leyte Gulf. Meanwhile Japan’s carrier task force and their Kamikaze would distract Admiral (“Bull”) Halsey. Tactically it was brillant and requried skills to put it off. It might have worked. Yukikaze departed on 22nd with Admiral Kurita and his center force with the Yamatos sister ships and the older but mighty Nagato, Kongō, Haruna, 10 heavy cruisers, 2 light cruisers, 15 destroyers including Yukikaze.
On the 23rd, their group was ambushed already by USS Darter and USS Dace: Atago and Maya were sunk, Takao was damaged beyond repair, escorted out by Naganami and Asashimo. On the 24th, US carrier attacks began, in what became the battle of the Sibuyan Sea. Yukikaze again, got off undamaged but Myōkō was badly damaged and out with Hamakaze and Kiyoshimo. Musashi had to endure the bulk of attacks over a seven hour long battle and sunk by 17 bombs and 19-20 torpedoes.
Battle off Samar:
Kurita’s Center Force was ordered to retreat but soon was back to the battle. This fake retreat order on clear to be intercepted, fooled US forces. After Nishimura’s Southern Force was destroyed at Surigao Strait, US forces discovered the decoy carrier force and engaged it, leaving the way free on the 25th for centerforce. Yukikaze was on the vanguard flank with Isokaze, Urakaze, and Nowaki, led by Yahagi. At 6:00 they spotted the undefended Taffy 3, six Casablanca class escort carriers, three destroyers, four destroyer escorts. Yamato’s mighy guns barked at them, followed by others, starting the battler. Yukikaze follwoed a torpedo attack on the escort carriers USS Kalinin Bay and USS Saint Lo but al missed, apart one on Kalinin Bay which was machine gunned and detonated by US fighters just in time.
Yukikaze then noticed through smoke clouds the USS Johnston, the true hero of Samar, crippled by three main gun hits and three secondary shells from Yamato and was down to two 5-inch guns at 17 knots. All five DDs engaged her, Yahagi disabled “B” turret, and a fire forced the staff off the bridge. They were deterred to close by fiercely attacking aircraft. Yukikaze, Isokaze, Urakaze, and Nowaki came back and finished off Johnston and she sank with 186 men. Yukikaze closed to salute her struggling crew for her bravery, Captain Masamichi, much impressed, personally paying his respects with all crewmen lining up and saluting. This was Yukikaze’s last battle.
During the battle the cruisers Chōkai, Chikuma, and Suzuya, were all sunk and others damaging but Yukikaze was unscaved again. She assisted the sinking Chikuma but replaced by Nowaki. Kurita lost his nerve and famously retreated, saving Taffy three, one of the three forces protectngthe US landings. The US launched more air attacks which claimed the Noshiro and several destroyers but again, Yukikaze was never hit. The Battle of Leyte consluded by a major Japanese defeat on the 27th. Centerforce arrived in Brunei and Yukikaze was refueled by Haruna a day later.
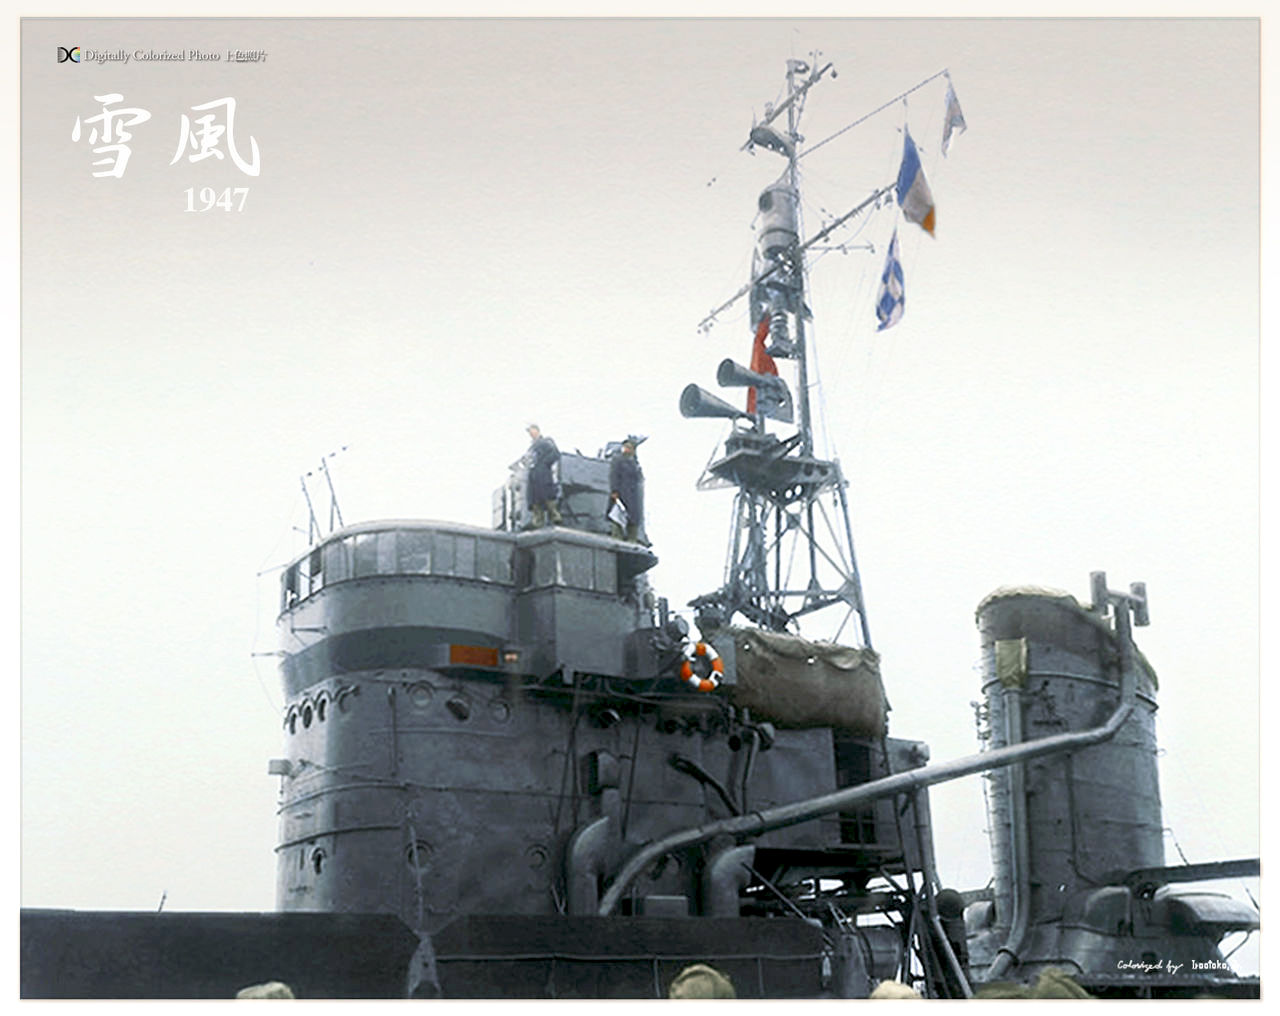
Yukikaze’s bridge, photographed in May 1947, colorized by Irootoko Jr.
Escorting Shinano:
While in Brunei out of fuel, continuous air attacks, saw strafing killing one Yukikaze’s machine gunner. On November, now resupplied, the last Japanese vessels left the area, and on the 16th the main fleet left Brunei was underway to Kure, Yukikaze protecting the capital ships. On the 22nd, Kongō and Urakaze were torpedoed and sunk en route by USS Sealion, but Yukikaze arrived at Kure on the 24th and later escorted Nagato to Yokosuka. Later she was assigned to escort the brand new, still completing IJN Shinano, the world’s largest aircraft carrier and last master ace for the IJN, with her near sister-ship Yamato (they shared the same hull). She needed to train and have sea trials, but was eventually spotted and reported by a lone B-29. She was commissioned before being fully fitted out, lacking her watertight doors, with a few not installed correctly. Yukikaze, Isokaze and Hamakaze escorted her from Yokosuka to Kure for her sea trials, departing on the 28th. At 3:00 on the 29th, a submarine was detected by Isokaze, signalling to Yukikaze to defend Shinano, but she never received the message. Shinano did, and started a serie of hard turns, one ironically presenting a perfect broadside for USS Archerfish. Six were launched, four found their mark. Admiral Abe on Shinano initially ignored the damage, and it took several hours to make enough effort with the rookie crew to try to avoid flooding despite having working flooding pumps and other damage control equipment. But the crew was down to bucket chains throughout the ship. At 11:00, Shinano she capsized and sank, and Yukikaze picked up survivors before retreating to Moji and remain there until December 29, escorting a troop convoy to Formosa and back. From January to March of 1945, she was in training exercises and sailed to replace Yukikaze on escorting duties (the latter was torpedoed and sunk by USS Blackfin).
Operation Ten Go:
Yukikaze by April 1945 was mobilized to face the invasion of Okinawa, last defensible position before the mainland. The navy was pressed by Emperor Hirohito to act after its lack of action to defend Okinawa. Yamato was to be sent in a one-ticket mission, beach herself on the Island as a gun fortress to shell allied convoys approaching. The escort for Operation Ten-Go, part of the battle of Okinawa counted Yukikaze as one of nine escorts including Yahagi leading the DDs Hamakaze, Isokaze, and Asashimo. There were also Hatsushimo, Kasumi, Fuyutsuki, and Suzutsuki. On April 6 they left Tokuyama, only to be spotted and reported by US submarines and shadowed on the 7th by Catalina floatplanes, keeping track of them. At 11:30, radars picked up a massive blob approaching. These were 386 carriers aircraft. This from USS San Jacinto sank Asashimo and Hamakaze. Another wave sank Yahagi, assisted by Isokaze, also sunk. Now, Isokaze was the last Kagerō class destroyer still afloat (with Yukikaze). Helldiver dive bombers fatally crippled Kasumi, Avenger torpedo bombers crippled Suzutuki. Once out of the way, the US aicraft still with an offensive payload and all fighter bombers concentrated on Yamato, already badly damaged. The epic battle lasted less than her sister Musashi, but still three hour, 7 bombs and 11-13 torpedoes ended with a spectacular magazine explosion. Yukikaze, again, survived the battle with just superficial strafing damage, 3 killed, 15 wounded. Yukikaze rescued survivors from Yamato and approached Isokaze to pick up her crew and scuttled her, the last of her sisterships. Kasumi was also scuttled.
Yukikaze was back to Sasebo and dropped off Yamato and Isokaze survivors. In April-May she was patrolling Jpanese waters until oil reserves were depleted, so like the rest of the fleet she was stuck in port. On May 30 she was in Maizuru harbor when a massive air raid took place, and again, she took no direct hit albeit some shrapnel damage (1 killed, 20 injured). She received enough enough fuel to escape Maizuru with Hatsushimo, but thelkatter struck a submarine dropped mine, forced to run aground. Yukikaze arrived at the less exposed base at Ōjima and heavily camouflaged, anchored on security duties. On July 30th she had little damage from aircraft strafing, one sailor kill, others wounded. At that stage, close to the end of the war, the pressed started to be interested by her. IJN Yukikaze was called “the unsinkable ship” or “the miracle ship”. She went through 10 major battles, more than 100 escort missions and yet remained unscaved.
![]()
Yukikaze as a transport postwar (Irootoko Jr)
Postwar:
She was anchored in Kure in the last days of the war. She was used to transport back home Japanese POWs. On August 15 1945, her captain learned by the radio about the capitulation. Her camouflage was removed, the crew prepared to burn secret documents and destroy valuable equipment. A day after the former surrender in Tokyo Bay, an allied intelligence team inspected her. Disarmed, with her name painted in alphaberical letter on her hull, she would be used to transport Japanese troops and POWs back home.
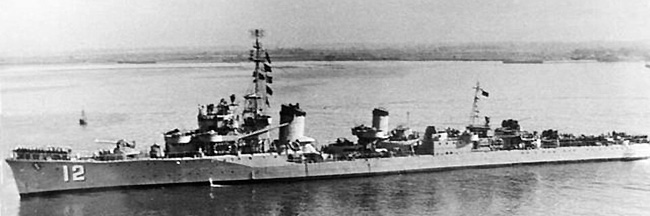
On 6 July 1947, Yukikaze was transferred to the Republic of China as war reparation. She instantly became the best ship of the newly formed Navy and renamed Dan Yang (丹陽 DD-12). Other destroyers joined in, and they were all named with “Yang”. She became flagship of the Republic of China Navy (ROCA) but became an unarmed training vessel until 1952. In 1953, she received Type 89 12.7 cm/40 dual mounted guns, and Type 98 10cm/65. In 1956, they were removed and replaced by three US 5″/38 and 3″/50 replacing the last torpedo tubes plus Bofors 40 mm guns, and US depth charge launchers. She once sailed to Manila to be visited by 50,000 overseas Chinese in August 1953. She notably patrolled the South China Sea, intercepting smugglers into Shanghai. On 4 October 1953, she captured the Polish oil tanker Praca southeast of Taiwan. On 12 May 1954, she shelled and captured another Polish freighter (Prezydent Gottwald) bringing machinery and medicines. On 23 June 1954, she captured the the Soviet oil tanker Tuapse carrying kerosene in the Balintang Channel near the Philippines. Sime crewmen were detained in captivity until… 1988. She saw action in the Taiwan Strait in a supporting role but after the arrival of many surplus US destroyers she was decommissoned and scrapped in 1970 after heavy damage, beyond repair, by a typhoon in 1969. Last time it’s a reef that cause her more harm than the enemy. There was a campaign in Japan to have her returned and preserved, but only her rudder anchors were repatriated, now exhibited at the Navy Academy Museum.
The Mystery destroyer: Akigumo, Kagerō or Yūgumo ?
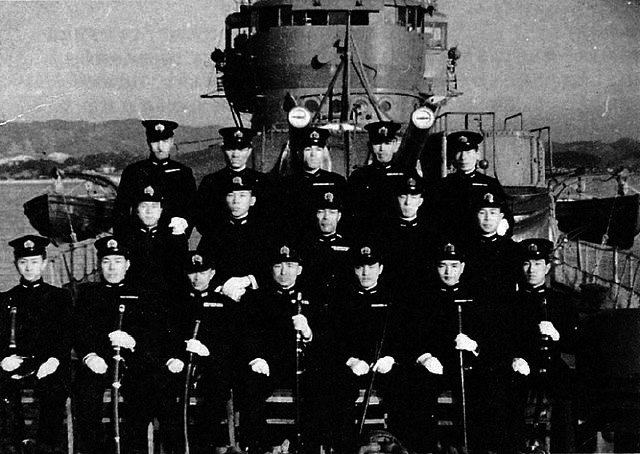
The staff photo, redicovered recently, that proved her true belongings.
For decades after WW2, Akigumo was was rumored to be a Yūgumo class (the next destroyers) due a testimony byImperial Japanese Navy photographer Shizuo Fukui, later just retaken by several books and naval historians, exacerbated by the complete lack of existing photos. The original versaion was that she was assigned to destroyer division 10 (and that was verified), comprising only Yūgumo class destroyers (with the lead ship, Yūgumo, as Makigumo, Kazagumo), to topple it off, the name shared the suffix as new Yūgumos. It was however discovered that her “X” turret was removed and replaced by AA guns, whereas all Yūgumo class kept this turret due to their increased elevation. This was the domino effect which debunked the myth and solidified Akigumo a Kagerō class destroyer. Eventually someone had the good taste to cherck the original records, undestroyed, and showing her listed as as as Kagero class on crossed archives and records. In fact the final nail came on 1994 from maritime historian Tamura Toshio, which confirmed her as a Kagerō class, with the only known photo of Akigumo taken on 19 January 1944 rediscovered in Rear Admiral Takama Tamotsu’s personal belongings. It showed her as part of destroyer squadron 11, with the staff posing on her bow. The forward turret and bridge behind and general shapes eventually clearly made her a Kagerō, not a Yūgumo. Explanation for the suffix came later, as she was initially to be named Shimakaze, before this was reassigned to the one and only “super destroyer” in the IJN after 1942. By the time, the command was just out of “kaze” suffixed names and went for Akigumo instead.
Career of the class
 Kagerō (1938)
IJN Kagerō was laid down at the Maizuru Naval Arsenal on 3 September 1937, launched on 27 September 1938, commissioned on 6 November 1939. On 7 December 1941 she was assigned to Destroyer Division 18 (Shiranui, Kagerō, Kasumi, Arare) as well as being part of Destroyer Squadron 2, IJN 2nd Fleet. She was deployed from Etorofu in the Kurile Islands to escort Nagumo’s Kido Butai for this first high stakes attack, and back to Kure on 24 December. Many of her class also took part in this escort. Non saw action as the USN never sent any ship against them and the carriers were far away. In January 1942, Kagerō escorted the best IJN aircraft carriers, Shōkaku and Zuikaku, to Truk, then to Rabaul, to cover landings there and at Kavieng and back with Shōkaku alone from Palau to Yokosuka on 3 February. On 1 March she retuned with the first air fleet (Kido Butai) for the Dutch East Indies. She took part in the hunt for the 8,806-ton Dutch freighter Modjokerto, notably Shiranui, Kasumi, Isokaze, Ariake, and Yūgure. It took just 3 minutes all gguns blazing. She sank with 42 men, 26 rescued. On 17 March, she left Yokosuka with Shōkaku and Zuikaku for Staring-baai in Sulawesi, back to the Netherlands East Indies. Kagerō left on 27 March to escort the Kido Butao for the Indian Ocean raid, rampaging the Royal Navy there and striking Colombo and Trincomalee. She was later back to Kure for an overhaul on 23 April. She was back to Saipan on 3 June escorting a troop convoy intended to seize Midway if the US carriers were destroyed. Next she escorted Kumano and Suzuya from Truk back to Kure.
On 5 July, she escorted the transport Kikukawa Maru to Kiska, Aleutian Islands when ambushed by USS Growler, making a carnage of desdiv 18: Arare sank, Kasumi and Shiranui were crippled. On 8 August, Kagerō towed Kasumi back to Japan. On 20 July, without unit, she was reassigned to DesDiv 15 with Oyashio, Hayashio and Kuroshio, Kagerō, 2nd Fleet. By mid-August 1942, Kagerō escorted Jintsu to Truk, then made her first high speed transport run to Guadalcanal. She made patrols in the region up to February 1943, to the Shortland, and detached for many “Tokyo Express” runs in the Solomon, but also escorted aircraft carriers at the battle of the Eastern Solomons on August 24 and at the battle of Santa Cruz on October 26. In November 15th, Kagerō took part in the second naval battle of Guadalcanal, taking part in the famous torpedo attack on USS Washington but failing to damage her. In return to sank Kirishima and Ayanami, seind the Japanese packing.
On the 30th, Kagerō took part in a supply drum transport mission off Lunga Point. This next night, while dropping their drums, five American cruisers and six destroyers rushed to them, starting the battle of Tassafaronga.
Kagerō lost track of the main formation, sailed away with Makinami, abandoning the flotilla, and unable to take part in the main torpedo attack by Takanami, Oyashio, Kuroshio, Kawakaze, and Naganami which decided of the battle by sinking USS Minneapolis, New Orleans, and Pensacola. USS Honolulu was driven away, while USS Northampton turned northwest, continuing on alone engaging the Japanese destroyers, and while doing so, crossed the path of Kagerō and Makinami, still with their torpedoes loaded. They fired all their sixteen torpedoes and hit several times, breaking apart the heavy cruiser, whuch sank rapidly (2x port side rear half, 1x engine room, 1x behind turret 3, detonating her fuel takes). She immdeiately listed at 10 degrees and the crew was found caught between rapid flooding below and raging inferno above. Damage control was just impossible and order to abandon ship ordered. Still, despite being eviscerated by four “long lance” she sank in 3 hours by the stern, with “only” 50 goinf down. The rest managed for the most to reach nearby islands.
By mid-February 1943, Kagerō escorted Junyō via Truk to Kure and in mid-March 1943 she sailed with Junyō and Hiyō back to Truk. Kagerō continued on to Shortlands and arrived on 24 April. She made a troop transport run from Rabaul to Kolombangara on 7 May but hit underwa a naval mine while leaving Vila port. Near dead in the water, Allied aircraft came, spotted her and attacked from all sides. She sank southwest of Rendova with 18 crewmen killed, 36 wounded. The rest managed to be rescued later. She was only stricken on 20 June 1943.
IJN Shiranui (1938)
Shiranui was laid down at the Uraga Dock Co. on 30 August 1937, launched on 28 June 1938 and completed on 20 December 1939.
Pre-WWII Training and Maneuvers: Shiranui participated in training and fleet maneuvers until Japan entered WWII in December 1941.
Pearl Harbor Support: She provided escort for the aircraft carriers of the 1st Air Fleet during the attack on Pearl Harbor.
Early Pacific Campaigns: Participated in invasions of the Philippines, Dutch East Indies, and supported operations in the Solomons.
Battle of Midway (June 1942): Shiranui was part of the escort for the battleship Yamato in the Main Body of the fleet, but did not directly engage in the battle.
Torpedoed (1942): Damaged by a torpedo from a U.S. submarine USS Growler (SS-215) near the Solomon Islands, which left her out of action for repairs for several months.
Final Engagement and Sinking (1944):
On October 27, 1944, while attempting to rescue survivors from the Battle off Samar (part of the Battle of Leyte Gulf), Shiranui was ambushed by U.S. aircraft from Task Force 38.
She was sunk west of Panay Island in the Philippines.
Most of the crew perished, including the captain; very few survivors were rescued.
Kuroshio (1938)
The IJN Kuroshio (黒潮, “Black Tide”) was laid down at Fujinagata Shipyards on 31 August 1937, launched on 25 October 1938 and completed on 27 January 1940.
Early War: Participated in initial invasion operations in Southeast Asia including:
Philippines Campaign
Dutch East Indies campaign – assisted in landings and convoy escort
Battle of the Java Sea (Feb 1942): Supported Japanese surface forces during this major naval battle, helping defeat the ABDA (American-British-Dutch-Australian) fleet.
Solomon Islands Campaign:
Took part in high-speed Tokyo Express missions delivering supplies and reinforcements to Japanese forces in Guadalcanal.
Saw extensive action and frequently dodged air and surface attacks.
Fate of IJN Kuroshio:
Date of Sinking: May 8, 1943
Cause: Struck naval mines laid by American aircraft near Blackett Strait, off Kolombangara Island (Solomon Islands).
The ship exploded and sank rapidly; most of her crew were killed, though some survived.
Oyashio (1938)
The IJN Oyashio (親潮, meaning “Parent Tide”) was laid down at Maizuru Naval Arsenal on 29 March 1938, launched on 29 November 1938 and completed on 20 August 1940.
1941–42: Early Campaigns:
Escort duties during the attack on Pearl Harbor, covering Japanese carrier groups.
Participated in the invasions of the Philippines and Dutch East Indies
Engaged in Battle of the Java Sea (February 1942), assisting in sinking Allied warships.
1942–43: Solomon Islands Campaign: Took part in multiple Tokyo Express runs (night resupply and troop transport missions to Guadalcanal and New Georgia).
Heavily involved in the Naval Battle of Guadalcanal operations and high-speed evacuations.
Fate: She sank on May 8, 1943, Struck naval mines while exiting Kula Gulf, after completing a Tokyo Express run. Immobilized, she was then attacked by U.S. aircraft and sunk with heavy casualties.
Hayashio (1938)
 (早潮, “Swift Tide” was laid down at Uraga Dock on 30 June 1938, launchedon 19 April 1939 and completed on 31 August 1940.
1941–42: Early War Activity, Escort missions during the Malaya and Philippines Campaigns and Participated in operations in Dutch East Indies and supported landings
1942: Solomon Islands: Took part in the Tokyo Express missions — high-speed night resupply operations to Japanese forces in Guadalcanal. Engaged in naval operations around New Georgia and the Slot, facing increasing Allied air and naval pressure.
Fate: Sank November 24, 1942 near Koli Point, Guadalcanal, hit by U.S. dive bombers SBD Dauntless while unloading troops and supplies. She exploded and sank, with the loss of much of her crew and many troops that were still being unloading suplies.
Natsushio (1939)
Natsushio (夏潮) was laid down at Fujinagata Shipyards on 9 December 1937, launched on 23 February 1939 and completed on 31 August 1940. At 18:00 hours on 23 June 1941, she collided with the destroyers IJN Kuroshio and Minegumo in Bungo Channel while in manoeuver. Repairs were relatively quick.
At the time of the attack on Pearl Harbor, she was assigned to Destroyer Division 15 (Desdiv 15), Destroyer Squadron 2 (Desron 2) IJN 2nd Fleet. She was deployed from Palau as part of the escort for the aircraft carrier Ryūjō, taking part in the invasion of the southern Philippines with the minelayer Yaeyama.
In early 1942, IJN Natsushio took part in the invasion of the Netherlands East Indies. She escorted the invasion forces for Menado, Kendari and Ambon in January. With the the invasion of Makassar on 8–9 February, she was torpedoed by the old S-37 and sank c22 miles (35 km) south of Makassar. Ten crewmen went down with her, killed immediately, but survivors were rescued by Kuroshio quickly after. Natsushio was stricken on 28 February 1942 as the first Japanese destroyer sank by an U.S. submarine in WW2, and first of her class sunk as well as the only one of the Kagero-class destroyer not taking part in the Battle of Midway.
Hatsukaze (1939)

Hatsukaze was laid down at Kawasaki Dockyard Co. 3 on December 1937, launched on 24 January 1939 and completed on 15 February 1940.
1941–42: She took part in operations during the invasions of the Philippines and Dutch East Indies, Escort duty for larger warships and troop transports. She was present during the Battle of Midway in June 1942 as part of the support fleet. In 1942–43: Solomon Islands. She Participated in Tokyo Express resupply runs to Guadalcanal. She Took part in the Naval Battle of Guadalcanal, a chaotic night engagement between Japanese and Allied forces in November 1942.
Sinking of IJN Hatsukaze was on November 2, 1943 at the Battle of Empress Augusta Bay (off Bougainville, Solomon Islands)
During the confusion of night combat, Hatsukaze collided with the heavy cruiser IJN Myōkō, which severely damaged her bow. Immobilized and drifting, she was left behind by the Japanese fleet.
U.S. forces discovered her the next morning and sank her with gunfire. Most of the crew were lost; only a few survived.
Yukikaze
Yukikaze was dubbed the “luckiest destroyer in the IJN” postwar, see her full career in the assessment section above. She was built at Sasebo Naval Arsenal, launched on 24 March 1939 and Commissioned on 20 January 1940.
Amatsukaze (1939)
Amatsukaze (天津風, “Heavenly Wind”) was a Kagerō-class destroyer Laid down at Maizuru Naval Arsenal on 14 February 1939, launched on 19 October 1939 and commissioned on 26 October 1940 under command of Tameichi Hara in 1942. She saw heavy combat, especially at Guadalcanal (full career, see above, assessment section). She took part in the capture of the Philippines and Dutch East Indies, captured the port of Davao, saw combat at the battle of the Java Sea, assisted in capturing the hospital ship SS Op Ten Noort, helped sinking the submarines HNLMS K-10 and USS Perch, escorted Admiral Yamamoto’s battleship force at the battle of Midway, escorted carriers at the battles of the Eastern Solomons and Santa Cruz. She acquired her legendary status during the first naval battle of Guadalcanal on November 13, 1942. At point blank range she sank the destroyer USS Barton and helped sinking the cruiser USS Juneau, crippling also the heavy cruiser USS San Francisco but was herself damaged by USS Helena.
She had various escorting missions in 1943, but did not see frontline combat. On January 16, 1944, she was damaged beyond repair by SS Redfin. Cut in two, she amazingly survived, further cementing her reputation. The forward section sank, but the aft section stayed afloat, was towed to Singapore, and amazingly, given a new bridge and prow, and continue to she spent nearly the rest of her service in that shape from March 1945, eventually running aground after heavy air attacks and scuttled on April 10. Tameichi Hara published a book postwar which participated greatly in her legend as well as her second commander.
Tokitsukaze (1939)
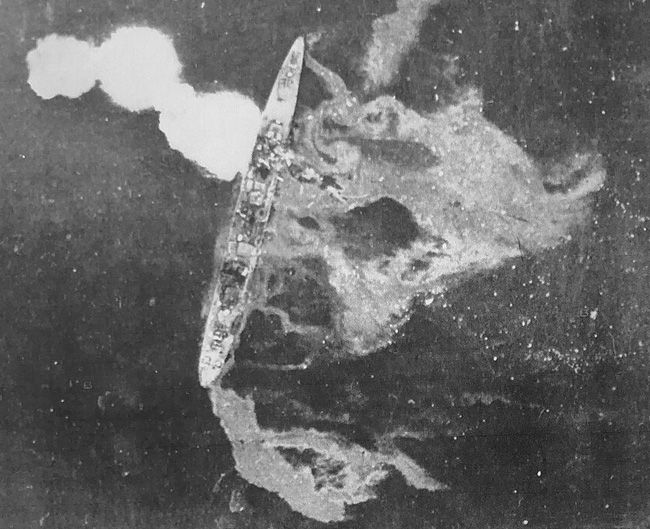
Tokitsukaze was laid down on 20 February 1939 at Uraga Dock, launched on 10 November 1939, commissioned on 15 December 1940.
1941–42: Early Pacific Campaigns. She participated in the invasions of the Philippines and Dutch East Indies and she supported Japanese naval operations in the Java Sea and surrounding waters.
She was in escort duty for troop transports and major fleet units. 1943: Solomon Islands Campaign: She Took part in high-risk Tokyo Express missions to resupply Japanese forces in the Solomons. Fate; She was sunk on March 3, 1943 while participating in the Battle of the Bismarck Sea, escorting a troop convoy from Rabaul to Lae, Tokitsukaze was attacked by Allied aircraft (mostly U.S. and Australian bombers and fighters). She was hit by bombs during the intense aerial assault. A bomb blast broke her in half, severing the bow and stern sections.
The stern section remained afloat temporarily, allowing part of the crew to be rescued. Survivors were picked up by the destroyer Yukikaze. The wreck eventually sank off Lae, New Guinea.
Urakaze (1940)
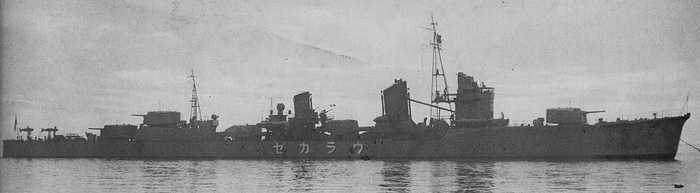
Built at Fujinagata Shipyards in Osaka, Urakaze was laid down on 11 April 1939, launched on 10 April 1940 and commissioned on 15 December 1940.
1941–42: Early War, she took part in the invasion of the Philippines, Dutch East Indies, and escorted troop convoys during Japan’s initial offensives.
She served as an escort for capital ships, including battleships Yamato and Musashi, and various aircraft carriers.
Mid-War Operations: She was Engaged in Solomon Islands operations, including the Tokyo Express night supply runs. Escort and screening duty for fleet movements in the Central and South Pacific. Involved in the Battle of the Philippine Sea (June 1944), as part of carrier task group escort forces.
Fate; She was sunk on November 21, 1944, torpedoed by the U.S. submarine USS Sealion (SS-315) near Kyūshū, while escorting the battleship Yamato, which was transporting troops to reinforce the Philippines. She sank quickly with all 300+ crew members perished, including Captain Tameichi Hara, one of the few surviving senior destroyer commanders from the early war who had just recently transferred off the ship.
Isokaze (1939)
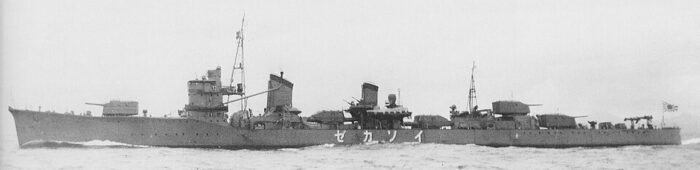
IJN Isokaze was built at Sasebo Naval Arsenal, laid down on 25 November 1938, launched on 19 June 1939 and commissioned on 30 November 1940.
1941–42: Early War Service: Escort and screening missions during the Invasions of the Philippines and the Dutch East Indies and the Battle of Midway (June 1942) as part of support forces
1942–44: Central & South Pacific: Engaged in Tokyo Express runs in the Solomons, Participated in Battle of the Philippine Sea (June 1944) and subsequent carrier escort missions.
Frequently served as an escort for super-battleships Yamato and Musashi.
Final Mission – Operation Ten-Go (April 1945): In early April 1945, Isokaze was part of Operation Ten-Go, the kamikaze-style final sortie of the battleship Yamato, which aimed to beach itself on Okinawa and fight as a shore battery. She was one of the destroyer escorts in the task force and sank on April 7, 1945 in the East China Sea, south of Kyūshū, Struck by air attacks from U.S. carrier aircraft (Hellcats, Helldivers, Avengers). She Suffered multiple bomb and torpedo hits. Her engines were disabled, and she became immobilized. The Crew abandoned ship, and she was scuttled by the destroyer Yukikaze to prevent capture. Dozens killed, but many were rescued by Yukikaze.
Hamakaze (1940)
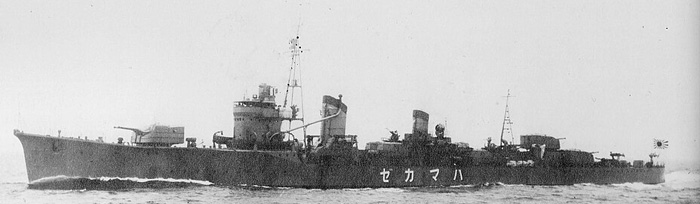
Hamakaze was built at Uraga Dock, laid down on 20 November 1939, launched on 25 November 1940 and commissioned 30 June 1941. She was assigned with Urakaze, Isokaze, and Tanikaze in DesDiv 17, and had a short peacetime career training. From November 18-22, Hamakaze departed Saeki for Hitokappu Bay in escort of the Kido Butai for the attack on Pearl Harbor, on December 7. She was back to Japan on the 24th. In January 1942, Hamakaze escorted Akagi and Kaga for the strikes on Rabaul, and in February she escorted the Kido Butai for the attack on Port Darwin. Next she escorted carriers for the Operations in the Java Sea and Indian Ocean raid. She escorted IJN Kongō and Haruna and with Urakaze and Tanikaze, bombarded Christmas Island andtook part in its successful capture. Hamakaze arrived back in Kure on April 27 and drydocked for repairs.
At the battle of Midway, Hamakaze escorted the Kido Butai for the attack of the defenses on Midway Island, luring out American carriers, for Nagumo’s carriers and Yamamoto’s battleships to catch them in a pincer followed by the capture of Midway. US intel intercepted the plan a month before and laid in ambush its own aircraft carriers. Hamakaze saw direct combat trying to stem US aircraft attacks, but failed to shot down any aircraft. All four Japanese aircraft carriers and an escorting heavy cruiser. Hamakaze later assisted the crippled aircraft Sōryū by USS Yorktown, assisting evacuating her crew. Isokaze scuttled Sōryū. On the 8th, Hamakaze transferred her survivors to the battleship Kirishima, and was back to Hashirajima on the 14th.
After transits between ports, Hamakaze was in the very first troop transport run to Guadalcanal on August 8-14. She escorted the carriers in the Battle of Santa Cruz on October 26, under heavy air attacks. Hamakaze’s AA claimed no US attacking aircraft. She remained escorting duties until late 1942. In 1943, she escorted a troop convoy from Rabaul to lae and back bt lost to air attacksNichiryu Maru and Myōkō Maru, but witnessed the sinking of USS Argonaut. In February she took part in evacuation runs from Guadalcanal, damaged by a bomb hit destroying her forward turret. On March 6-16, Hamakaze towed the crippled and disabled Michishio from Truk to Japan without and docked in Kure until June. In the Solomon Islands Campaign she took part in troop transport runs and saw the battle of Kula Gulf no engaged, then the Battle of Kolombangara in the protection force of a transport run, by night, seeing Jintsū blasted by USS Honolulu and USS Saint Louis, finished off by USS Taylor. She made a torpedo run and claimed HMNZS Leander but took an half hour to reload her torpedoes, and made a second pass which claimed USS Gwin, Honolulu and Saint Louis. Next she was at the Battle of Horaniu on August 18, against an American destroyer flotilla, damaged by a single shell hit. Next she took part in Operation Ten Go on 7 April 1945, escorting Yamato to Okinawa, sunk by TF 58 primarily aviation, attributed to USS San Jacinto air group, 150 miles SW of Nagasaki.
Tanikaze
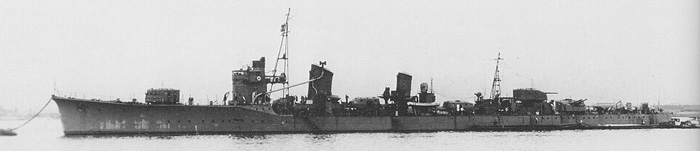
Taniaze was built at Fujinagata Shipyards, Osaka, launched on 1 November 1940 and commissioned on 25 April 1941 under commander Katsumi Motoi and assigned the destroyer division 17 with her sisters Urakaze, Isokaze, Hamakaze. From 18–22 November she left from Saeki to Hitokappu Bay and escort the Kido Butai (Akagi, Kaga, Sōryū, Hiryū, Shōkaku, and Zuikaku) escorted by six Kagerō-class and two Asashio-class destroyers for the attack on Pearl Harbor. They departed on 26 November, steaming at 18 knots for 11 days on the greatest secrecy and reached the launching point on 7 December unnanounced. This was a perfect surprise, albeit ther departure back home was known by US intel. This was a complete success. For the elminitation of the entire Pacific fleet and air force, the Japanese “only” lost 29 aircraft and 4 midget submarines. The Kido Butai steamed back home unmolested to Kure, but Sōryū and Hiryū were detached to attack Wake Island escorted by Tanikaze On 21 December, they attacked and took Wake Island and sailed back to Kure on 29 December.
On 8 January 1942, Tanikaze escorted Shōkaku and Zuikaku to Truk on the 12th and then for strikes on Rabaul on the 20th. Next on the 23th she escorted Akagi and Kaga for attacks on Kavieng and back to Truk. On 19 February 1942 she escorted Akagi, Kaga, Sōryū and Hiryū for the air strike on Port Darwin in Austrlia. She escorted them for the Java Sea campaign and on 7 March, she escorted the battleships Kongō and Haruna for the bombardment of Christmas Island, herself also bombarding and assisting the capture. On 27 March, she escorted the Kido Butai for the Indian Ocean raid, until April. On 27 April, she was bakck home, drydocked in Kure for maintenance.
On 4 June 1942 Tanikaze escorted the Kido Butai at the battle of Midway, but witnessed the sinking of the Akagi, Kaga, and Sōryū while her AA gunners tried to fend off air attacks. Tanikaze was sent byl Nagumo to escort Hiryū. But this order was fateful. As she progresed towards her position, Tanikaze’s large wake was spotted by 61 lost Douglas Dauntless bombers sent to find Hiryū, but they were unable to locate the carrier already sunk an hour earlier and instead attacked the lone destroyer, as they needed to jettison their bombs before landing. Commander Katsumi Motoi ordered his ship heavy zig zagging and not one of the 61 dive bombers mande any direct hit albeit she had 6 killed and man wounded by shell fragments and shrapnel from a single near-miss. There was an explosion inside the turret. AA fire shot down one of the dive bombers (piloted by Lt. Adams, USS Enterprise’s VS-5). But her position was reported and Tanikaze was next bombed by five Boeing B-17 from Midway. It was done from 11,000 feet (3,400 m) and pretty innacurate. Tanikaze later returned to combined fleet.
Next she was sent to the Guadalcanal campaign from 13 July, wuth the 3rd fleet. On 8 August she left Saipan to Kure and on the 16th, departed on a troop transport run to Guadalcanal (arrived the 18th) next on the 25th Tanikaze she escorted the Milne Bay invasion force, made another transport run on 28–29 July, to Milne Bay. On 1 September, Tanikaze took part in another troop transport run to Guadalcanal, then on 4–6 September escorted a convoy from the Shortlands to Rabaul. In September-October she was on patrol duties north of the Solomons. On 11 October, she escorted carriers in an attempt to lure out and sink American shipping off Guadalcanal. On the 15th, Zuikaku sank USS Meredith and this became later the battle of Santa Cruz. Tanikaze was unscaved. She escorted a damaged Chikuma, by Hornet to Truk on the 29th, and then Zuihō and Kumano to Japan, drydocked in Kure on 2–7 November for maintenance.
From 22 November to 4 December she escorted Kumano from Kure to Manila and the Shortlands. On 7 December she made a supply run to Guadalcanal, marred by PT boat attacks. Same on the 11th, a success. On 16th-21st she made two separate troop transport runs to Munda. On 25 December she assisted the damaged troop ship Nankai Maru and a DD after collision, to Rabaul for repairs. In December she made a troop transport run to New Georgia and on 5–10 January 1943, escorted a troop convoy to Lae and back. On the 14th, this was a troop transport run to Guadalcanal. She had air attacks and had only near miss damage, but a shrapnel killed Commander Katsumi Motoi. On 16–26 January while drydocked for repairs, Tomura Kiyoshi took command. Next she escorted a troop transport run to the Russell Islands. She later took part in the first and second Guadalcanal evacuations on 1 and 4 February, 7–8 February to the Russell Islands and Rabaul and Truk on the 11th. From 29 March to 3 April she escorted convoys to Palau. On 6 April to the 20th, she was with a troop convoy from Palau to Hansa Bay and Wewak and back to Palau and assisted the troop transport India Maru. On 26 April, she was back to Truk, and Tomura Kiyoshi was relieved by Maeda Shinichirou. From 28 April to 1 May she escorted the supply ship Irako to Iwa Jima and other runs until the Battle of Kula Gulf.
On 5 July destroyer transports led by Niizuki to Kolombangara were intercepted by a US cruiser destroyer group with Niizuki sinking USS Strong, but the mission was aborted. On 6 July 1943, seven destroyers with 2,600 troops attempted another run to Vila, Tanikaze was in their protection force, last ship in the flotilla, Niizuki on the lead, Suzukaze between them. In the night, they met the exact same US cruiser destroyer force (USS Helena, USS St. Louis, USS Honolulu). Niizuki was sunk in minutes but Tanikaze and Suzukaze attacked Helena after she ran out of flashless powder. Tanikaze launched all her torpedoes after Suzukaze, one hit Helena (turret 1 magazines blasted) and two more hit amidships, having her dead in the water and adrift. Later she fbroke in two and went down with 168 men. Next St. Louis and Honolulu and escorting destroyers focused on the Japanese destroyers with USS O’Bannon and Radford missing Tanikaze, which was hhit by a lucky 6-inch shell dud. She withdrew from the battle, reloaded her torpedo tubes and both Tanikaze and Suzukaze looked bacl to Niizuki survivors and stumbled upon USS Nicholas, failing to engage her. She later joined the troop transport force, which arrived at Kolombangara, mission accomplished.
On 9 July, Tanikaze covered another troop transport run to Kolombangara (no combat) and on the 13–15 July from Rabaul to Truk. From the 19th she left Truk to escort the IJN Jun’yō to Kure, on the 24th, remained until 15 August to escort Jun’yō to Saeki, Singapore (delivering aircraft), and back to Kure on 11 September. By 19–24 September she escorted her on a troop transport mission to Truk. On 26–28 September 1943 she escorted IJN Kiso and Tama on a troop transport run to Ponape and back to Truk. On 17–26 October she escorted the battleship fleet looking for US carriers and back to Truk. On 31 October she escorted warships to Kure. Junyō was damaged by USS Halibut and Tanikaze rescues some of her sailors thrown overboard. In November she drydocked for repairs and had a turret removed for extra AA. Next, she escorted the Shōkaku from Yokosuka to Truk and back and Yamato from Yokosuka to Truk.
In January 1944, she escorted Kumano and Suzuya on a troop transport run to Kavieng. She assisted the crippled Kiyozumi Maru back to Truk. From 10–27 January she escorted tankers from Truk to Palau and back and same on 1–8 February, and from the 16th to 22nd from Palau to Lingga. From 11 March to 26 April to Davao, Balikpapan, and Saipan, and to Davao and Tawitawi.
On 9 June 1944, Tanikaze’s luck ran out. She was on patrol duty off Tawitawi along with Isokaze when crossing the path of USS Harder, already having sank Minazuki and Hayanami a few days earlier. That evening Harder spotted Tanikaze and approached to 1,000 yards (910 m), firing four, two hits. Tanikaze’s boilers exploded, rurptured her keel and caused a catastrophic flooding, in fact she sank immediately with 114 onboard, but amazingly 126 managed to escape including Lt.Cdr Shunsaku Ikeda (who died two days later) rescued by Isokaze and Urakaze.
Nowaki
IJN Nowaki was laid down at Maizuru Naval Arsenal on 8 November 1939, launched on 17 September 1940 and commissioned on 28 April 1941. She was assigned to the 4th destroyer division (Arashi, Hagikaze, Nowaki, Maikaze) and went through the Terashima Strait to join Admiral Kondō’s fleet before the attack on Pearl Harbor.
She steamed with the Philippines invason vanguard force, and soon spotted the Norwegian cargo ship Helius after being inspected by her and Hagikaze, capturing and escorting her to Japanese waters (future Setsuzan Maru). Next she was in distant cover for troop convoys to the Philippines and escorted the Malaya troop convoys. Next she was in the Dutch East Indies with the invasion convoys to Staring Bay, and was in Dutch waters in distant support.
On 1–4 March she escorted the cruisers Maya, Atago, Takao in a free for all hunt of fleeing Allied vessels in the Java Sea. On 1 March, the first to go was the motorship Toranja and British minesweeper Scott Harley, and Dutch steamship Bintoehan captured. On 2 March, she jelped sinking the HMS Stronghold, spending a large amount of shells. On 3 March 1942, she helped sink USS Asheville on a one-sided massacre. On 4 March, she assisted sinking the Australian sloop Yarra, British Motor Minesweeper 51, tanker Francol, depot ship Anking.
She took part in the Battle of Midway, escorting the Kido Butai and mostly unscaved as Dauntlesses focused on the carriers. With her poor AA she could do nothing but witness the three carriers being successively hit. She later picked up survivors off Akagi and helped scuttle her. Later she and DesDiv 4 were reassigned to DesRon 10 in Truk.
Until early 1943, Nowaki took part in the Solomon Islands campaign. She fled Truk on 17 February 1944 as a massive US air and surface attack (Operation Hailstone) took place. Harassed kater by Task Force 50.9 she only took minor splinter damage, but was straddled by 16 inch salvos from USS Iowa and USS New Jersey.
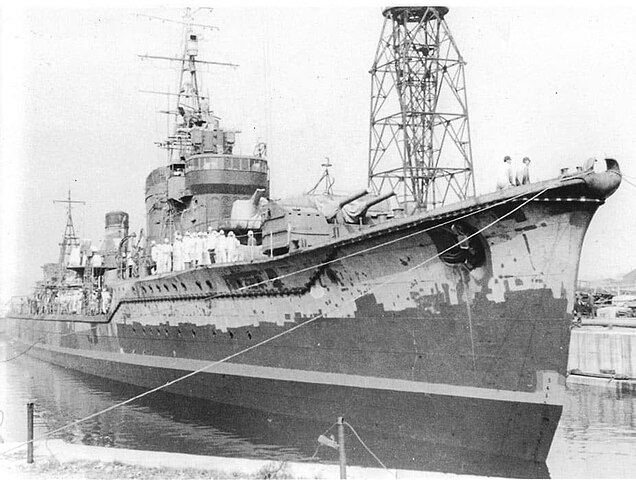
Back to the Central Pacific after repairs and overhaul modernization in Japan, Nowaki was part of the Battle of the Philippine Sea, specifically she was present in escort at the Battle off Samar on 25 October 1944, witnessing torpedo attack on the U.S. escort carriers of Taffy 3, assisted in sinking USS Johnston. Later she picked up survivors from Chikuma and scuttled her, albeit this is contested by some historians. The next day, isolated from the main force she was spotted by radar and caught by a formation of cruisers, USS Vincennes, USS Miami, and USS Biloxi. These three Cleveland class represented a total of 32 six-inches guns, raining on her several times a minute, assisted by radar. She was no match. Crippled by gunfire, Nowaki was finished off by torpedoes from the escorting USS Owen. It was 65 miles (105 km) east-southeast of Legaspi. She sank with all hands.
Arashi

Arashi was laid down at Maizuru Naval Arsenal on 4 May 1939 and launched on 22 April 1940, then Completed on 25 November. After trial runs she was finally commissioned on 27 January 1941. Her naming was made backwards and even reads “Yamakaze” after a mailing mix up. From March to July of 1941 she joined the destroyer division 4 being working out under Captain Aruga Kosaku and becoming the flagship, with sister Hagikaze, Nowaki and Maikaze. Commander Watanabe Yasumasa take command of DesRon 4. Maikaze only arrived on 15 July 1941, so they had little time training together before Pearl harbour. The squadron escorted Admiral Kondō fleet (Kongō and Haruna, Takao and Atago) for the invasion of Malaya, and on January 11 1942 Arashi covered the Malaya troop convoys. She escorted the fleet back and forth and led a bombardment on February 15 to cover the troop landings, Dutch East Indies. From February 18-21 she sailed from Palau to Celebes. On February 23 escorted an operaton in the Java Sea.
In early March Arashi operated alongside Nowaki with the Takao class cruisers trying to catch escaping allied ships.
On March 1, she and Nowaki caught and sank the Dutch merchant ships Tomohon and Pageri. Later with Nowaki and Takao she sank the British minesweeper Scott Harley and Dutch freighter Toradjo, capturing the Dutch steamship Bintoehan. The next day this time with Maya she tracked down HMS Stronghold, closed to 2,000 yards and fired on her 290 shells, Nowaki 345 rounds and Maya 635 which disabled and sank her, but this was an amazing lack of accuracy and efficience. Arashi and Nowaki alsoi caught and sank the gunboat USS Asheville. On March 4, Arashi, Nowaki and Maya, Takao, Atago fell on a whole convoy for Australia. Arashi concentrated on the British oil tanker Francol, and assisted Atago capturing the Dutch freighters Duymaer van Twist and Tjisaroea. Both were lated impressed in Japanese service. From March 18 to April 3, Arashi escorted Atago on newly occupied islands and on 4th-18th, with Nowaki she escorted Atago back to Yokosuka for maintenance, herself being drydocked for the same until late May.
She then was back in action to take part in the Battle of Midway. Shhe escorted the Kido Butai carrier group and detected cruiser sub USS Nautilus, after being already spotted and attacked by a Zero firing machine guns at while at periscope depth to catch the destroyer’s attention. Arashi dropped depth charges. The Task force changed course meanwhile, and after long hours keepung the sub below, Arashi broke off and rejoined the carrier group. However Enterprise’s aircraft were soon spotted while underway, and they followed Arashi full speed ahead to the north trying to lonk up with the 1st fleet. This was a fatal error as she unwillingly served the USN the UJN fleet on a silver platter. Her long wake was like a direction arrow to US aviators, while followed it to the carriers. Meanwhile the fighters had been kept budy deterring lowe torpedo attack from Hornet (VT-8). This was the decisive moment of the battle. Several hours after, Arashi arrived at took on sailors from Akagi, scuttling her with torpedoes.
But her crew also picked up and murdered, a downed airman from Yorktown’s VT-3. The captain of Arashi, Commander Watanabe Yasumasa was searched for postwar for war crimes but he died as Commander of DesDiv 1 aboard destroyer Numakaze, on 18 December 1943. On June 9, Arashi escorted Zuihō to Wake Island, and patrolled until July 12 outside of the Aleutians. From July 30 to August 12 she escorted troopships to occupied islands and back to Truk. On the 16th-18th this was a troopship run to Guadalcanal. She escorted the damaged Hagikaze to Truk until the 24th and she sailed to Rabaul, engaging in two troop transport missions to Milne Bay.
On September 6, Arashi assisted Tatsuta bombarding the Gili Gili warves and helping in the Island’s evacuation. They also spotted and sank the Australian freighter Anshun lent to the US army. On 14-15th, she escorted the troop ship Sado maru to the Shortlands and made a troop transport run to Guadalcanal as well as on the 18th, but she was attacked by aircraft from Henderson Field. One dropped torpedo landed too deep, passed below her, and this scared the troop transport enough to abort. Until late October 1942, Arashi patrolled off the Solomon Islands, and then aircraft carriers to the battle of Santa Cruz on the 26th.
Back in Japan she was drydocked in November and went back in escort to Rabaul. In December she escorted troop transport missions to Guadalcanal, rescuing 140 men from Teruzuki, sunk to PT-boat attacks. Arashi also helped Hatsukaze (hit by PT-112), and helped sinking PT-44 and PT-112. Next she was in a troop transport mission to Guadalcanal, but was damaged by near misses from US aircraft, followed by 2 days repairs. By early February 1943 she covered the evacuations of Guadalcanal and amde escorts between Truk and Yokosuka, being herself drydocked for repairs until May. Arashi escorted Shōkaku on training and escorted the main fleet from Japan to Truk, and in July escorted Nisshin to several bases. She returned to troop transport mission notably one to the Vella Gulf by August 1-2, as lead ship.
On August 6 1943, Arashi was in a troop transport mission with Hagikaze, Kawakaze, and Shigure through Kolombangara. Underway in heavy fog and rain squalls blinding them, the USS Dunlap, Craven, and Maury had them on radar and created an atack formation while undetected, then surprised the Japanese. This was a butchery as they launched in concert and at short range all their 24 torpedoes. Arashi saw one hitting Kawakaze and then spottedthe trail of two more torpedoes coming on them, too late to dodged them. The destroyers was gutted and flooded rapidly, to quicklk for the damage party to do anything. Hagikaze was cut in two nearby, detonated and sank rapidly. Arashi sank by the stern and crews were frantic on deck when the three destroyers opened fire at near point black range, disabling their armament first and then setting their superstructure alight, an easy work as they were all dead in the water. Arashi only fired her machine guns but her magazines blew up and she sank with almost all hands.
Hagikaze (1940)
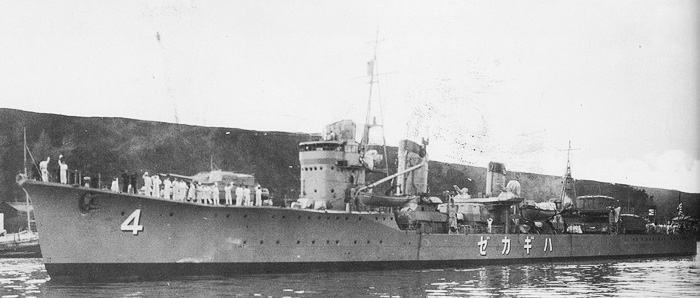
Hagikaze was built at Uraga Dock Company and launched on 18 June 1940 and she escorted Admiral Kondō fleet preparing the invasion of the Philippines and the Dutch East Indies, and their invasion convoys afterwards. On February 15, she was on shore bombardment, covering troop landings, and escorted the next months Japanese aircraft carriers until back to Japan on April 22, 1942 and drydocked for maintenance. She also escorted the Kido Butai at the Battle of Midway, and she scuttled Kaga with two torpedoes. The following months, she was on escorting and transport missions in and around Guadalcanal, from the invasion, reinforcement missions but by February 22, 1943 she was damaged by a bomb hit from B-17s. The hit dislodged her “X” so she was in repairs until late March. Next she escorted the escort carrier Chūyō, escorted the Kongō and Haruna to Truk, then transport missions apart when detached on May 8 to assist the crippled destroyers Kagerō and Oyashio, but she arrived too late as they were finished off by land based aircraft. On August 2, she escorted a troop transport mission witnessing by night IJN Amagiri ramming and sinking PT-109 (future US president John F Kennedy’s boat).
Her major action was the Battle of Vella Gulf:
On 6 August 1943, Hagikaze and Arashi, Kawakaze, and Shigure were escorting a troop transport mission, opposed initially by Captain Tameichi Hara of Shigure as they had made the exact route three times, and were now awaited by US forces. Hagikaze then took the lead in the group and became Admiral Sugira Kajū’s flagship. They went though heavy rainsqualls with a visibility down to 200 yards. Captain Hara and the others then spotted a cluster of US destroyers, spotting their group on radar, with USS Dunlap, USS Craven, and USS Maury emerging from the darkness on 7 August 1943 to close to point blank range at a parallel angle to launch all 24 torpedoes. 5 minutes later, Hagikaze was hit, with her guns and torpedoes blasted away, by at least two hits. She then came to complete halt, while listing heavily to port. The flooding was just overwhelming and damage control was unable to stop it. If that was not bad enough two more torpedoes smashed into Arashi, and one more hit Kawakaze. A sixth and final torpedo hit Shigure but was a dud. Dunlap, Craven, and Maury then swapped to artillery, with radars and fuses, and the excellent 5-in/38 made their dealy business. This was the final blow. Hagikaze receoved at least a dozen hits, and was down to machine guns, failing to do any impression apart saving honor. She sank before order to abandon ship was give, gowing down with 178 men. Arashi and Kawakaze also sank with 178 and 168 men, but Shigure still managed to launch torpedoes but failed. She was the only one retreating. There were 50 survivors escaping Hagikaze, rescued by the US or swimming to Japanese occupied Kolombangara island. Admiral Kajū was one of the latter, he spent over a week there before being rescued.
Maikaze (1941)
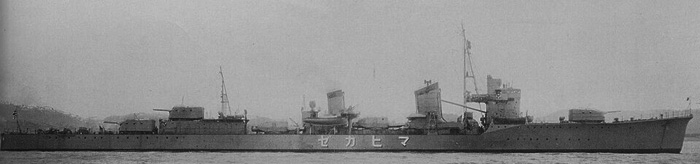
Maikaze was built at Fujinagata Shipyards, laid down on 22 April 1940, launched on 15 March 1941 and commissioned on 15 July 1941. She was assigned to DesDiv 4 (Arashi, Hagikaze, Nowaki, Maikaze). She was in escort missions across the Philippines and Dutch East Indies in 1942 and acted as carrier escort at the Battle of Midway, helping evacuating and scuttling Akagi and Kaga. She escorted troopships and supply missions for the whole Guadalcanal campaign. By August 24, she escorted the Kido Butai at the battle of the Eastern Solomons. On October 26 she escorted carriers at the battle of Santa Cruz. On December 13-18, she towed the crippled Nowaki to Truk. In 1943, she survived a bombing raid while escorting troop ships. Nichiryu Maru and Myoko Maru were sank on 7 January 1943 so she rescued their survivors. On the 10th she escorted the remaining convoys, and spotted the submarine USS Argonaut preparing for an attack. Teaming with Isokaze, Maikaze depth charged the spot until the massive USS Argonaut surfaced. Maikaze and Isokaze opened fire on Argonaut and crippled the massive cruiser sub until she sank with all 105 hands. Maikaze evacuated Japanese troops from Guadalcanal at the occasion of Operation Ke. She was damaged by US aircraft and was escorted for repairs. The remainder of 1943, she remained in convoy escort between Truk and other Islands.
Maikaze’s magazines detonating, taken from USS New Jersey
On 17 February 1944, as she evacuated convoys to Yokosuka from Truk after a massive raid, Maikaze, Nowaki, the training cruiser Katori, armed merchant cruiser Akagi Maru, armed trawler Shonan Maru were spotted and attacked by waves of carrier aircraft, notably USS Enterprise’s helldivers. Maikaze took three 3 bomb hits, leaving her dead in the water. Then Akagi Maru sank and Katori was nearly done for as well. Nowaki towed her sister but she was located by US surface forces. Soon, on the horizon appeared the massive silhouette of USN premium battleships, USS Iowa and USS New Jersey, supported by USS New Orleans and USS Minneapolis and a myriad of destroyers. Maikaze fired all her eight torpedoes, that New Jersey narrowly dodged. But she answered with her massive own secondary guns, joined by 8-inch shells from New Orleans and Minneapolis plus USS Bradford closing on for the final kill. She sank with all hands after her magazines exploded. This included the commander, Destroyer Division 4, Captain Kenma Isohisa. Iowa finished off Katori by sending on her seven 16-inch (406 mm), nine 5-inch (127 mm) shell on target, before turning on Shonan Maru. Nowaki escaped after being straddled by Iowa.
Akigumo (1941)
Akigumo was laid down at Uraga Dock Company on 2 July 1940, launched on 11 April 1941 and commissioned on 27 September 1941. She was the last of the 19 Kagerō class destroyers and prenultimate one before Pearl Harbor. She was not appointed to a destroyer division but assigned as single escort for the aircraft carrier division 5 with IJN Shōkaku and Zuikaku (Commander Arimoto Terumichi). On 18 November she sailed for Sakei Bay, and departed Japan escorting the Kido Butai for the attack on 7 December. After refueling, she was back to Japan on 22 December, docked in Kure. Commander Soma Masahira took command before she headed to Truk, and January 1942, escorted the carriers for the raids on New Guinea and Philippines, and was on patrol duty off Japanese waters. In April, she escorted the Kido Burai for the Indian Ocean Raid. Back home she was finally assigned to DesDiv 10 (Kazagumo, Makigumo, Yūgumo, Akigumo). She then escorted the failed pursuit of the Doolittle Raid force and was in refit while back. From 4-5 June, she escorted the Kido Butai in the battle of Midway, seeing the demise of Akagi, Kaga, Sōryū, and Hiryū. Sehe later patrolled, trained and escorted remaining carriers at the battle of the Eastern Solomons, on 24 August. Next she escrorted a serie of troop transport missions to Guadalcanal in September-October.
On 24 October 1944, Akigumo escorted the Kido Butai at the battle of Santa Cruz, where she was attacked by nine Dauntless dive bombers from USS Enterprise and USS Hornet (not hit). Akigumo later saw the glowing reddish tinge in the distance of USS Hornet before she closed to point blank range, noting the tow cables hanging. Orders were to captured Hornet so Akigumo and Makigumo tried to tow her, but the flooding and fires doomed the ship, now abandoned. Akigumo reported the issue and she was granted to finish the carrier off, firing twenty four 127 mm rounds with little effect and both destroyer then sent at an ideal range two torpedoes. Akigumo left seeing Hornet sinking under the light of her searchlights.
After the battle, Akigumo escorted Zuihō (damaged) and Kumano (damaged) to repairs. On1-7 February 1943, Akigumo assisted the evacuation of Guadalcanal, notably to the Russell Islands. In March Akigumo was back in convoy escorts between transport runs in April and a refit in Japan on May-June. On July-August 1943 she was back to transport runs. On 8 September her captain was promoted to Rear Admiral and she became flagship of DesRon 3. After leading two troop transport runs to Kolombangara she took part in the the battle of Vella Lavella, on 7 October. This was the last Japanese naval victory of the war but she far off from the initial engagement and only managed to join Kazagumo and Isokaze in a torpedo attack on US destroyers close to the end, missing. They were back to the troop convoy. In October she patrolled off Truk and was back to Japan for a last refit, with Commander Iritono Atsuo taking command from 23 November.
She escorted a tanker convoy off the Marshall Islands when Toa Maru was torpedoed and sunk by USS Searaven. Akigumo attacked and dropped 27 depth charges but Searaven survived and withdrew. She picked up 117 survivors. Back to Japan on 12 December she was modified for extra AA, receiving also the type 22 and the passive type E-27 radars. Underway by 19 January 1944, her command staff was photographed (see above). In February-March 1944 she escorted aircraft carriers to occupied Islands back to Japan and off the Lingga Roads. On 1-4 April, she transported materials for the 601-airgroup to Davao, air attacked underway. On 9 April 1944, she departed for Singapore but 2 days later ahead of the transport ship Kiyokawa Maru, she was attacked by USS Redfin, launching four torpedoes. Her lookouts failed to see the tracks until two torpedoes hit her. The damaged was considerable and flooding untoppable. Commander Atsuo ordered the abandon ship but stayed and went down with the ship, in his cabin. She capsized and sank with 140 men, and 113 were saved by local fishing boats.
Read More/Src

The new appearance of Amatsukaze. It is very rare that a destroyer broken in half resumed service and had a whole new career. There rare exceptions were “Zubian” (born from the forward half of the Tribal class HMS Zulu and aft part of HMS Nubian) in WW1… and WW2 IJN Amatsukaze. The latter, despite having a rushed job of a bow, with poor entries lines despite having lost a good chunk of displacement for the same output, was still capable of 20 knots, and thus, of escort job for many more months afterwards. It’s how much the Japanese were desperate at this stage.
Irootoko’s Gallery
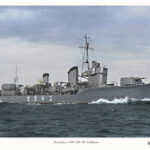
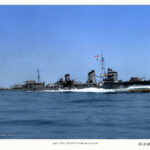
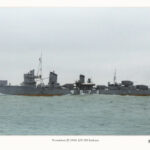
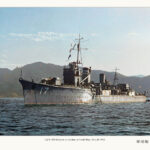
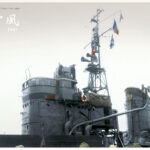
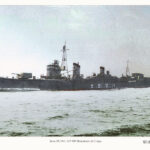
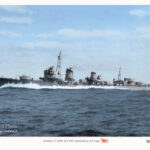
Books
Chesneau, Roger, ed. (1980). Conway’s All the World’s Fighting Ships 1922–1946. Greenwich, UK: Conway Maritime Press.
Jentschura, Hansgeorg; Jung, Dieter & Mickel, Peter (1977). Warships of the Imperial Japanese Navy, 1869–1945.
Whitley, M. J. (1988). Destroyers of World War 2. Annapolis, Maryland: Naval Institute Press.
“Rekishi Gunzō”., History of Pacific War Vol.64 Mutsuki class destroyer, Gakken (Japan), May 2008
Collection of writings by Sizuo Fukui Vol.5, Stories of Japanese Destroyers, Kōjinsha (Japan) 1993
Model Art Extra No.340, Drawings of Imperial Japanese Naval Vessels Part-1, Model Art Co. Ltd. (Japan), October 1989
Daiji Katagiri, Ship Name Chronicles of the Imperial Japanese Navy Combined Fleet, Kōjinsha (Japan), June 1988
The Maru Special, Japanese Naval Vessels No.41 Japanese Destroyers I, Ushio Shobō (Japan), July 1980
Links
japanese-warship.com yukikaze/
combinedfleet.com/kagero_n.htm
combinedfleet.com/kagero_c.htm
navypedia.org kagero.htm
en.wikipedia.org/ Kagero-class_destroyer
japanese-warship.com/ kagero/
combinedfleet.com /tanikaze
vip.udn.com 122151/5545417
colorizations by Irootoko JR
kagero is also a famous Polish publication company for military modellers
Model Kits
All kits on scalemates ex. Hasegawa/Pit-road 1:700, ASK (JP) 1:1000, XP Forge 1:1200.
Quite a popular subject.
Videos
 Latest Facebook Entry -
  X(Tweeter) Naval Encyclopedia's deck archive
 Instagram (@navalencyc)


 French Navy
 Royal Navy
 Russian Navy
 Armada Espanola
 Austrian Navy
 K.u.K. Kriegsmarine
 Dansk Marine
 Nautiko Hellenon
 Koninklije Marine 1870
 Marinha do Brasil
 Osmanlı Donanması
 Marina Do Peru
 Marinha do Portugal
 Regia Marina 1870
 Nihhon Kaigun 1870
 Preußische Marine 1870
 Russkiy Flot 1870
 Svenska marinen
 Søværnet
 Union Navy
 Confederate Navy
 Armada de Argentina
 Imperial Chinese Navy
 Marinha do Portugal
 Mexico
 Kaiserliche Marine
 1898 US Navy
 Sovietskiy Flot
 Royal Canadian Navy
 Royal Australian Navy
 RNZN Fleet
 Chinese Navy 1937
 Kriegsmarine
 Chilean Navy
 Danish Navy
 Finnish Navy
 Hellenic Navy
 Polish Navy
 Romanian Navy
 Turkish Navy
 Royal Yugoslav Navy
 Royal Thai Navy
 Minor Navies
 Albania
 Austria
 Belgium
 Columbia
 Costa Rica
 Cuba
Cuba Czechoslovakia
 Dominican Republic
 Haiti
Haiti Hungary
 Honduras
 Estonia
 Iceland
 Eire
Eire Equador
 Iran
Iran Iraq
Iraq Latvia
 Liberia
 Lithuania
 Mandchukuo
 Morocco
 Nicaragua
 Persia
 San Salvador
 Sarawak
 Uruguay
 Venezuela
 Zanzibar
 Warsaw Pact Navies
 Bulgaria
 Hungary

 Bundesmarine
 Dutch Navy
 Hellenic Navy
 Marina Militare
 Yugoslav Navy
 Chinese Navy
 Indian Navy
 Indonesian Navy
 JMSDF
JMSDF North Korean Navy
 Pakistani Navy
 Philippines Navy
 ROKN
ROKN Rep. of Singapore Navy
 Taiwanese Navy
 IDF Navy
 Saudi Navy
 Royal New Zealand Navy
 Egyptian Navy
 South African Navy


 Ukrainian Navy