
 United Kingdom (1911)
King Georges V, Centurion, Ajax, Audacious
WW1 RN Battleships
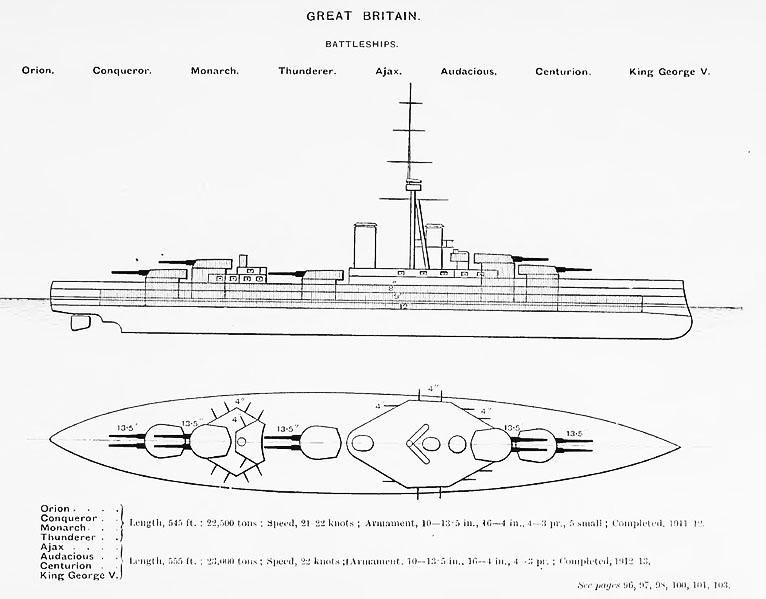
HMS Dreadnought | Bellerophon class | St. Vincent class | HMS Neptune | Colossus class | Orion class | King George V | Iron Duke class | HMS Agincourt | HMS Erin | HMS Canada | Queen Elizabeth class | Revenge class | G3 classMajestic class | Centurion class | Canopus class | Formidable class | London class | Duncan class | King Edward VII class | Swiftsure class | Lord Nelson class
Invincible class | Indefatigable class | Lion class | HMS Tiger | Courageous class | Renown class | Admiral class | N3 class
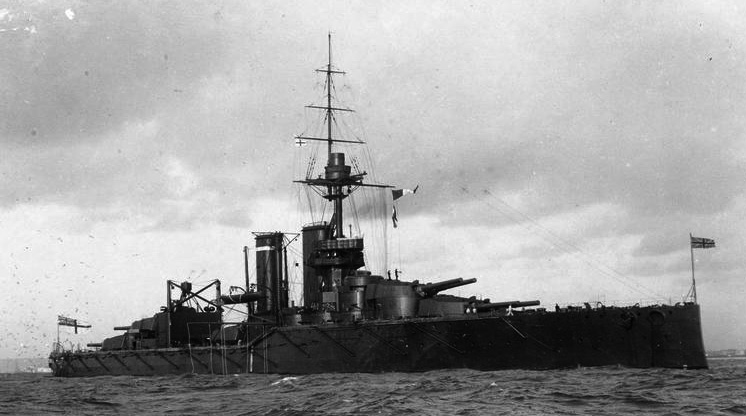
If the King George V class battleships is generally assumed to be the one which soldiered in WW2, there was another one which did the same in the previous war, in 1914-18. These were “super-dreadnoughts” (faster with a heavier artillery) presenting a new aspect of the Royal Navy’s line of battle, a second generation following the Orion class and before the Iron Duke class, predecessors of the famous Queen Elisabeth seeing service in both wars. With their five axial twin turrets they seemed a simple repeats of the Orions but they were improved on many points. HMS Audacious hit a mine in 1914 and was lost, KGV and Ajax were sold in 1926 but HMS Centurion was still around in 1944, used as …a mock Duke of York to deceive German intel.

Genesis of Development
On Brasseys naval annual, – Orion and KGV.
These battleships were part of the 1910 Programme. To gain time in design, they were at first planned as “repeat Orions” but lessons from the Lion’s trials helped altering the design.
For example, they swapped on a pole foremast, stepped ahead of the fore funnel instead of the Orion’s mast.
The second point discussed on the admiralty was the 4-in (102mm) secondary battery. They would have been replaced by 6-on (152mm) due to the theat posed by a new generation of torpedo boat and destroyers, but the admirakty was precised bu the DNC (Director of Naval Construction, Sir Philip Watts at the time until 1912) that this needed an extra 2000t just as the Government was trying to reduce naval expenditure.
The slight increase in dimensions granted however allowed a slight improvement in deck armour. It was also now time to upgrade the fire control system with something truly revolutionary (see later). Eventually, progresses made in gunnery conducted to chose more powerful guns and heavier shells, making them the best armed capital ships worldwide at the time.
These four powerful “super-dreadnoughts”, King George V (KGV), Centurion, Audacious and Ajax, although derived from the Orion incorporated all the lessons learned all possible lessons from the trials of the battlecruisers Lion and Princess Royal. Engineers were able to pugrade the Orion design without taxing muhch the displacement. Ultimately proved a well upgraded design compared to the Orions. They were copied outright for the next quatuor, the Iron Duke class, which brought some innovations of its own.
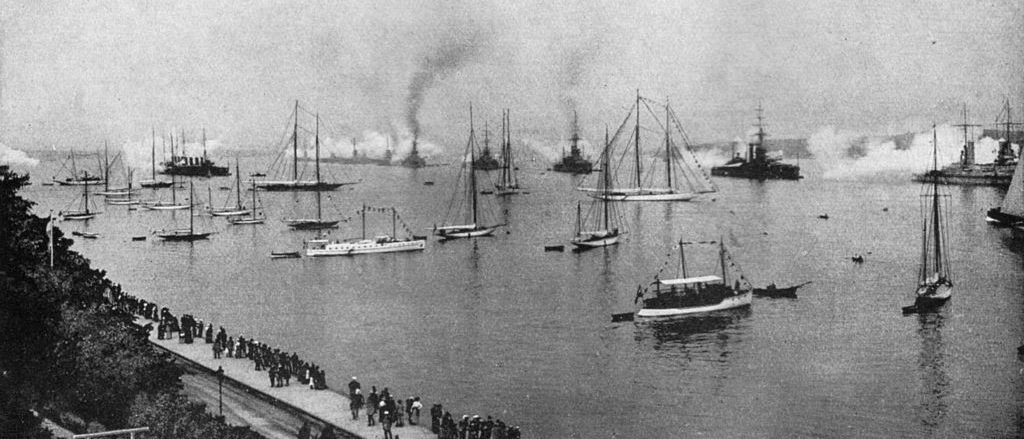
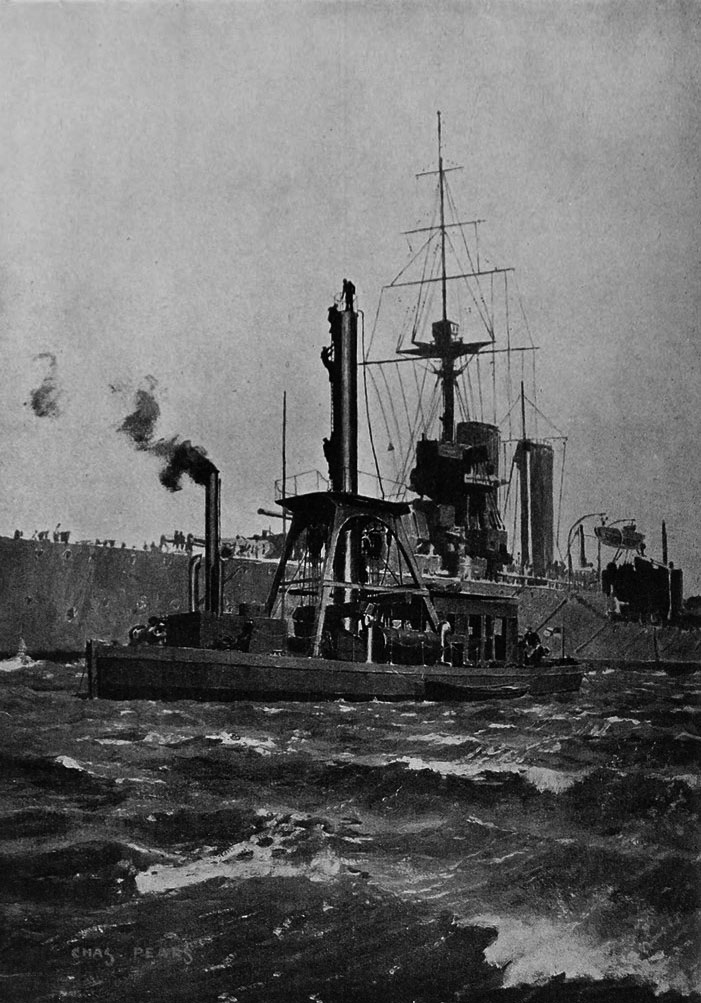
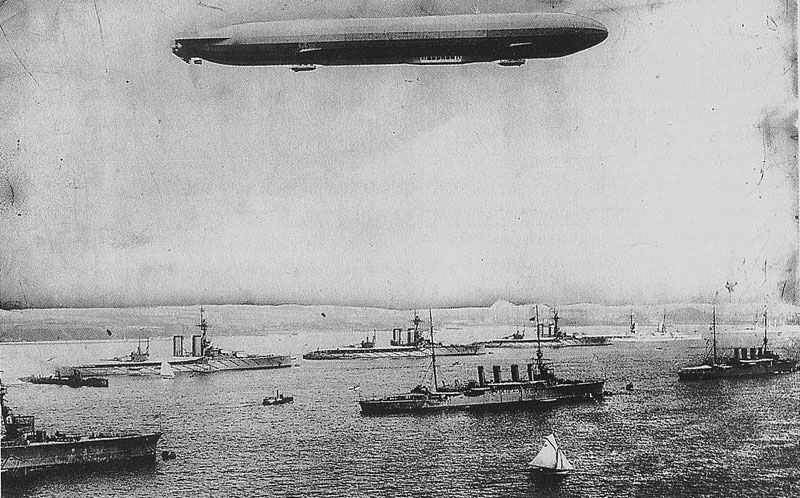
Three 2nd squadron battleships saluting the Kaiser at Kiel’s naval review, for the opening of the canal, 24 june 1914.
Design specifics
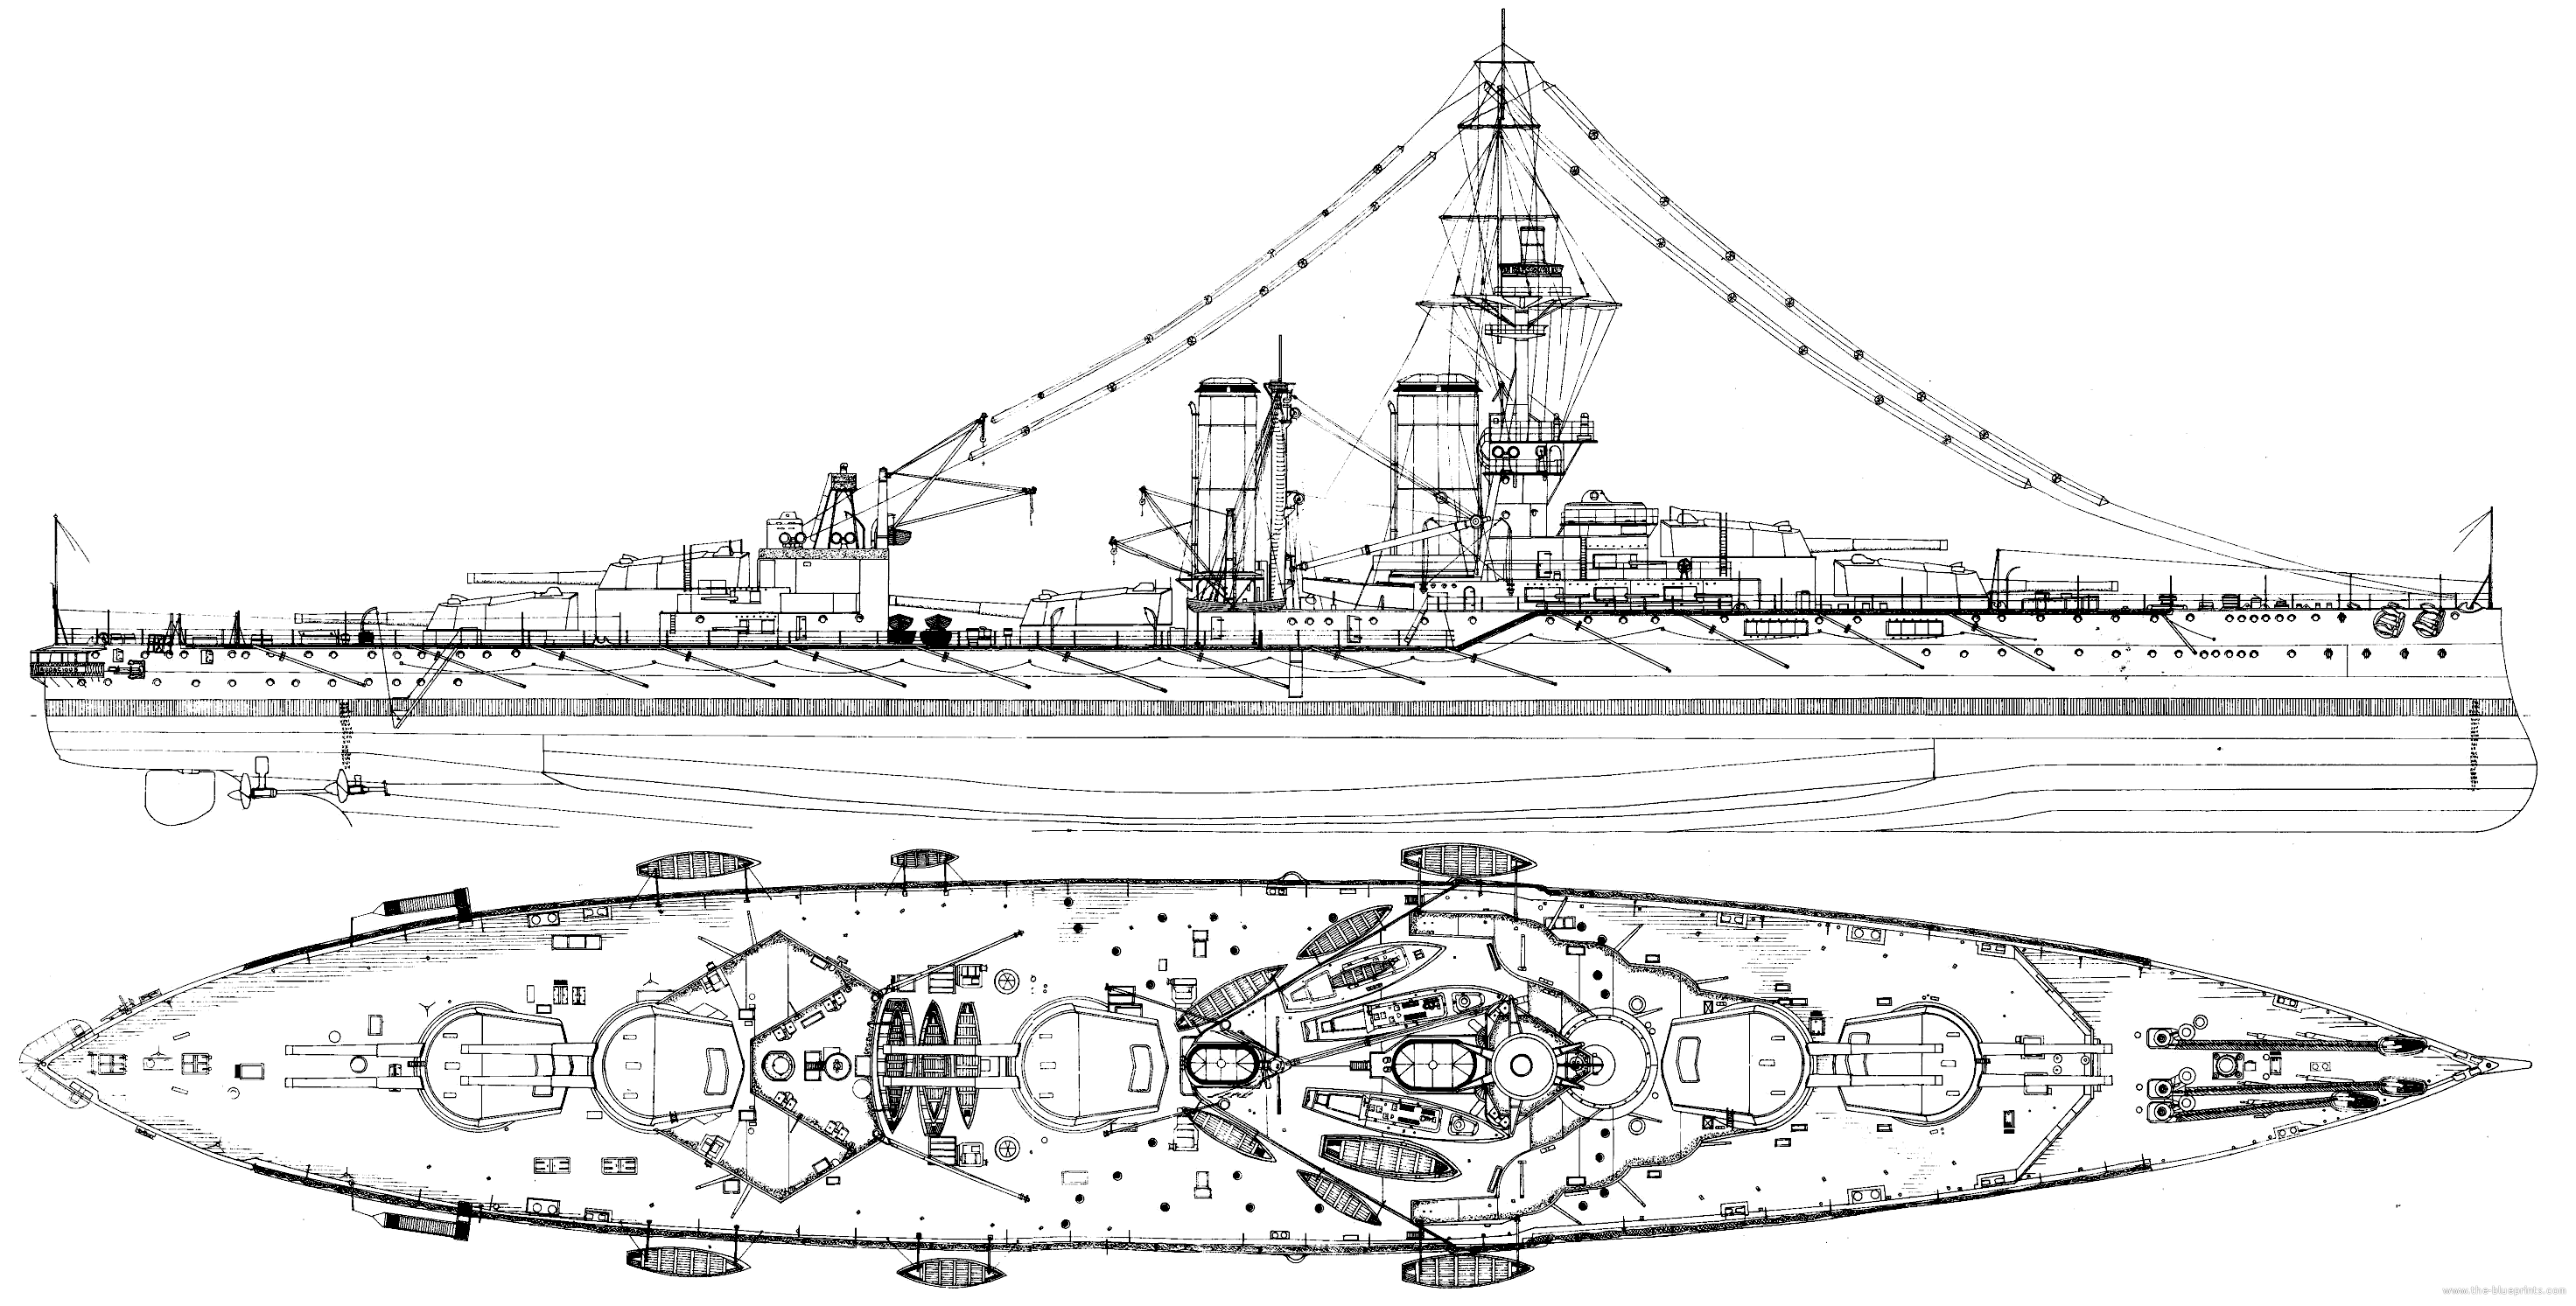
HMS Centurion in 1917 – The blueprints
These 25,420 long tons (25,830 t) battleships, 89 ft 1 in (27.2 m) wide. The design remained classic, with five axial turrets and well-cleared superstructures, tall narrow funnels, a smoke-free firing post, and light secondary artillery (4in guns). Their main innovation was the new ammunition developed for the 13.5 in cannons, shells with heavier additional charges which increased their range, but also improved fire-control arrangements and additional armour.
The general hull shape remained the same as for the Orion class, with a forecastle ending with the secondary battery, a ram bow, and rounded stern. The way the artillery and superstructures were managed was also identical to the Orion class. The superstructure containing all forward secondary guns had six mounts all capable of firing forward. It started at the base of “B” turret’s barbette. Behind it was located the conning tower, topped by a Barr & Stoud coincidence rangefinder.
Next was the bridge, three stirey high, with a small closed bridge and open pbridge on the roof with chadburn and voice pipes. The main foremast was thicker on Centurion to be able to support the main fire director. There was no aft mast and thus radio cables were hanging from the top of the upper composite main foremast, attached to the bow and aft of turret “C”.
For the best arc of fire, the superstrcutures were prism-shaped to allow the aft turrets to fire as forward as possible at the same angle as “C” turret amidships.
All the boats were placed as far from the main guns blast as possible to avoid damage:
There were two steam cutters and a steam picket boat as well as a yawl on deck, two more under davits abaft the bridge, four smaller yawls abaft the funnels and a single main crane located between the two funnels, straight and of unequal size. Five to six boats were also on deck immediately aft of “C” turret, and four more yawls under davits aft.
They were fitted with Siemens No.3 Twin Mountings for 24-inches projectors. In 1914, they to be modified allo a 90 degree elevation for night anti-aircraft defense.
Armament
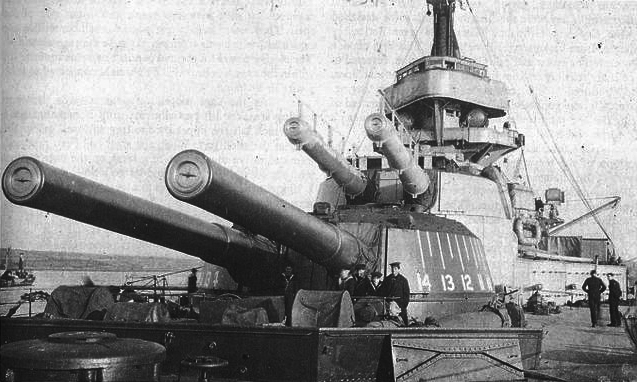
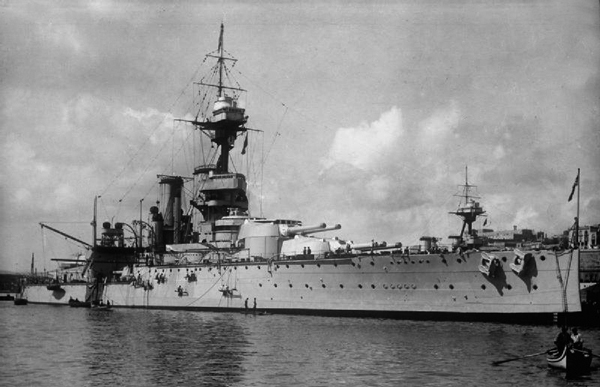
Detail of HMS Ajax main guns
Main Guns
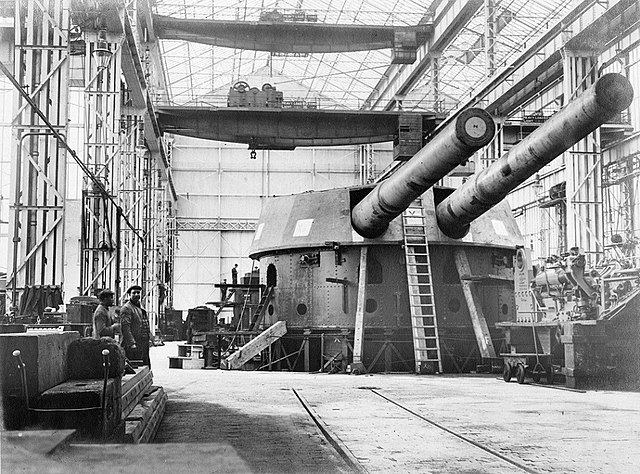
These ships featured an impressive and unrivalled at that time broadside of ten 45-calibre breech-loading (BL) 13.5-inch Mark V guns. They were located in five hydraulically powered turrets, all centreline and twin-mount. The 13.5-in (343mm) Mk V gun were essentially the same as inaugurated on the Orions, but modified to fire a 636 kg AP shell, further improving the long-range shooting.
Quick Specs: +20° elevation, range 23,830 yards (21,790 m) range (gunsights +15°, super-elevating prisms installed 1916).
-Loading system later overhauled for the new new 1,400-pound (635 kg) shells.
-Muzzle velocity AP 2,500 ft/s (760 m/s).
-Rate of fire: two rounds per minute, on average.
-100 shells provided per gun, 500 total.
Secondary Guns
Sixteen secondary 50-calibre BL four-inch (102 mm) Mark VII.
In casemates along the battery deck but were re-arranged ahead due to a study showing TBs tended to attack on the frontal arc:
Eight in the forward superstructure, four aft, four in casemates. Hull casemates sprayed heavily in rough seas, later discarded, plated over.
Elvation +15°, range 11,400 yards (10,424 m). They fired at 4 rpm a 31-pound (14.1 kg) HE shell at 2,821 ft/s (860 m/s).
The tertiary artillery consisted in four 3-pounder (1.9 in (47 mm)) saluting guns.
Torpedoes
Three 21-inch submerged torpedo tubes were in the sides and stern, with 14 torpedoes in storage.
Fire Control Systems
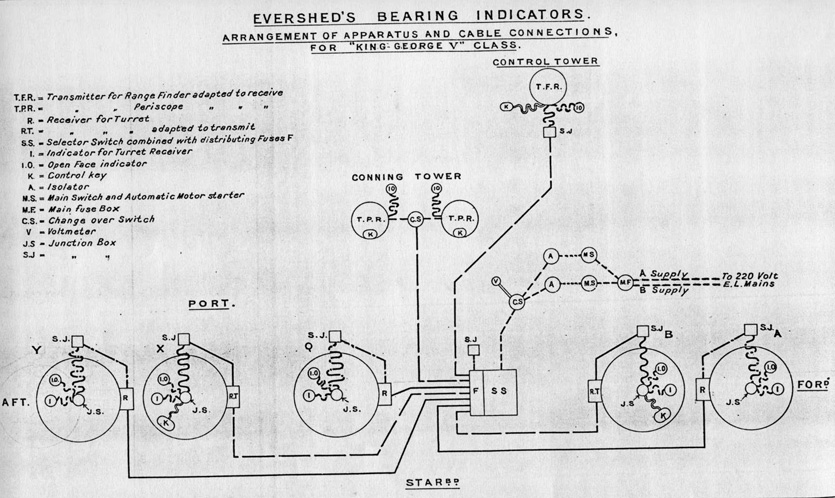
Crucially however, these ships were the first in the Royal Navy to feature the first modern fire control system that will be adopted for all subsequent British Dreadnoughts.
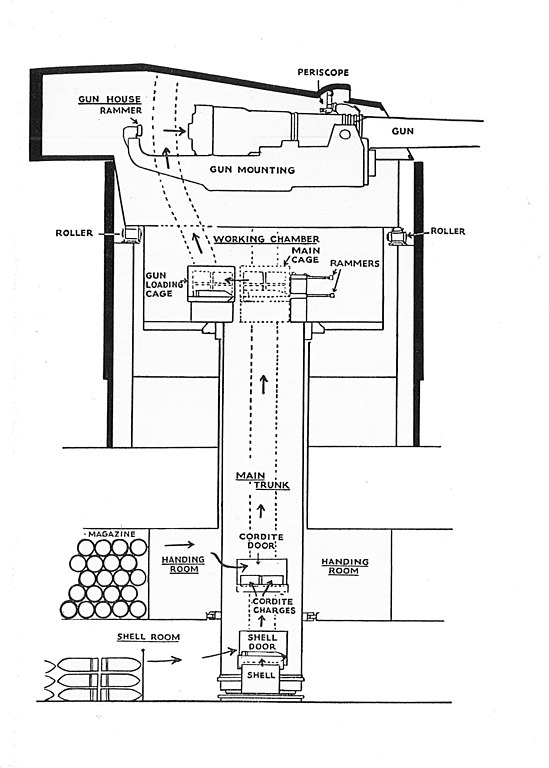
It was located in the conning tower. Data came from a 9-foot (2.7 m) coincidence rangefinder, an unstabilized Barr and Stroud. From the next series, stabilized Argo units replaced them. Data transmitted were the target’s speed and course, which were fed into a Dumaresq mechanical computer. The result was transmitted to a Dreyer Fire-control Table (Mark III Dreyer-Elphinstone model). The the transmitting station was located on the main deck, and final transmission went through voicepipe or sound-powered telephone.
Dreyer Fire-control table: It converted data into usable elevation and deflection for the guns, taking in account dispersion and location of the turrets, although to help spotting the shell splashes, minimising the effects of the roll volley fire was the usual practice. Target data was recorded on a plotting table, allowing the gunnery officer to predict the target’s net moves. If destroyed, turret own systems (the two superfiring ones) could take over.
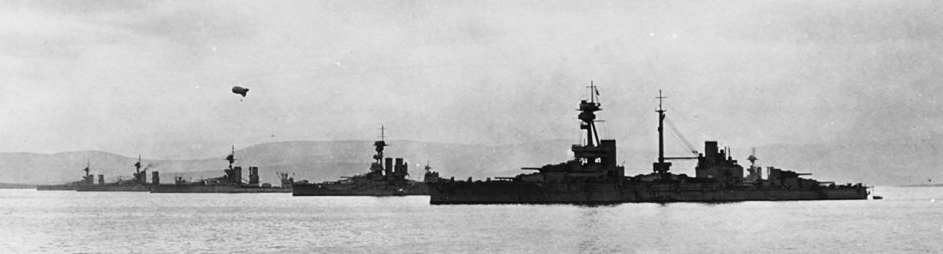
HMS Agincourt and battlships of the 2nd squadron, Grand Fleet ast Scapa Flow in 1918
Armour
-The Main belt (as most critical armour plating made in KC (Krupp Cemented) armour compound, was protected by 12 in (305mm) on its essential citadel, between barbettes “A” and “Y”.
It was extended on both ends by 6-in fwd, 4-in aft (152-102 mm respectively) forward from barbette “A”. The forward outer belt tapered down just 42 ft (13 m) from stem. It was extended also aft, from barbette “Y”, and 45 feets (14m) from stern. The total height of the belt, waterline and upper, was 20 ft (6.25m) at full length.
-The Lower belt extended between the main and middle decks only. Its thickness was 9-in (229 mm between barbettes “A” and “Y”) and tapered down to 6-in (152mm) then 4-in (102mm) and 2.5 in (64mm). -The Upper belt extended between barbettes “A” and “Y” between the main and upper decks. It was 8-in (203mm) thick.
-The main belt was closed by a fore 6-in (152 mm) and aft 10-in (254 mm) bulkhead (yes, the aft one was much thicker).
-The Upper belt was enclosed by 8-in (203mm) bulkheads. There was a second fore 4-in (102mm) bulkhead at the end of 4-in part main belt and between the two regressed to 1.5 in (38mm). The end of the 2.5 in aft part of the lower belt was closed by a same thickness bulkhead.
-The upper deck, between barbettes “A” and “Y” was 1.5 in (38mm) thick. The Main deck reached 2.5 in (64mm) between the first and second fore bulkheads and the first and second aft bulkheads. It was assorted by a 1-in (25mm) middle deck, with same thickness slopes closed citadel.
-The lower deck above the machinery space, was 4-in to 3-in (102-76mm) aft from barbette “Y”. Forward, it was downgraded to 2.5 – 1 in (64-25mm) from barbette “A”.
-The funnel uptakes were protected by 1.5 to 1 in (38-25mm) splinter protection.
Waterline belt: Made of Krupp cemented armour, 12 in (305 mm), concentrated in the area between the fore and rear barbettes.
Belt ends: Reduced to 2.5–6 inches (64–152 mm) fore and aft, leaving a gap towards the bow and stern.
Upper belt: 16 feet 10.5 inches (5.1 m) above the waterline, extended a meter below the waves.
Bulkhead connecting the belt main: 9-inch (229 mm), face was protected by 9-10 in.
Main turrets: 11-inch (279 mm) frontal arc, 3-4-in roofs.
Armoured decks: Four, protecting internal areas 1 to 4 in (25 to 102 mm).
Conning tower: 11-in thick, roof 3 in.
Gunnery control tower: 4-in thick and
Torpedo-control tower: 6-in.
Anti-torpedo longit. bulkheads: Engine rooms and magazines – 1-1.75 inches (25 to 44 mm)
Boiler rooms stray: 1–1.5-inch (25–38 mm) armour plating.
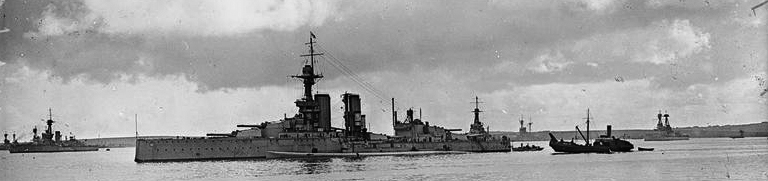
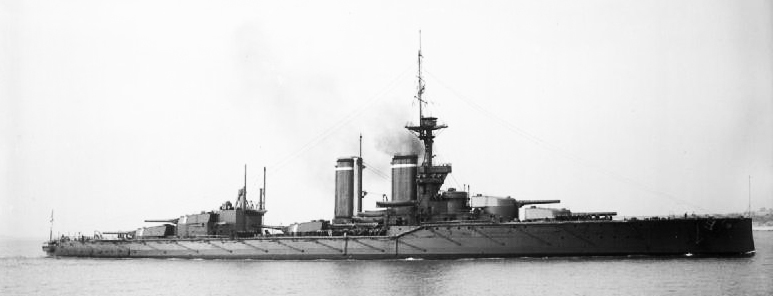
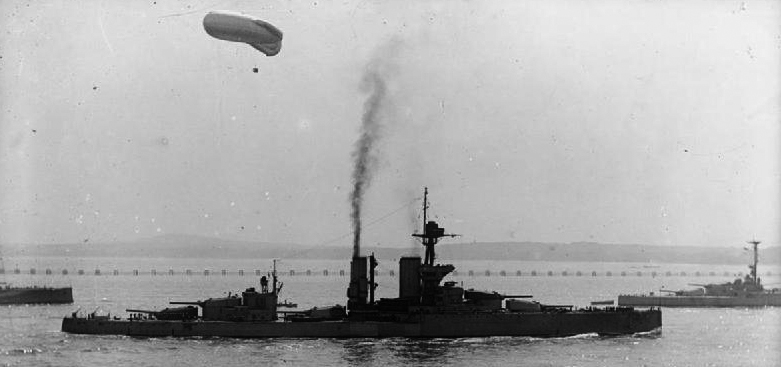
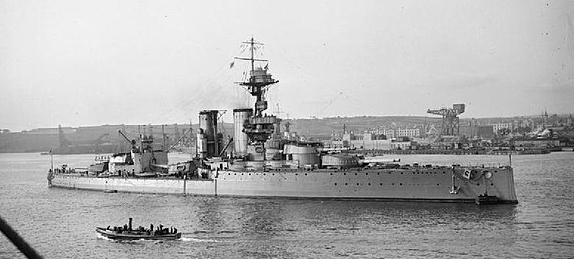
HMS King Georges V at Scapa Flow
Propulsion
These ships differed little from the precious Orion class: They were also given four shafts propellers, connected to the same number of steam turbines sets, fed all by 18 water-tube boilers, for a total of 27,000 shp (20,000 kW), and a top speed of 21 knots (39 km/h; 24 mph). Range was 6,310 nmi (11,690 km; 7,260 mi) at 10 knots (19 km/h; 12 mph).
However they diverged in equipments:
HMS Ajax and King George V were given Parsons steam turbines and Babcock & Wilcox boilers.
HMS Audacious, Centurion had the same Parsons sets but Yarrow boilers.
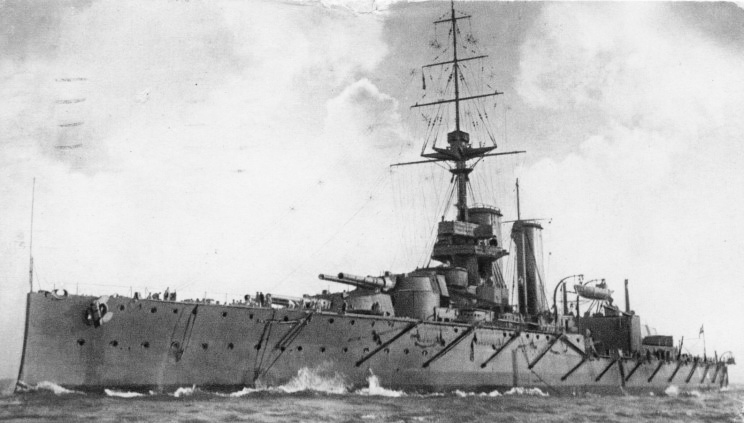
Closeup of HMS centurion
King Georges class construction and modifications
These super-dreadnoughts were started at Portsmouth, Devonport, Cammell Laird and Scotts in January-February 1911, launched in October-Nov. 1911 and March-September 1912, and accepted in service in Nov.1912 (KGV) and March (Ajax), May (Centurion) and November 1913 (Audacious). Paradoxically, this latecomer was sunk early in the war (October 27, 1914, after 11 months), and was the only loss of the class.
-Masts: The first two ships were completed with a light pole foremast configuration (unable to support a fire director), but the last pair were completed with thicker braced already to carry a larger firing director: Their foremast was indeed braced by struts halfway up. Later Centurion was then altered in the same way, but HMS King George V only received stiffening flanges, and ultimately a full tripod by 1918.
-In 1914, QF 3-inch (76 mm) AA guns were fitted to each ship.
-In 1915, four single 4-in/50 (102 mm) DP guns were added as well as two single BL Mk VII AA guns ).
-After May 1916: 81 tons of additional deck armour was added. The KGV was also modified to tow Kite balloons for observation.
-In early 1917, a new 4-inch AA gun was installed in replacement for one 3-in gun. The forecastle’s hull fwd casemated guns were removed and plated over. The stern torpedo tube was removed
-In 1917-18, the masts were modified as tripods, projectors were protected in armored towers.
-Also in 1917, the bridge was enlarged and the hull’s nets removed.
-In 1918 flying-off platforms were fitted on turret roofs of “B” & “X”. They were able to launch a Sopwith 1-1/2 Strutter for gunnery spotting.
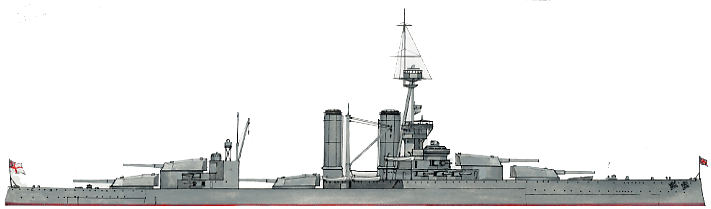
Author’s Illustration of the KG V
First Published July 22, 2018, rewritten and expanded April 2023.
⚙ KGV specifications |
|
| Dimensions | 182.1 x 27.1 x 8.7 m (622’9” x 90′ x 29’6”) |
| Displacement | 23,000 t, 25,700 T FL |
| Crew | 782 to 990 (wartime) |
| Propulsion | 4 shafts Parsons turbines, 18 boilers, 31,000 ihp |
| Speed | 21 knots (38 km/h; 23 mph) |
| Range | 6,310 nmi (11,690 km; 7,260 mi) at 10 knots |
| Armament | 10 x 13.5 in (5×2), 16 x 4-in, 4 x 3-pdr, 3 x 21-in TTs (sub). |
| Armor (max) | Belt 12 in, Battery 10 in, Barbettes/turrets/CT 11 in, decks 4 in. |
Resources
The King Georges V at Scapa Flow – IWM
Books
Gardiner, Robert & Gray, Randal, eds. (1984). Conway’s all the world fighting ships 1906-1921 – Maritime Press
Friedman, Norman (2011). Naval Weapons of World War One. Barnsley, UK: Seaforth.
Friedman, Norman (2015). The British Battleship 1906–1946. Barnsley, UK: Seaforth Publishing
Brown, David K. (2006). Nelson to Vanguard: Warship Design and Development 1923-1945. London: Chatham Publishing.
Halpern, Paul G. (1995). A Naval History of World War I. Annapolis, Maryland: Naval Institute Press.
Parkes, Oscar (1990). British Battleships (reprint of the 1957 ed.). Annapolis, Maryland: Naval Institute Press.
Links
archeosousmarine.net – Centurion in Normandy
On historyofwar.org
On the dreadnoughtproject.org
King George V-class battleship (wikipedia)
Videos
Model Kits

Little choice apart Kombrig, 1:700, resin. Completely obfuscated by its ww2 counterpart.
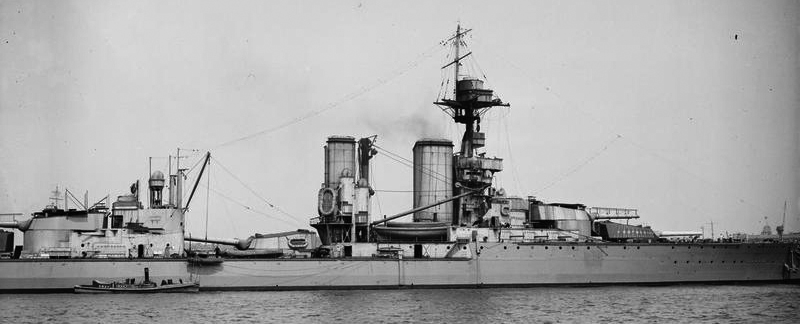
 HMS King Georges V
HMS King Georges V as completed
HMS King Georges V was posted to the 2nd squadron and received the title of Home Fleet flagship for a time. She was also 2nd squadron flasghip by all time.
On 17-20 July 1914, she took part in a test mobilisation and fleet review following the the ealry July Crisis. She sailed to Scapa Flow waiting for a possible attack by the Imperial German Navy in the North sea. After 4 August, the Home Fleet became the Grand Fleet, headed by Admiral Jellicoe. After the KGV waited, training in the North Sea with rare sorties to try to catch German ships. King George V developed however problems with her condensers in November 1915. and stayed out of operations for monthes.
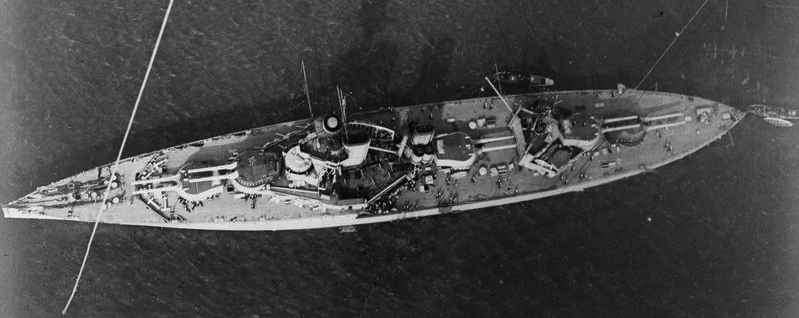
HMS King Georges V in the firth of Forth, aerial view
She was deployed twice in a major action. The first was in the wake of the raid on Scarborough, Hartlepool and Whitby, intercepted and decoded by radio, the ships departing on 15 December, on the British sidewith in intent to ambush Hipper’s fleet on their way home. The six dreadnoughts of the 2nd Battle Squadron sailed, including the three King George Vs, and the four Battlecruisers of David Beatty. However if the screening forces met each other in the early morning darkness, in heavy weather on 16 December the Germans won the engagement. However Admiral Von Ingenohl ordered the fleet to turn away, and followed by miscommunications and bad decisions, Beatty left Hipper’s ships to pass through unmolested.
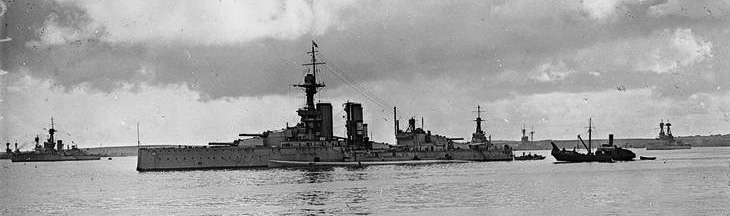
HMS King Georges V and sister ships in front of protective nets (background), part of the close defense against U boats at Scapa Flow, 1917. IWM
The second engagement was at Jutland: The 2nd Battle Squadron sailed from from Cromarty, Scotland on the morning of 31 May, and met the rest of Jellicoe’s fleet, taking part in the left (east) side of the armada. But because of the heavy seas, mist, and light cruisers obstruction, none of the King George V class were able to fire more than 19 rounds in this legendary battle.
HMS King George V
On 18 August 1916 the High Seas Fleet advanced into the southern North Sea. But yet again, bad communications and mistakes prevented Jellicoe from catching the German ships, and they made it to port while Two British light cruisers were sunk by U-boats. The Admiralty, aware that U-boats and mines infested the sector near the German coast passed some point forbade the Grand Fleet to make ny sortie.
The last time the King Georges V sailed off to sea was on 23 April 1918 after catching a radio transmission from the Hochseeflotte, at sea to try to catch a convoy, but the were too far away and escaped. The King Georges V was present when the German fleet surrendered on 21 November. After the war, she survived until 1926 as a training ship, then was disarmed and broken up in accordance of the Washington Treaty.
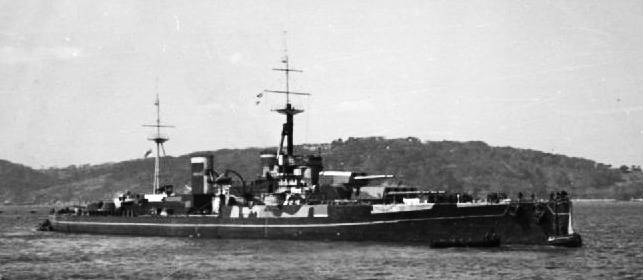
HMS Ajax
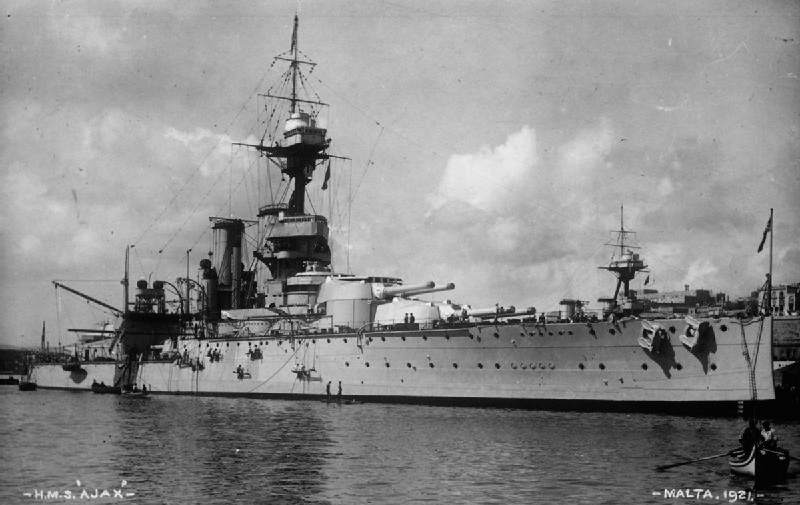
HMS Ajax at Anchor, Grand Harbour, valetta 1921 IWM
HMS Ajax, built at Scotts Shipbuilding and Engineering Company, Greenock joind to the 2nd Squadron and fought in Jutland and made the same sorties as other 2nd squadron battleships (see above). She also made a sweep 17–19 May and 29–31 May in the north sea. At Jutland a year later, Ajax (Captain George Baird) was the second ship from the battle line head, firing one salvo of six ronds to the German battlecruisers shortly after 19:00 but stopped when the 4th Light Cruiser Squadron passed in between. Her last missed occasion was when in April 1918, the hochseefloote, respecting a total radio silence, sortied to attack British convoys to Norway. However SMS Molkte was damaged and broke the silence.
Her call was catch by Room 40 which crambled the fleet, of which Ajax was part. None reached the scene in time. At the end of 1918, HMS Ajax entered the Mediterranean (4th Battle Squadron) and joined the British Black Sea Fleet, which supported the coalition troops against the Bolsheviks and covering the evacuation of Odessa. She was present in the Chanak Crisis near Smyrna, and remained in Gibraltar until 1924 and was sold shortly thereafter, paid off in 1926.
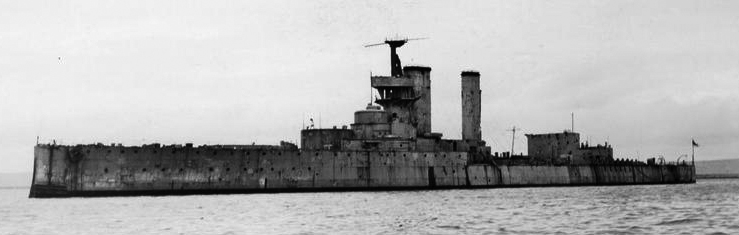
HMS Centurion
HMS centurion at Rosyth in 1918
When making her sea trials on the night of 9/10 December, HMS Centurion accidentally rammed and sank the Italian steamer SS Derna, a cargo ship. She was under repair until March 1913 an later joined the 2nd Squadron for the remainder of the war with her sisters, commanded by Vice-Admiral Sir George Warrender. King George V was the squadron flagship. HMS Centurion received on board the President of France, Raymond Poincaré, for the naval review at Spithead on 24 June 1913 while her sisters represented the Royal Navy at the Kaiser Wilhelm second opening of the Canal in Kiel, Germany, in June 1914, and Kiel Week.
HMS Centurion in 1919 joined HMS Ajax in the Black Sea, then joined Portsmouth after 1924 to be converted into a target ship. She did serve as such until 1941, escaping the Washington treaty clauses as whe was disarmed and disarmoured, still in Portsmouth. She then went into a shipyard to be modified and serve as a massive decoy ship, equipped with reformed sheet plates and welded wood, camouflaged to resemble the modern battleship HMS Anson in 1942.
She sailed to Gibraltar (one of her engines failed and was repaired) then Cape Town, (Where she collided with a troop carrier), Freetown, the Red Sea, Suez Canal. She would later lost a fake turret in a storm, landed in Bombay where the turret was replaced, and was back at Port Said. In June 1942 this old lady was re-used to escort a convoy to Malta, hit by a bomb during this action. She
later served in Egypt as a floating AA battery until January 1944, sent back to Britain, before ending as a makeshift jetty in Normandy for the artificial Mullberry on June 9, 1944.
HMS Centurion in 1930
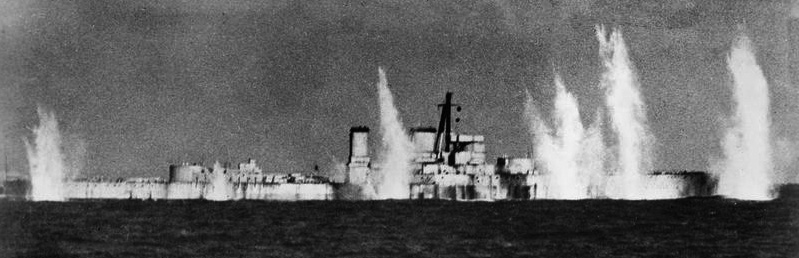
Centurion as a target ship, under fire, 1934,IWM
HMS Centurion Maskeraded as HMS Anson 1942
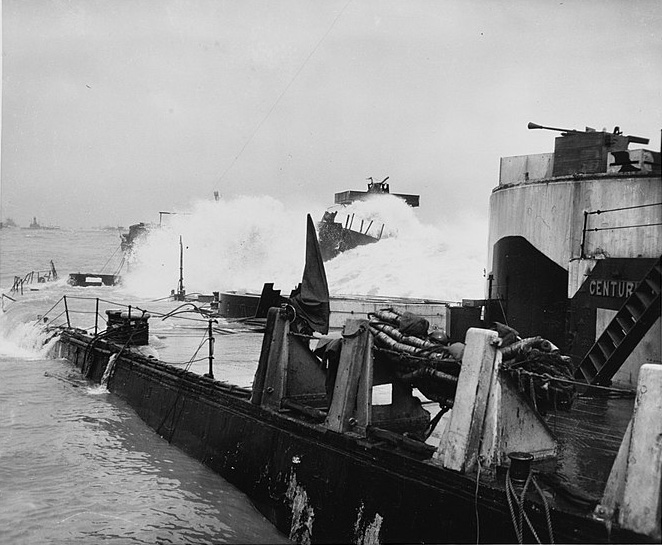
HMS Centurion used as breakwater after the Normandy Invasion
HMS Audacious
HMS Audacious, IWM
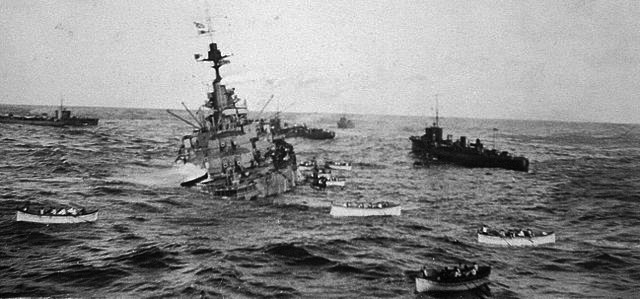
HMS Audacious was part also of the 2nd squadron. While the latter was conducting gunnery training off the northern coast of Ireland on 27 October, she struck a mine in the Lough Swilly field. Although her watertight bulkheads worked wonders, the water continued to slowly seep in, and the weathering prevented towing maneuvers. however all of her crew was successfully rescued before she capsized, on October 27, 1914.
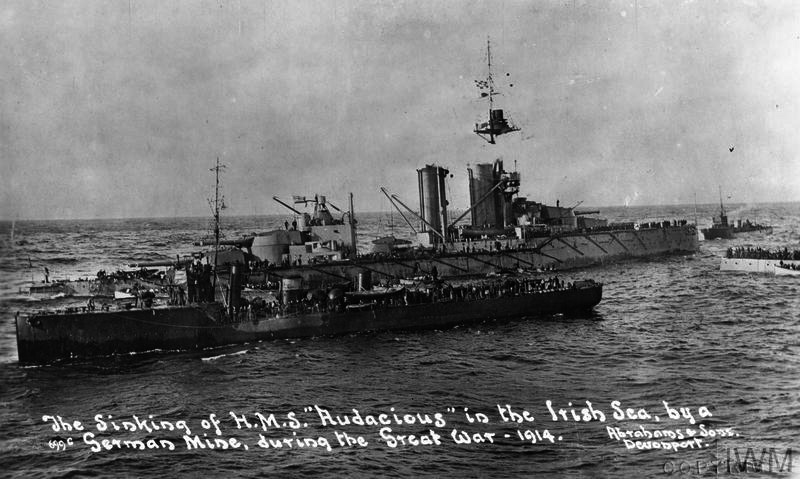
HMS Audacious sinking
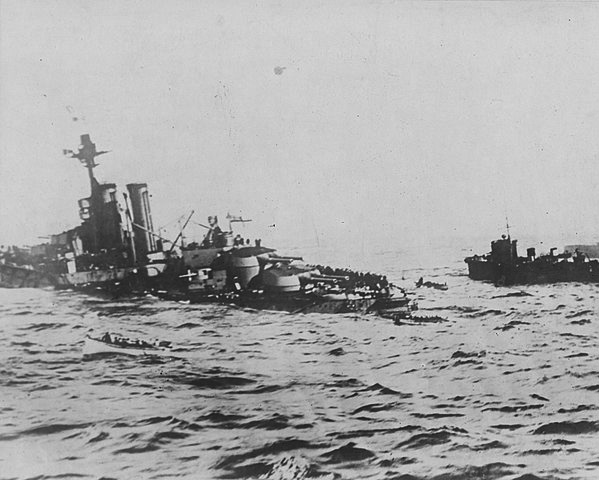
HMS Audacious sinking off the Irish Coast after having struck a mine.
 Latest Facebook Entry -
  X(Tweeter) Naval Encyclopedia's deck archive
 Instagram (@navalencyc)


 French Navy
 Royal Navy
 Russian Navy
 Armada Espanola
 Austrian Navy
 K.u.K. Kriegsmarine
 Dansk Marine
 Nautiko Hellenon
 Koninklije Marine 1870
 Marinha do Brasil
 Osmanlı Donanması
 Marina Do Peru
 Marinha do Portugal
 Regia Marina 1870
 Nihhon Kaigun 1870
 Preußische Marine 1870
 Russkiy Flot 1870
 Svenska marinen
 Søværnet
 Union Navy
 Confederate Navy
 Armada de Argentina
 Imperial Chinese Navy
 Marinha do Portugal
 Mexico
 Kaiserliche Marine
 1898 US Navy
 Sovietskiy Flot
 Royal Canadian Navy
 Royal Australian Navy
 RNZN Fleet
 Chinese Navy 1937
 Kriegsmarine
 Chilean Navy
 Danish Navy
 Finnish Navy
 Hellenic Navy
 Polish Navy
 Romanian Navy
 Turkish Navy
 Royal Yugoslav Navy
 Royal Thai Navy
 Minor Navies
 Albania
 Austria
 Belgium
 Columbia
 Costa Rica
 Cuba
Cuba Czechoslovakia
 Dominican Republic
 Haiti
Haiti Hungary
 Honduras
 Estonia
 Iceland
 Eire
Eire Equador
 Iran
Iran Iraq
Iraq Latvia
 Liberia
 Lithuania
 Mandchukuo
 Morocco
 Nicaragua
 Persia
 San Salvador
 Sarawak
 Uruguay
 Venezuela
 Zanzibar
 Warsaw Pact Navies
 Bulgaria
 Hungary

 Bundesmarine
 Dutch Navy
 Hellenic Navy
 Marina Militare
 Yugoslav Navy
 Chinese Navy
 Indian Navy
 Indonesian Navy
 JMSDF
JMSDF North Korean Navy
 Pakistani Navy
 Philippines Navy
 ROKN
ROKN Rep. of Singapore Navy
 Taiwanese Navy
 IDF Navy
 Saudi Navy
 Royal New Zealand Navy
 Egyptian Navy
 South African Navy


 Ukrainian Navy