
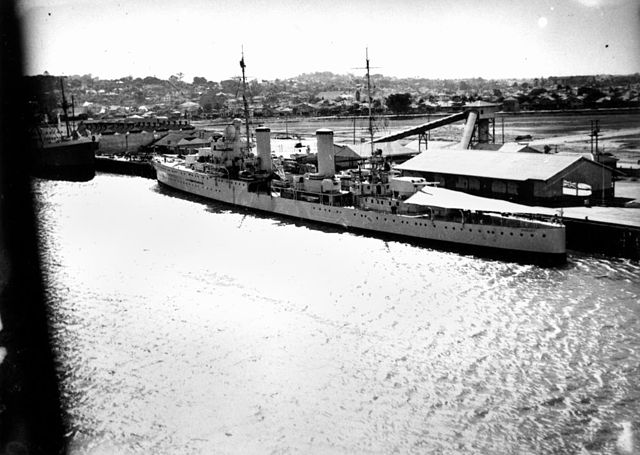
 Australia (1934-36)
HMS Perth, Hobart, Sydney
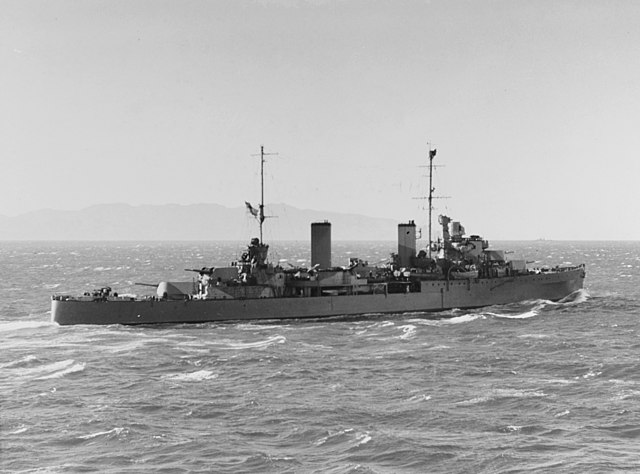
The Australian light cruisers
These three light cruisers (Perth, Hobart, Sydney) were built specifically for the Australian Navy. They were largely inspired by the Leander class, but now are seen as part of a sub-group called the Amphion class. They distinguished themselves by their two funnels, reflecting a different boiler room arrangement. The armament was basically the same otherwise, and they carried a reconnaissance seaplane. Their AA was modified in 1939 with the adoption of 4-inches dual-purpose turrets and they had a very active and short career between the Pacific and Indian Ocean. Searching for German raiders was part of their mission, which proved fatal in a famous case: The duel of HMAS Sydney versus KMS Kormoran, certainly the most powerful of the Kriegsmarine’s auxiliary cruisers. It happened at close quarters and was merciless, resulting in the loss of both ships. HMAS Perth was sunk in March 1942 during the battle of battle of Sunda Strait, with the remains of the ABDA force. HMAS Hobart was nearly fatally hit by a torpedo in July 1943, left 17 months in repairs, the only one to actually survive the war and serve in the cold war RAN until 1962.
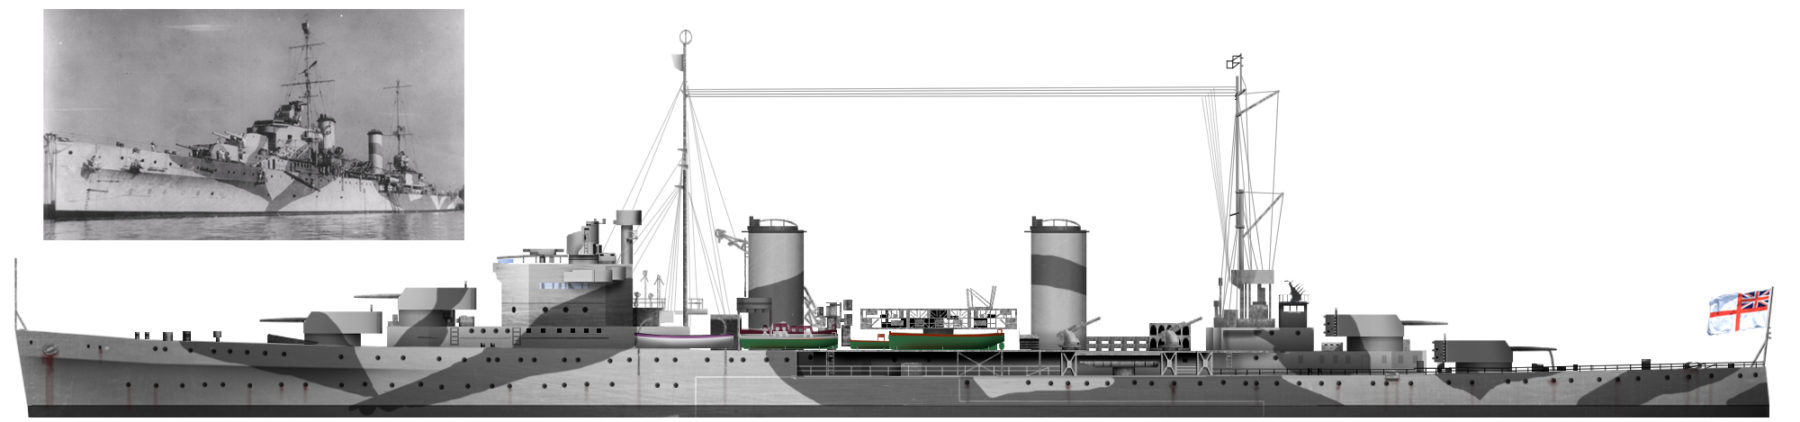
HMAS Sydney, arguably one of the most successful Commonwealth cruiser in WW2. The “Petrel” as named by Cunningham was the most decorated battle-hardened veteran of the Mediterranean, making captain Collins a household name, but she was lost after a fatal duel with the German armed merchant cruiser KMS Kormoran.
Design development
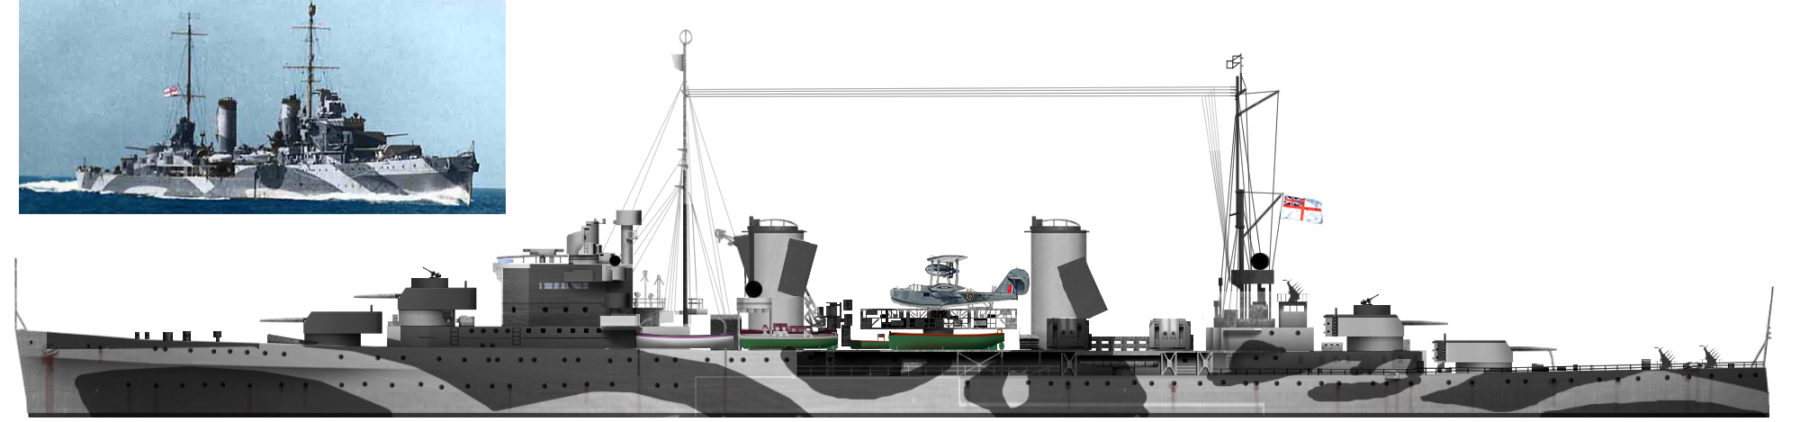
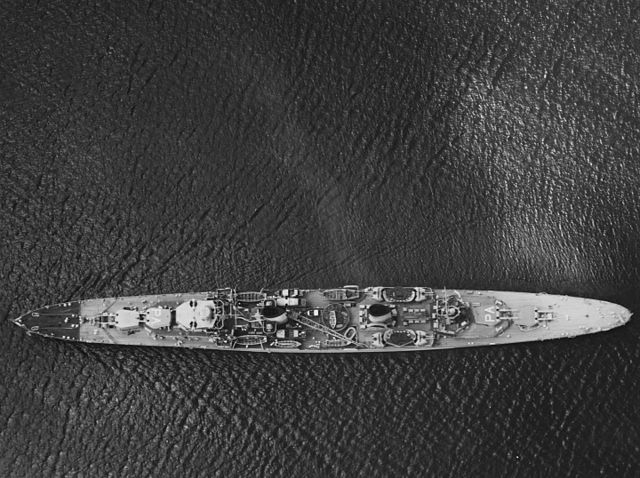
2 view blueprint of HMAS Sydney as she was in 1940. Apart the camouflage, not many modification were made to her until her fight with the Kormoran.
The design was basically the same as the Leander-class cruisers, from the 1932–1933 Naval Programme. But the sub-group Amphion had the particularity of rearrange their propulsion machinery into separate units, creating their two-funnels profile. This was intended to improve survivability in case of a torpedo or shell hit into one paired boiler room or and steam turbines. All still could could operate independently. As built, the lead vessel HMS Amphion was identical to the Leander class with an overall length of 562 feet 4 inches (171.4 m) or 530 feet (161.5 m) between perpendiculars. Thier beam was 56 feet 8 inches (17.3 m) and draught 19 feet 5 inches (5.9 m) deeply loaded. The Leander were slightly shorter at 554.9 ft (169.1 m) and thinner at 56 ft (17.1 m), with a lighter draught at 19.1 ft (5.8 m). The HMS Amphion displaced 7,040 long tons (7,150 t) standard, 9,140 long tons (9,290 t) deeply loaded, actually more than the Leander (7,270/9,740 tonnes). Their metacentric height was 4.5 ft (1.4 m) deeply loaded and they carried 36 officers and 586 ratings.
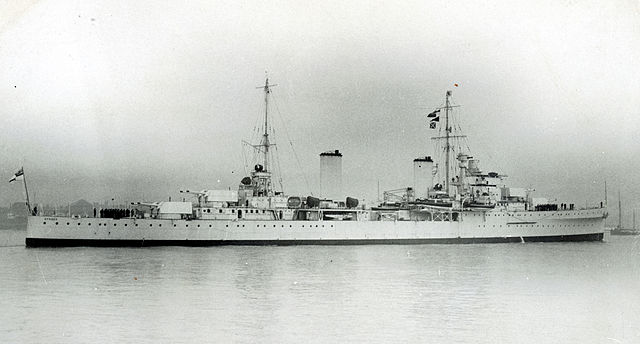
HMS Amphion was ordered for the Royal Navy as part of the 1931–1932 Naval Programme. However, the order was suspended as a new design was on the works, to integrate it. This was called the “Modified Leander class” and as each machinery space had its own uptake, their profile looked more coherent and elegant than the early Leander. Historian Henry Lenton even judged them as “the most handsome cruisers ever built by the Royal Navy, with a symmetry that was as attractive as it was functional.”
Nevertheless, it also had is detractors: Like early commanding officer Captain J.W.A. Waller, RN, which believed the single director control tower was a problem as a single hot can disable all fire management on board; This director control tower high up, in which users determined the optimal range and angle for each gun salvo. The information was then passed onto the gun turrets. But the problem was its lack of protection and absence of any redundancy. Waller thought this centralised system was a major weakness, compounded by an also centralised wiring. There was still however the possibility of using the turrets in independent control. His opinion was dismissed by other commanders though, and the unique FCS proved more robust than expected in action.
Powerplant
The modified Leanders were powered by four Parsons geared turbines, each driving its own shaft, fed by the steam provided by four Admiralty 3-drum boilers. The turbines were rated at 72,000 shaft horsepower (54,000 kW). Top speed as designed gave them a top speed of 32.5 knots (60.2 km/h; 37.4 mph). The desgin particulars of the class were that these units were well separated, and the four boiler rooms were truncated to their own funnel. Autonomy-wide, the cruisers carried enough fuel oil for a 7,000 nautical miles range (13,000 km; 8,100 mi). The Amphion class could cover this distance at 16 knots cruise speed.
The choice of this more complicated machinery compartmentation instead of an “in-line” design (six boilers in three compartments forward and four turbines in two compartments aft) provided two redundant machinery groups, something already tested in the US Navy. Two boilers and assimilated turbines drive the outer shafts forward, and the other group for the inner shafts. Another innovation was to provide a steam circulation that allowed to redirect it from any boiler to any turbine. That way, this reduced the risk to have a ship “dead in the water” in case of the flooding of the machinery room.
Armour
The Amphion (Perth) class, was lightly protected: There was an 1-inch (25 mm) hull plating reinforced by 3-inch (76 mm) on the armour belt secntion and over the machinery spaces. However this immune zone was lenghtened on this design, contrary to the revious ships, from 84 to 141 feet (26 to 43 m) covering the new machinery compartments and 2-inch (51 mm) plates, over the ammunition magazines.
Armament
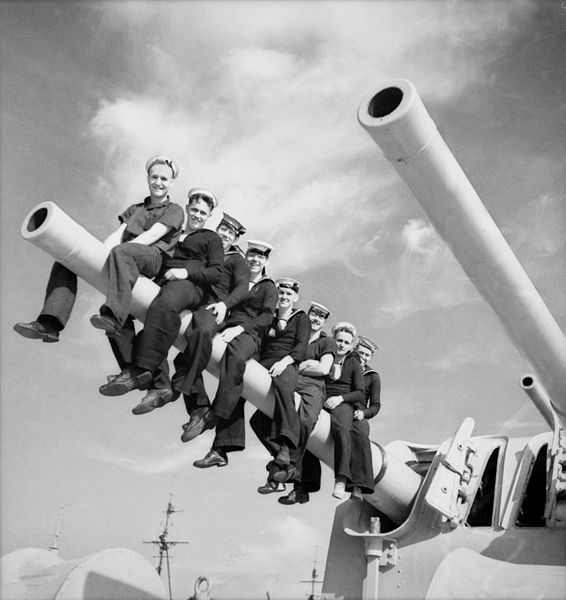
HMAS Perth’s main guns, ‘A’ turret in 1941.
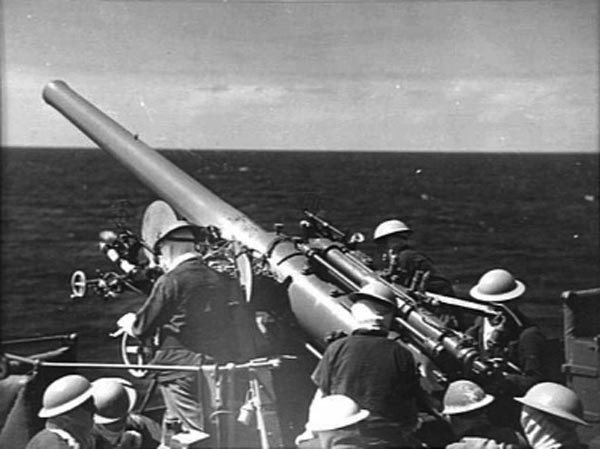
Main: Amphion’s main armament relied on eight 6-inch (150 mm) breech-loading Mk XXIII guns.
They were mounted in four twin turrets Mk XXI, two superfiring pairs, fore and aft, called “A”, “B” and “X” “Y”. A full salvo fire was tested, and they could be elevated to 60°, depressed to −5°. Average rate of fire was eight rounds a minute, reaching targets at 24,800 yards (22,700 m), but with limited accuracy.
Secondary: Four 4-inch (100 mm) dual purpose and quick-firing Mk V guns. They were mounted in single high-angle, Mk IV mountings. Two were place on a platform setup around the aft funnel. They can reach aircraft up to 28,750 feet (8,760 m) but could equally perform against surface targets 16,300 yards (14,900 m) away.
It was planned to upgrade them with more potent combination of eight Mk XIX high/low-angle guns, in four twin mounts. In 1939 this was prevented on Sydney, as due to the heavy use of the latter in wartime. But Perth had them. These ships were also fitted with Four 3-pounder (47-mm, 1.9-in) quick-firing Hotchkiss saluting guns (one was used in Somaliland as dismounted antitank gun), but they were removed during the August 1940 refit of Sydney alone.
AA guns
To compensate the absence of upgrade, twelve 0.5-inch (13 mm) Vickers Mk III machine guns in Mk II quadruple mountings were installed as a complement. There were two abreast the forward superstructure, and a third on top of the aft superstructure. In addition to these, 0.303-inch (7.7 mm) machine guns were fitted on pedestals along the ship, her bridge and searchlight platforms, abreast the forward funnel, and on the roof of the aft superstructure. These were fourteen Lewis and two Vickers machine guns, then down to nine Lewis guns and no Vickers at all in 1940. The problem with this combination was a moderately powerful close range, slow long range, and nothing in between. Despite of this, none of these ships were sunk by aviation.
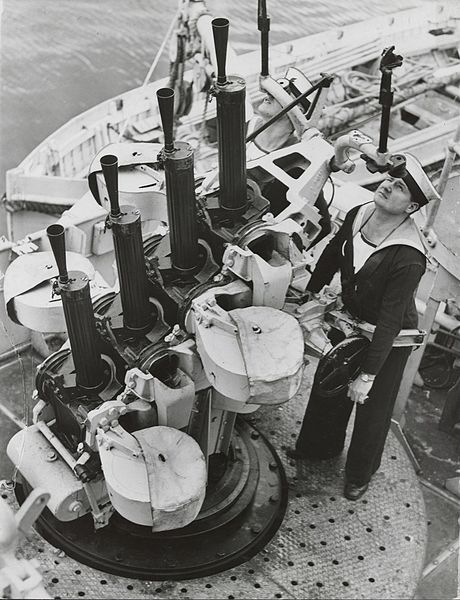
Vickers AA 0.5 in quad tandem guns, on HMAS Perth
Torpedoes
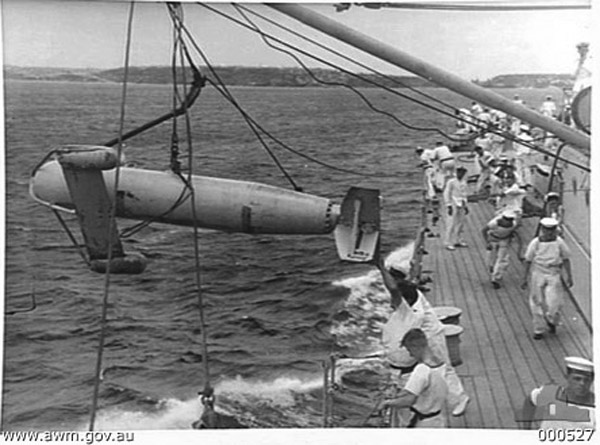
Two quadruple mounts, for a total of eight 21-inch (533 mm) torpedo tubes were installed, of the QR Mk VII model. They were installed on the deck below the 4-inch guns AA platform, and the ship only carried a single Mark 9 torpedo reload.
ASW
These cruisers were fitted with a single stern depth charge rack. It carried five Mk VII depth charges. Although it does not count for a weapon, the ships also carried smoke dischargers for active protection; They proved useful at least at several occasions.
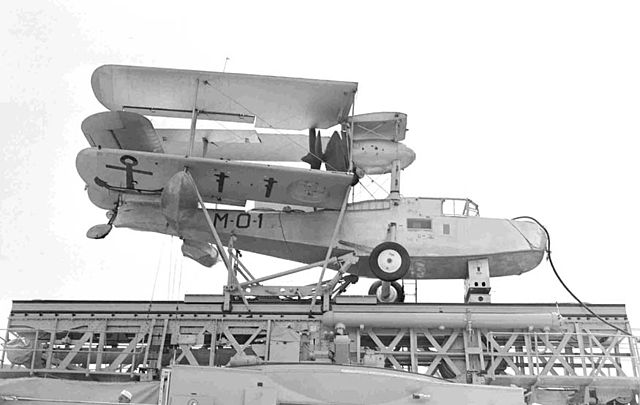
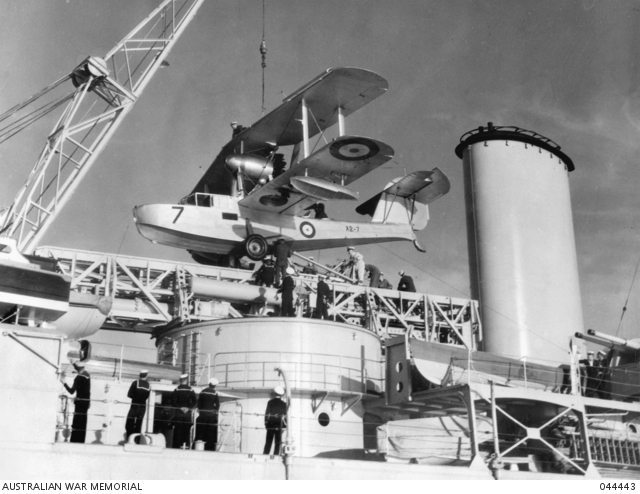
Supermarine Walrus on the standard 53 feet catapult.
Aviation
All three carried a 53-foot (16 m) long catapult. It was cordite-powered and could traverse 360°, although the plane itself needed to clear off the two funnels. It was powerful enough to launch the Supermarine Walrus seaplane. It was operated by Royal Australian Air Force, at No. 5 Squadron RAAF (No. 9 from 1939). The seaplane could be recovered by a 7-ton electric crane also managing the ship’s own boats.
Career
HMAS Perth
Prewar:
HMAS Perth at NYC world’s fair, 1939
HMS Amphion was commissioned on 15 June 1936 for the Royal Navy initially, completed on 6 July that year. She was the flagship of the Commander-in-Chief, African squadron and 6th Cruiser Squadron under command of Vice Admiral Sir Francis Tottenham until 1938. In early 1939 HMS Amphion was back in UK for maintenance and refit: Her Mk V four-inch guns were replaced new twin QF models, Mk XVI. Also she was fitted with a base for a rotating catapult and crane, but both were mounted later. Meanwhile decision was taken to reinforce the Australian Navy, and after negotiations, HMS Amphion was sold to the RAN in 1939, officially commissioned on 29 June 1939. She kept her former name until renamed HMAS Perth on 10 July, a ceremony taking place headed by Princess Marina the Duchess of Kent. For her first training cruiser in Australian waters, she carried a crew of 646, with 35 officers (611 ratings). The crew was sent in UK previously in May 1939 aboard SS Autolycus. By August 1939 HMAS Perth stopped to participate in the New York World’s Fair but a minor mutiny aboard erupted because of orders to return at 18:00 and change uniforms. This was considered too much for men which had to sleep in animal’s sheds on their trip to UK. Over 60 sailors confronted their officers on the forecastle, with side arms. Captain Harold Farncomb tried to persuade them a mutiny was a grave crime, and as the standoff could be seen from the wharf side, the NYPD dispatched several patrols here. Farncomb eventually defused the situation by renouncing the uniform order.
Caribbean and Australia
En route to Australia, the cruiser learned about the war breaking out while off Venezuela. As the only British Commonwealth warship in the Caribbean at that time, she started immediately operations, searching for German merchant cruisers and and escorting convoys, until March 1940. She passed the Panama Canal and arrive din Australia on 31 March. She was refitted at the Garden Island Naval Base, until 29 April. Her catapult was installed but her first plane was an older Supermarine Seagull V, not a Walrus. She started convoy escort missions along the Australian coast from may to june, when Captain Sir Philip Bowyer-Smyth took assumed command. HMAS Perth also now hosted Rear-Admiral John Crace as flagship, Australian Squadron. By November 1940, she was assigned to Mediterranean, relieving Sydney, escorting en route a troop convoy. She arrived in Alexandria on 24 December, assigned to the 7th Cruiser Squadron.
Mediterranean campaign
HMAS Perth through the Panama Canal, March 1940
HMAS Perth in Gatun Lake, Panama, March 1940.
She was escorting a convoy during Operation Excess in January 1941. She stopped at Grand Harbour in Malta while on 16 January she was attacked by a wave of German bombers, a near-miss caused damage: Her electrical power shut down and she took some flooding. Her crew however used the manual onboard pumps to combat fore onboard the neabry ammunition ship SS Essex, avoiding a dramatic explosion, and lager assisted the damaged aircraft carrier HMS Illustrious. Perth afterwards left Malta for Alexandria, arriving on the 18 for dockyard temporary repairs. On 22 January she escorted Illustrious to Greece, patrolling a line between Crete and Piraeus. While returning to Alexandria she encountered a severe sandstorm on 6/7 February as she arrived and had to be cleaned up in haste to be inspected by Prime Minister of Australia, Robert Menzies.
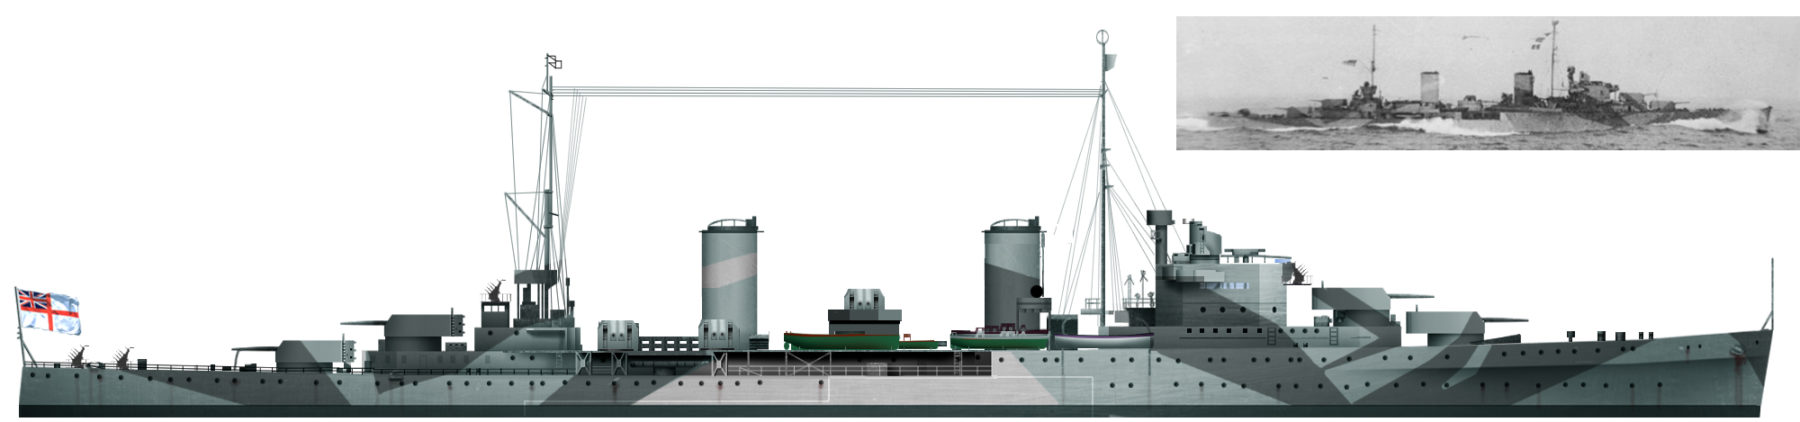
Author’s profile of HMAS Perth in 1941
Entering drydock on 9 February, she was repaired for 10 days, her catapult removed and replaced by two captured Italian 20 mm Breda AA guns. A Type 286 search radar was also installed. On the 27 the she escorted destroyers carrying reinforcements (Operation Abstention) attacking Kastellorizo in the Italian Dodecanese. As Italian forced were underestimated, the British promptly evacuated, still covered by HMAS Perth. The cruiser was also engaged in the battle of Greece: “On 7 March, Perth supported the Allied reinforcement of Greece by transporting soldiers from Alexandria to Piraeus along with patrolling the waters between Greece and Crete. On 17–24 March, she escorted another convoy to Malta and was framing the Italians at the Battle of Cape Matapan (26–29 March), her squadron chased by the Italians and retreating to the main RN force. In April she received at least a more potent AA, with a quadruple 2-pounder Mk VIII “pom-pom” on the catapult base, in addition to the Italian Breda. She escorted another convoy to Malta on 18–20 April and covered the shelling of Tripoli on 21 April. On the 25 she covered the evacuation of Allied troops from Greece.
HMAS Perth seen from HMS Gloucester at the battle of cape Matapan
HMAS Perth also escorted the Tiger Convoy between Malta and Alexandria in May 1941. During the invasion of Crete on 20 May, HMAS Perth was with Force C (two cruisers, four destroyers), patrolling along the Kasos Strait, NE Crete. Force C was repeatedly attacked by German and Italian aircraft, claiming one destroyer. Perths joined Force D, an intercepted a German invasion convoy on the 22. They targeted its sold escort, the Italian TB Sagittario. Perth sank a straggler and later spotted the TB which tried to protect the convoy under smoke, helping the convoy to escape, loosing only two ships.
On 28 May, Perth joined Force D, strong of three cruisers, three destroyers and a troopship, snet to evacuate troops from Sphakia, south of Crete. Perth for this carried two small landing craft. The embarkation took place the next day scheduled to depart the 30 when at 09:30 German aircraft attacked them. Perth suffered several near-misses and a hit in her forward boiler room, but with light casulaties. Her power was off until her second powerplant could take over. Power was restored half an hour later, and it was found her starboard inner propeller shaft was bent, the galley, high-angle fire-control ballistic computer, Admiralty Fire Control Table were all damaged, while there was flooding from many leaks. Perth was still able to reach Alexandria the next day. She was repaired until 22 June and sailed for Haifa (Palestine) to cover the invasion of Vichy-French Syria and Lebanon. On the 27 covered the laying of a minefield off Damour, provided gunfire support on demand until 15 July. Back in drydock she lost her quadruple “pom-pom” and Breda guns to see her catapult reinstalled.
HMAS Perth in April 1941
Pacific Campaign
Perth was sent to Australia for permanent repairs, in Sydney at Cockatoo Island starting after arrival on 12 August, in which a Type 286 radar was removed, and two quad Vickers 0.5-inch MGs installed, for forward on her quarterdeck and likely four 20 mm Oerlikon AA single mounts on both superfiring turrets’ roofs and superstructure. Captain Hector Waller assumed command in October while repairs were delayed by a fire in electrical cables. On 24 November she sailed for her sea trials and later joined the heavy cruiser Canberra on 12 December heading for Brisbane, then meeting with HMNZS Achilles, escorting the Pensacola Convoy. Perth went on with convoy escorts until January 1942. That year she was affected to the eastern home waters (ANZAC Area). She was then deployed with the American-British-Dutch-Australian (ABDA) force, departing on 31 January from Sydney. She stopped in Fremantle on 10 February, escorting a convoy of four empty oil tankers and two cargo sent to the Dutch East Indies. Singapore later fell and the convoy was ordered back to Fremantle. The whole operation was cancelled on 21 February 1942 600 nm (1,100 km; 690 mi) from the Sunda Strait. After her mission Perth was ordered north again, bolstering ABDA’s Western Strike Force, stopping at Tanjong Priok in Java on 24 February 1942. She escape a Japanese air raid.
Perth in February 1942
The Battle of Java
The Japanese Eastern Invasion Fleet was posted the following day, heading for Surabaya. Perth joined Exeter and their escorts, the destroyers Jupiter, Electra and Encounter. The fleet proceeded to Surabaya, joined by the Eastern Strike Force (Rear-Admiral Karel Doorman) with USS Houston, HNLMS De Ruyter, HNLMS Java and three British and two Dutch destroyers, plus four older US destroyers. On the 26, there was an unsuccessful attempt to catch the Japanese, but on the 27 at 11:00 IJN floatplanes spotted Doorman’s force. It was 12:35. Doorman was on its way to refuel in Surabaya, and later received a report the Japanese were 50 nmi NW of Surabaya while he was passing the protecting minefield, and reversed course. Followed by Japanese floatplanes reporting their position by radio, this led time to the Japanese to take positions. Allied fighters attacked these spotters at several occasions, until eventually the screening destroyer HMS Electra spotted IJN Jintsū at 16:12. Nachi opened fire at 16:17 and was answered while at 16:21 Doorman turned southwards to avoid a ‘T’ corssing manoeuver from Rear-Admiral Takagi. But the later opened up range instead. Accurate fire but few losses, and another ABDA turn southwest at 16:27, keeping the allied too far to make any gunfire. Japanese destroyers meanxhole agressively torpeo attacked with their Type 93 “Long Lance” torpedoes, followed by Haguro’s own eight torpedoes at 16:52, but all missed. Perth reported “tight salvos landing around us, first 25 yd (23 m) short, then 25 yards over”. Takagi realized Doorman was heading on the invasion convoy’s route and ordered a full attack. Exeter was soon badly damaged, and Perth was ordered to circle her laying a smokescreen.
Doorman wanted Exeter to retire to Surabaya escorted by surviving British and Dutch destroyers under smoke while Japanese made more torpedo runs, and a total of 98 torpedoes were launched, all missing. Two British destroyers charged, Electra was lost, while Allied cruisers still tried to frame Exeter and at 18:10 US destroyers charged out, launching all their torpedoes at Nachi and Haguro but missing. At 18:12 Perth claimed a single hit on IJN Haguro but seeing the lighthouse of Surabaya, Kutira withdrawn to avoid the minefields. Doorman however soon turned aainst and gave chase at 18:31. Jintsū was hit and Doorman disengage, circling around southwards, trying to attack from behind the Japanese escorts as night was falling. The US destroyers headed for Surabaya, low on fuel and ammo, and USS Jupiter struck a Dutch mine and sank. Takagi was following Doorman thanks to Jintsū’s floatplanes and flares. About 22:00 both sides lost contact.
At 23:02 the Allied cruisers were spotted again, and Doorman’s ships opened fire at 23:10, including Perth. A dozen torpedoes were launched, De Ruyter and Java both were hit and sank. Perth and Houston survived and withdrew to Tanjong Priok, arriving on the morning of 28 February. Fuel shortages meant they could only partially refuel, and they had little ammunition left. They teamed with the Dutch destroyer Evertsen and sailed for Tjilatjap the following night.
Battle of Sunda Strait
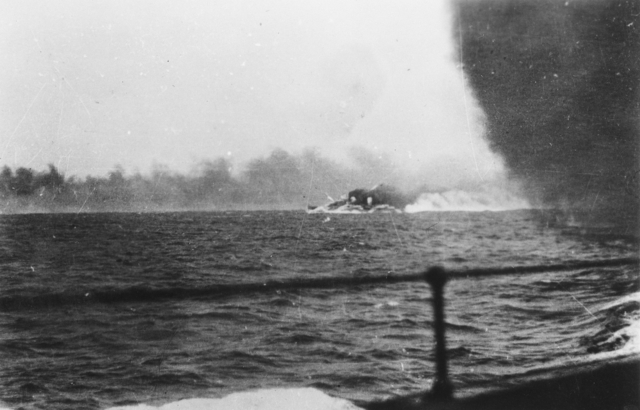
Perth’s epilogue was the battle of Sunda Strait: The line comprised Perth and Houston, with Perth leading. They believed the Sunda Strait was free of IJN presence, but the Western Invasion Force had was at Bantam Bay, near Java. They were spotted at 22:39 by IJN Fubuki patrolling east of the bay. Admiral Kenzaburo Hara sent the cruiser Natori, which confirmed their presence at 22:48 and decided to use the cruiser as bait, luring Perth and Houston away from his precious transports. At 23:06 Perth spotted a ship, believed to be one of the Australian corvettes supposed to be on station. Captain Waller ultimately saw the ship retreat under smoke and recognised the silhouette of a Japanese destroyer, IJN Harukaze. He decided to chase her at 23:15, but both cruisers were trailed now by Fubuki, 3,000 yd (2,700 m) behind Houston. She fired nine Type 90 torpedoes and opened fire but missed. Hara eventually ordered a full attack in turn, starting by Hatakaze targeting HMAS Perth. Damage was light, but at 23:40, Hatsuyuki and Shirayuki closed to 4,000 yd and fired all their tubes before turning away under smoke. Perth hit Shirayuki’s bridge and was missed by the torpedoes. Waller (at the head of the squadron) ordered to loop around south and west while IJN destroyers, reloading, came back to attack.
Asakaze fire her six torpedoes but missed. At 23:44 Natori started a duel with Perth, usiong her 140 mm (5.5 in) guns, firing four torpedoes and missing. Mikuma and Mogami then arrived while the DDs retreated to attack Perth with torpedoes at long range (12,000 yd) at 23:49, missing too. Perth and Houston duelled with both but missed, possibly because the Japanese used paravanes to artificially increased their bow wave. Perth was hit around 23:50, light damage. Mogami and Mikuma then concentrated on Houston at 12,200 yd (11,200 m), using searchlights. Mikuma was hit in return. By that time, Perth had expanded all its main ammo and was down to practice rounds. Harukaze and Hatakaze returned, close to 4,200 yd, firing their last eleven torpedoes followed by Shirakumo and Murakumo, nine more at 5,000 yd (4,600 m) and Natori four more at 9,000 yd (see later). At 00:05 however Mogami sank four transports and a minesweeper and Waller ordered to force their way through the Sunda Strait. Perth was hit by a torpedo forward (probably Harukaze) and a second torpedo near the bridge, plus two more, crippling the cruiser. Waller ordered to abandon ship while gunners stayed at post, engaging at close-range the destroyers. Eventually the Australian cruiser capsized to port and sank at 00:25. It was the 1st March 1942. She carried with her 353 sailors and other personal. USS Houston followed 20 minutes later. About 330 swam to shore and became POWs. HMAS Perth wreck was rediscovered in 1967, but was stripped by Indonesian marine salvagers and wrecked in the process, never given the status of a war grave.
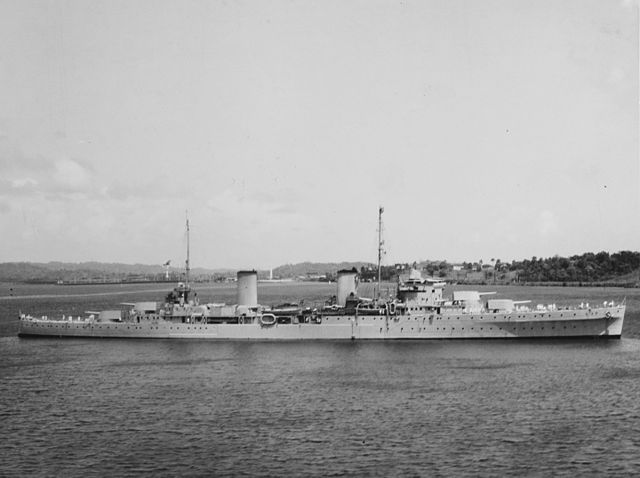
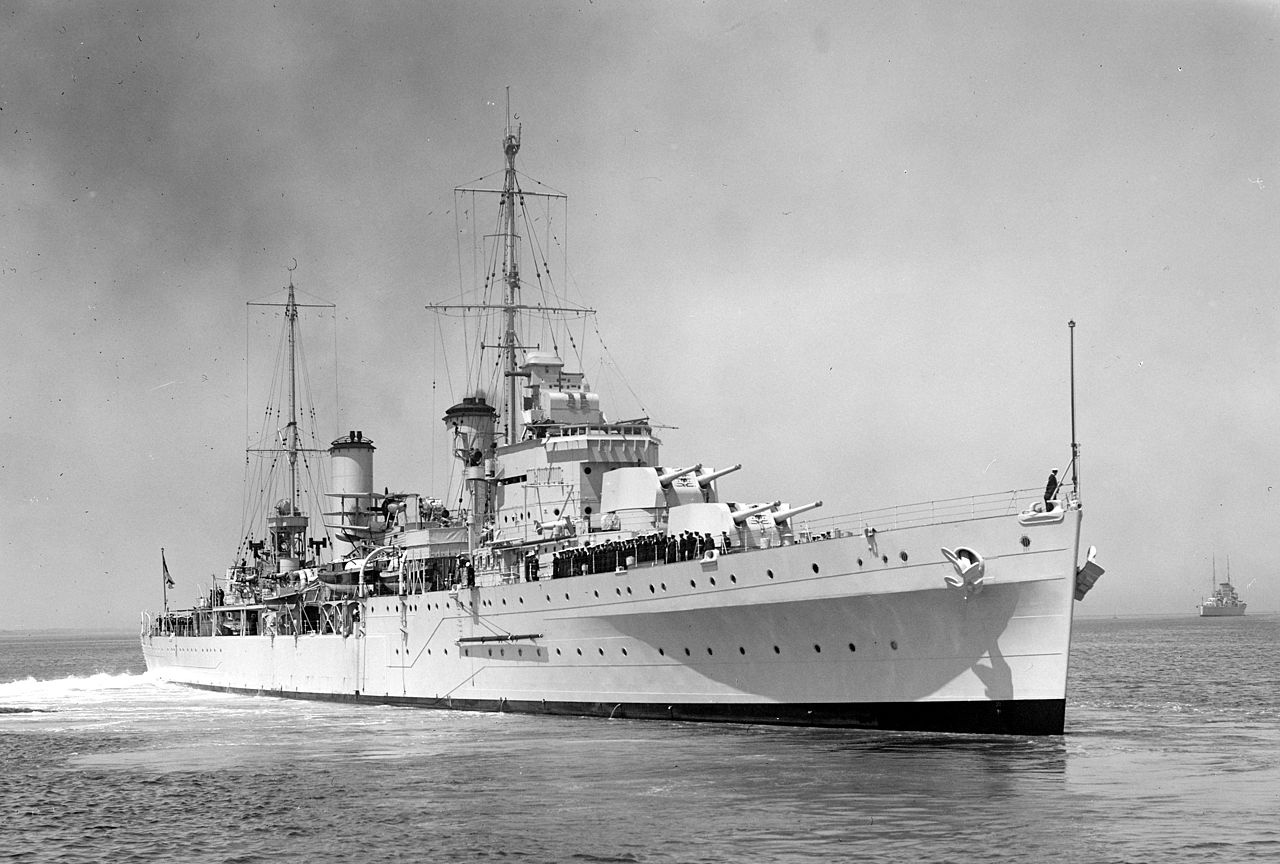
HMAS Hobart
The launch ceremony of Apollo in 1934
HMS Apollo was approved for construction and ordered at Devonport Dyd on 15 August 1933, the third of the Perth (Amphion) class. She was launched on 9 october the next year, and completed on 13 January 1936, half a year earlier than HMS Amphion, the class lead ship. She served with the Royal Navy in 1936-38, training after her sea trials, and operating on the North American and West Indies Stations until mid-1938. She was actually purchased by the Australian Government afterwards, after the transfer of the seaplane tender HMAS Albatross to the RN, as part of the total payment. Originally to be renamed and transferred to the RAN on 6 October 1936, the mobilisation in response to the Munich Crisis decided otherwise: This was brought forward to 28 September and she arrived in Australia in November. She visited the namesake city in February 1939 and trained in Australian waters until September 1939.
HMS Apollo at Vancouver, 1936
HMS Apollo at Miami, 1938
Read Sea Force
By that time, HMAS Hobart was patrolling the Bass Strait and on 13 October, she headed for Singapore with several Australian destroyers, assigned to convoy escort between the Bay of Bengal and the red Sea, as well as patrols, searching for possible German corsairs. In February 1940, she escorted an Australian troop convoy to the Middle East. She became flagship at Ceylon, Colobo, for the Commander-in-Chief of the East Indies station. She was transferred to Aden afterwards and teamed with HMS Liverpool by April 1940, in which became the “Red Sea Force”.
Her first action was on 12 June 1940, defending Aden against Italian air attacks. On 19 June 1940, her Walrus strafed and bombed an Italian wireless radio station at Centre Peak Island, Red Sea.
HMS Hobart in Brisbane, 1939
British Somaliland
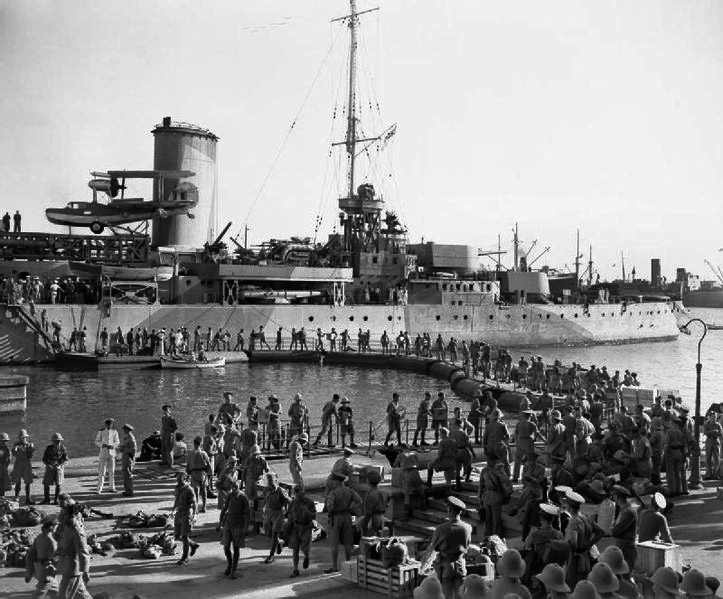
In August 1940, HMS Hobart escorted a force to Berbera after the invasion of British Somaliland. When it was decided to abandon the colony, Hobart became the evacuation headquarters, managing all operations. Its Supermarine Walrus was very active at the time, managing to counter air attacks and bomb the Italian HQ of Zeila. Meanwnhile, the landing party brought on land one of the onboard 3-pounder Hotchkiss saluting gun, which was converted into an anti-tank gun. It helped defending a hard-pressed rearguard sector, with three sailor volunteers staying up to the last shell. All three were captured. The evacuation of 7,000 soldiers and civilians was carried on a very strange misc. ships fleet, reminiscent of the “little boats” of Dunkirk. The cruiser then left the last, on 19 August, using her boats to ferry stragglers on board, including the demolition teams, while the guns blazed to eradicate anything of vale that was left behind on the coast.
Hobart’s Walrus, one of the most successful seaplanes of WW2, seeing heavy action at many occasions
 Mediterranean
Hobart stayed in the Red Sea station until October 1940, and departed for Colombo, to have a maintenance and refit period before heading to Australia. The crew was on leave, and Rear Admiral John Gregory Crace transferred his flag from HMAS Canberra to Hobart. The cruiser resumed service for escort duties in Australian waters, until June 1941. Her seaplane and catapult were removed by that time, but she no longer was used as flagship, and returned to Mediterranean, relieving her sister ship HMAS Perth. On 13 July, she was caught by an air raid at Port Tewfik, her AA guns blazing. The troopship SS Georgic was badly damaged and to avoid sinking tried to beach, but doing so she collided with another transport, Gleneran. Both were driven ashore and Hobart’s crew helped evacuation of the crew and passengers. They also assisted in the refloat operation of SS Georgic the next day. Hobart also started to provide gunnery support to Allied forces in the Western Desert Campaign, lasting until December 1941. After the 7, and Pearl Harbor attack, the Australian government asked Hobart back home in emergency.
Back to the Pacific
Hobart escorted a convoy on the now perilous Colombo-Singapore way, arriving on 3 January. The same day took place a massive Japanese air raid. She departed Fremantle on 11 January 1942, bound to Java, escorting another convoy, and back, a trip lasting until the end of the month. On 3 February 1942, between Singapore and Batavia, and with the destroyer HMS Tenedos, she helped evacuating the crippled SS Moller, destroyed by the IJA. From then on, Hobart was constantly in convoy escort duties for the Eastern Squadron, while being attacked on 25 February by 27 bombers, in the worst possible situation, caught refuelling from a tanker at Tanjong Priok. Fortunately she took only splinter damage, but she had to leave without her fuel complement. That was fate that intervened that day, as because of this she was unable to reach the ABDA, and therefore escaped its fate in the Java sea on the 27.
HMAS Hobart leaves Wellington, New Zealand, 22 July 1942
Port Moresby Defence (May 1942)
By May 1942, the known uncoming invasion of Port Moresby urged Hobart to team up with HMAS Australia and both joined the US Task Force assembled in the Coral Sea. At 07:00 on 7 May, Rear Admiral Crace became commander of Task Force 44 from HMAS Australia. He was ordered bring Australia, Hobart, USS Chicago, and the three US destroyers Perkins, Walke, and Farragut to the Jomard Passage. There was the expected path take by the Japanese invasion fleet. Meanwhile, several US carrier groups would engage another Japanese force bound to the Solomon Islands. Around 14:00, TF 44 arrived on their ambush position when spotting eleven unidentified aircraft, and engaged them. Later at 15:06 they were attacked by twelve Japanese twin-engine torpedo bombers, but they missed while their AA claimed five of them. At 15:16, another attack took place, with nineteen Japanese heavy bombers. TF 44 only suffered splinters damage, especially USS Chicago. Three heavy bombers later attempted a low altitude attack, but they were also inaccurate.
HMAS Hobart as a troopship off Guadalcanal, 9 August 1942
It was later learned, at the consternation of Crace, that these belonged to the USAAF! USN Vice Admiral Herbert F. Leary made excuses and ordered aircrews training in naval vessel recognition, but this was denied by General George Brett, which flatly refused or denied any blue on blue incident. Crace decided to withdraw afterwards, and dropped anchor for the night some 220 nautical miles from Port Moresby. There was reconnaissance in the Jomard Passage or China Strait, but they spotted nothing coming. Crace intercepted radio messages during the battle of the Coral sea to track progress, and at least on 10 May, Crace decided to withdraw south, to Cid Harbour (Whitsunday Island). Having no news from the US Command, he declared there was no longer a threat to Port Moresby. Afterwards, Hobart resumed her escort and patrol activities, until the end of the year and the next, without notable incident but some rare air attacks, leaving no damage. She also helped in the defence of Guadalcanal, escorting US troopships, or ANZACS in New Guinea.
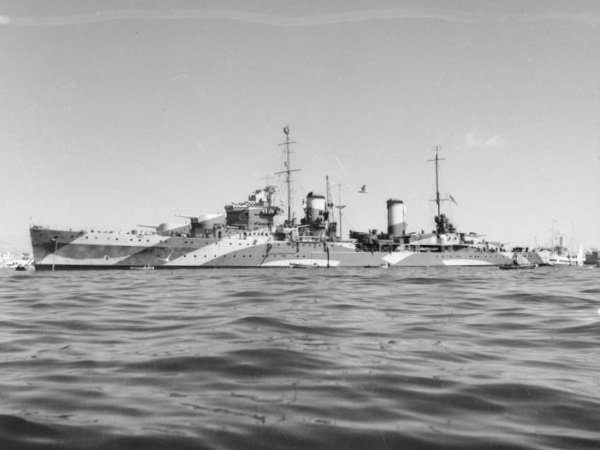
Hobart’s camo liveries in 1941 (Red sea, Med, above) and Pacific, below.
Espiritu Santo
Torpedo damage of HMAS Hobart in July 1943
On 20 July 1943, however, chance turned while Hobart was sailing to Espiritu Santo, now part of Task Force 74. She was ambushed and torpedoed by an unidentified Japanese submarine. A single torpedo hit, striking her port quarter. The damage was quite serious: Outside structural damage around the wardroom, loss of electricity and steering, seven officers and six sailors killed, six officers and one sailor injured (the wardroom was devastated). She was repaired provisionally at Espiritu Santo, assisted by USS Vestal, heading there under the escort of USS Nicholas and USS Radford. A post-event enquiry showed the attack took place at least 10 nautical miles (19 km; 12 mi) away when the spread of torpedoes was launched, missing HMAS Australia, but one ended its course on Hobart. She reach Australia on 21 August, escorted by HMAS Arunta and Warramunga, and made it in Sydney harbour, drydocked at Cockatoo Island. Such was the damage that she stayed there until 1945.
HMAS Hobart in 1945, coll. Allan Green (cc)
She returned into action, taking part in the landing at Tarakan on 25 April 1945, and Wewak on 11 May, then Brunei in June, and Balikpapan in July, assuming escort and then artillery cover. The battered Australian cruiser entered Tokyo Bay on 31 August 1945, part of Victory naval parade on 2 September 1945 at the signing of the Surrender. HMAS Hobart spent 1946 and 1947 in Japanese waters and returned home, to be awarded eight battle honours for her service:
“Mediterranean 1941”, “Indian Ocean 1941”, “Coral Sea 1942”, “Savo Island 1942”, “Guadacanal 1942”, “Pacific 1942–45”, “East Indies 1940”, and “Borneo 1945”.
HMAS Hobart in 1945
She was paid off, went into reserve on 20 December 1947. She was to be sold for BU but in 1950 Australia failed to secure a new British cruiser design, and this added to dollar shortage prevented to purchase an US Cruiser. So it was decided Hobart would receive some modernization instead. She was converted as an aircraft carrier escort, before being replaced by the planned Daring-class destroyers. This changed in 1952 again because of budget cutbacks. It was decided to replace her by the new Battle-class destroyers in this role, and she replaced Australia as main RAN training cruiser, converted at State Dockyard in Newcastle. In 1953-54, it was decided to take of service a carrier so Hobart was no longer needed as training vessel, and returned to reserve. Although many options were explored, notably a guided missile cruiser conversion, it was decided to drop all plans in April 1955. Already £A1 million were spent on her conversion and it was decided to cancel it. She was marked for disposal and eventually sold for scrap on 22 February 1962. She was BU by Mitsui & Co (Aust) Pty Ltd. leaving Sydney for Osaka on 3 March under tow.
HMAS Sydney

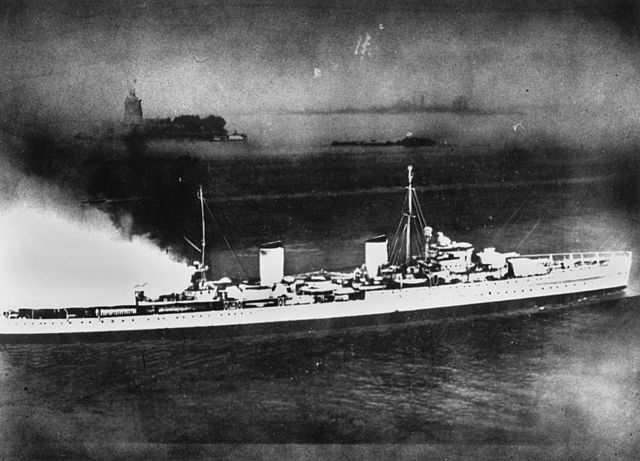
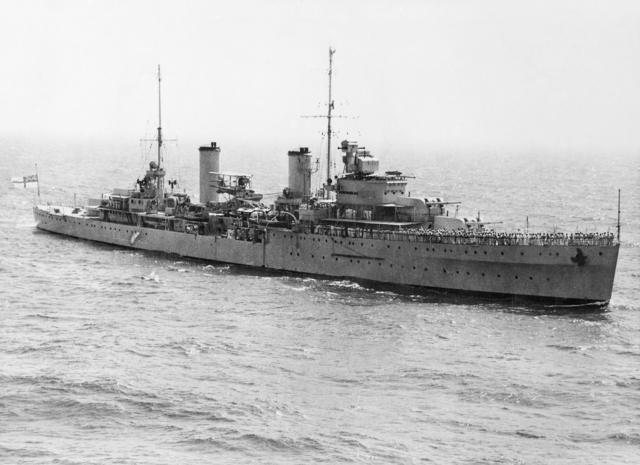
HMAS Sydney in 1941, shortly before his fight against the German raider Kormoran
Last in our study, HMAS Sydney is perhaps the most famous of the three, because of a single engagement. Not only she was the only cruiser sunk by a civilian ship (converted as a corsair), but one of the rare large ship to sink at the same time as its opponent. This shook Australia at the time. A post-event enquiry has been made afterwards, as well as conspiracy theories, books and documentaries on the subject.
Prewar career
HMAS Sydney is quite unique in the sense she was ordered at Swan Hunter yards of Wallseye as HMS Phaeton on 10 February 1933, laid down on 8 July 1933. She was purchased before launch by the Australian government, on 22 September 1934 so she was completed under Australian flag contrary to the two others. She made her sea trials before off Portsmouth on 29 October 1935, under Captain J.U.P. Fitzgerald command. On her way she was ordered to join the Royal Navy’s Mediterranean Fleet based at Gibraltar. She was to assist the 2nd Cruiser Squadron enforcing economic sanctions against Italy after the invasion of Abyssinia. In January 1936 she had her first maintenance in Alexandria. Some of her crew were hospitalized in Cyprus because of cases of rubella and mumps. By March 1936 she served with the Australian 1st Cruiser Squadron with the heavy cruiser HMAS Australia, training with the Royal Navy. She departed for Australia on 14 July, reaching Fremantle, Melbourne and Sydney.
She spent the next year in fleet exercises and training cruises. but in 1938, she was prepared to respond to the Munich crisis, which was later diffused. In April 1939, she joined a trade protection exercise off the south-east Australian coast. In August she was prepared in Darwin for a trip to the Dutch East Indies but as war was slooming in Europe, she sailed instead to Fremantle, preparing for war in the Mediterranean.
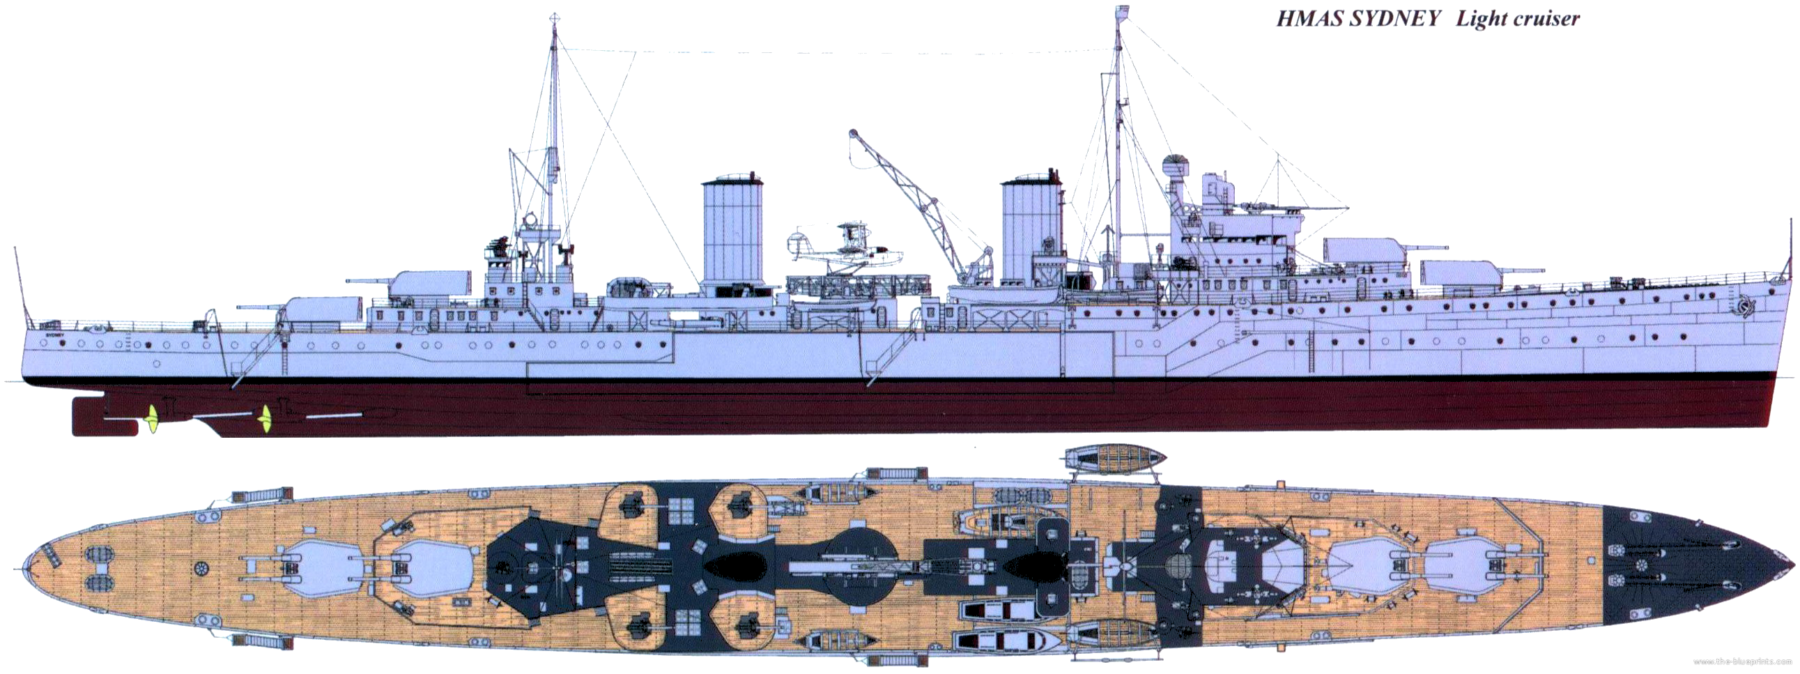
HMAS Sydney as built
Indian Ocean
HMAS Sydney first wartime duties were patrol and escort duties, like her sister ships, in Australian waters, later under Captain John Collins command from 16 November. On 28 November, she teamed up with Australia and Canberra, searching for the German “pocket battleship” Admiral Graf Spee, allegedly roaming the Indian Ocean. Replaced by HMAS Adelaide on 13 December, she was drydocked at cockatoo for periodic maintenance, completed in late January 1940. She made a training cruise with Leander and Ramillies, escorting an Anzac convoy. She relieved Australia in February for west coast patrols/escort. On 19 April, she covered another Anzac convoy off Albany and to the Cocos Islands, replaced by the French cruiser Suffren. On 1st May she was reassigned to the East Indies Station, Colombo. She escorted the Anzac convoy US 3 off the Cocos Islands and in the Indian and on 12 May was ordered to the Mediterranean.
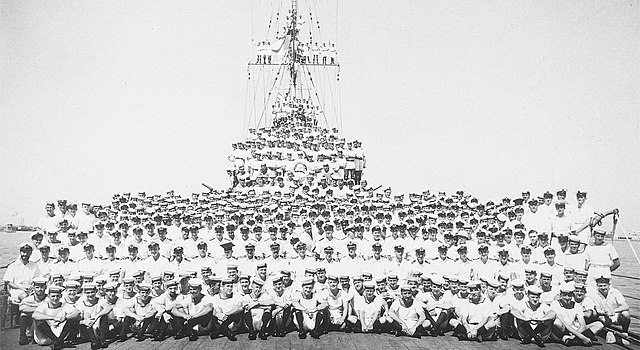
Sydney’s crew before the war, Captain Collins
Mediterranean Operations (May 1940-January 1941)
Heading via Colombo she proceeded to Aden, and later teamed with HMS Gloucester and Eagle, across the Suez Canal on 25–26 May, and Alexandria, prepared for operations in the Red Sea. Howver due to the impressive performances of the Australian destroyer flotilla in the British Mediterranean Fleet, Andrew Cunningham asked to “keep the Australian cruiser for himself”. And so Sydney was attachedto the 7th Cruiser Squadron. On 10 June 1940, the cruiser was on war footing as Italy entered the war. Her squadron sortied the 11, searching for Italian warships off Alexandria and maritime communications for eastern Mediterranean secotr, and Aegean islands. Sydney took part in the “westbound sweep” as far as the Gulf of Taranto. She made an unsuccessful depth charge attack on a possible Italian submarine on 13 June but was back to Alexandria.
On 21 June, she joined the British cruisers HMS Orion and Neptune and French battleship Lorraine plus destroyers for a bombardment raid on Bardia. HMAS Sydney’s own target was a military camp, pounded by her 6-in guns for 22 minutes, assisted by her Walrus, which provided accurate spotting for the entire squadron. She however was soon attacked by three unidentified biplanes fighters, reported as CR.42 Falcos, but later possible friendly Gloster Gladiators. The aircraft crash landed near Mersa Matruh. The Italians conducted later a retaliatory airstrike when the squadron was on her way home, but without success. The French Armistice the following day later prompted Operation Catapult. HMAS Sydney and the Alexandria squadron that day turned their guns on French ships present, but fortunately unlike in Mers-el-Kébir, Admiral Cunningham and René-Emile Godfroy negotiated a disarmament and internment of the ships present (including the Battleship Lorraine, cruisers suffren, Duquesne, Tourville, Duguay-Trouin, 3 Destroyer, six torpedo boats and a Submarine).

Sydney’s main guns Mark XXIII being maintained on 21 July 1940
Sydney sailed with the 7th Squadron on 27 June to escort a convoy bound to Malta and later the following day, engaged underway an intercepting force of three Italian destroyers which themselves were escorting an axis convoy to Tobruk. Espero was disabled by gunfire but Sydney that evening had little opportunity to fire, but later searched for survivors from the destroyer. But the latter was still not sunk, and started to fire at the cruiser from 6,000 yards (5,500 m). Two shells landed short of the cruiser’s bow, and she replied. After four salvos, the destroyer was badly damaged and sank at 20:35, Sydney staying for two hours to collect 47 survivors and proceeded to Alexandria, leaving a boat with food supplies behind.

HMAS Sydney’s 4-in guns in action
Battle of Calabria
On the evening of 7 July 1940, HMAS Sydney departed with four other cruisers, three battleships, an aircraft carrier, and sixteen destroyers divided into three groups to protect another convoy to Malta. On 9 July they met 120 nautical miles east of Cape Passero, 150 nautical miles (280 km; 170 mi) from Malt. Destroyers started their escort while the rest sailed to attack “targets of opportunity” around Sicily. On 8 June, the submarine HMS Phoenix reported an Italian fleet, while Italian air raids took place. Sydney’s AA crews were busy that day, and the following night. On 9 July, 14:00, contact was made with the Italian fleet. Sydney’s own lookouts spotted smoke at 14:45, and later identified five cruisers at 15:00. The Allied cruiser squadron, supported by HMS Warspite, turned northward and at 15:20, Sydney identified and fired on a Zara-class cruiser from 23,000 yards, but the Italians kept their distance, and no hit was recorded. She also tried to sink an Italian DD retreating under smoke. The battle ended in the evening while Malta Convoy MA 5 was successful. Sydney in the meantime had expended all her AA ammunition and a large part of her 6-in stock.
The battle Cape Spada
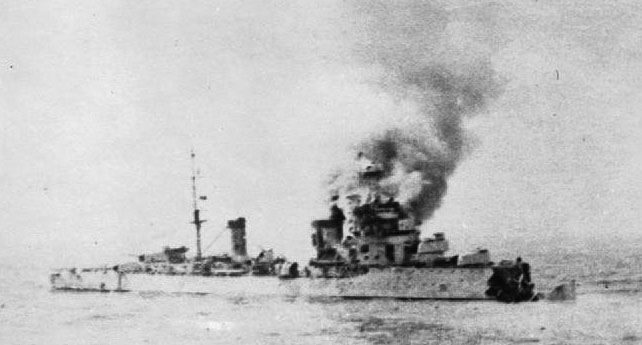
RN Bartolomeo Colleoni after being battered by HMAS Sydney. She was finished off by destroyers. Sydney almost succeeded in destroying Bande Nere also.
After five days in resupply and maintenance, she departed for Crete with HMS Havock, arriving on 18 July, to patrol the next day the gulf of Athens and assisting the HMS Hyperion, Ilex, Hero, and Hasty in a large anti-submarine sweep to the north. Captain John Collins decided to move the crusier 100 nautical miles south while maintaining radio silence and on 19 July, spotted two Italian light cruisers, RN Giovanni delle Bande Nere and Bartolomeo Colleoni. After 7 mintes, both opened fire while British destroyers turned north-east at 30 knots, informing Sydney and closing the gap. Sydney and Havock moved to chase off the Italians, pursuit, and were close enough to open fire 30 min. later at 08:29. Sydney battered the lightly protected Bande Nere, and both cruisers withdrew to the south, with the six ships in hot pursuit. At 08:48, Bande Nere was hiding under a smoke screen, and Sydney concentrated her fire on Bartolomeo Colleoni, hit at 09:33. Collins then ordered the destroyers to make a torpedo attack, and Hyperion, Ilex, Havock launched a generous spread on Colleoni, sinking her and staying behind to rescue survivors while HMS Hero and Hasty supported Sydney, trying to catch Bande Nere. At 10:37 it ended as the very fast Bande Nere successfully outrun its opponents, while at the same time, with the dark and just ten shells left for her forward turrets the captain decided to fold up. The fleet was back on 20 July in Alexandria, all AA guns blazing to fend off several air attacks along their way.
Her only damage came from a single shell at 09:21, piercing her forward funnel. Captain Collins was awarded multiple times following the action, made Companion of the Order of the Bath, two DSO DSC and five, DSM plus twelve despatched Mentions to the crew were made, plus the battle honour “Spada 1940”.
HMAS Sydney underway in 1940 (AWM)
Aegean sea
After refuelling and rearming, Sydney teamed with HMS Neptune, sailing out on 27 July to join a convoy from the Aegean sea; The convoy was attacked five times by aviation, Sydney’s AA repelling some of these, taking shrapnel. Both ships ledt the convoy to locate and sink the Greek tanker Ermioni supplying the Dodecanese Islands, in Italian hands. They were back on 30 July, Sydney departing soon after this time with HMS Orion for a three-day patrol. Back home she was refitted in drydock, her captain insisting on building a 3-foot (0.91 m) high and 0.5-inch (13 mm) in thness armour around the 4-inch gun platform. She was also camouflaged in high contrast strips fit for the Mediterranean light. On 12 August she was out in a mission with Neptune and five destroyers. The idea was to intercept Italian reinforcements to Africa or the Aegean Sea, staying in radio contact with the HQ and Bletchley Park. Sydney was re-tasked in between, assisting a destroyer squadron shelling Bomba and Bardia. Sydney later that month also escorted the Malta convoy MB 5 and on her return voyage, she attacked Italian facilities.
The Captain now tried some tricks, and ordered to construct in Canvas and timber fake superstructures in order to make the ship look like an Italian Condottieri-class cruiser. The idea was to fool recognition from the axis and close in to Scarpanto during the night of 3–4 September, where the rough silhouette was enough. She sailed at dawn with the destroyer HMS Ilex, and as planned, both closed by night and shelled the Italian Makri Yalo Airbase, at Scarpanto. Sydney rained 135 shells in 25 minutes. Meanwhile, the destroyer managed to fend off five German E-boats from a nearby base, two were sunk and the rest crippled. sinking two. Sydney’s disguise almos had her fired on whe she joined the fleet until she raise the White Ensign and ordered the crew to hastily and cut down the disguise. The captain received praises from Admiral Cunningham saying “Well Done. You are a stormy petrel.”, and the latter became her unofficial nickname in the Royal Navy and the RAN. After a short refit she departed on 24 September to supported HMS Protector, while intercepting a French merchant vessel to Syria. She made a sweep in the Aegean, west of Cyprus and escorted another Malta-bound convoy, made on her return another sweep of the Aegean with Orion, and shelled Maltezana.
HD Photo of Sydney in 1936
Greece and Crete
The Mediterranean fleet departed on 8 October to escort several Malta Convoys, hoping the this would draw the Italian fleet into battle, but it did not succeed in this, although the mission was a complete success, and a quiet one, although Ajax briefly duelled with seven Italian torpedo boats and destroyers, sinking three. On 25 October, Sydney, Orion, Jervis and Juno made another sweep in the Aegean, reaching the Dardanelles. Soon, the Italians invaded Greece and they were recalled. Joined by York and Gloucester they met the Mediterranean fleet, west of Crete and the next days patrolled around Crete and Greece. On 5 November, Sydney and Ajax were in Port Said, sailing out to escort a military equipment convoy to Souda Bay in Crete for an advanced base. After delivery of equipments, supplies and troops, they joined the fleet back, patrolling until 11–12 November, and later supporting the famous raid on Taranto. On their way back, Sydney’s lookouts spotted a convoy of four axis merchantmen and two escorting destroyers and they opened fire at 01:27, Sydney directing the cruisers fire from 7,000 yards. For 23-minutes Sydney sank three merchant ships and badly damaged a destroyer. One however managed to launch a spread of torpedoes, which she dodged.
Sydney in Crete
From 15 to 20 November, Sydney and the three other cruisers carried some 4,000 Allied soldiers and equipment from Alexandria to the Piraeus, hoping to help the Greeks. Other convoy escorts followed, in the eastern and central Mediterranean. On 24 November she was targeted by Italian planes at Souda Bay. In December she was in the Aegean and between escorts, shelled the port of Valona. She was repaired at Malta, and was given a degaussing equipment.
Part II: Australia, Petrel vs. Kormoran
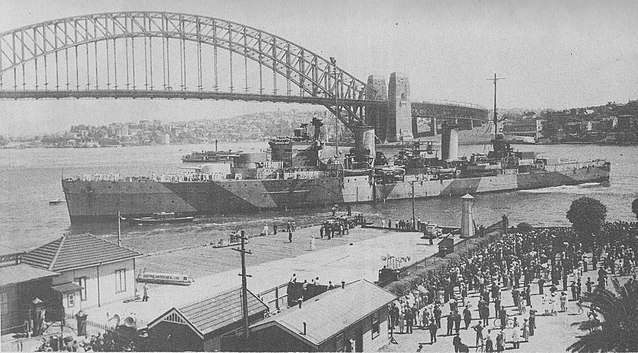
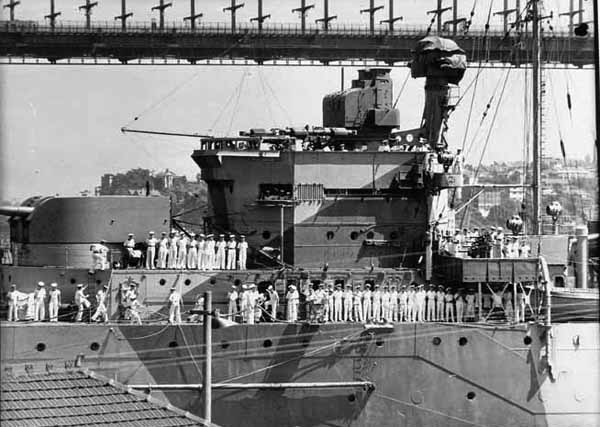
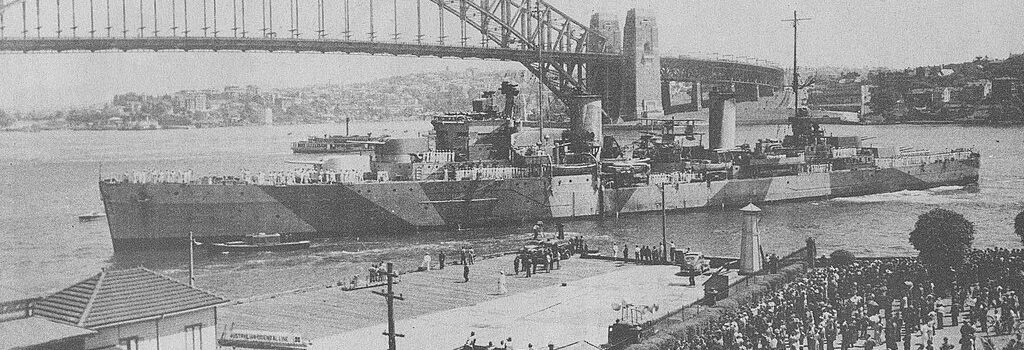
Triumphal arrival of HMAS in her namseake city on 10 February 1941, and Captain John Collins celebration speech, and above with rear admiral Crace.
A Hero’s welcome
Back in the fleet on 8 January 1941, she was ordered to sail to the north coast of Africa, joining a convoy to Australia, called SW 4B, with SS Empress of Canada. On her way home, Sydney was relieved by HMS Ceres for escort duties, and instead was ordered to find and sunk Italian ships off Mogadiscio. She later refulled in the Seychelles and on 24 January was part of the chase against German corsairs after the sinking of the merchantman Mandasor by the Atlantis. She arrived home on 9 February, and underwent a major refit while her personnel was given a well-served leave. Locally there was still the threat of German merchant raiders. It was even more acute after the attacks on Nauru. The crew was given a hero’s welcome, and on 11 February, a holiday was declared for school students in Sydney, joined the crowds witnessing the Sydney company’s official parade into the city. The press relayed this event throughout Australia. At the time, HMAS Sydney was the most decorated ship in the history of the RAN. And it made her sudden disappearance later resonate even more strongly with the people of Australia, a shock comparable to the loss of the Hood for the British. Here how it all unfolded:
After a short refit, HMAS Sydney headed for Fremantle on 27 February. There, she was assigned to escort missions in the Indian Ocean, covering convoys off southern Australian bound to the Middle East and Europe, if taking the west road, or east to the the Dutch East Indies. She only escorted them on the first leg due to her limited fuel reserves. In April 1941, HMAS Sydney escorted the Queen Mary from Fremantle to Jervis Bay and carried Admiral Ragnar Colvin and advisors to Singapore on 19 April for the first secret ABDA conference. She was back to Fremantle and Collins, promoted, left his command to Captain Joseph Burnett, on 15 May, with an impeccable battle records. Sydney escorted SS Zealandia to Singapore via Sunda Strait, taking over by HMS Danae and by early June, escorted them back. She later escorted another convoy on the east coast of Australia from 24 June, followed by another of a Pacific convoy, and home for maintenance until 8 August.
She later escorted the Queen Mary and Queen Elizabeth (Anzac convoy US 12A), headed for Melbourne and stayed there until 19 September, with a new camouflage. She later escorted the convoy US 12B to Fremantle. She has her “A” turret jammed due to the battering of large waves in heavy weather, and was repaired. By fear of mines, Sydney intercepted Queen Mary bound to Fremantle and remain with her until minesweepers cleared a path. She was back home on 7 October, and resumed service in Western Australian waters. The rest of the year was relatively uneventful, at least until mid-November.
Paravane being deployed by HMAS Sydney
4-in gun in action on HMAS Sydney
The troop transports Queen Mary and Queen Elizabeth viewed from HMAS Sydney’s tern
A Fatal Encounter
On the afternoon of 19 November, Sydney sailed off Western Australian coast, around Carnarvon, returning to her home base in Fremantle when at 15:55, she spotted a merchant ship which quickly turned away at 14 knots. Intrigued by this behaviour, Captain Burnett ordered full spead ahead in pursuit. closing the gap, lookouts started to recognise the ship, while starting to signal by light to ask some clues, and when left without response, combined light and signal flag. At last, the unidentified merchant ship hoisted her call-sign still at this angle, obscured from Sydney by her funnel. Sydney’s captain made another request, and obtained as a response a call-sign corresponding to the Dutch ship Straat Malakka (verified not on Sydney’s list for the area), and further flag signals were exchanged, asking the usual destination and cargo. But at 17:00 the unknown ship their alleged ship, Straat Malakka, had been recently attacked by a merchant raider. The Captain ordered immediately limited battle stations, and to pull alongside from astern, going for a true parallel course, still at 1,300 metres (4,300 ft), and correctly train the main guns and torpedo tubes on her. There was a secret call-sign associated to each merchantman listed, so the captain ordered it for confirmation, and obtained no response fifteen minutes later.
The duel
 There was no possible response for the captain of the German auxiliary cruiser Kormoran, disguised. There was no other option than opening fire the first, and that what Fregattenkapitän Theodor Detmerse did. His main guns were unmasked, as the torpedo tubes, and hell was unleashed at almost point-blank range for cruisers. On what happen next, accounts are divided. What is sure, is that Kormoran fired all her six 150 mm (5.9 in) guns on starboard, and the gunners had plenty of time to aim on the cruiser’s bridge and gun director tower, plus her forward turrets. Damage was heavy and immediate for Sydney, which only fired after her sixth salvo, and only from “Y” turret (inaccurately) while “X” managed to put multiple hits on the German corsair, damaging her machinery, one gun, and started a fire. Kormoran’s gunners however seemed to maintain a quick firing pace, and at the ninth salvo, one German torpedo hit Sydney under “A” turret, close to the ASDIC room, weakest point of her hull. This had an immediate effect of ripping a massive gash and her bow to buckle down. Sydney started to plough heavily while swinging hard to port. She fell behind Kormoran and soon had her “B” turret out of action too.
At 17:35, barely after five minutes, Sydney was already lost. Heading south she was loosing speed while the crew tried to master multiple fires which obscured her last remaining turrets. A-B were out of action, and X Y were jammed to port, facing the other side of Kormoran while the secondary guns were out of range, but this did not stopped the German corsair to continue firing at the same pace, perhaps believing the cruiser was still a threat. About 17:45, Sydney’s starboard torpedoes, last card, were launched without effect, while Kormoran was manoeuvring to cross her ‘T’ with her port broadside, but her engines soon broke, while she maintained her heavy fire, with less accuracy as the distance grew. Kormoran ceased fire at 17:50, then 6,600 yards away, even launching another torpedo at 18:00, which missed. At that point, HMAS Sydney still was on a south-south-east heading. From now, reports came from observers on Kormoran. She drifted over the horizon, still glow as dark fell until about 22:00, adrift but she apparently sank after midnight as she was lost from view.
Aftermath
The RAN admiralty only learned about her fate when she was reported missing at Fremantle on 20 November as planned. It was not initially cause for concern as there was a strict order to maintain wireless silence. On 23 November at last, the admiralty transmitted an order to break silence and report its status, without chance, while German survivors were picked up by British tanker the following day. Based on their witnessing of the action, a large-scale air and sea search operation started, lasted until 29 November. In all, 318 Kormoran’s crew were found, more of her complement, but just a lifebelt from Sydney, nor a single sailor on the 645 aboard. Australian PM John Curtin officially announced HMAS Sydney’s loss on 30 November, to great natonal consternation. It came as a major blow to Australian morale, the personal loss amounting to 35% of the RAN casualties total for WW1. Her loss was compounded by the total absence of wreckage of survivors. The ship basically vanished from the seas.
Enquiry
The enquiry that followed was based entirely on German sailors accounts. Despite her short time firing, Sydney at least had some protection unlike the Kormoran, and effectively crippled her. Wildly burning, to the pojint some fires became uncontrollable below deck and near ammo magazines, it was decided to evacuate her. She was eventually scuttled at midnight. The German survivors were thorourghly interrogated in Fremantle, but German officers instructing them to falsify their responses. Given the various perspective it was impossible to recut the events and establish a firm report on what happened. The broad details were known, most of which was based by isolated German sailors rescued without their officers. The enquiry was closed in December while Kormoran’s crews became POWs in Victoria until 1947. At last, on 6 February 1942, a Carley float containing a dead body washed ashore on Christmas Island and was examined by some island’s inhabitants, reporting they were from Sydney. As there were other priorities, the war ended before more could be said about this said case, until 1949, when a new investigation was conducted by the Royal Navy, but still not sure about the raft and body being from Sydney. The body was exhumed again in October 2006, reburied at Geraldton Cemetery after DNA extract to establish its identity.
Controversy
The quite unique duel between Sydney and Kormoran remained mysterious and controversial to this day. Despite the fact both ships had about the same firepower, and giving the advantages of surprise, the Germans could have won it. But during the war already there was a general disbelief that a modified merchant ship could defeat a cruiser. This was compounded by the lack of survivors and evidence and general distrust of German testimonies. Rumours went wild after the war, and historians such as Tom Frame and Wesley Olson note that author Michael Montgomery publishing in 1980 “Who Sank The Sydney” fan the flames of conspiracy. One point was underline, the apparent complete lack of precautions by Burnett, both believed to be inexperienced or incompetent, conflicting orders or belief that raiders captured ships rather than sink them, and lack of identification in time. The most common theory to explain the disaster was that the Germans “played dirty” and fired on Sydney before raising their battle ensign. They could also have used a flag of surrender or distress signals to lure the cruiser. Other rumors alleged a Japanese submarine was responsible for sinking the cruiser, covered up as the United States was not yet involved. This view also included the submarine surfacing and killing all Australian survivors on sight to avoid witnesses. One of the most common theories nowadays argues that the cruiser was never ready, at battle stations, or that distress calls from the cruiser were heard by shore facilities but ignored.
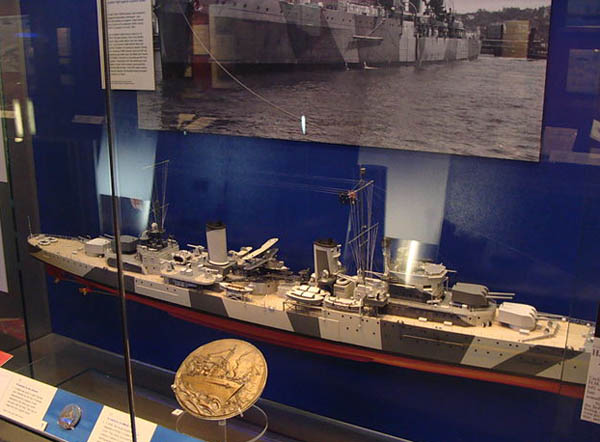
Maritime Museum, model of the Sydney
The Weck
Multiple searches were carried out by the RAN between 1974 and 1997 or by RAAF aircraft using magnetometers. A 1998 inquiry by the Joint Standing Committee for Foreign Affairs, Defence and Trade, stated the German accounts were a “feasible” interpretation of the battle, but never stopped wild speculations. In the end, the blame generally fell on Captain Burnett, but without hard evidence like a wreck, it was impossible to go further. Even German testimonies after the war had less value as memory faded out. Despite a very approximate position for the Kormoran, which was the only known, the was an immense area to cover, and some supported a ‘northern’ or ‘southern’ position. HMAS Sydney (D48) was eventually located in Shark Bay, by American shipwreck hunter David Mearns. He started to study the case in 1996 and started to publish in 2001. Believing german accounts were true, he was contacted for a partnership by HMAS Sydney Search, and an expedition was financed by the State and Federal government, for a first campaign lasting from February to early April 2008.
Kormoran was located first, on 12 March 2008 and given the heading, speed, last sighting reports, a new search box was calculated, and the cruiser was at least found on 17 March 2008 just after 11:00, soon after the German corsair location was made public. This was announced by PM Kevin Rudd on 18 March. The ship rested under 2,468 metres (8,097 ft) of water, 11.4 nautical miles SE of Kormoran. Given her general state, it was deduced Sydney lost buoyancy and sank after her bow, torn off, was completely submerged, and the front section went down almost vertically, detaching from the rest, which apparently glided 500 metres forward when sinking in turn, and hitting the bottom upright, stern first. The bow was located at the opposite end of a debris field about 500 metres (1,600 ft) NW from the rest of the hull. The wrecks were immediately placed under the protection of the Historic Shipwrecks Act 1976 to avoid pillaging. ROVs extracted a few items, until the expedition closed on 7 April. A new expedition in April 2015 by Curtin University and the Western Australian Museum started a 3D mapping of the site for further study and detect any deterioration since 2008. A memorial was erected at Geraldton, Western Australia, on top of Mount Scott, started in 1997 and dedicated on 18 November 2001.
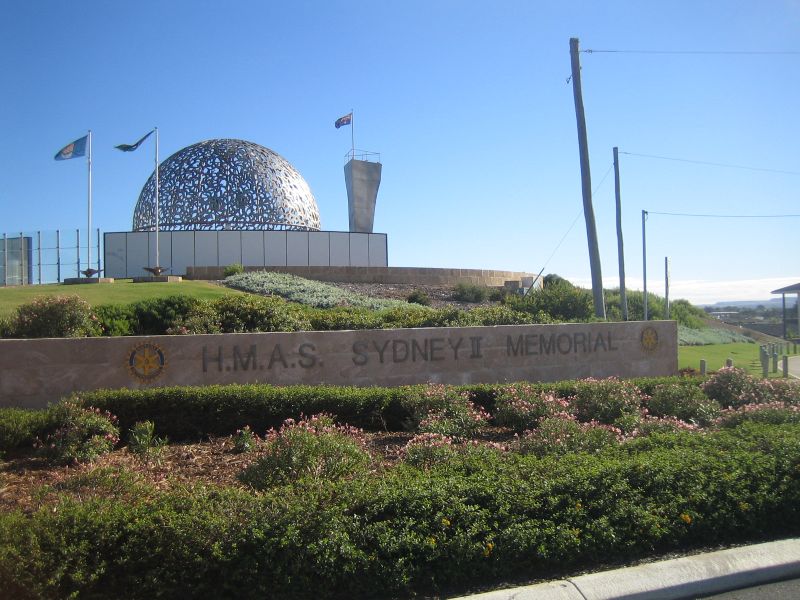
HMAS Sydney’s Memorial on mount Scott, Geraldton
Specifications
Displacement: 7,200 t. standard, 9,500 t. Fully Loaded
Dimensions: 171,37 m long, 17,27 m beam, 5,80 m draft
Machinery: 4 shaft Parsons turbines, 4 Admiralty boilers, 72,000 shp
Top speed: 32,5 knots
Armor Belt: 90 mm.
Armament: 4×2 152mm (6 in), 4×2 102mm (4 in), 2×4 40 mm AA Bofors, 2×4 533 mm TTs (21 in), 1 seaplane
Crew: 570
Links/sources
Conway’s all the world’s fighting ships
fr.naval-encyclopedia.com
2009 report for the Cole Inquiry “frauds, conspiracies and speculations” about the loss of Sydney
Colledge, J. J.; Warlow, Ben (2006) [1969]. Ships of the Royal Navy: The Complete Record of all Fighting Ships of the Royal Navy (Rev. ed.). London: Chatham Publishing.
Frame, Tom (1993). HMAS Sydney: Loss and Controversy. Rydalmere, NSW: Hodder & Stoughton.
Raven, Alan; Roberts, John (1980). British Cruisers of World War Two. Annapolis, MD: Naval Institute Press.
Waters, S. D. (1956). The Royal New Zealand Navy. Official History of New Zealand in the Second World War 1939–45. Wellington, New Zealand: War History Branch.
 Latest Facebook Entry -
  X(Tweeter) Naval Encyclopedia's deck archive
 Instagram (@navalencyc)


 French Navy
 Royal Navy
 Russian Navy
 Armada Espanola
 Austrian Navy
 K.u.K. Kriegsmarine
 Dansk Marine
 Nautiko Hellenon
 Koninklije Marine 1870
 Marinha do Brasil
 Osmanlı Donanması
 Marina Do Peru
 Marinha do Portugal
 Regia Marina 1870
 Nihhon Kaigun 1870
 Preußische Marine 1870
 Russkiy Flot 1870
 Svenska marinen
 Søværnet
 Union Navy
 Confederate Navy
 Armada de Argentina
 Imperial Chinese Navy
 Marinha do Portugal
 Mexico
 Kaiserliche Marine
 1898 US Navy
 Sovietskiy Flot
 Royal Canadian Navy
 Royal Australian Navy
 RNZN Fleet
 Chinese Navy 1937
 Kriegsmarine
 Chilean Navy
 Danish Navy
 Finnish Navy
 Hellenic Navy
 Polish Navy
 Romanian Navy
 Turkish Navy
 Royal Yugoslav Navy
 Royal Thai Navy
 Minor Navies
 Albania
 Austria
 Belgium
 Columbia
 Costa Rica
 Cuba
Cuba Czechoslovakia
 Dominican Republic
 Haiti
Haiti Hungary
 Honduras
 Estonia
 Iceland
 Eire
Eire Equador
 Iran
Iran Iraq
Iraq Latvia
 Liberia
 Lithuania
 Mandchukuo
 Morocco
 Nicaragua
 Persia
 San Salvador
 Sarawak
 Uruguay
 Venezuela
 Zanzibar
 Warsaw Pact Navies
 Bulgaria
 Hungary

 Bundesmarine
 Dutch Navy
 Hellenic Navy
 Marina Militare
 Yugoslav Navy
 Chinese Navy
 Indian Navy
 Indonesian Navy
 JMSDF
JMSDF North Korean Navy
 Pakistani Navy
 Philippines Navy
 ROKN
ROKN Rep. of Singapore Navy
 Taiwanese Navy
 IDF Navy
 Saudi Navy
 Royal New Zealand Navy
 Egyptian Navy
 South African Navy


 Ukrainian Navy
Missing ships name:
A Hero’s welcome
Back in the fleet on 8 January 1941, she was ordered to sail to the north coast of Africa, joining a convoy to Australia, called SW 4B, with SS Empress of Canada. On her way home, Sydney was relieved by HMS ???? for escort duties.
It was ceres, added and linked. Thx for spotting, you are my walrus…