
Revenge class Battleships (1915)
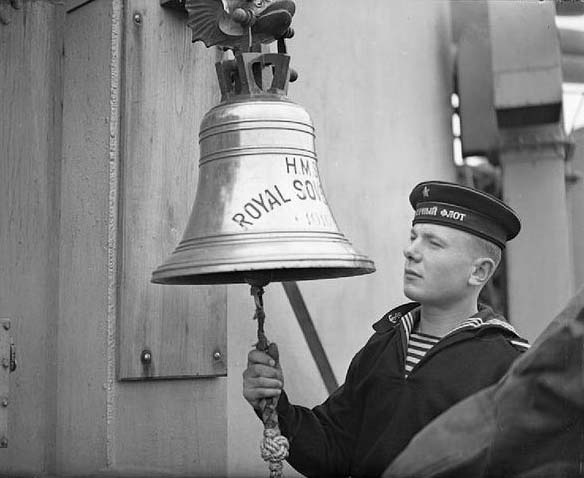
 Revenge, Ramillies, Resolution, Royal Oak, Royal Sovereign.
The Revenge class battleships: Super-dreadnoughts on a budget
Overshadowed by the Queen Elisabeth class, the Revenge nonetheless were the next British super-dreadnought serie also taking took part in two world wars. They actively contributed to the Royal Navy’s history, just in time for Jutland where they duelled with German battlecruisers, partially modernized in the interwar, but indeed relegated in WW2 to quieter theaters of operation and convoy escort. One was sunk in the early days of WW2 (Royal Oak), and two badly damaged in action… against the French, missing part of the war in repairs. They also had limitations: Smaller, more cramped, slower, shorter range, with turrets capped to 20° elevation, they went at the bottom of the queue for upgrades, which were difficult to their smaller size anyway. Their Boilers were not producing as much steam after 25 years and by 1939 they were almost sidelined. One was even “expandable” enough to be lent to Soviet Union (Arkhangelsk) in 1944. But in any case, They still participated in many operations.
The last British dreadnoughts: Design development
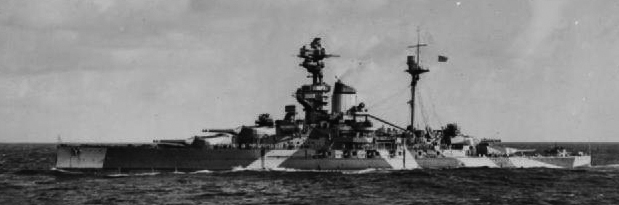
Launched shortly after the Queen Elisabeth class and commissioned from 1916 to 1917, the five Revenge class battleships, also referred to as the Royal Sovereign class given their launch/completion dates, were designed to be “economical” vesions of the previous dreadnoughts. Dimensions, tonnage, propulsion were all reduced, both speed and range were lower but their armament was kept intact. They indeed retained their impressive 15 inches (381 mm) main artillery at the time still almost unparalleled in Europe and for most of the interwar. In WW2 they demonstrated they were arguably one of the finest piece of heavy marine artillery ever designed. Another quirck in their design was their use of mixed heating (coal and oil) initially for fear of a lack of oil supplies in wartime. In the end these ships looked more stocky and their unique funnel had them immediately recognized from the previous battleships.
Initial requirements
In around 1903, Germany quickstarted a famous naval arms race under the direction of Admiral Alfred von Tirpitz. This pushed dreadnought construction and innovation in this field. The Royal Navy’s own construction programme aimed simply at out-building the Germans, maintain dominance in numbers. In all, in 1913, they ended building twenty-seven modern dreadnoughts battleships whule the Germans still layed behind with seventeen and lower main caliber guns. Among these were a new new breed of “super-battleships” designed when Winston Churchill became First Lord of the Admiralty in October 1911 and integrated a serie of 15-inches armed capital ships, a bit intermediate with battlecruisers according to discussions with Admiral Jackie Fisher. Construction started according to the 1911 programme, but another batch was planned for the 1913 Estimates. It is imoprtant to remind the British Empire was still at peace at the time, despite distinctive saber-rattling, notably in the Balkans. This led, from a pure “repeat” of the previous Queen Elisabeth class, to reassess their cost, considerably higher than any pre-dreadnought and still higher than HMS Dreadnought herself. In the discussions leading to thier final design (it was agreed early one they woould be overall similar and therefore avoided many pre-design engineering assessement already done back in 1911-1912.

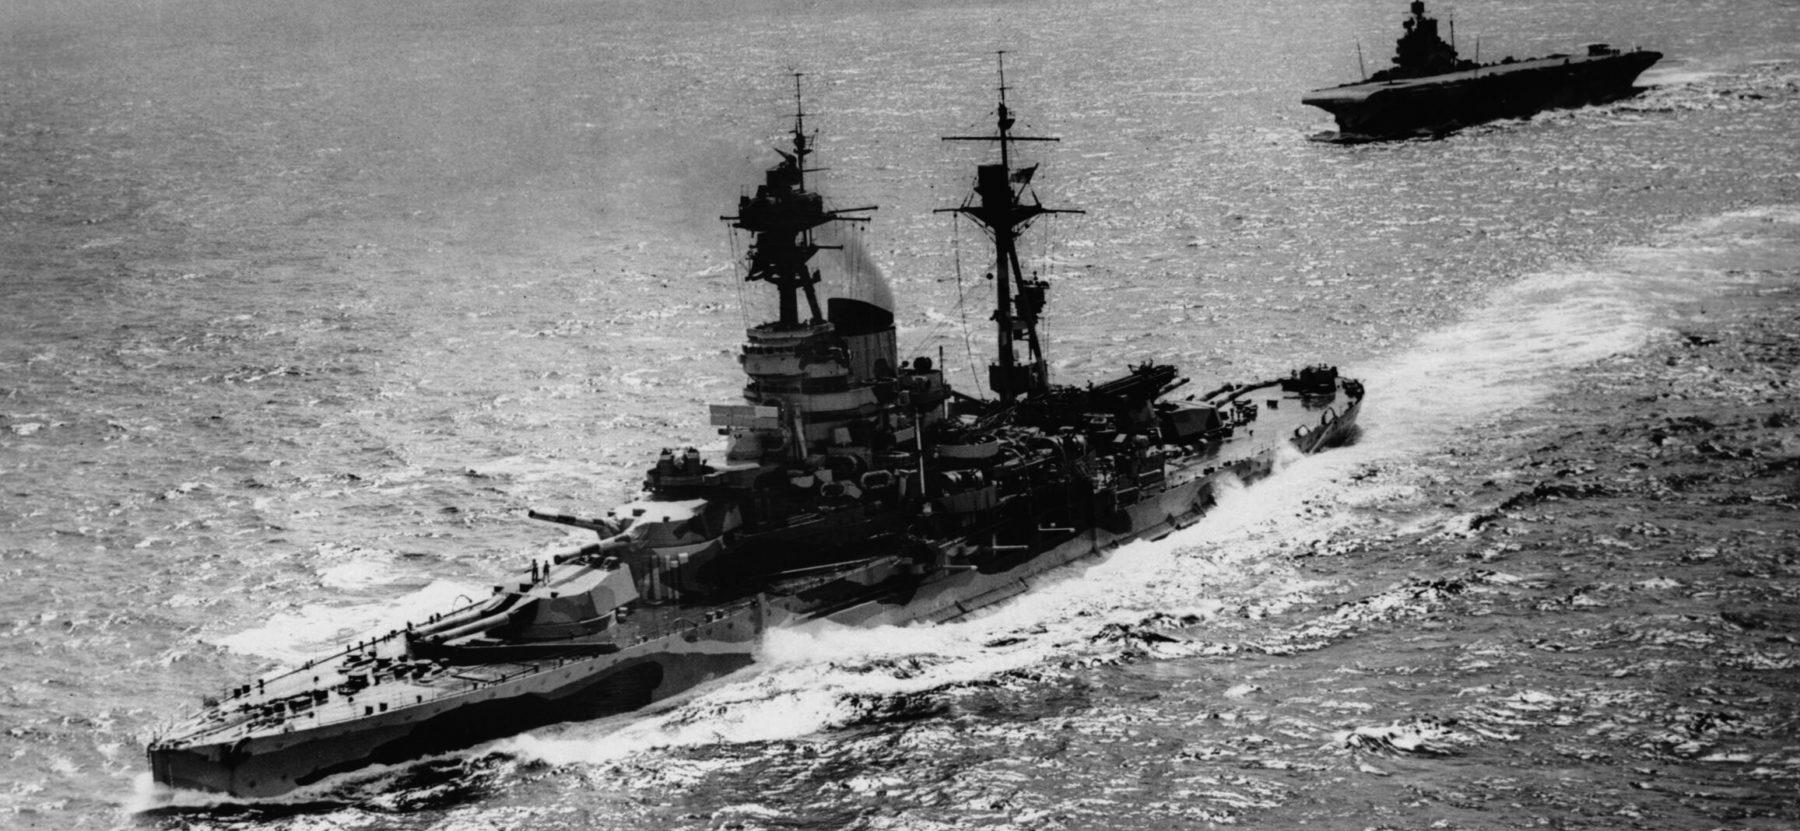
Resolution and Graf Spee at Spithead, 1937
Design development
Their name was eventually chosen in 1913 as the “Revenge-class” (“Royal Sovereign class”, later simply “R class”) and soon the Chancellor of the Exchequer asked to bring about its cost down, fearing the house of commons’s reaction. Therefore, the Board of Admiralty, fearing the class not voted in time, they commissioned the design staff led by Eustace Tennyson d’Eyncourt (Director of Naval Construction)
with strict intructions to “scale down the class”, making it slightly smaller, slower, but also more heavily protected if possible, as the preceding Queen Elizabeth-class were almost intermediate between battleships and battlecruisers and made concessions in this department in order to achieve record speeds. In a sense, the Revenge class resembled a “return to normality”, slower but better protected. It was even hoped that with lower cost, and risng international tensions in 1913, it would be possible to vote two batches of four ships yearly according to maximal shipyard capacity in UK, so eight in all, expected to be completed in 1915-16.
d’Eyncourt worked out a version of the earlier Iron Duke class completed at the time and armed with the same battery of 15-inch (380 mm) guns of the Queen Elizabeth in January 1913, whith ten guns rather than eight on the Queen Elizabeth. But economy measures prevailed, and the much larger design was revised to have eight guns. The previous practice of using both fuel oil and coal was also adopted while First Sea Lord Jackie Fisher contested it in October 1914 and while the ships were Still under construction, oil-fired boilers were asked again to increase power output by some 9,000 shaft horsepower (6,700 kW) and specifications were revised. It could be argued Fisher feared they would have been too slow more than the possibility of scarce oil supplies, but this raised their speed also, possibly to take part in a “standard battleline” as for the USN with the Queen Elisabeth, with the benefit of a full division of 15-in armed ships.
The initial design completed by d’Eyncourt’s team mounted only eight 15 in guns as fitting a fifth turret in the specified displacement proved impossible. The Admiralty Board also suggested triple turrets to solve this, making a british equivalent to the Gangut, Dante or tegetthoff, but reason prevailed and d’Eyncourt was quick to point out that as no triple turret design existed, it would considerably delay construction, and also advancing the single turret hit disabling more guns. The Board in the end approved d’Eyncourt’s proposal on 31 March 1913. This was just a draft, but showing a single funnel and more compat dimensions, but overall appareance as a Queen Elisabeth shrinked in its middle section.
Construction arbitration
Eight ships were initially planned are planned: They were to be named Renown (laid down 22 December 1913, later Revenge), Ramillies (12 November 1913), Resolution (29 November 1913), Royal Oak and Royal Sovereign (15 January 1914), and Resistance (ordered to HM Dockyard, Devonport and Cancelled in August 1914), and Repulse, Redesigned as a Renown-class battlecruisers with the lead ship renamed. So this shows three ordered per year, 1913 and 1914, but the last one delayed until mid-1914 and then delayed, then cancelled in August. But HMS Resistance was sometime used during WWI to confuse German intel. The Cancellation came with the doubts about ay hipe to complete the ship in wartime. The same doubt, ironically applied to the decision to “repurpose” the last two as battlecruisers, albeit quite late in this process. Both Churchill and King wanted them forefully and argued about their speedy construction to gain approval, which indeed both achieved. By virtue of timing, and postwar events, the “R class” proved to be the last dreadnoughts of the Royal Navy. The G3 and Nelson class afterwards were already of a new generation.
Construction schedules and shipyards:
- Revenge #06, Vickers 22 December 1913, launched 29 May 1915, comp. 1 February 1916
- Resolution #09 Palmers 29 November 1913, launched 14 January 1915, comp. 30 December 1916
- Royal Oak #08 HM Dockyard, Devonport 15 January 1914, launched 17 November 1914, comp. 1 May 1916
- Royal Sovereign #05 HM Dockyard, Portsmouth 15 January 1914, launched 29 April 1915, comp. 18 April 1916
- Ramillies #07 W. Beardmore 12 November 1913, launched 12 June 1916, comp. 1 September 1917
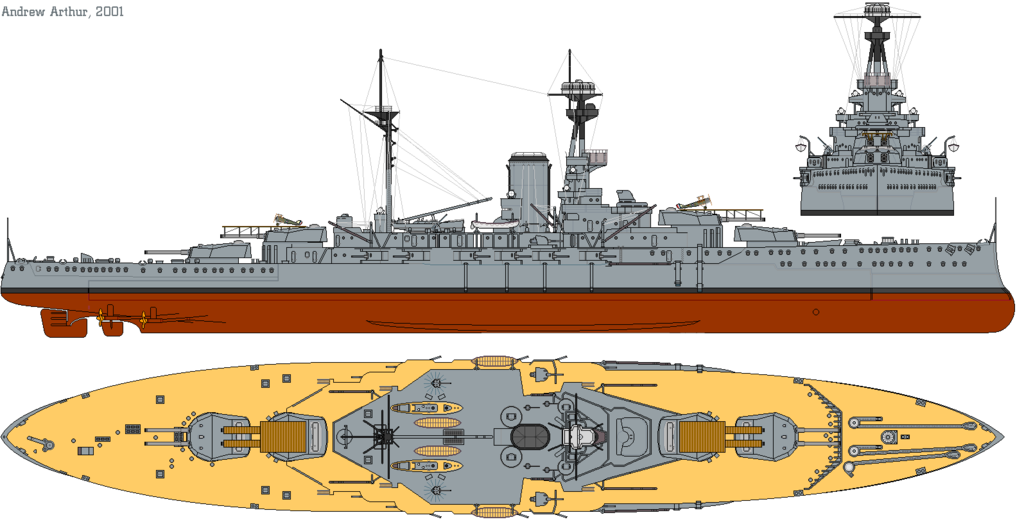
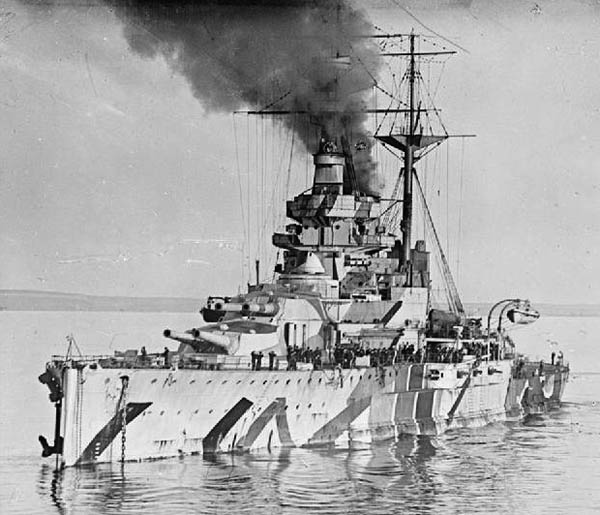
Profile of the class in 1916 (wikimedia commons)
Design in detail
Hull & construction
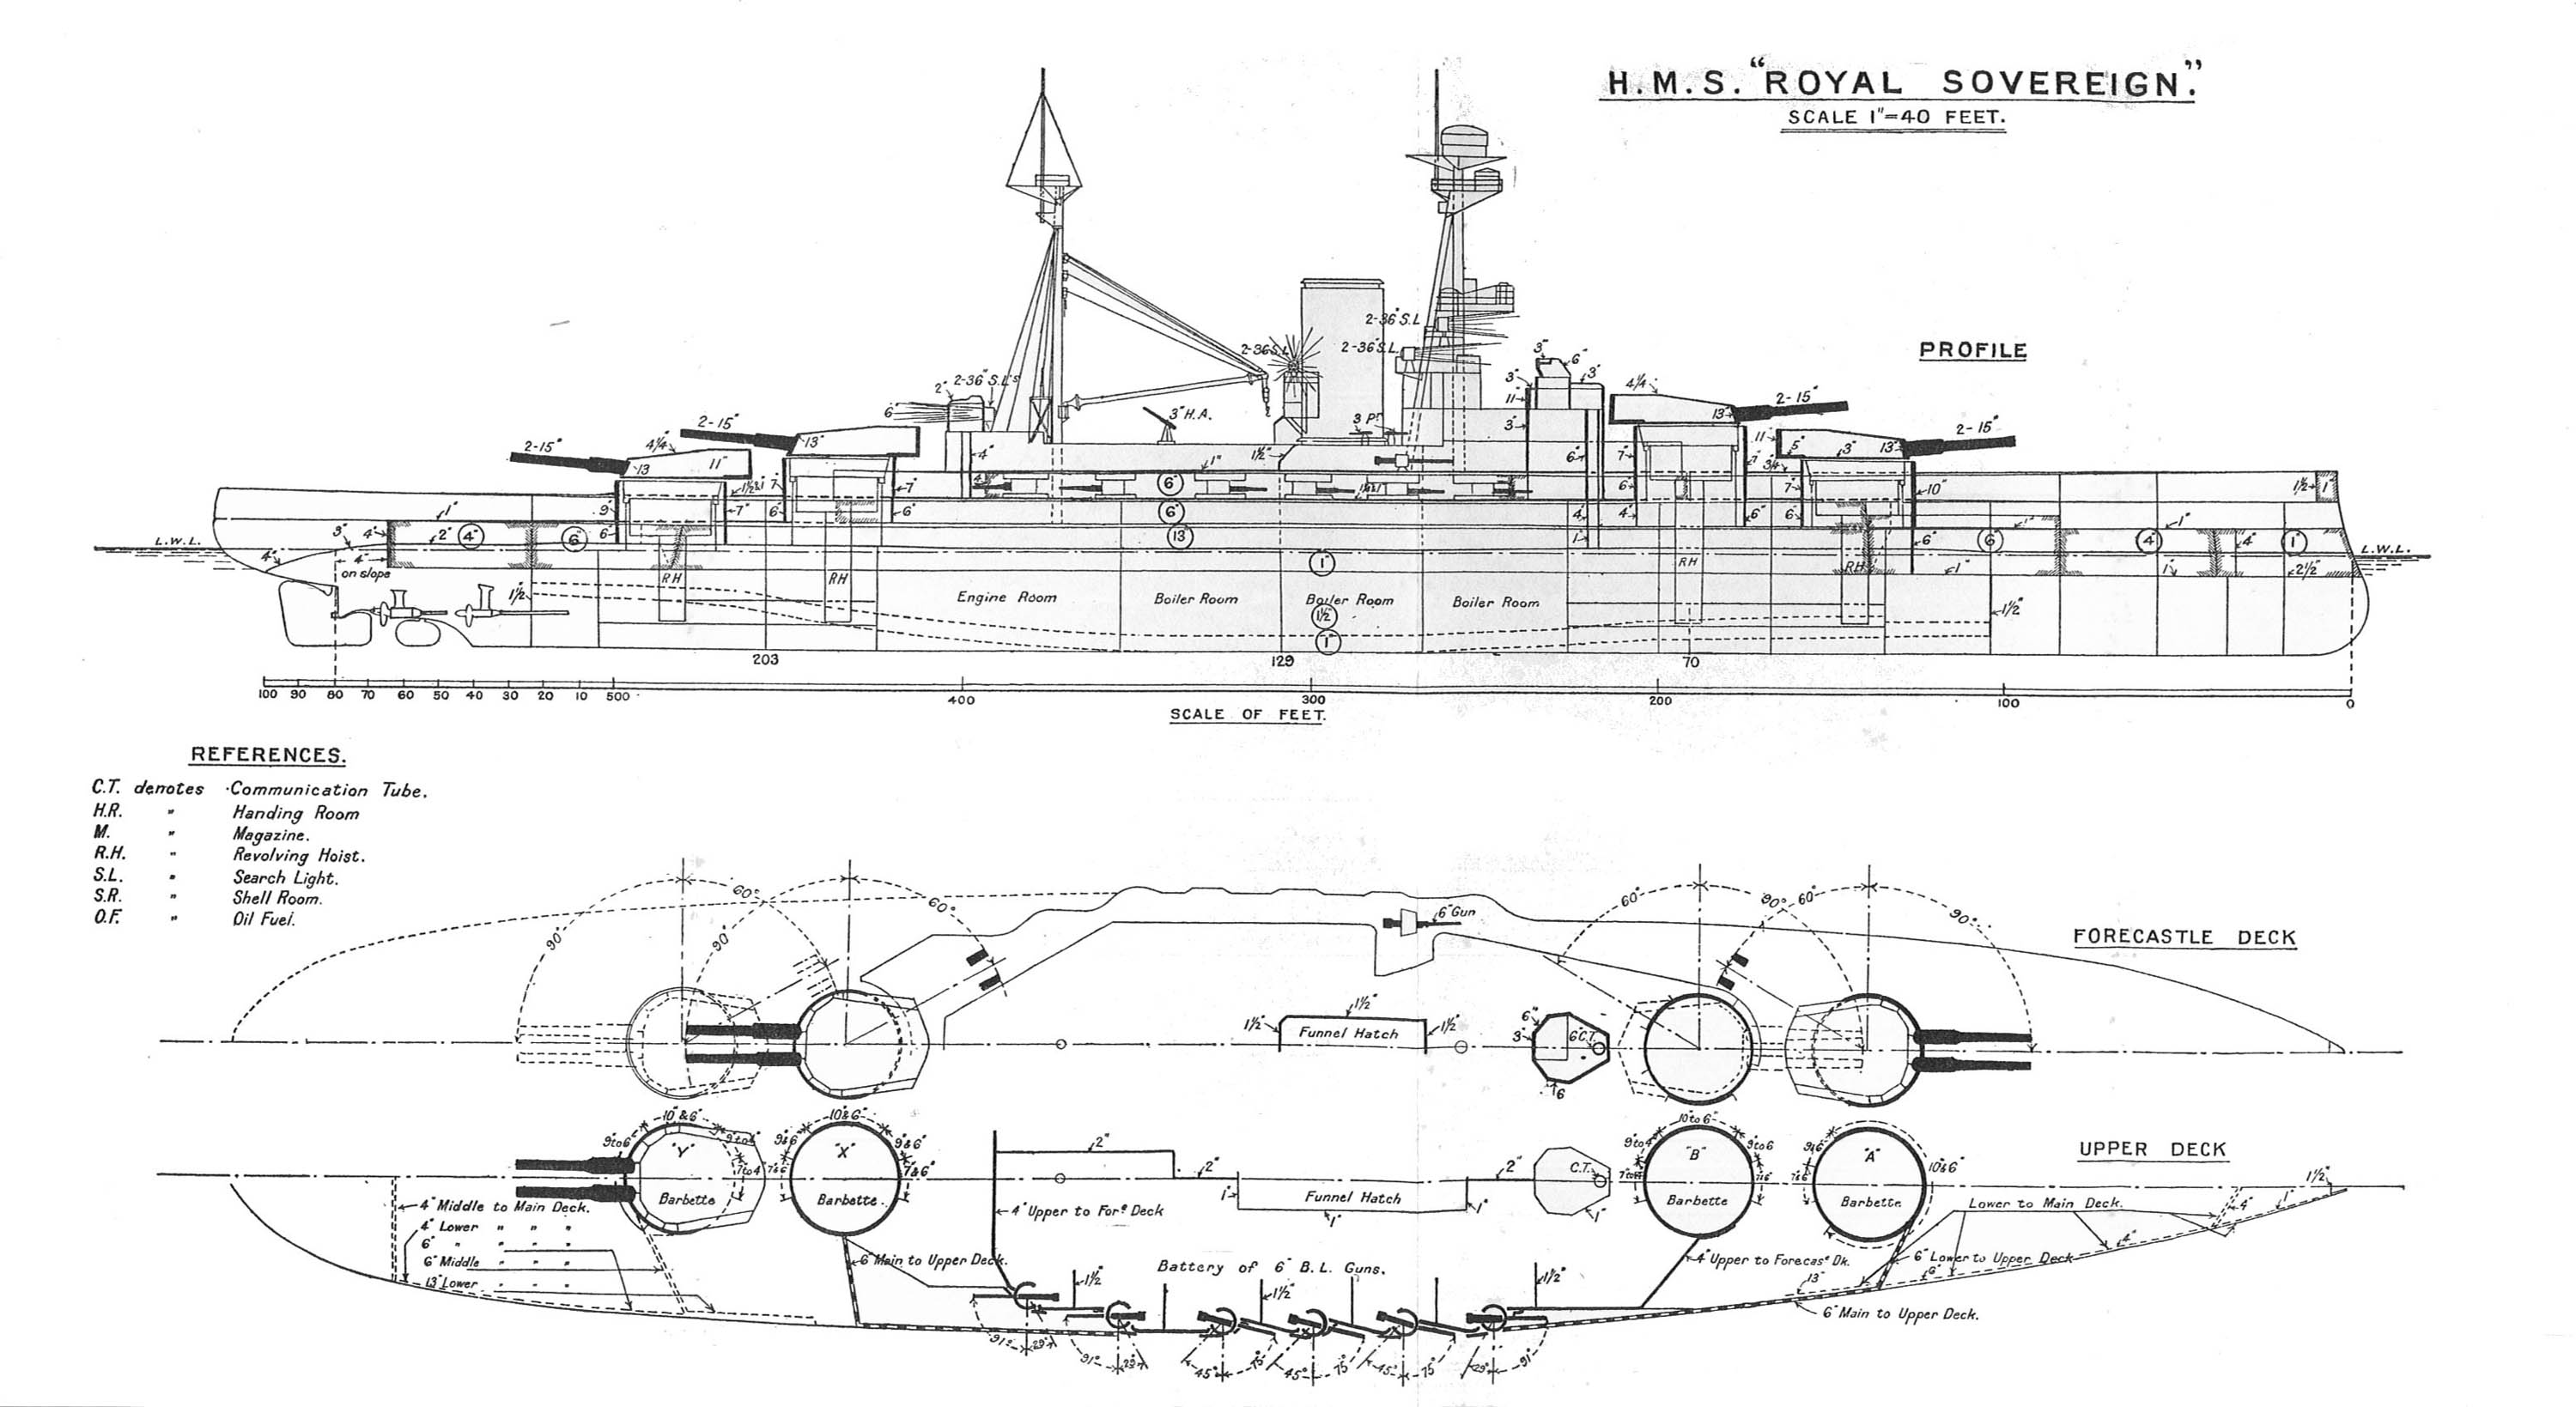
The Revenge class measured between perpendicular 580 feet 3 inches (176.9 m) and 614 ft 6 in (187.3 m) at the waterline. Their overll lenght, including the stern gallery reached 620 ft 7 in (189.2 m). Their original beam was 88 feet 6 inches (27 m) later extended by the fitting og antitopedo bulged. Deep draught (fully loaded) was 30 feet 9 inches (9.4 m), also later modified with bulges. Normal displacement reached 28,000 long tons (28,449 t) as contracted, but 31,200 long tons (31,700 t) fully loaded. Metacentric height was 3.4 feet (1.0 m) deeply loaded also, due to their higher lenght/width ratio, they were considerably slightly better gunnery platforms than the queen elisabeth and it only improved wth the addition of bulges during the interwar. For the protection scheme, it was largely a duplicate of the Queen Elisabeth class. See the details below.
The Revenge class crew reached 940 officers and ratings in 1917, 909 in the lowest case, and 940 as flagship, but in the early 1920s it grow to 1,012 and 1,240 as flagship. Like all previous battleships they carried small boats, notably steam and sail pinnaces, steam launches, cutters, whalers, dinghies and rafts located abast the funnel and behind the main bridge, handled by five boat derricks. Around the funnel and main superstrcture, they received eight searchlights: Four on the bridge, two on the funnel, two on the after superstructure.
Armour Protection
Armor protection for these ships, at first duplicates, were however entirely reviewed compared to the Queen Elizabeth class: Their armored deck was placed higher up with a much thicker belt at 13 inches (330 mm). When the Revenge was designed indeed, the Admiralty still imagined close distance fights, like what happened at Tsushima, not long range gunnery. They optimized protection for direct fire rather than parabolic, plunging fire that would need a thicker armored deck, a layared protection and thicker side slopes where the belt connected to the deck. This was in fact a seen as a measure of economy, in phase with the rest of the design.
Belt:
Their waterline belt made of Krupp cemented armour (KC) extended at max thickness between ‘A’ and ‘Y’ barbettes. Beyond that they fell to 4 to 6 inches (102 to 152 mm) respectively and never reached the bow or stern. Above the belt was a strake of armour, 6-inches (152 mm) extended also between external barbettes. The citadel comprised of course transverse bulkheads, like the outer belt, 4-6 inches thick and angular, closing the 13 inches main belt.
Turrets:
The main gun turrets were essentially the same os on the Queen Elisabth, but protected by 11 to 13 inches (279 to 330 mm), respectively for the front and sides, all sloped, and all in KC armour. Their roofs however were only 4.75–5 inches (121–127 mm) thick. Aviation was not seen much of a threat still and parabolic fire at that angle seemed rare. The main turrets barbettes were the thickest above the armored upper deck, reching 6 to 10 inches (152 to 254 mm). Below it, they were thinned down to 4-6 inches (100-152 mm).
Armored decks:
Instead of a single, very thick armoured deck above the citadel, and a stray behind, there was a layared defense with multiple deck from 1 to 4 inches (25 to 102 mm) from bottom to top.
Conning tower and other details:
The main conning tower was protected by 11 inches walls (280 mm) enclosed with a 3-inch roof. The torpedo director, located in the aft superstructure was protected by 6 inches walls (152 mm).
Late Construction modifications
Summer 1916 Addon armor:
After the Battle of Jutland it was clear that some parts of the design needed to be buffetted, one inch of high-tensile steel was added to the main deck over the magazines, plus additional anti-flash equipment (sprinkler with fast pumps, deflectors, quick closing doors) were added in the magazines, reflecting the fear born from the loss of three battlecruisers.
Anti-torpedo Bulges
Cettinaly the biggest change was the idea of the Director of Naval Construction to add bulges to the ships. The ide came out in March 1915 when construction was well advanced already for most ships. Nothing could be done to “cut open” the hulls to add internal armour so the only choice was some exra drydock time to add external bulges. The idea was to improve the Revenge class survivability against naval mines and torpedoes. In fact this was so new that Ramillies, the least advanced in construction, was chosen for that purpose. She became the first ever battleship in the world to be “bulged out”.
Testings already show bulge filled with hollow tubes really mitigated the effects of a torpedo warhead blast. Ramillies’s bulgs applied were 220 feet (67.1 m) long, 7 feet 3 inches (2.21 m) high and divided into two watertight compartments: There was a upper and lower inner compartments. Both were fill with steel “crush” tubes 9-inch (22.9 cm) thick to mitigate blast pressure, both ends plugged by wooden bungs. They were there to absorb the powerful underwater blast wave, that can create superfast and massive ripples on the steel hull, bursting out rivets and cracking in the process. Also the tubes prevented splinters and debris from penetrating the inner torpedo bulkhead.
The outer compartment was divided longitudinally, and empty to absorb the detonation, allowing it to disperse. Air under pressure could not be compressed beyond a certain point. The bulge also increased the ship’s beam to 102 feet 6 inches (31.2 m), decreased the draught by about 1 foot (30.5 cm) because of added buoyancy, but increased her displacement by 2,500 long tons (2,500 t). Indeed, they had now 29 feet 8 inches (9 m) in draught. Displacement also rose to 30,000 long tons (30,481 t) stadard, 32,800 long tons (33,326 t) fully loaded, but this depended of the bulge type fitted during refits. Metacentric hight rose also from 3.4 feets to 5.1 feet (1.6 m).
HMS Resolution and Revenge indeed were latter fitted with a different bulge in a drydock refit in 1917–1918. The latter was intended to just improve their stability, while still offering some ASW protection. They had no crushing tubes to save weight, but a single watertight compartment, still divided into upper and lower oned. The upper section was filled with concrete and scrap wood, lower was empty. This increase their beam to a lesser extent at 101 feet 5 inches (30.9 m), draught reduced more however, by 16 inches (41 cm), displacement taking an added 1,526 long tons (1,550 t).
A third type of bulge was fitted on HMS Royal Sovereign during her 1920–1924 refit: It was similar to the latter, but with an upper compartment enlarged, extending above the waterline. It was fitted with crush tubes and also weighed 1,474 long tons (1,498 t).
However, stability was not much improved contrary to what was throught. Reports came to the admiralty of excessive rolling in rough seas. Therefore, the Admiralty Experimented to determine the best bulge shape, eliminating this, while testing at the same time improved bilge keels. HMS Royal Oak was left without bulge, only fitted in 1922–1924. There were a fourth type partially empty, with the lower compartment partially filled with water. They also extended further also fore and aft. Metacentric rose to 5.5 feet (1.7 m). These bulged, after all these tests, were modified, first with HMS Ramillies, with all the experience gained. In her 1926–1927 refit, Royal Oak’s type bulged were fitted, with crush tubes removed but those abreast of the magazines. HMS Resolution had her upper compartment empried and lower compartment partially filled with water. This was done during her 1929–1931 refit and these changes also applied to HMS Revenge during her 1931 refit as well.
Powerplant

HMS Revenge on sea trials, shipyard photo.
The Revenge class were given two sets of Parsons steam turbines. Both were driving shafts, four in all, turning each a 3-bladed bronze screw. Steam was provided by eighteen Babcock & Wilcox boilers using a working pressure of 235 psi (1,620 kPa; 17 kgf/cm2). It was different for the HMS Resolution and Royal Oak which were fitted with Yarrow boilers. This was a downgrade compared to the Queen Elisabeth class and the less numerous boilers were ducted into a single funnel, making a clar distinction between the two classes. The turbines were located in three watertight compartments placed side by side: The low-pressure turbines drove the inner shafts for cruising, connected to the centre engine rooms, and the while the high-pressure outboard turbines turned the outer shafts for high speed manoeuvers. This was similar to previous practices.
The powerplant was rated overall at 40,000 shaft horsepower (30,000 kW), to compar with the 75,000 shp of the Queen Elisabeth class, based on 24 boilers, not 18. Top speed aas cotracted was 23 knots (43 km/h; 26 mph). On trials, HMS Revenge however only reached 21.9 knots (40.6 km/h; 25.2 mph) (based on 41,938 shp, more than contracted), on 24 March 1916. This was also disappointin for the others but HMS Royal Oak reaching 22 knots (41 km/h; 25 mph). HMS Ramillies with her bulges still managed to reach 21.4 knots (39.6 km/h; 24.6 mph for 42,383 shp) on 20 September 1917, slightly slower than the unbulged Revenge, Royal Oak and others. Fuel storage was 900 long tons (910 t) of oil, 3,400 long tons (3,500 t) of coal in peacwtime. When converted later during the interwar to oil-fired boilers only, they used a 3,400 long tons storage capacity, enabling a greater range. The initial range was 7,000 nautical miles (13,000 km; 8,100 mi) at 10 knots, reduced to 2,700 nautical miles at 21 knots. In the wartime “surge in the north sea scenario”, this was honorable.
Armament

No big change here, this was a copy-paste of the Queen Elisabeth, and main strong point of the design: Eight excellent 15-in guns, 14 6-in casemates, four AA light guns. This of course changed several times during the war and interwar.
Main armament
All ships had eight 15-inch guns, on the same superfiring twin turrets fore and aft. These heavy guns were in fact intended to deal with new classes of large long range destroyers, but it proved still too slow, heavy and with too limited depression or low position for effective fire in rough seas. Stability was intentionally reduced to give a slow, gentle rolling motion and thus, facilitate firing in all conditions.
These eight Vickers-Armstrong breech-loading (BL) 15-inch (381 mm) Mk I were designated ‘A’, ‘B’, ‘X’, and ‘Y’. Specs as the same as for the QE class: 20°/-5° angles, loading at any angle, 1,929-pound (875 kg), 2,450 ft/s (750 m/s) shell to 24,423 yards (22,332 m) and one shot every 36 seconds.
At first, eighty shells were provided per gun. Magazines were later rebuilt, extened to allow up to 100 shells per gun, so overall 800, both AP and HE. The Mk I turrets typically were best reloaded at +5 degrees.
Secondary Armament

6-in Royal Ordnance BL Mk.XII diagram
The secondary battery comprised fourteen BL 6-inch (152 mm) Mk XII guns. This was two less compared to the QE class as built, and twelve of them were located in casemates amidships, prolongating the forecastle. The remaining two were located on the shelter deck, protected by gun shields. The main change was that these casemate guns were moved further aft from the bow compared with the previous QEs, to be less affected by spray in heavy seas. The were however similar to previous guns, fiting 100 pds (45 kgs) shells at 2,825 ft/s (861 m/s). At 15 degrees max elevation, they reached 13,600 yd (12,400 m).

Tertiary Armament
Light armament constisted in four “universal” QF 3-pounder (47-millimetre (1.9 in)) guns, used to deal with close TBs and firing flares or blank shots for saluting as well. They were however provided from the origin with two quick-firing (QF) 3-inch (76 mm) 20 cwt Mk I AA guns. They also had the usual torpedo tubes: Four submerged, 21-inch (533 mm) on each broadside. Twenty-one torpedoes, Mk II, Mk IV, and MK IVHB types were provided.

Fire control
Main fire control directors
The Revenge-class originally had two main fire-control directors, fore and aft, each mouting a 15-foot (4.6 m) rangefinder. The forward one was above the conning tower with an armoured hood. The other aft was raised by a tripod mast. The turret themslves were also fitted with a 15-foot rangefinder as a backup. There was even an arrangement in case of both, exposed main RGFs were hit and ‘X’ turret coukd take commnd of fire direction in that case; The secondary armament was controlled by compass platform, foremast’s locations, but this was done from March 1917.
Torpedo control director
There was also a torpedo-control director aft, fitted with a 9-foot (2.7 m) rangefinder. The ‘B’ and ‘X’ turret models were replaced after the war by more modern 30-foot (9.1 m) models from 1919.
Ballistic computing
The ships ballistic calculation was made by a dreyer table used to display data, coupled with a mechanical computer. It was fed from data coming from the main directors, or backup turret telemeters. These were Mark IV* Dreyer Tables with the exception of the late HMS Ramillies having a Mark V. They also used Dreyer Turret Control Tables
Fire Control systems
The pattern established in the Colossus class meant all five vessels were fitted with Vickers F.T.P. Mark III range and deflection instruments. The gun sights were Barr and Stroud Mark II* Inference telemeters. This meant they had Gun Ready signals in the T.S. and control positions but no Target Visible signals. In 1916, it was approved that the would receive a range rate transmitter/receiver transmitted from the spotting top for the main armament. HMS Lion, and the King George V class and the following as it was decided should also be retrofitted with these instruments at the fore top, interchangeable as gun control position with the main control system.
The Revenge class were also fitted with a pair of Dumaresq Mark VII*s FCS, one on each side. They had bearing transmitters and handles. Sources of the relative bearings sent below, to the Dreyer table in the main fire direction room. Beneath these, were situated repeaters indicating the target inclination, course, speed and range rate.


Evershed Bearing Indicators
All five units were fitted with this equipment for the main and secondary batteries. In 1917, it was decided to have all dreadnought having them to their C.T. (Conning Tower) to communicate with either the fore top or the G.C.T There was also a bearing plate with open sights and 6-power binoculars on the main open command bridge. In 1917, it was decided that all directors should be fitted with receivers and fore top, G.C.T. and controlling turrets also fitted with transmitters as well if possible. In practice the C.T. couild have been able to transmit bearings to the 6-in guns as well but space lacked for this.
Mechanical Aid-to-Spotter
Latter in their life, all Revenge class were fitted with four Mark II Mechanical Aids-to-Spotter: There were two on the foretop (driven by flexible shafting) one on each side of the G.C.T. which used an electrical F.T.P. system. This was decided already in early 1916, but the installation wa probably made between stops in 1917-18. It was also decided they would have all mechanical links from the director and pointers indicating the aloft Evershed’s bearing.

British battleships of the 1st Battle Squadron German surrender November 1918
Other equipments
Seachlights:
Intercom:
The main battery fire control used Pattern 333X Navyphones. These 15-in T.S. had an exchange board in communication with the main navyphone exchange board. It was fitted with four exchange navyphones wired up, for conversing with remote navyphone in the main turrets, G.C.T. Spotting top, all main turrets, the CT Gun control tower, the Light aloft director tower and spotting top. In addition to the four general-use navyphones in the 15-in T.S., the remote “range” navyphones in the turrets could also be directly addressed via four Pattern 3334 Navyphones wired into the TS’s exchange board. A multiple plug permitted one of these to address all four turrets at once, if desired. Additionally, a navyphone in the conning tower was also connected to this exchange board. Lastly, “X” turret’s working space had a navyphone to the 15-in T.S., working off a battery. By mid-1918, it was approved to fit Pattern 3331 Navyphones with loud-sounding bells in the auxiliary machinery compartments of Lion and Orion classes and later where existing navyphones have proven ineffective.
Onboard Aviation

Fairey Swordfish Mark I floatplane version, NAS 702, HMS Resolution, 1941.
Onboard Aviation evolved over time. Already in 1918, having planes to povide gunnery direction became mandatory and for that, two platforms were added to the upper turrets, above the rangefinders. They usually could lanched two ready fighters and eight reconnaissance aircraft (Strutter). Both platforms were removed during the main reconstructions of the 1930s. They comprised a articulated part with a main platform over the roof and two articulated extension over the main guns, still allowing the latter to be elevated to 20 or depressed to -5°. HMS Resolution received an aircraft catapult on quarterdeck during her main refit, HMS Royal Sovereign following in 1933–1936. Revenge and the other ships soon gained a catapult atop ‘X’ turret but from 1942-1943 they were gradually removed as both carrier air groups and radar provided that capability.
In 1918 as we saw already, Pups were replaced by Camel, and Sopwith 1-1/2 Strutters with longer range were used. These beiong land-wheel based needed to either find a spot to land after being their mission was complete, to ditch at sea. From the 1930s, with catapults installed, floatplane models were used notably the Fairey III. Soon in 1939, the floatplane version of the Swordfish was also used. The latter had the added advantage to carry bombs and torpedoes. Next, the Swordfish floatplane became standard due to its limited size, and the Supermarine Walrus afterwards, when used on turret catapults (Like for Resolution in 1942)
⚙ HMS Revenge 1916 specifications |
|
| Dimensions | 190 m long, 30 m wide (27 origin), 8.7 m draft. |
| Displacement | 29,590 long tons (30,060 t), 32,820 Full Load |
| Propulsion | 4 shaft Parsons turbines, 18 B&W boilers, 40,000 shp. |
| Speed | 21 knots, range 4,000 nm at 10 knots. |
| Armament | 4×2 15-in/42, 12x 6-in Mk XII, 2x 3-in AA, 4x 3 pdr, 4x 21 in TTs. |
| Armor | Belt 13 in, deck 4 in, barbettes 10 in, turrets 13 in, CT 11 in, bulkheads 6 in. |
| Crew | 997 |
| cost | £2,400,000 on average of the time. |
Reconstructions & improvements
 Outside the addition of Bulges, which started right when the last ship, Ramillies, was completed, a variety of ASW bulges were added at the end juist after WWI during drydock refits. Some were modified afterwards during the second reconstruction phase. These anti-torpedo Bulges provided on paper an excellent protection against torpedo attacks all the way into the thirties. But because of the rise of new torpedoes warheads (notably in Japan) they soon proved insufficient to deal wtih heavier warheads without a serious overhaul, this time of the internal protection, or fitted larger bulges altogether, meaning the risk of being “over-panamax” as well. The Royal Oak still had her WWI pattern bulge when she met her fate in 1939. However the better bulges of the two other ships torpedoed saved them.
Interwar refits
Armour wise, previous Queen Elisabeth class had conical plate reinforcements at the top and bottom of the armored belt. But they were extremely expensive to produce. It was determined by engineers that this was indeed an effective scheme, but quickly rendered obsolete by developments in naval artillery as well as aviation and new tactics evolving almost immediately after they entered service.

HMS Revenge, date unknown (IMW)
Another important characteristic worked out whe first designed was their stability. It voluntarily sacrificed to give the ship a gentle, but steady roll, in order to artificially give them a better elevation. This made any further modernization difficult if not impossible given their hull form. Total reconstructions on the Warspite or Valiant saw the addition of near 3000 tons of additional steel, but this was out of question on the Revenge class, which explains in part the refusal to have them rebuilt extensively. The other reason was of vcourse budgetary, and Washington treaty’s own limits about these reconstructions.
As a result, the reconstruction of all five Revenge class was rather superficial, even “cosmetic” in appearance. It consisted mainly in modernizing their powerplant (which was the most urgent), for an “all-oil” burning plant, increasing endurance as well, while saving space to allowing for extra ASW protection in 1922-24. In 1928, two barbette guns were eliminated, in favor of modern dual-purpose 102 mm turrets while submarine torpedo tubes were removed from 1931 on, and then 40 mm Bofors were adopted to bolster the AA. In 1910 this amounted for a total of 32, and in 1941-42, up to 12-16 single Oerlikon guns. This was still unsufficient through, but their limited size and cramped superstrcture did not allowed much improvement on that point, if not supplementary 20 mm AA guns on decks. Fortunately, none suffered a fatal air attack, but torpedoes became more of a concern, although well adressed by their bulges.
HMS Resolution during the interwar
1928
Before that, outside planes flying off platforms, only from 1924 important upgrades were made: In May 1924, Royal Oak had its bulges fitted (beam rose to 31.1m, full displacement to 32,100ts). By October 1924 it was Royal Sovereign’s turn: She had bulges fitted increasing her beam to 31.0m for 32,474 tons, and in 1927, the last one, HMS Ramillies had new upgraded bulges and her beam was decreased to 31.1m. It’s only by late 1928 that sinificant changes were made to all ships: They had two 6-in (152mm/45) removed and two 3-in (76mm/45) AA guns added plus four 4-in (102mm/45) QF Mk V dual purpose guns, all in single mounts on the battery roof.
1931
HMS Resolution: recived a third 102mm/45 DP gun plus two 102mm/45 QF Mk XVII guns. All fro 1931 to 1934 would have their two 533 mm (21 in) TTs removed, and two octuple 40mm/39 2pdr QF Mk VIII added. They also had two quad 0.5 in Vickers (12.7mm/62) HMGs added.
1934
HMS Ramillies: receives a catapult for a single seaplane (Fairey III) aft.
1936
In august HMS Royal Oak is drydocked for her first major reconstruction: Her main deck is increased to 5 inches (127 mm) over the magazines, 3.5 in (89 mm) over her machinery spaces. In addition all but two of her torpedo tubes are removed for good. Due to the armour addition, her draught, deeply loaded goes to 9.60m and her displacement rose to 29,950 tons standard and 33,240ts FL.
Until 1939 all ships except HMS Resolution received four single additional 4-in DP guns (102mm/45) and four 102mm/45 QF Mk XVI AA guns. Also in 1936, both Resolution and Royal Oak receives catapults for an E-III-T seaplane or S-II-T for the second. But still no major upgrade, notably due to budget concerns and the immobilization already of HMS Warspite.
1938
HMS Resolution on her turn receives a twin 4-in turret aft (102mm/45) and three single 102mm/45 plus four twin 102mm/45 QF Mk XVI on the sides. Her secondary armament is thus well completed, offering a long range AA bubble as well. Until 1939, all except Royal Oak had their torpedo tubes removed but two remaining. In 1939, HMS Ramillies receives an upgraded catapult and new seaplane (probably Fairey III).
Wartime upgrade
1941
Royal Sovereign, Resolution, Ramillies, Revenge receives two quad 12.7mm/62 Vickers AA HMGs and ten 20mm/70 Oerlikon Mk II/IV, type 279, 2x 285 radars. In October in addition to these changes, a drydocked Royal Sovereign receives 51mm plates to her main deck, over the magazines. She was also the first to receive two additional quad 40mm/39 2pdr QF Mk VIII. The armour upgrade was made on Resolution later, as well as the AA 40 mm Bofors upgrade. Royal Sovereign was the last upgraded with radars, receiving the type 273, 279, 284, and two type 285 radars.
1942
Nothing but the addition on HMS Revenge of the type 273, 284, and two 285 radars, same as for Royal Sovereign.
1943
HMS Resolution had two 152mm/45 removed, plated over, followed by Revenge, Ramillies. The latter also receives ten twion mounts with 20mm/70 Oerlikon Mk II/IV AA. Thge radar suite is standardized to 273, 279, two 282 models, two 284B, and two 285 FC radars. By the end of the year, HMS Royal Sovereign had four 6-in (152mm/45) barbette guns removes, a type 284 radar added as well as six twin 20mm/70 Oerlikon Mk II/IV AA guns and four single plus later two 2x type 282 and 284B FCS and surveillance radars. Her displacement rose to 29,950 and 34,836 tonnes FL.
1943
Royal Sovereign sees the addition of four 20mm/70 Oerlikon, Resolution receives a new catapult and her full displacement rose to 34,700tons. Ramillies receives three single 20/70 Oerlikon guns but she is also the first to receive the new type 650 jammer. At that stage her full displacement was 35,390 tons, arguably the heaviest of all Revenge class.
Postwar modifications
In 1946 it would have seen ludicrous to have the ships heavily modified, and instead they all received a modernized AA, since inovation has been huge especially between 1943-1945 in this field. Resolution was the first to receive this AA upgrade, in Januay. At that point, she still had her four twin 381mm/42 Mk I, but only ten 152mm/45 P Mk IX, four 102mm/45 Mk XIX, two quad 40mm/39 Mk VIA, two quad 40mm/39 Mk VII, ten 20mm/70 Mk III. Her eletronics suite comprised the type 273, type 279, type 284, and two FC type 285 radars. The secondary battery was reduced to eight 6-inches for the others, but the AA scheme remains the same. Ramillies however had thirteen single 20mm/70 Mk III, but also type 284B radars and she was the sole ship to receive the type 650 ECM suite.

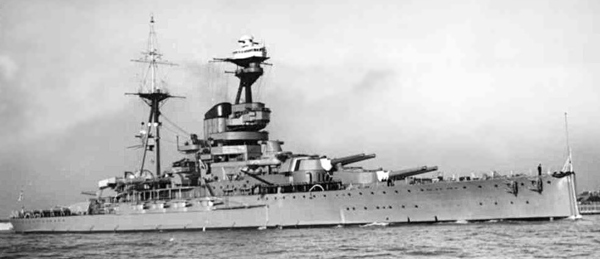
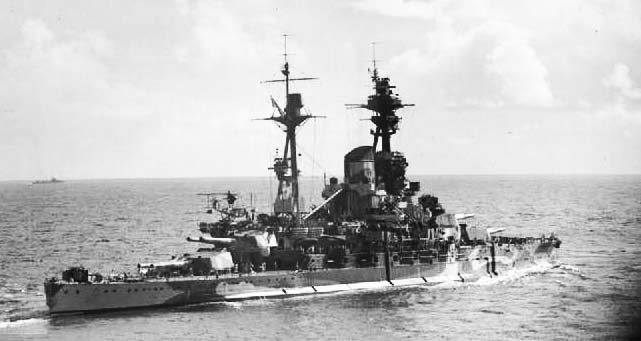
HMS Royal Oak in 1937.
⚙ Revenge 1939 specifications |
|
| Dimensions | 190 m long, 30 m wide (27 origin), 8.7 m draft. |
| Displacement | 28,000 t. standard -34 510 t. Full Load |
| Crew | 997 |
| Propulsion | 4 shafts Parsons turbines, 24 Admiralty boilers, 26,500 hp. |
| Speed | Maximum speed 21 knots, RA 5000 nautical at 12 knots. |
| Armament | 8 x 381mm cal 42 (4×2), 12 Mk XII 152 mm in barbets, 8 x 102 mm AA (4×2), 32 x 40 mm AA, 52 x 20 mm, 2 seaplanes. |
| Armor | 330 mm belt, 127 mm bridge, 278 mm central reduction, 330 mm turrets, 254 mm barbettes, 278 mm bunker. |
The Revenge class in action
In operation, the five battleships were considered less efficient than the previous Queen Elisabeth and somewhat relegated to less active or glamorous duties. They all participated in convoy escorts and were were based in Scapa Flow, waiting for the event of a Kriegsmarine raid that never came. Scapa Flow was judged by the admiralty and the press as “inviolable”, leading to the disaster of te Royal Oak. This came as a shock for the Nation this November 14, 1939,. But Later in operations, Ramillies and Resolution were also torpedoed. The first to be fitted with ballasts damped the shock, and they were able to regain an harbor for repairs.
The Royal Sovereign, as part of Russian aid in Murmansk convoys, was eventually to the Soviet Navy, taking the name of Arkhangelsk in 1944. She escorted the convoys in anticipation of a Norway-based Kriegsmarine attack. She was returned to the Royal Navy in 1948, put in reserve and scrapped soon after, a fate rather similar, of later than the other battleships of the class.”
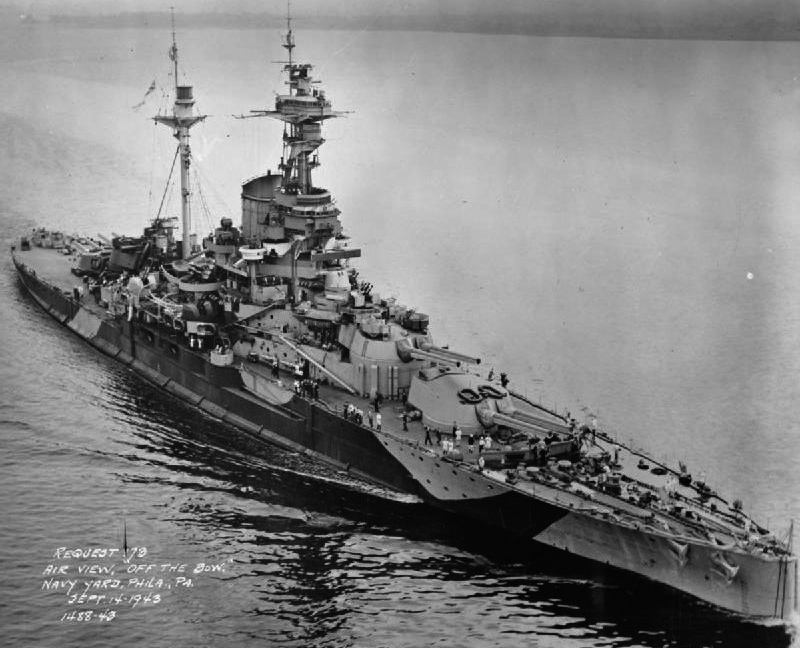
HMS Royal Sovereign at Philadelphia in 1943.
Profiles
Old author’s profile: HMS Ramillies during Operation Ironclad, Madagascar.
Links/sources
Books
en.wikipedia.org/wiki/Revenge-class_battleship
Conway’s all the world’s fighting ships 1922-1947
Brown, David (2000). Naval Operations of the Campaign in Norway, April–June 1940. Routledge.
Burt, R. A. (2012a). British Battleships, 1919–1939 (2nd ed.). Annapolis
Burt, R. A. (2012b). British Battleships of World War One (2nd ed.). Annapolis
Campbell, John (1998). Jutland: An Analysis of the Fighting. Conway
Daniel, R. J. (2003). The End of An Era: The Memoirs of A Naval Constructor. Periscope Publishing.
Friedman, Norman (2014). Fighting the Great War at Sea: Strategy, Tactic and Technology. Seaforth Publishing
Friedman, Norman (2011). Naval Weapons of World War One- An Illustrated Directory. Seaforth Publishing.
Gardiner, Leslie (1965). The Royal Oak Courts Martial. William Blackwood & Sons.
Halpern, Paul, ed. (2011). The Mediterranean Fleet, 1919–1929. Farnham: Ashgate Publishing.
Jackson, Ashley (2006). The British Empire and the Second World War. Hambledon Continuum.
Jellicoe, John (1919). The Grand Fleet, 1914–1916: Its Creation, Development, and Work. New York: George H. Doran Company.
Johnston, Ian, ed. (2014). Battleship Ramillies: The Final Salvo. Barnsley: Seaforth Publishing.
Levy, James P. (2002). The Royal Navy’s Home Fleet in World War II. New York: Palgrave MacMillan.
Massie, Robert K. (2003). Castles of Steel: Britain, Germany, and the Winning of the Great War at Sea. New York: Random House.
McCartney, Innes (2002). Lost Patrols: Submarine Wrecks of the English Channel. Penzance: Periscope Publishing.
Preston, Antony (1985). “Great Britain and Empire Forces”. In Gardiner, Robert & Gray, Randal (eds.). Conways
Raven, Alan & Roberts, John (1976). British Battleships of World War Two: The Development and Technical History of the Royal Navy’s Battleship and Battlecruisers from 1911 to 1946. Annapolis
Smith, Peter C. (2009). Battleships at War: HMS Royal Sovereign and Her Sister Ships. Barnsley: Pen & Sword Maritime
Smith, Peter C. (2008). The Great Ships: British Battleships in World War II. Mechanicsburg: Stackpole Books
Sites & web resources
On dreadnoughtproject.org
naval-history.net
world-war.co.uk
hmsramillies.co.uk
Royal Sovereign naval-history.net
On uboat.net
Naweaps.com on the 15-in
Naweaps.com on the 6-in
On laststandonzombieisland.com
the-weatherings.co.uk
freemanart.ca
maritimequest.com
battleships-cruisers.co.uk
worldnavalships.com
militaer-wissen.de
All Creative Commons photos
wiki on the Revenge class
on forummarine (FR)
On shipsnostalgia.com
On modelwarships.com
On dreadnoughtproject.org (tech notes)
Extra photos on destinationsjourney.com
Documentary about the sinking of the Royal Oak
Gallery
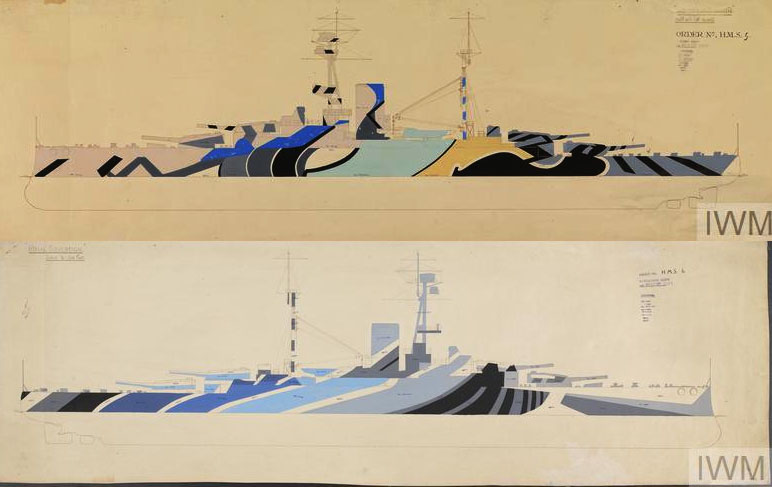
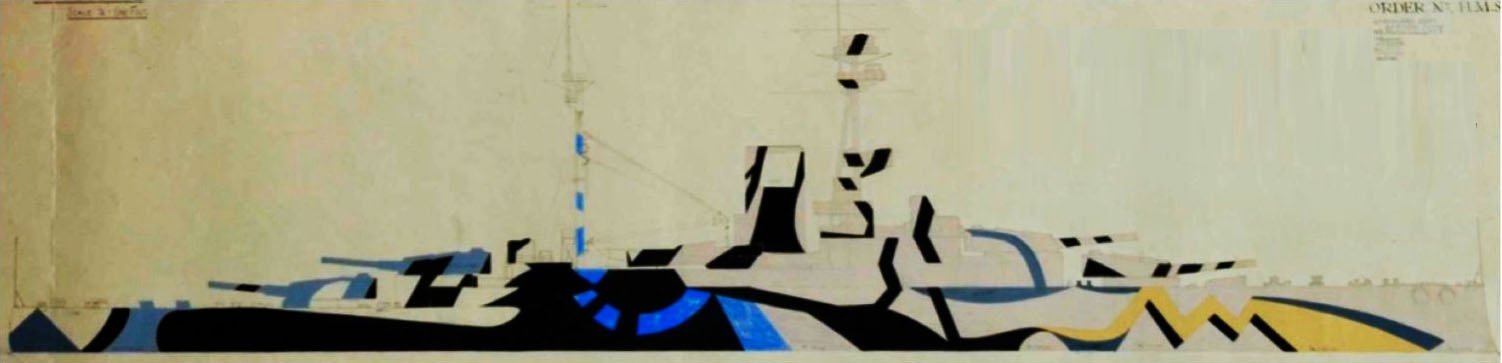
1918 official camouflage design for Revenge and Ramillies (IWM)
Revenge class general scheme on Warships Today 1936
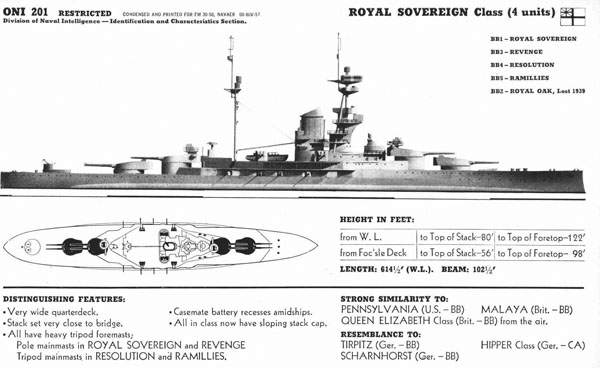
ONI (US Intel recoignition book) – Revenge class
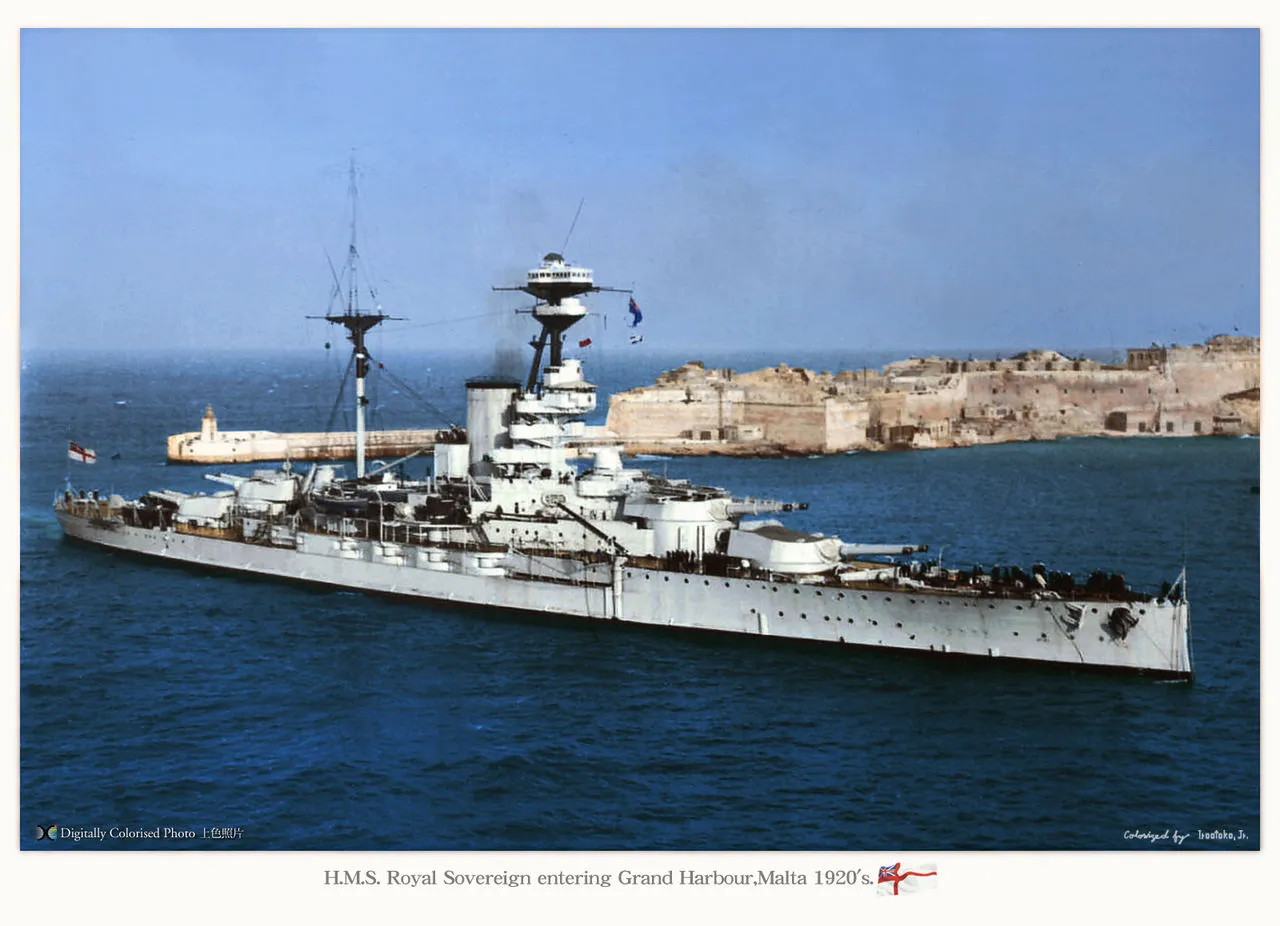
HMS Royal Sovereign entering Malta in the 1920s colorized by Irootoko JR.
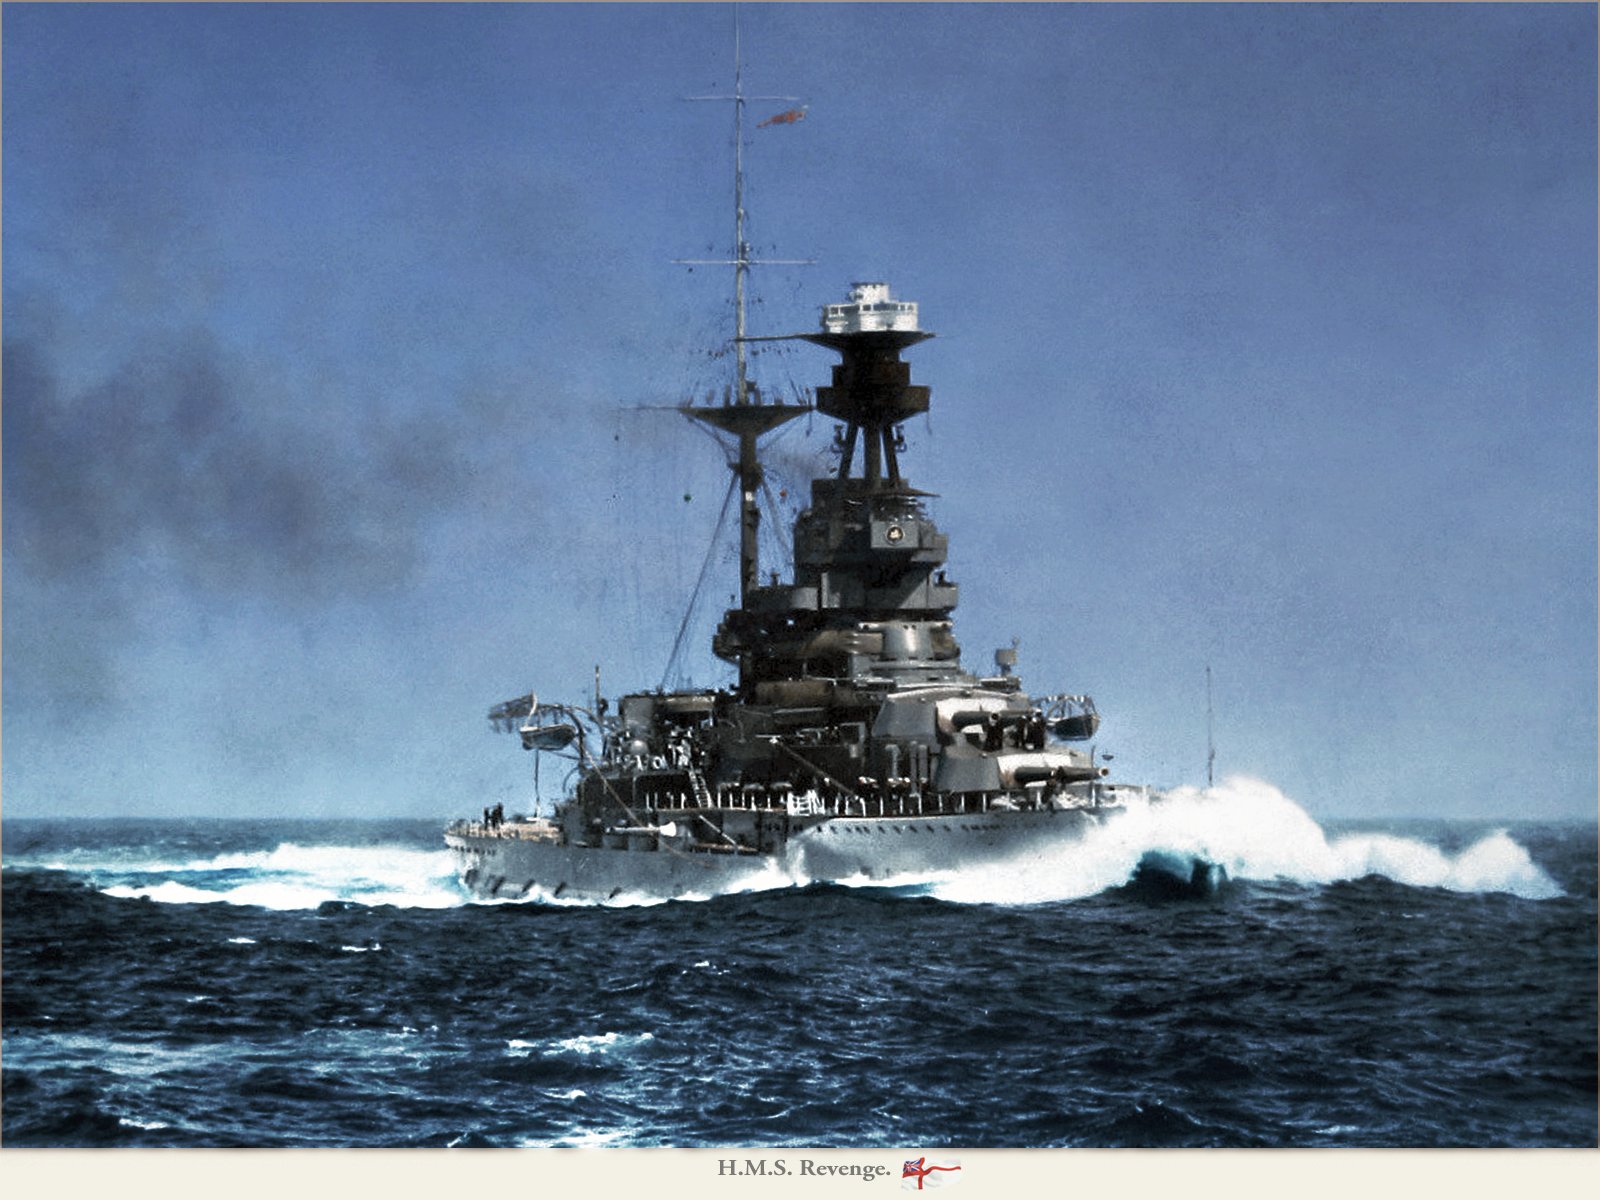
HMS Revenge at sea in heavy weather – same.
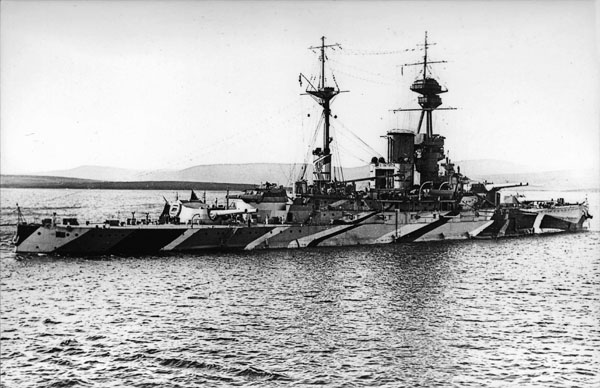
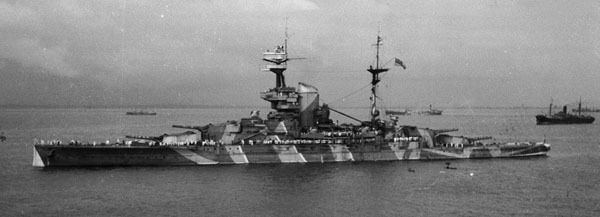
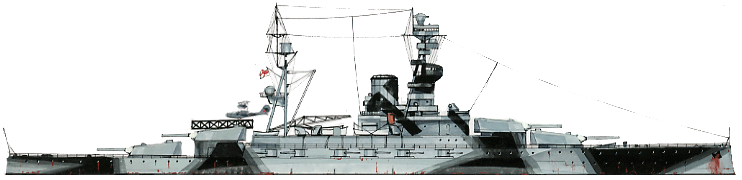
HMS Ramillies 1918 (top, src reddit) and HMS Revenge unusual disruptive Mediterranean/red sea camouflage 1941 – credit National Army Museum
Author’s profiles
Arkhangelsk 1944
Modeller’s corner
In a general way, the R-class was far less popular than the QE class for modellers, probably due to their lackluster career. The bulk were made at the same 1:500 scale largely redistributed (1916, so lot of work to convert those to 1940s), but at least one 1:700 was pressed in its 1939 state.
– 1:700 HMS Royal Oak (1939) WSW Modellbau 1:700, ROP o.s. Samek Models
– 1:500: Battleship H.M.S. Royal Sovereign 1916 & Revenge: Revell, Ark Models, Eastern Express, FROG, Novo, ZTS Plastyk, UPC
– 1:96: HMS Royal Oak Deans Marine
See also: http://www.steelnavy.com/royalsov.htm
http://theminiaturespage.com/boards/msg.mv?id=357462
Alan Raven’s 1942 RN camo book had th R-class painted with “an unofficial black and light grey” scheme but the 1943-1944 volume shows a 1943 three color design with “dark, medium and light grey.” In reality the number or available patterns are rich: In 1916, all were in the same overall medium/light grey as the rest of the Grand fleet, but in 1918 Ramillies received a 5/6 colors dazzle pattern, as the Revenge, but les complicated for the latter. In 1937, HMS Resolution shows a dark and medium gray overall camouflage, stopped at the main fire control system bridge, left white, as in the US Navy that just swapped dark grey for dark ocean blue.
During WW2 things start to be more complex, notably for HMS Resolution in 1942 which had a two colors wavy camouflage with a green tone, dark blue, and black over standard medium grey. The others generally uses wavy black stripes, or black and dark blue, dark gray and medium blue.
The Revenge class in action
HMS Revenge 1916-1948
HMS Revenge, launched as Vickers shipyard in Barrow-in-Furness in 1915 was commissioned into the Grand Fleet on 1 February 1916. She was rushed for service without full completion, and this phase proceeded until 24 March, with her sea trials and training at the same time. She was assigned to the 6th Division, 1st Battle Squadron, Grand Fleet, with HMS Marlborough as her divisional/squadron flagship and also HMS Hercules and Agincourt. She had little time to train in and out od Scapa flow before her first and most serious test in her career: The Battle of Jutland.

hms hercules & revenge jutland
On that day HMS Revenge and her 6th Division were at the rear of the British line advaning in support of Beatty’s battlecruisers. Sailing east at full speed, they eventually met the Germans coming from the south off the Danish coast. At 18:15, the Grand Fleet headed by Jellicoe was deployed for action, causing some congestion with the rear divisions. HMS Revenge had to reduce speed to 8 knots to avoid collision, while at the same time the German fleet came into range. At 18:17 duels engaged. The British were plagued by poor visibility and Revenge had to wait until 18:22 to find a target through the weather, and she perhaps engaged SMS Wiesbaden or the German battle line, firing intermittently for 17 minutes, scoring none.
At 19:09, HMS Revenge hard turned and avoided a torpedo probably from V48. She later engaged the battlecruiser SMS Derfflinger, her first salvo at around 11,000 yards (10,000 m), overshooting. After resetting, she straddled Derfflinger with a second salvo, then found her range and scored 5 hits in succession. She then turned to SMS Von der Tann, next in line, leaving Derfflinger to other battleships. She apparently disabled the latter’s aft turrets withg two rounds, the rest causing little damage. Von der Tann was hit in turn close to her aft conning tower but with minor damage and even fired a torpedo at long range, which found no target.
HMS Revenge turned away at 19:35 when spotting torpedoes from an unidentified TB, and with the rest of the line she turned again at 19:42 as false Uboat report came. Revenge aftwards spotted no other target and had to wait for HMS Marlborough, hit by a torpedo and slowed down, with other ships in the 6th division. At 01:56, 1 June, Vice-Admiral Cecil Burney onboard Marlborough, informed HMS Revenge he would be to transferred to her, allow Marlborough to limp back home. For this, he transferred onboard HMS Fearless and raised his mark in Revenge at around 03:00.
The night ended around 8h00 amidst still very poor visibility and at 10:00, the 6th Division was lagging 45 nautical miles north of the Grand fleet. They rejoined the fleet at 19:25, only to head back to Scapa Flow. When counts were made, Revenge had fired 102 main battery rounds, all AP, and 87 secondary guns rounds. She was not hit and had no casualty.
Her participation in the action on 19 August 1916 where her last commitment, after two light cruisers were sunk by U-boats. Admiral John Jellicoe by then esteemed the latter presented to much a risk for another sotie. He just waited for the High Seas Fleet to sally forth again to attack ships of the blockade. But the latter remained in port, only making some Baltic Sea training during the year 1917. The same year, regular convoys to Norway were escorted by light forces and raided twice so Admiral David Beatty committed the Grand fleet to escort the convoys. But Revenge saw no action and was present to escort the surrendeing German fleet into internment at Scapa Flow. By then her division was commanded by Vice-Admiral Sydney Fremantle, and she was the flagship. After the great scuttling of 21 June 1919, Fremantle ordered the German commander Rear Admiral Ludwig von Reuter aboard. He was accused of violating the terms of the armistice and became a POW as most of the crews.
The interwar saw HMS Revenge operating with her sister ships in a single division, and still as flagship. Traning sorties followed by refits or modernisations perriods alternated without notable event. In April 1919 she operated with the Atlantic Fleet, 1st BS. Then the Mediterranean Fleet (she safeguarded british interests in Turkey and the Black Sea during the Greco-Turkish War, and Russian Civil War. By July 1920, she was visited by the King Alexander of Greece in Panderma, for a fleet review with the Greek fleet. She saw the Greek landings at Sultanköy and Eregli. In August 1920 she was back in the Atlantic Fleet and the 1st and 2nd Battle Squadrons merged (May 1921), Revenge now flagship of the 1st Division with her sister ships, the five Queen Elizabeth-class making the 2nd Division. She was back in the Mediterranean Fleet (September 1922 until 1924) and on 1st November 1924, returned to the Atlantic Fleet while the 2nd division (Queen Elizabeth-class) replaced them in the Mediterranean Fleet. They became the 1st Battle Squadron again, returned to the Mediterranean Fleet in 1927. Until January 1929 HMS Revenge was in refit, followed by another May-December 1931.

In early 1935, Revenge and her 1st BS was back to the Atlantic Fleet and participated in July to the fleet review at Spithead (King George V’s silver jubilee). Until March 1937, she underweent another modernisation and was present afterwards for the Coronation Review for George VI on 20 May 1937. Her last prewar refit started in early 1939 until August. On 9 August she was participating in her last peacetime fleet review for the king, at Portland. The war started for Revenge, her second one.
On 3 September 1939 she was versed into the Channel Fleet, Portland. To deceive German intel, the merchant ship SS Pakeha was disguised as HMS Revenge and on 1st October, the battleship was prepared for escort convoys in South Atlantic, threatened by the German pocket battleship KMS Admiral Graf Spee. On 5 October 1939 however she was attached instead to the North Atlantic Escort Force operating to and from Halifax in Nova Scotia. With HMS Resolution she was loaded with gold bullion to Canada, needed by the Anglo-French Purchasing Board settled in New York at the start of lend-lease procurements. In total, this represented 148 boxes of gold bars (£2 million, basically less than her price) loaded equally between each battleship at Portland, to sail out on 7 October and arriving in Halifax on the 15. Convoy escorts back and forth went on without event. Revenge transported gold again, this time for £10 million and departing Plymouth, on 28 January 1940. On 7 February, she collided with a small British tanker as convoy formed up off Halifax. She was repaired in Halifax.
On 12 May 1940, she rammed by accident HMCS Ypres, a small ASW trawler acting as boom defence vessel in Halifax. This trigerred a running gag each time she was back in Halifax with other crews of gate ships. On 30 May this was Operation Fish carrying this time ALL United Kingdom’s gold reserves to Canada as invasion was feared. She existed the Clyde with £40 million on board, sailing to Halifax. On 3 July 1940 she sent boarding parties in Plymouth to take control of refugee French battleship Paris and submarine Surcouf (Operation catapult). She had a sailor, Leading Seaman Albert Webb, shot dead by a French officer, shot in turn by a British officer. She then resumed her gold trips to Canada, with £47 million and on 11 August with £14.5 million.
On 15 September 1940, HMS Revenge was based in Plymouth for the Western Approaches Command (counter invasion force). Operation Sealion however never took places as weeks went on, after the battle of Britain ended. She was the only British capital ship deployed with the English Channel fleet. On 11 October, HMS Revenge carried out Operation Medium shelling the invasion transport ships and barges located in Cherbourg, escorted by six destroyers and motor gunboats. There was also a covering force of three cruisers and six destroyers preventing interception by E-Boats or Torpedo boats. This was led by night, simultaneously with an air raid by the RAF, dropping flares to illuminate the targets. The shelling lasted for 18 minutes, Revenge landing 120 main-gun shells in the harbour, her escorts firing their 4.7-inch guns. The coastal artillery replied bu failed to score any hit and the force sailed home at 21.5 knots. On 13 November 1940 Revenge was back to North Atlantic convoy duties until 1941.
By October 1941, she was transferred to the 3rd Battle Squadron based in Colombo, Ceylon, joined by her sisters. The squadron was attached to Force F and from 7 December, started a serie of escotrt missions and patrols in the Indian Ocean, protecting India. In March 1942, the Eastern Fleet was created (Admiral James Somerville) and was prepared to meet Vice Admiral Chūichi Nagumo and his Kido Butai, far superior. It was decided howevere to spare them and replace them by the modernised battleship Warspite and two fleet carriers instead, so Revenge and her sisters plus HMS Hermes returned to escort convoys from the Indian Ocean to Alexandria or South Africa.

HMS Revenge in Greenock, back from her Indian Ocean raid in September 1943. Note the sternwalk
By late March 1942, code-breakers from the Far East Combined Bureau informed Somerville of a planned Japanese raid into the Indian Ocean, bound to Colombo and Trincomalee. The fleet was split into two groups, Force A (Two CVs, Warspite and four cruisers) and Force B with Revenge & sisters and HMS Hermes. He planned to ambush Nagumo’s fleet in a night action but after three days of search without success her had Force B back to Addu Atoll to refuel, receiving a report the Japanese fleet was just approaching Colombo. On 5 April, the harbour and bases were shelled and attacked, followed by Trincomalee on 9 April. Somerville withdrew Revenge & sisters to Mombasa, east africa, to continue their escort duties between the Middle East and Persian Gulf. The four battleships remained in Mombasa as a base in 1943 and later from Kilindini. Revenge was refitted in Durban until November 1942 and by February 1943, with HMS Resolution she led Operation Pamphlet, a convoy with 9th Australian Division from Egypt back to Australia.
In mid-1943, an inspection commission came on board for a detailed review of the four ships. They soon established that, without a proper modernization, the ships were considered not only obsolete but also worn out. The admiralty recalled them to home waters to be placed in reserve, frrring crews for more modern ships. They were back in the Clyde on 31 September 1943, reduced to reserve status until September 1945. Their electrical system needed a thorough overhaul, the hull cleaning and strenghtning. Revenge however had the privileg to sail again to carry PM Winston Churchill for Tehran Conference in November and December 1943. By January 1944 Revenge was in Portsmouth until 17 December, converted into a training ship, for boiler room personnel. However in May 1944, her main armament was removed, as pares for Ramillies and Warspite and monitors later used in Normandy. In March 1948, she was stricken and sold in July, purchased to be BU by Thos W Ward at Inverkeithing (5 September 1948). Some items survived in various places.
HMS Resolution (1916-1948)
HMS Resolution was built by Palmers Shipbuilding and Iron Company in Jarrow, laid down on 29 November 1913, launched 14 January 1915, commissioned on 7 December 1916, so she missed Jutland. On 30 December 1916, she joined the Grand Fleet in Rosyth, 1st Battle Squadron. Sorties were stopped by Jellicoe, fearing U-Boats, preferring to wait for a possible sally of the Hochseeflotte but it never happened and in 1917 apart a possible distant covering convoys to Norway escorted by light forces and German quick raids, nothing really happened until David Beatty decided to commit its battle squadrons again as escorts. On 23 April there was such attack where the Germans almost lost their battlecruiser SMS Moltke. HMS Resolution and the rest of the Grand Fleet made a sweep on 24 April hoping to fell on the latter, but it was too late. On 21 November 1918, Resolution shadowned the German fleet into internment at Scapa Flow.

HMS Resolution in Malta (Flickr)
The interwar years saw Resolution attached to the same division, swapping with the Queen Elisabth division between the Mediterreanean and Atlantic fleet. In 1919, this was the Atlantic Fleet, then Mediterranean Fleet (Black Sea actions against the Bolsheviks and Greco-Turkish War). Resolution was posted in Prinkipo, Batumi, Constantinople and Chanak with Royal Oak and the light cruiser Ceres. By the summer or 1920 they were back to the Atlantic Fleet. This was the Mediterranean Fleet in 1922 (crisis in Smyrna), Dardanelles and Marmora sea patrols, stopping in Mytilene and Smyrna with HMS Emperor of India in 1923. Atlantic Fleet in 1924. During exercised in the English Channel, HMS Resolution rammed and sank by accident HMS L24 as she was surfacing. She was lost with all hands, but from Resolution it was barely noticed and only deduced after her bow was inspected. This was also the occasion of a refit and she was reaffected with the 1st Battle Squadron. This was followed by another refit in 1926-1927. Afterwards she swapped for the Mediterranean Fleet. In 1935, it was back to the Atlantic and the newly named “Home Fleet”. She took part in the King George V’s silver jubilee parade, and after another in 1936 as at the Coronation Review in May 1937. Until August 1939, she was sent to Invergordon, with two of her sisters and Rodney, Repulse. They joined Nelson (Admiral Charles Forbes) as the fulcrum of the Home Fleet, making ready for war.
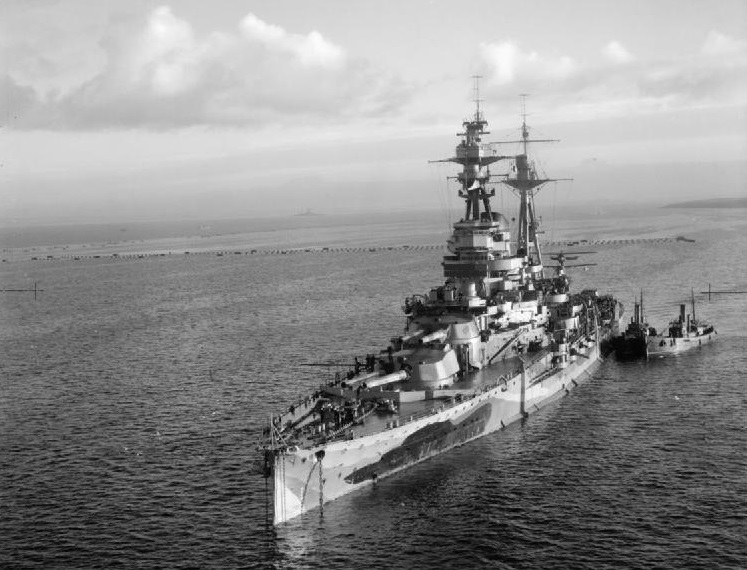
HMS Resolution in the second plan, Spithead naval review, 1937, note her dark grey livery.
In September 1939, Resolution was assigned to the Channel Force in Portland. She later was to join the hunt for the Admiral Graf Spee in the South Atlantic Command, but this was cancelled and instead she joined the North Atlantic Escort Force with HMS Revenge, carrying gold to Canada and escorting troopships from Canada. Like Revenge she received a “doppelganger” to confuse German intel, the transformed merchant ship SS Waimana until February 1942.
Campaign of Norway
In April 1940, HMS Resolution was back in the Home Fleet for the campaign in Norway. She relieved battleship Warspite off Narvik on 26 April. With HMS Aurora she shelled German positions around Beisfjord in May, supported the landing at Bjerkvik (Battles of Narvik) with two cruisers and five destroyers and carrying herself five tanks and other vehicles, hoisted out in the darkness. As the Germans conducted a vigorous counter-attack, she made a creeping barrage. Ultimately the troops secured Narvik and signalled to the fleet they could depart. At the end of May she was attacked by Junkers Ju 88 bombers and hit by a single 1,000-pound (450 kg) bomb. Two men were killed, 27 wounded, but the damage was not capital. She went back to Scapa Flow and was repaired (and spared from further air attacks).
Operation Catapult
On 4 June 1940, HMS Resolution sailed for Gibraltar to join Force H with Hood and Valiant and participating in Operation Catapult, the neutralization of the French fleet at Mers-el-Kebir, on 3 July 1940. She participated in sinking the Battleship Bretagne, badly amaged Provence and Dunkerque, but missed Strasbourg which went through and fled. Next target for Force H was the impressive battleship Richelieu which previously took refuge in Dakar. The attack was to commenced on 6 July but Somerville recalled Resolution to Mers-el-Kebir in order to be sure Dunkerque was destroyed, after being chased by Hood, Valiant, and Ark Royal. Next on 8 July Resolution diverted the attention of the Regia Marina allowing the passage of Malta convoy: She feinted a raid toward Sardinia while Ark Royal raided Cagliari, which was called Operation Hurry in late July and August. Resolution and Ark Royal left Force H to participate to the raid on Dakar, with Barham, three cruisers, and ten destroyers. This was called Force M, placed under the command of Cunningham.
Battle of Dakar (Operation Menace)
On the morning on 23 September, Force M was off Dakar, sneding a boat to communicate to the French commander and ultimatum. The French refused again, and known what happened in Mers El Kebir, opened fire right away. Fopr about 30 min. an artillery duel went on, Resolution and Barham firing 100 main rounds in between them, marred by Poor visibility. They scored a single hit on a freighter. Cunningham broke off the attack after his ships received serious hits (from coastal batteries) and the next day, led an air strike from Ark Royal. Richelieu was not seriously damaged. The destroyer HMS Fortune was straddled later from a French cruiser, itself repelled by a volley from Resolution. The fleet then moved to silence the coastal fortifications and attack the port, scored a hit on Richelieu. Resolution’s fire director gear however broke down and she lost accuracy. There was another withdrawal, follwoed by another attack in the afternoon, Resolution silecing a shore battery, Barham concentrating on Richelieu but both missed while Resolution herself was hit several times.
HMS Resolution in 1943
Resolution off Madagascar, 1942
Cunningham disengaged for the night and the next morning sent his two battleships around 9:00 supported by two heavy cruisers. At that moment, the French submarine Bévéziers previously placed in ambush torpedoed Resolution. A single hit amidships, port side which tore a large hole in her hull, flooding the port boiler room. She was down to 12 knots and listed to port, forced to withdraw. Barham was left to deal with Richelieu.
Resolution was given an escort to Freetown for repairs, later took in tow by Barham when she disendaged. Both were in Freetown on 29 September, Resolution staying there for six months in drydoc, the back to Portsmouth in March 1941. She was shook but not hit by a German air attack. British shipyards being at full capacity, the sailed to Philadelphia Naval Shipyard on the US coast for extensive repairs and modernisation, under Lend-Lease. Her main battery gained an elevation to 30 degrees and she received new radars and AA. This was over on September 1941.
Indian Ocean campaign
In early 1942, the Indian Ocean and the task to defend British India became paramouns and the allies fleets there collapsed before the Imperial Japanese Navy. The danger of the latter spreading in the Indian Ocean, as far as the coast of Africa was real. Resolution sailed to Cape Town, to team with HMS Formidable and later Revenge and Warspite. They rendezvoused with the carriers Indomitable and Hermes. Fall March 1942, this Eastern Fleet under Admiral Somerville was to be pitted againsy Vice Admiral Chūichi Nagumo’s Kido Butai, arguably much superior. Warspite was kept ultimately, while Resolution and her three sisters plus Hermes were sent away in reserve, escorting convoys in the Indian Ocean.
The Japanese later raided indeed Colombo and Trincomalee and Resolution was in Force B led bt HMS Royal Sovereign as flagship and her sisters plus Hermes, at first deployed to ambush Nagumo’s fleet, but as the latter never appeared, Sommerville refuelled at Addu Atoll, learning the Japanese instead were off Colombo. Force B was then recalled to Mombasa, helping to secure shipping routes to the Middle East and Persian Gulf until 1943. In February, Resolution and Revenge partipated in Operation Pamphlet, a convoy carrying the battered 9th Australian Division back to Australia.
Last years as TS 1943-48
In September 1943 Resolution was refitted in UK, but afterwared reduced to reserve status. In 1944 hpwever she was assigned to training, later disarmed, with her main battery used as spares. She kept her role as TS until paid off in February 1948, on the disposal list and sold to Metal Industries Ltd, Faslane, BU from 13 May.
HMS Royal Oak
HMS Royal Oak firing tests (IWM coll.)
HMS Royal Oak was buiot in Devonport Royal Dockyard between January 1914 and 17 November 1915, fitting-out and commissioned on 1 May 1916, soon before the battle of Jutland. Her name was famous, as the eighth vessel, going back to Elisabethan times. She was effected to the Third Division, Fourth Battle Squadron, Grand Fleet, with in colmand Captain Crawford Maclachlan. On 31 May–1 June 1916 she participated in the battle of Jutland: At 18:29, HMS Royal Oak opened fire on the German cruiser SMS Wiesbaden, with four salvoes in quick succession and her secondary battery to boot, but only scoring a single hit with her third one. She was straddled by a German salvo but remained undamaged. German torpedo boats also attempted to save Wiesbaden by approaching to launch torpedoes, but they were repelled by Royal Oak’s secondary guns.
By 19:15 her gunners spotted the German battlecruiser squadron and soon she targeted SMS Derfflinger. They first overhoot, but at 19:20 found the range and scored tow hits aft, but damage wa slight and Derfflinger disappeared into the mist. SMS Seydlitz was targeted newt, and she land a hit on her at 19:27 before she also get out. Meawhile, a German torpedo boat flotilla approached and fired a volley of torpedoes on the British battleline, Royal Oak’s firing her seconndary guns at 19:16. Soon the High Seas Fleet disengaged and Grand Fleet ceased action. At 21:30 it was reorganised for a night-time cruising formation and combed the area at dawn, but without finding any german ship, even damaged. In all, HMS Royal Oak fired 38 main rounds, 84 secondary rounds.
Royal Oak in action at Jutland (), painted by William Lionel Wyllie
HMS Royal Oak was later in June reassigned to the First Battle Squadron and on 18 August, as Scheer ordered a sortie on Sunderland, reported by British intel, so Jellicoe was able to deploy the Grand Fleet but both sides withdrew because of submarines on 19 August 1916, HMS Nottingham and Falmouth being lost to U-Boats while SMS Westfalen was torpedoed by E23. Apart another sortie in late 1917 intended to attack convoys to Norway, and another German sortie in April 1918 to catch an isolated British squadron, nothing much happened as the Grand fleet was kept in the firth of forth. On 5 November 1918 HMS Royal Oak was anchored off Burntisland with the seaplane tender Campania and battlecruiser Glorious when a Force 10 squall had Campania dragging her anchor and collide with Royal Oak and Glorious. Both had light damage, but Campania’s damage was extensive, so much she sank five hours later. The capitulation of Germany saw Royal Oak participated in the massive 370 ships entente escort for the High Seas Fleet to captivity. The day it scuttled on 21 June 1919, Royal Oak was with the Grand Fleet out of Scapa Flow conducting training manoeuvres.
The interwars saw Royal Oak assigned to the Second Battle Squadron, Atlantic Fleet. She was modernised in 1922–24 and transferred in 1926 to the Mediterranean Fleet in Malta. In early 1928, she made local headlines in the “Royal Oak Mutiny”. It started as a simple dispute between Rear-Admiral Bernard Collard, Captain Kenneth Dewar and Commander Henry Daniel… over the band at the ship’s wardroom dance. Tjos turned into a bitter personal feud for several months, with accusations of “vindictive fault-finding” the rear-admiral also humiliating and insulting both officers before their crew, while Collard accused them of disoberying orders shouting they were “worse than a midshipman”. Letters of complaint went to Vice-Admiral John Kelly, passed to the C-in-C Admiral Sir Roger Keyes. Keyes convened a Board of Enquiry and remove all three men from their posts, send back to UK. A major naval exercise was postpone in the process, which caused rumours that the Royal Oak had experienced a mutiny. Eventually this reached the King, who summoned First Lord of the Admiralty William Bridgeman for an explanation. Both officers were later sacked. The scandal proved an embarrassment to the reputation of the Royal Navy, making the admiraty review means by which naval officers would bring complaints against the conduct of their superiors.

Royal Oak carrying the body of Queen Maud from London to Oslo.
The Spanish Civil War saw HMS Royal Oak conducting non-intervention patrols off the Spanish coast from Gibraltar. At one occasion she was off 30 nautical miles (56 km; 35 mi) east of Gibraltar on 2 February 1937, when attacked by three Republocan aircraft, dropping bombs, two of which exploded at around 550 m to her starboard bow. The British chargé d’affaires protested to the Republican Government, which apologised. Later off Valencia on 23 February 1937 during an aerial bombardment by the Nationalists a Republican anti-aircraft shell fell on Ark Royal. The explosion had five men injured including her captain, T. B. Drew. There were no consequences. In May 1937 with HMS Forester, she escorted SS Habana carrying Basque child refugees to England. In July 1937 she recused with Resolution more refugees in northern Spain, onboad the steamer Gordonia about to be captured by Nationalists off Santander. On 14 July the British freighter Molton was however captured, by the cruiser Almirante Cervera, aslo committed in the evacuation of refugees. Royal Oak also took part in the filming of “Our Fighting Navy”, swa by the RN as a recruitment opportunity. Royal Oak portrayed the rebel battleship El Mirante, with Robert Douglas as captain, but it was poorly received by critics.
In 1938, HMS Royal Oak was back to to the Home Fleet as flagship of the Second Battle Squadron (Portsmouth). On 24 November 1938, she returned the corps of Queen Maud of Norway from London to Oslo, for a state funeral, with King Haakon VII. In 1939 she made a short training cruise in the Channel before preparing for another tour of duty in the Mediterranean, receiving tropical uniforms but hostilities draw near and she was instead sent to Scapa Flow and anchor there on 3 September.

Royal Oak in Spithead, 1937
The “Phoney War” started and in October 1939 HMS Royal Oak joined the search for the KMS Gneisenau into the North Sea, allowing Deutschland and Admiral Graf Spee to sail unopposed to the Atlantic. HMS Royal Oak by the time was unable to follow, fue to the condition of her machinery, recuded to less than 20 knots. On 12 October she returned to Scapa Flow, battered by North Atlantic storms. Her Carley floats had been smashed and flooding damaged her secondary guns, which needed cleaning. German reconnaissance planes were spotted and Admiral Charles Forbes ordered the fleet to disperse to safer ports, fearing a massive aerial attack. Royal Oak however remained in Scapa, at least to provide her own her anti-aircraft capabilities to the meagre air defence of the Scottish base. The irony was that the real threat would not come from the air…
To understand what happened we need to see how Scapa flow was situated in the Orkney Islands, north coast of Scotland. This was a large natural harbour surrounded by a ring of islands, separated by shallow channels with fast-racing tides. It was still possible for an U-boat knowing local conditions to sweep into it, but the threat was dealt for by several countermeasures already in WWI: Blockships sunk at critical points, and floating booms deployed at the three widest channels operated by tugboats to be opened for shipping. The capital ships themselves in WWI deployed their own nets. But they no longer existed in 1939 and instead nets were deployed around ships by tugs. It was considered highly unlikely that a U-boat commander would attempt to run into Scapa before the boom was closed. Two UBoats already tried to infiltrate the base, on 23 November 1914 (U-18), spotted and rammed twice, running aground, and UB-116, detected by hydrophone and sank on 28 October 1918. After a new anchorage at Rosyth, still in the Firth of Forth, but south, Scapa Flow was reactivated in 1939 for the Home Fleet, praised for its natural and artificial defences. Improvement was planned and the first weeks of September, provision of additional blockships was being made.

Scapa Flow map

U-47 raid map
Meanwhile, Kriegsmarine Commander Karl Dönitz devised a plan to attack Scapa Flow just days into the war. A sucessful attack would have for consequences the Home Fleet relocated elsewhere, weakening the North Sea blockade, also leaving more room to attack Atlantic convoys, but also as symbolic act of vengeance related to the internment of the German High Seas Fleet. Dönitz choosed Kapitänleutnant Günther Prien and the raid was prepared for the night of 13/14 October 1939, in high tide and no moon. Good air photographs by Siegfried Knemeyer helped to reveal weaknesses in the defences. Prien was briefed to enter Scapa Flow from the east, via Kirk Sound. Her was to arrived to the north of Lamb Holm which was a small island between Burray and Mainland. That night however, Prien initially mistook Skerry Sound for it, but suddenly realised he was heading for a shallow blocked passage. He made a rapid turn to the northeast and was still visible by the aurora borealis.
He managed to insert between the sunken blockships Seriano and Numidian, and was even grounded temporarily on a cable, strung from Seriano and later briefly caught in the headlights of a taxi onshore, the driver never realizing what he saw. U47 was at last in the harbor itself at 00:27 on 14 October and took a south-westerly course for several kilometres, turned, then realized the anchorage was near empty as Forbes previously dispersed the fleet. U-47 surfaced and closed to four warships and soon saw the HMS Belfast anchored off Flotta and Hoy at around 4 nautical miles and later a lookout spotted Royal Oak about 4,400 yards (4,000 m) north. Knowing a Revenge class battleship was a better prize, and close to it he believed was the Repulse, in fact the tender Pegasus.
At 00:58 Prien’s U47 took position and fired a salvo of three bow tubes torpedoes, the fourth not leaving the tube. In addition two missed, but a single one struck the bow of Royal Oak at 01:04. The whole battleship shook, waking up the crew, but still there was little visible damage. Soon one sailor realized the starboard anchor chain had been severed and was clattering noisily down through its slips. Some suspected an explosition for her forward inflammable store, something that happened on HMS Vanguard, also at Scapa Flow in 1917 already. The magazine temperatures were checked but nothing seemed unusual and many sailors simply returned to their hammocks !.

Royal Oak port side, 1938
Prien heard and saw the hit but through this was not enough and turned his Type VII U-Boat to present his stern tubes. He fired, but again, missed; Meanwhile, his crew was frantically reloading his bow tubes for a third attempt, until alert was given. When back in position from the bow, he fired a new salvo of three torpedoes, which was this time successful, at 01:16. All three struck the battleship in quick succession amidships. This time, there was no doubt onboard the battleship: The explosions created a hole in the armoured deck, devastating the messes, causing general electrical power shutdown, inflaming cordite from a magazine, the following fireball going through the ship’s internal spaces, which had all safety doors opened as it was outside battle quarters procedures. HMS Royal Oak then listed faster to 15°, so much her starboard-side portholes went below the waterline, and rolled further completely to 45°, her belly appearing at 01:29, 13 minutes after the last hits. The ship then filled rapidly and sank to the bottom, carrying with her many of her crew still sleeping, including Rear-Admiral Henry Blagrove of the Second Battle Squadron as well as sadly 134 boy seamen.
There were rescue efforts by the tender Daisy 2 anchored to her port side, her attaches cut loose, but she was caught by her anti-torpedo bulge and lifted for a short time. Some of the crew closer to the deck managed to jump out, dressed for most in their nightclothes in the chilling water, often only to be engulf in a thick layer of fuel oil filling their lungs and stomachs while preventing them to swim. They had about 800 m to the nearest shore, and only a handful survived. Royal Oak’s own port side pinnace managed to sail away, paddled using wooden boards but she became overladen when picking other survivors and capsized 300 metres from Royal Oak. Daisy 2 managed to pull 386 men in all from the water, including Captain William Benn. Rescue efforts would last for two and a half hours, until nearly 4:00 am. Boats from Pegasus and from the harbour wontinued searching until dawn and ever afterwards. Daisy 2’s captain Gatt was later awarded the Distinguished Service Cross. There were 424 survivors and 411 drawn with the ship or in the water, between fuel oil and hypothermia.
The loss of Ark Royal at first led to wild speculations, on-board explosion and aerial attack until concluding a submarine attack was the most likely. U-47 meanwhile had escaped, on his way back to Germany. The BBC released news of the sinking on 14 October, confirming the kill to Prien himself. Divers discovered remnants of a German torpedo, which confirmed the attack. On 17, October Winston Churchill officially announced the loss of Royal Oak to the House of Commons, recoignising this has been “a remarkable exploit of professional skill and daring”, but that it would not affect the naval balance of power. A board of inquiry was held between 18 and 24 October and the Home Fleet was sent to safer ports, until security issues at Scapa were addressed.
Nazi Propaganda Ministry capitalised on this, with radio broadcasts and later Prien and his crew greeted as heroes, Prien being awarded the Iron Cross First Class, and Iron Cross Second Class for all crewmen. Hitler later awarded Prien in Berlin with the Knight’s Cross of the Iron Cross, for the first time to any German submariner. Dönitz was also promoted from Commodore to Rear-Admiral, Flag Officer of U-boats. “The Bull of Scapa Flow” had its U-47’s conning tower decorated with a snorting bull mascot, later the 7th U-boat Flotilla emblem.
On Churchill’s orders, the eastern approaches to Scapa Flow were sealed with concrete causeways linking Lamb Holm, Glimps Holm, Burray and South Ronaldsay to Mainland, created by Italian POW. The “Churchill Barriers” were completed in September 1944. The wreck was made early on a war grave but still contains 3,000 tons of furnace fuel oil aboard, leaking from the corroding hull. This was spotted in 1990s but measures only taken in 2006, when all double bottom tanks had been cleared and oil from the inner wing tanks with cold cutting equipment were removed in turn in 2010, 1600 more tons were removed. An ecological disaster was spared to Scapa. Still 783 m3 of oil remains, with plans to resume pumping in mid-2021. A modern 3D survey of the site is also planned.
HMS Ramilies
HMS Ramillies in 198, in dazzle camouflage
HMS Ramillies, was the fourth ship of her name (1706 Battle of Ramillies), built at William Beardmore and Company shipyard in Dalmuir in Scotland fitted during construction with anti-torpedo bulges and launched on 12 September 1916. However she struck her slipway, badly damaging her bottom hull and rudders. She was towed to the Laird shipyard in Liverpool for completion after temporary repairs in Dalmuir. Fitting out took place under supervision of her first captain, Henry Doughty, appointed on 11 April 1916. She was only fully repaired in May 1917 but ran aground on her way and pulld out by tugs on 23 May. She was the last commissionned of the Revenge class, under Captain Percy Grant by July 1917, later assigned to the 1st Battle Squadron in September. After extensive sea trials to test her bulges, she was recoignised fully ready for service and greenlight the installation of bulges on her sisters. She was the only one painted with a dazzle camouflage in 1918.
Ramillies with the rest of the Grand Fleet saw no action for the remainder of the war. She escorted the surrendering German fleet in November 1918, and in the interwar, operated with her sister ships of the 1st Battle squadron, later division, between the Atlantic and Mediterranean: Under Captain John Luce by late 1919 in the Atlantic Fleet, then Mediterranean Fleet in early 1920 (Turkey, Black Sea), notably landing parties of Royal Marines and sailors in Constantinople. In Georgia she shelled approaching Bolshevik troops. In April, Captain Aubrey took command, and she later bombarded Turkish Nationalists advancing on Ismid, and send another party to reinforce the 242nd Infantry Brigade defending the city, supported by seaplanes from Pegasus and Ark Royal. INS Yavuz Sultan Selim was boarded by Ramillies sailors as well, towed away from Ismid. She also covered the landings in Eastern Thrace during the Greek Summer Offensive and was back in the Atlantic Fleet in August 1920. Captain Francis Mitchell assumed command in August 1921 and she was soon back in the Mediterranean Fleet in September 1922 (Smyrna crisis). She patrolled in the Dardanelles and Sea of Marmora and was back in 1923 in the Atlantic Fleet, with Captain Wilfrid Nunn in command, on 20 April 1924. A refit at Rosyth followed this summer.
On 1 November 1924, the Atlantic Fleet was reorganized, ans the 1st Division went back. Ramillies was refitted in Devonport in September 1926-1st March 1927 and soon transferred to the Mediterranean Fleet in August 1927. Captain Hubert Monroe took command 3 February 192 and after torpedo and anti-submarine exercises and large scale mock battle in January 1929, combined exercises with the Atlantic Fleet, Captain Bernard Fairbairn too command. She was detached to Jaffa in Mandatory Palestine, October 1929, to try to deter unrest and asle later ran aground in Malta’s Grand Harbour (January 1930). She was Alexandria in September 1930 also due to riots and was back to Devonport for another refit until August 1934.
By early 1935, she was in the the Atlantic Fleet (“Home Fleet”), participating at the Spithead silver jubilee. Later she collided with the steamer Eisenach in a gale, in the Strait of Dover on 31 August, but having little bow damage. In 1936 she started a career as training ship for Royal Naval Reserve and ship’s boys, until December 1937. Captain Edward Syfret took command on 10 January 1938 and after another refit in Devonport until February 1939 (Cap. Harold Baillie-Grohman September 1938) she was transferred to the Mediterranean Fleet and sent back to the Home Fleet as a training ship. She was in Alexandria in late August 1939 and on her way to Egypt via Gibraltar on 1st September
On 5 October 1939 she ordered to the North Atlantic Escort Force (Halifax) but instead recalled to Alexandria, replacing HMS Malaya. In November 1939 she was in Aden looking for Admiral Graf Spee. She sailed through the Indian Ocean, Australia and New Zealand by December. She escorted a convoy with 2nd New Zealand Expeditionary Force to Egypt, first battleship to visit New Zealand and later returned to Australia to pick up another troop convoy. Transferred back to the Mediterranean Fleet in May 1940, by late June she escorted convoys with HMS Royal Sovereign and Eagle. During Operation Capatult she was in Alexandria, shere the drama was avoided, Baillie-Grohman negotiating with the commander of the battleship Lorraine there, demilitarised with the breechblocks ceased and unloading fuel.
On 15 August 1940, Ramillies shelled Bardia and Fort Capuzzo, close to Sollum with Malaya, Warspite and Kent. They were attacked by Italian bombers and in common with Eagle, shot down twelve attackers. She escorted a convoy to Malta on 8-14 October, in poor weather. Captain Arthur Read took command on 27 October and she converted others convoys to Malta and Greece in November. The submersible Pier Capponi ambushed her and fired but missed as she approached Grand Harbour. She teamed with HMS Illustrious during the November night Taranto raid. After the Regia Marina retreated, Ramillies was considered surplus and reallocated to the North Atlantic Escort Force. She was however attached to Force H and perticipated fromp afar in the Battle of Cape Spartivento. She was refitted in Devonport by December, escorting a convoy from Gibraltar to Greenock along the way and was operational again from 6 January 1941.
On 12 January 1941, HMS Ramillies joined a convoy out of Halifax and bound for the Middle East. In August, she escorted Convoy HX 106, encountering KMS Scharnhorst and Gneisenau on 8 February 1941. Ramillies by her simple rpesence in the convoy deter them to attack. She was in May detached from Convoy HX 127 to join the search for the Bismarck. PM Winston Churchill visited her on 16 August in Hvalfjörður, Iceland after his conference with the US president in Newfoundland (Atlantic Charter). Back in Liverpool she was in refit until 20 November 1941.
In October already the Admiralty decided to transfer her to the 3rd Battle Squadron based in Colombo, Ceylon, with her three sisters. This later became Force F and from 7 December 1941 in high alter in the Indian Ocean until March 1942 under command of Admiral James Somerville. No longer considered front-line warships after Chūichi Nagumo attacked not where expected, the force was sent escorting a convoy back to the red sea, caught off-giard when refelluing in Addu Atoll (Maldives). In April she was in Mombasa, and she was soon affected to the covering force for the invasion of Madagascar (Operation Ironclad).
She provided a landing party of 50 Royal Marines carried by the destroyer HMS Anthony at high speed past the coast defences of Diego Suarez, on 6 May 1942. They captured the French artillery command post, barracks and naval depot. On the 7 May, Ramillies engaged the coastal batteries on Oronjia Peninsula and remained there during the Battle of Madagascar, until the surrender of November.
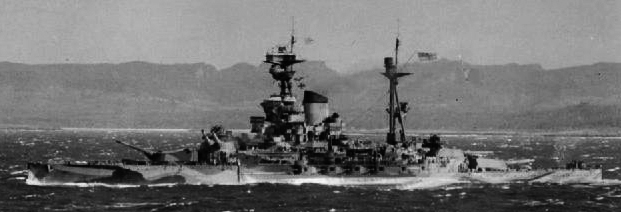
HMS Ramilies in Operation Ironclad, the allied invasion of Madagascar in 1942
In between, on 30 May already, Japanese midget submarines attacked ships in Diego Suarez and one scored a hit on Ramillies, close to her “A” turret, port side. It caused extensive flooding, mastered by damage control teams. She was able to steam to Durban in South Africa at 10 knots to be drydocked and repaired. Constructor H. S. Pengelly inspected the ship, concluding that being 26 years old with reduced size and slow speed she was nonetheless in exceptionally good shape. He even declared “I should wonder whether or not the capital ships of today with their lighter scantlings would survive a blow as well as this old girl, some 26 years after they were built.”.
She was fully repaired in Devonport, and was back in service in June 1943, based in Kilindini (East Africa) befoire joining the Eastern Fleet, the only battleship on station under command of Captain Gervase Middleton. On 28 December 1943 she sailed home, refitted to be used as coastal bombardment ship and in January 1944 reassigned to the Home Fleet.
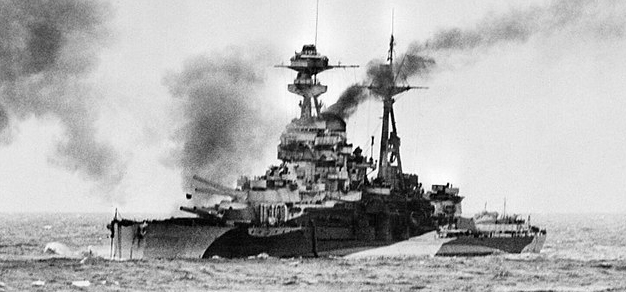
HMS ramilies Normandy 1944
Her refit mostly saw her anti-aircraft gunnery augmented and radio coordination for spotting enhanced. She was assigned to Bombardment Force D in supporting the Normandy landings. This only started in June, with HMS Warspite, and the monitor Roberts plus five cruisers and fifteen destroyers. They were placed east of Sword Beach, supporting Assault Force S. After assembling the fleet in the Clyde area she arrive don station on the morning of 6 June and opened fire at around 05:30. Ramillies silenced the German battery at Benerville-sur-Mer and later straddled three German torpedo boats from Le Havre. They verered off and escape but launched their torpedoes, two passing between Warspite and Ramillies, hitting the Norwegian destroyer Svenner behind, which sank. Ramillies resumed firing on other positions until the end of the day, allowing cruisers and destroyers to move closer for direct fire support. Bennerville battery was destroyed and silenced in the afternoon, allowing to cancel commandor Operations Frog and Deer to take it.
Both Ramillies and Warspide then retreated for the night and returned, this time with Rodney. Rodney and Nelson alternated fring on German defences at Sword, Gold, and Juno and in total, Ramillies alone spend 1,002 main shells but her worn-out guns were replaced at HM Dockyard by spares from her earlier sisters.
In July 1944 HMS Ramillies joined the Mediterranean allied fleet mobilized for Operation Dragoon planned for August. She was one of five battleships in support to the landings, with USS Nevada, Arkansas and Texas, and the Free French Lorraine, rearmed from Alexandria. Her cover lasted from 15 to 28 August as part as Support Group Alpha, which concentrated on coastal batteries around the Gulf of St. Tropez. She silenced a heavy battery south of St. Tropez at 06:15 and the one near Cape Camarat at 06:54. The landing were successful and on 17 August, she moved to Sitka sector, shelling German positions on the island of Port-Cros, guided by USS Quincy (CA-71) spotted plane. She scored six direct hits on the town’s fort, turning it to rubble.
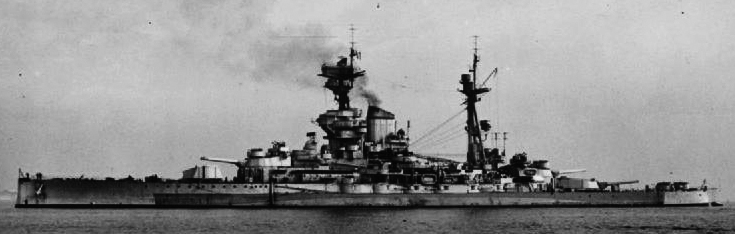
HMS ramillies in 1945
Then her group moved towards Toulon, assisting French forces capturing the city and silencing the batteries on the St. Mandrier Peninsula. Later she operated off Porquerolles on 25 August with Lorraine and cruisers, silencing two batteries. On 26 August, the shelling went on, as well on 27 August until the German gun crews surrendered on the 28. She departed the following day, but at that point both her crew an captain knew this was her last hurrah, also symbolic of the use of Battleships during this war in general.
On 31 January 1945 Ramillies was reduced to reserve at Portsmouth, partially disarmed. She was converted into a barracks ship on 15 May 1945 after the surrender, attached to to HMS Vernon training establishement, as Vernon III. In December 1947 she was sold for scrap to Cairnryan, and broken up from 23 April 1948. One of her main gun has been preserved at the Imperial War Museum in London.
HMS Royal Sovereign
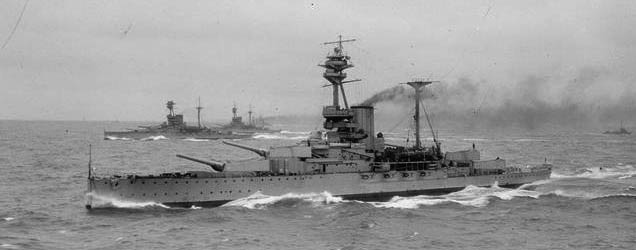
Royal Sovereign underway with other R class battleships, Grand Fleet, 1917.
HMS Royal Sovereign, the eight of the name (started 1637) was built at HM Dockyard, Portsmouth between 15 January 1914 and her launch on 29 April 1915, fitted out and commissioned in May 1916. On 30 May 1916, she was barely three weeks in service, her crew still training, when fleet commander Admiral John Jellicoe ordered the Grand Fleet to sea (and battle). Due to such “green” crew, the battleship was ordered to stay behind in port, to some bitterness later among officers and crews. There would be indeed no other occasion to shine until the end of the war. When judged fully ready for service, HMS Royal Sovereign participated in her first operational sortie on 18 August 1916, when trying to ambush the Hochseeflotte, spoiled by miscommunications and mistakes on the 19. After an other event showing the danger of submarines and mines, the Grand fleet stayed in port until April 1918, on the threat posed on convoys to Norway. Strict wireless silence prevented Room 40 to warn Admiral David Beatty, later revealed by the accident of SMS Moltke and it was too late to intercept the fleet. HMS Royal Sovereign was present on 21 November 1918 when the Hochseeflotte was conducted to Scapa Flow.

HMS Royal Sovereign shelling Mudanya, Turkey July 1920.
Inter-war years and refits
Royal Sovereign meanwhile went into drydock at Invergordon in September 1918. In late 1919 she joined the 1st Battle Squadron, Atlantic Fleet but like her sister was pressed to act in the eastern Mediterranean. The 1922 Washington Naval Treaty had the RN limited to fifteen battleships, and it was decided to kept the last dreadnought in service, pending possible modernization. After service in the Atlantic Fleet until 1926, on 4 October 1927, Royal Sovereign had her major refit (new rangefinders, searchlights and other modifications), returning on active duty from May 1929, this time assigned to the Mediterranean Fleet. In addition to her and Resolution, Revenge, the Malta-based force also comprised HMS Queen Elizabeth, as the five ships of the Queen Elizabeth class were rotated, underging extensive modernisation. Royal Sovereign participated in fleet exercises in 1934 in the Bay of Biscay and off Greece. In 1935, this was the Jubilee Fleet Review and she ended in the 2nd Battle Squadron, Atlantic Flee afterwards, as flagship of Rear Admiral Charles Ramsey. She became a training ship until 2 June 1937, and refitted afterwards until 18 February 1938.
She escorted in 1939 King George VI in a state visit to Canada but by early 1939, she was scheduled by the Admiralty to be to send to Asia with her three sisters, amidst growing tensions and Japanese expansionism. The “Singapore strategy”, called for a fleet to be formed in Britain and sent there, but the plan was contested due to the time it would take to get there, unlike a dedicated local battlefleet (which never was created until Force Z). As the new King George V-class battleships were not scheduled to enter service until 1941 the plan was dropped and the ships were kept in the home fleet. HMS Royal Sovereign was stationed in Invergordon before the war, soon joined by her sisters HMS Resolution and Royal Oak, reinforced by HMS Rodney and Repulse, and later Nelson which became flagship of Admiral Charles Forbes. That was the home fleet core, while the Mediterranean fleet comprised the QE class when WWII broke out.
1939: N. Atlantic, 1940: Mediterranean
HMS Royal Sovereign first mission was to screen the Greenland-UK Kingdom gap, searching for German merchant ships trying to get home to Germany. She was part of the 2nd Battle Squadron, North Atlantic Escort Force and was based in Halifax to protect convoys from Canada to Britain. After a short refit in Plymouth by May 1940 she was sent in the Mediterranean Fleet, Alexandria with Warspite, Malaya, and Valiant (Admiral Andrew Cunningham). On 25–27 June with HMS Ramillies escorted two Alexandria-Malta convoys (Italy was now at war since the 10th). On 28 June Italian destroyers were spotted off Zakynthos Admiral John Tovey sent there the 7th Cruiser Squadron with HMS Royal Sovereign as distant backup. She teamed with Malaya as Group, present at the Battle of Calabria, 18 July 1940, but lacking speed she stayed behind with Malaya. In mid-August 1940, she was torpedoes but missed in the Red Sea by the submersible Galileo Ferraris.
1941-43: Indian Ocean

HMS Royal Sovereign in the Indian Ocean, 1942
By the fall of 1940, she headed north, returning to the home fleet, was assigned to Atlantic convoy duties until August 1941. Maintenance was done in Norfolk, Virginia, due to British Yards being at full capacity. By May 1941 the admiralty wanted to create a powerful fleet based in Singapore: Royal Sovereign was to be sent there with her sisters Revenge, Ramillies, and Resolution. It was due to be assembled in March 1942 and at the start of March 1942, HMS Royal Sovereign and Cornwall escorted the convoy SU.1 (twelve troopships, 10,090 Aussie soldiers going back home) from Colombo to Australia. It reached Fremantle on 15 March and afterwards, Royal Sovereign joined her sisters in the Eastern Fleet (Admiral James Somerville). The fleet had an air component also with HMS Hermes and the four Revenge plus Warspite, seven cruisers and sixteen destroyers. But soon the “R class” were kept away from combat and back to escorting convoys in the Indian Ocean. Later while refuelling the battleships, Somerville learned the Japanese were about to fell on Colombo, and he later decided to withdrew Royal Sovereign and her sisters to Mombas. They were to escort convoys between Middle East and the Persian Gulf until September 1943 (And in between a refit in Philadelphia by late 1942). Royal Sovereign had her deck armour increased by 2 inches (51 mm) and four six-inch guns removed. She returned for another one, mostly to add AA and new radars, from March to September 1943 and back to the Indian until January 1944.
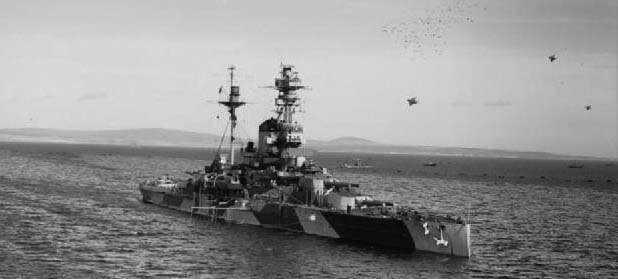
In Soviet service as Arkhangelsk (1944-49)
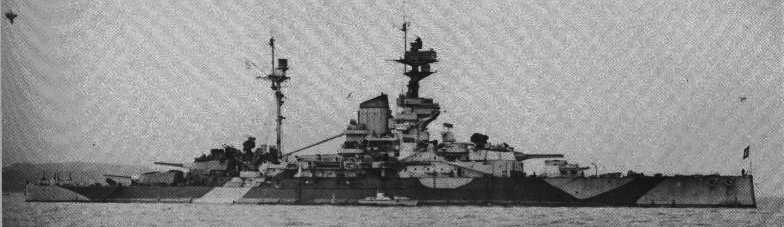
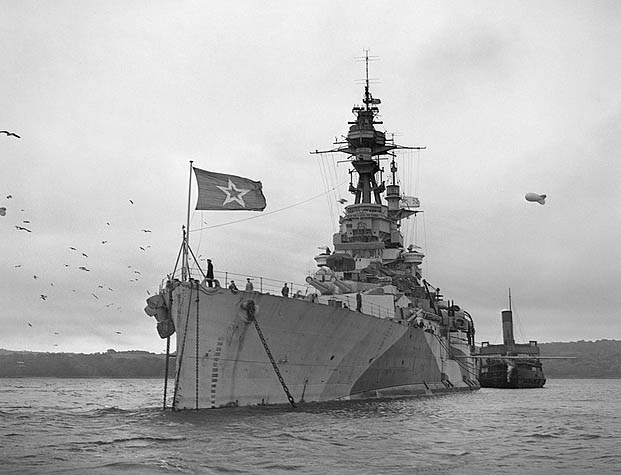
Arkhangelsk 1944
HMS Royal Sovereign was sent to Scapa Flow until 30 May 1944, when transferred on loan to the Soviet Navy, rebaptised Arkhangelsk. This choice was alternative to a transfer of a war reparation battleship from Italy. Leaving home waters on 17 August 1944 as escort of the Convoy JW 59 (33 merchant vessels bound to Murmansk) she was attacked by U-boat U-711 (Hans-Günther Lange), which fired -but missed- and yet reported hits on Arkhangelsk and a destroyer. In fact he used the new magnetic torpedoes, which all exploded prematurely. Other attacks followed when she was moored in Kola, but she was well protected by her anti-torpedo nets. Later Dönitz planned to send six Biber midget submarines to attack her, but the model’s own issues had the plan cancelled. Arkhangelsk departed Kola to patrol the White Se anyway, and for the first time, her Soviet crew arrived for a formal commission on 29 August 1944, at Polyarny. Arkhangelsk was almost the only battleship left operational, and the largest of the Soviet fleet, flagship of Admiral Gordey Levchenko. She usually sailed to meet approaching Allied convoys in the Arctic Ocean, escorting them to Kola. This lease also freed experienced crews for the RN, affected to other ships. The war ended, yet the battleship stayed in service until 1947 (by that stage the cold war arguably started).
Arkhangelsk ran aground in the White Sea in late 1947, with a seemingly moderate damage as the ships was returned to the Royal Navy on 4 February 1949. The British government indeed decided to send the more modern and faster Italian battleship Giulio Cesare, former wae prize, to the Soviet Black Sea Fleet (as Novorossiysk). The Soviet Navy at first claimed that Arkhangelsk was not seaworthy enough to make the trip, until inspected by a Royal Navy officer. She came back home in January 1949, reaching Rosyth naval base. Inspection revealed her poor condition so she was sold for scrap, at Thos W Ward’s, Inverkeithing (Scotland) on 18 May 1949.
 Latest Facebook Entry -
  X(Tweeter) Naval Encyclopedia's deck archive
 Instagram (@navalencyc)


 French Navy
 Royal Navy
 Russian Navy
 Armada Espanola
 Austrian Navy
 K.u.K. Kriegsmarine
 Dansk Marine
 Nautiko Hellenon
 Koninklije Marine 1870
 Marinha do Brasil
 Osmanlı Donanması
 Marina Do Peru
 Marinha do Portugal
 Regia Marina 1870
 Nihhon Kaigun 1870
 Preußische Marine 1870
 Russkiy Flot 1870
 Svenska marinen
 Søværnet
 Union Navy
 Confederate Navy
 Armada de Argentina
 Imperial Chinese Navy
 Marinha do Portugal
 Mexico
 Kaiserliche Marine
 1898 US Navy
 Sovietskiy Flot
 Royal Canadian Navy
 Royal Australian Navy
 RNZN Fleet
 Chinese Navy 1937
 Kriegsmarine
 Chilean Navy
 Danish Navy
 Finnish Navy
 Hellenic Navy
 Polish Navy
 Romanian Navy
 Turkish Navy
 Royal Yugoslav Navy
 Royal Thai Navy
 Minor Navies
 Albania
 Austria
 Belgium
 Columbia
 Costa Rica
 Cuba
Cuba Czechoslovakia
 Dominican Republic
 Haiti
Haiti Hungary
 Honduras
 Estonia
 Iceland
 Eire
Eire Equador
 Iran
Iran Iraq
Iraq Latvia
 Liberia
 Lithuania
 Mandchukuo
 Morocco
 Nicaragua
 Persia
 San Salvador
 Sarawak
 Uruguay
 Venezuela
 Zanzibar
 Warsaw Pact Navies
 Bulgaria
 Hungary

 Bundesmarine
 Dutch Navy
 Hellenic Navy
 Marina Militare
 Yugoslav Navy
 Chinese Navy
 Indian Navy
 Indonesian Navy
 JMSDF
JMSDF North Korean Navy
 Pakistani Navy
 Philippines Navy
 ROKN
ROKN Rep. of Singapore Navy
 Taiwanese Navy
 IDF Navy
 Saudi Navy
 Royal New Zealand Navy
 Egyptian Navy
 South African Navy


 Ukrainian Navy