

 United Kingdom (1902-1922)
King Edward VII, Commonwealth, Dominion, Hindustan, Britannia, New Zealand, Africa, Hibernia
WW1 RN Battleships
HMS Dreadnought | Bellerophon class | St. Vincent class | HMS Neptune | Colossus class | Orion class | King George V | Iron Duke class | HMS Agincourt | HMS Erin | HMS Canada | Queen Elizabeth class | Revenge class | G3 classMajestic class | Centurion class | Canopus class | Formidable class | London class | Duncan class | King Edward VII class | Swiftsure class | Lord Nelson class
Invincible class | Indefatigable class | Lion class | HMS Tiger | Courageous class | Renown class | Admiral class | N3 class
The tipping point of British pre-dreadnoughts
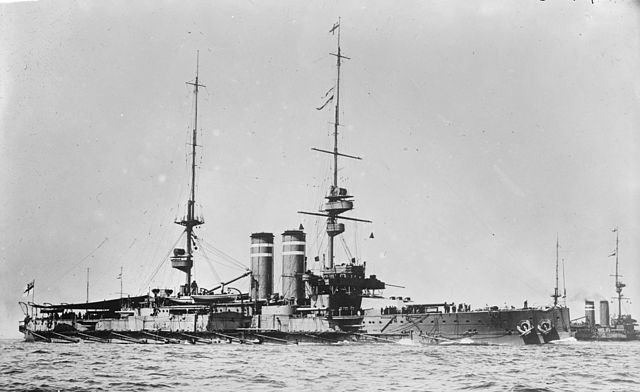
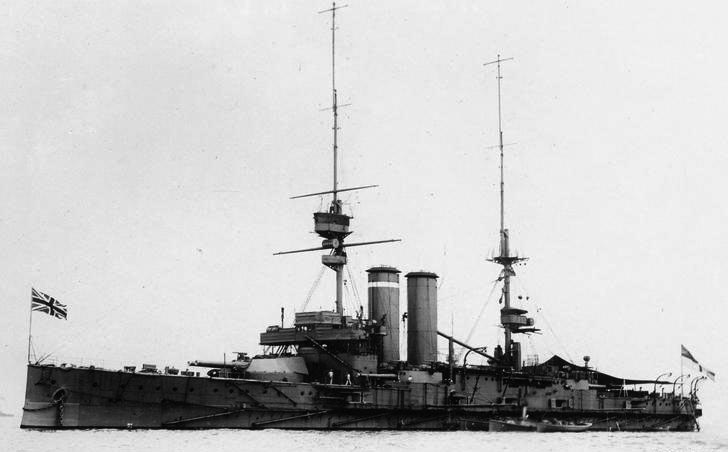
The eight battleships of the King Edward VII were the pinnacle of British capital ship development in their age, as the lead ship was launched in 1903. They retook the lead over innovative designs to Italy and the USA, introducing a powerful secondary battery to almost double their firepower. However this was paid with some sacrifices design-wise, and in 1914, these now obsolete vessels were seen largely as “expandable”. But they were a brave leap forward, as the first British “Semi-Dreadnoughts” followed by the even more radical Lord Nelson class.
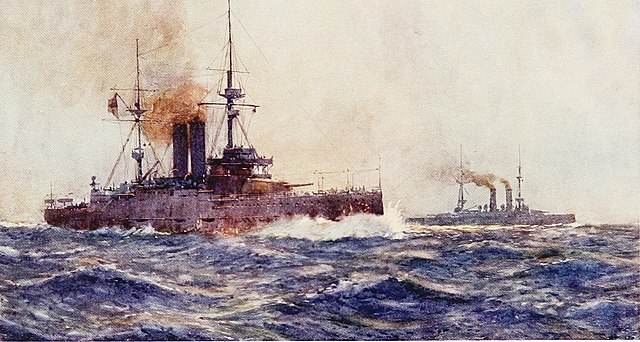
They also played their part in WWI. After all were based for years in the Mediterranean, the logical place for British pre-dreadnoughts after 1906, in WW1 they were back to the North sea and the channel, left more vulnerable since the Grand Fleet was way north, in Scapa Flow. HMS Hibernia was flagship in the Dardanelles, served alongside New Zealand. HMS Hindustan participated in the Zeebrugge and Ostend raids, King Edward VII hit a mine off Cape Wrath, but sank slowly with few losses. HMS Britannia was the second loss, torpedoed by UB 50 on November, 9, 1918, a mere three days before the armistice. They were all stricken in 1920.
Design development
Design work on the future “King Edward VII” class actually started in in 1901. The Royal Navy back then seen with interest Italy’s latest battleships of the Regina Elena class but also on the other side of the pond, the US Navy’s Virginia class, older, but mounting a heavy secondary battery with 8-inch (203 mm) guns on superfiring turrets.
Interested by this additional “medium-heavy” caliber, the British design staff started their own study without approval by the director of Naval Construction, William Henry White (The latter was indeed also ill at the time). They had two examples of seocndary heavy artillery in superfiring and wings turrets, and started with the known, trusted London class.
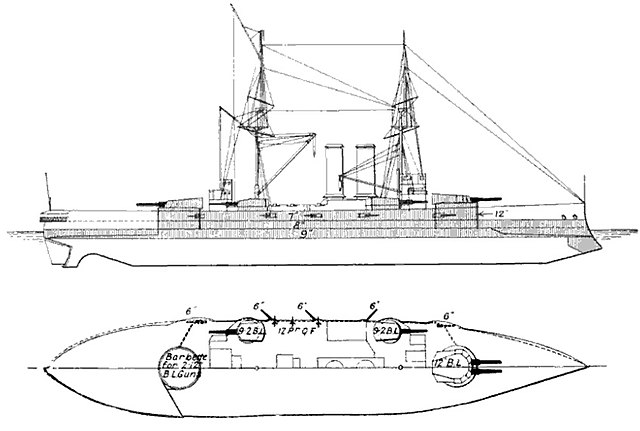
The goal was to arm them with a secondary battery, either with the 7.5 in (191 mm) or 9.2 in (234 mm) caliber. Assistant DNC, J. H. Narbeth however reported the challenge it was to provide a workable solution, in which these secondary turrets would not interfere with the main battery, and this, eventually ruled out the superimposed turrets solution. Light the USN later, it was found that due to loading issues, it was not worth the complication. In fine, that’s the Italian arrangement with four secondary turrets which was retained, with one at each corner.
Next was the choice of artillery caliber. pros and cons were weighted, as a large caliber would most likely built single-gun turret, therefore less firepower, and also broadly similar water plumes as the main guns, making spotter’s work more difficult. Based on these arguments, the Admiralty provisionally settled on the first draft with eight 7.5 in guns in twin gun turrets. However soon, the DNC William Henry White returned to office, and suggested the 9.2 in guns were more effective for dealing with other battleships. Due to his prestige and seniority, he eventually reversed the Admirakty’s decision, which choose the second draft.
Next was the more precise design phase, with precise calculations to see it was workable on an engineering standpoint. The heavy secondary guns were much heavier, took up more space on deck, and thus it appeared quickly compromises were needed. Designers started to sacrifice the secondary battery, getting rid of most casemates, relocating them to a central box battery protecting the whole, instead of individual casemates. They also modified their mount to have these lower, and further reduce the gravity center relative to the waterline, and decreased the freeboard.
But that decision doomed these secondary guns in rough seas. Water spray would just prevent them to fire. Also, due to a generally higher metacentric height caused by the secondary turrets, combined with a low freeboard, and the King Edward VIIs were suceptible to plough heavily in heavy seas and rolled a lot more than conventional designs. Was the cost of this worth it ?
In the end, yes, because with this secondary battery, they almost doubled the firepower compared to earlier British battleships, and was on par with these Italian and American designs. It seemed to give back the edge to the Royal Navy in warship innovation as well, creating what is seen retrospectively by modern authors, as it’s first “semi-dreadnought”. Nevertheless, due to the habit of building large series of battleships, there were risks to see the last vessels obsolescent at completion (indeed, Hibernia was completed in 1907, whereas the keel of the first ship was laid down in 1902): The HMS Dreadnought made them all obsolete overnight.
Indeed, these ships were still slow, and weakly armed compared to the new breed of capital ships and in 1914 were largely seemed as “expandable”, sidelined in secondary theaters, or deployed at the front of dreadnought battle squadrons, screening for naval mines. These were the last battleships of what was called later the “White Era” which started with Royal Sovereign class in the late 1880s, and many classes afterwards, all under his directorate. They were a culmination in British classic battleship design, although succeeded by a very last class, also of “semi-dreanoughts”, but more radical and modern in their approach: The Lord Nelson class.
Sir John Arbuthnot Fisher, now at the head of the admiralty as first sea lord from 21 octobre 1904, completely rebooted the “Navy”‘s software”, and among others, stopped the contruction of possible follows-up of the Nelsons, to embark on the dreadnought race. A new era began, a race up to 1914 which with a new fleet of dreadnoughts to face the Kaiser’s Hochseeflotte grand ambitions, while all these older “pre-dreadnoughts” were now relegated as second-fiddle. The King Edward VII ultimately were a transitional breed, that played their part in a two-step move for the Royal Navy to retake the lead over any navy.
Design in detail
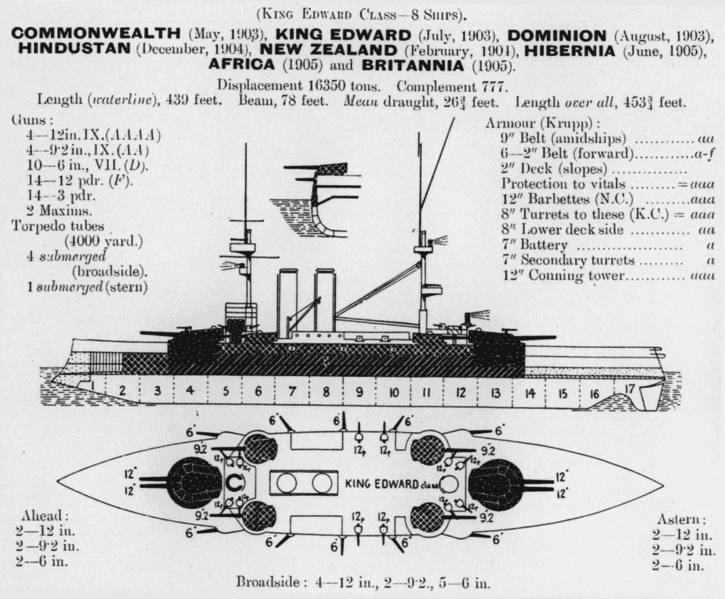
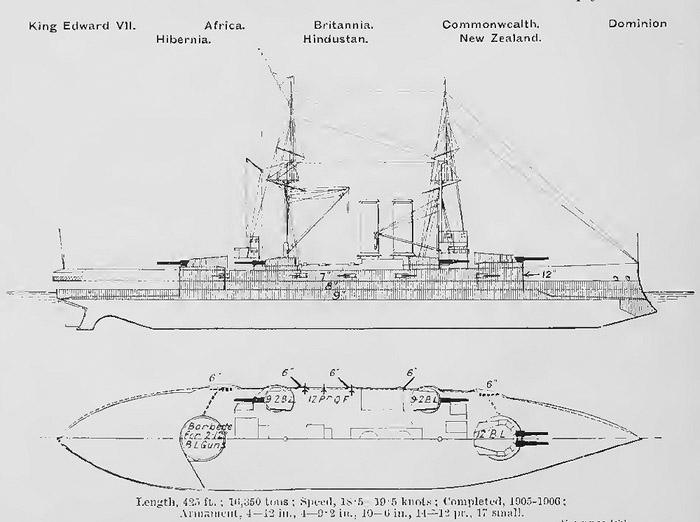
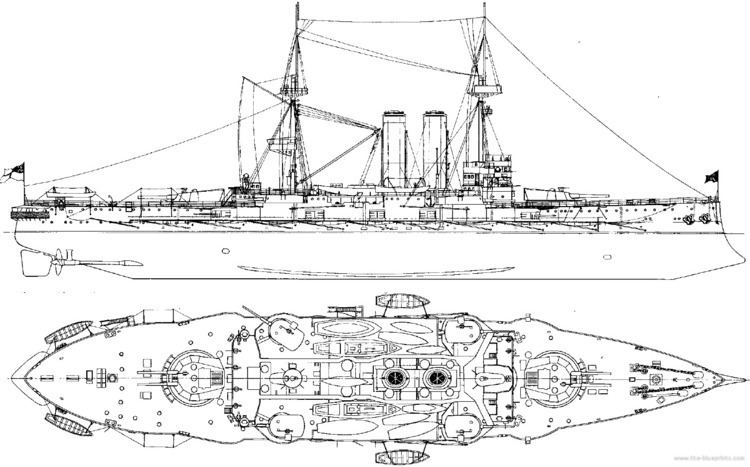
Brassey’s blueprint in 1907
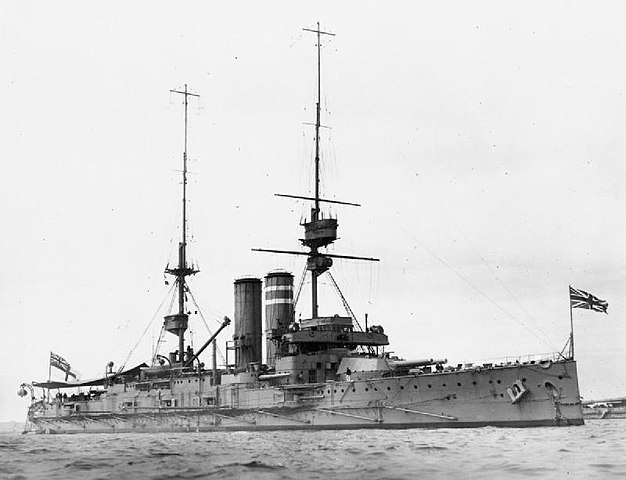
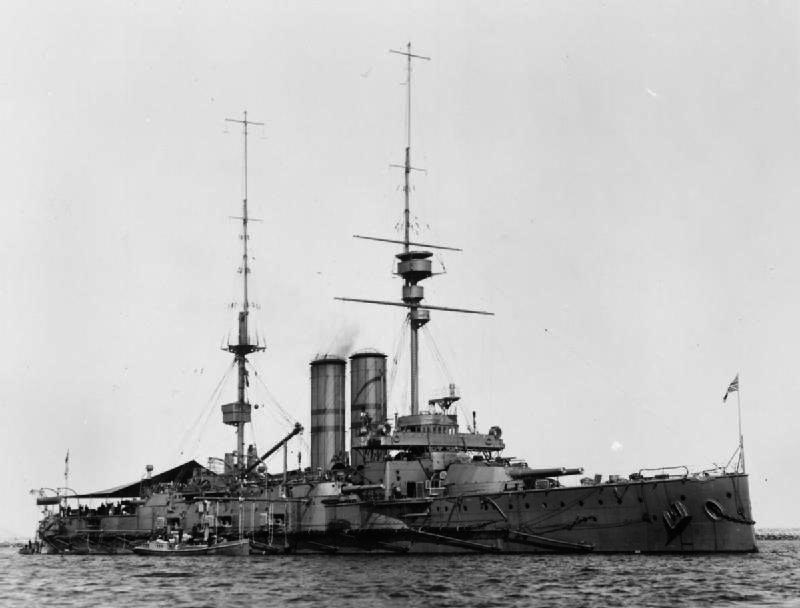
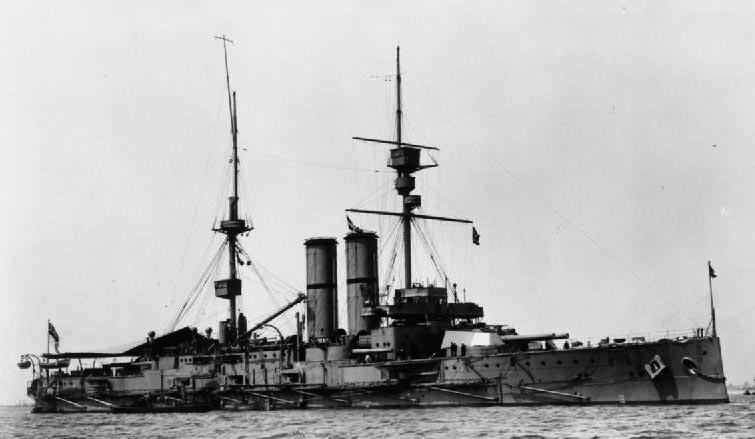
The King Edward VII class was the first to get rid of the aft conning tower, replaced by a torpedo control tower, directing the stern torpedo tubes. Two heavy pole masts were installed, with foremast’s tops unarmed but reserved for wireless telegraphy cabling, and fire control. The tops differed on King Edward VII, Commonwealth, Dominion, Hindustan, and New Zealand, having large oval tops with a smaller top below, and Africa, Hibernia, Britannia have smaller square tops plus two smaller tops lower.
Underwater, they innovated by having balanced rudders, not seen on a British Capital ship since 1870. Due to this, they were very manoeuvrable, showng on trials, hard rudder, a tactical diameter of just 340 yards (310 m) at 15 knots (28 km/h; 17 mph). However in service this installation was paid by some unability to keep as a straight course, earning them the nickname of “Wobbly Eight” when manoeuvering with the Grand Fleet in WWI. They also had a faster roll, while still making excellent gun platforms. However, compromises with ther freeboard meant they became very wet in bad weather.
Hull construction
All eight vessels had the same dimensions, being 425 feet (130 m) long between perpendiculars, 453 ft 9 in (138.30 m) overall. Beam was 75 ft (23 m), draft 25 ft 8 in (7.82 m) fully loaded. They were about 1,000 tons more than the previous thousand tons heavier than the previous Duncan.
They displaced 15,585, up to 15,885 long tons normal, and 17,009-17,290 long tons fully loaded between them. As saif, theior freeboard was rather low, just 22 ft (6.7 m) forward, 16 ft 6.5 in (5.042 m) amidships, 18 ft (5.5 m) aft. This measured made them wet, but save weight also, combind with the fact they only carried supplies for the crew limilited to three months instead of four, the usual practice. The crew was around 755 in peactime but grew during WWI to 815.
Powerplant
The King Edward VII-class differed little fro previous classes, with two 4-cylinder triple-expansion engines connected to sgats driving inward-turning screws. Steam was from eighteen water-tube/fire-tube boilers. On this matters, yards had some freedom in their choice, and composition avried from ship to ship. Only common ground, they were all coal-burning as designed (see later)
-King Edward VII: 10 Babcock & Wilcox boilers +6 Scotch marine boilers
-Africa, Britannia, Hindustan, Hibernia: 18 Babcock & Wilcox boilers +3 cyl. return tube boilers.
-New Zealand: 12 Niclausse boilers +3 cyl. return tube boilers
-Dominion, Commonwealth: 16 Babcock & Wilcox boilers.
Yards also received instructions to test comparative arrangements effectiveness for a future standardisation, and between boiler types. The mixed boiler ships proved to be disappointing, complicating powerplant management, and this experiment was never repeated.
Boilers were trunked into two funnels amidships, like previous designs, and if they all burned coal, they saw oil sprayers installed during construction, which was an innovation in British battleships propulsion. Their main advantage was to raise quickly the internal temperature, and thus steam pressure, but could be used also to boot their acceleration at sea. This system proved the effectiveness of oil, and draw the idea of all oil-fired boilers, even though this was a transitionl long process, lasting until the Queen Elizabeth-class super-dreadnoughts in 1913. New Zealand was the only one in her class having Niclausse boilers, not adaptable to oil sprayers.
Performance-wise, the new Battleships stuck the usual top speed, managing 18.5 knots (34.3 km/h; 21.3 mph) as specified, based on 18,000 indicated horsepower (13,000 kW) but on trials, some reached 19 knots (35 km/h; 22 mph), the fastest being HMS Dominion and Hindustan. Cruising radius was limited to 5,100 nmi (9,400 km; 5,900 mi) at 10 knots (19 km/h; 12 mph), and when filling the fuel oil tanks, 6,700 nmi (12,400 km; 7,700 mi), equivalent to the Duncan class, which were also marginally faster (19 knots).
Protection
The heavy armour of the King Edward VII class was made of Krupp cemented armour, apparently excmusively whereas the previous Duncan/Londons had a mix of Krupp, Harvey and mild steel for the lass sensitive parts. The Krupp process was replicated under licenced and produced in UK. The layout was still reminiscent of previous classes, but the main change was an armoured box to protect the 6-inch guns, rather individual armoured casemates, a heavier solution.
The belt armour, the main and secondary turrets and their barbettes plus the conning tower were all made in Krupp Armor. The secondary 9.2 in turret barbettes were just 4 in (102 mm) thick as they were very low over the deck and on the assumption side armour provided sufficient protection, with little chance a shell would exploding below the barbette in the ammunition hoists. However it was a good compromise, never seriously tested in combat.
- Main armoured belt 9 inches (229 mm) thick
- Aft of the citadel, 2 in (51 mm) of Krupp non-cemented plate
- Forward of the citadel, 7 in, tapered to 5 in, 3 in (76 mm)
- Upper edge, main belt: 8 in (203 mm)
- Transverse bulkheads aft and fwd ends 9-12 in (229 to 305 mm)
- Battery deck (6-in guns): 7-inch-thick with Krupp non-cemented screens
- Armoured deck: 2 in mild steel
- Armoured deck (citadel floor): 1 in (25 mm)
- Battery deck floor (6-in guns): 2 in (51 mm)
- Main Battery turrets: 8-12 inches thick
- Main Battery barbettes: 12 inches thick
- 9.2-inch gun turrets: 5-9-in
- 9.2-inch gun barbettes: 4-in (102 mm)
- Conning Tower: 12 in walls.
Armament
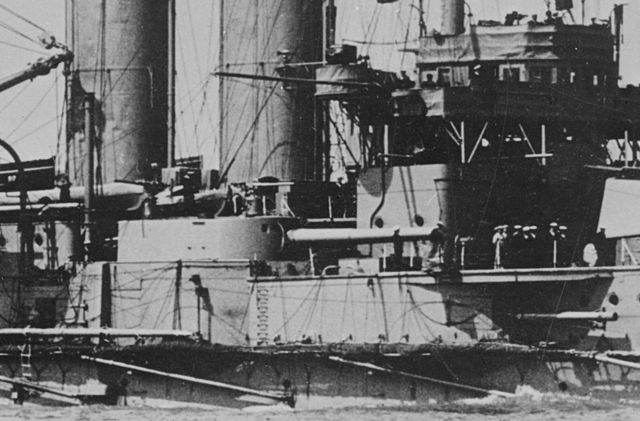
King Edward VII’s side turret
Main: 2×2 12-in/40 Mk.IX
The main armament was very much the same as previous classes: Two twin turrets (with flat plating), 12-in BL 12 in (305 mm) Mk IX guns fore and aft, at each end of the superstructure. They were mounted slightly lower than usual due to weight-savings, but high enough to be safe from sea spray.
The 49 long tons, 40-foot-5-inch long ordnance pieces fired a 850 pounds (390 kg) separate charge/shell and used a Welin interrupted screw breech. The mount elevated -5/+15 degrees, for a rate of fire of 1 round per minute and a shell (AP) muzzle velocity of 2,612 ft/s (796 m/s) specifically on the King Edward VII class, effective range of 15,000 yards (14 km) at 15° elevation.
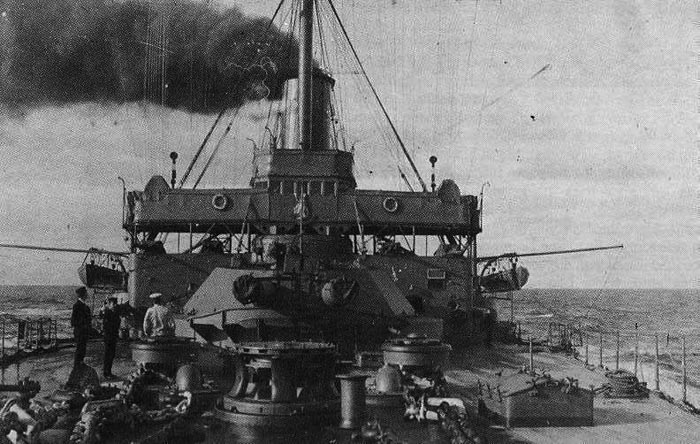
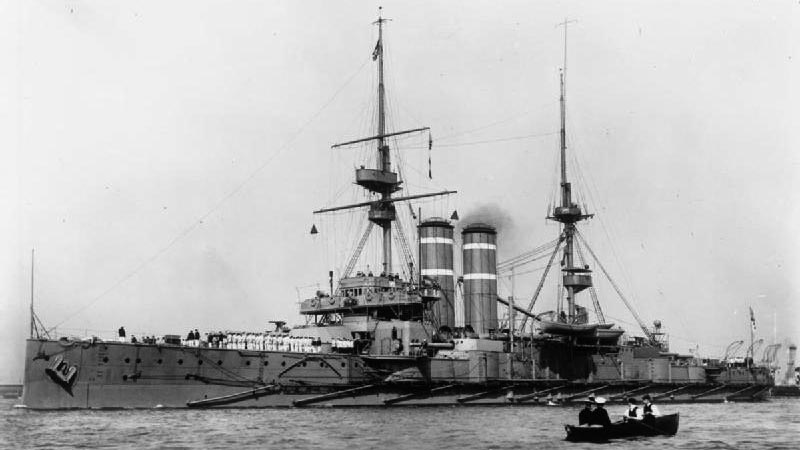
HMS Britannia’s Forecastle (October 1914)
Secondary: 4×1 9.2-in Mk.X/46
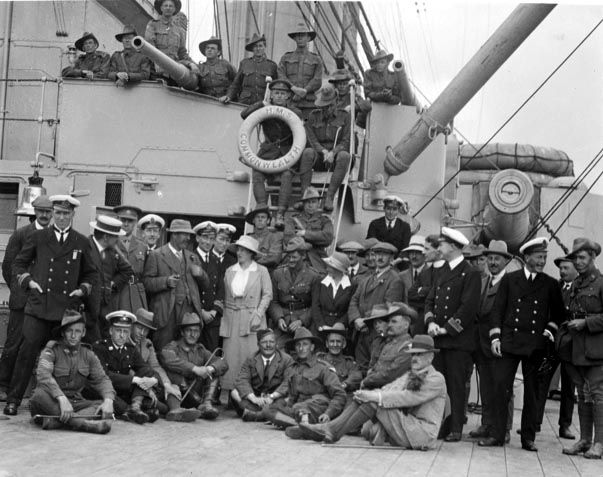
Australian soldiers visiting HMS Commonwealth in 1919. To the left, the barrel of the 10-in gun is visible, as well as a superstructure’s
Manufactured by Elswick Ordnance Company, these BL 9.2 in (234 mm) Mk X guns were placed into four narrow turrets placed on the four corners of the superstructure. As wing turrets their traverse was limited to about 45° for and aft. The Mk X weighted 28 tons, were 35 ft 9 in (10.897 m) long, 46.7 caliber, with a Welin interrupted screw Breech. They fired a 380 lb (170 kg) shell at 2,643 ft/s (806 m/s) (extact caliber of 9.2-inch, 233.7 mm), 15° elevation on the Mark V Barbette mount) and 29,200 yd (26,700 m) range.
Tertiary: Ten BL 6 in (152 mm) Mk VII guns
Placed as it was said above, these guns were not in single casemates, but rather protected by the same armoured box, in the battery amidship. They suffered from sea spray in heavy weather, being lower than previous class. Four were in the corners of the casemates, in recesses, while the rest had more limited traverse. Albeit not sponsoned they still can fire almost 90° forward or aft. They fired HE shells at 8 rpm and over 14,600 yd (13,400 m) with a light charge and 15,800 yd (14,400 m) with an heavy charge.
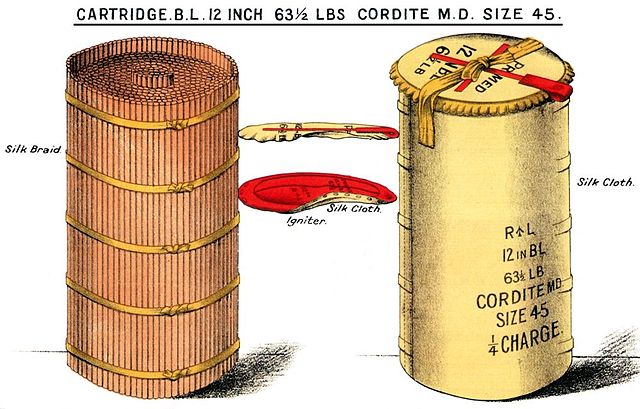
BL 12 inches Cordite Cartridge, 63.5 Ib, model used by the King Edward VII class.
Anti-Torpedo Boat Light guns & torpedoes
The KE VII class had an extensive light battery of 28 light QF guns, more impressive than on the previous Duncan class, which had just 16 of them: fourteen 12-pounder or 3 in (76 mm) guns (10 on Duncan) and fourteen 3-pounder 47 mm (1.9 in) guns (6 on Duncan). They were dispersed around the ships, four 12-pdr being under shields on the battery roof on either side, the others’s location being mostly in the superstrcture.
As usual, these battleships had a standard torpedo battery of previous British Battleships, composed of five submerged 18-in (450-mm) torpedo tubes, four in the broadside, one in the stern.
Construction
The naming convention of the new class changed compared to the previous Duncan clas (honoring ancient admirals) and the London class (mixed references). HMS King Edward VII was the first battleship laid down after the start of Edward VII’s reign, and thus as an hommage, was named after him. The Paid hommage to the British Empire at large, ships took the name of Australia, Canada, Hindustan (India), New Zealand, and the entire African colonies (“Africa”). It also looked towards the antiquity, with Hibernia (ancient Roman name for Ireland) and of course Britannia itself.
HMS King Edward VII was laid down at Devonport Dockyard on 8 March 1902, launched on 23 July 1903 and completed in February 1905, in roughly three years, usual in UK, but twice faster than French or Italian standards at the time: Seven years for the Patrie class, or six for the Regina Margherita class battleships.
HMS Commonwealth was built at Fairfield Shipbuilding and Engineering Co., laid down on 17 June 1902, launched 13 May 1903, completed March 1905. HMS Dominion was built in Vickers, laid down 23 May 1902 and launched 25 August 1903, Hindustan at John Brown & Company (laid down 25 October 1902, launched 19 December 1903), HMS Britannia at Portsmouth Dockyard on 4 February 1903, launched 10 December 1904 as HMS New Zealand, laid down a few days later on 9 February. HMS Africa was laid down at Chatham Dockyard on 27 January 1904. HMS Hibernia was laid down at Devonport Dockyard on 6 January 1904, launched 17 June 1905 and completed on January 1907, as HMS Dreadnought was completed also.
Modifications
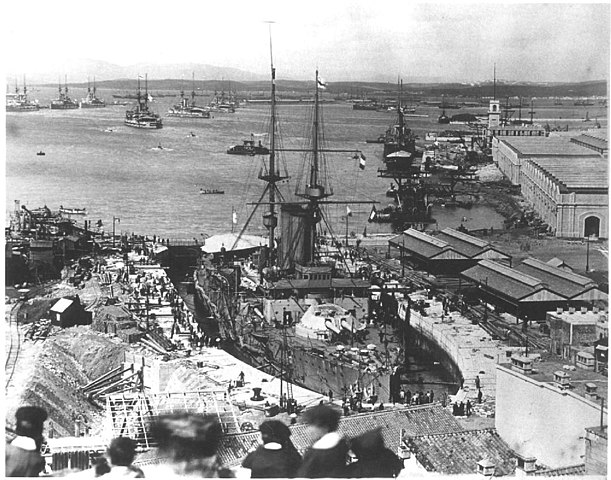
King Edward VII in drydock for maintenance, likely Mediterranean WW1.
According to photos, livery wise, these battleships were never painted in the classic black hull-canvas yellow superstructure, but in medium gray from ther completion, as it became the norm from 1903. However, funnel identification bands were to their funnels. Their location and order made these ships all unique, easily spotted in the battle line. This was a current practice at the time.
The Battleships being caught by advances in technology went through a wave of modifications during their almost twenty year career:
In 1907, King Edward VII saw a relocation of some of her 12-pounder guns to the main turret roofs, soon found unsatisfactory and reverted the same year. In 1907-1908 like her sisters Commonwealth, Dominion, Hindustan, and New Zealand, she had her 3-pdr in the bridge removed entirely. She gained however search lights, some installed on the the 9.2-inch turret roofs and bridge wings. Onne can marvel at the result of a blast on these glass devices…
In 1911-12 HMS Hibernia and Hindustan received new rangefinders placed on their aft superstructure. These years, most had alterations to their search lights. Also in between, their anti-torpedo nets were all removed. They were seen since years as an hinderance in operation for little gain.
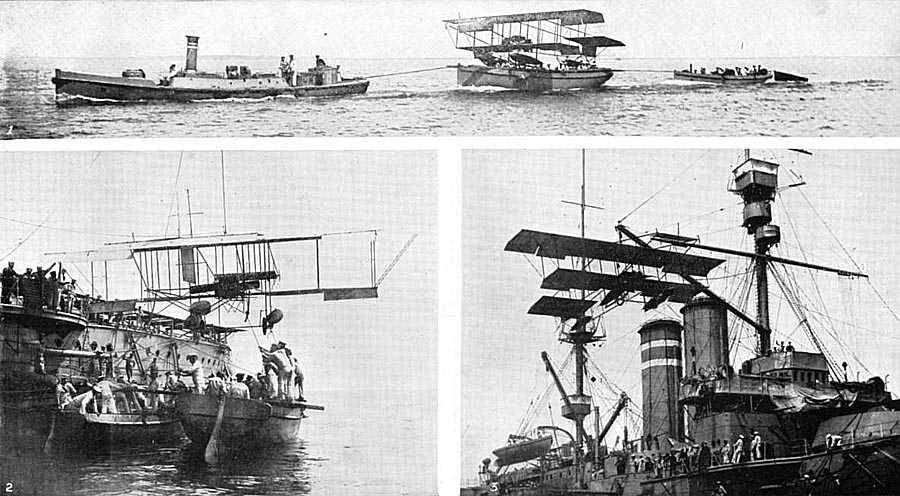
Hibernia-seapane-tests.
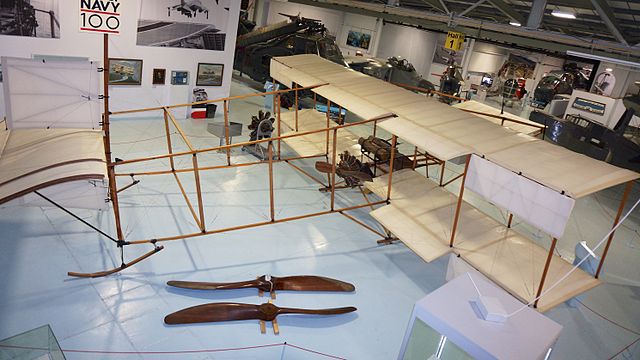
Fleet_Air_Arm_Museum_Short-S27-hms-africa
HMS Africa in 1912 started to experiment aircraft launching, on a dedicated ramps installed on her bow. Many flight tests were done to validate a procedure, the use of a spotter aircraft. Many tests were performed but ultimately the installation was retired, transferred to HMS Hibernia the same year, and removed form the latter soon afterwards. The use of platform-launched aicraft would have to wait until 1917 to resurface, on Dreadnoughts.
After the First World War broke out, HMS Zealandia (ex-New Zealand, name given in between to a battlecruiser) had one 12-pounder retired, sent to a Q-ship, but she received two 3-pdr instead. In 1914, HMS Dominion had her bridge enlarged.
The most radical modification was done from 1916 and until April 1917: All 6-inch were removed but four, relocated a deck higher in open pivot mounts as it was shown they were useless in heavy weather. They took the place of 12-pounder guns previously located there. The remainder quickly found uses on many vessels in completion. They also received additional search lights.
In 1918, HMS Zealandia and Commonwealth were completely modernised and converted as gunnery training ships:
-Pole masts replaced with tripods supporting the latest fire control directors and rangefinders.
-Remaining 12-pdr guns removed
-Two 3 in (76 mm) anti-aircraft guns added, aft superstructure.
-Anti-torpedo bulges on Commonwealth only.
-Dazzle camouflage for Commonwealth and possibly, but not photo-confirmed, Zealandia.
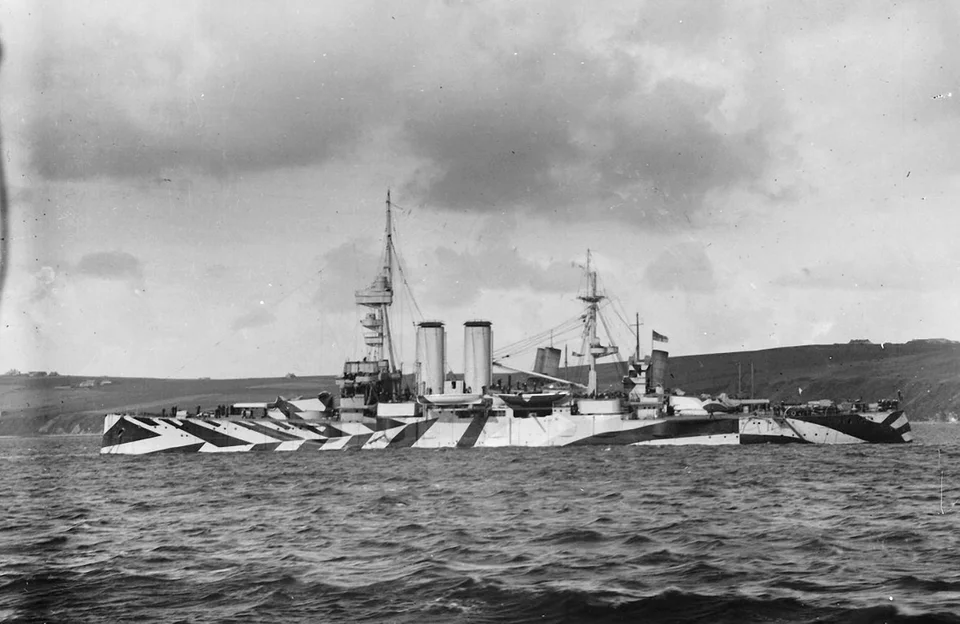
HMS Commonwealth as a TS, modernized and camouglaged in 1918, Scapa Flow. Src reddit.
General assessment of the “Wobbly Eight”
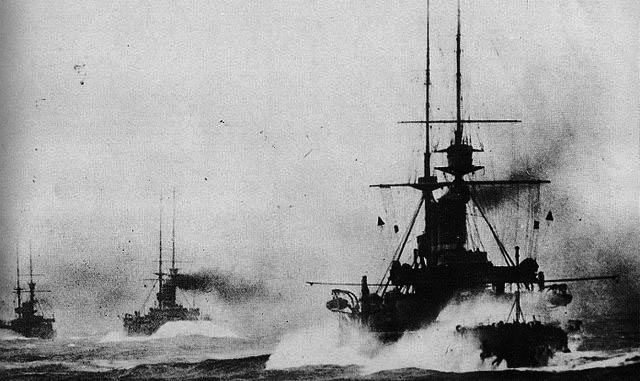
KE VII class battleships on maneuvers, 1909
The King Edward VII class were quicky obslete as they entered service from 1905 with the Atlantic Fleet. The lead ship became its permanent flagship due to the will of its namesake. In 1907, they were transferred to the Channel Fleet, KE VI kept as fleet flagship. She and HMS Africa were next assigned to the Home Fleet in 1908, followed in 1909 by the rest of the class. HMS New Zealand was renamed “Zealandia” in 1911, freeing a battlecruiser name and from 1912, their division was now part of the 3rd Battle Squadron, Home Fleet.
By mid-1912, both HMS Africa, followed by HMS Hibernia were involved in airplane tests: They launched from a platform the Short Improved S.27 biplane “S.38”. It first flew by Commander Charles Samson and it was a British first. Later the feat was repeated underway. These tests showed their utility for spotting and scouting, but also that suitable equipments and procedures were needed. The 3rd BS first foering deployment was in the Mediterranean, protectin British interests in the First Balkan War (1912–1913), als part of the international blockade of Montenegro due to the occupation of Scutari, assigned to Albania.
The First World War was the first serious test for the 3rd Battle Squadron, reassigned to the Grand Fleet in Sapa Flow, ready for any Hochseeflotte sortie, depite their lower speed and being substandard compared to modern German dreadnought. In case of an operation, they would have been at sea as a reinforcement line (the first échelon being the scout battlecruisers, and the “anvil” being the dreadnoughts. They were temporarily detached to reinforce the Channel Fleet in November 1914 but quickly back to the Grand Fleet, tasked with conducting operations off Scotland, and the North Sea (Northern Patrol).
The 3rd Battle Squadron also made a sortie with the entire Grand Fleet in the central North Sea through mid-1915, notably after the Scarborough, Hartlepool, Whitby raid of December. They were still assigned as second balckup for the 1st Battlecruiser Squadron, mobilized during the battle of Dogger Bank in January. Nothing much happened until January 1916. While steaming to Ireland for a refit, King Edward VII struck a mine but sank slowly enough to save their entire crew which was rare at the time.
In 1916, the 3rd BS was assigned to the Nore Command (British southern coast) while HMS Hibernia and Zealandia were detached and sent to the eastern Mediterranean in late 1915, as reinforcement for the Gallipoli Campaign. However their role was just to act a mere presence here. They were not risked close to Turkish guns. They saw little activity until covering the Allied forces retreat in early 1916. HMS Zealandia as back to the 3rd Battle Squadron but Britannia stayed in the Adriatic Sea, taking part in the multinational fleet protecting the Otranto barrage, with the Regia Marina, trapping the Austro-Hungarian Navy.
HMS Africa took the lead of the 9th Cruiser Squadron, started a round of Atlantic Patrols in 1917, but escorting convoys way down south, between Sierra Leone and Cape Town in South Africa, a rather cushy assignation. In 1918 he crew was stricken by the Spanish flu in Sierra Leone, having 52 deaths, more than any other ship of the class, which speaks volumes about the active combat use of the class. In 1918 also, Commonwealth and Zealandia, having no more use as capital ship due to their type obsolescence, were modernised to be used in the Northern Patrol briefly and as gunnery training ship (for Commonwealth). Zealandia was used only for fire control experiments and barracks ship.
HMS Dominion and Hindustan also ended as depot ships, in distant support of the Zeebrugge Raid, in 1918. HMS Britannia, torpedoed by UB-50 off Cape Trafalgar (9 November 1918) remained afloat long enough for her crew to be evacuated with just 50 men were killed in the torpedo explosion and fire. None of them ever took part in an active battle, not fired on German ships. Their operational qualities is difficult to judge, but the only positive point was their apparently successful ASW compartimenation, even if designed in 1902, at a time, submarines were considered largely experimental and could be counted with two hands. They were just doomed by HMS Dreadnought. As a consolation perhaps, the previous Duncan and London classes did not saw much service either, but at least were considered “expandable” enough to be more involved in the Gallipoli campaign. Their inactivity is partly explained by the fact they were too recent to be fully expandable. The more recent Lord Nelson class however saw far more action in the Mediterranean.
Author’s illustration of the KE VII class
⚙ King Edward VII class specifications, as built |
|
| Dimensions | 138,3 x 22,9 x 7,82 m (454 x 75 x 26 ft) |
| Displacement | 15,500/15,885 t standard, 17,000-17,300 t FL |
| Crew | 777 wartime |
| Propulsion | 2 shaft VTE, 16 WT boilers, 18.750 ihp (13.420 Kw) |
| Speed | 18.5 knots top speed |
| Range | 6,700 nmi (12,400 km; 7,700 mi) |
| Armor | Belt 9 in, Bulkheads 12 in, Barbettes 12 in, Turrets 5-9, 8–12 in, Casemates: 7 in, CT 12 in, Decks 1–2.5 in |
| Armament | 2×2 12-10, 4×1 9.2-in, 20x 6-in, 14x 3-in, 14x 3pdr, 4x 18-in TTs Sub. |
Read More/Src
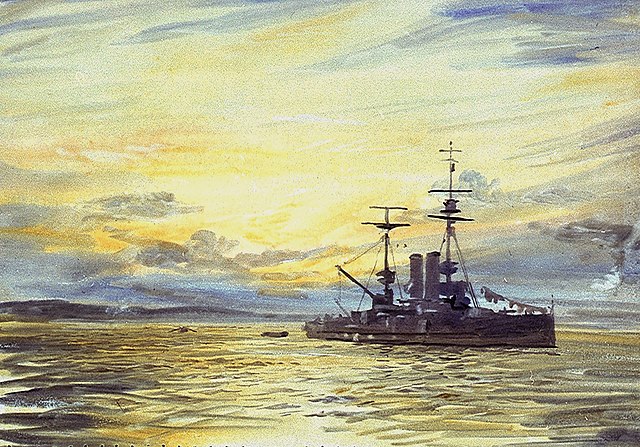
A King Edward VII class battleship in Scapa Flow in the evening (painting)
Books
Gardiner, Robert. Conway’s All the World’s Fighting Ships 1860–1905
Burt, R. A. (2013) [1988]. British Battleships 1889–1904. Barnsley: Seaforth Publishing.
Corbett, Julian Stafford (1920). Naval Operations: To The Battle of the Falklands, December 1914.
Corbett, Julian Stafford (1923). Naval Operations: The Dardanelles Campaign. Vol. III. London
Friedman, Norman (2011). Naval Weapons of World War One: Guns, Torpedoes, Mines and ASW Weapons of All Nations
Jellicoe, John (1919). The Grand Fleet, 1914–1916: Its Creation, Development, and Work. New York
Conway’s All the World’s Fighting Ships, 1860–1905. Greenwich: Conway Maritime Press
Manning, Thomas Davys & Walker, Charles Frederick (1959). British Warship Names. Putnam.
McBride, Keith (2001). “‘The Wobbly Eight’: The King Edward VII Class Battleships, 1897–1922”.
Thetford, Owen (1991). British Naval Aircraft Since 1912. Annapolis
Vego, Milan N. (1996). Austro-Hungarian Naval Policy, 1904–14.
Colledge, J. J.; Warlow, Ben (2006) [1969]. Ships of the Royal Navy: Complete Record, Chatham Publishing.
Dittmar, F. J. & Colledge, J. J. (1972). British Warships 1914–1919. London: Ian Allan
Gibbons, Tony (1983). The Complete Encyclopedia of Battleships and Battlecruisers. Salamander Books
Parkes, Oscar (1990) [1957]. British Battleships. Annapolis
Pears, Randolph (1979). British Battleships 1892–1957: The Great Days of the Fleets
Links
On worldnavalships.com
On battleships-cruisers.co.uk
From KE VII to Nelson on avalanchepress.com
On navypedia.org
On historyofwar.org
On alchetron.com
KE VII on dreadnoughtproject.org
Naval operations by Corbett, Julian Stafford; Newbolt, Henry John 1862-1938
The Grand fleet 1914-1916 by VAdm viscount Jellicoe (archive.org)
wiki
Poster KE VII 1905 on Hugh Evelyn Prints
Model kits
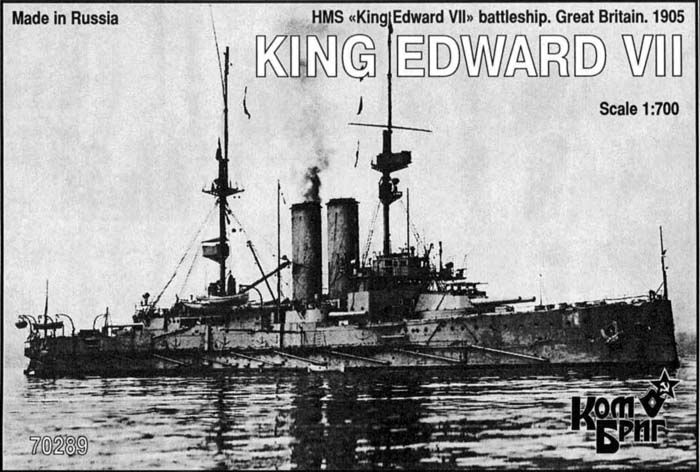
Kombrig 1/700, the only one caring to represent this class.
3d rendition
Wartime service
HMS King Edward VII (1903)

HMS King Edward VII’s construction was the most “Royal” event for obvious reasons: Her first plate was laid down, signed, by King Edward VII in person, while at the same time, his wife, Queen Alexandra, was attending the launching ceremony of her namesake, HMS Queen (A London class battleship laid down in March 1901), a fitting parallel event. King Edward VII (KE VII) was again, launched by the King himself on 23 July 1903. The King obliged the Royal Navy to keep her as flagship at all times for the honor to carry his name. Commissioned on 7 February in Devonport she hoisted the C-in-C Atlantic Fleet. After a short 1906–1907 refit, she was paid off at Portsmouth on 4 March 1907.
Recommissioned in March as flagship, Admiral Lord Charles Beresford C-in-C Channel Fleet she soon had another refit at Portsmouth and her unit became the 2nd Division, Home Fleet still being its flagship on 27 March. After another refit until 1910 she was placed in reserve, then recommissioned at Portsmouth, 1 August 1911 now at the head of the 3rd/4th Divisions. From May 1912 she took the head of the newly form 3rd Battle Squadron, First Fleet, Home Fleet. Their first foreing assignation was the Mediterranean in November 1912 (First Balkan War) based in Malta from 27 November 1912 and blockading Montenegro, watching over the occupied Scutari. The 3rd BS was back to the Home Fleet on 27 June 1913.
The First World War saw the 3rd Battle Squadron assigned to the Grand Fleet in Rosyth, and KE VII now under command of Vice Admiral Edward Bradford. The 3rd Squadron, which already comprised all seven pre-dreadnought gained in addition the five Duncan-class battleships, now used as distant cover for the Northern Patrol’s cruisers. On 6 August, she provided a distant cover for a sortie off the coast of Norway, in search of a German naval base, which was found. On 14 August, the 3rd BS sortied for battle practice before, followed by a north sea sweep, until the 15th.
Having two 12-inch guns developing inner tube cracks KE VII left Scapa Flow for Devonport, Bradford moving his flag to HMS Dominion. Back on 2 September as flagship, Dominion sailed in turn for the same problem. On 2 November, the 3rd BS was detached for the Channel Fleet in Portland, then back on 13 November (30th for King Edward VII). Next sweeps saw her class spread away of the main fleet and more valuable dreadnoughts, watching for mines. These “impromptu minesweeper” role was not the most glamorous and certainly worried both captains and crews, but reflected the general opinion about pre-dreadnoughts at that stage.
On 14 December as a British force departed to hunt down the raiders on Scarborough, Hartlepool and Whitby, Grand Fleet’s commander, Admiral John Jellicoe, ordered Bradford and his 3rd Battle Squadron to sail in support and four hours later, they arrive din sight of the 1st and 4th Battle Squadrons already folding down. The High Seas Fleet was already withdrawn. The Gand Fleet (and 3rd BS) were kept at sea until 17 December. King Edward VII’s squadron made another sweep into the North Sea on 25 December, for nothing.
The 3rd BS made a gunnery practice sortie on 12 January 1915 until the 14th and back to Rosyth on the 15th. On 24 January, as the Battle of Dogger Bank developed, the Grand Fleet sortied in support, the 3rd BS leaving first, steaming at full speed to join the Harwich Force reporting contacts. They arrived around 14:00 jus to see the sinking, burning armoured cruiser Blücher. They patrolled the area and were back on 25 January. The 3rd Battle Squadron later patrolled the central North Sea with the 3rd Cruiser Squadron on 10–13 March, and also on 5–8 April. The 11 April saw the entire Grand Fleet at sea, and again the 12–13 April. Same on 17 April, 21 April. Lastly, the 3rd BS combined again with the 3rd CS, sweeping the northern North Sea (5–10 May). They were ambushed en route by an unidentified German U-boat, which fired but missed.
After an unsuccessful sweep on 17–19 May, the 29-31 May patrol south to the Dogger Bank, June was reserved to training, with a gunnery practice sortie for dreadnoughts on 11 June, northwest of Shetland. Again, meanwhile, the 3rd BS and 3rd CS patrolled the central North Sea. July was calm due to coal shortages (threatened strike by coal miners) from 18 July and to August. September was equally quiet, and the Grand fleet sortied without the 3rd BS.
Finally, on 6 January 1916, King Edward VII departed Scapa Flow at 07:12 on a voyage around the northern coast of Scotland, up to Belfast for a major refit. While underwy she struck a mine at 10:47. It was part of a large minefield laid previously by the German auxiliary cruiser SMS Möwe, off Cape Wrath on the 31 December 1915. In all she had laid 252 mines under cover of darkness in a snow storm. The mined detonated just under her starboard engine room. Intense flooding caused a rapid list of 8° on this side.
Captain Crawford Maclachlan ordered a hard turn to starboard, attempting to join the coast, possibly beaching his ship, but the helm was jammed hard to starboard due to the schock of the detonation, the flood quickly stopping all power onboard. Dead in the water, her captain ordered Counterflooding so she listed only by 5°. The scene was observed by the passing collier Princess Melita, which started to close, and attempted to tow her. Since an U-boat was reported, HMS Kempenfelt, leading twelve destroyers quickly arrived to patrol the area, finding nothing. After a while they came back in assistance to the sinking battleship. HMS Kempenfelt as a flotilla leader had powerful manchnery and attempted to join the towing attempt from 14:15. But it eventually failed as King Edward VII took too much deadweight by flooding, taking eventually a 15° list, her deck dangerously low. With rising sea and strong winds the captain assessed the danger and prepared the crew for a possible evacuation. Princess Melita dropped her towline and departed at 14:40, Maclachlan orderig Kempenfelt to do the same soon after.
With darkness approaching, order was given to abandon ship and the crew was evacuated in good order by the destroyer Musketeer, which went alongside from 14:45. She was soon assisted by HMS Fortune and Marne. Amazingly, the mine made no casualty, detonating alongside void compartments, and the machinery was evacuated in good order. Just one sailor died, by accident as he fell between the battleship and a destroyer. The last man to leav was of course captain Maclachlan, boarding HMS Nessus, at 16:10.
Nessus stayed after other ships departed with the crews, leaving the captain seeing his ship continue her slow sinking. From 17:20 tugs arrived to assist while Nessus departed, but they could do little to tow King Edward VII at that stage, far too deep and heavy already. They saw her capsize at 20:10. It was nine hours after the explosion. Möwe’s minefield was left undiscovered until practically the end of the war, HMS Africa even passing through the area before without incident.
HMS Commonwealth (1903)
Most of the King Edward VII sister ships was spent with the 3th Battleship Squadron, so since its activity had been seen in detail above, the following career records will be focused on the ships alone. Before the war, HMS Commonwealth was in Portsmouth Dockyard on 14 March after completion, in reserve, and full commission on 9 May, in Devonport, assigned to the Atlantic Fleet. She collided with HMS Albemarle near Lagos (Liberia) on 11 February, having a damaged hull and bulkhead and spent a part of 1907 in repairs, being rammed by Albemarle. Later she was assigned to the Channel Fleet in March but in August, ran aground, repaired again at Devonport Dockyard until October 1908.
Her unit in 1909 became the 2nd Division of the Home Fleet, and she was refitted at Devonport (1910-1911) being assigned later to the 3rd Battle Squadron (3rd BS) sent in Mediterranean during the First Balkan War, blockade of Montenegro and an occupation of Scutari. Sje was back to the Home Fleet in June 1913.
By August 1914, the 3rd Battle Squadron, she was based in Rosyth, backing up the cruisers of the Northern Patrol. Several sweeps and sorties followed until the end of 1914. HMS Commonwealth was drydocked and refitted until February 1915, back to the 3rd BS. She was involved later in a serie of uneventful sorties. From 29 April 1916, with her squadron she was based in Sheerness and from 3 May, the Nore Command. However HMS Commonwealth left the 3rd BS in August 1917. She was paid off, the admiralty having projects to convert her as a gunnery training ship. For this she received the most modern conversion and reconstruction of any other pre-dreadnoughts of the time: A solid tripod replaced her former pole, supporting an equally modern fire control system, the same as the latest British Dreadnoughts of the QE and Revenge classes. When she left Portsmouth Dockyard, she also had torpedo bulges, no longer her 6-inch guns, all but four removed (relocated on the battery roof).
Battleship_HMS_Commonwealth_IWM
Thuis long refit however was delayed by lack of resources and workmanship, so much so that her refit only was complete in April 1918, and she was recommissioned on the 16th, assigned to the Northern Patrol. Transferred to the Grand Fleet on 21 August 1918 she became a seagoing gunnery training ship, with Invergordon as base. Her gunnery TS career ended in February 1921. She was paid off, placed on the disposal list at Portsmouth (April 1921), and sold for BU to Slough Trading Company in November, and resold afterwards to German scrappers, towed to Germany.
HMS Dominion (1903)
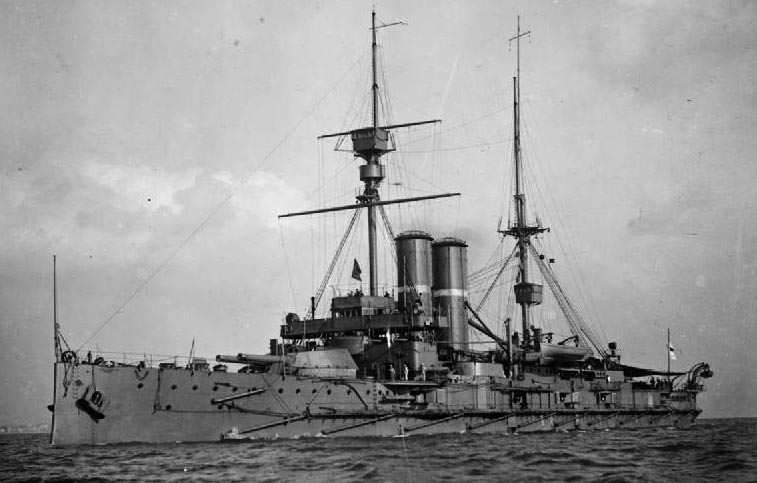
HMS Dominion in 1914
HMS Dominion started her sea trials in May 1905, before completion in July and commission on 15 August, at Portsmouth Dockyard. Assigned to the Atlantic Fleet she ran aground in the Gulf of St. Lawrence, on 16 August 1906, one year after commission, and damaged to her lower hull plating was bad enough, including severe flooding to be sent in Bermuda for temporary repairs. They were only completed by January 1907, so she can proceed to Chatham Dockyard for a final repair in February-June. She was in between transferred like her unit to the Channel Fleet and from 24 March 1909, 2nd Division, then from June 1912, the 3rd Battle Squadron, First Fleet from. She was deployed in the Mediterranean during the First Balkan War and was back home in June.
Under command of Vice Admiral Edward Bradford (head of the 3rd BS), she was based at Rosyth with her class and the five Duncan-class battleships, covering the Northern Patrol’s cruisers by August 1914. After a first sortie off Norway in search of a German naval base where she stayed in distant support, she participated in a training sortie and a gunnery training revealing on 25 August that two of her 12-inch guns inner tubes cracked. It was decided to send the flagship, King Edward VII which had the same problem for her guns to be replaced, making HMS Dominion flagship until King Edward VII came back on 1st September allowing Dominion to leave in turn. She was back from Devonport later. On 2 November 1914 she was in the Channel Fleet, Portland.
She sailed in distant support of the answering quick reaction force to the German raid on Scarborough, Hartlepool and Whitby. She also made a sweep into the North Sea on 25 December, on 12 January 1915 (gunnery training), stayed as distant cover during the Battle of Dogger Bank and went to sea repeatedly until the end of 1915. Her Squadron often patrolled with the 3rd Cruiser Squadron making sweeps after sweeps without ever spotting a German vessel. There was a “hot alert” by an U-Boat.
On 29 April 1916, her Squadron was based at Sheerness, then Nore Command and HMS Dominion remained there until March 1918, ambushed and torpedoed by a unidentified German submarine (which missed) in May 1916. Next she was refitted at Portsmouth in June 1917. Her sister ships from the 3rd BS started to disperse gradually. From 1st March 1918, HMS Dominion and HMS Dreadnought were the last left in the 3rd BS, finally dissolved that month. She paid off as a barracks ship, planned to be used for the Zeebrugge Raid and First Ostend Raid, with HMS Hindustan, housing crews of the ships involved stationed in the Swin until early May 1918 and transferred afterwards to the Nore Reserve as an accommodation ship. On 29 May 1919, about a year later she was on the disposal list at Chatham, sold for BU on 9 May 1921 to Thos. W. Ward, scrapped in Preston, Belfast from 28 October 1924.
HMS Hindustan (1903)
HMS Hindustan was launched on 19 December 1903, started her sea trials in January 1905, was completed in March 1905. Placed in reserve she was soon into full commission on 22 August, at Portsmouth, for the Atlantic Fleet. Like her sisters she served with the Channel Fleet in March 1907, 2nd Division, and after a 1909–1910 refit in portsmouth her only notable event was when she was hit during a target practice in November 1911 by a shell from HMS Colossus.
The fleet reorganization of May 1912 saw her sharing her fate with the 3rd Battle Squadron in the First Fleet, in the Mediterranean for the First Balkan War. Both HMS Hindustan and Africa came back in UK later, by February 1913, to join the 4th Battle Squadron and then back to the 3rd Battle Squadron in June. She was under command of Vice Admiral Edward Bradford in Rosyth by August 1914, in company of the Duncan class battleships, as cover for the Northern Patrol.
After a sweep in Norway, battle practice, the sweep into the North Sea she headed for the Channel Fleet in Portland and back to the Grand Fleet on 13 November 1914, later covering the 1st Battlecruiser Squadron after the Scarborough, Hartlepool and Whitby raid, but arriving too late to make an impression. The rest is made of uneventful sweeps in the north sea, punctuated by training sorties and gunnery practice. This routine went on until 29 April 1916:
The 3rd Battle Squadron in Sheerness was transferred to the Nore Command, HMS Hindustan remaining there until February 1918 and leaving in February 1918 to be a parent/depot ship for the Zeebrugge Raid and first Ostend Raid. She moored smaller vessels, carried crews and supplies, stationed in the Swin, Thames until May 1918. She also wollided with the destroyer HMS Wrestler in May 1918, badly damaged (Hindustan had nothing). On 15 May 1918, Hindustan was placed into reserve at the Nore, becoming an accommodation, Royal Naval Barracks, at Chatham Dockyard. Placed on the disposal list by June 1919 she was eventually sold to Thos. W. Ward, on 9 May 1921, towed to Belfast in 1923, Preston, for BU, which started in late 1923.
HMS Britannia (1904)
HMS Britannia was was completed in September 1906 and commissioned in Portsmouth on 6 September 1906, fully commissioned on 2 October 1906, Atlantic Fleet. Like her sisters, she went into the Channel Fleet in March 1907, then was versed to the Second Division, and then Flagship, Vice Admiral, Second Division, in April 1909. After a refit at Portsmouth (1909-1910) her only prewar notable event was a collision on 14 July 1910 with the barque Loch Trool, with light damage.
May 1912, saw her assigned to the 3rd Battle Squadron, soon sent to the Mediterranean to assist the internationa fleet deployed in the First Balkan War, based in Malta. Back on 27 June with the Home Fleet, she was however detached to join the Second Division. Britannia was back at the start of WWI with the 3rd Battle Squadron. The rest of ha activity mirrored her sister ships. However in the Battle of Dogger Bank on 23 January 1915, she sortied to support the battlecruisers, at full speed to reach ships the Harwich Force, but they arrived too late, at around 14:00.
After a night at sea they were ordered back to Rosyth on 25 January to steam to Rosyth. But while off the Firth of Forth, near to Inchkeith on the 26th, HMS Britannia ran aground, being stranded for a full 36 hours until refloated. Rocky shoals cuaused her hull extensive damage and she proceeded to Devonport for lengthy repairs. She was back hover for the relocaton at Sheerness on 29 April 1916. Nevertheless, Britannia was detached on 3 May and transferred to the Nore Command.
HMS Britannia remained until August and a refit at Portsmouth, until September, after which she left the 3rd Battle Squadron for 2nd Detached Squadron organised in 1915 to reinforce the Italian Navy at Otranto, closing the Adriatic Sea. There, she was placed under orders of Admiral Paolo Thaon di Revel, Italian naval chief of staff. He denied any sweeps due to his fear of Austro-Hungarian submarines and naval mines in the narrows. HMS Britannia was therefore permanently anchored as a support for the blockade while smaller vessels as screening. MAS boats on their part, were far more active.
As she needed maintenance, a refit was performed at Gibraltar, in February–March 1917. After this, she was assiged to the 9th Cruiser Squadron, Atlantic Patrol. There, she started convoy escort duty from Sierra Leone, relieving the old armoured cruiser HMS King Alfred, in quality if flagship in March 1917. This was interrupted by a refit at Bermuda in May 1917, her battery 6-inch being removed and replaced by four of the same relocated in shielded pivot mounts on her shelter deck (battery roof), replacing older 12-pdr guns.
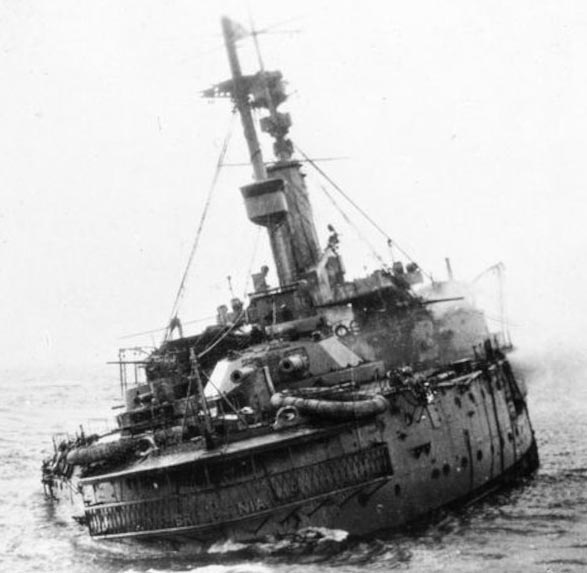
HMS_Britannia_sinking_on_9_November_1918
Her fate arrived as she was underway at sea in the western entrance to the Strait of Gibraltar. This the early morning, still dark, on 9 November 1918, the war seemed soon over with negociations taking place with Berlin. Placed under command of Captain Francis Wade Caulfeild she was torpedoed off Cape Trafalgar, by UB-50. A first explosion caused by one or tow torpedoes flooded her machinery to port, and she start listing 10° on this side. A mere few minutes after, a second explosion put fire to her 9.2-inch magazine, in turn detonating the stored cordite bags.
This was violent enough to cause the ship a ful electrical failure, and she was found in total darkness below decks. The safety team therefore was unable to find the flooding valves for the magazines, in general poorly located. The captain order to flood the magazin failed and as a result caused most of the deads onboard, by toxic smoke from burning cordite: In all 50 men died, 80 were injured, mostly intoxicated. On the other hand, the battleships, which listed to 10° stayed stable, and too, 2 and a half houirs to sink, leaving ample time to evacuate her 39 officers and 673 men. HMS Britannia became the final capital ship to sink because of enemy action in WWI, just two days before the Armistice was signed.
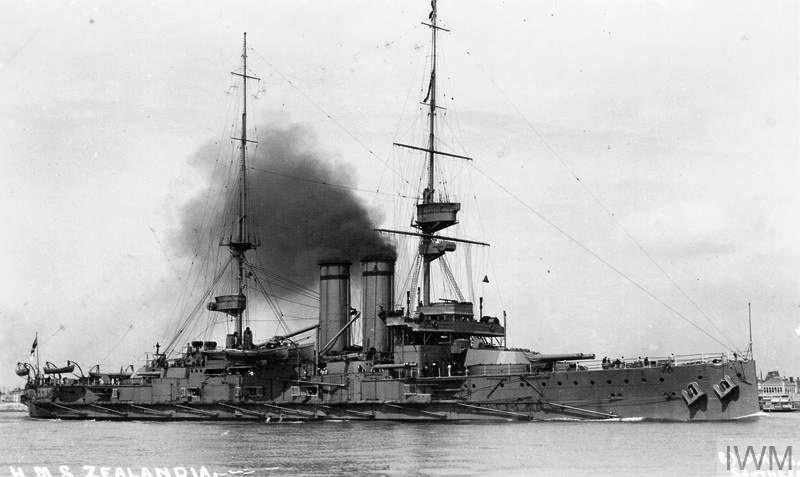
HMS New Zealand (Zealandia) (1904)
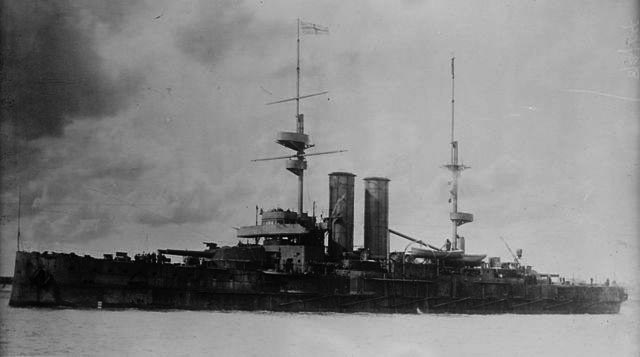
HMS New Zealand as built
HMS New Zealand emerged from Portsmouth Dockyard in June 1905, commissioned on 11 July at Devonport, Atlantic Fleet. She was refitted soon like the others, but at Gibraltar, from October to December 1906 and went back to the Channel Fleet on 4 March 1907. After an otrher refit she became part of the 2nd Division, and in 1911 to release her name for a new battlecruiser presented to the Royal Navy by the government of New Zealand she was at first renamed HMS Caledonia (Roman name for Scotland,on par with “Hibernia” and “Britannia” also in the class), and was favoured, but New Zealand argued they would prefer Zealandia, which was a personification of New Zealand. It was eventually adopted on 1 December 1911. The battleship had a crew partly composed of New Zealanders.
The fleet reorganisation of May 1912 (3rd Battle Squadron) was followed by a peace keeping operation during the First Balkan War. Like the others she ws back home on 27 June 1913, the last peacetime routine year. In August 1914,
HMS Zealandia was with the Northern Patrol, accompanying the sweep of Norway followed by another into the North Sea, also starting a routing of screening in front of dreadnoughts as “mine catchers”. On 14 December, they wait as cover after the Scarborough, Hartlepool and Whitby raid and battlecruisers rush. Despite sailing at full speed, they failed to reach the German High Seas Fleet.
The rest of the year and 1915 were relatively uneventful, alternating training and north sea sweeps without encountering the enemy (see the KE VII career for more details and precise dates). On 6 November 1915, however HMS Zealandia, Hibernia (flagship), Russell, and Albemarle were sent to assist in the Gallipoli Campaign. HMS Albemarle had to return for repairs (badly damaged in heavy seas) escorted by Zealandia, in the outbound voyage. HMS Zealandia also had damage to her gun ports and needed repairs. With HMS Russell, and Hibernia in the Dardanelles she resumed operations on 14 December 1915. After HMS Irresistible, Inflexible and HMS Ocean struck mines, pre-dreadnought Battleships were definitively kept out of close operations. HMS Zealandia was kept as distant support, it’s unclear if she even fired a short in anger.
Battleship HMS Zealandia, IWM
By late January 1916, HMS Zealandia and Hibernia were detached back home, reaching Portsmouth Dockyard on 6 February 1916. Zealandia was refitted until March and was back with the 3rd BS on the 26th. The squadron was based for a shot time in Sheerness, then Nore Command in May. Zealandia left on September 1916 for a refit at Chatham, until June 1917. When back, she left again on 20 September 1917, paid off into reserve and refitted (January-September 1918) as a gunnery training ship with the same upgraded fire control as HMS Commonwealth but not torpedo bulges.
Ultimately however she was never recommissioned as a gunnery training ship, but was kept for experiments of fire control equipments instead, and later an accommodation ship at Portsmouth in 1919. Placed on the disposal list she was sold on 8 November 1921 to Stanlee Shipbreaking, resold to Slough Trading Co. ad to German scrappers, BU in late 1923.
HMS Africa (1905)
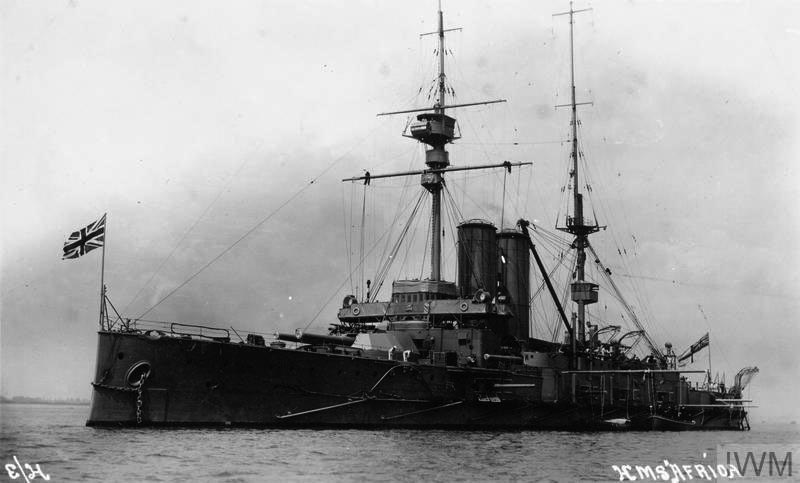
HMS Africa was completed at Chatham Dockyard in November 1906 and commissioned 6 November 1906, being also the very last battleship built at Chatham dockyard, which drydock size was never expanded afterwards. From the Atlantic Fleet she was transferred to the Channel Fleet on 4 March 1907, colliding with the merchant steamer SS Ormuz, off Portland (23 March 1907), but damage was light. After the Nore Division by June 1908, from April 1909 she was in the 2nd division of the Home Fleet, became flagship, Vice Admiral Sir William Henry May at the head of the 3rd/4th Divisions from 25 April 1911. She was relieved by HMS King Edward VII in refit. By November 1911 she was placed in reserve, Nore.
from January 1912, HMS Africa was the first British battleship experimenting with airborne reconnaissance, experimenting lunched and recovery of a Short seaplane at Sheerness. For this she received a 100 feet (30 m long) flying off, downward-sloping runway installed on her foredeck over her forward 12-inch (305-mm) turret. It was equipped with rails to guide the aircraft, especially to counter the wind. The crew held the Short Improved S.27 pusher seaplane in place as the Gnome engine was pushed full throttle. Lieutenant Charles Samson attempted the first British shipboard aircraft take-off. It was done on 10 January 1912 while at anchor, in the River Medway where wind was reduced. Samson circled the battleship several times to the cheers of the crew and later climbed to 800 feet (240 metres), landing safely at an airfield ashore.
After this success, the whole apparatus and planes were all transferred to her sister ship HMS Hibernia in May 1912. The battleship HMS London will soon also test it in turn and the Royal Navy concluded that shipboard aircraft could be useful for spotting, reconnaissance and carrying dispatches, but the runway platform in its form was a problem for artillery while recovering seaplanes was too difficult and inpractical in operation. From 1917, the system was completely re-thought, and became an important part of British fleet operations, with short runways solidary to the turrets and guns (allowing them to traverse and elevate), and launching more powerful models, although using wheeltrained. The RN also impressed into service scores of seaplane carriers in WWI.
HMS Africa was refitted at Chatham and was now assigned to the 3rd Battle Squadron, making a tour of duty in the Mediterranean during the First Balkan War and back home in June 1913. She served the first half of WWI in the same unit, at first under overall command of Vice Admiral Edward Bradford with the Grand Fleet and based at Rosyth. She served with the Northern Patrol, made the Norway base coast sortie, North Sea sweeps, Channel Fleet, cover for the aftermath of the Scarborough, Hartlepool and Whitby raid, and resume 1915 with gunnery training and north sea sweeps. In December 1915 however, HMS Africa made her refit in Belfast, until January 1916, passed later unharmed through Cape Wrath minefield that claimed later HMS King Edward VII.
HMS_Africa
In 1916 she was based in Sheerness, then Nore Command, refit in Portsmouth, but by September 1916, was detached from the 3rd Sqn to be sent to the Adriatic Sea in support of the multinational forcethere blockading the Otranto barrage, to interdict the Austro-Hungarian Navy passage to the Mediterranean. She left the Adriatic in January 1917, was refitted at Gibraltar and after March 1917, attached to the 9th Cruiser Squadron, Atlantic Patrol, for convoy escort duties from Sierra Leone, down to South Africa. Her more “exotic” refit, to the crew’s delight, was at Rio de Janeiro (December 1917-January 1918). From September still in Sierra Leone, her crew was hit by the influenza pandemic, until 476 crew members were reported ill , and from there she sent burial parties ashore daily while being placed in quarantine. She lost 52 crew members in total.
In October 1918, back home, she was placed into reserve at Portsmouth, became a depot ship for the 9th Cruiser Squadron, accommodation ship and by December 1919 was to replace the protected cruiser HMS Diadem as a stokers’ training ship, Portsmouth, but this was cancelled, and she was sold for scrapping to Ellis & Co, Newcastle upon Tyne by 30 June 1920.
HMS Hibernia (1905)
HMS Hibernia was completed in December 1906 in Devonport, last of her class. Commissioned on 2 January 1907 she became flagship, Rear-Admiral, Atlantic Flee, later transferred to the Channel Fleet also as Flagship on 27 February 1907. In January 1909 she was Flagship, Vice-Admiral and from 24 March, her unit became the 2nd Division of the Home Fleet. As her sister ships she suffered an accident in these prewar years: On 14 July 1910 she was rammed by Loch Trool, a barque let loose after she collided with HMS Britannia, but damage was light. In January 1912, HMS Orion took her place as flagship and she was placed in semi-reserve with a skeleton crew in the Third Division, Nore.
In January 1912 she took part in aviation experiments at Sheerness following HMS Africa, with her flights performed in early 2 May. Pilot Samson also made a show when Hibernia was steaming at 10.5 knots at the Royal Fleet Review in Weymouth Bay witnessed by King George V, which followed other flights for four days. Her equipments were passed on HMS London before the whole program was closed and a report written. Also in May that year, HMS Hibernia was versed into the 3rd Battle Squadron, First Fleet and became Second Flagship, Rear-Admiral. The 3rd Sqn went into the Mediterranean due to the First Balkan War and was back home in June 1913.
In August 1914, she was based in Rosyth, and supplemented the Northern Patrol cruisers, while she stayed as Second Flagship, taking part in the sweep to Norway in search of a German base, made a battle practice sortie, and several sweeps in the north sea. She was detached to the Channel Fleet, Portland. In December she covered the British attack after the Scarborough, Hartlepool and Whitby raid. The rest of her wartime career is the same as the 3rd BS.
In November 1915, Hibernia, as flagship, Rear-Admiral Sydney Fremantle was detached with HMS Zealandia, Russell, and Albemarle to take part in the Dardanelles Campaign leaving Scapa on 6 November 1915, but Albemarle was damaged in a storm and returned, escorted by Hibernia and Zealandia. The three remaining battleships arrived in the Dardanelles on 14 December 1915. Hibernia stayed in stand-by at Kephalo, covering the evacuation of V and W Beaches, Cape Helles on 8 and 9 January 1916. She was stationed later at Milo, in case they had to cover an evacuation of the French force at Salonika.
Russell became the new divisional flagship, allowingd Hibernia to return hime and be reassigned to the Grand Fleet, refited at Devonport on 5 February 1916-March 1916. On the 29th she moved to Sheerness with the 3rd BS, and later detached and transferred to the Nore Command until October 1917. Her ten battery 6-inch guns were removed and replaced during a refit (they ended on the monitor HMS Marshal Ney) and she was paid off into the Nore Reserve, Chatham Dockyard, as accommodation ship.
In September 1918, Admiral David Beatty wanted a large target for realistic gunnery practice for the Grand Fleet, and the admiralty suggested to convert Hibernia as a radio control vessel, but HMS Agamemnon was selected instead. In July 1919 she was stricken and placed on disposal, sold on 8 November 1921 to Stanlee Shipbreaking Company of Dover, then to German scrappers, BU there in November 1922.
 Latest Facebook Entry -
  X(Tweeter) Naval Encyclopedia's deck archive
 Instagram (@navalencyc)


 French Navy
 Royal Navy
 Russian Navy
 Armada Espanola
 Austrian Navy
 K.u.K. Kriegsmarine
 Dansk Marine
 Nautiko Hellenon
 Koninklije Marine 1870
 Marinha do Brasil
 Osmanlı Donanması
 Marina Do Peru
 Marinha do Portugal
 Regia Marina 1870
 Nihhon Kaigun 1870
 Preußische Marine 1870
 Russkiy Flot 1870
 Svenska marinen
 Søværnet
 Union Navy
 Confederate Navy
 Armada de Argentina
 Imperial Chinese Navy
 Marinha do Portugal
 Mexico
 Kaiserliche Marine
 1898 US Navy
 Sovietskiy Flot
 Royal Canadian Navy
 Royal Australian Navy
 RNZN Fleet
 Chinese Navy 1937
 Kriegsmarine
 Chilean Navy
 Danish Navy
 Finnish Navy
 Hellenic Navy
 Polish Navy
 Romanian Navy
 Turkish Navy
 Royal Yugoslav Navy
 Royal Thai Navy
 Minor Navies
 Albania
 Austria
 Belgium
 Columbia
 Costa Rica
 Cuba
Cuba Czechoslovakia
 Dominican Republic
 Haiti
Haiti Hungary
 Honduras
 Estonia
 Iceland
 Eire
Eire Equador
 Iran
Iran Iraq
Iraq Latvia
 Liberia
 Lithuania
 Mandchukuo
 Morocco
 Nicaragua
 Persia
 San Salvador
 Sarawak
 Uruguay
 Venezuela
 Zanzibar
 Warsaw Pact Navies
 Bulgaria
 Hungary

 Bundesmarine
 Dutch Navy
 Hellenic Navy
 Marina Militare
 Yugoslav Navy
 Chinese Navy
 Indian Navy
 Indonesian Navy
 JMSDF
JMSDF North Korean Navy
 Pakistani Navy
 Philippines Navy
 ROKN
ROKN Rep. of Singapore Navy
 Taiwanese Navy
 IDF Navy
 Saudi Navy
 Royal New Zealand Navy
 Egyptian Navy
 South African Navy


 Ukrainian Navy