
Fast Battleships 1939-1945
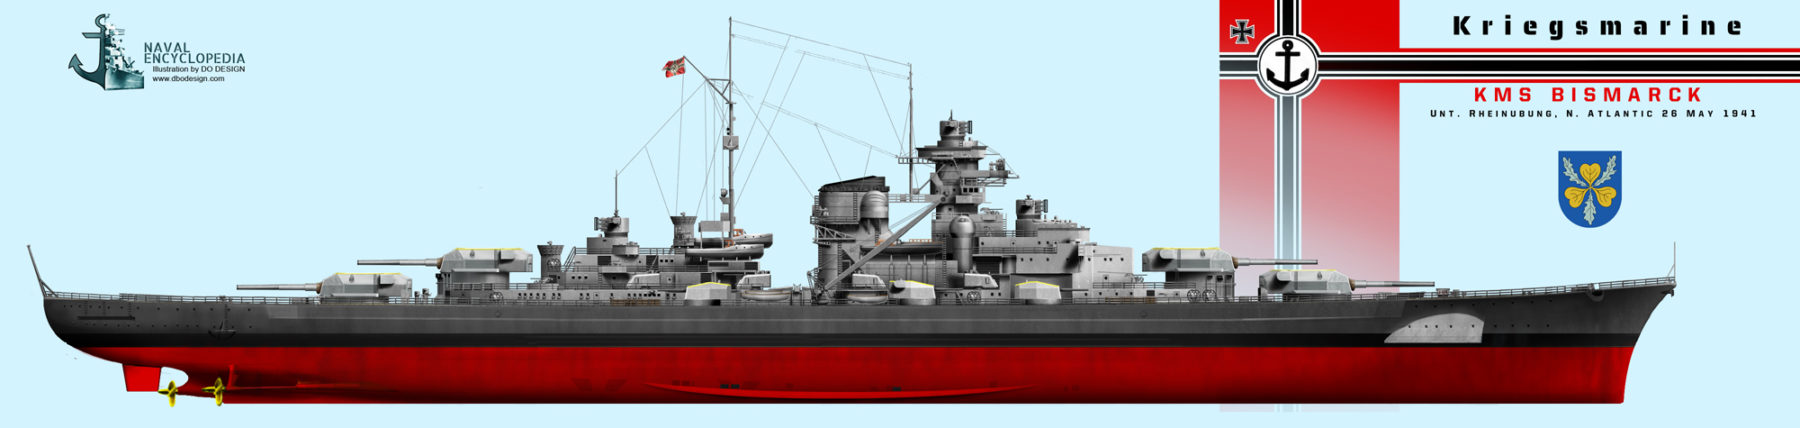
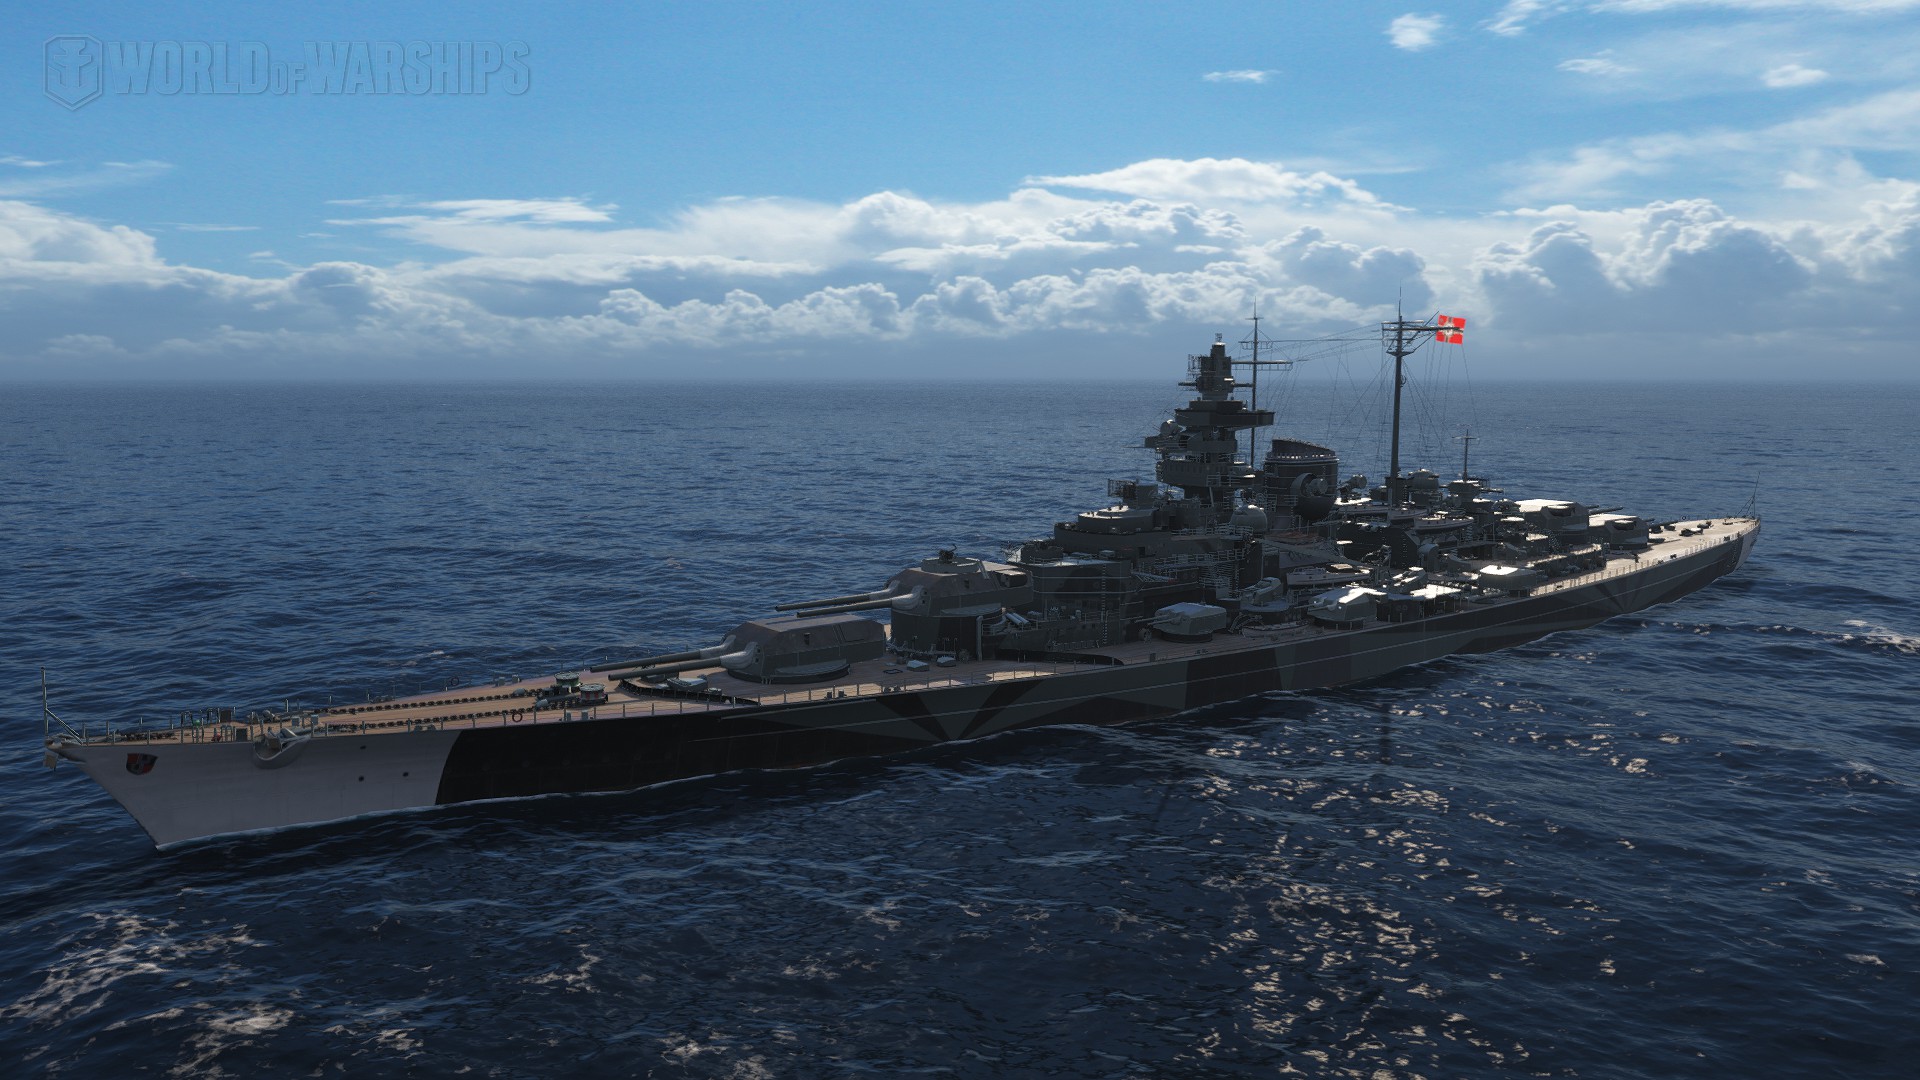
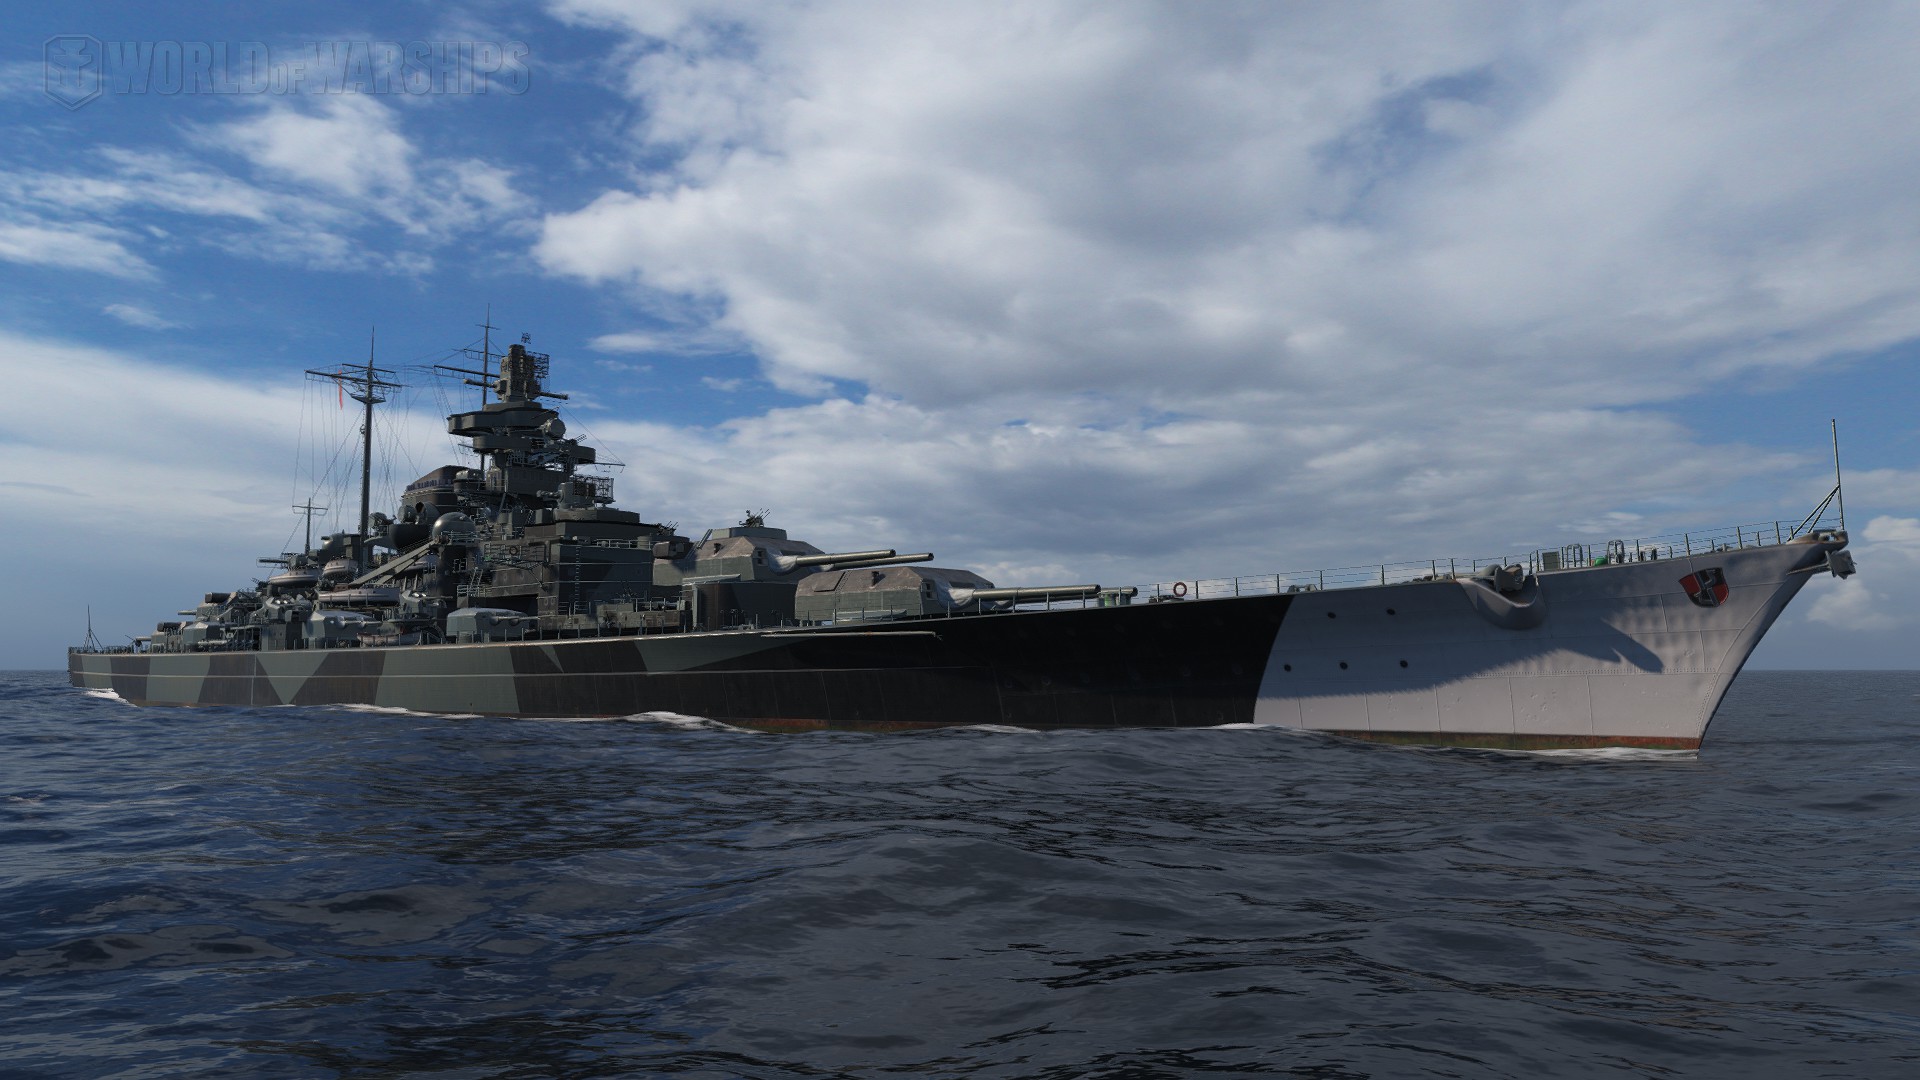
 Germany (1940) KMS Bismarck, Tirpitz
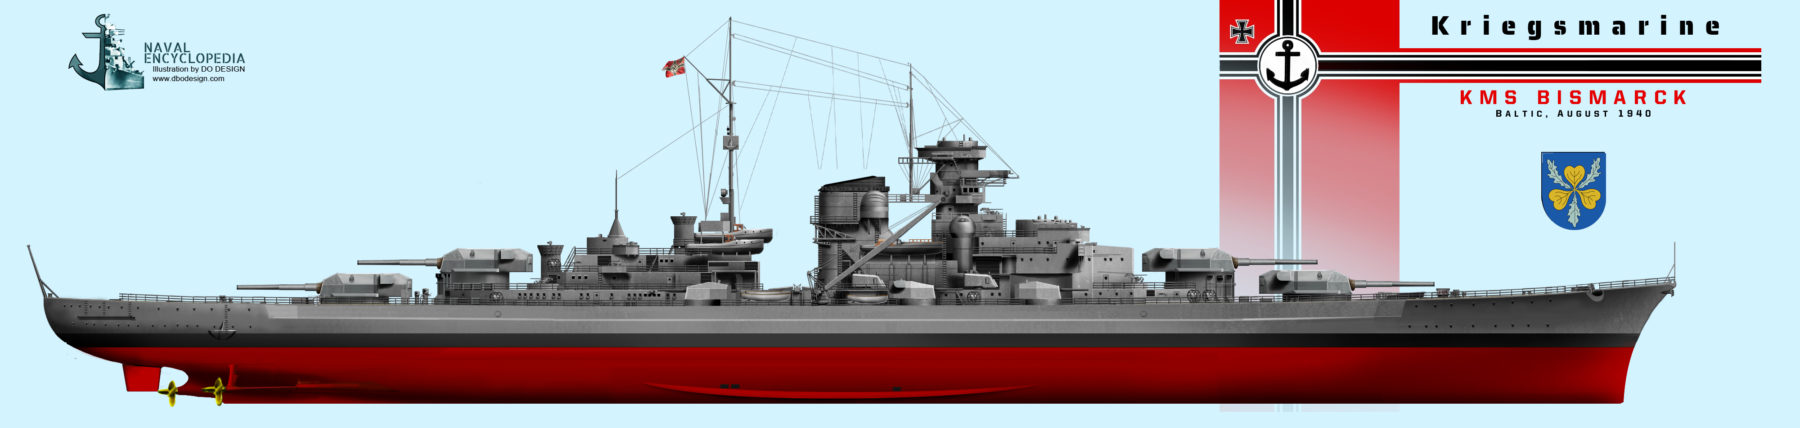
Introduction: The most formidable battleship in the world, 1941.
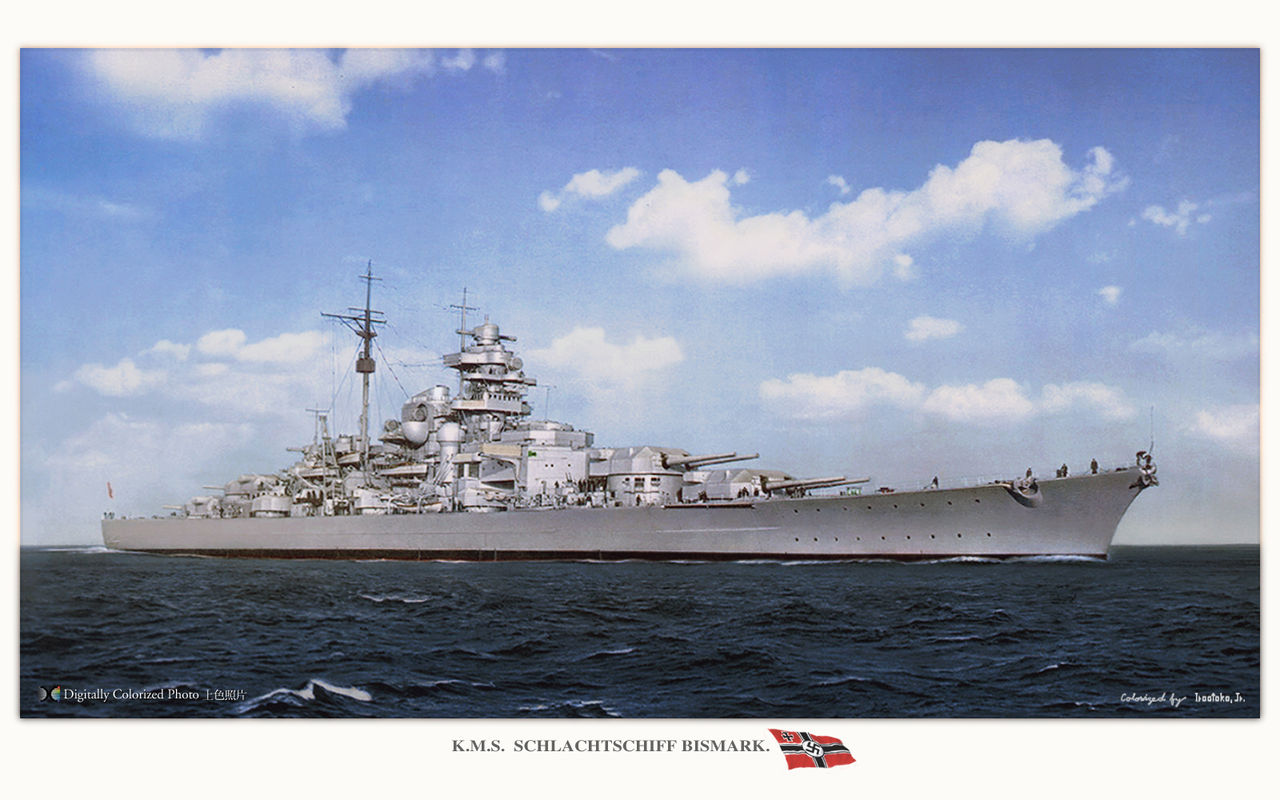
The Bismarck is perhaps after the YAMATO, the most famous battleship class of WW2. However this status is certainly exaggerated in the light of its cost-effectiveness and battle records, as well as the encounter between axis propaganda and the scare associated it represented on the allied side. Churchill’s nightmare was that this “monster”could be on the loose in the Atlantic, decimating convoys at will. Everything was deployed in order to stop it, and stopped it was. Her sister-ship Tirpitz was completed later and lived longer, as the “solitary queen of the north”. The British tried to eliminate her by using all tricks in the book. She was indeed the wolf waiting to fall on the Murmansk convoys. The Bismarck class were also the forerunners of the mighty navy planned for 1950, in Z plan, and their iconic status as the largest battleships of Europe don’t hold modern scrutiny: They were perhaps the largest, but certainly not the best.
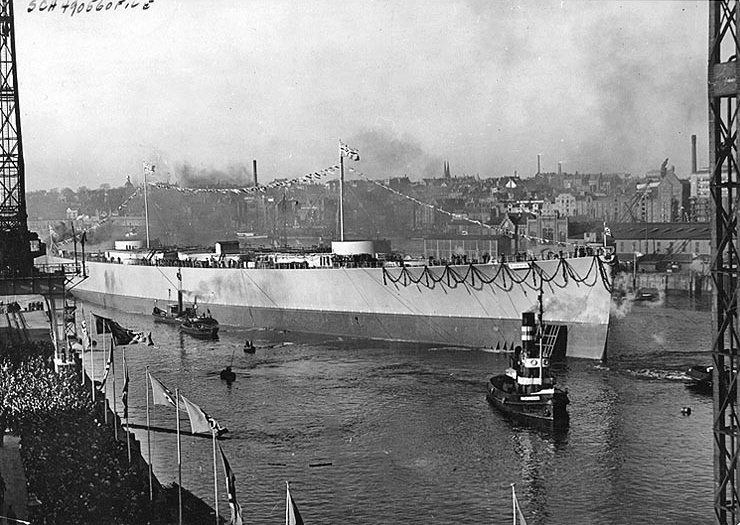
Bismarck prow seen in Hamburg harbour, 1940.
Design development
A serie of conceptual designs started under supervision of admiral Karl Zenker for the Reichsmarine the year 1932, to determine ideal characteristics of a battleship built to the 35,000 long tons (36,000 t) limit defined by the Washington Naval Treaty. Needless to say, this study was a prospective one, in case a new treaty after the ten years vacancy would be signed on behalf of Germany, which became indeed the Anglo-German naval treaty of 1935.
The probable adversary of the time was not the United kingdom, but France, and recently the Scharnhorst class answered the French Dunkerque class which “opened the ball” after the Washington treaty vacancy. These early studies determined that this future ship needed an armament on at least 33 cm (13 in) guns (like the Dunkerque) with a top speed of 30 knots (56 km/h; 35 mph), and sufficient armor protection compared to the Scharnhorst. At the time, the German Navy was still constrained by the terms of the Treaty of Versailles so to respect a maximum displacement of 10,000 long tons (10,000 t). A sketch design was produced by the Construction Office in 1933, while the final design was accepted in 1936.
Organization of the Kriegsmarine scheme
Project’s head: Hermann Burckhardt
 H. Burckhardt was the ministerial advisor in the Reichsmarine responsible for the project, also later managing the launching of KMS Tirpitz. The naval staff was confronted with a variety of issues on the strategic and operational level. Some was about the best propulsion system. War games were practiced by the German admiralty as well as in other navies of the time. They suggested that the new projected battleships were tailored to attack French shipping at long range, but also capable of close combat with smaller French and Polish units, the immediate threats. The French had a clear numerical advantage, so the German fleet was to be used at relatively close range in the North Sea and stability and armor protection were privileged. For the first point, it was important to adopt a very thick vertical belt heavy integral citadel armor plating plus extensive splinter protection, also in the bow and stern, most often absent from foreign designs.
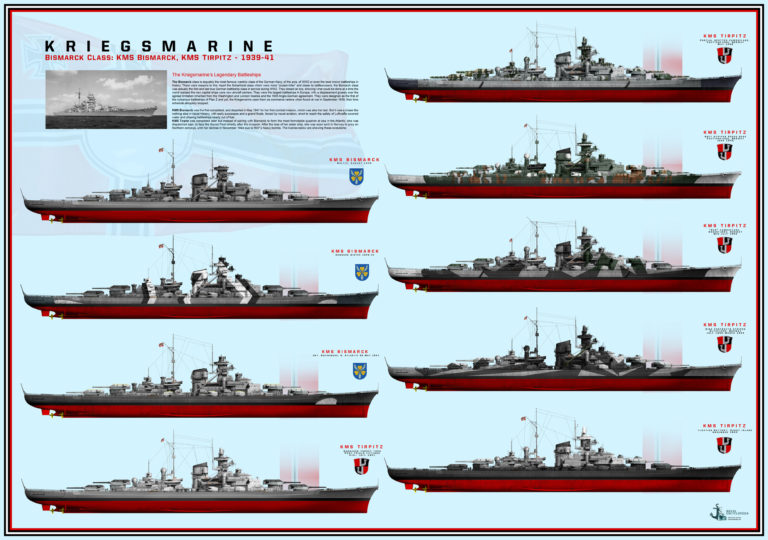
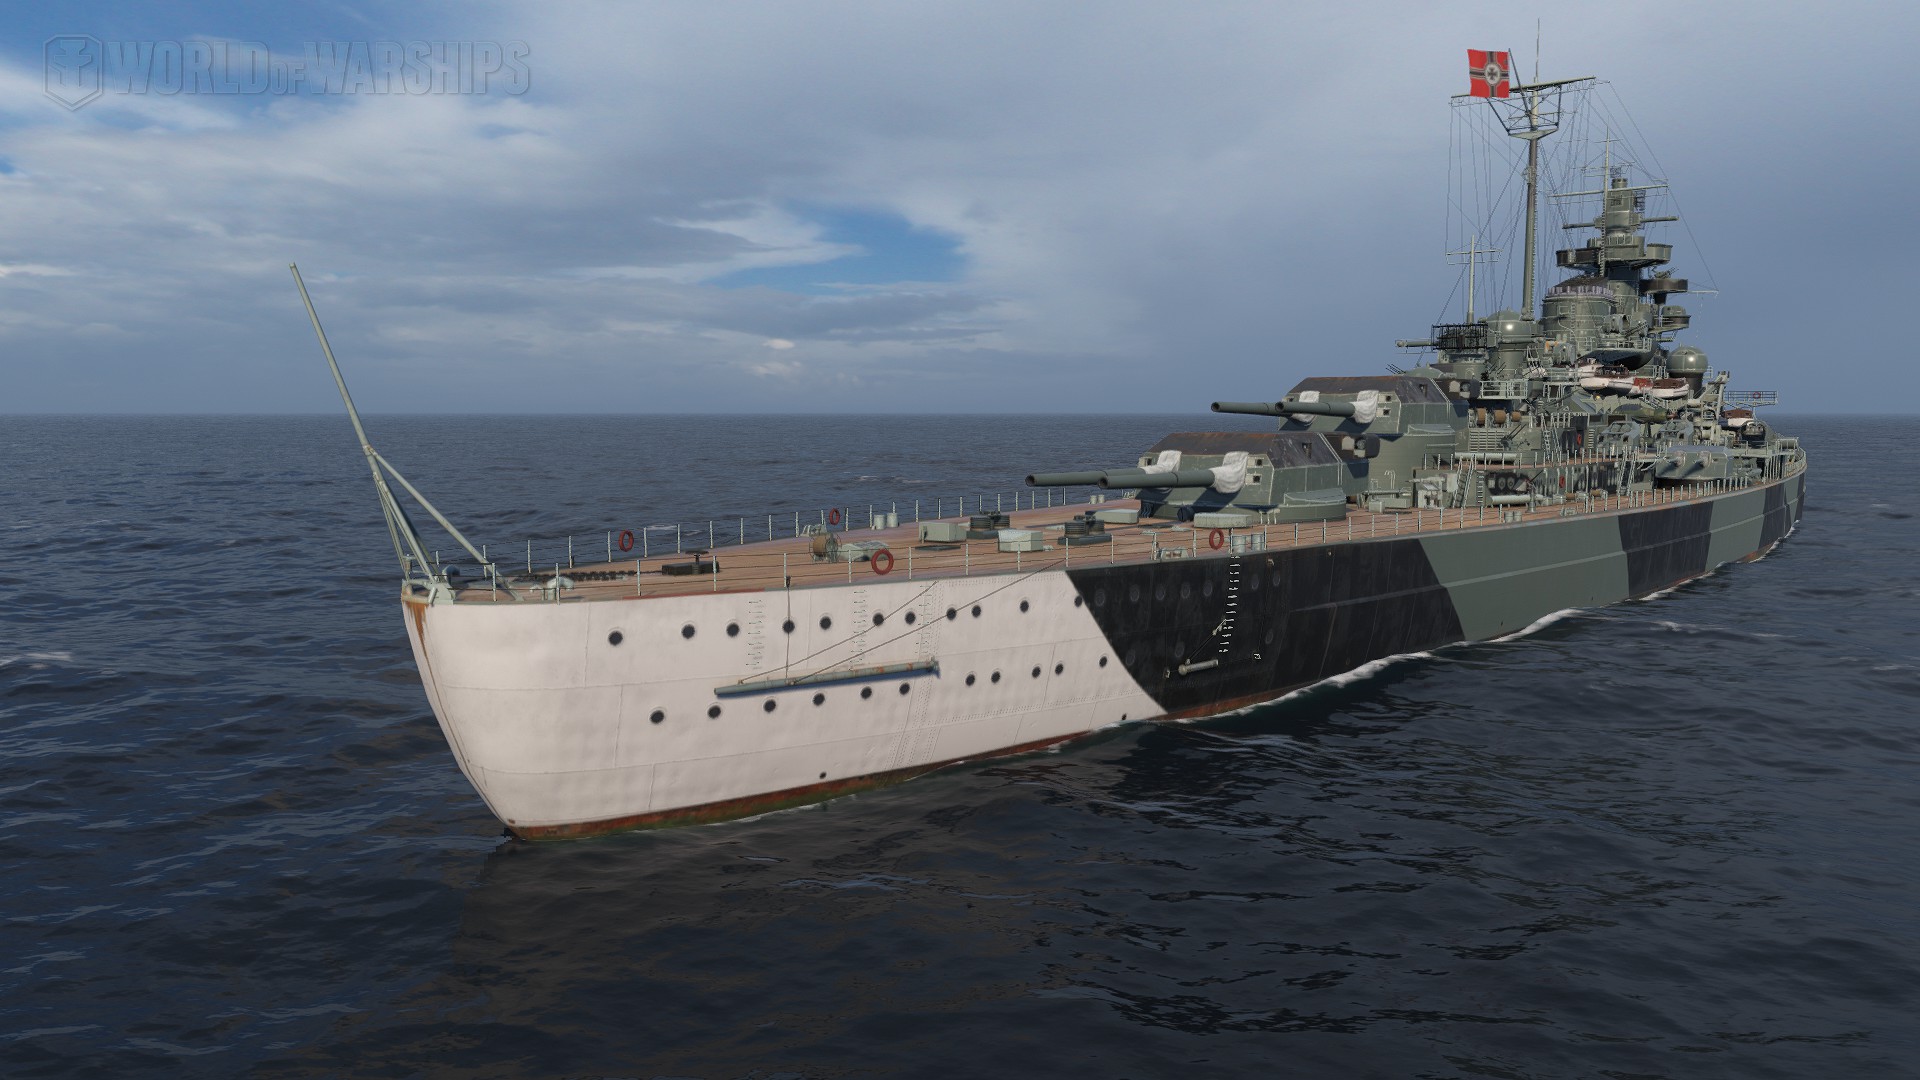
The Bismarck and Tirpitz appareance: Click to Purchase and support naval encyclopedia !
In between the Reichsmarine learned in June 1934 that Italy started two 35,000-ton battleships, armed with 35 cm (14 in) guns. Knowing the state of rivaly with the Marine Nationale, it was obvious to trigger a response (which was the the Richelieu class). Therefore to keep pace Germany needed a similar size and armament knowing that it was preparing negotiations with Great Britain, securing a bilateral naval agreement abrogating the naval restrictions of the Versailles treaty. Germany was nonetheless to cap its fleet to a third of the Royal Navy in global tonnage, but now the path was freed to study two 35,000-ton battleships.
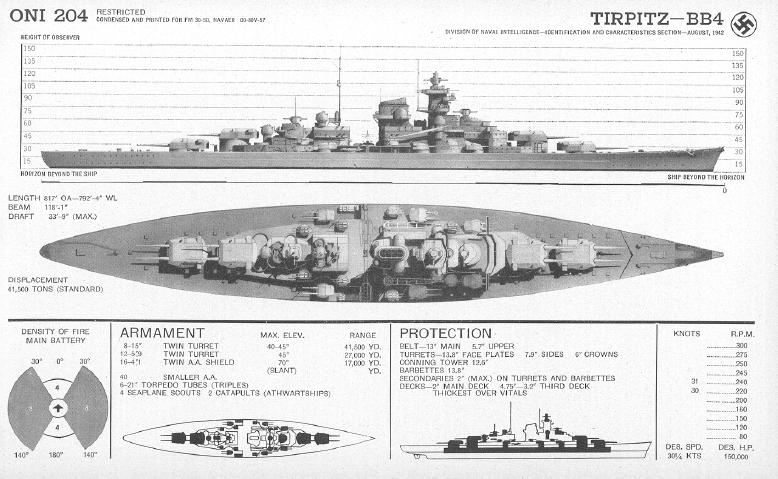
ONI recoignition drawing of the Bismarck
Early preliminary designs in 1934-35
The German naval design staff started work by late October 1934. The first reunion’s objective was to agreed upon the best requirements for armament armor and speed. In November 1935, a preliminary design was completed, showing a configuration with four twin turrets armed with 33 cm guns, and protected by an armored belt 350 mm (14 in) thick. Top speed was set to 30 knots (56 km/h; 35 mph). However the team admitted exceed that 35,000-ton limit was not to be respected, and alternative designs were proposed with the solution of a triple or, even quadruple turrets which allowed to concentrate armour and respect the limit.

But discussions within the board eventually agreed four twin turrets better distributed the main battery, notably maximizing the firepower forward and aft and arc of fire as well as simplify fire control. This arrangement immediately drawn comparisons with the Bayern class, in effect the last class of battleships built in Germany, during WW1. That similarity in the arrangement of the main battery also joined the three-shaft propulsion system. Design work went on into January 1935, now under direction of Generaladmiral Erich Raeder, the new and last commander of the Reichsmarine. Raeder discussed with all department and section’s head which helped him to make more precise design requirements.
The Naval Ordnance Department proposed for example to increase the gun caliber to 35 cm guns, just to reach the level of the Italian and (estimated caliber) for the French ships, and it was approved by 19 January.
By March 1935 the same Ordnance Department proposed the caliber of 38 cm (15 in), initially rejected because of the massive increase in displacement, but Raeder formally approved the 35 cm version on 1st April 1935, allowing an upgrade option depending on what was done in France and Italy. On 9 May, because of the preference of the Chancellor Adolf Hitler, Raeder approved the 38 cm caliber, knowing the new ship will not met tonnage limits.
Another aspect to be settled was the propulsion system, the rsult of discussion about strategic planning. Senior officers wanted the new class to be a raider in Atlantic Ocean, and required for that long range, therefore the design staff looked at diesel engines, in alternative to steam turbines, but also examined the possibility of using turbo-electric drive engines. The latter, tehnologically was more appealing, and documentation of its effectiveness was known from the use of the two American Lexington-class aircraft carriers, but also the brand new French passenger line, the S.S. Normandie. Increasing range range to reach the Atlantic, was also dictated by the lack of overseas bases, but this was later toned down by the use of numerous supply ships.
Signing the Anglo-German naval agreement, June 1935
This was an important step. Whe the German delegation met the British in London in June to discuss an “appeasement” naval, the staff was supposed to know their new projected battleships was already illegal. The treaty indeed only allowed Germany to swap from Versailles limitations to Washington limitations, therefore, still capped to 35,000 tonnes battleships, while her global capital ship tonnage was capped to 35% for the total Royal Navy, which was generous: UK indeed had ten dreadnoughts by the time, totalling 350,000 tonnes of battleships, not counting to the Hood and the two Repulse which were “battlecruisers” and already answered by the Scharnhorst class. These 35% translated into 122,500 tonnes, versus 175,000 for France, giving Germany at least a parity with its arch-rival in allotted tonnage. This tonnage in terms of standard battleships (35,000 tonnes) meant 3.5, but at least granted a provision for two “future battleships” with 38 cm guns and margins for lighter battlecruisers (the successors of the Scharnhorst class).
Shipbuilding planification
Propulsion changes
Admiral Raeder after these discussion ordered the new battleships would be using for the first time turbo-electric propulsion, and contracted the manufacturer Siemens-Schuckert, for this. This only that had some experience in this area. However the latter eventually could not meet the navy’s requirements after extensive studies and preparation work. Siemens-Schuckert declared its withdrawal from the project, just a month before construction. This was a blow to the technical staff, and it was decided in emergency to rearranged plans for classic high-pressure steam turbines, which there was plenty of expertise. This in fine also eliminated the use of diesels.
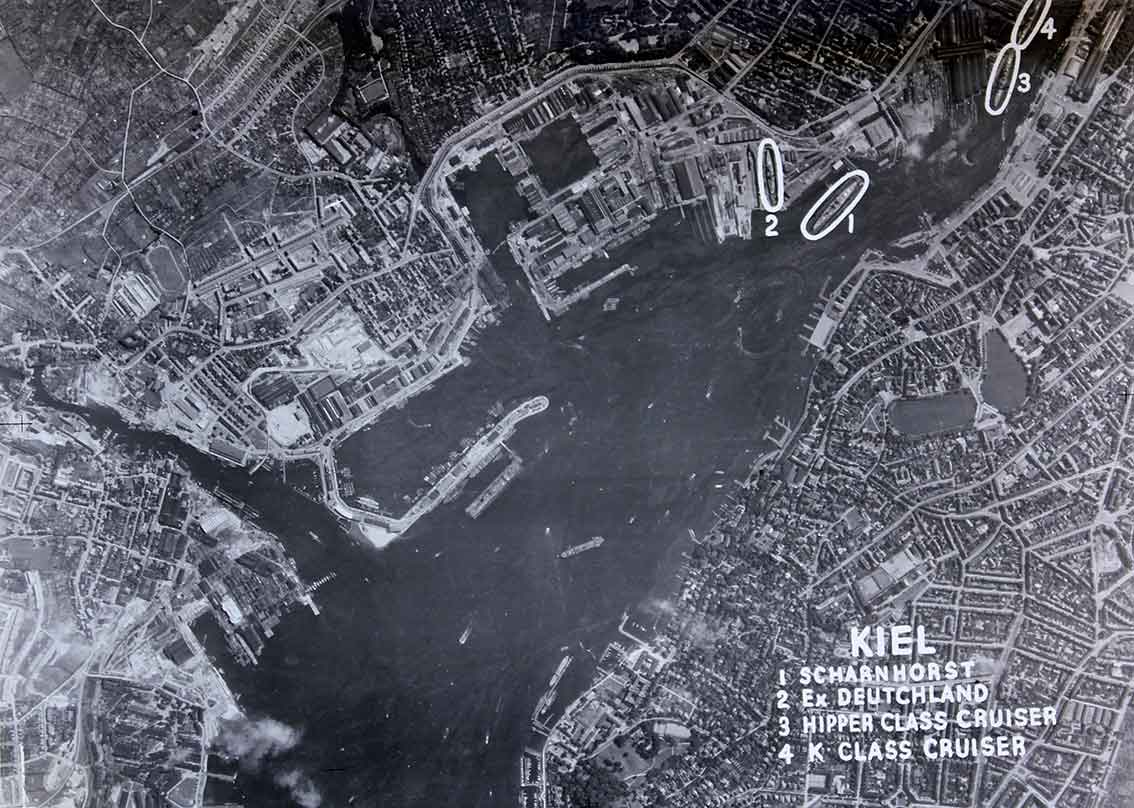
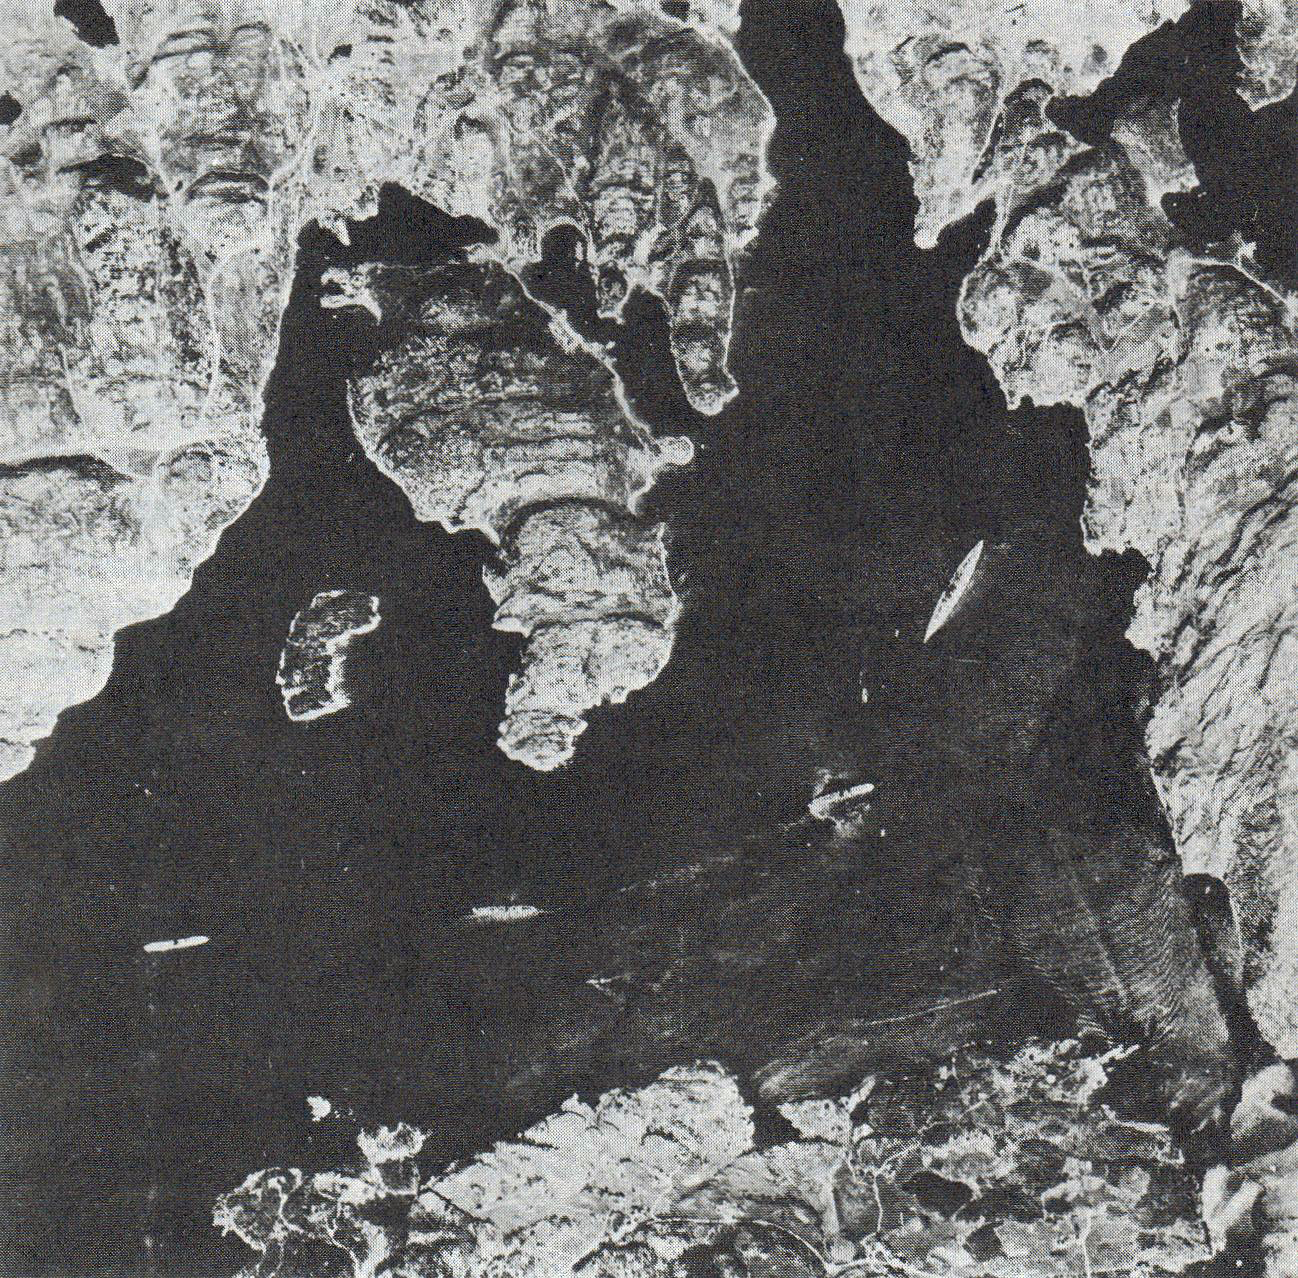
Kiel naval yard, aerial recon photo – SRC ww2photos.com
Yard and canal limitations
The class eventually received a name, proposed by Hitler: Bismarck. The Prussian chancellor that basically funded the new unified German nation seemed obvious to all. The second ship was to honor the grand admiral of WWI. The construction however was hampered by another issue, just before construction began: The limited capabilities of existing infrastructure, namely in Kiel and Wilhelmshaven. The other one was the Kaiser Wilhelm Canal which could not have been deep enough. On 11 February 1937, the Construction Office (Schiffbaubüro, or SBB) informed Admiral Raeder that these limitations forced a maximal tonnage of only 42,000 long tons (43,000 t). The SBB also proposed to built a third vessel in this class so to ‘consume’ the 35,000-ton treaty limit to the full and gaining time.
Tonnage revisions 1935-37
Admiral Werner Fuchs by the time at the head of the General Command Office (Marinekommandoamt) of the Oberkommando der Marine (OKM) which headed the SBB, advised Raeder and Hitler of modifications needed to adjust the displacement to respect legal requirements as defined by the London Naval Treaty. Japan on its side eventually rejected to sign the new treaty. On 1st April 1937 an escalator clause now allowed treaty signatories to raised the limit to 45,000 long tons (46,000 t), and went into effect. Therefore the previous design revisions were abandoned as the new displacement of 41,400 long tons (42,100 t) allowed to design to be completed as defined by the agreed specifications in 1935.
Nevertheless, the role of the new battleships stayed the same and Raeder and the rest of the staff still wanted Bismarck and Tirpitz act as commerce raiders, chiefly against French shipping, and in case, British shipping in the Atlantic. But they also knew this mission was contracted by the Bismarck’s design, steam turbines bein excellent for top speed, but bad for cruising radius while decisions about armament and armor layout were all destined for a traditional naval battle, at relatively close range in the North Sea, a view close to the origin of the project and in line with the officers that served during WWI (most of them). The raiding option was however the only one valid at a time the Kriegsmarine was not realistically capable to engage the Royal Navy and could only wage an asymetric warfare with whatever was available. In the end this created a gap between the mission and the way the ships were designed, but it made sense later in the light of the Plan Z, as the first of the promised battleship force capable of taking on the Royal Navy head on if completed in 1950.
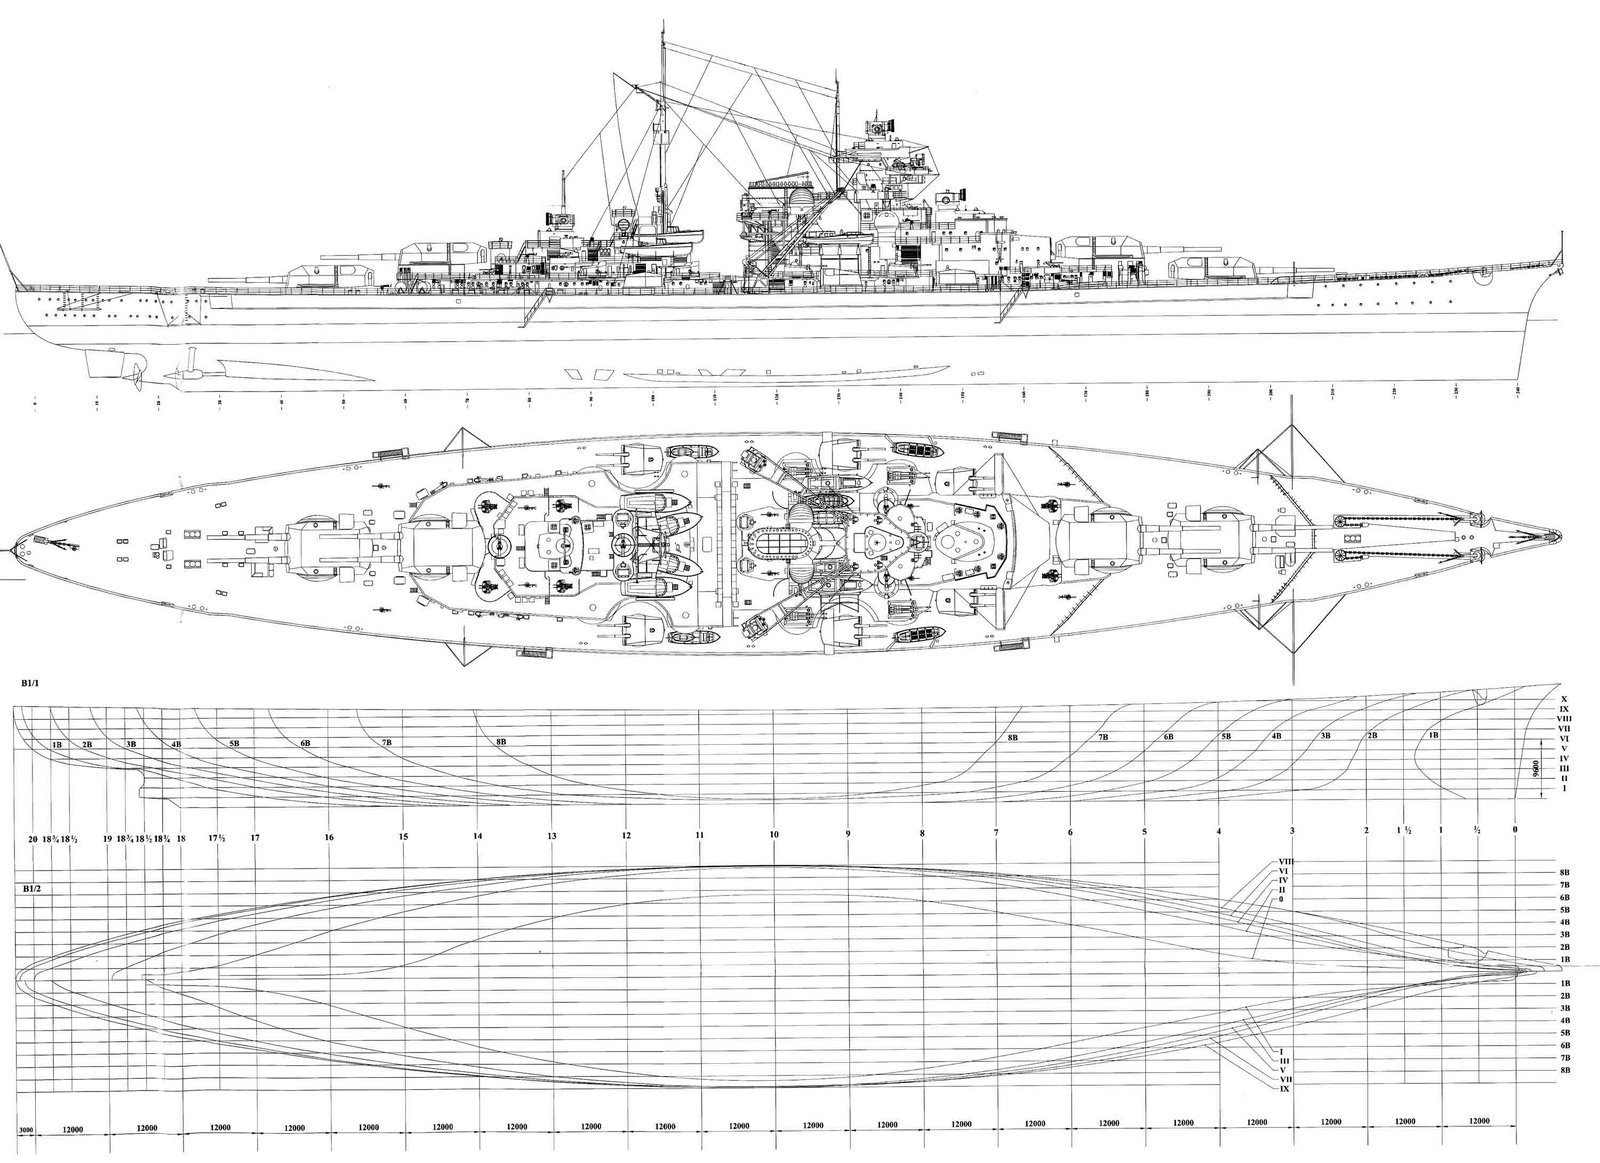
Bismarck’s final design schematics
https://commons.wikimedia.org/wiki/Category:Bismarck_(ship,_1939)
https://www.kbismarck.com/design.html
Final design
As defined in 1937 in the final draft, the Bismarck-class battleships featured the following specifications:
Dimensions:
-251 m (823 ft 6 in) long overall, 241.60 m (792 ft 8 in) waterline.
-36 m (118 ft 1 in) for the beam
-9.30 m (30 ft 6 in) draft as designed, 8.63 m (28 ft 4 in) standard, 9.90 m (32 ft 6 in) fully loaded.
Designed displacement: 45,950 metric tons (45,220 long tons)
Standard displacement: 41,700 t (41,000 long tons)
Fully loaded displacement: 50,300 t (49,500 long tons).
Due to the gap in construction, design revisons made the Tirpitz heavier at 42,900 t (42,200 long tons) standard for 52,600 t (51,800 long tons) fully laden.
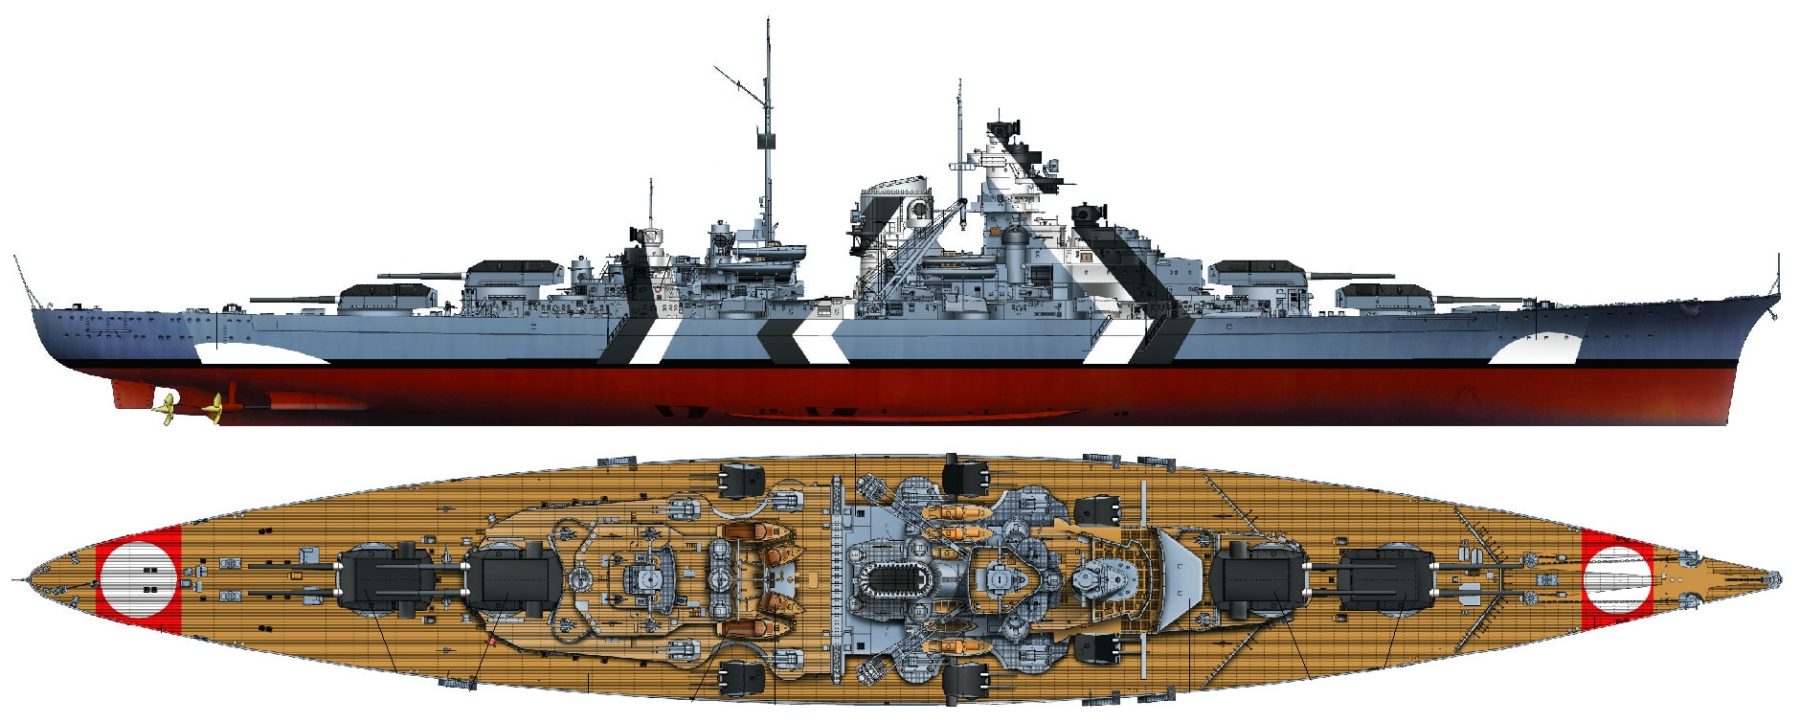
General characteristics
US Navy recognition drawing about the Tirpitz
Double bottom existed for about 83% of their hull’s length (22 watertight compartments) and they were assembled at 90% by welding. The armour was concentrated in the citadel in conformity of whwat was done at the time, with additional strays above the steering compartment, but the stern was weak, and this showed later in action, in particular for the Bismarck in the heavy seas of the North Atlantic and her only combat mission. Total building cost for KMS Bismarck was 196 million Reichsmarks, her sister ship a bit less as expected, at 191.6 million Reichsmarks. The design characteristics showed several good points:
-Great stability because of their wide beam, good for their artillery’s accuracy, especially at long range.
-They were Good seaboat, only with slight pitching and rolling seen in sea trials in the heavy seas of the North Atlantic.
-They were relatively agile, responsive to commands from the helm and rudder deflections close to just 5°, heeling only 3° hard over, but to the cost of 65% of their top speed.
Trials showed also however they handled poorly at low speeds and travelling astern, and needed tugs in confined waters. When commissioned, both battleships also had a degaussing coil fitted, as the danger of magnetic mines was recoignised. Also final equipments included four minesweeping paravanes placed on either side of the aft superstructure deck and used in conjunction with the bow protection gear.
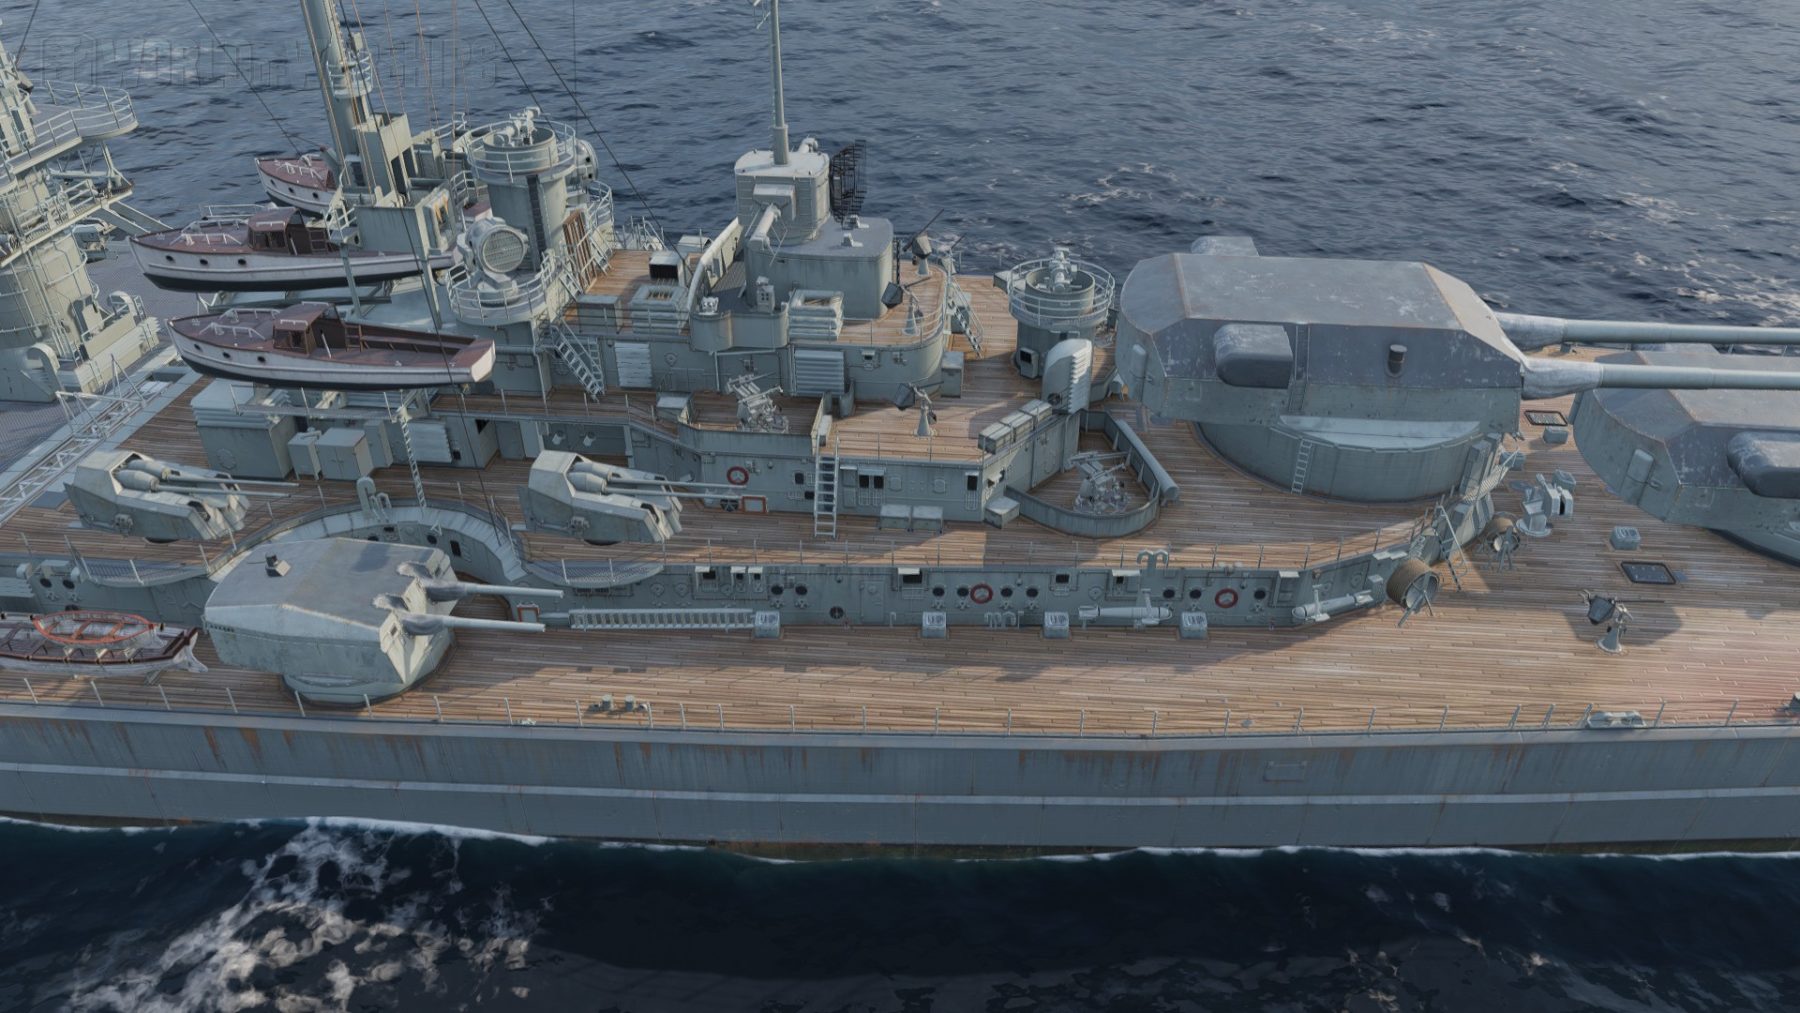
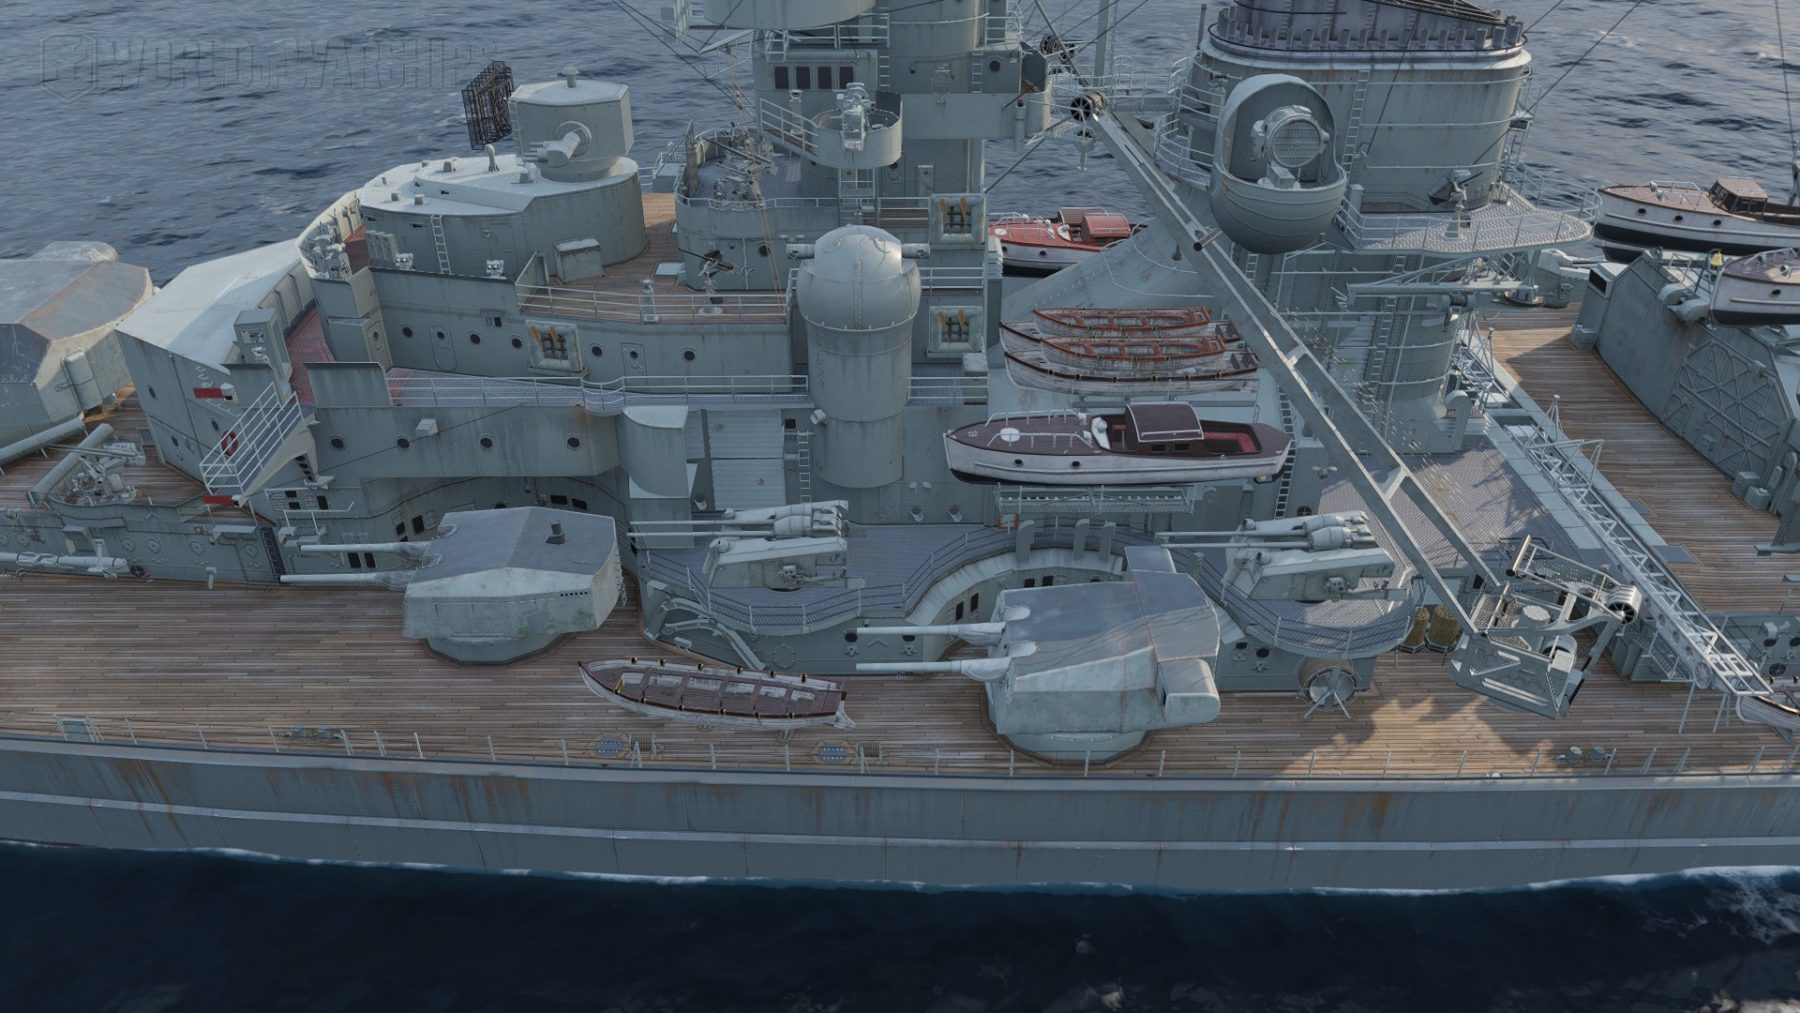
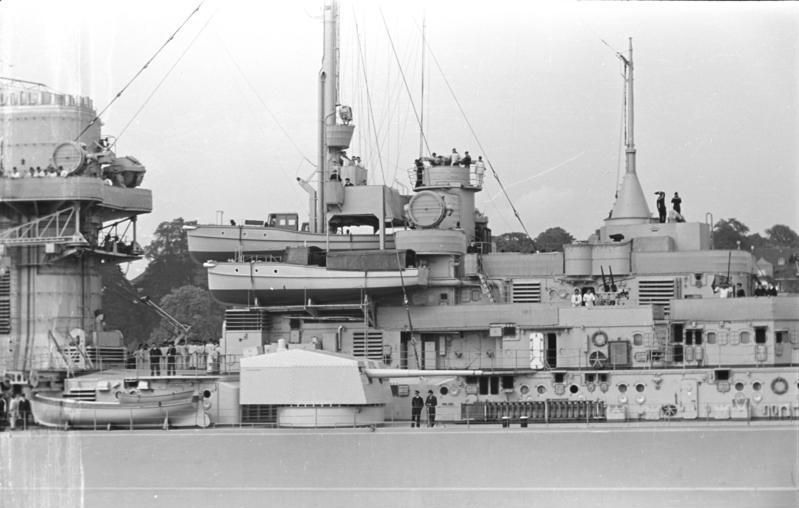
Pics wow close bismarck/tirpitz details
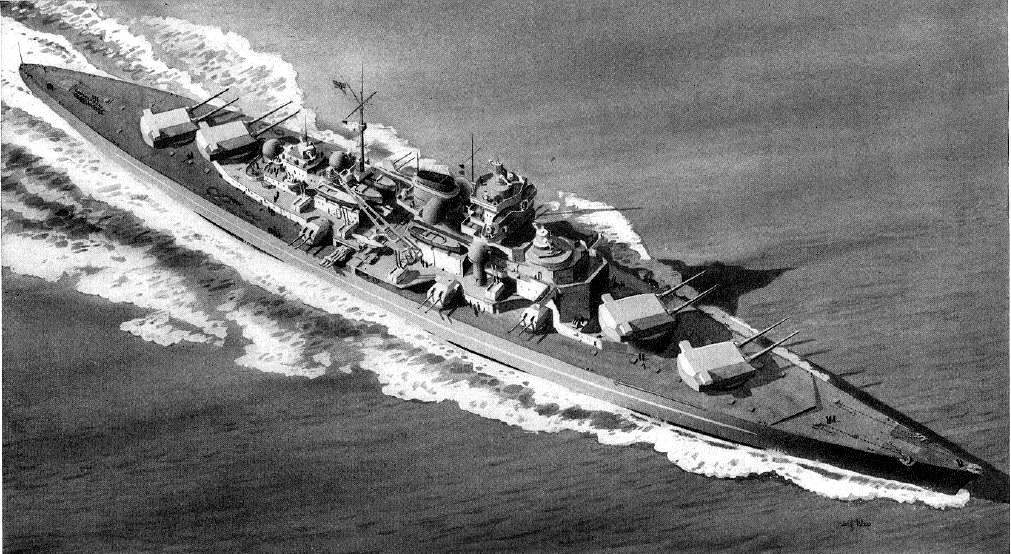
The crew comprised in peacetime 103 officers and 1,962 enlisted men for the Bismarck, But in wartime it rose to 108 officers + 2,500 men by 1943 on the Tirpitz, acting as flagship. Equipments comprised two sets of cranes, seven searchlights for night combat, and a fleet of service boats consisting in three picket boats, four barges, one launch, two pinnaces, two cutters, two yawls, and two dinghies which were placed alongside the funnel and the mainmast aft, basically either side of the central catapult anc over the hangars. A striking element compare to many designs of the time was the relative “spread” of the main artillery along the hull rather than extreme concentration in the center. The hull’s profile was elliptical as seen from above to preserve for the underwater protection sufficient depht and the hull lines were greatly based on the Scharnhorst class and just widened and variations tested in basin. The clipper prow underwater design was straight, but with a slight bulge in width at the base, insignificant compared for example to the Yamato.
Differences bwteen the Bismarck and Tirpitz
Design revisions led to slightly different designs between the two sister-ship, but in a lesser extent than between the Scharnhorst and Gneisenau.
-The funnel cap on Bismarck was silver-grey, black on Tirpitz.
-Cranes on Bismarck placed 3.5 m (11 ft) further outboard and 3 m (9.8 ft) further aft, Tirpitz superstructure deck.
-Two starboard and port 10.5 cm (4.1 in) flak guns were mounted 5 m (16 ft) further inboard on Bismarck.
-Bismarck had a straight stem while Tirpitz had “an Atlantic bow” on completion.
-Bismarck had a single aircraft hangar either of the funnel, double hangar at the mainmast while Tirpitz had two double hangars abreast the mainmast base.
Design of the Bismarck class
Propulsion

Bismarck in drydock, showing the three-shaft arrangement
The Bismarck-class had three sets of geared turbine engines like the Baden class back in 1916 and more recently the Scharnhorst class. Their manufacturer was Blohm & Voss. Tirpitz however used British-built Brown Boveri turbines purchased before the war. Each set was driving a three-bladed propeller screw 4.70 m (15 ft 5 in) in diameter. Why choosing a three-shaft arrangement ? It saved weight.
This combination of high and medium-pressure turbines ran at different speed, 2,825 rpm for the HP, 2,390 rpm for the low pressure. Steam was provided by twelve Wagner ultra high-pressure, oil-burning water-tube boilers. An estimation made on the alternative electric-transmission turbines gave an approximate figure of 46,000 shp (34,000 kW) for each one, making it for a higher top speed, but at a much grater tonnage. The lighter geared turbines had slight power to ratio advantage and procured the advantage of a reliable and well known construction.
Top speed as contracted was 30 knots (56 km/h; 35 mph), on trials, this was surpassed slightly at 30.01 knots (55.58 km/h; 34.53 mph) for Bismarck, 30.8 knots (57.0 km/h; 35.4 mph) for Tirpitz. Tirpitz was heavier, despite being rated for 163,023 PS (160,793 shp; 119,903 kW), versus an output of 148,116 shp for Bismarck. They also differed by their fuel store capacity: Bismarck carried 3,200 tons of fuel oil as designed, pushed in wartime to 6,400 tons in standard, and with extra fuel bunkers filled, up to 7,400 tons. Tirpitz carried less, only 3,000 tons of fuel, but more in wartime fue to its additional bunkers, up to 7,780 tons. Range was 8,525 nautical miles (15,788 km) for Bismarck at 19 knots cruising speed and 8,870 nautical miles (16,430 km) for Tirpitz.
However this arrangement also caused issues with the design. As noted by Robert Ballard that discovered and surveyed the wreck of Bismarck, the center shaft weakened the keel at the point it emerged from the hull while the four shaft arrangement would have procured greater hull strength, allowing to steer with propeller revolutions. When Bismarck’s rudder was jammed in May 1941 by a torpedo hit, she was caught in course which could not have been be corrected by using alternated screw revolutions as foreign battleships. This problem was known already at the time of sea trials, but it was too late to do anything.
Electric power was distributed by many generators, the most important being two electric plants, made of of four 500 kW diesel generators, plus two electric plants each, which provided a total 7,910 kW at 220 volts, plus five 690 kW turbo-generators (2600 kw), one 460 kW generator connected to a 400 kVA AC and another 550 kVA AC diesel generator for distribution. These were manufactured by Garbe, Lahmeyer & Co.
Armament
Main battery
Turret “Anton” on the Bismarck in completion.
KMS Bismarck and Tirpitz main battery was made of four turrets, A and B fore and C and D aft, named Anton, Bruno, Cesar, and Dora respectively. These were all of carrying a 38 cm (15 in) SK C/34 gun in deck level and superfiring pairs. These turrets were tailor-made around the independent gun mounts. Here are the specifics:
Development of the 38 cm (14.96″) SK C/34:
It was not the first time the German Navy developed such caliber guns. The first time was for the Baden and their successors.
Amazingly, during some time, it was more important to deliver more Linienschiffe than to take the time of researching a new generation of gun, which took years. So in 1914-18, German Battleships jumped directly from the 12-in to the 15-in caliber without intermediaries. The Baden incarbated such leapfrog in artillery for the Kaiserliches Marine.
The new generation 38 cm guns created for Bismarck class battleships, as often referred as 47 calibers long whereas they were 51.66 calibers as some auuthors of the time thought they carried the same 38 cm L/45 guns of the Bayern class. These were a completely new design with only their caliber as common.
Design development started in 1934, and they entered service in 1939.
The use of four twin turrets in symmetrical configuration, again, like the Baden class, was a design practice which emerged during WW1. This was a peculiar choice as most capital ships, if not all designed in the interwar choose to respect treaties by grouping their guns in triple or quadruple turrets in order to save protection weight. This made for a shorter armored citadel and magazine length, plus more compact vessel overall. At some point triple turrets were considered for the Bismarck class, bu the idea was dropped because of three reasons:
-Lowering the overall rate of fire in each turret
-The risk of a single well-aimed hit disabling more firepower at once.
On the contrary, four twin turrets allowed for a better field of fire and made a more effective use of successive salvo, also lowering the stresses on the hull which were spread more heavenly, not counting concerns about the displacement which was “freed” in order to cope with unsurmountable design dilemna. The Germans simply could use this configuration, by lying on the displacement.
skc-34 APC shells in a German ordnance manual SRC
Gun Specifications:
-Loose liner A tube, four rings 2/3 of the length from the breech
-Jacket shrunk over 2/3 ring layer
-Breech end-piece and block supporting piece
-Horizontal sliding breech block.
-Gun Weight, with breech: 244,713 lbs. (111,000 kg)
-Gun Length overall: 772.8 in. (19.630 m), 724.6 in. bore length
-Rifling Length: 629.2 in. (15.982 m), 90x 0.177 in deep x 0.306 in grooves
-Twist RH 1 inches 36 to 1 inch 30
-Chamber Volume: 19,467 in3 (319 dm3)
-Rate Of Fire: 2.3 to 3 rounds per minute
Ammunitions:
-APC L/4,4: 1,764 lbs. (800 kg)
-HE L/4,5 base fuze: 1,764 lbs. (800 kg)
-HE L/4,6 nose fuze 3a: 1,764 lbs. (800 kg)
-HE L/4,6 nose fuze AA 4a: about 1,740 lbs. (789 kg)
Bursting Charges:
-APC L/4,4: 41.4 lbs. (18.8 kg)
-HE L/4,5 base fuze: 71.9 lbs. (32.6 kg)
-HE L/4,6 nose fuze: 141.5 lbs. (64.2 kg)
-HE L/4,6 nose fuze AA: 141.5 lbs. (64.2 kg)
Fire characteristics:
-Elevation 30°
-Maximum range 36,520 m (39,940 yd).
-820 meters per second (2,690 ft/s) velocity on average.
-115–120 shells per gun, 940–960 shells stored in total.
These were Krupp-made wit the sliding wedge breech blocks requiring brass cartridge cases for the propellant charges. The turrets were electrically trained while elevation was hydraulic-powered. This elevation also could be controlled remotely. But they could only load at a 2.5° elevation. Tirpitz received time-fuzed shells in order to combat Allied bombing attacks. These guns became thus the largest FLAK guns ever used in combat !
Besides the Bismarck class, this gun was intended to rearm the Scharnhorst class as well. Gneisenau was too badly damaged in 1942 for transformation, and the spare turrets were reallocated to coastal artillery. Cap de la Hague, Paimpol (France), Oxsby (Denmark) had facilities built for them but never completed. The Soviet Union was interested and ordered sixteen of them for the battlecruisers Sevastopol and Kronstadt (Project 69), never delivered as the war broke out. One of these survived until today, at the Kristiansand Cannon Museum in Norway.
Secondary battery
One of Bismarck’s 15 cm gun turrets
For ships’ secondary battery, designers were in familiar ground as it was chosen to use the same battery as for the Scharnhorst and Deutschland class. But repartition and management changed.
This battery of twelve 15 cm (5.9 in) SK C/28 guns were indeed mounted in six twin turrets, whereas they were only four on the Scharnhorst for lack of space and four more, but in single mount under shields. The Bismarck’s dual 15 cm gun turrets were the same as on the Scharnhorst class.
Specificities:
-Elevation 40°, depression −10°
-Rate of fire: 6 per minute.
-Ammunition: 45.3 kg (100 lb) shell
-Muzzle velocity: 875 m/s (2,871 ft/s).
-Range: 23,000 m (25,000 yd).
Tirpitz’s 15 cm guns were supplied with time-fused shells in 1943 to act also as “FLAK”.
Naval historians notably Antony Preston, criticized the choice of pure antiship guns while allied (and Italian) opted for dual-purpose guns. William Garzke and Robert Dulin also noted if dual, these would have considerably bolstered the anti-aircraft battery, at the expense of the defence against destroyer attack, but German naval expertsof the time estimated it was more important. Again, these battleships were intended for classic battles, not the way they were used.
FLAK (AA batteries)

Bismarck and Tirpitz received an anti-aircraft battery in three stages, like for the Scharnhorst, and with the same types:
-Sixteen 10.5 cm (4.1 in) C/33 65 guns: 8×2 mounts
-Sixteen 3.7 cm (1.5 in) C/30 guns: 8×2 mounts
-Twelve 2 cm (0.79 in) C/30 guns, individual mounts.
The 10.5 cm guns were mounted on the first superstructure deck but two amidships guns were moved forward on Tirpitz on completion to give them better fields of fire. These eight mounts were guided by four fire-control directors. Tow were installed aft of the conning tower, and a third positioned aft of the main mast. The fourth and last, behind turret ‘Caesar’. Tirpitz had its directors covered by light armoured protective domes to avoid shrapnel damage.
The 3.7 cm/83 guns mounts were placed in the superstructure and were hand-operated butautomatically stabilized in roll and pitch. A total of 32,000 rounds of ammunition wre stored for the, a fraction of which were ready round in close by ammunition stores.
The 2 cm guns were twelve, all in single mounts, but this was augmented on Bismarck and, moreover on Tirpitz, notably by swapping on Flakvierling quad mounts, protected by better shields. In total, they were provided with 24,000 rounds in total. Bismarck received its first quadruple mountings in 1941, raising the total to twenty 2 cm guns. Tirpitz’s went to 78 guns in single and quadruple mountings in 1944 and up to 90,000 rounds in store.
Torpedo armament:
The intitial design eliminated them, but Tirpitz was fitted with two spare quadruple banks of of 53.3 cm (21.0 in) torpedo tubes at the end of 1941 or early 1942, placed on the sides, 24 torpedoes in store. They were placed on the deck, abreast the main mast aft, close to a 105 mm mount and the aft 150 mm twin turret.
Armor Protection
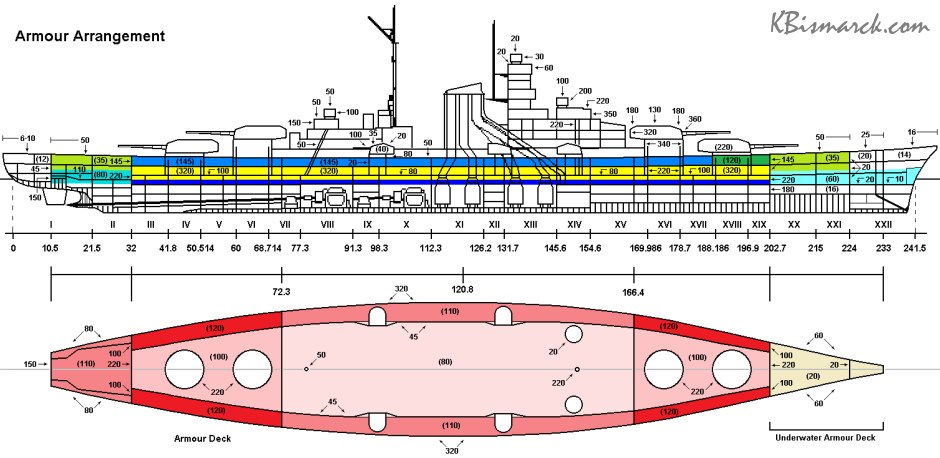
Armour scheme of the Bismarck class – credits kbismarck.org
This is a controversial topic, because as we will see, the ships were not “impervious” to enemy fire. The whole armour scheme was copied over the Scharnhorst and improved, but not that far. Given the latter were almost considered battlecruisers, this tells volumes about the level of protection of the Bismarck class. The combinedfleet.org test for the “best treaty battleship” SRC: http://www.combinedfleet.com/baddest.htm – The Bismarck class is indeed given the score of 146, pitted against the Iowa class (best in class), and behind the South Dakota (193) Richelieu (175), Yamato (170), and… the King Georges V (152). It is however better than the Vittorio Veneto (130). Indeed Bismarck’s armor figures were only slightly improved compared to the Scharnhorst, and with thicknesses still inferior of designs such as the King George V and Richelieu.
The armor plating in its majority was made in Krupp cemented steel, containing an assembly of 0.34% carbon, 3.78% nickel, 0.31% manganese, and 2.06% chrome. It was classified either Ww for soft, and “Wh” for hard. The armored deck was mounted low in the hull, reducing the internal volume protected by the citadel in contrast to allied designs featured a single armored deck high in the ship. The main citadel was designed so to resist a 380 mm (15.5 in) hit weighting 1,016kg fired in the “magic square” comprised between 10,793 meters and 21,031 metersup to 23,319 meters over the magazine. Safety valves of course were present to flood these, as well as safety anti-flash doors.

A comparison between contemporary armour schemes
-Armored belt: From 220 to 320 mm (8.7 to 12.6 in), thickest in central portion around the barbettes and in-between.
-Transverse bulkheads 220 mm thick.
-Upper deck 50 mm (2 in)
-Armored deck from 100 to 120 mm (3.9 to 4.7 in) amidships,
-Bow deck armor 60 mm (2.4 in)
-Tern deck armor 80 mm (3.1 in).
-Forward conning tower 350 mm (14 in) walls, 200 mm (7.9 in) roof
-Aft conning tower 150 mm walls, 50 mm roof.
-Fwd Range finder 200 mm sides, 100 mm roof.
-Aft range finder 100 mm sides, 50 mm roof.
-Main battery turrets faces 330 mm, sides 220 mm, rear 130 mm, roof 180 mm (7.1 in).
-15 cm Secondary battery turrets: 100 mm face, 40 mm sides, 35 mm (1.4 in) roofs
-10.5 cm shielding 20 mm (0.79 in), roof 40mm (1.6 in).
-Underwater main protection design to resist a 250kg TNT blast.
-Uw Armour depth 5.5 meters (216.5 in)
-Longitudinal bulkhead 53 mm (2.1 in) thick
-Bottom protection 1.7 meters (66.9 in) depht.
Construction of the Bismarck class
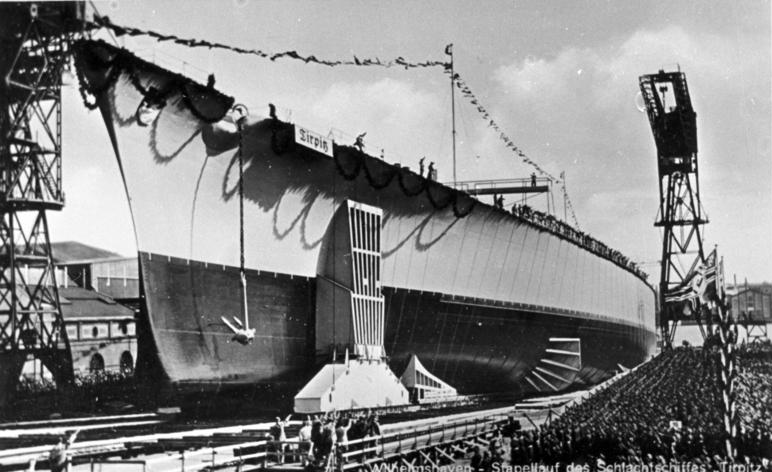
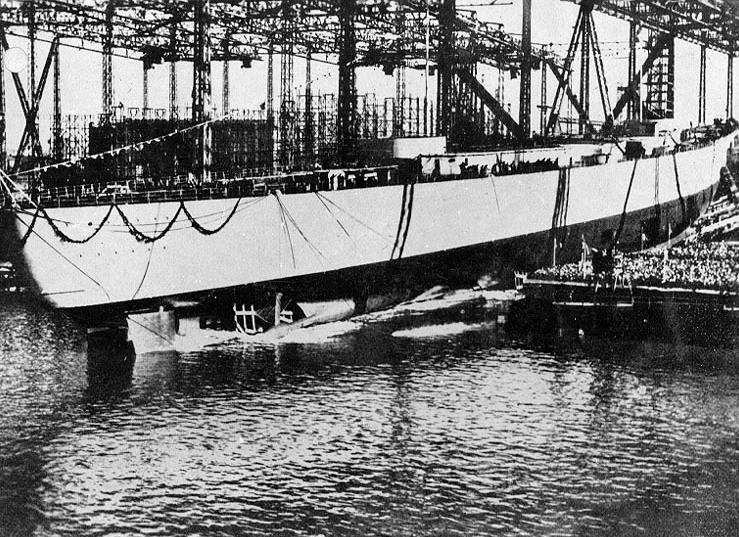
Bismarck being launched
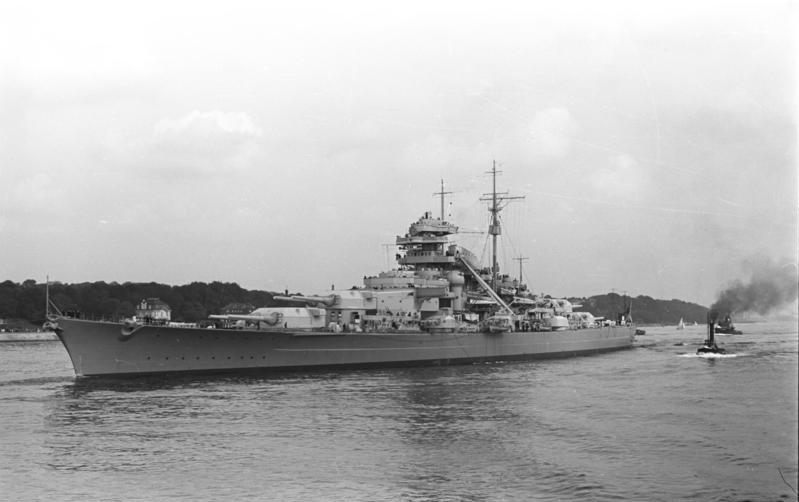
KMS Bismarck was laid down at Blohm & Voss shipyard, 1st July 1936, assigned construction number 509 (contract name Ersatz Hannover), as a replacement for the pre-dreadnought of the same name. She was launched on 14 February 1939, so after three years of work, and a delighted Adolf Hitler was in attendance. This was also a grand ceremony and propaganda coup for the regime as the ship was flagged at the time the “largest battleship in the world”. Hitler and all the staff knew perfectly this class was way over all treaty limits. But war was just a few month away. The granddaughter of Otto von Bismarck christened the battleship for the occasion. At the time she was completed with a straight bow but the yard modified it to a clipper bow during the fitting-out. Tirpitz on her side was designed with the original clipper bow. Bismarck was commissioned on 24 August 1940 and Kapitän zur See Ernst Lindemann took first command. After trials in the Baltic Sea by December 1940 fitting-out work took place to iron-out all defects spotted during trials. Trials and tests went on after that also in the Baltic while the tcrew trained, all along in March and April 1941 and she finally was active in May, ready for her first -and last- operational sortie.
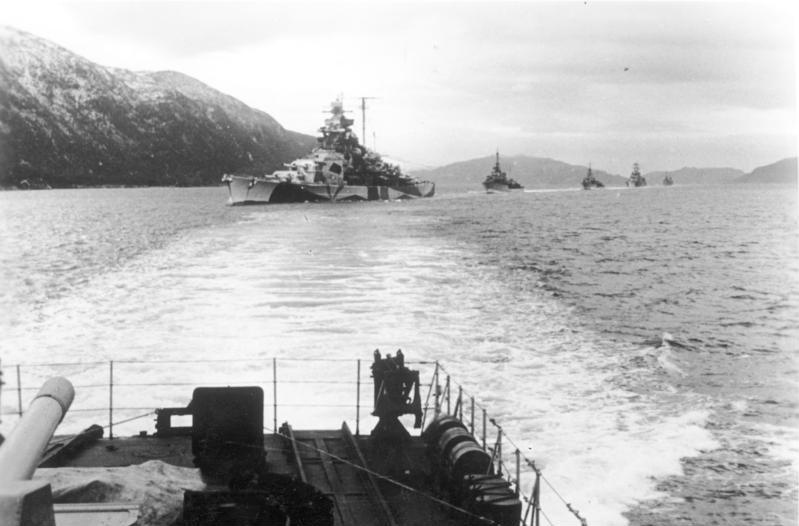
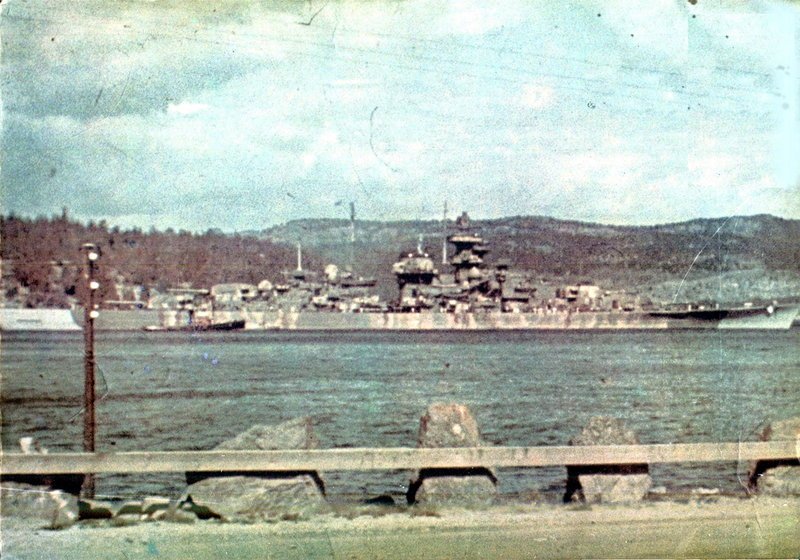
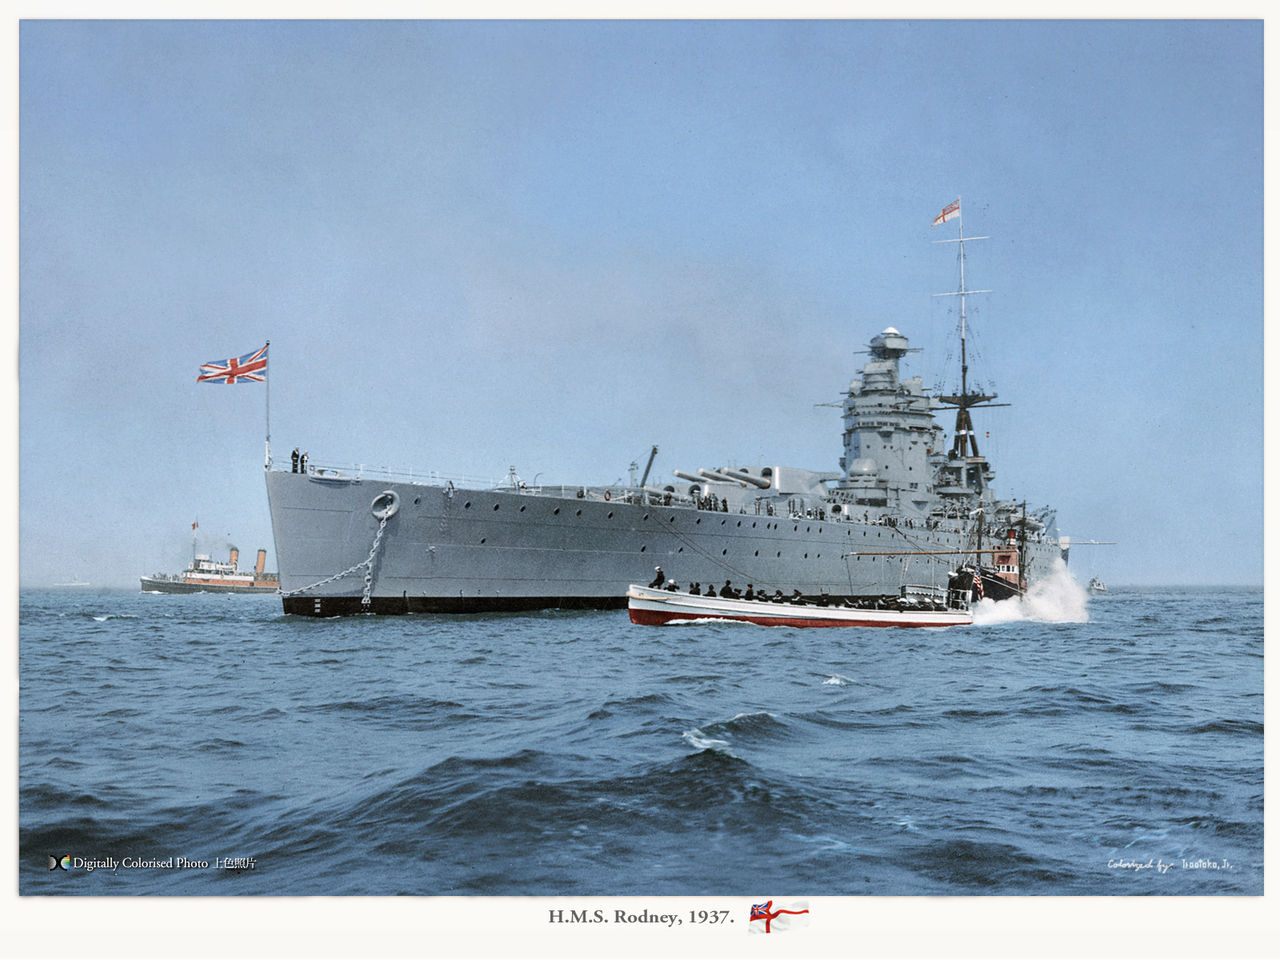
KMS Tirpitz on her side, was laid down at the Kriegsmarinewerft Wilhelmshaven, 20 October 1936, construction number 128 (Ersatz Schleswig-Holstein) as she was to replace the old schoolship pre-dreanought that opened fire on Poland in September 1939. Grand Admiral Alfred von Tirpitz’s daughter Ilse von Hassel, was present for the launch and christened the Bismarck 1st April 1939, while fitting out went on until February 1941 and she was commissioned on 25 February 1942, so one year afterwards. All in all she was not only cheaper, but faster to built. Trials started in the Baltic and the North Sea and she went back for post-trials fixes. By that time, the situation had changed and was not so favourable for the kriegsmarine after many surface losses and U-Boats seemingly the focus of operations. Her career was far longer than er sister-ship, as Hiter did not wanted to throw her away like the Bismarck and she spent much of her career in Norwegian waters as the “solitary queen of the North”.
Links/Read More
Books:
Specs Conway’s all the world fighting ships 1921-1947.
Ballard, Robert (2007). Robert Ballard’s Bismarck. Edison: Chartwell Books.
Bercuson, David J. & Herwig, Holger H. (2003). The Destruction of the Bismarck. New York The Overlook Press.
Breyer, Siegfried (1973). Battleships and Battle Cruisers 1905–1970. New York Doubleday.
Breyer, Siegfried (1989). Battleship “Tirpitz”. West Chester: Schiffer Publishing Ltd.
Campbell, John (1985). Naval Weapons of World War Two. Naval Institute Press.
Garzke, William H. & Dulin, Robert O. (1985). Battleships: Axis and Neutral Battleships in World War II.
Gröner, Erich (1990). German Warships: 1815–1945. Vol. I: Major Surface Vessels.
Koop, Gerhard & Schmolke, Klaus-Peter (2014). Battleships Of The Bismarck Class.
Maiolo, Joseph (1998). The Royal Navy and Nazi Germany, 1933–39 A Study in Appeasement and the Origins of the Second World War.
Mulligan, Timothy P. (October 2005). “Ship-of-the-Line or Atlantic Raider? Battleship “Bismarck” between Design Limitations and Naval Strategy”.1013–1044. doi:10.1353/jmh.2005.0246. S2CID Preston, Anthony (2002). The World’s Worst Warships. London: Conway Maritime Press.
Sturton, Ian, ed. (1987). Conway’s All the World’s Battleships: 1906 to the Present. London: Conway Maritime Press.
von Müllenheim-Rechberg, Burkhard (1980). Battleship Bismarck, A Survivor’s Story. Annapolis: Naval Institute Press.
Williamson, Gordon (2003). German Battleships 1939–45. Oxford: Osprey Publishing.
Killing the Bismarck: Destroying the Pride of Hitler’s Fleet by Iain Ballantyne
Hunt the Bismarck: The Pursuit of Germany’s Most Famous Battleship by Angus Konstam
The Sinking of the Bismarck by William L. Shirer
Bismarck: The Final Days of Germany’s Greatest Battleship by Michael Tamelander and Niklas Zetterling
The Battleship Bismarck by Stefan Draminski
Die Entdeckung der Bismarck by Rick Archbold
Battleship Bismarck: A Design and Operational History by Robert O. Dulin, William H. Garzke, and William Jurens
Sites:
https://www.kbismarck.org
https://www.german-navy.de/kriegsmarine/ships/battleships/bismarck/index.html
http://www.navweaps.com/index_inro/INRO_Bismarck.php
The Bismarck on wikipedia
The Tirpitz on wikipedia
Visiting Bismarck, Explorers Revise Its Story
more sources on history.navy.mil
Video: WoW Naval Legends
Discussion on the turrets colors
The model’s corner
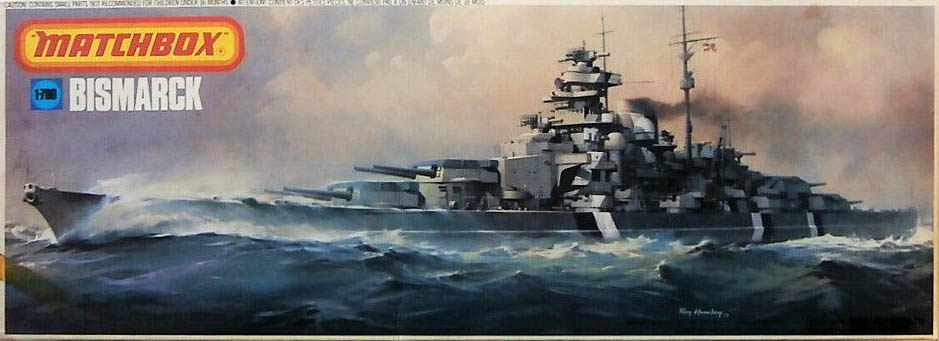
The subject is perhaps the best liked model of all times for maritime ww2. It was covered by virtually all model manufacturers, and at all scales. In addition, some amazing scratch-built models has been built, sometimes at scales for radio-command large enough to allow a kid to fit in. A friend of mine made a 1/72 scale Bismarck, and my very first warhip kit ever, which basically drew my passion for ww2 model kits afterwards, was a 1/700 Matchbox kit (see above). It also showed me the limited precision and detail of grape pieces in thermoformed plastic. I learned a great deal from there. Between the price of these kits and their rarity i learned to scratch-built my own 1/700 scale ships, making about 200 of them of all eras, not only WW2. It was 20 years ago. To simplify the process, they were all waterline, made on a light cardboard of about 170 g/m2, 400 g/m2 for small pieces, Rhodoid, and molded plastic from all these grapes, or very thin paper (for boats). Hair-thin molded plastic made excellent wiring, guns and masts depending on the stretching, Rhodoid for windows, barriers, ladders, cranes…
-Academy 1/350
-Tamiya 1/350
-Revell 1/350
-Trumpeter 1/350
-Tamiya 1/700 WLS
-Airfix 1/600
-Matchbox 1/700
-Heller 1/400
-Meng 1/700
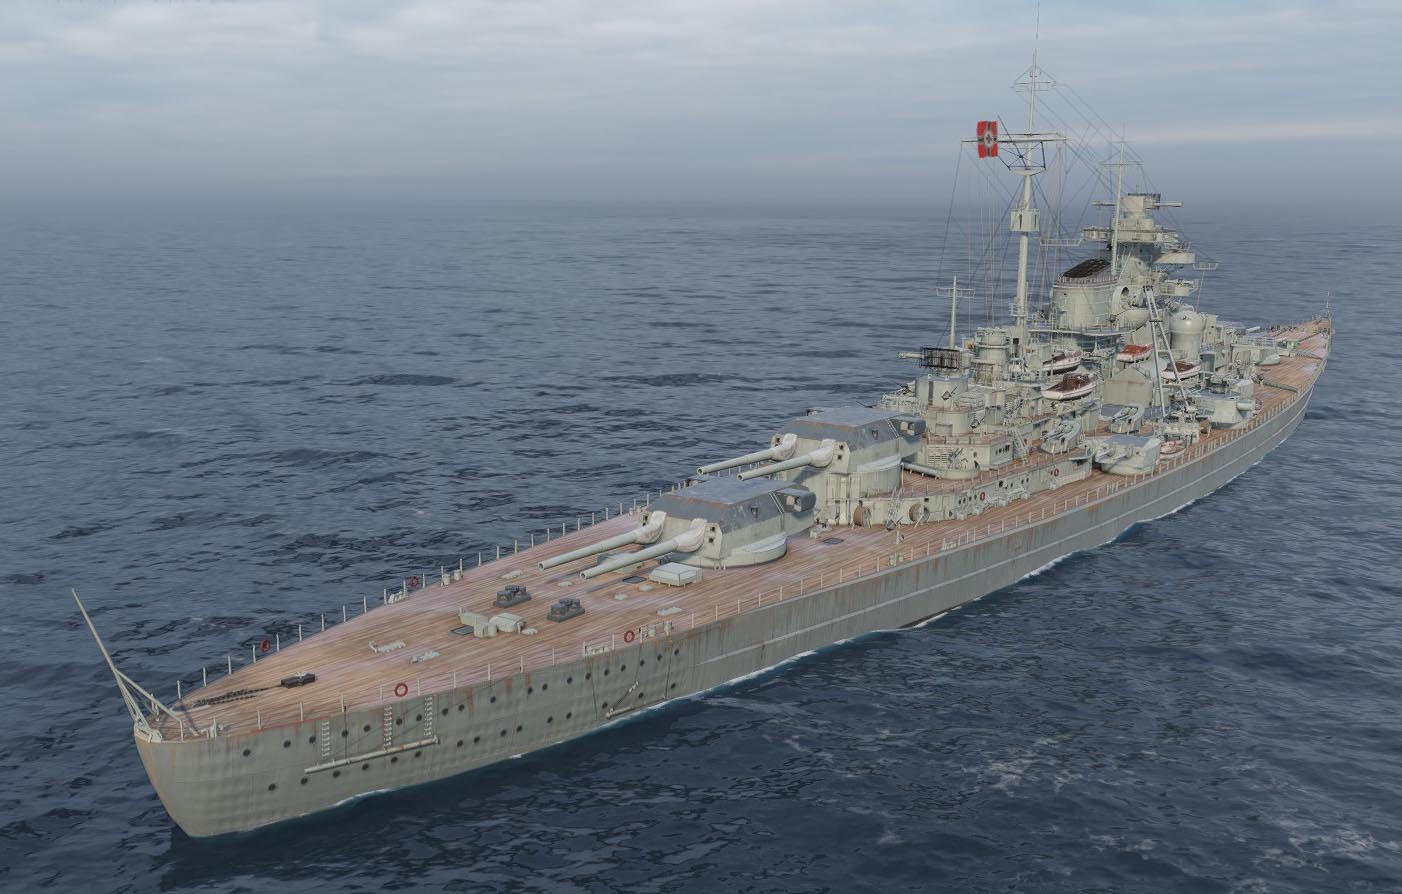
The Bismarck in 3D

Bismarck specifications |
|
| Dimensions | 248 x36 x10.6 m |
| Displacement | 42,300t/52,600t FL |
| Crew | 2600 |
| Propulsion | 3 screws, 3 Brown-Boveri turbines, 12 Wagner boilers, 138 000 cv |
| Speed | 30 knots (55.58 km/h; 34.53 mph) |
| Range | 8,870 nmi (16,430 km, 10,210 mi) 19 knots (35 km/h, 22 mph) |
| Armament | 4×2 380 mm, 12×150 mm (6×2), 8×2 105mm, 8×2 37mm, 12 20mm AA, 4-6 hydroplanes. |
| Armor | Belt 317mm, deck 50mm, torpedo bulkheads 44mm, turrets 362mm, blockhaus 356mm |

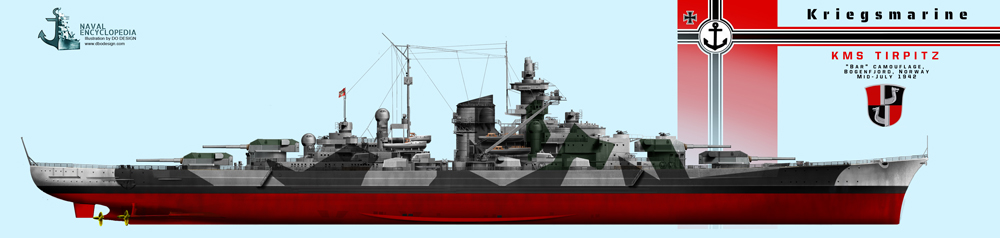
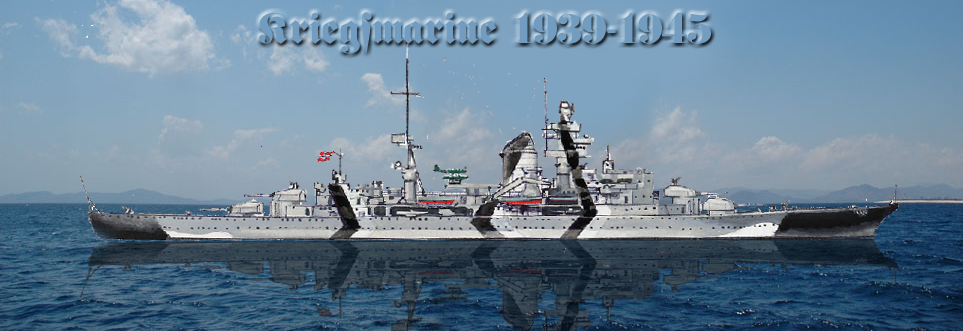
The KMS Tirpitz in june 1944, in its “Norwegian livery”, author’s old illustration
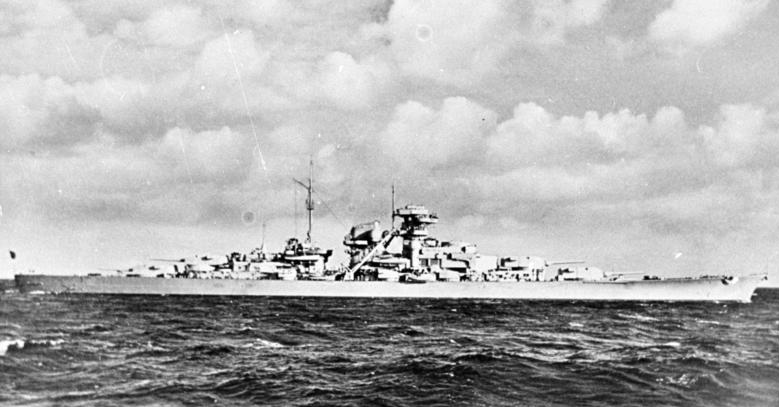
KMS Bismarck in August 1940. Freshly Commissioned, she missed the four aft 105 mm FLAK turrets, some AA guns, and more crucially its telemeters and radars. The ship stayed in this guise until October.
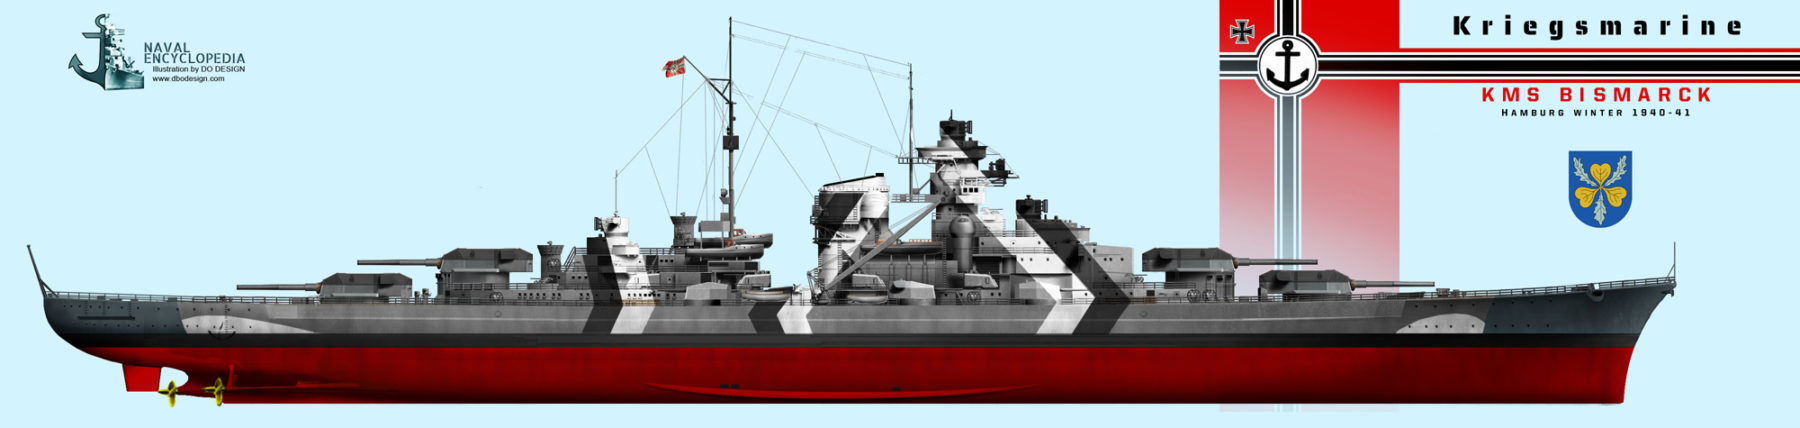
Bismarck in the winter of 1940-41 in Hamburg, she received her new distinctive new camouflage with dazzle stripes, false bow and stern waves and darkened ends called Tarnanstrich-Muster, applied from 18 May. She also carried dark grey (or red on other sources) turret tops, including the slopes.

Bismarck on 21 May 1941 in Norway, at the start of Unternehmen Rheinubung. She was repainted there, all her camouflaged painted over for a dark grey hull/light superstructures, but the bow wave (see below).
The Bismarck’s camouflage on 26 May 1941 as she steamed towards France. Her turret tops, main and secondaries, has been painted yellow for the Luftwaffe.
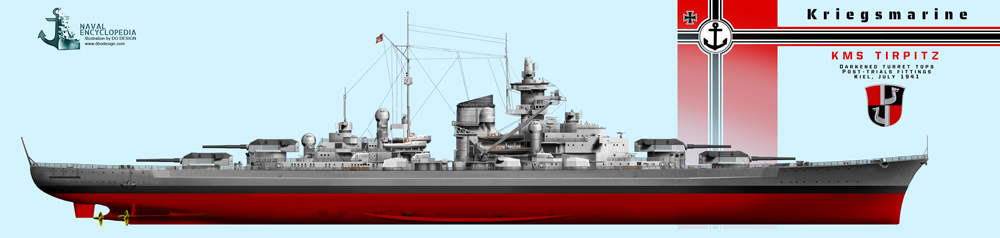
Tirpitz in July 1941, post trials fittings in Kiel, darkened hull, dark turret tops
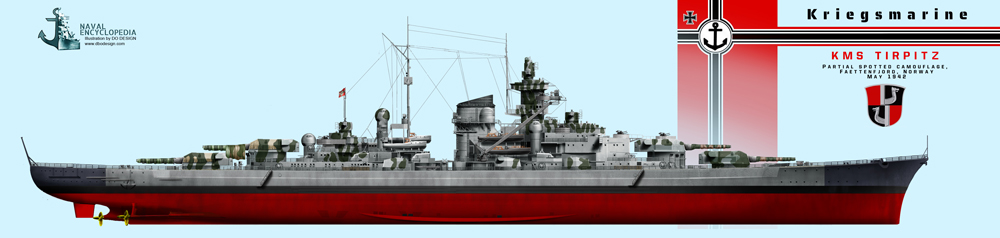
Tirpitz in May 1942, transitional camouflage and painted canvas to blend in nearby hills, Norway
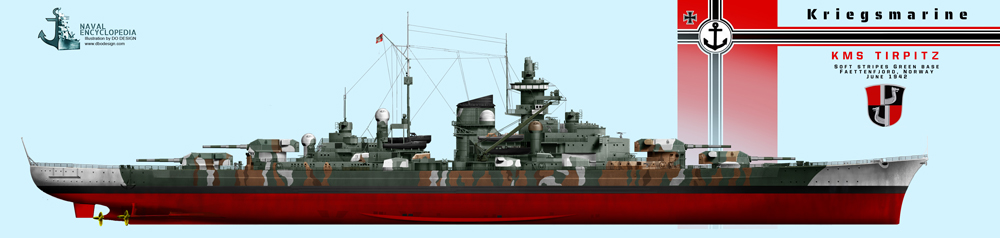
Tirpitz in June-July 1942, with a complex, provisional camouflage blending over the hills of Faettenfjord.
Tirpitz standard camouflage in July 1942

Tirpitz in July 1943. This was the straight stripes, high contrast, probably dark grey the battleship carried in Altafjor dand other locations until March 1944

Tirpitz after modifications to be used as a floating FLAK battery, November 1944
Tirpitz in Norway, October 1942

Tirpitz fitting out in November 1940 in Wilhelmshaven, painted to mimick a brick factory
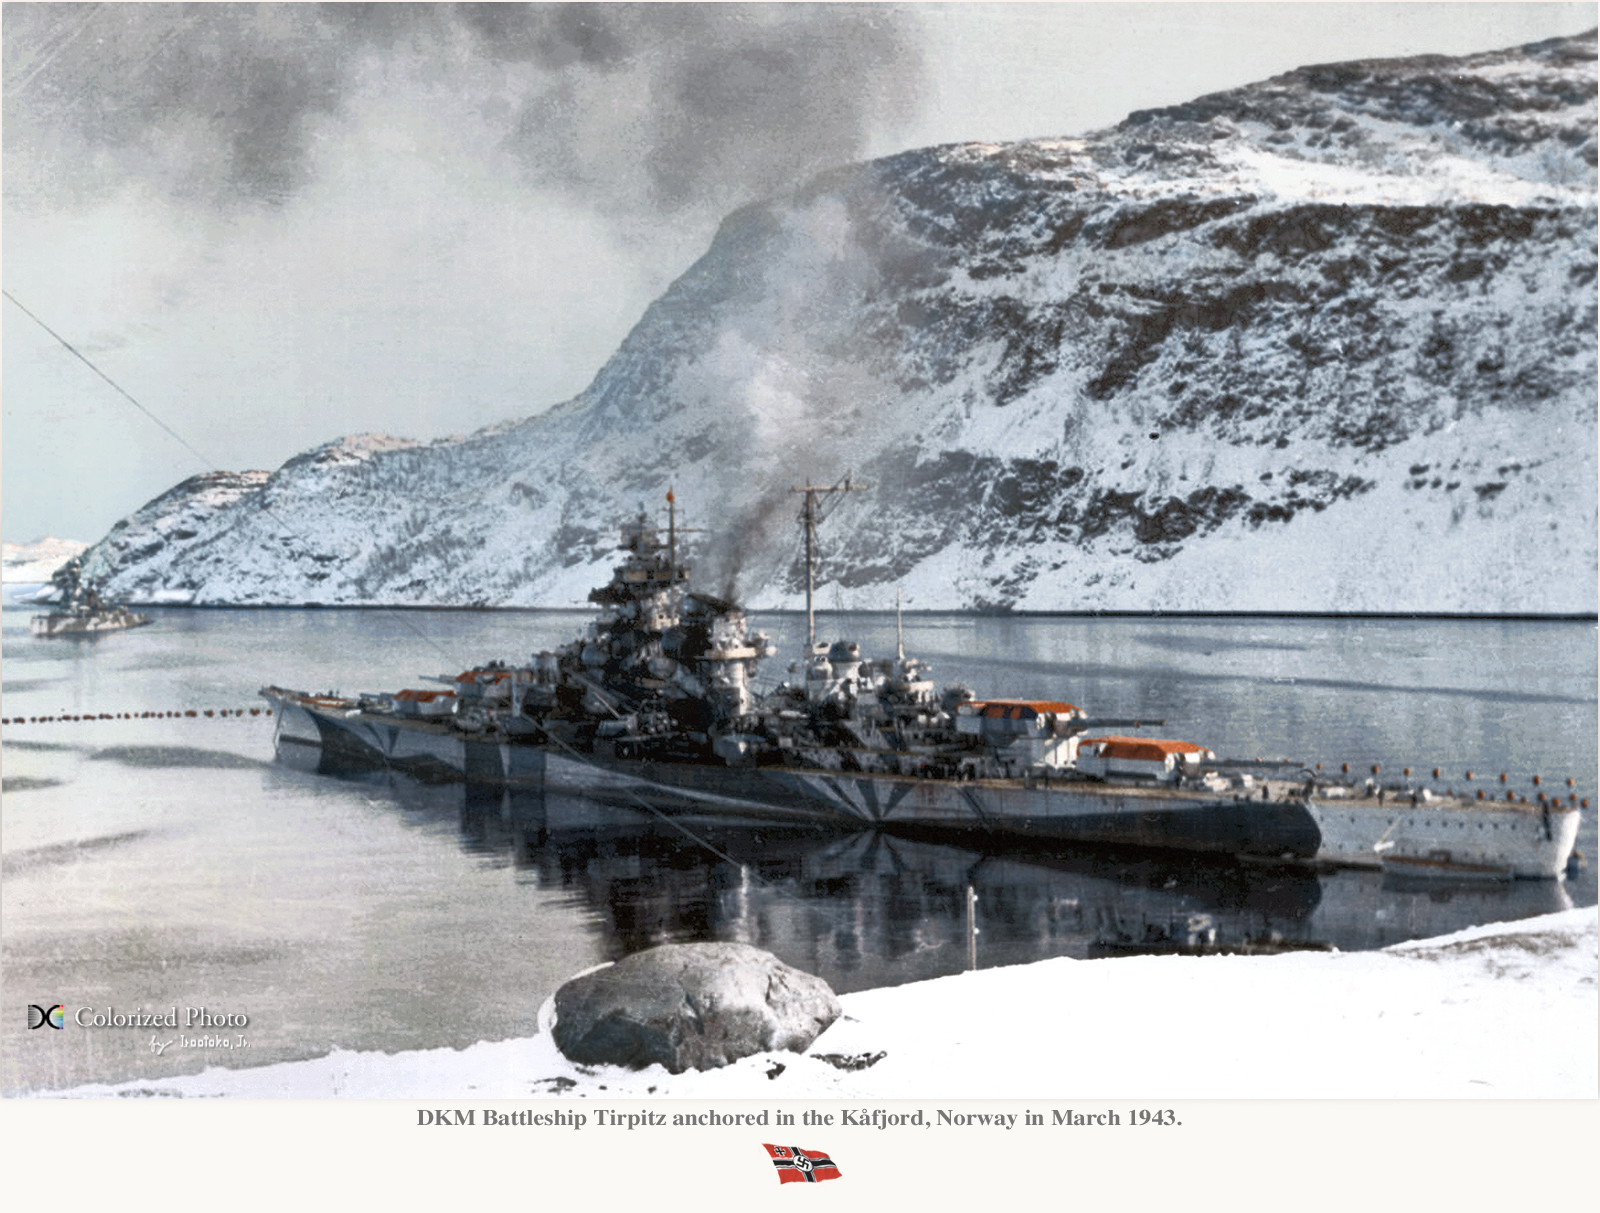
kms Tirpitz in kafjord in 1943, colorized by irootoko JR
KMS Tirpitz in 1942
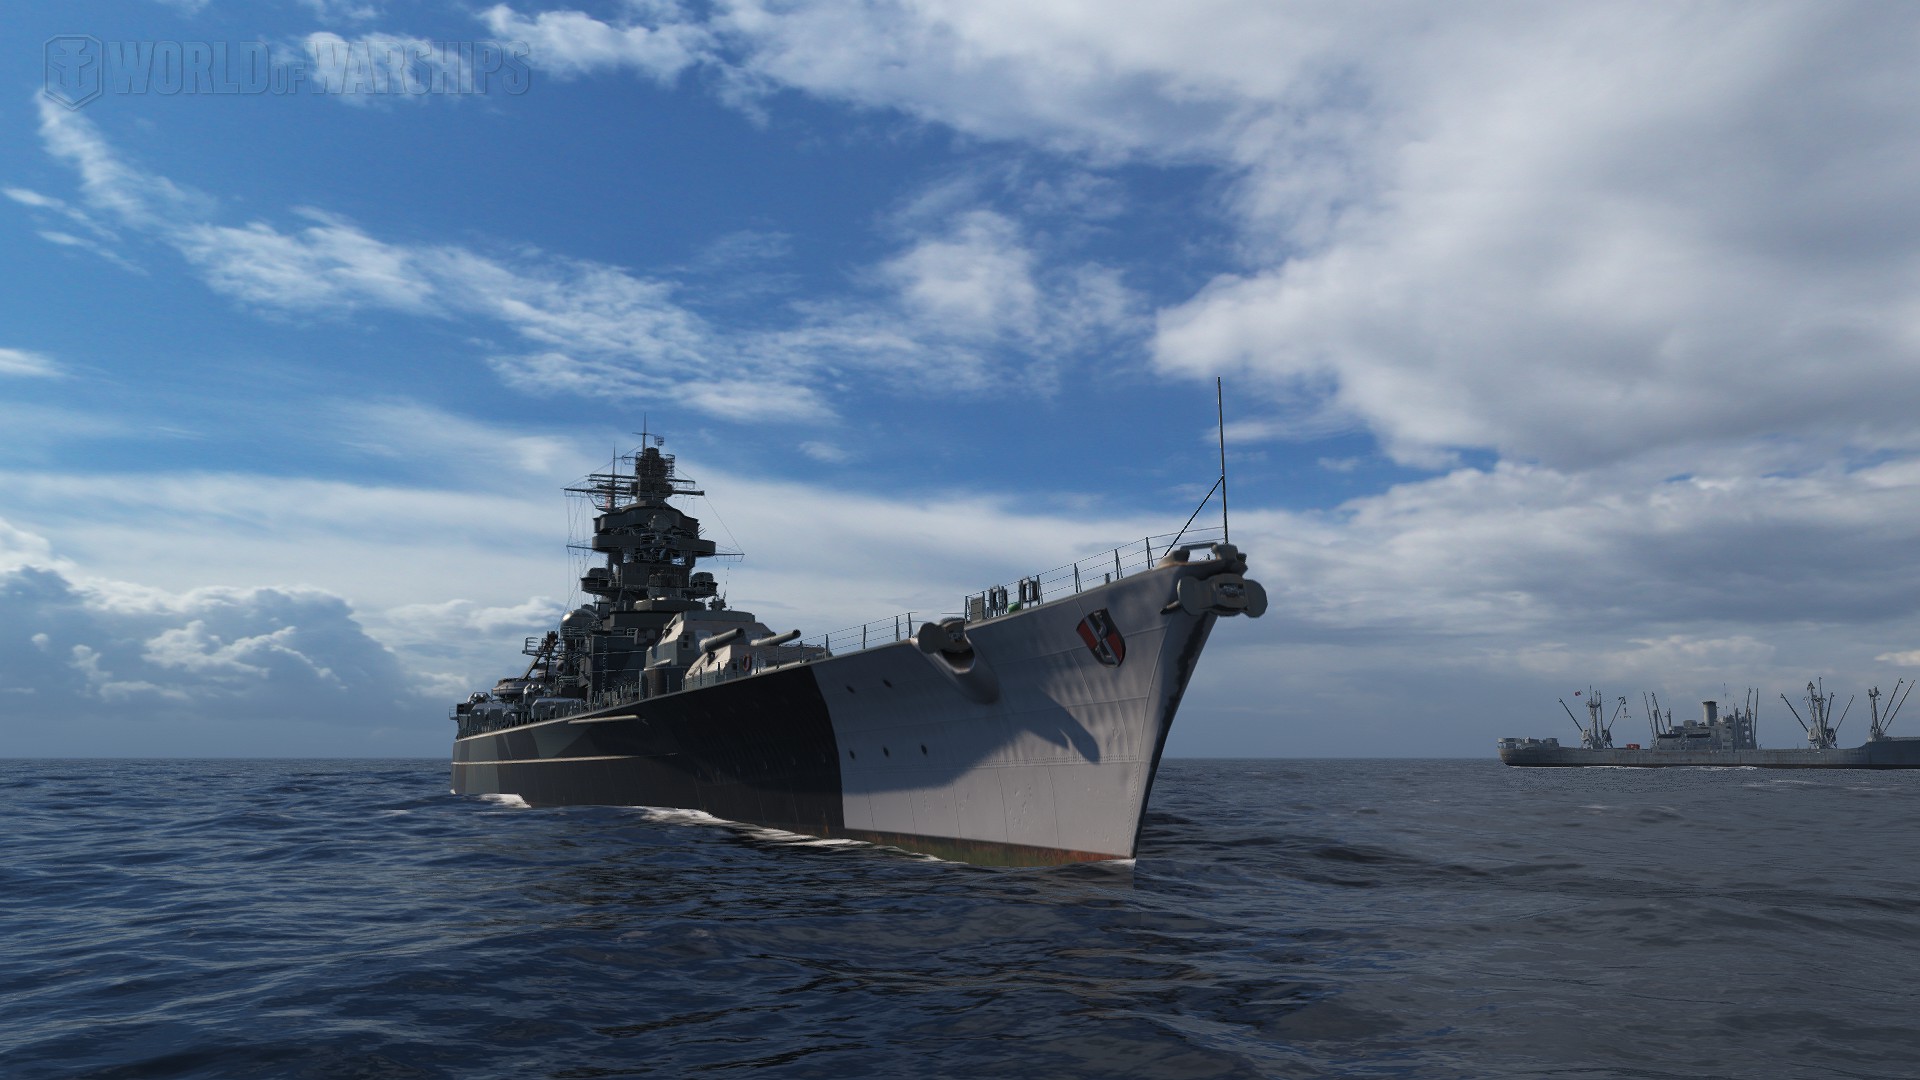
World of Warships’s rendition of the Tirpitz
Videos
https://www.youtube.com/watch?v=N6_C-kEZnS0
“Sink the Bismarck” (1960)
https://www.youtube.com/watch?v=Wx2rhmAITWA
Documentary, James Cameron expedition in 2002
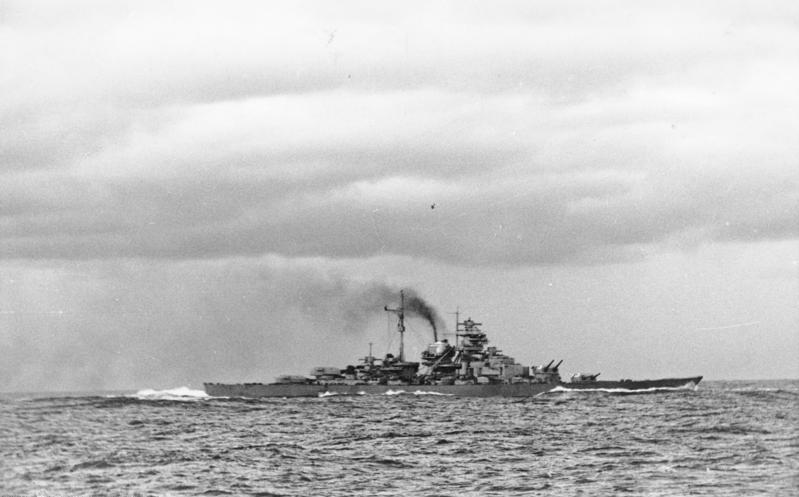
KMS Bismarck in action
Post-completion trials
KMS Bismarck (contract “F”) from Blohm & Voss shipyard (Hamburg) started her first sea trials in September 1940, just three weeks after commissioning in Kiel Bay. She was escorted to Arcona and Gotenhafen for prolongated trials in the Gulf of Danzig. Most of this was about fixing problems with the powerplant. She made the compulsory measured-mile and high speed runs, testing her stability and manoeuvrability. When steering while altering propeller revolutions, Bismarck showed it could not stay on course. The outboard screws at full power in opposite directions even barely were able to procure any turning ability. The main battery guns were also test-fired in late November, showing she was indeed, as predicted by engineers, a very stable gun platform. These sea trials lasted until December and she was back to Hamburg on 9 December for fixes and alterations, at the very end of the fitting-out routine.
KMS Bismarck as completed, colorized by Irootoko Jr. This was in late 1940 or January-February 1941. She was camouflaged from 18 May
March-April 1941: Endless Delays
She was due to return to Kiel on 24 January 1941, but was blocked by a merchant ship which sank into the Kiel Canal and later heavy weather further delayed the salvage operations. Bismarck could cross the canal by March 1941, a delay which greatly frustrated her captain, Lindemann, as these long delays hampered her first mission deployment. During her long inactivity, the battleship hosted Swedish Captain Anders Forshell, naval attaché to Berlin, which returned to Sweden and which description leaked to Great Britain. This was only a first glance description but lacked many classified information such as her true displacement, and top speed or her radius of action.
On 6 March 1941, KMS Bismarck proceeded to Kiel escorted by Messerschmitt Bf 109 fighters and two armed merchant vessels preceded by a an icebreaker. At 08:45, 8 March, she ran aground on the southern shore in the Canal, but quickly freed by the tugs present. In Kiel, her crew was busy loading ammunition and fuel plus supplies for a first mission. She also received a coat of dazzle camouflage painting with bands, and her turrets roofs were also painted, in red. Kiel on 12 March was attacked by the RAF which knew the new battleship was here. Between the local, dense FLAK and bad visibility, the battleship was never hit. On 17 March, KMS Schlesien screened Bismarck as iceabreaker, through the thick ice to Gotenhafen. There, she resumed training and final preparations, waiting further orders.
Planification of a fleet in Being in the Atlantic
The Oberkommando der Marine (OKM), under leadership of Admiral Erich Raeder, had plans for their now, pricy and deadly toy of war. They would try to send her as a commerce raider in the Atlantic, against Allied merchant traffic. Previously, the two Scharnhorst-class made such mission with moderate success, called Operation Berlin, and were now anchored at Brest in the French Atlantic coast. While Tirpitz approached completion the long term project was to have both Bismarck and Tirpitz making a sortie in the Baltic and met the two Scharnhorst-class ships mid-way in the Atlantic. This would have made the msmost formidable battelship force Germany ever put at sea during WW2. The operation was initially scheduled for 25 April 1941, waiting for the new moon but completion of the Tirpitz dragged on, to the point she was not ready in May 1941 nor at the end of the year. Meawnhile Gneisenau was torpedoed in Brest and bombed in drydock, so in prolongated repairs.
Scharnhorst had powerplant problems after Operation Berlin and also needed work to be operational again, compounded by the fact replacing the boilers was not an easy task. To add insult to injury, the RAF multiplied air attacks over Kiel, destroying supply depots, and two other warships were delayed in their planning, Admiral Scheer and Admiral Hipper, also planned for the operation, and scheduled to be ready again in the summer.
Appearance in May 1941 (box cover, trumpeter kit). Needless to say, swatiskas were painted forward and aft (there, empty circles to avoid censorship)
At the time, the sortie planned for May was codenamed Operation Rheinübung (“Exercize Rhein”) and Flottenchef Admiral Günther Lütjens took its head and expressed his wish to delay the operation until either Scharnhorst or Tirpitz were ready. But delays amounted and eventually the OKM decided to proceed anyway, (perhaps under pressure of Hitler), mobilizing what was available, Bismarck and the heavy cruiser Prinz Eugen. Raeder met the naval staff in Paris on 26 April and persuaded the Kriegsmarine flotte chief, Lütjens, to proceed, perhaps to take British intelligence on its back foot, at perhaps they were too, awaitng a more important fleet gathering.
Operation Rheinübung, Bismarck’s first and last sortie
The last voyage of Bismarck, by Drachinfels
On 5 May 1941, Hitler, accompanied by Wilhelm Keitel (German field marshal) and his “court” of officers, arrived in Gotenhafen to see the Bismarck, and nearby Tirpitz still completing. They made a comprehensive tour of the ships, and Hitler had a head to head with Lütjens, making the point on his mission. On 16 May, Lütjens reported both Bismarck and Prinz Eugen ready to depart, but was only ordered to proceed on the evening of 19 May. Eighteen supply ships already departed since a while ago in order to refuel both ships at pre-positioned points and in addition four U-boats were to reach their reconnaissance areas along the known convoy routes between Halifax and UK, providing intelligence.

Map of Operation Rheinubung initial deployment and actions at sea.
When she rolled up anchor and steamed up, Bismarck’s crew comprised a grand total of 2,221 officers and enlisted men, because it also included the admiral’s staff, 65 me, and a prize crew of 80 sailors which could man the transports captured along the way. At 02:00, 19 May, Bismarck left Gotenhafen, heading for the Skaggerak, the Denmark strait. She was joined at 11:25 by KMS Prinz Eugen, departed already a night before at 21:18 from Cape Arkona. They were not alone, but given an escort of the three destroyers Z10 (Hans Lody), Z16 (Friedrich Eckoldt) and Z23, plus minesweepers to open the way just in case. The Luftwaffe also was in the sky, providing cover over German waters. At noon, on 20 May, Captain Ernst Lindemann loudspeaked the crew of the mission. Shortly afterwards,a squadron of 10-12 Swedish aircraft flying reconnaissance planes crossed this German flottilla and reported it, and information passed to British Intelligence, causing a great deal of alarm.
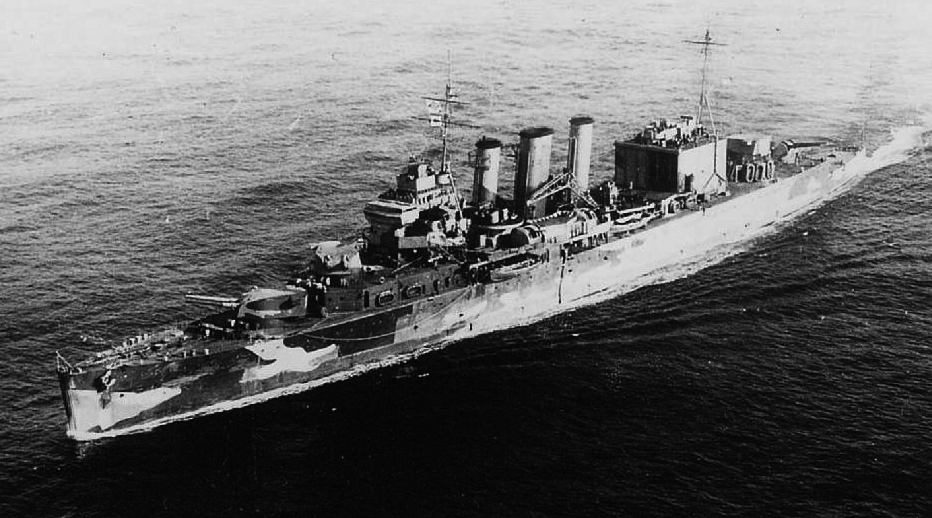
The Prinz Eugen, which profile superficially looks like the Bismarck, and is very large for a cruiser, hence perhaps some confusion in early reports
The passage of Kattegat
Still early, the German flotilla crossed the Swedish cruiser HSwMS Gotland which shadowed them for two hours, all along the way in the Kattegat. The Swedish cruiser transmitted his report to the Swedish naval headquarters with these worlds: “Two large ships, three destroyers, five escort vessels, and 10–12 aircraft passed Marstrand, course 205°/20′.” The Kattegat crossing was not a concern for the OKM, nor Gotland, anthough at that point both Lütjens and Lindemann knew their secrecy had probably vanished as they feared -rightly so- leaks to British intelligence. The report indeed made its way in Captain Henry Denham’s hands, the British naval attaché to Sweden. Code-breakers at Bletchley Park confirmed the upcoming Atlantic raid based on previous informations, decrypting reports of the Bismarck and Prinz Eugen preparations, notably about the prize crews and navigational charts requests. Two Supermarine Spitfires soon took off to fly along the Norwegian coast, searching for both warhips.
Reconnaissance photos of the Bismarck in Norway
Stop in Norway
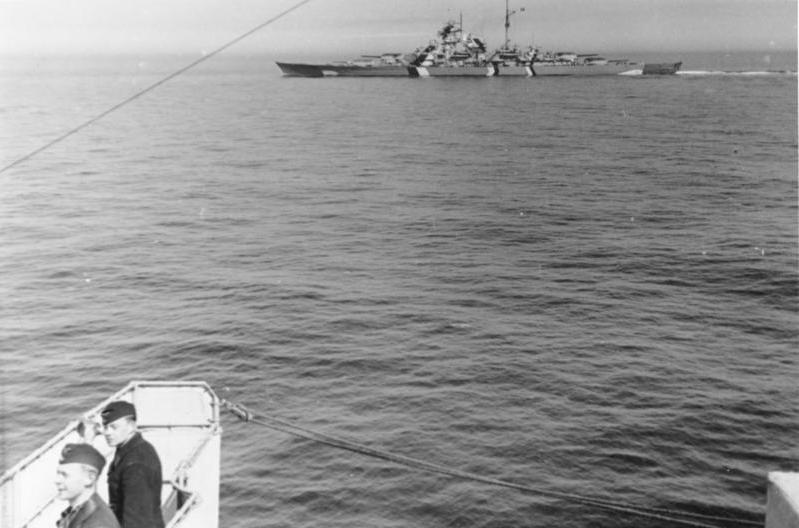
German aerial reconnaissance confirmed the British had one aircraft carrier and three battleships, plus cruisers at Scapa Flow, which reassured Lütjens about the secrecy of the operation. On 20 May in the evening, the flotilla reached the Norwegian coast as planned, and short of fuel, separated from their minesweepers, but the destroyers remained. During the morning hours, radio-interception on board Prinz Eugen catch a British reconnaissance aircraft message to look for them (to be more precise “two battleships) as the Swedes believed the Prinz Again was Bismarck’s sister ship), off the Norwegian coast. At 7:00 AM on 21 May, the Germans spotted four unidentified aircraft and after 12:00, they reached Bergen, laying anchor at Grimstadfjord to be repainted with their standard “outboard grey” livery used to operate in the Atlantic.
Bismarck and Prinz Eugen in the Denmark Strait
During the stay in Norway, two Bf 109 fighters stayed in flight as long as possible to procure a ready defense in case of an RAF attack. But despite of this, Michael Suckling managed to get through on his reconnaissance Spitfire and took a evealing photo of the German flotilla from 8,000 m (26,000 ft). Admiral John Tovey now fully informed ordered HMS Hood and HMS Prince of Wales escorted by six destroyers to join the cruisers already in patrol off the the Denmark Strait. The Home Fleet was on high alert and eighteen bombers were scrambled until the weather over the fjord made their find impossible, and they headed back for home.
Bismarck left the port 200 t (200 long tons) short of a full load as she already spent around 1,000 t (980 long tons) of fuel since Gotenhafen while Prinz Eugen resupplied 764 t (752 long tons) of fuel. In the evening, around 19:30, on 21 May, the flotilla left Bergen, heading for the North Atlantic. At midnight, Raeder was confirmed the mission by Hitler, reluctant at that time to the raid as he thought the forces were not enough. The three destroyers left at 04:14 the following day, 22 May, short of fuel, and the force was off Trondheim at mid-day when Lütjens ordered the break-out in the Atlantic.
The Prinz Eugen, colorized by Irootoko Jr
On 23 May, around 4:00 AM, Lütjens ordered to increase speed to 27 knots for the dash through the Denmark Strait, and both ships activated their FuMO radar. Bismarck was ahead of Prinz Eugen, separated by around 700 m (770 yd) and in mist, they could barely see farther than 3,000–4,000 m, crossing some ice along the way. By 10:00, speed decreased to 24 knots to avoid hitting ice and at mid-day, they were in the north of Iceland, zigzaging to avoid ice floes. At 19:22, both the onboard hydrophones and radars detected the HMS Suffolk at 12,500 m while Prinz Eugen intercepted and decrypted radio signals, learning they had been located. Soon, the British heavy cruiser was in range and after permission by Lütjens, started to engage HMS Suffolk delayed because there was no clear view of the target. This helped Suffolk to retreat to a safe distance, continuing to shadow the two German ships. At 20:30, HMS Norfolk, of the same class, joined the fray, but approached the Germans too closely, and she was engaged immediately: Bismarck fired five salvoes, three of which straddled Norfolk, raining shell splinters on her decks. To save her neck, Suffolk laid a smoke screen and fled into a fog bank, ending the brawl. However the concussion caused by the 38 cm when firing were enough to disable Bismarck’s delicate FuMO 23 radar set, prompting Lütjens to send Prinz Eugen ahead so she can provide radar cover and scout for the formation.
At around 22:00, Lütjens ordered Bismarck a 180-degree turn to head for the two heavy cruisers as she was obscured in the rain squall. But HMS Suffolk’s still can track her on radar and saw the manoeuvre, and evade in time. Both cruisers remained their course during the night and relayed the position and course of both German ships. At noon on 24 May, the sky was clear. At 05:07 the hydrophone operators of Prinz Eugen detected two large vessels approaching their position at 20 nmi (37 km; 23 mi) and reported “Noise of two fast-moving turbine ships at 280° relative bearing!”. These were Hood and Prince of Wales…
HMS Suffolk in May 1941
The Battle of the Denmark Strait (24 May)
At 05:45 on 24 May, the weather was clear, and German lookouts atop the bridge spotted smoke on the horizon. This came from the Hood and Prince of Wales under the command of Vice Admiral Lancelot Holland. But at that time, the ships could not be identified by the Germans. Nevertheless, Lütjens ordered battle stations. By 05:52, the range was now 26,000 m (28,000 yd) and both ships were identified, on both sides. However Hood opened fire first, followed by HMS Prince of Wales, just a minute later. Hood at first engaged Prinz Eugen, mistook for the Bismarck, and this was Prince of Wales that fired on Bismarck. It should be noted at this point, that the hood’s condition, fight, and demise, had been amply covered in the post dedicated to the Hood. For the Prince of Wales, this was another affair: She was fresh from early trials, and there were still many civilian workers working to fix multiple issues on board. Against their will, they were found hostages of this battleship, knowing full well what would be the consequences, but everybody was confident, even the POW’s inexperienced crew. This would play a role in the following events.
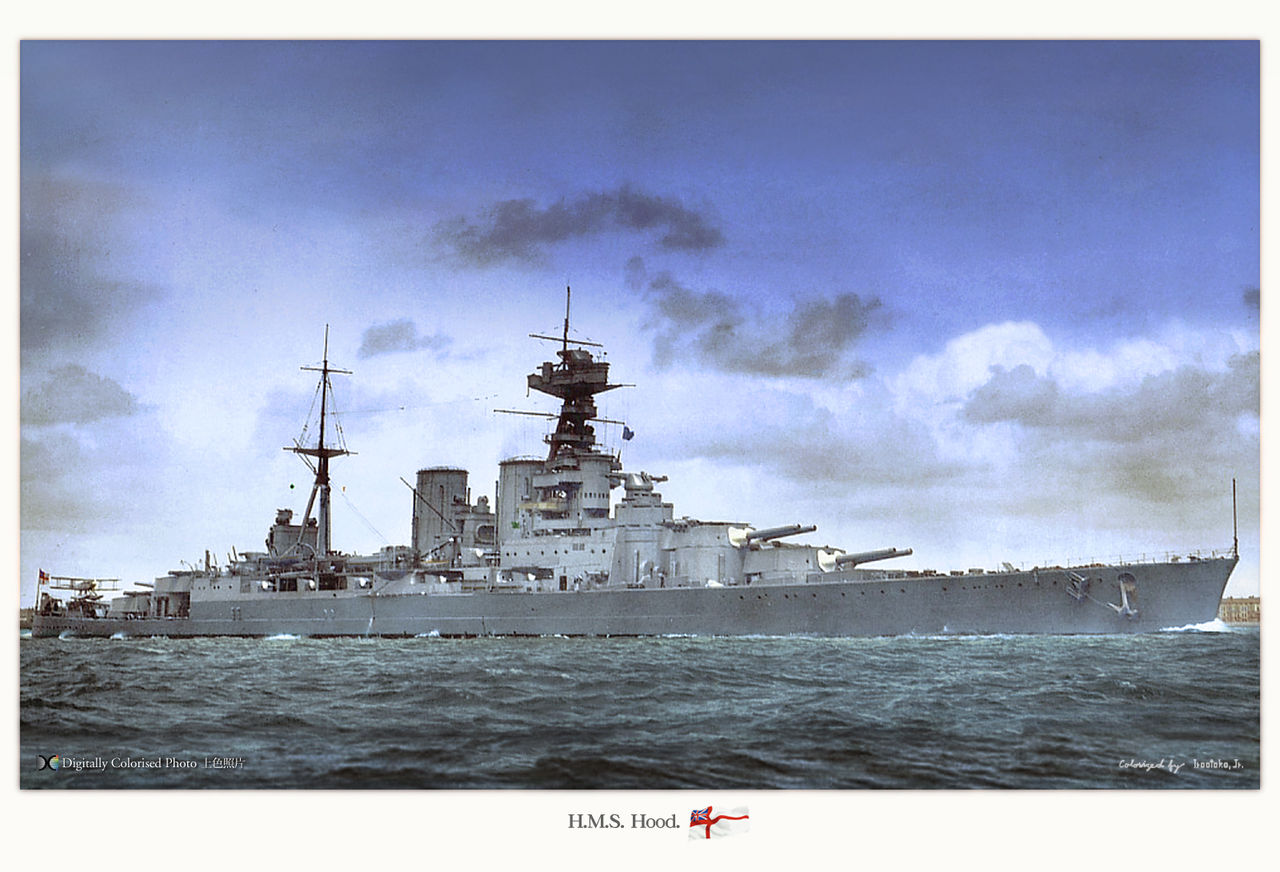
HMS Hood, colorized by Irootoko Jr.
Adalbert Schneider, first gunnery officer aboard Bismarck, twice requested permission to return fire, but Lütjens was still muted, until Captain Lindemann intervened, and asked in turn permission to fire from Lütjens, granted at 05:55. Three minutes had passed until then. The British ships approached head on, using their forward guns and presenting a shot silhouette, while Bismarck and Prinz Eugen had their broadside turned at them. So this was sixteen guns, eight 38 and eight 20 cm, versus four 38 and six 35 cm (10 heavy calibers). Prinz Eugen was in range indeed and well played her part. Several minutes had passed when Holland ordered a 20° turn to port to pesent their own broadside. Both German ships now concentrated on Hood, probably assuming she was a bugger threat/prize or the weaker of the two. Prinz Eugen scored a hit with a 20.3 cm (8.0 in) HE shell on Hood, which detonated stored ammunition close to the aft mainmast and secondary artillery, out in the open. The large fire that started was however quickly extinguished. On Bismarck, three four-gun salvoes went on until Schneider found the correct range. He ordered rapid-fire salvoes from the eight guns as well as the 15 cm secondary guns to engage Prince of Wales, now in range too. Holland ordered a second 20° turn to port, to create a parallel course while Lütjens ordered Prinz Eugen to concentrate now on Prince of Wales. The latter was hit by two shells which started a small fire.
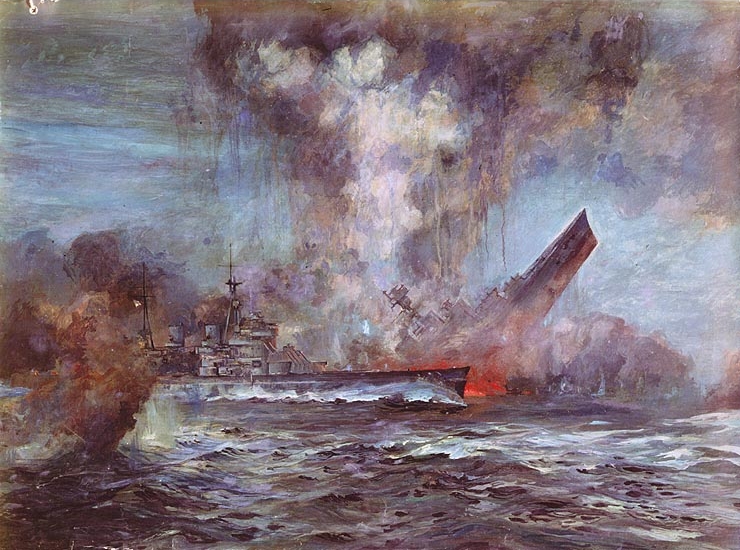
The sinking of HMS Hood (painting)
At some point later, Lütjens ordered Prinz Eugen to drop speed and be stationed behind Bismarck, whe she can continue to monitor the Norfolk and Suffolk in case they were closing in. On paper, the Prinz Eugen had the same artillery, eight 20 cm guns, but she was much larger, had much better optics and range and was ten year more recent. She was quite a match for each of these.
The fight was now ranging at 10-12 nmi (19-22 km) the tow lines heading east. At 06:00, Hood made a second turn to port she was hit by Bismarck’s fifth salvo. Two AP shells fell short, but at least one struck Hood, penetrating her deck armour, and as the consensus goes on the matter, penetrated her rear ammunition magazine. There 112 t of cordite propellant were stored. There was no time to flood it, the hot metal of the shell and splinters were enough to ignite the whole stock, which detonated. The tremendous explosion broke the the ship in two, just forward of the main mast. The forward section still moved forward before the rushing ater at its back made it drop by the rear and rise rapidly into the air, reaching eventually a steep angle. The stern also rose the same way, separated by an enormous mushroom. The scene baffled everyone, even if this kind of events was awaited. Schneider shouted “He is sinking!” over the loudspeakers. The pride of the British navy was gone after eight minutes, taking with her 1,419 men. It was the worst disaster so far for the Royal Navy.
Bismarck shifted fire on Prince of Wales, the tables were turned. HMS Prince of Wales managed to score a hit on Bismarck with her sixth salvo, but Bismarck was spot on at her first salvo. One shell struck the bridge and exited the other side, killing everyone in the command centre but Captain John Leach. Both Prinz Eugen and Bismarck rained fire on upon Prince of Wales, making more damage until guns malfunctioned. With those still operational, HMS Prince of Wales scored three hits on Bismarck, striking the forecastle above the waterline, below the armoured belt blasting the torpedo bulkhead and flooding a turbo-generator room and partly the adjacent boiler room while the third passed through one boat and landed in the floatplane catapult but failed to detonate.
At 06:13, Captain Leach gave knew with his artillery partly disabled and command center out of action, he might better retreat than loose his brand new ship. Indeed at that point he only had five guns operational and had taken major damage. She made a 160°, laying a smoke screen to cover the manoeuver. The Germans ceased fire later, although Lindemann wanted to chase Prince of Wales and finish her off, he was marred by Lütjens which had strick engagement orders. This fight was not possible to avoid, but now the path was open again to resume their trip to the prepositioned refuelling point and repair. Bismarck fired by that time some 93 AP (armour-piercing) shells, hit by three in return, but sunk a battlecruiser and badly damaged a fast battleship. Not bad for her first encounter. Her damage ws limited to flooding, about 1,000 to 2,000 t through the forecastle, contaminating the fuel oil reserves of the bow. Lütjens refused to reduce speed to ease repairs, and meantime the shell hole widened with the force of the waves entering the ship above the armour deck. The second hit also caused flooding and splinters damaged a steam line in the turbo-generator room. This did not hampered much power on board however. The combined flooding had the hull listing 9-degree to port and 3-degree trim by the bow. Despite of this and the near-heavy weather, Bismarck could still run almost at max speed.
24 May: Start of the chase
After the engagement, Lütjens reported to Berlin “Battlecruiser, probably Hood, sunk. Another battleship, King George V or Renown, turned away damaged. Two heavy cruisers maintain contact.”. At 08:01 he transmitted his damage report and intentions to the OKM: He wanted to detach Prinz Eugen for commerce raiding while making it for Saint-Nazaire with the Bismarck for repairs. At around 10:00, ordered Prinz Eugen to fall behind Bismarck and examine the severity of Bismarck’s oil leakage. The latter conformed “broad streams of oil on both sides of her wake”. An hour later, the squadron was spotted and identified by a British Short Sunderland flying boat. The latter reported the oil slick also, to the still shadowing Suffolk and Norfolk now protecting the the Prince of Wales. Rear Admiral Frederic Wake-Walker commanded the two cruisers and ordered Prince of Wales to stay behind his ships.
PM Winston Churchill by that time was informed and voiced to Tovey his most famous order: “Sunk the Bismarck !“. He ordered all warships available in the area to join in the concentration sent against the Bismarck and Prinz Eugen. Tovey’s Home Fleet was already at sea by that point on the morning of 24 May, but he was still 350 nmi (650 km; 400 mi) away. Manchester, Birmingham, and Arethusa which previously were in escort, were detached to patrol the Denmark Strait in case Lütjens tried to get back home. Rodney, escorting until then the RMS Britannic on her way to be refitted at the Boston Navy Yard also was ordered by Tovey to join the fray at full speed. HMS Revenge, from Halifax, and Ramillies escorting Convoy HX 127 were also scrambled to take part in the chase. By that time it respresented six battleships and battlecruisers, two aircraft carriers, thirteen cruisers, twenty-one destroyers, all fully committed to find and sink the battleship. At around 17:00, Prince of Wales’s crew and workers managed to fix nine main guns, and therefore Rear admiral Wake-Walker allowed her to take the lead of his two cruisers and take part in a future attack Bismarck if needed.
24 May: New fight, the force splits
As the weather worsened, Lütjens wanted to uses the bad visibility to execute his new plan at 16:40 and detach Prinz Eugen. However both were still shadowed by Wake-Walker’s cruisers, maintaining radar contact. Prinz Eugen was recalled and detached again at 18:14, this time for good. Bismarck then turned towards Wake-Walker’s formation. Suffolk turned away at high speed but Prince of Wales closed in an fired twelve salvos. The second time during this engagement. These were answered by nine salvos from Bismarck. But due to the weather and poor visbility, non scoere any hit. The engagement allowed Prinz Eugen to slip away however. Bismarck then resumed her initial course while Wake-Walker’s placed themselves on their shadowing parralel course with Bismarck, on her port side. Bismarck at that point was still able to maintain 27-28 knots and unless she could be slowed, she would be able to reach safely Saint-Nazaire. There was nobody on her interception course yet indeed. So on 25 May around 16:00 Tovey detached the Carrier Victorious and four light cruisers in the best interception course to launch her torpedo bombers. At 22:00, Victorious the first wave took off, with six Fairey Fulmar fighters escorting nine Fairey Swordfish torpedo bombers, 825 Naval Air Squadron (Lt Cdr Eugene Esmonde). Inexperienced they mistook HMS Norfolk in the mist and later the U.S. Coast Guard cutter USCGC Modoc on their interception course, giving some early warning on their approach on Bismarck, and the anti-aircraft gunners were prepared.
Air attacks
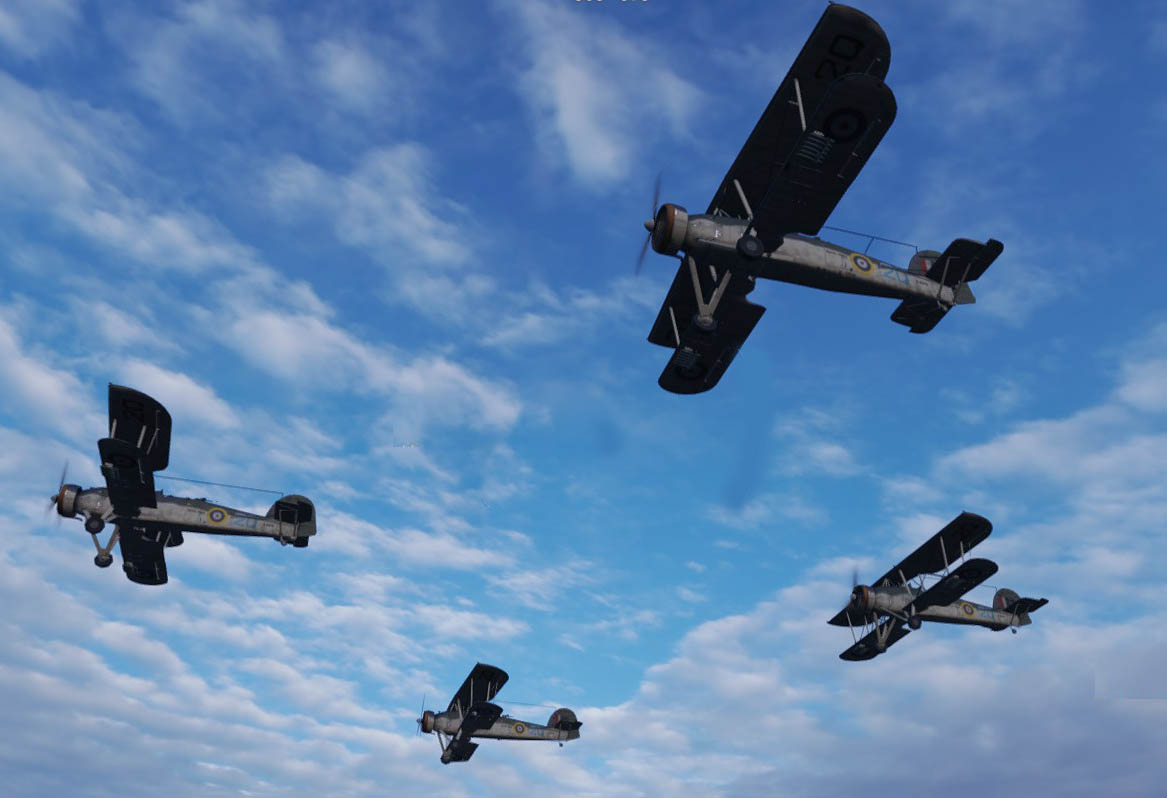
A squaron of Swordfish approaching
When the Swordfish were spotted by Bismarck, the first top open fire were not the 105 mm FLAK but the secondary batteries, of 15 cm (6-in) firing at maximum depression in the war, in order to create massive splashes, right into the paths of incoming TBs. Amazingly enough, none of the attacking aircraft were shot down initially. This led to numerous rumors, including the fact German AA guns setup worked for modern places capable of at least 300 kph, whereas the Swordfish made 143 mph (230 kph, 124 kn). There was even a video about this, from Military History Visualized. According to a crossing of various sources this was a combination of factors:
1-The Fire control systems for the heavy FLAK (10.5 cm) were a tech in infancy at the time, and were easily saturated*
2-The pilots flew very low during their approach, basically to the point of almost dodging waves, FLAK guns could not be depressed enough
3-Time fuses defective or bad setup
4-Less precise observation in heavy weather
5-The use of outliers
6-Basic targeting issues for the guns themselves
7-Interwar classic training called for the use of sleeves as targets, not drones
*Too many parameters to combine and send in real time: The target speed and location, piching/rolling of the ship, and the wind.
It should be added that if no plane was downed, most were hit by splinters, but survived thanks to their rugged construction. It was even aknowledged by a British pilot present during the event,
the German FLAK was “extremely accurate, and followed them until seven miles from the target”. Swordfish 4C later landed with 175 holes in its tail, wings and fuselage. Several pilots were also wounded (Mark Horan).
Damage control work (24-25 May)
On the other hand Bismarck evaded eight torpedoes, but the ninth, the last one, struck amidships the main armoured belt. It made one dead and five injured, caused minor damage to electrical equipment, but the most serious concern were the hard over manoeuvres made to evade the torpedoes, notably loosened collision mats increasing flooding. In the end it was decided to devacuate port number 2 boiler room, a second boiler now lost, meaning, in addition to fuel losses and increased submersion, a drop to 16 knots (30 km/h; 18 mph). Later, past the attack, the ship slowed down to let divers repairing the collision mats in the bow,. The ship was able to proceed to 20 knots during which the pumps were hard at work on the bow. It was not the fastest, but most economical to reach France’s St Nazaire yard, the only dock in occupied western Europe to house the giant battleship.
Bismarck and Prince of Wales engaged for a thord time afterwards, exchanging shells, but again, neither scored any hit and soon damage control teams coild resume work but could only contained the damage. The pressure in the flooded number 2 port side boiler was such water was seeping in and threatening the turbo-generator feedwater system. Once saltwater reached the turbines, they would have badly eroded the turbine blades the the ship’s top speed would have plummeted again. Such was the pressure on the teams, which worked al night. On the 25 May in the morning, they had done the impossible. Bismarck had slow down to 12 knots (22 km/h; 14 mph) for a second time in order divers to pump fuel out of the forward compartments, and to the rear tanks, using two hoses connected in turn. In all, they saved a few hundred tons of fuel, allowing more range.
25 May: The situation becomes tense for both sides
The chase opened an area frequently roamed by U-Boats and Wake-Walker’s squadron started a serie of zig-zag to avoid offering an easy target. This slowed them down a bit, but they still could maintain pace with the Bismarck, alternating turns port and starboard every ten minutes, staying on course. During one of these, Bismarck disappeared from Suffolk’s radar while around 03:00, Lütjens ordered maximum speed, at 28 knots to evade the British. He ordered a turn westward, then northwards. This manoeuvre combined with the radar blank allowed the battleship to effectively reached the objective of disappearing. In addition, he managed to circle back behind her pursuers, all by night. Suffolk’s captain assumed Bismarck veered westwards and steamed that way, but after half an hour, no contact was made, and Wake-Walker ordered the ships to disperse at daylight and try to spot these visually. The weather that day was better, visibility range too.
In the Royal Navy HQ underground bunker in London, the ambiance became frantic, as it was known Bismarck was now lost, and the chasing ship were low on fuel. Tile was running out, and again, the HQ ordered Victorious and cruisers westwards while Wake-Walker headed south and west, and Tovey to the mid-Atlantic. Force H, now was scrambled. The Mediterranean fleet, which can be rapidly in the gulf of Gascoigne, was ordered to depart Gibraltar. The force comprised the aircraft carrier Ark Royal and her escort. Meawnhile, not knowing the forces unleashed against him and that he successfully evaded, Lütjens contacted Berlin and the Naval Group West, Paris. Of course these signals were intercepted by the British and bearings determined. This corrected an error in Tovey’s plotting table, King George V jeading in the wrong direction for seven hours now. However, meanwhile, Bismarck was now out of reach of the British ships. She just could not be catch by anything afloat. Lütjens was confident he could make it to France on the 26.

RNAS Catalina Mark I from 209 Squadron, Lough Erne, May 1941. This plane located Bismarck on the morning of 26 May.
British code-breakers were able to after analysis of German signals, knew the Luftwaffe was called for help, and prepared to take off around Brest, while the French Resistance confirmed Luftwaffe units were redeployed in this sector. The idea was notably to send fighter intercepting possible Swordfish attacks on the way, at extreme range limit. Tovey tried to order all his naval assets to concentrate on the most probably path of the Bismarck, while at the same time, a squadron of Coastal Command PBY Catalinas took off from Northern Ireland and joined the search, trying to locate and conform the Bismarck heading. At 10:30 on 26 May, one of these Catalina, piloted by Ensign Leonard B. Smith (US Navy) located the battleship some 690 nmi (1,280 km; 790 mi) northwest of Brest. At that point, Bismarck was even close enough to reach the protection of U-boats, but now they were close to enter the Luftwaffe’s oprational range from France.
26 May: The last ditch air attack
Bismarck was close to safety now, and the Royal Navy only chance by that time was Sommerville ‘s Force H Ark Royal, while HMS Victorious, Prince of Wales, Suffolk and Repulse were now heading hom at slower speeds to spare fuel. Still in the chase were King George V and Rodney, still hours away. The pilots on Ark Royal knew the stakes when they took off with squadron of Swordfish and were already in the air, searching in complement to the Catalinas. They confirmed the location, some 60 nmi (110 km; 69 mi) away from HMS Ark Royal and Somerville had to wait for the Swordfish to return, and be armed with torpedoes fitted with new magnetic detonators. Bad weather was there again, and the squadron mistook the cruiser Sheffield and started to attack her. It went so far as torpedoes were launched, but fortunately their faulty magnetic detonators destroyed them when touching water. Adding much stress to the situation, now the Swordfish had to return to the Ark Royal and be rearmed with torpedoes fitted with contact detonators.
HMS Sheffield
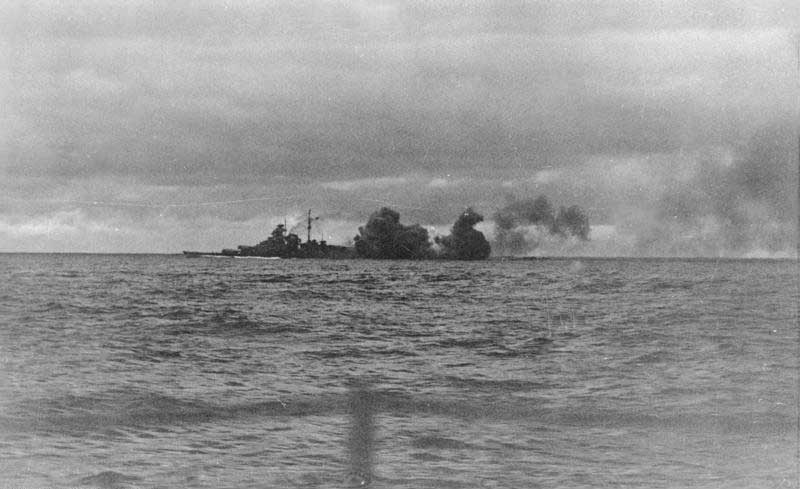
In this second attack, fifteen planes took off, at 19:10. It was 20:47, so with the night falling and heavy clouds, that the Swordfish started their last dicth attack. Wen this happened, Bismarck had located the shadowing Sheffield and was firing at her. The cruiser was hit by the second salvo and the shell fragments killed three and wounded many more, and she retreated under the cover of a smoke screen. Swordfish fel on the Bismarck, until then placed to present her broadside, and she started to turn violently to face the squadron, all anti-aircraft guns blazing. It was too late though, as a first torpedo hit amidships on the port side below the bottom edge of the main armour belt. The underwater protection absorbed most of the blast, and there was a minor flooding, but the second torpedo struck Bismarck in her port side stern, very close to the port rudder shaft and its coupling was badly damaged by the shockwave. As a result, it was now locked in a 12° port position. As the planes retired, Bimarck’s safety crews were busy fixing the new problem, and had success with the starboard rudder, but not the port rudder. A diver suggested to blast the port rudder with explosives but Lütjens was fearful it can also dislodged the shafts or damage the screws. At 21:15 he reported to Berlin his ship was now unmanoeuvrable. A severe blow, now a few hours, by night, to safety. Options were considered, but there were few, and the grim reality started to seep in the crew.

The Swordfish aircrews that torpedoed the Bismarck rewarded (HMs Ark Royal)
26-27 May: The Last battle of Bismarck
Now with her port rudder jammed the battleship was forced in a large circle, and Lütjens knew this put him in the path of Tovey’s forces, hard on his heels. The latter had now the King George V, Rodney, Dorsetshire and Norfolk converging on the Bismarck. Lütjens signalled at 21:40, on the 26, “Ship unmanoeuvrable. We will fight to the last shell. Long live the Führer.” The return messages were encouraging but still cannot hide the truth, and the crew started to depress, some bound to desperation. At that point, only FW-200 “Condor” could reach the Bismarck, but there was little they could do. During the night, Bismarck dtected the Sheffield again and fired on her, and the latter lost contact. Meanwhile Captain Philip Vian’s five destroyers squadron was ordered to shadow the Bismarck during the night’s hours. These were the HMS Cossack, Sikh, Maori and Zulu, and the Polish destroyer ORP Piorun.
They were spotted by Bismarck’s lookouts at around at 22:38, and fired upon with main battery. At the third salvo, ORP Piorun was hit (a Polish destroyer), but still closed the range to try to torpedo her, when a very close near miss at 12,000 m from Bismarck convinced the captain to break off, taking evasive manoeuvers, and join the pack. Vian’s destroyers did not stayed idle during the night, they constantly illuminating the battleship with star shells and firing dozens of torpedoes at long range, taking risks when closing, but made no hit. Around 06:00, Bismarck launched one Arado 196 floatplane loaded with the ship’s war diary footage of the fight with Hood and documents but the catapult has been damaged by the Prince of Wales several days sooner, and cold not work, so the plane was pushed overboard, as it was full of aviation gasoline; The men were given their last meal, with the best reserves, and some schnapps to try to lift them up.
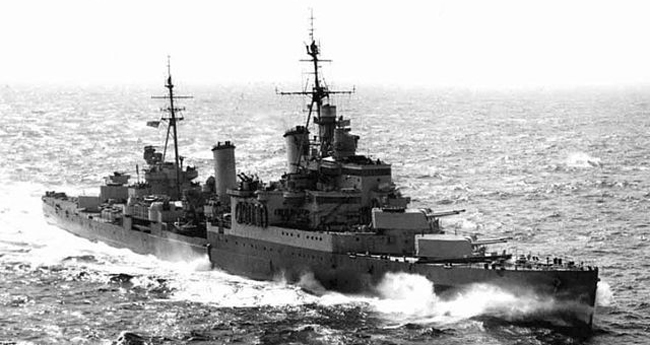
HMS Rodney, colorized by Irootoko Jr.
HMS King Georges V, colorized by Irootoko Jr.
On 26 May, Tovey was litteraly weeping his ships away, around 15:00 they sailed at 22 knots, maximum speed for Rodney, while King George V only had 32% fuel in store Rodney only until 8:00 on the 27. Admiral Tovey signalled his battle plan to Rodney before sunrise, stating she was free to manœuvre independently, in visual coordination to King George V. Both were also to close range to 15,000 yards (14,000 m) to avoid confusion and be more precise, and using broadside fire.
On 27 May, King George V spotted the Bismarck, followed by Rodney on her port quarter. Tovey made a direct course about 8 nmi (15 km; 9.2 mi) and turned south to present his broadside to Bismarck, and around 08:43, her lookouts spotted Bismarck at 23,000 m (25,000 yd). Four minutes were spent for Rodney to close in and point at first only her two forward turrets, and the six 16 in (406 mm) muzzle lighted, followed immediately by all ten King George V’s 14 in (356 mm) guns. Bismarck answered at 08:50, but only with her forward guns and straddled Rodney at the second salvo. However because of the battleship’s jammed steering, she moved erratically in heavy weather, making calculations useless. So her accuracy fell down pretty quickly.

Rodney firing on the Bismarck, burning fiercely at this point in the background
At some point, both British battleships opened fire their their secondary batteries while Norfolk and Dorsetshire were now close enough to join the fray, raining HE 8 in (203 mm) shells to blaze her superstrucures. At 09:02, one lucky 16-inch AP shell from Rodney hit the forward superstructure, killing most of the leading crewt there and staff while disabling both forward turrets. It is likely than Lindemann and Lütjens were killed at this moment, making the ship leaderless; Survivors accounts are contradictory on that point though. The main fire control director was knocked off soon after and the forward main battery was hit again, only managing to fire a last salvo at 09:27. Nevertheless, Lieutenant von Müllenheim-Rechberg the officer in charge of the rear control station still directed fire for rear turrets, and managed three more salvos before his gun director was destroyed. He gave the independent fire order but shells eventually disabled around 09:31 the remaining turrets. The only shell was scared Rodney fell off 20 feet from her bow, damaging her starboard torpedo tube. So this was very much an execution at this point.
The end of Bismarck, she was sinking, nearly all guns shut.
CDR Hans Oels took command from his station, deep in the Damage Control Central. At 09:30 he decided to abandon ship, but also to scuttle her to avoid any risk of capture and reduce casualties. The men below decks were gathered to evacuate first, the engine room crews were to close the watertight doors and prepare scuttling charges while chief engineering officer Gerhard Junack ordered a 9-minute fuse setting. He waited for confirmation, sent a messenger that never returned and activated the charges. The expplosions were setup to 10:10 while the crew was still making their way up when the first detonated. Oels then carried himself the order to abandon ship while there was a massive explosion, which killed him and many others. At 10:00 already, the battleship was silent, but apprently still did not struck the colors. Anyway, Tovey ordered to cease fire and avoid further bloodshed.
In all his two battleship had spent 700 main battery shells, the last fired at point-blank range in straight trajectories, about 2,700 m (3,000 yd), All combined, 2,800 shells rained at Bismarck with probably more than 400 hits. Yet, the battleship was still not sinking but, only through the bow damage seawater. The superstructure and all that was over the waterline was badly damaged, but the citadel and underwater compartimentation held on. Rodney fired two port torpedoes, claiming a hit, probably the only such done by any battleship in history. The scuttling charges detonated at around 10:20 and the Bismarck started listing at 10:35 to port. It grew until she capsized slowly and started sinking the stern. Bzfore that Tovey recalled his battleships, very low on fuel, and ordered Dorsetshire to to stay behind, torpedo the Bismarck (she fired two), with one hit. Dorsetshire moved around on her opposite (port) side to fire another, and another hit but the ship was already partly submerged. Her burning hull completely disapperaed at 10:40 while survivors were picked up. 400 men were in the water, and many were also picked up by HMS Maori, but the effort was stopped at 11:40 when lookouts spotted a U-boat persicope (allegedly). On 400, they both saved 85 and 25 me respectively, so just a quarter. A U-boat indeed arrived on site, but much later, only managing to pickup three men, and later a German trawler two, more. The total was about 114 survived, which recollections many years later were crucial to give an insight in the battleship’s final hours and previous events.
This led celebrated historian writer C. S. Forester in 1959 to published his novel “Last Nine Days of the Bismarck” adapted for a movie “Sink the Bismarck!” in 1960 while Johnny Horton was singing “Sink the Bismark”.
Survivors picked up by HMS Dorsetshire – Only 1/4 of the men which made it in the water were rescued because of the fear of U-Boats. The specter of Hogue, Cressy and Aboukir in 1914 was still there.
Aftermath: Finding the wreck, and controversy
The pounding of the bismarck and unknwon specifications at the time, made all believed they had destroyed a nearly “invincible, unsinkable ship” as the propaganda made believe. So it was important to locate the wreck to investigate and settle some questions. This was done in 1989 by Dr. Robert Ballard, made famous for his dicovery of the RMS Titanic previously. Bismarck was resting on her keel at around 4,791 m (15,719 ft) underwater, 650 km (400 mi) west of Brest, and had slided along an extinct underwater volcano, 1,000 m (3,300 ft) nderwater, the only relief in this abyssal plain. The 50,000 tonnes of steel created a massive landslide along the way. Bismarck stopped along the way, about 2/3 down. Exact location had been kept secret since as she is now considered as a war grave according to international law.
What was revealing was a serie of holes above the waterline and the evidence of internal implosions, conforming the scuttling, while the hull was found in relatively good condition, and so she “did not implode.” It appeared many compartments were flooded after the ship sank, and it was not damaged either by the descent and impact, although the stern had broken away, probably after the torpedo hit. There was another expedition in June 2001 (Deep Ocean Expeditions) with Woods Hole Oceanographic Institution, using Russian-built mini-submarines and an Anglo-American expedition in July 2001 by British TV channel, using ROVs to film the hull, led by David Mearns. And of course the 2002 documentary by James Cameron “Expedition: Bismarck” using small Mir submersibles and exploring the ship’s interior more in detail. This showed the main side belt armour had been penetrated twice, on the starboard side amidships, probably close-range shelling. The armour deck was left virtually intact. He also found the torpedoes were near to completely ineffective, somle even possibly explode prematurely in to the heavy seas. The torpedo bulkheads were largely intact. More damage was cause however by the contact and slide on the ocean floor, disproving some conclusion from David Mearns in 2001. Most experts esteemed that the ship could have floated about a day more if not scuttled. She could have been captured by the Royal Navy.
Painting by Ken Marschall depicting Argo exploring the wreck
Whatever the case pointing the exact cause, the single lucky hit by a Swordsfih, by a relatively puny 45 cm aerial torpedo, had severe consequences fo the Kriegsmarine, which ran deep. The rage caused by the loss of Bismarck turned Hitler against his surface navy and gave Raeder more lift in his advicacy of total submarine warfare. He was given more credits and eventually replaced Raeder at the head of the Kriegsmarine. What would happen if Bismarck made it to Saint Nazaire ? The port would have been an almost daily target for the RAF. And in the end, the Bismarck was more exposed there than in the Northern Ports, at some point the battleship could have waged another raid nortwards and tried to reach home, or join the Tirpitz in the mid-atlantic. Both battleships together in 1942, in open sea, would have been indeed quite a threat for the convoys.
But after the loss of Bismarck, surface raiding in the Atlantic was almost brought to a full stop. The remaining ships would be for now used for shorter missions, the only exception being the raid from Scharnhorst and Gneisenau, which ended later in a dangerous crossing of the channel in 1942. But from then on, only Norway, with its close proximity to Germany and numerous, deep fjords, made perfect hidehouts for a squadron able to threatens the northern convoys. Such was the fate of Bismarck’s sister, KMS Tirpitz.
KMS Tirpitz in action
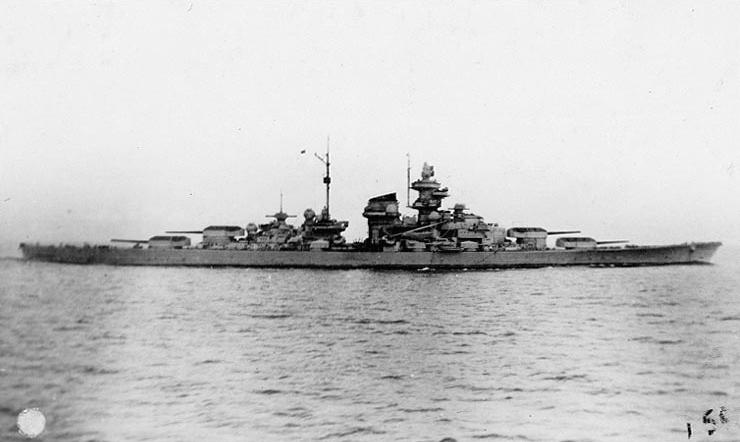
The baltic squadron
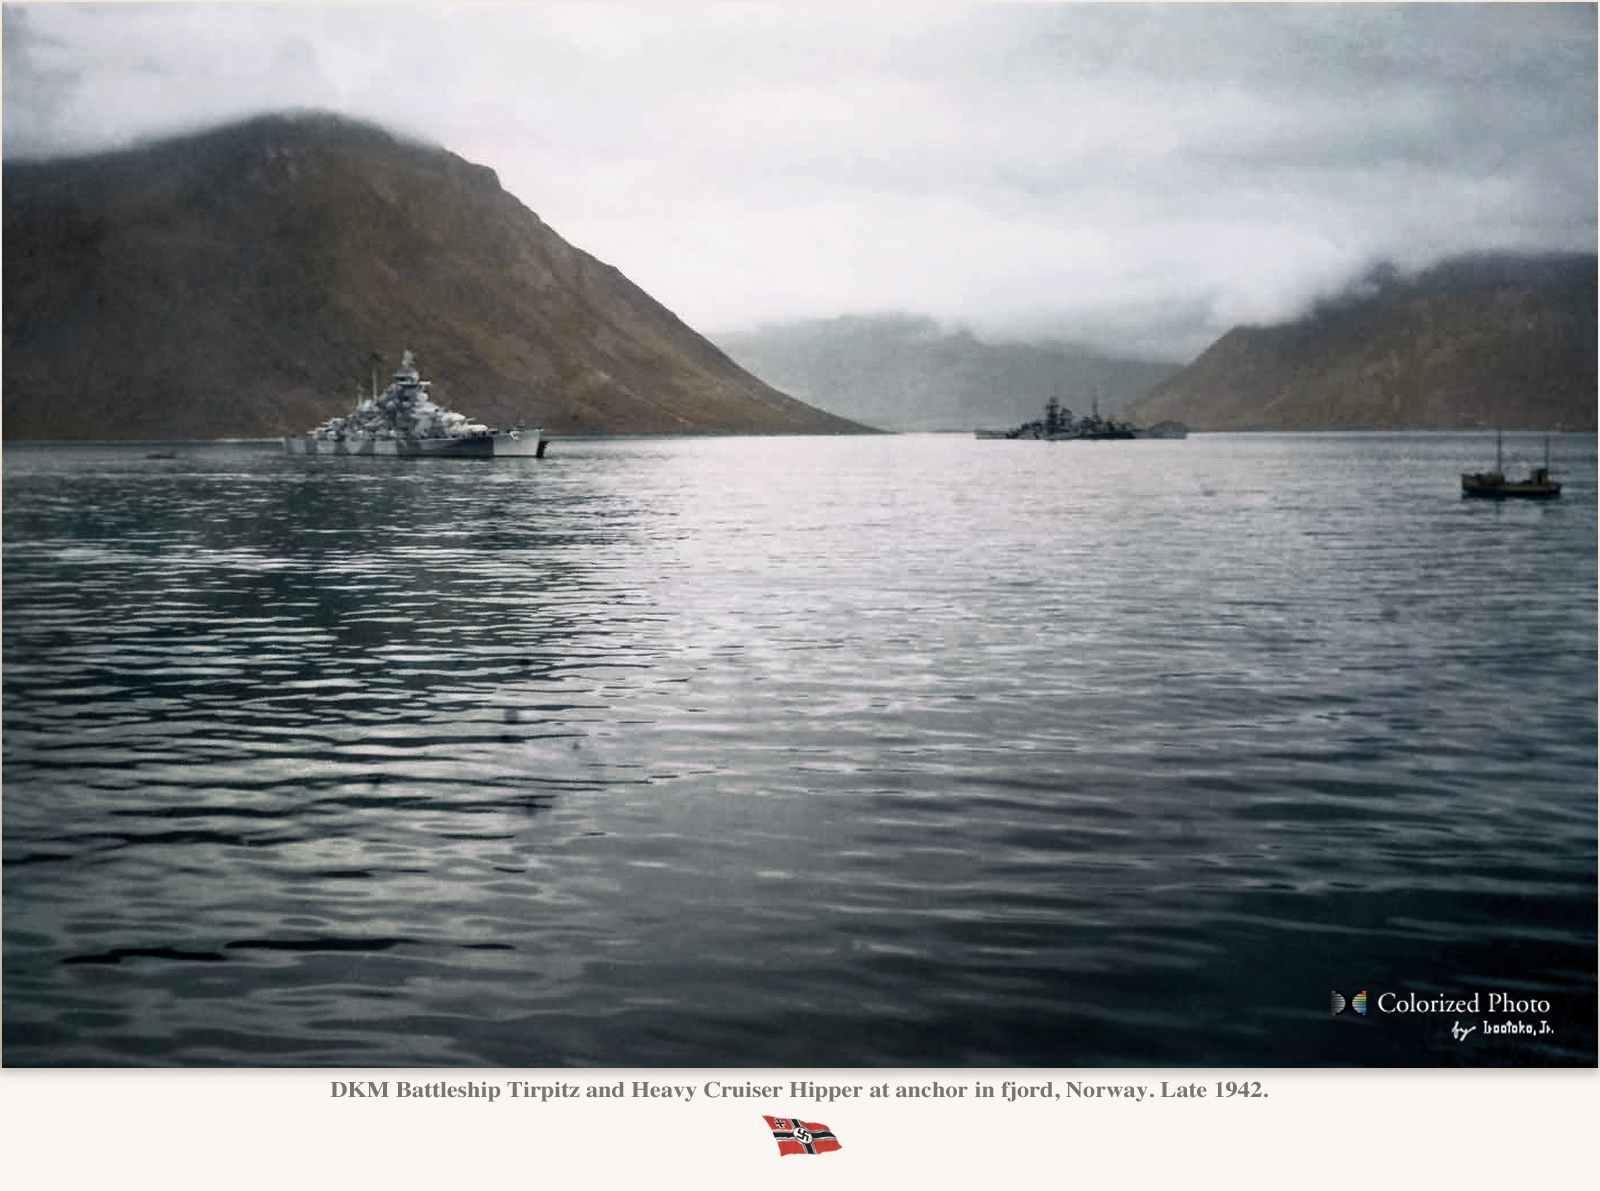
Tirpitz and Hipper in Norway, late 1942 – colorized by irootoko Jr.
KMS Tirpitz was (Ersatz Schleswig-Holstein, contract name “G”) emerged from Kriegsmarinewerft shipyard in Wilhelmshaven, launched on 1 April 1939 and completed by February 1941, with great hopes of making a binome with her sister-ship Bismarck. But during this period, the RAF raided the shipyard. They missed Tirpitz but badly damaged everything around and considerably slowed down the completion work. Commissioned on 25 February for sea trials in the Baltic she was stationed in Kiel and returned training in the Baltic in March to May. Back in Kiel in July, Germany invaded the Soviet Union and a provisional Baltic Fleet was created to intercept the Soviet fleet of Leningrad if it tried an escape to UK (there was no such plan). Tirpitz served as the flagship of the squadron, also comprising the Deutschland-class (now Lützow) Admiral Scheer, and the light cruisers Köln, Nürnberg, Leipzig, and Emden, destroyers and two flotillas of minesweepers. This Baltic Fleet was commanded by Vice Admiral Otto Ciliax. Its first mission was to patrol the Aaland Islands until 26 September 1941. When there was no proof the Soviet Navy would make any breakthrough and the rapid advances of the German Army, it was understood the Luftwafe would deal with Leningrad, which was besieged. The squadron was disbanded and Tirpitz made another training cruise. She tested her primary and secondary guns on a moving targer, the old converted battleship Hessen as a radio-controlled target ship. The RAF launch other bombing raids on Tirpitz in Kiel, but never succeeded. In May previously, Bismarck had been sunk, so there were less hopes of mounting an atlantic surface raiding mission again. Instead, Norwway looked les exposed and risky, while more effective now the allies started to supply the Soviet Army through the “northern road”; The battleship would from then on spend most of her career and end there as the “solitary queen of the north” as nicknamed by the Norwegians.
Deployment to Norway
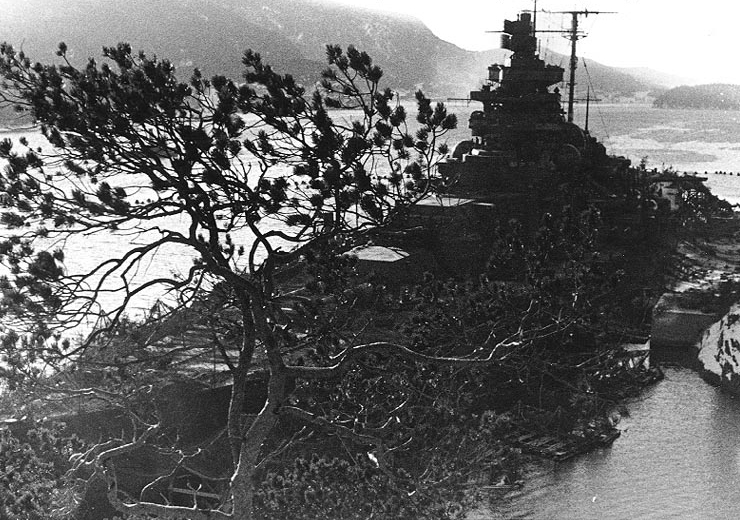
Tirpitz camouflaged in the Fættenfjord
Erich Raeder, still Grand Admiral and commander of the Kriegsmarine at the time proposed on 13 November Tirpitz be deployed to Norway, this was not an idea of Hitler, which would rather secretely wanted all surface ships scrapped for spare steel. From Norway, Tirpitz would be able to prey on nearby convoys and be the centerpiece of a fleet in being tying down British naval assets, and deter an Allied invasion of Norway as well and the precious metal road. Hitler agreed to the proposal. Tirpitz made a session indrydock and received additional anti-aircraft guns, with new 10.5 cm guns on the superstructure, while the catapult were moved outboard to improve the AA field of fire. Two quadruple 53.3 cm torpedo tube mounts were also installed, in case the ship would have dealt with the escort and was now close range in a convoy. Kapitän zur See Karl Topp took command and toured his ship, and later declared her ready for combat operations, on 10 January 1942. She left for Wilhelmshaven in order to conceal her actual destination on the 11.
On 14 January after dark, Tirpitz left for Trondheim and British military intelligence decrypting Enigma messages knew about the departure but poor weather prevented any RAF action and Admiral John Tovey was not informed of the Tirpitz course until 17 January. By that time she was already in Norway since a while. She had been detected by reconnaissance planes in Trondheim a day before indeed. Tirpitz moved to Fættenfjord, a deep fjor north of Trondheim that was thought better protected against air raids. This ws called Operation Polarnacht (Polar Night), and she was escorted by Z4 Richard Beitzen, Z5 Paul Jakobi, Z8 Bruno Heinemann and Z29, but the move was spotted by the Norwegian resistance, and signalled to British intelligence. Moored next to a cliff that forbade air attacks from the southwest she had trees cut down and placed on provisional framing and netting to camouflage her. She was also entirely painted in a new, wavy, complex and green-brown camouflage, including the deck. The crew was trained to create a smoke cloud or artificial fog in any aerial alert, using water and chlorosulfuric acid. To defend the fjor approaches, anti-aircraft batteries were installed around it. Also close to the anchorage, anti-torpedo nets and heavy booms were placed. As in Grimm and Andersen’s tales, the “Lonely Queen of the North” was born. She would have a rather dull active life from then on, due to the few opportunities to launch a raid, and and life for the crew was monotonous and lackluster. She was also plagued by fuel shortages and little training coild be done. The crew just maintained the ship and trained with the anti-aircraft defences, while sports activities and sorties in nearby countryside were organized to keep everybody physically fit.
Operations against Allied convoys
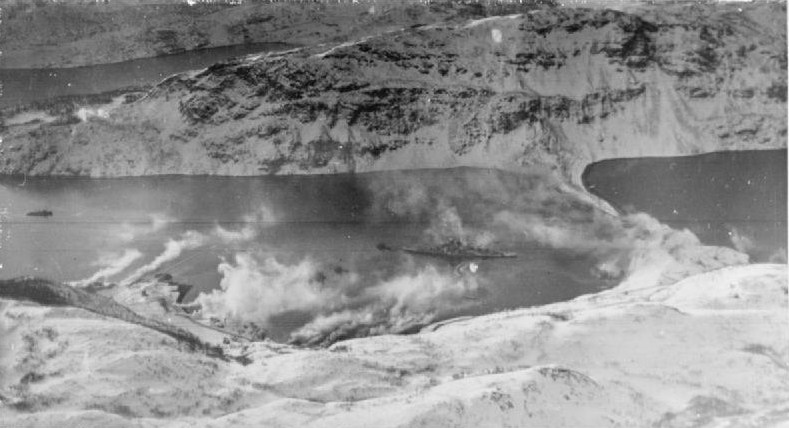
Tirpitz moored in Kaafjord while a artificial fog is generated to hide her.
-Jan-February 1942: Tirpitz’s inaction could be explained by several factors, the first of which were shortages of fuel and the withdrawal of the German destroyer force, sent to support Operation Cerberus, the channel dash of Scharnhorst, Gneisenau and Prinz Eugen. At the same time, the convoy PQ 8 by end of January was missed. A first British air attack at the end of the month was mounted, with heavy bombers, but also abandoned due to poor weather. In early February, Tirpitz took made a diversion to distract British attention before Operation Cerberus was launched. She steamed out of the fjord and set a course for the North Sea, only to cruise back to safety. By late February 1942, the Admiral Scheer and Prinz Eugen arrived with several destroyers to reinforced the “fleet in being”. However, just before arriving at the Fættenfjord entrance, she was ambushed by a British submarine and sent into repairs.
-March 1942: Unternehmen Sportpalast Tirpitz and Admiral Scheer sorties with Z14, Z5, Z7, Z25 and two torpedo boats to attack the convoy QP 8 and PQ 12 in “Operation Sports Palace”. Admiral Scheer however by then was only capable of 26 knots (znd could not keep up so she was left in the harbour with the destroyer Paul Jakobi ad the two torpedo boats. By 5 March, the Luftwaffe spotted PQ 12 off Jan Mayen Island but failed to note the HMS Duke of York and HMS Renown in distant escort and four destroyers. This was Tovey’s trick, to bait the Germans while there was an even more distant cover with HMS King George V and the aircraft carrier HMS Victorious, the cruiser HMS Berwick and six destroyers. Enigma messages warned the admiralty in advance of Tirpitz’s attack so both convoys were re-routed. But Tovey tried to pursue the Tirpitz anyway on 9 March. In between, Admiral Otto Ciliax already decided to get back.
The same 9 of March, as the squadron as exposed steaming back, they were attacked by twelve Fairey Albacore torpedo bombers from the Victorious. Tirpitz evaded the torpedoes but deplored three men wounded. The well trained anti-aircraft gunners shot down two of the attackers. Tirpitz headed for Vestfjord and to Trondheim, arriving 13 March. On 30 March the suquadron was attacked by thirty-three Halifax bombers, scoring no hits while five were downed. Two other raids were made in late April and a 31 Halifax night raid on 27–28 April. Again, no hit but five shot down. Next, 23 Halifaxes and 11 Lancasters the following night, again, no hit, two shot down. It that was needed, how better proof that these bombings were innacurate ? But the RAF persisted.
-27 June 1942: Unternehmen Rösselsprung
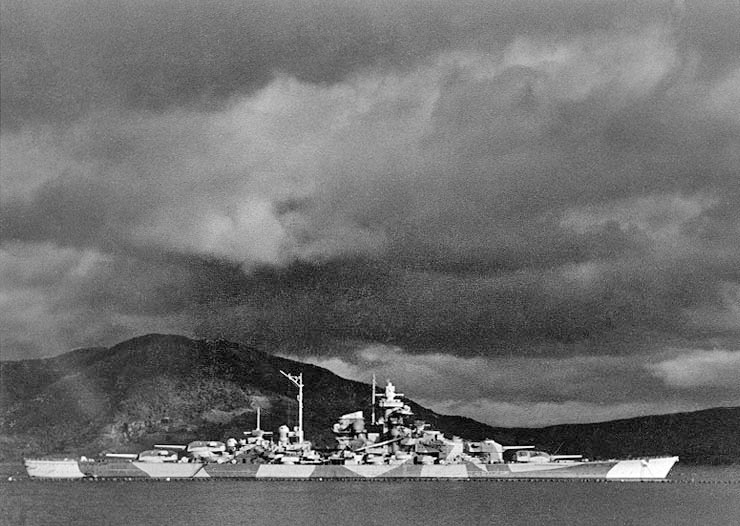
Tirpitz in the altafjord
Tirpitz until then had consumed some 8,230 tonnes (8,100 long tons) of fuel oil and it would take three months to replenish this reserve for other sorties. Convoy PQ 17, which left Iceland on 27 June and the German fleet departed, in what was called “Operation Knight’s Move”. To escort the convoy, battleships Duke of York and USS Washington watched over it, as well as HMS Victorious. The German attack force wa composed of Tirpitz, Admiral Hipper and six destroyers. They sortied from Trondheim, with behind another force composed of the slower Lützow, Admiral Scheer, and six destroyers which were gathered from from Narvik and Bogenfjord. Ciliax’s hope was to lure out the British escorts to this second force and alltogether that can put a good show. However, Lützow and three destroyers struck uncharted rocks underway and were too damaged to go on, they folded back. The Soviet submarine K-21 spotted Bismarck and fired torpedoes but missed although claiming the contrary. Swedish intelligence had previously signalled the German moves, and the British Admiralty rdered the convoy to disperse. While the Germans aborted the surface operation to convoy was now easy meat for to U-boats and the Luftwaffe, and was decimated with 21 of the 34 isolated transports sunk. So this was after all a German victory. Tirpitz was by now stationed at Altafjord.
October 1942-March 1943 Operations
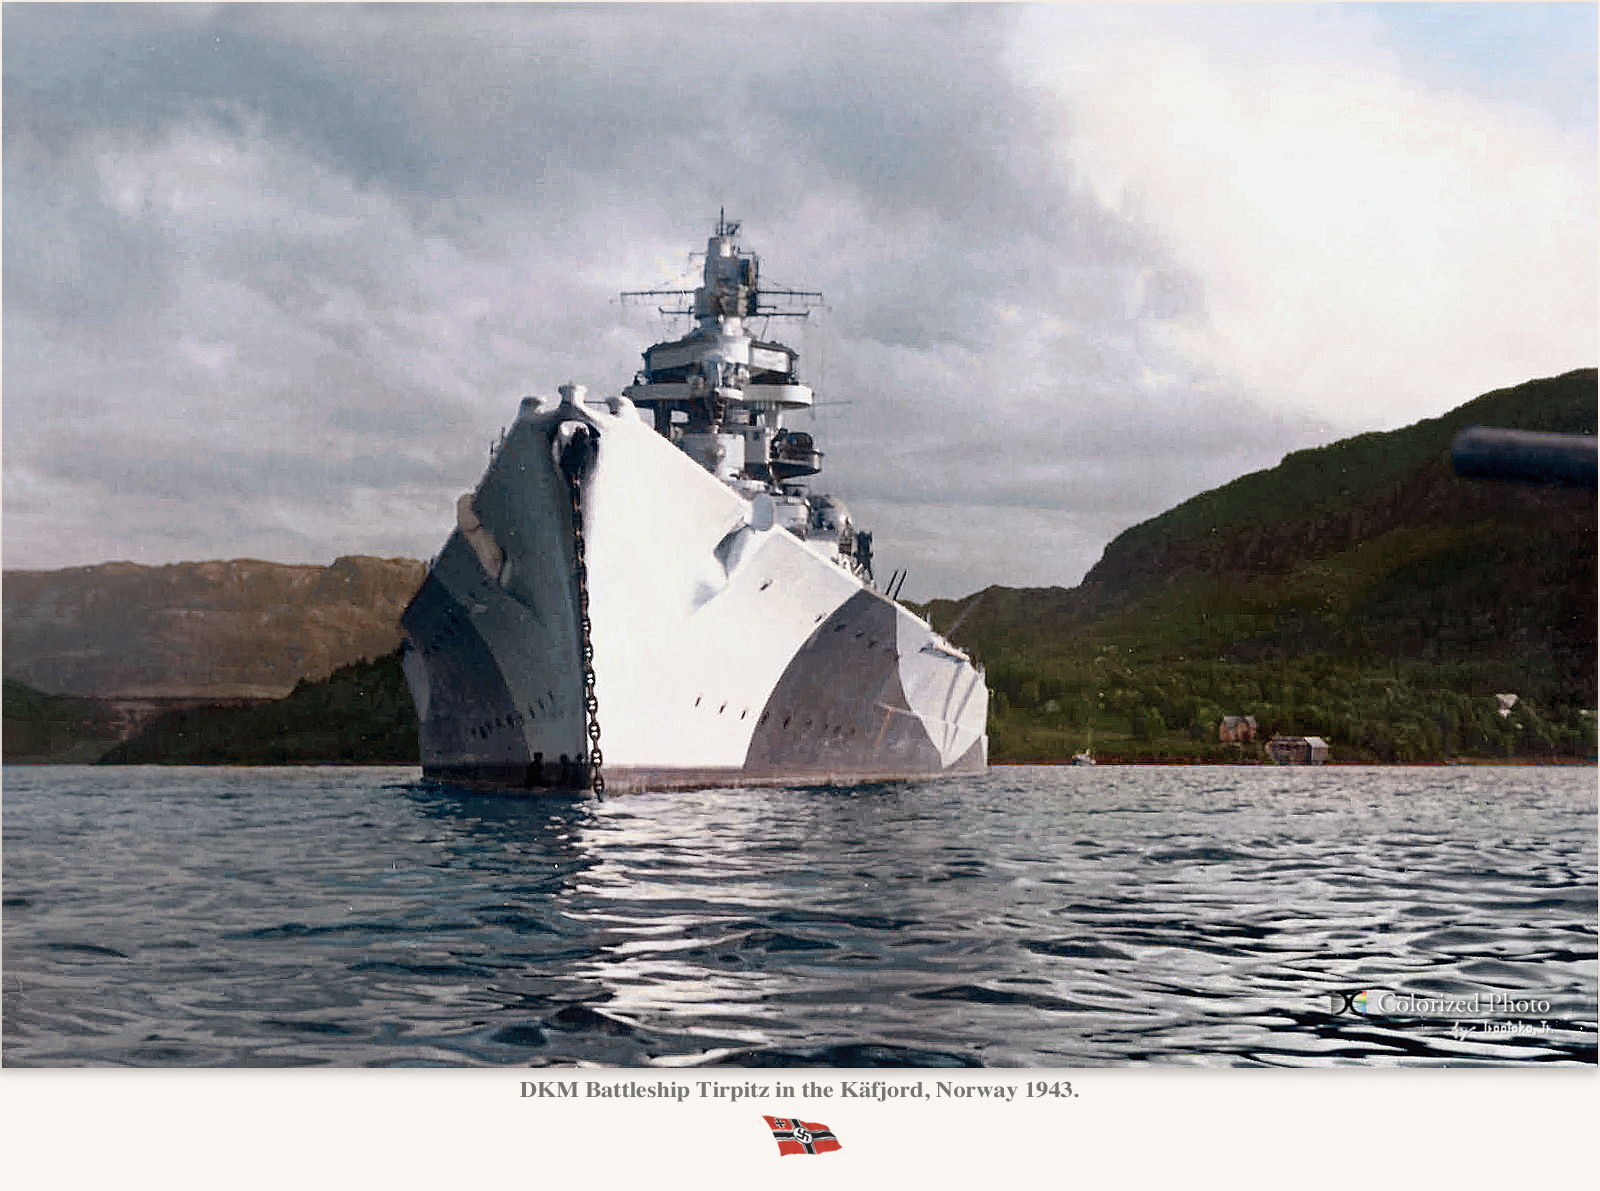
The prow of Tirpitz in 1943
Tirpitz moved again to Bogenfjord near Narvik and needed a major overhaul, but Hitler forbidden her return to Germany, so she was to be refitted in Trondheim, but not in drydock. She left Bogenfjord for Fættenfjord, outside Trondheim. The anchorage defenses were much strengthened many additional FLAK, and double anti-torpedo nets. The refit was fractioned so Tirpitz would remain partially operational, and eventually partially “drydocked” when a caisson was built around her stern to allow replacing her rudders. Meawnhile for the first time, the British made a Chariot human torpedoes attack, aborted because rough seas. The fishing vessel towing them, lost them. By 28 December, Tirpitz started her post-refit sea trials followed by gunnery trials on 4 January 1943, in Trondheim Fjord. On 21 February 1943, captain Topp became Rear Admiral, replaced by Captain Hans Meyer. On 26 Febrary, Scharnhorst arrived to the Norwegian squadron now under command of Vice Admiral Oskar Kummetz.
The raid on Spitzbergen
In March 1943, Allied convoys to Murmansk ceased and Admiral Karl Dönitz, replacing Raeder after the Battle of the Barents Sea on 31 December 1942 found a mission for the squadron, attacking Spitzbergen, and destroying the British weather station and refuelling base here, important for the northern convoys. The island was only protected by a garrison of 152 men from the Free Norwegian Armed Forces. The two battleships departed with ten destroyers on 6 September while Tirpitz flew the white ensign on the approach on 7 September, to fool the defenders about her nature. The squadron then mercilessly shelled the island’s instalaltion to smitherine. Tirpitz fired herself 52 main-battery HE shells plus 82 15 cm turret shells. This was the last time during the war she had to occasion to fire her main battery in anger… After the preparatory shelling, an assault force installed explosives to finish off shore installations and captured 74 prisoners. After this was all over, the fleet headed back to Norway, in separate fjord for better safety.
Operation Source (September 1943)
x-craft profile, by the author, scale 1/350
The British admiralry wanted, before resuming convoy activity in the area, to eliminate Tirpitz for good. The air attacks, so far all failed, as well as an attempted Chariot attack in October 1942, inspired by the Italian X-MAS quadron in the Mediterranean. In between, were deigned another British secret weapon: The X Craft midget submarines. Their carefully planned attack was called Operation Source. Thse targeted not only Tirpitz but also Scharnhorst and Lützow. These midget subs were towed by larger submarines and released close to the anti-torpedo nets, slipping beneath, and once at destination, would drop each two powerful two-tonne mines under their target’s belly. Ten of these X-voats were assigned to the operation, which was to start on 20–25 September 1943. But eight reached Kåfjord for the attack, starting on 22 September. X5, X6, and X7, performed their mission and managed to breach the defences, while X6 and X7 made theier way as intended close to the bottom of the battleship and laid their mines. X5 was detected sooner, emerging by accident 200 m (660 ft) from the nets and was spotted and sunk.
The first mine exploded aft, abreast turret “Caesar”, the second detonated about 44-55 m (148 to 180 ft) to the port bow. This ruptured a fuel oil tank and the armour plating was torn and bulkheadsof the double bottom buckled. Tirpitz was flooded with about 1,430 t (1,410 long tons) seawater and her fuel tanks were submerged as well as most void spaces in the port side double bottom compartments, so he listed 2°, later rectified by counter-flooding. The turbo-generators in room No. 2 were damaged, and there were broken steam lines and severed power cables. Turret D (“Dora”) left its bearings because of the blast and there was no equipment to have her lifted and readjusted, so she became fixed. Also Tipritz’s Arado Ar 196 floatplanes were destroyed also. Repairs were made on situ, by the repair ship Neumark, and the repair work, which lasted until 2 April 1943 was remarkably fast. She was ready for full speed trials on 3 April Altafjord.
Operation Tungsten
After Neumark’s departure Tirpitz was nearing operational readiness so in emergency, a major air strike was mounted, by combining naval air assets. Hundreds of planes were to be launched from the carriers HMS Victorious, Furious and the escort carriers HMS Emperor, Fencer, Pursuer, and Searcher and the operation scheduled for 4 April 1944 and advanced after enigma decriptions showing Tirpitz was to depart on 05:29, 3 April for sea trials. Out of the open, she would be more vulnerable. In total, the combined forces would launch 40 Fairey Barracuda dive-bombers, each modified to carry anti-ship 1,600-pound (730 kg) AP bombs escorted by 40 fighters, launched in two waves. They fell on Tirpitz and scored no less than 15 direct hits, 2 near misses. One was shot down of the first wave as the crew needed 12-14 minutes to manand prepare the anti-aircraft batteries. When the first attack commenced, 05:29 tugs were just about assist Tirpitz out of her mooring to depart, and the second wave made it over their objective an hour later after 06:30, and retired after many hits and just one plane short down.
While the main armour was intact, the bombs blasted the superstructure and caused about 122 men KiA and 316 wounded (William Garzke, Robert Dulin) or 132 + 270 (while Hildebrand, Röhr, & Steinmetz) including commander KzS Hans Meyer. Two 15 cm turrets were destroyed, as well as the new Ar 196 floatplanes, serious fires started while the concussive shock disabled the starboard turbine engine, and saltwater contaminated the feed water. Also seawater infiltrations amounted to 2,000 t mainly from two holes in the side created by shell splinters of near-misses, but also water used to fight the fires. Dönitz ordered repairs regardless of the cost, even knowing its insufficient fighter support. This started in early May, parts and equipments ferried by destroyers plus workers from Kiel in just three days three days. By 2 June 1944, another feat, Tirpitz was ready again and was making gunnery trials at the end of the month. While replacing the 15 cm guns they received high-angle mounts for AA fire, while 38 cm fuzed shells were provided for AA fire. This was a siilar “shotgun” type of shell like those used by the Yamato.
Operations Planet, Brawn, Tiger Claw, Mascot and Goodwood
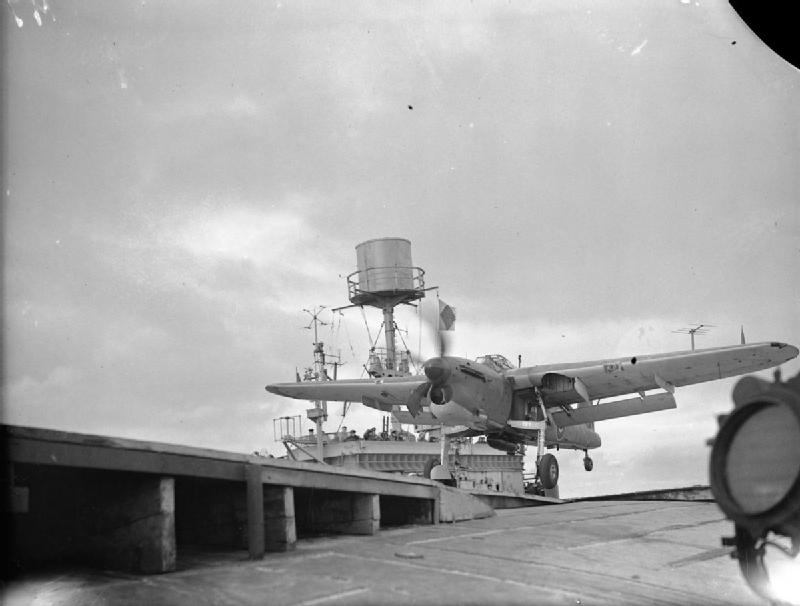
Fairey Barracuda taking off from HMS Furious during Operation Mascot, 17 july 1944.
The good results compared to previous heavy bomber raids confirmed the admiralty to program more carrier strikes over three months. But in September bad weather had them cancelled. Operation Planet, was planned for 24 April 1944 and cancelled. Operation Brawn, (27 bombers, 36 fighters) on 15 May, Operation Tiger Claw, 28 May. Victorious and Furious made these, joined later by HMS Indefatigable which took part in Operation Mascot. It was planned for 17 July 1944, and no less than 62 bombers escorted by 30 fighters were planned, but postponed until the weather improved by late August. Operation Goodwood started. It consisted in a serie serie of attacks called Goodwood I and II (22 August, Furious, Indefatigable, Formidable, Nabob, Trumpeter) In these 38 bombers escorted by 43 fighterstook off and raided the ship twice, but they failed to inflict any damage while three were shot down. Goodwood III (24 August) grouped 48 bombers escorted by 29 fighters. They scored two hits but only minor damage. One bomb made it through two armour decks and ended in the No. 4 switchboard room but failed to detonate while the second was a lighter 500-pound (230 kg) bomb which exploded but made only superficial damage while six planes were missing. Goodwood IV (29th) consisted in the launch of 34 bombers, 25 fighters but marred by heavy fog while the battleship’s gunners shot down a Firefly and a Corsair and also fire fifty four 38 cm FLAK rounds and 161 from the 15 cm guns, 20% of her AA ammunition supply.
Operations Paravane (15 Sept. 1944)
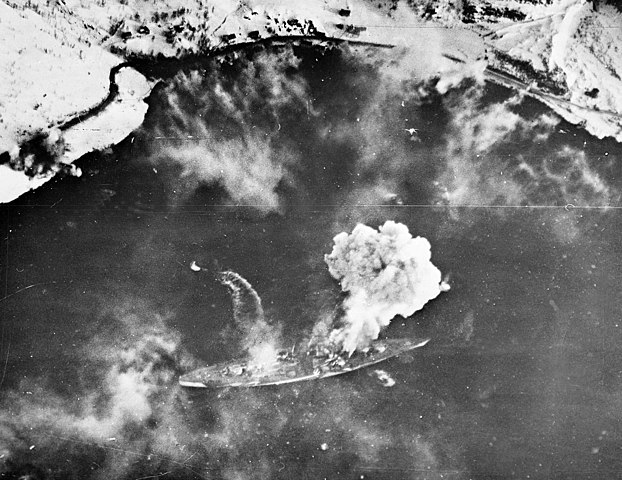

Tirpitz on 3 April 1944 during a fleet air arm attack and covered by a smokescreen in Kafjord.
As the Fleet Air Arm by mid-1944 recoignised its failore, the relay was passed onto the RAF’s No. 5 Group, using Lancaster bombers. Just for the task preparations and tests were made since a year, and the result development was Barnes Wallis 6-short-ton (5.4 t) Tallboy. It was made to penetrate the Tirpitz heavy armour. Operation Paravane took place on 15 September 1944 from Yagodnik in Russia. 23 Lancasters (17 with a Tallboy, six with twelve JW mines) arrived over the ship and scored a single hit at the bow, by a Tallboy bomb. It had enough weight and velocity to make it through the keel, exploded just under the ship’s belly. The whole ship’s bow was lifted by the force, and flooded by 800-1,000 t of seawater. This cause a trim and Tirpitz was by then deemed unseaworthy, limited to 8-10 knots was severed damage was caused to the fire-control equipment. This extensive damage was such that at that point, the admiralty reduced the reppairs to reduced the battleship to a giant floating gun battery, basically anchored for good. Repair needed months but was made in stages, holes patched in a few weeks, so she could be moved further south to Tromsø. On 15 October 1944 she made the last voyage of her career.
Operation Obviate (29 October 1944)
Wit this success confirmed by recce planes, the 9 Squadron and No. 617 Squadron were planned for another raid on 29 October. The battleship was moored off Håkøya Island, off Tromsø when 22 Lancasters bombed the Tirpitz with Tallboys. But bad weather reduced accuracy and there was just a near-miss. Nvertheless, the underwater explosion torn off the port rudder and the port shaft, resulting in some flooding. The Tirpitz’s fired 38 cm fragmentation shells, which proved totally ineffective at this high altitude, just one Lancaster was damaged, but by ground AA. Tirpit’s anchorage was improved afterwards, notably with a large sandbank constructed under her, and around her hull, preventing any future capsizing, plus new anti-torpedo nets while she was prepared as floating artillery platform, with very limited fuel, for the turbo-generators, the crew reduced to 1,600 officers and men, but there was no other AA improvement.
The end: Operation Catechism (12 November 1944)
The last attack on Tirpitz followed in mid-November 1944 with 32 Lancaster of 9 and 617 Squadrons, also carrying Tallboys, of which 29 fell close to the German battleship. Warned of their arrival, Tirpitz fired its “FLAK” 38 cm at 09:35 and dispersed them, but they regrouped and attacked. The weather was good, so this was accurate, and the RAF reported two direct hits and one near miss. The anti-torpedo net barrier was blasted by other near-missies and the seabed was cratered, making the sandbank disperse. More critical was the bomb which entered between the forward turrets, ‘Anton’ and ‘Bruno’. Fortunately for the crew, it failed to detonate, probably because again, the fuze was damaged during the penetration. The second fell between the aircraft catapult and funnel. The ship’s side and bottom was blasted away, an entire section of belt armour was gone, and according to various reference, as thord impact fell on the port side of turret Caesar.
Flooding was massive enough so that the ship started to list to port up to 20 degrees. In ten minutes it went to 40 degrees, and at this point, the captain ordered to abandon ship. It reached 60 degrees at 09:50 (15 min. after the attack) seemed to stabilise until at 09.58 turret Caesar was destroyed by a large explosion. Her roof and some of her barbette rotating structure were ejected, crushing survivors swimming to shore. She rolled over completely, her superstructure embedded in the sea floor, also trapping 82 men of the crew inside. They were rescued by cutting through the exposed bottom, surviving in air pockets, but the toll eventually was about 950-1,204, 200 survivors. They were repatriated by the Lützow in January 1945.
The Luftwaffe was criticised, and commander of III./Jagdgeschwader 5 Major Heinrich Ehrler blamed for for failing to intercept the bombers. He was court-martialled in Oslo and sentenced to three years in prison, kater demoted and transferred in Germany. Investigations indeed highlighted the poor communication between the Kriegsmarine and Luftwaffe at this point. Ehrler was just not informed of the new position of Tirpitz two weeks prior to the attack.
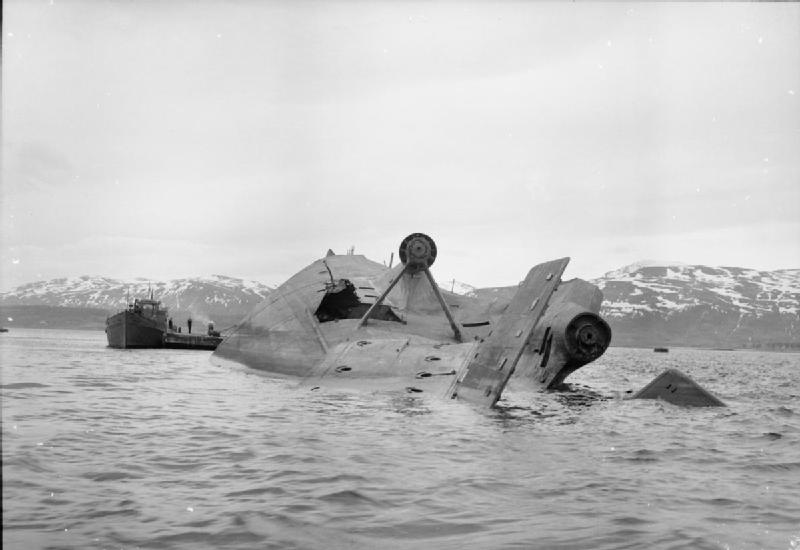
Tirpitz capsized in Tromsö. Her wreck was still there after the war, eventually scrapped by a German-Norwegian company in 1948-1957.
Videos
 Latest Facebook Entry -
  X(Tweeter) Naval Encyclopedia's deck archive
 Instagram (@navalencyc)


 French Navy
 Royal Navy
 Russian Navy
 Armada Espanola
 Austrian Navy
 K.u.K. Kriegsmarine
 Dansk Marine
 Nautiko Hellenon
 Koninklije Marine 1870
 Marinha do Brasil
 Osmanlı Donanması
 Marina Do Peru
 Marinha do Portugal
 Regia Marina 1870
 Nihhon Kaigun 1870
 Preußische Marine 1870
 Russkiy Flot 1870
 Svenska marinen
 Søværnet
 Union Navy
 Confederate Navy
 Armada de Argentina
 Imperial Chinese Navy
 Marinha do Portugal
 Mexico
 Kaiserliche Marine
 1898 US Navy
 Sovietskiy Flot
 Royal Canadian Navy
 Royal Australian Navy
 RNZN Fleet
 Chinese Navy 1937
 Kriegsmarine
 Chilean Navy
 Danish Navy
 Finnish Navy
 Hellenic Navy
 Polish Navy
 Romanian Navy
 Turkish Navy
 Royal Yugoslav Navy
 Royal Thai Navy
 Minor Navies
 Albania
 Austria
 Belgium
 Columbia
 Costa Rica
 Cuba
Cuba Czechoslovakia
 Dominican Republic
 Haiti
Haiti Hungary
 Honduras
 Estonia
 Iceland
 Eire
Eire Equador
 Iran
Iran Iraq
Iraq Latvia
 Liberia
 Lithuania
 Mandchukuo
 Morocco
 Nicaragua
 Persia
 San Salvador
 Sarawak
 Uruguay
 Venezuela
 Zanzibar
 Warsaw Pact Navies
 Bulgaria
 Hungary

 Bundesmarine
 Dutch Navy
 Hellenic Navy
 Marina Militare
 Yugoslav Navy
 Chinese Navy
 Indian Navy
 Indonesian Navy
 JMSDF
JMSDF North Korean Navy
 Pakistani Navy
 Philippines Navy
 ROKN
ROKN Rep. of Singapore Navy
 Taiwanese Navy
 IDF Navy
 Saudi Navy
 Royal New Zealand Navy
 Egyptian Navy
 South African Navy


 Ukrainian Navy
At the time, France, which had begun a program of naval expansion, was viewed as the most likely threat, not Great Britain.
Indeed, you’re right to point that out. However, rather than naval “expansion”, as French Navy as been capped at Washington in 1922 as par with Italy, was obliged to be creative and rationalize the fleet, far from ww1 “collection of prototypes” left by the young school. It was more homogeneous and perhaps the best fleet we ever had, but yes, the Deutschland were designed, after which the Dunkerque answered, on turn dealt with the Scharnhorst, answered in turn by the Richelieu, and so on.
”Naval historians notably Antony Preston, criticized the choice of pure antiship guns while allied (and Italian) opted for dual-purpose guns. ”
Well no, italians did the same choice with a similar secondary artillery. BTW the Scharnorst had 4 turret, not two.
Japanese had a more dual use guns, but as the french, the 150-155 mm is too big to have use in a AA mount. French designers were forced to reintroduce the 100 mm, british had much problems with small 133 mm turrets, american had excellent DP guns but with short range in anti-surface role, italians had 90 mm overly complex and single turrets.
So the real weak point was the manual loaded 37 mm, precise but with slow ROF. The french were on the same level if not worse, they did not have 20 mm guns but only 13 mm. Japs had a 25 mm universal gun, but not without limits and defects as it cannot do the same work of 37-40 mm. Italians had the 37 mm automatic gun, but with a rigid mount even if stabilized, not really a big success but still better than the others + 20 mm guns (stabilized!). But still, V.Veneto was hit by an Albacore in full daylight.
Sentence fixed, thanks.
Using the extremely US centered Combinedfleet as a source for armor protection. Just no. Armor protection of the modern US battleships is overrated. There’s a reason Montana would have had a very different armor scheme than Iowa and South Dakota; the US Navy was not satisfied.
The combination of 320 main belt and 110-120mm turtleback gave Bismarck better effective vertical protection than even Yamato. Effective horisontal protection was on par with most other modern battleships, turret armor was on par with KGV and Littorio, all three having citadel armor of the highest quality, unlike US, French and Japanese battleships.
Scharnhorst, too, was very well protected, the main difference from Bismarck was a thinner upper belt and slightly less deck armor.