
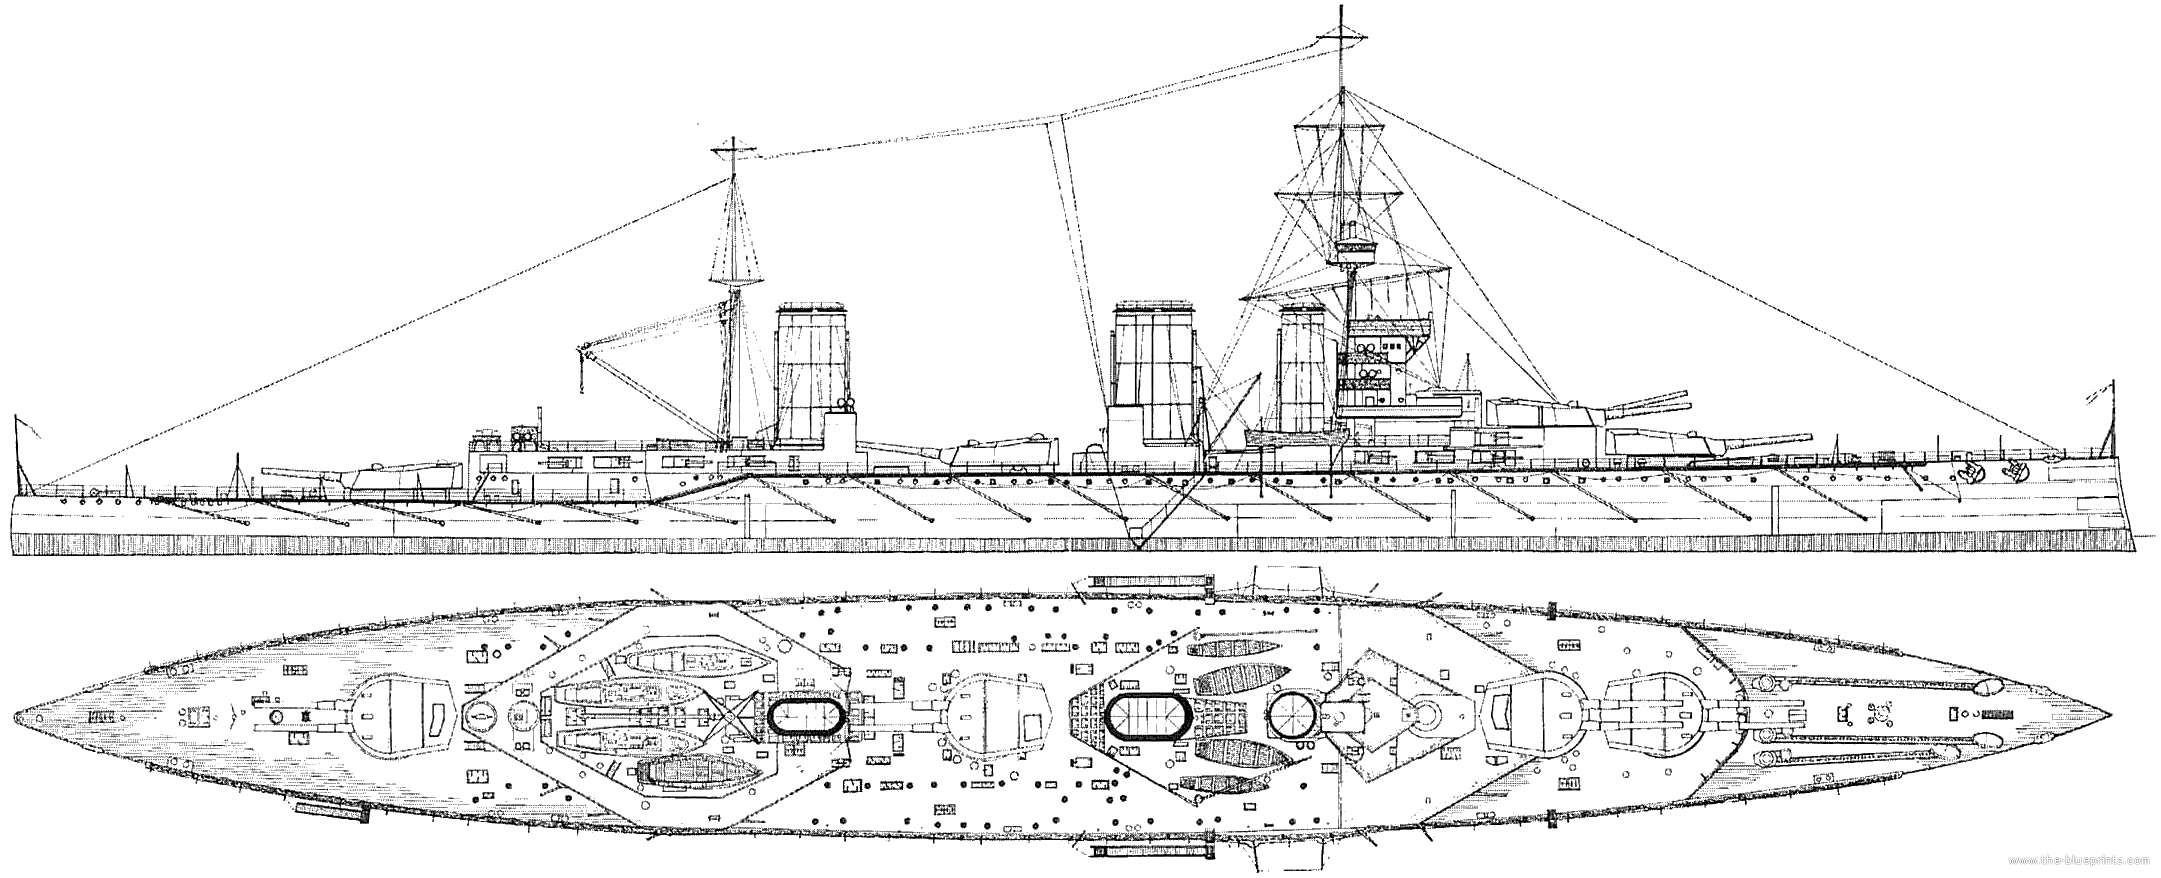
Lion class Battlecruisers (1910)
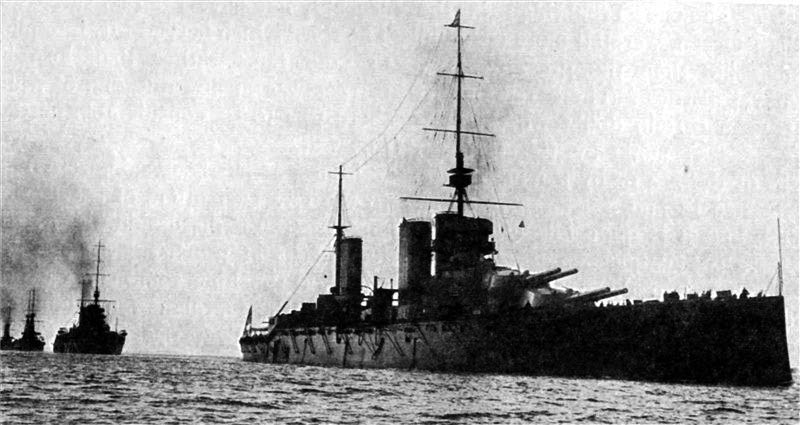
 HMS Lion, Princess Royal, Queen Mary
Beatty’s “splendid cats” at Jutland were a source of pride in 1914… but a source of embarrassment in June 1916. The fatidic day of the battle the admiral said famously “what is wrong with our b… ships today ?” after seeing Queen Mary blowing out. With another badly mauled and his own flagship narrowly avoiding a similar explosion, British Battlecruisers that day showed all a crucial weakness, not in protection, but in practice at that time, as revealed when the wreck of Queen Mary was rediscovered in 1991, close examination helping to solve a very long mystery about the way fire spread into the ammunition storage rooms.
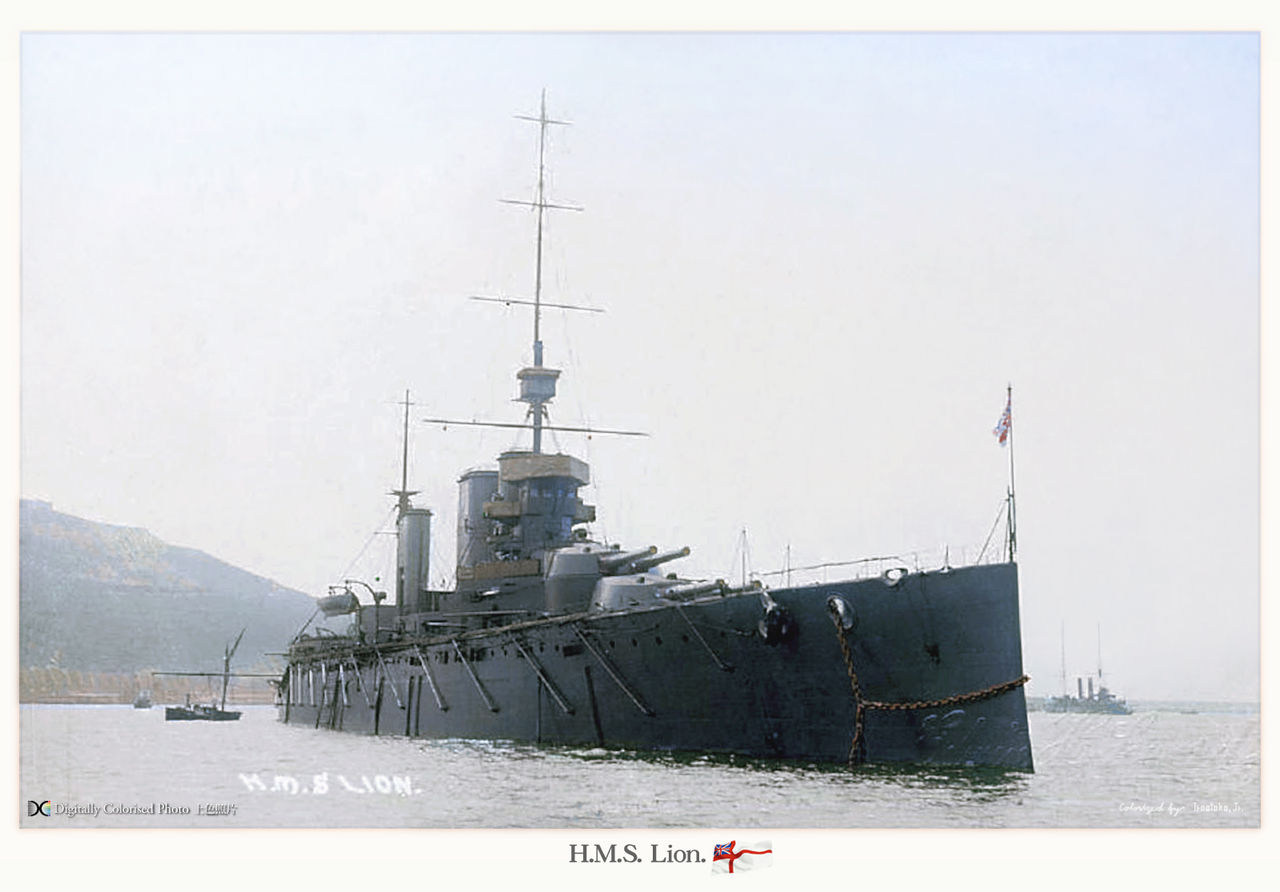
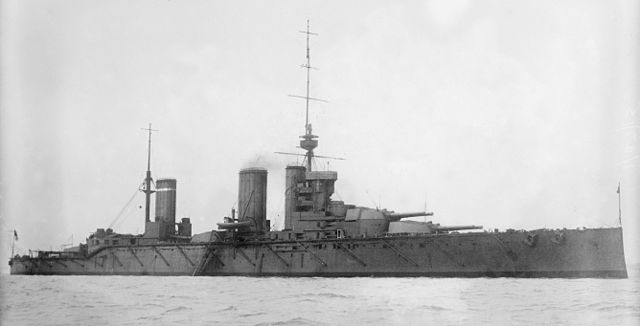
Controversy aside, the “splendid cats” were indeed magnificient battlecruisers, and capital ships at large when commissioned in 1912. Lion was the world’s first “super battlecruiser” (the term was never really officialized even in literrature, but mirroring the “super dreadnoughts”, the Orion class). The first armed with 13.5-in guns. Nothing was as fast, and she could seriously match German battlecruisers of the time: Just completing were the Moltke class, armed with ten 28 cm or 11 in guns); In short she could engage them at a greater distance and retreat at leisure. Lion was also 5,000 tonnes heavier but still four knots faster.

Development
It’s really the German naval building programme taking a sudden rise in 1907–1908 that forced H. H. Asquith’s Government under public pressure to authorise more ships for the next 1909–1910 Construction Programme. After that a single battleship and single battlecruiser were authorised in the previous one, three battleships and a battlecruiser were authorised for the next plus three more battleships and a battlecruiser in contingency. By July 1909 after both the cross fire of the admiralty and public, at last the contingency ships were announced to be built as well. The admiralty even gained the right to define its own size and power without interference in order to maintain a clear cut qualitative superiority over German dreadnoughts, which was the main trigger behind the design of the Orion class battleships, the first “super dreadnoughts”.
As for battlecruisers, it soon appeared logical to adopt the new gun caliber defined for the Orions: The Armstrong 13.5 inches (343 mm). The new battlecruisers aimed at being largely superior to the new German battlecruisers of the Moltke class then in construction as well as being a radical upgrade over the previous Invincible/Indefatigable classes. The layout, like the guns, were also a borrowing of the Orion class but with the upgaded 13.5-inch Mk V guns, all in the axis.
The previous echelon amidships configuration indeed forbade safely firing across the deck and so making any broadside a hazard at some angles. The axial configuration was allowed by the much greater hull’s lenght and dictated by the superior size and weight of the new turrets. Given the aim for speed, the beam was reduced making wing turrets totally impracticable. Director of Naval Construction at the time, Sir Philip Watts, suggested fifth turret superfiring over the rear turret by just adding three frames for an extra 12 feet (4 m) and £175,000 additional cost, but resulting in the same armament as the Orions, and 25% more firepower.
However this was not approved for various reasons. HMS Lion and Princess Royal, as well as the strongly related HMS Queen mary launched in 1912, were three ships of a new standard, breaking with the Invincible and Indefatigable series. This clearly was a radical upgrade compared to the Invincible class. Not only the new breed of battlecruiser was to be much faster, but have better armour as well, better armed and with a better, safer broadside.
This gun size forced a 40% increase in size over the previous Indefatigable class, which was quite enormous. The hull was massive, artillery was distributed in the same centerline arrangement as the Orion, but machines power was increased by 150% compared to that of Orion to match their battlecruiser specifics, making them the most powerful ships the Royal Navy ever put at sea. Despite being 29,700 tonnes fully loaded, they were no less than six knots faster than the Orions.
In short, with this design, the Admiralty placed the bar much higher for the Kaiserliches Marine to match. Indeed, the latter only swapped to the 12 in caliber for the Derrflinger class before WW1 and then directly to the Mackensen class to answer the Renown class, so with 15-in guns, bridging the caliber gap. Retrospectively, these advantages were reasuring on paper, but not proven in fact as Jutland never suceeded in confronting these battlecruisers in a fair match.
Detailed Design

Lion class on Janes 1919
Hull and general design
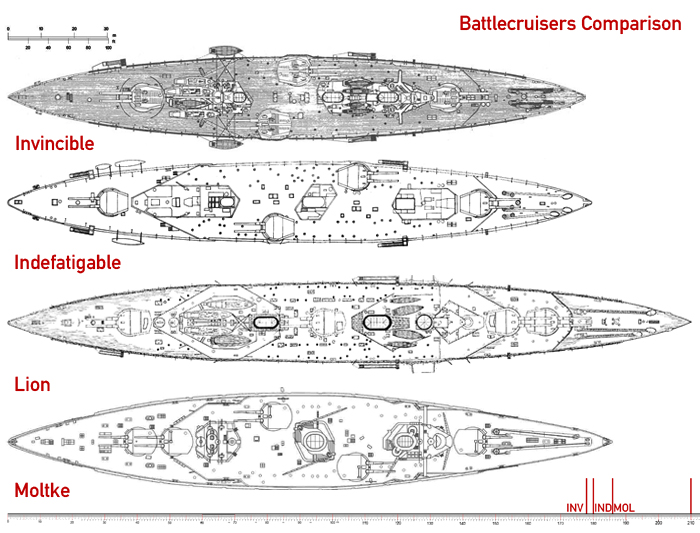
Comparison between the two early classes and HMS Lion, as well as Moltke below. Note the much stronger hull ratio of the latter especially compared to HMS Lion, tailored for speed more than for stability. She was the first closing on a cruiser ratio, she was in fact even narrower than most armoured cruisers of the time.
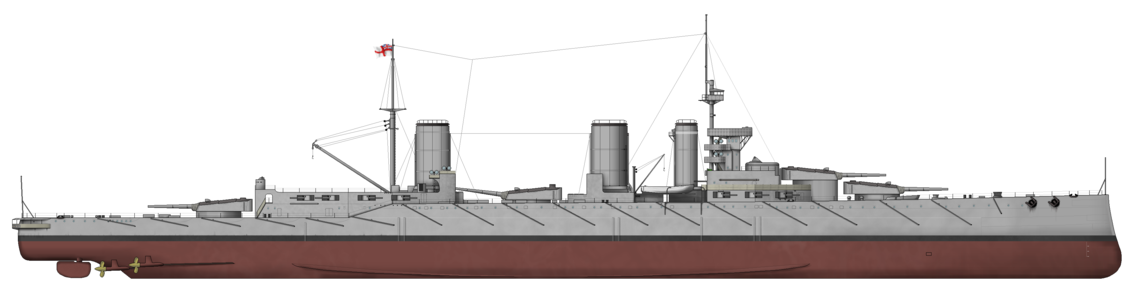
HMS Lion overall measured 700 feet (210 m), making her the largert Royal Navy ship ever built at the time, and worldwide. She was also 88 feet 7 inches (27 m) in beam (almost like the Orions) for a draught of 32 feet 5 inches (9.88 m) deeply loaded for a displacement of 26,270 long tons (26,692 t) – normal load, and 30,820 long tons (31,315 t) deeply loaded, battle ready. Compared to the Moltke class she looked enormous. Compared to the Indefatigable/Invincible, she looked much larger but also radically different in approach, and in hull design with a much more favourable ratio of 1/7.
Armour protection
Their armour protection was generally heavier than that of the Indefatigables: They used Krupp Cemented Armour for their belt, 9 inches (229 mm) thick amidships (versis 6-inch). It was tapered down to 4 inches at both ends but stopped before reaching the bow and stern, left unprotected. Their upper armour belt was 6 inches over the same section of thickest waterline armour. It was tapered down to 5 inches (127 mm) abreast both “A” and “D” turrets.
This armoured citadel was closed by 4-inch transverse bulkheads. Her protective decks used Nickel-steel armoued and was divided between a lower deck 1 inch (25.4 mm) thick (the citadel floor in effect), but reaching outside the citadel 2.5 inches (64 mm). The upper armoured deck however was at the top of the upper armour belt, and 1 inch thick. The forecastle deck varied berween 1.25 to 1.5 inches (32 to 38 mm). This formed a three layered defence towards plunging fire of around 3.5 inches at best.
The gun turrets were protected by relatively light armor (sloped though) of 9-inch for the front and sides. Their roofs received 2.5 in for nthe flat section and 3.25 inches (64 to 83 mm) forward. Barbettes below had walls also of 9 inches above the deck, then 8 inches (203 mm) below and 3 inches below it the second armor deck. The conning tower forward had 10 inches (254 mm) walls and a 3-inch roof. Its communication tube below was also 3-in thick (76 mm).
ASW protection comprised Nickel-steel 2.5 inches (64 mm) torpedo bulkheads abreast the magazines and ammunition storage spaces. The three funnel uptakes were also protected by nickel-steel, but just splinter armour 1.5 inches (38 mm) thick either side, 1 inch on their ends in between the upper and forecastle armor decks. After Jutland they received an addition 1 inch of additional armour (130 long tons) over their magazine crowns and turret roofs. In short:
- Belt: 4–9 inches (102–229 mm)
- Bulkheads: 4 inches (102 mm)
- Barbettes: 8–9 inches (203–229 mm)
- Turrets: 9 inches (229 mm)
- Decks: 2.5 inches (64 mm)
- Conning tower: 10 inches (254 mm)
Powerplant and performances
The Lion class had two inner three-bladed propellers 12 feet 3 inches (3.73 m) propellers, on shafts connected each to a Parson direct-drive steam turbine. They also had two outer shafts 11 feet 8 inches (3.56 m) propellers, also connected on the same turbines, for four sets in all. They were fed by no less than forty-two (42) Yarrow boilers (an unprecedented number) that operated at a pressure of 235 psi (1,620 kPa; 17 kgf/cm2).
This gargantuan powerplant provided 70,000 shaft horsepower (52,199 kW). However HMS Lion did not reach her designed speed of 28 knots (52 km/h; 32 mph) during her sea trials, although she reached 76,000 shp (56,673 kW). HMS Princess Royal, not from the same year, however achieved 28.5 knots (52.8 km/h; 32.8 mph). All three carried the same 3,500 long tons (3,556 t) of coal plus 1,135 long tons (1,153 t) of fuel oil used on sprayers installed in each boiler to increase the coal’s burn rate. Their raduis of action was 5,610 nautical miles (10,390 km; 6,460 mi) at 10 knots (19 km/h; 12 mph). To compare, this was a less than the Indefatigables, reaching 6,690 nmi (12,390 km; 7,700 mi) at 10 knots (19 km/h; 12 mph).
So, the Lions were not outstanding steamers, nor stable platforms, nor supremely agile due to their hull ratio, although responsible at the helm. Their motion was predictable however and if they bleed more speed in hard turns than their predecessors, they felt “at home” in heavy seas due to their famourable hull lenght, cutting and not riding the longer wavelenghts, and their metacentric height of 6 feet (1.8 m) at deep load which was reasonable. Superstructures were less extensive in height, but the hull was higher overall, making them good seaboats in heavy seas.
Armament
4×2 BL 13.5 inch Mk V gun
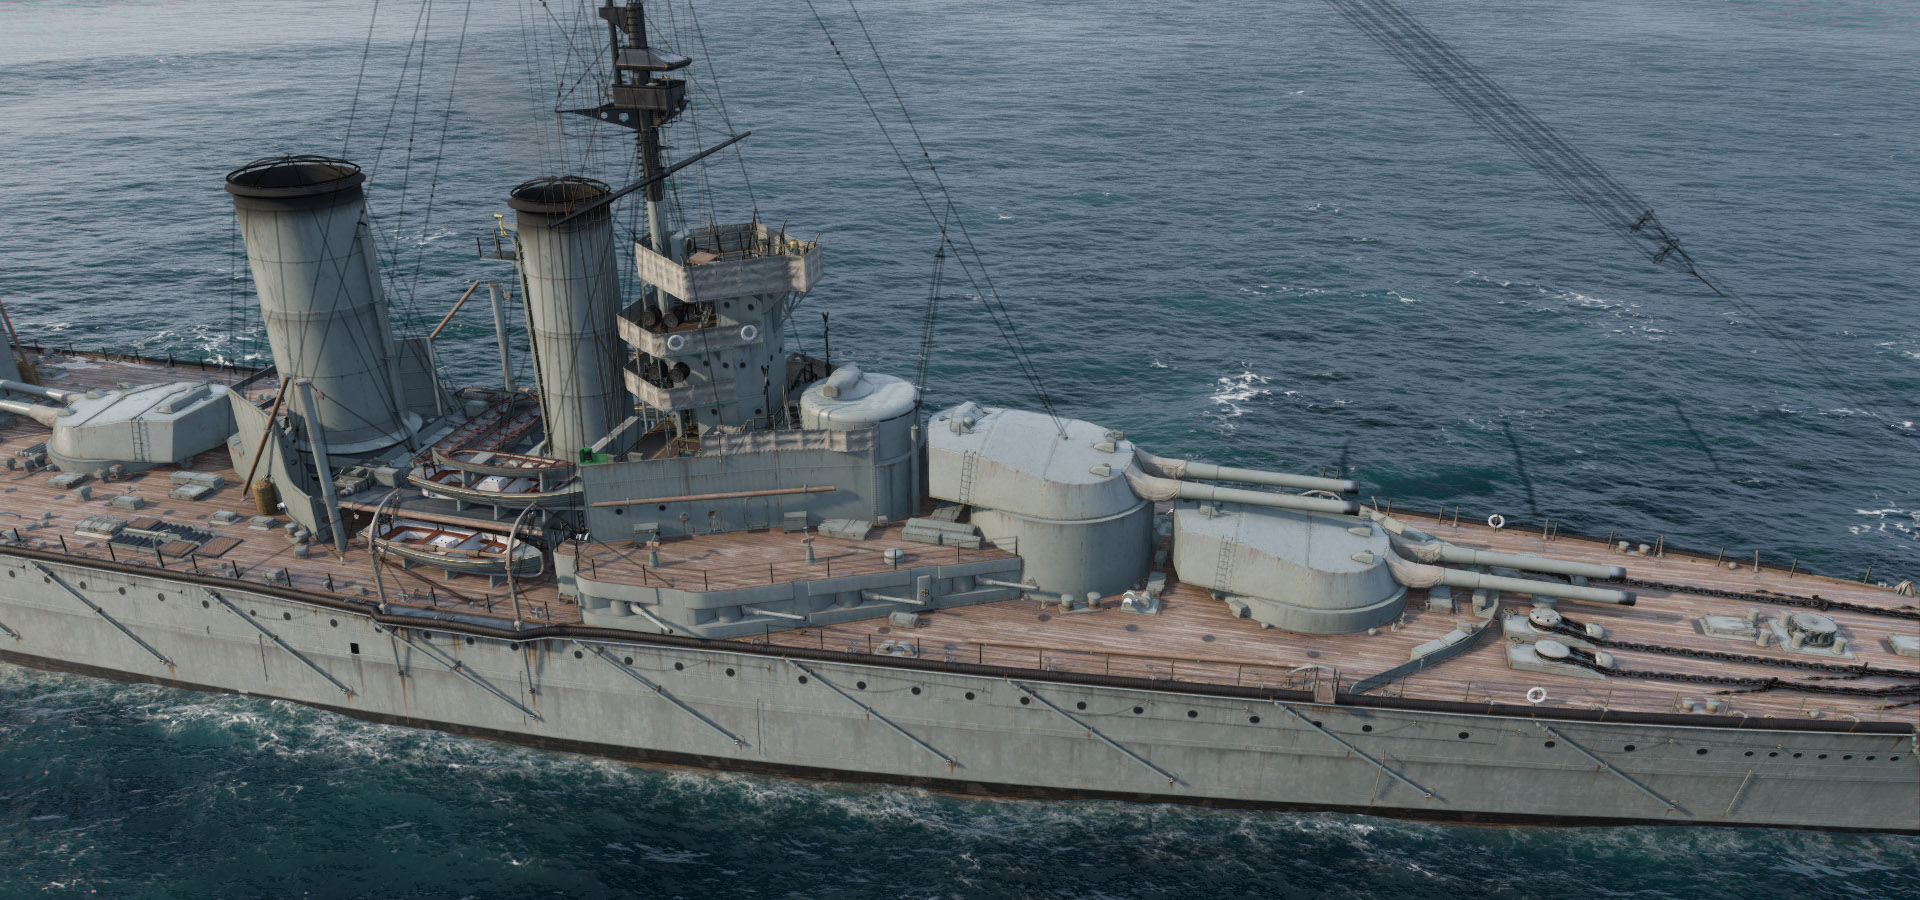
Developed in response to the unsuccesful high-velocity 12-inch Mk XI/XII the goal was to send larger and heavier shells, but at lower velocity compensating range and penetration for a heavier explosive charge. First design in 1909 and introduced on the Orion and King Georges V classes. On the three Lions, they were installed in four axial turrets, two superfiring forward, two aft with an important gap between “Q” and “Y”.
Performances-wise they fired either a high charge 1,400 lb (635.03 kg) or low charge 1,250 lb (566.99 kg) HE/AP shell. Muzzle velocity 2,491 ft/s (759 m/s) and 2,582 ft/s (787 m/s) for the H and L types. Exact caliber was 342.9 mm. Elevation 20°, traverse about 300° depending on the location. Range was 23,740-23,820 yards (21,710 m/21,780 m) at 20° for both types.
Before Jutland, their gunsights were limited to +15° until super-elevating prisms were installed in May 1916. This allowed at last a full effective fire at 20° elevation. Rate of fire was two rounds a minute, with 880 rounds in storage total in wartime, 110 shells per gun.
16× 4 in (102 mm) guns
The secondary armament comprised sixteen BL 4-inch Mark VII guns, eigh per side, all in single mounts, casemated. Maximum elevations was +15°, for 11,400 yd (10,424 m), sa about half the main artillery range. Their 31 Ibs (14.1 kg) HE shells, fired at 2,821 ft/s (860 m/s). 150 were stored per gun.
2 × 21-inch (533 mm) torpedo tubes
These two 21-inch (533 mm) submerged torpedo tubes were present on either broadside. Mark IV and later Standard Mark II*** type for capital ships, 515 lbs. (234 kg) TNT, Wet-heater, 4,500 yards (4,110 m)/45 knots or 10,750 yards (9,830 m)/31 knots for settings.
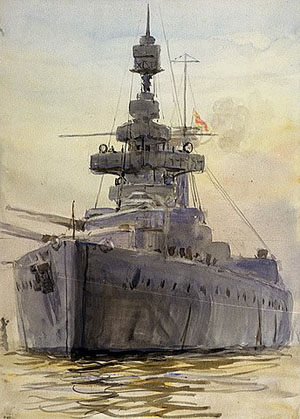
HMS Lion, IWM
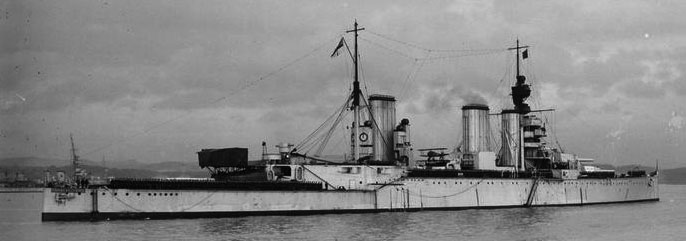
Queen : 2x 3-in Cwt AA guns
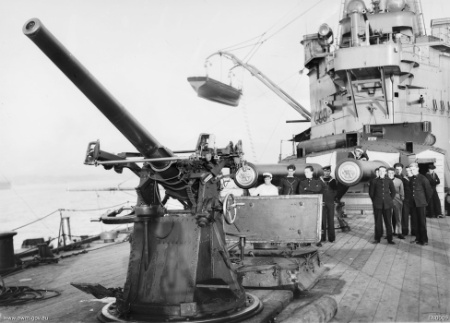
3 inches 2cwt AA guns onboard HMS princess Royal
Anti-aircraft guns were fitted in October 1914, a single QF 6-pounder Hotchkiss gun and a QF 3-inch 20 cwt. The first delivered a 6 Ib (2.7 kg) shell at 1,773 ft/s (540 m/s) and the other a 12.5 Ib (5.7 kg) shell at 2,604 ft/s (794 m/s), reaching 23,000 ft (7,010 m).
Fire Control
Main guns on all three ships were controlled by the nine-foot (2.7 m) Argo rangefinder on top of the conning tower. Data was input into a Mk I Dreyer Fire-Control Table. It was located in the transmitting station (TS) below the conning tower. There, it was converted into range and deflection data, transmitted back to the artillery officer in each turret. Target’s data was graphically recorded also on a plotting table so that the main gunnery officer predicts target moves, calculating its speed and bearing in real time. ‘B’ and ‘X’ turrets also had their own nine-foot rangefinders on their roof, acting as secondary or backup control positions.
Fire-control tech before and after the start of World War I however advanced so fast that the fire-control director on HMS Lion became the first that electrically provided gun data to the turrets via a dial pointer. The turret officer just followed this simple indication, insensitive to vibrations. The director layer aided in spotting shell splashes while calculating the effects of roll on shell dispersion. This new systemwas installed in early 1915 on Lion during repairs after the Battle of Dogger Bank, Princess Royal was fitted with it before the battle of Jutland in the spring of 1916.
Construction & Upgrades

Princes Royal and Queen Mary at Konstadt, with Andrey Pervozvannyy and Admiral Makarov in June 1914
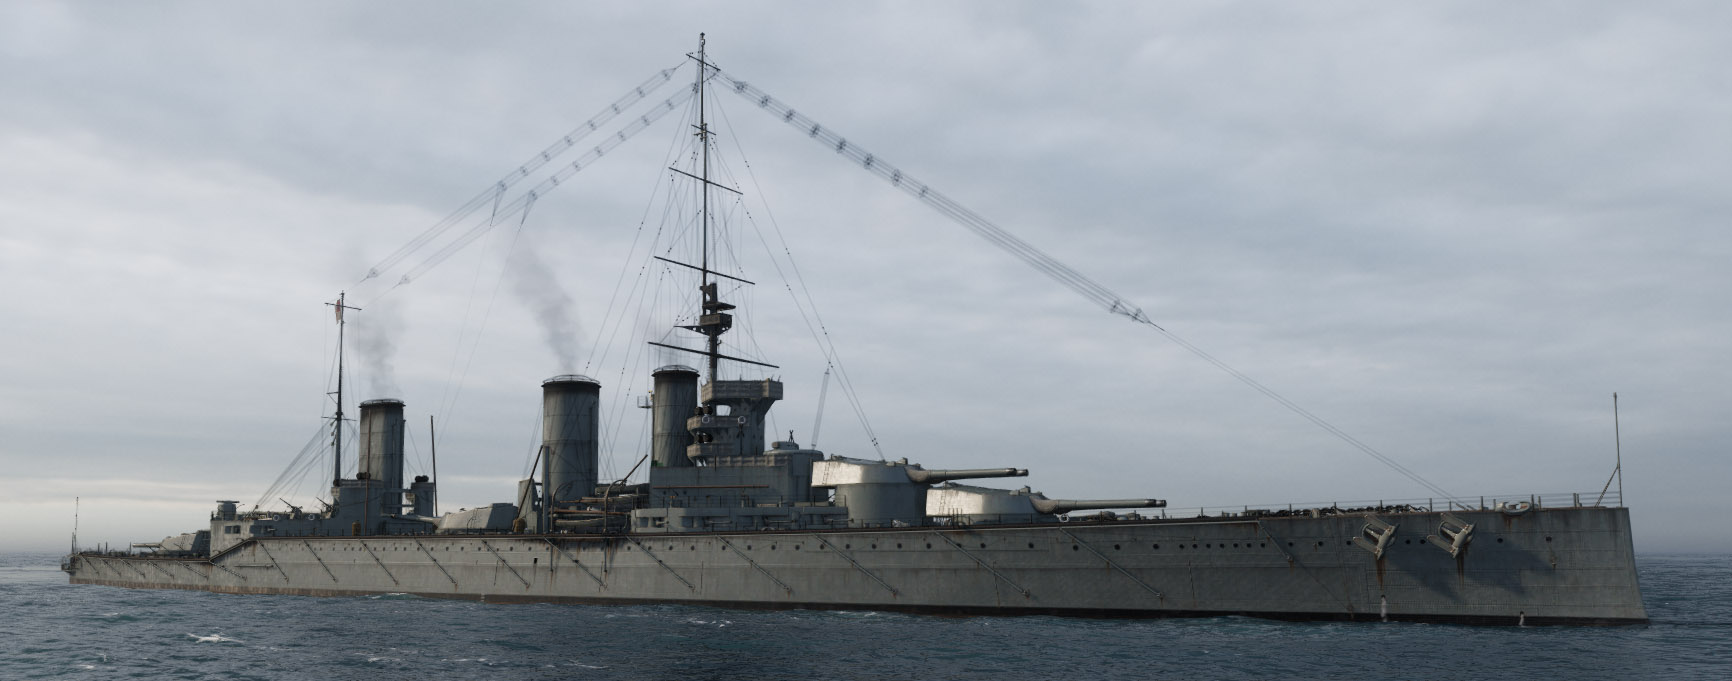
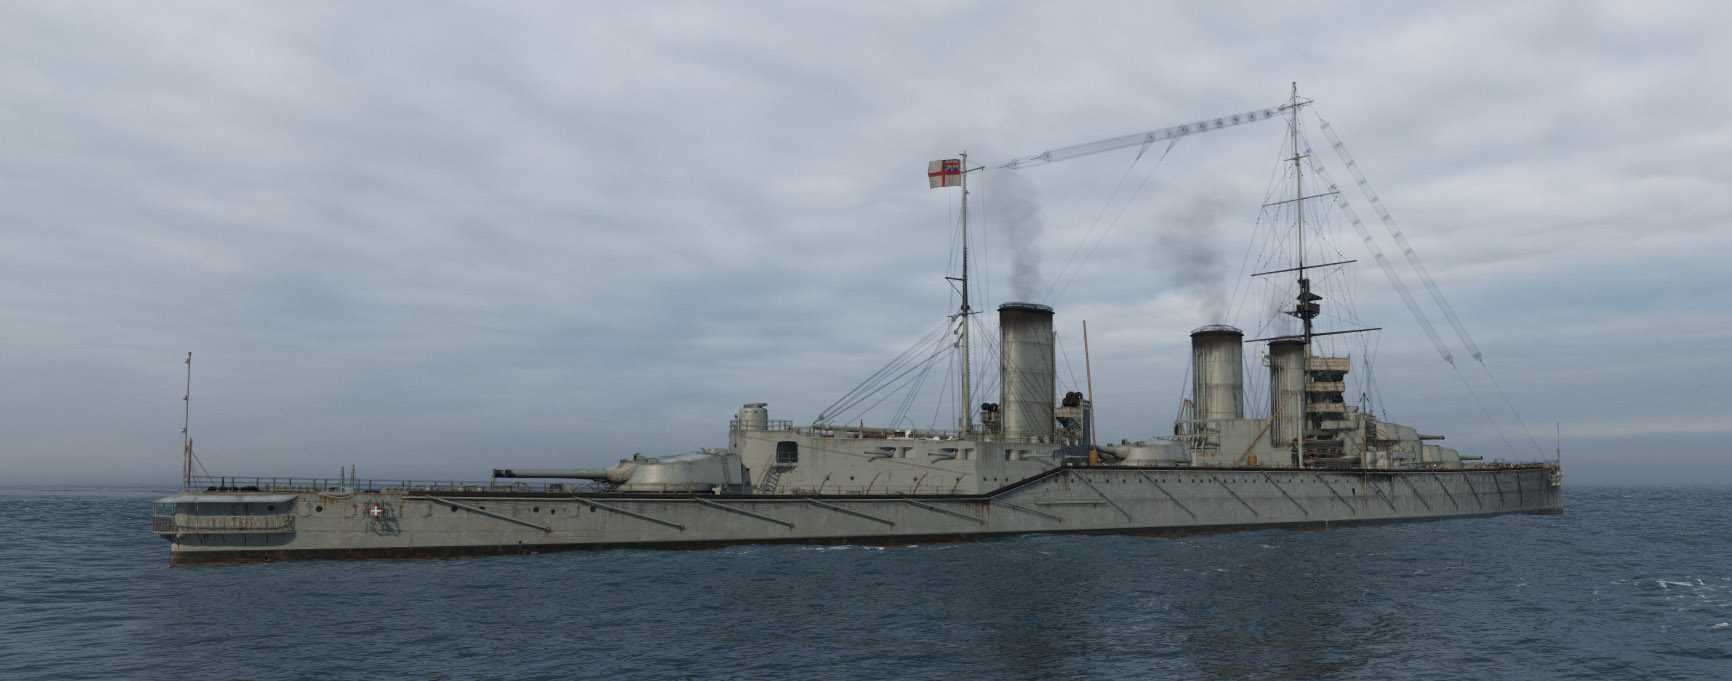
Only Lion was completed to the original design. She had her fore funnel placed between the forward superstructure and tripod foremast. This was heavily criticized later (see issues). But in effect this made all three ships different, although Queen Mary was arguably the most differet of all three. Most authors in fact separate her entirely. We do not, for the sake of simplifications.
The “three” Lions were built respectively in Devonport, Vickers and Palmers respectively were launched in 1910, 1911 and 1912, completed in 1912 and 1913 and at their acceptance into service were the largest warships in the world and the pride of the Royal Navy. Nobody then would have thought or believed a second what fate was awaiting for them. Total Cost, including armament was £2,086,458 for Lion, £2,089,178 for Princess Royal and wwww for HMS Queen Mary.
Issues and criticism
 However these ships suffered from conception issues: The central turret position combined was the placement of its ammunition bunkers and boilers between the front and stern was an error, the hull was fragile and vibrated, and they possessed woefully unprotected areas, even though the press was talking of “capital ships”, “fast battleships” which was false.
Moreover on HMS Lion, the fire direction system was placed very close to the forward funnel. This meant that hot clinkers and flue gases from boilers transformed the spotting top on the foremast completely unworkable when steaming at high speed: The upper bridge was so hot it was uninhabitable depending on the wind. The signal flags and halyards were also close to igniting. This was all completely overlooked by engineers and later rectified in HMS Princess Royal (during construction) and Queen Mary.
Modifications
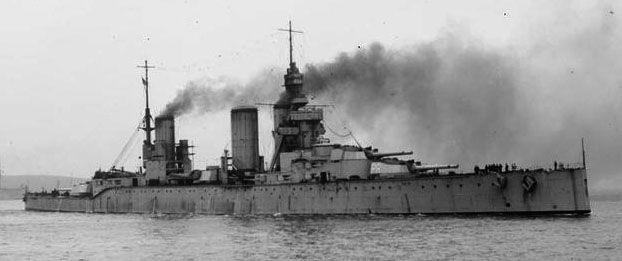
To correct these grave design shotcomings, Both Lion and Queen Mary were modified, the first before commission after her sea trials revealed the issues, and Princess Royal as fitting out for an additional £68,170. Total cost made them the most expensive capital ships ever built. In effect, the fore funnel was moved aft, and the original fore and mainmasts swapped position. The foremast was converted into a pole mast. The spotting tower aft, on the conning tower, was removed while the latter was enlarged to acccomodate a new 9 ft Argo rangefinder. Foremy on the foremast spotting top, it was relocated on the conning tower. All the funnels were raised to the same height also to better control smoke interference. Later, two 4-inch guns (forward casemates) were enclosed to protect the crews from weather and splinters. Also a second director was later added in 1918 on both battlecruisers, on the model installed in late 1915 and early 1916 for refined main gunnery calculations.
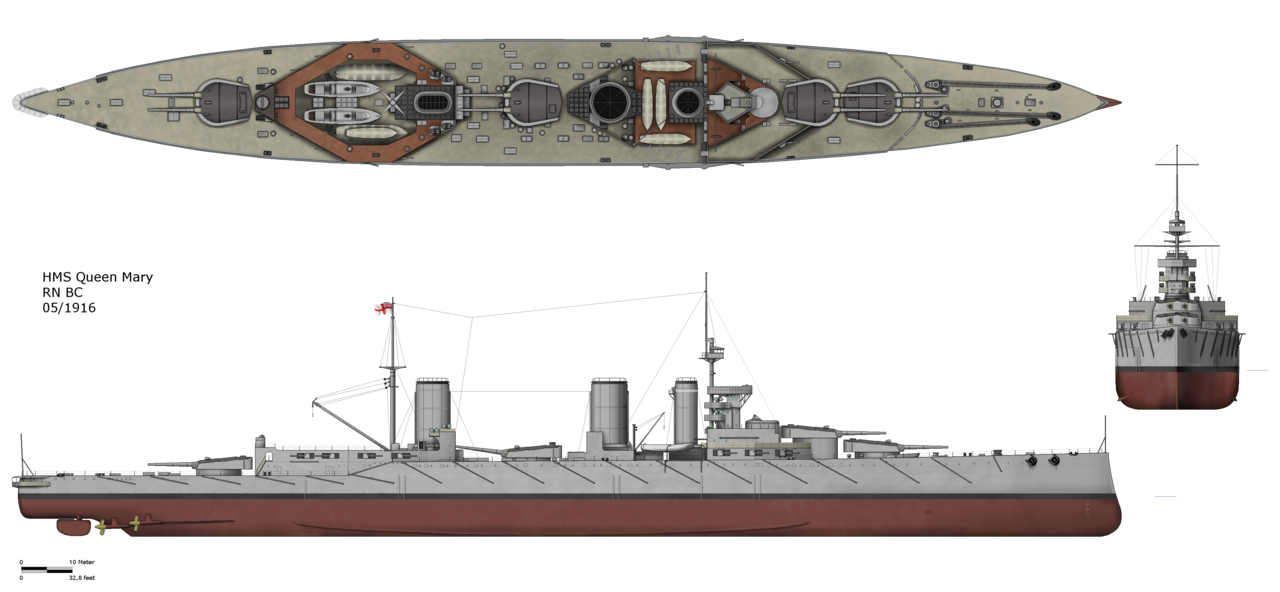
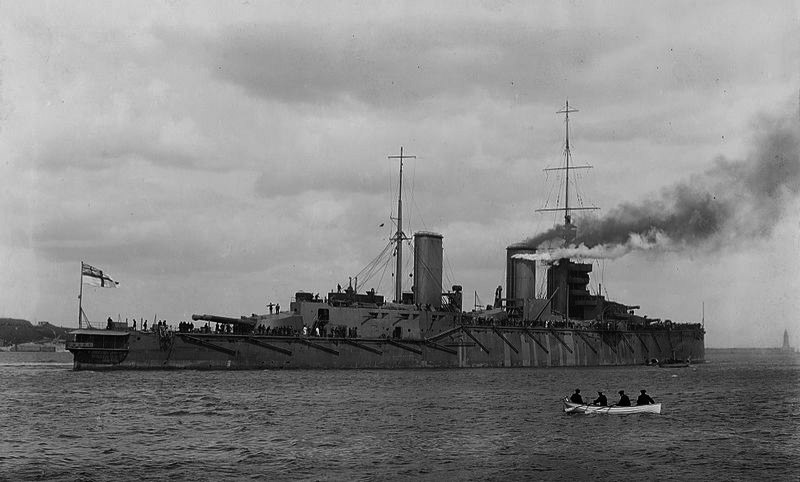
HMS Queen Mary
Queen Mary underway
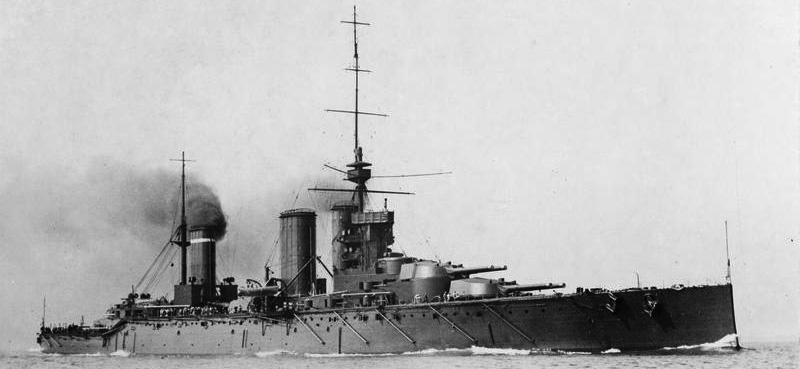
HMS Queen mary on her side was ordered at the same time as the four King George V class battleships under the 1910–11 Naval Programme, as customary of the time for proportion, always a single battlecruiser ordered per naval programme. She differed from the Lion class in her secondary armament and armour layout, as well as the location of the officers’ quarters. usually, the quarters were closer to their action stations amidships but after complaints from the officers, HMS Queen Mary was the first to restore them in the stern, the old way. She however was the first also to mount a sternwalk.
HMS Queen Mary (after Mary of Teck, wife of King George V) remained the only RN ever named so, and was overshadowed by RMS Queen Mary, a famous transatlentic liner later built. She was also a tad larger than the preceding Lion-class with 700 feet 0.6 inches (213.4 m) overall in lenght for 89 feet 0.5 inches (27.1 m) in beam and 32 feet 4 inches (9.9 m) draft deeply load. 26,770 long tons normal, rose to 31,650 long tons (32,160 t) deeply load so more than 1,000 long tons more. Her metacentric height was comparable yet smaller at 5.92 feet (1.8 m) deeply loaded. Her crew was a bit larger, 997 officers and ratings in wartime and 1,275 at the time of the Battle of Jutland. She was the last completed of the trio, followed by a revised design, leading to HMS Tiger for the next program, last of the “splendid cats”.

HMS Lion damage to Q-turret 1916
This pride turned into propaganda at the beginning of the war, the press exaggerating also their speed figures (alleged peaks of 34 knots) when actually it was only possible on trials for very short periods, and wearing their boilers red hot (to reach a staggering 90,000 hp). In reality, speed remained in service under 28,1 knots. These “beautiful cats” were adored by the press, after askined for such vessels for so long to the Asuith’s government. Despite teething problems, they were naturally always at the forefront of the action in 1914-18. During the war their AA artillery was improved, their mast became tripod again and firing range extended, while their torpedo nets were removed altogether.

Lion class battleship Jane’s Fighting Ships 1919
Battlecruiser Queen Mary, 1916, author’s old illustration.
Lion & Princess Royal specifications |
|
| Dimensions | 213,4 x 27 x 8,4/9.9 m (700 x 88 ft 6.75 in x 32 ft 5 in) |
| Displacement | 26,270 t, 29,690 t FL |
| Crew | 997 |
| Propulsion | 4 screws, 4 Parsons turbines, 42 Yarrow boilers, 70,000 hp |
| Speed | 27 knots () |
| Range | |
| Armament | 8 x 343 (4×2), 16 x 102, 4 x 37, 2 TT 533 mm (side SM) |
| Armor | Belt 230, Battery 230, Barbettes 230, turrets 250, blockhaus 250, decks 65 mm. |
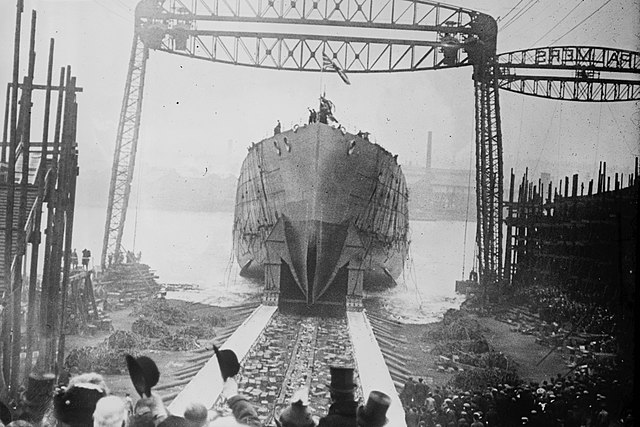
Launch of Queen Mary
HMS Queen Mary Specs. |
|
| Dimensions | Beam 27.2 m () |
| Displacement | 26,770 t, 31,650 t FL |
| Crew | 997/1275 |
| Propulsion | 4 screws, 4 Parsons turbines, 42 Yarrow boilers, 70,000 hp |
| Speed | 27 knots () |
| Range | |
| Armament | 8 x 343 (4×2), 16 x 102, 4 x 37, 2 TT 533 mm (side SM) |
| Armor | Belt 230, Battery 230, Barbettes 230, turrets 250, blockhaus 250, decks 65 mm. |
The Lion class in combat: General assessment
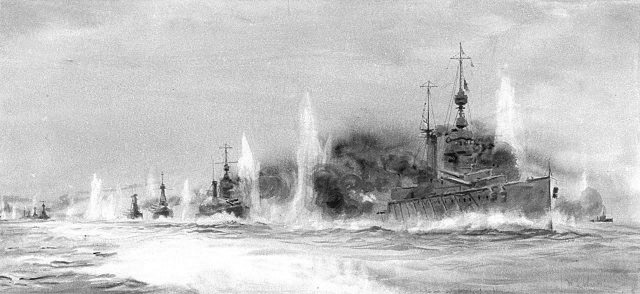
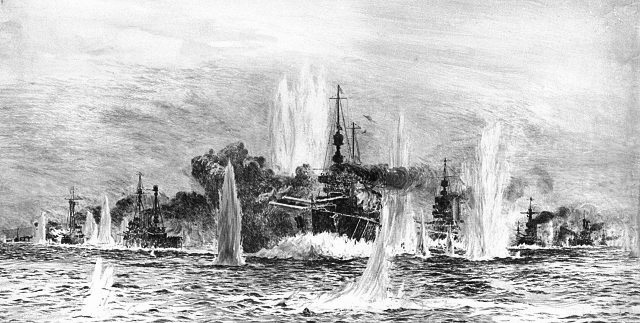
The Battlecruisers of the 5th BCS at Jutland, 31 May 1916
Lion was part of the 1st battle cruisers squadron (Counter-Admiral Beatty) in 1914. She took part in the Heligoland Bay battle in August 1914 then to the Dogger bank action in 1915, claiming three hits but also conceding three with serious consequences: Stopped dead in the water after its machines were shut down (port turbines damaged) she had to be towed to Rosyth by the Indomitable. Repaired, she became flagship of the fleet and had its moment of truth at Jutland in may 1916.
Willy Stoewer, HMS Lion at the Dogger Bank
She took no fewer than 13 hits from SMS Lützow. She escaped certain destruction by the heroism of the only surviving officer stayed behind inside the bunker, mnually opening valves and preventing an explosion, although badly injured and burned, by ordering through the intercom to drown this section (and drawned with other survivors as a consequence). Lion joined with great difficulty Rosyth and undergone comprehensive repairs. She returned at sea in September. She then made numerous trips until the armistice under the command of counter-Admiral Pakenham. She was decommissioned in 1924 following the Treaty of Washington, paid off and BU.
Princess Royal became flagship of the 1st squadron of battle cruisers in 1914. She fought at Heligoland, was sent to the Far East to intercept Von Spee’s pacific squadron, then came back to the North Sea to participated in the Dogger bank engagement, without damage. However in May 1916 this was not the same music anymore. Targeted by concentrated and accurate fire from Derrflinger, Markgraf and Posen, she took eight hits and had to drown her ammunition bunkers to avoid the fire trigerring yet again an explosion (the fate suffered by the Queen Mary). Despite being still operational and remaining so until the end of the battle with part of her artillery useless she escaped. From Rosyth, she still did a number of missions before disarmament in 1922.
HMS Queen Mary was slightly faster and heavier but was completed August 1913 due to strikes and social troubles in the yard. Nonetheless, she passed her tests successfully, and joined Beatty’s first squadron for the duration of the war. She took part in the Heligoland bay action, but not the Dogger as being in overhaul at that time. At Jutland she fired about 150 rounds to the Seydlitz, and was attacked by the Derrflinger. The latter responded with a shot in here third turret. Another shell fell, following the same path the same turret, making the jump even though a second made its transition to the ammunition bunkers turrets before. The result was a terrifying explosion that vaporized the entire front, including the footbridge. The ship sank slowly forward while burning inside, with new explosions before sinking with almost all hands 38 minutes after the start of the battle.
Links/Src
Books
Specs Conway’s all the world fighting ships 1906-1921.
Burt, R. A. (2012). British Battleships of World War One (2nd ed.). Annapolis NIS
Campbell, N. J. M. (1978). Battle Cruisers. Warship Special. Vol. 1. Conway Maritime Press.
Friedman, Norman (2011). Naval Weapons of World War One: Guns, Torpedoes, Mines and ASW Weapons of All Nations Seaforth Publishing.
Marder, Arthur J. (1978). From the Dreadnought to Scapa Flow, The Royal Navy in the Fisher Era, 1904–1919. Vol. III: Jutland and After, May 1916 – December 1916. Oxford University Press.
Marder, Arthur J. (1970). From Dreadnought to Scapa Flow: The Royal Navy in the Fisher Era, 1904–1919. Vol. V: Victory and Aftermath (January 1918 – June 1919). Oxford University Press.
Massie, Robert K. (2003). Castles of Steel: Britain, Germany, and the Winning of the Great War at Sea. New York: Random House.
Parkes, Oscar (1990) [1966]. British Battleships, Warrior 1860 to Vanguard 1950: A History of Design, Construction, and Armament (New & rev. ed.). Annapolis NIS
Preston, Antony (1985). “Great Britain and Empire Forces”. In Gray, Randal (ed.). Conway’s All the World’s Fighting Ships 1906–1921. Annapolis NIS
Roberts, John (1997). Battlecruisers. Annapolis, Maryland: Naval Institute Press.
Tarrant, V. E. (1999) [1995]. Jutland: The German Perspective: A New View of the Great Battle, 31 May 1916. Brockhampton Press.
Links
Lion class BCs on wikipedia
On historyofwar.org
On nationalarchives.gov.uk
The Lion class at Jutland – britishbattles.com
iwm.org.uk
worldwar1.co.uk
British and German Battlecruisers by Michele Cosentino (Author), Ruggero Stanglini (Author)
dreadnoughtproject.org
calculator hull ratio/speed
Videos
Launch of HMS Lion, 1910
Lion class guide – Drachinifel
HMS Tiger (1913) – Not Exploding on the Job – Drachinifel
3D renditions


Model kits
On scalemates (all kits)
Kombrig 1/700 Lion
1:700 NNT Modell+Buch Queen Mary
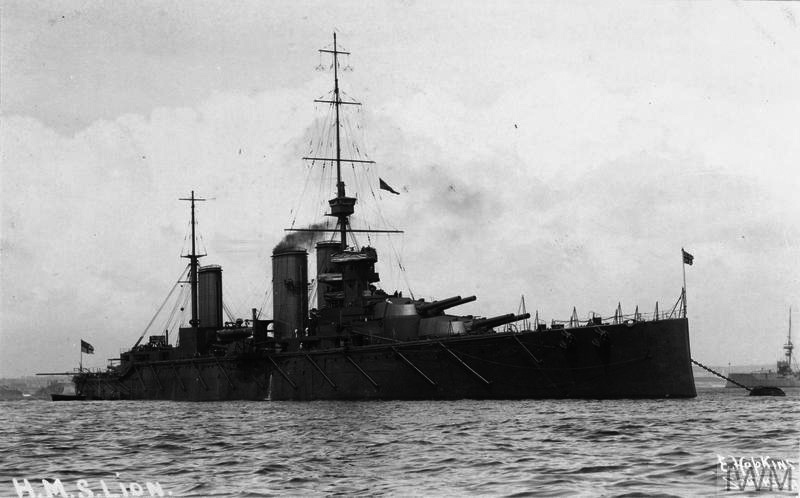
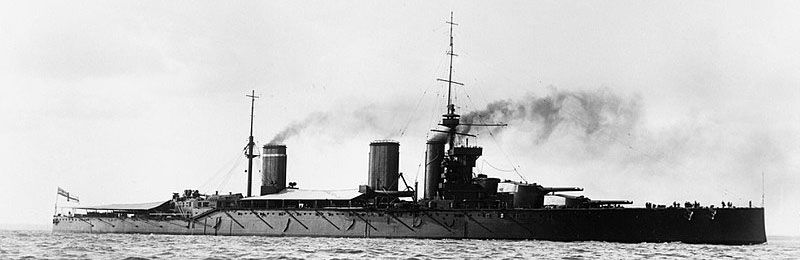
HMS Lion
HMS Lion, colorized by Irootoko Jr.
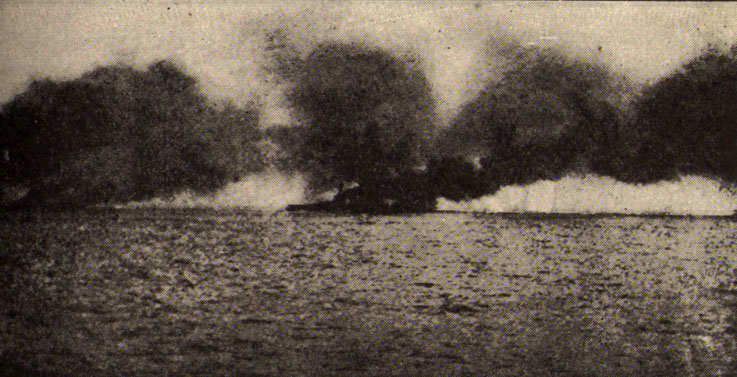
HMS Lion hit at Jutland
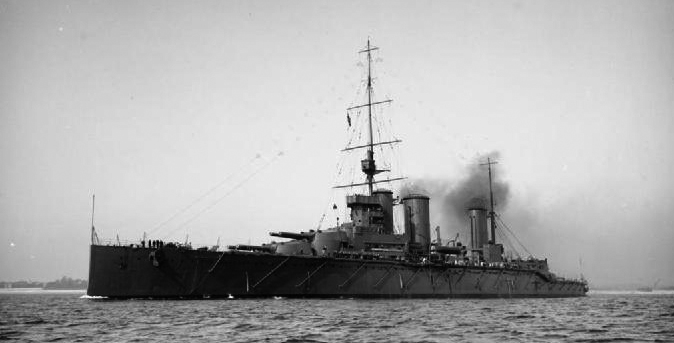
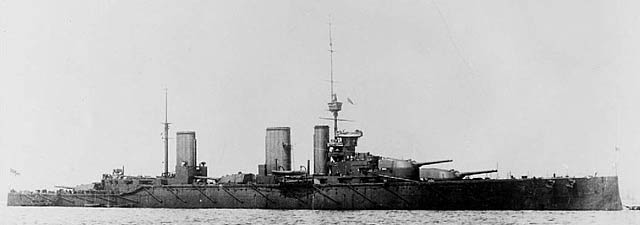
Lion was laid down at the Devonport Dockyard, Plymouth, on 29 November 1909. She was launched on 6 August 1910 and commissioned on 4 June 1912. She became flagship of the 1st Cruiser Squadron, later renamed the 1st Battlecruiser Squadron (“1st BCS”) for more clarity in January 1913 with Rear Admiral David Beatty assuming command on 1st March (and until 1916). HMS Lion visited with its squadron Brest harbour in France (Britanny) in February 1914 and started a long trip via the Skagerrak to Russia in June 1914, where the officers entertained the Russian imperial family aboard, in Kronstadt.
Battle of Heligoland Bight
 When the war broke out, the squadron was back from Russian training in the north sea. The first action of the lead vessel was the Battle of Heligoland Bight on 28 August. At first a distant support for cruisers and destroyers closer to the German coast, they stayed ready to pounce in case the Hochseeflotte would make a mass sortie.
Turning south at full speed at 11:35 as the light forces failed to disengage on schedule, German capital ships now cleared the bar in the Jade Estuary with the rising tide. HMS Arethusa badly mauled by Strassburg and Cöln when surprised by Beatty’s battlecruisers coming from the mist at 12:37. Strassburg escaped by but Cöln was crippled, and later the light cruiser Ariadne; Lion dealt with her in three salvos at close range, around 6,000 yards (5.5 km). At 13:10 Beatty turned north and signalled the general withdrawal, stumbling on Cöln and finishing her off by HMS Lion.
Raid on Scarborough
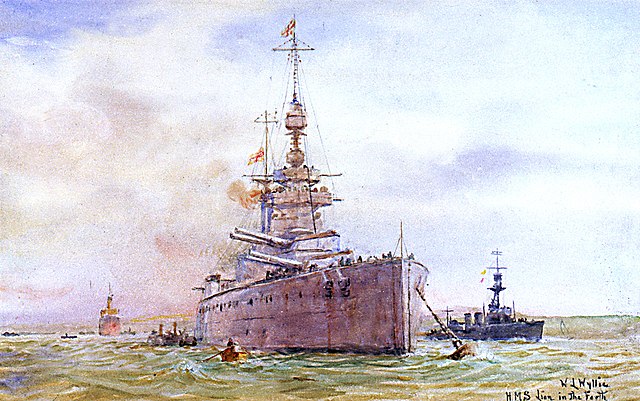
Lion warming up in the firth of forth
The Kaiserliches Navy launched her first raid on British towns in order to draw a portion of the Royal Navy’s capital ships (in that case, the 1st BC was the first to come out), in order to be caught by the main fleet and destroy peacemeal. The same tactic was applied again and again until Jutland. The “bait” was made of the German opposite of the 1st BC, Von Hipper’s own battlecruisers force. The Raid on Yarmouth on 3 November being successful, a larger operation was lef by the German Battlecruisers covered by the Hochseeflotte’s dreadnoughts stationed east of Dogger Bank. However the naval codes being broken, the RN devised a plan to catch the raiding force on its return journey. Beatty’s 1st BCS (four battlecruisers led by HMS Lion) teamed up with VADM Sir George Warrender’s 2nd Battle Squadron (six fast dreadnoughts) detached from the Grand Fleet ware waiting for an order.
British destroyers met German destroyers at 05:15 and Warrender was informed at 05:40 but not Beatty. Later HMS Shark spotted KMS Roon and her escorts at 07:00, the info arriving at 07:25. Warrender again was informed, not Beatty despite the BC HMS New Zealand was relaying these messages. At the end, Beatty reversed course when he at last got the message, dispatched HMS New Zealand to search for Roon, then rejoin the squadron and turned west for Scarborough while British forces split to search Southwest of the Dogger Bank, Beatty’s ships going northwards, Warrender south, leaving a 15-nautical-mile (28 km) gap between them and minefields.
At past midday, HMS Southampton spotted KMS Stralsund and signalled it to Beatty which turned his battlecruisers towards the position, presumed she was part of Hipper’s screen. The 2nd Light Cruiser Squadron screening Beatty was sent in wide search but a misinterpreted signal send them back to their screening positions. The confusion allowed the German light cruisers to escape while informing Hipper and he in turn, escaped. The battle was at a result, a failed occasion on both sides.
Battle of Dogger Bank
On 23 January 1915, Hipper’s German battlecruisers sortied to clear the Dogger Bank of British small craft collecting intel on German moves, but their messages were interecpted a Beatty was soon at sea to intercept them. Contact was mader at 07:20 on the 24th as HMS Arethusa spotted SMS Kolberg. At 07:35 Beatty’s force was spotted and Hipper turned south. Beatty meanwhile ordered full speed if practicable all the way, before the Germans could escape.
HMS Lion led the pack followed by Princess Royal and Tiger at 27 knots, opening fire at 08:52 from 20,000 yards (18,000 m) but achieving little between extreme range and bad visibility, although SMS Blücher, slower, was hit at 09:09. German battlecruisers tried to defend her for a few minutes later from 18,000 yards (16,000 m) and concentrated in HMS Lion. She was hit at 9:28 on the waterline. Blücher also hit ‘A’ turret, blowing the roof up. For two hours she lost the turret.
At 09:35 Beatty signalled ‘Engage the corresponding ships in the enemy’s line’ but cinfusion led SMS Moltke to be left unengaged, continuing to fire at Lion unempeded. Lion at least had good hit in Seydlitz’s rear barbette, creating a massive fire killing 159. The latter send a 283-millimetre shell in Lion’s 5-in armour aft, creating a hole flooding her low power switchboard compartment and knocking her dynamos out. SMS Derfflinger hit Lion at 10:18 with 12 in shells on her port side, again below the waterline. Captain Ernle Chatfield thought she had been torpedoed due to the scheck.
She had another 30-by-24-inch gash, while several compartments were flooded around the torpedo room, she had a hole in the exhaust pipe, capstan engine, contaminating the auxiliary condenser. The other bend and displaced plating in a 2 feet (0.61 m) gap, flooding lower coal bunkers. At 10:41 another shell hit ‘A’ barbette, starting a fire in her turret lobby, quickly put out and the magazine flooded. She took other shells in quick succession, one piercing the 9-inch armour belt abreast the engine room, causing another large gash in the armour plate, rupturing her port engine’s feedwater tank. At 10:52 after 14 hits and taking 3,000 long tons of seawater she started listing 10° to port, speed falling. Hr port engine stopped and she ended crawling at 15 knots (28 km/h; 17 mph).
Meanwhile SMS Blücher was also crawling, in fire, at 17 knots, steering gear jammed. Beatty ordered Indomitable to finish her off at 10:48. A submarine periscope was believed spotted and Beatty ordered a 90° turn to port to avoid the submarine, failing to launch to the others the ‘Submarine Warning’ flag. She also lost her remaining dynamo and soon lost all light and power. The last orders were ‘Course Northeast’ at 11:02 and ‘Attack the rear of the enemy’ confusing RADM Sir Gordon Moore aboard HMS New Zealand, believing he had to stop the pursuit and engage Blücher. Beatty’s signals next were lost in the bad visibility and smoke as he fell from its initial position.
Lion’s starboard engine being shut down and cleaned, it was restarted so she could get back home at 10 knots, followed by the other battlecruisers, which caught her at 12:45. In the end, Lion fell to 8 knots and she was taken in tow at 15:00, but ot took two hours and she eventually arrived after her starboard engine was temporarily repaired. She was quickly repaired at Rosyth with timber and concrete to proceed to Newcastle upon Tyne and Palmers yards for a comprehensive drydock repair.
She rejoined the Battlecruiser Fleet as flagship on 7 April 1945, being replenished of 243 rounds she spent in that battle with only four hits for her credit: On Blücher, Derfflinger, and Seydlitz. For her 14 hits taken, she deplored however only one killed and 20 wounded. The rest of the year was mostly uneventful, as the spring of 1916.
Battle of Jutland
On 31 May 1916, HMS Lion was again Admiral Beatty’s flagship. After decoding German radio messages showing the Germans were at sea again, Hipper’s battlecruisers first, the later spotted Beatty’s own battlecruisers to their west at 15:20, but it took ten minutes for Beatty to spot them in turn. Hipper made manoeuvers ensuring her was falling back on the High Seas Fleet, just 60 miles (97 km) behind. Beatty altered course assuming he was still too far north to cut off Hipper.
The started the famous “Run to the South”, Beatty changing course east-south-east at 15:45, parallel to Hipper and closing to 18,000 yards (16,000 m), whike fire broke at 15:48, Lion and Princess Royal at the lead. The German fire was accurate whikle the British overestimated their range in the haze. Lion engaged her opposite, SMS Lützow, but the latter’s fire was very accurate, Lion being hit twice rapidly.
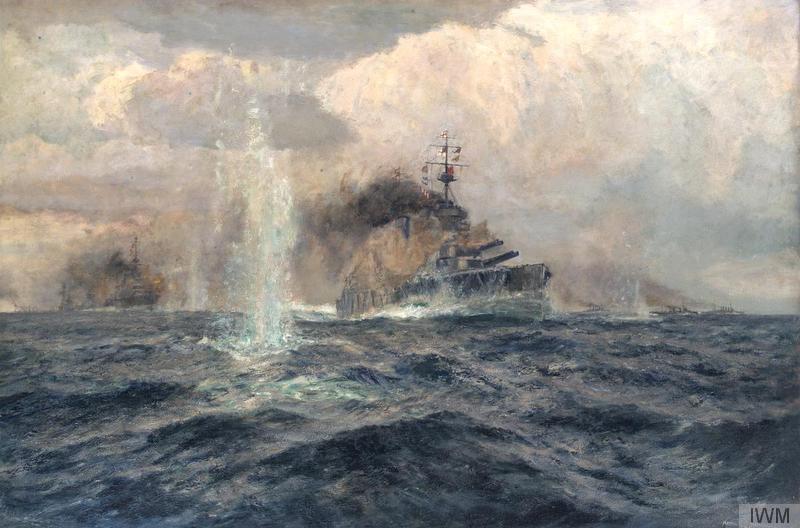
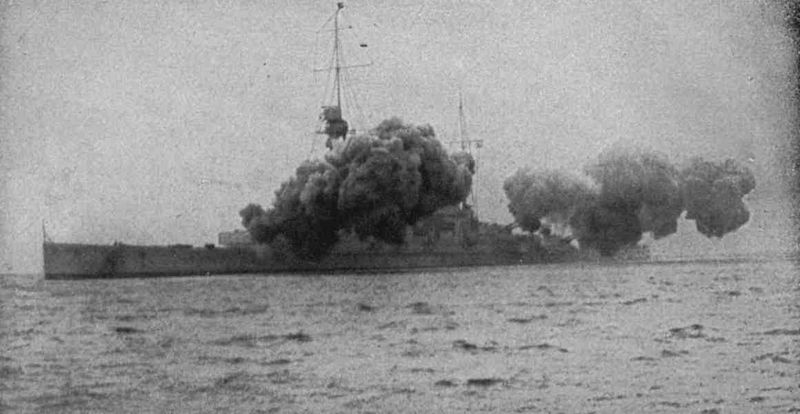
At 15:54 the range fell 12,900 yards and Beatty ordered 2 points starboard to open up the, capitilizing on its greater artillery range. Lion hit Lützow and was hit in return at 16:00, her ‘Q’ turret being penetrated in the joint between the faceplate and roof, detonating over the left-hand gun, blewing the front roof plate and center faceplate. Everyone aboard was killed or badly wounded instantaly while a fire progressed into the magazine, stopped by the closed doors and magazine flooded. Still eight full propellant charges in the turret burned violently, ravaging the entire turret basket. Royal Marine Major Francis Harvey in fact was the one shutting down manually the magazine, posthumously awarded the Victoria Cross. If failing to do it, Lion would have blown up and probably gave the Kaiserliches Marine the clear-cut victory looked for.
Lion besides Queen Mary, blowing up
At 16:11 Lion observed a torpedo fired by Moltke passing astern, believing it came from an U-boat, confirmed when Landrail reported a periscope. Beatty altered course four points to close at 16:12 and 16:15 so Lützow was again hit at 16:1 but hit Lion in return before the smoke and haze from these hits stopped the excnange; Instead she targeted HMS Queen Mary at 16:16 and at 16:25 while now just 14,400 yards (13,200 m) close, Beatty ordered 2 points starboard to open range, but Queen Mary had her forward magazines exploding and rapidly sinking.
At 16:30 HMS Southampton spotted the Hochseeflotte arriving at high speed, first the screen, and Scheer’s lead battleships, but crucially waited 5 min. before sending the message to Beatty. The latter awaited confirmation before truning 16 point turn starboard. Lion received two more hits during her ‘Run to the North’, always at full speed, and staying out of range. After a new turn north-northeast he tried to reach the Grand Fleet. At 17:40 the line sighted and fired at the German battlecruisers again, on a setting sun blinding German gunners.
The latter turned northeast at 17:47 while Beatty at last joined Jellicoe’s Grand Fleet in battle formation, taking its screening position ahead of it, but messed the manoeuvre, forcing the leading division to move away to avoid collision and sail eastwards, away from the Germans. By 18:35 Beatty was behind the 3rd BCS going east-south-east and leading the Grand Fleet, still spotting at time German battlecruisers to their southwest. Scheer ordered a starboard turn and contact was lost, and by 18:44 he turned southeast, then south-south-east in hot pursuit. Her gathered the two remaining vessels of the 3rd BCS to beef up his forces while staying close to the Grand Fleet. HMS Lion’s gyrocompass failed at that time, so she started a complete circle and lost her position. At 18:55 Scheer turned againa way from the Grand Fleet, the latter managing to cross it’s T, allowing to pound Scheer’s lead ships.
German battlecruisers were spotted again at 8,500 yards (7,800 m), engaged first by HMS Inflexible at 20:20, followed by the rest of Beatty’s vesels. They later spotted Pre-dreanoughts and hit some before returning in the haze around 20:40. Lion reached Rosyth on 2 June 1916 in the morning and started repairs, going on until 19 July. ‘Q’ turret and its barbette and well, ammo stores, were removed entirely, not replaced for a while. In between she had been hit 14 times, having 99 dead and 51 wounded, firing herself some 326 rounds; claiming three on Lützow, on on Derfflinger. She fired all her torpedoes without success. The latter fact was sufficient to have the admiralty deleting torpedo tubes from capital ships from then on.
Later years
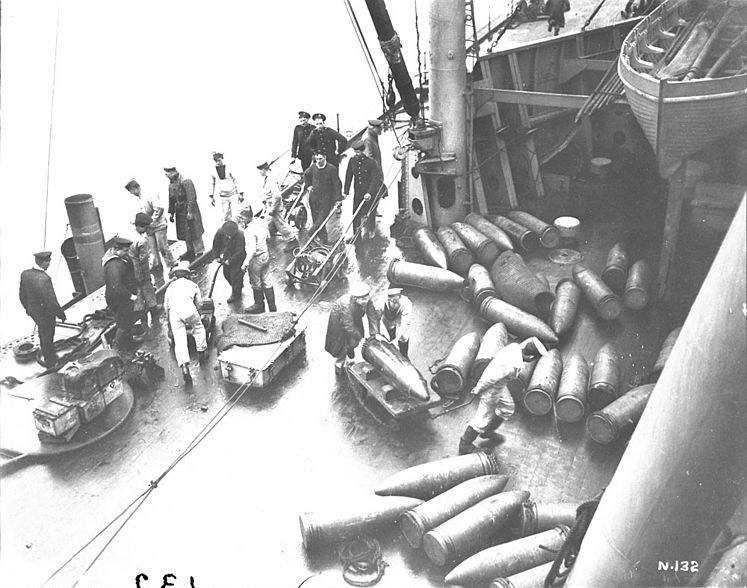
Loading shells aboard 1917
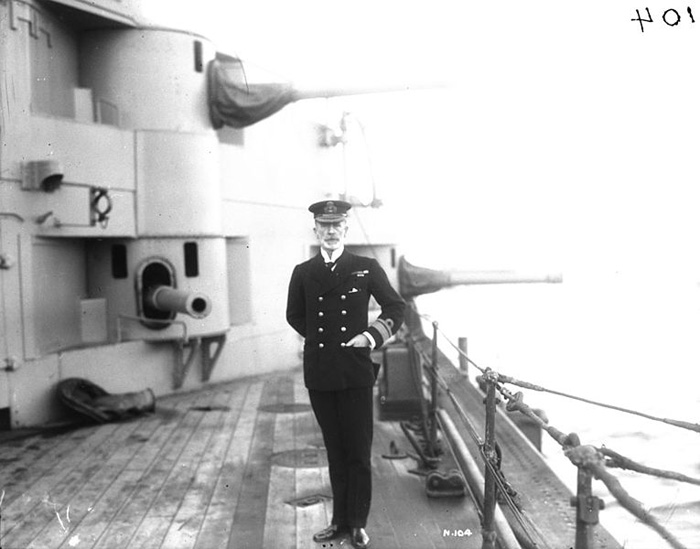
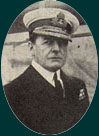
Rear-Admiral William Pakenham aboard his flagship HMS Lion, February 1917
Back with the Battlecruiser Fleet, still as flagship on 19 July 1916, and still without her ‘Q’ turret, she made a refresher training course. Her turret was eventually replaced in Armstrong Whitworth, Elswick on 6-23 September, using normal spares. On 18 August the Grand Fleet sortied based on a Room 40 reported a German sortie by night to bombard Sunderland. The Grand Fleet totalled at the time 29 dreadnought and six battlecruisers, but conflicting intelligence had the fleet missing Scheer.
When Beatty was promoted at the head of the Grand Fleet, HMS Lion became flagship of VADM W. C. Pakenham, in December 1916. The rest of her wartime career was pretty uneventful, making a few North Sea patrols and supported light forces during the Second Battle of Heligoland Bight (17 November 1917). The 1st BCS also tried to intercept in vain a sortie to harrass the convoys to to Norway, but missed the German cruisers. There was another sortie on 23 March 1918 for another such sortie against a Norway convoy, but again the Germans escaped. She guarded the Hochseeflotte all the way up to Scapa Flow’s internement zone on 21 November 1918. Reassigned to the Atlantic Fleet in April 1919, she made some training and was placed reserve in March 1920. Kept during negociations for the Washington treaty, she was eventually paid off on 30 March 1922. At the time, many in the parliament and Navy wanted her saved as a memorial, but she was sold for BU on 31 January 1924.
HMS Princess Royal
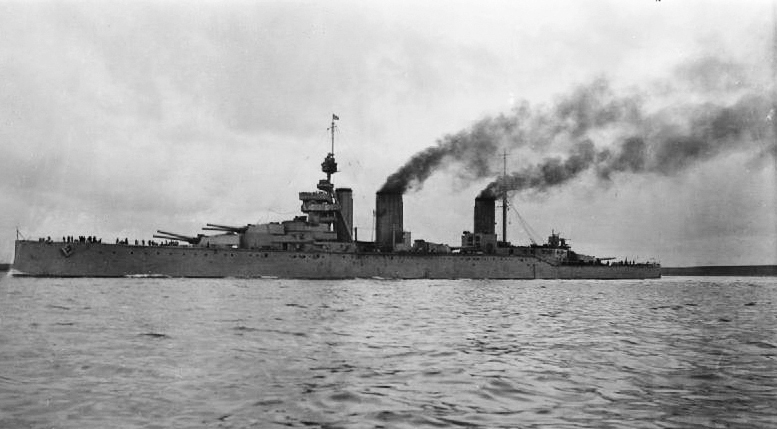
HMS Princess Royal, colorized by Irootoko Jr.

HMS Princess Royal
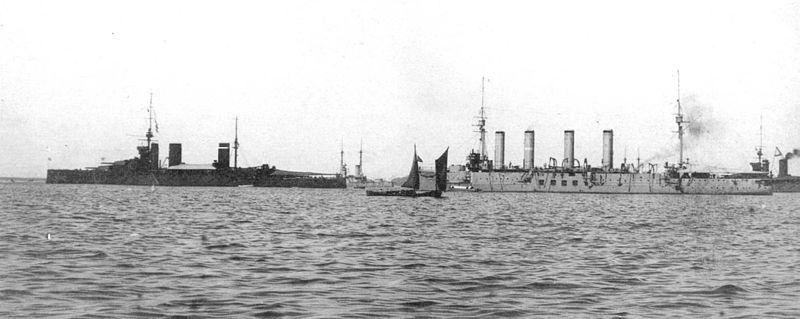
Princess Royal, Andrey Pervozvannyy, Admiral Makarov & Queen Mary in Kronstadt
Upon commissioning, HMS Princess Royal was assigned to the 1st Cruiser Squadron, then 1st BCS in January 1913 with RADM David Beatty in command. With HMS Lion she visited Brest in February 1914 and for a state visit in the Russian Empire in Kronstadt in June. She was back in 1914. Her career, like HMS Queen Mary, was intrinsictly close to the 1st BC so i will concentrate only on their specific actions in the following battles.
The first major action in which she participated in was the Battle of Heligoland Bight, as she saw combat on 28 August 1914 in distant support to cruisers and destroyers. She fired on, but missed SMS Strassburg, able to duck into the mists but hit Cöln. After the battle, back home, HMS Princess Royal sailed from Cromarty on 28 September to cover a Canadian troop convoy and was back with the 1st BCS on 26 October, detached to join the Atlantic/Caribbean Squadrons, this time searching for Admiral Graf Spee’s East Asia Squadron after the Battle of Coronel. She operated from Halifax on 21 November, and New York City and then the Caribbean, guarding the Panama Canal (the US were neutral and Spee planned to join home). The East Asia Squadron however was dealt for by two battlecruisers in the Falkland on 7 December so she was back home on 19 December.
On 23 January 1915 she was take part in the battle of Heligoland. Beatty had been informed by Room 40 and sailed to intercept the German force. On 24th Arethusa spotted Kolberg, and Hipper veered away but Blücher could not keep up, steaming at 23 knots (43 km/h; 26 mph) while Beatty was in hot pursuit. Lion, Princess Royal and Tiger at 27 knots eventually caught Blücher and engaging her at 20,000 yards and German battlecruisers when replying concentrated on Lion. Tiger’s captain erroneously teamed with Lion on Seydlitz, leaving Moltke unengaged and with Derfflinger theyr both pummeled Lion, while Princess Royal was engaging Derfflinger.
Blücher was eventually finished off by Indomitable. The battle later ended due to communication errors. Beatty lef Lion, badly damaged, transferred to HMS Attack at 11:50 to board HMS Princess Royal at 12:20 but eventually the porusuit was called when reaching German waters. Princess Royal hit Derfflinger once during the battle, but only damaging two armour plates, flooding coal coal bunker. She also hit Blücher twice or more, but in total she required 271 main caliber shells with a practical hit rate of just 0.7%. Lion did better at 1.6%. P. Royal also fired two 13.5-inch shrapnel shells and the airship L 5, attempting to finish off by bombing the sinking Blücher believing it was a British ship; She emeged unscathed from the battle.
Blücher sinking
The next test was her most serious: On 31 May 1916, Princess Royal became flagship of the 1st BCS, under Beatty’s command. German battlecruisers were spotted at 15:20, and after course change to cut off their line of retreat, started the “Run to the South”. Beatty changed course to maintain range at its advantage, in line with Hipper’s course, with Lion and Princess Royal only ready when the Germans opened fire. Both targeted and hit Lützow (lead ship) but Derfflinger soon engaged HMS Princess Royal.
Battlecruiser_HMS_Princess_Royal_IWM
The very accurate fire placed two hits on Princess Royal and her ‘A’ turret stopped working, left gun inoperable, breech pinion gear sheared. The right gun misfired also. At 16:11, a torpedo fired by Moltke passed under Princess Royal and the latter believed it came from an U-boat opposite side their line, later confirmed by a bogus periscope sighting by HMS Landrail. HMS Queen Mary lost and retook contact with the line and this time was hit multiple times in quick succession: Her forward magazines exploded…
Derrflinger firing a full salvo
About 18:22 HMS Princess Royal after retaking contact, was hit by two 12-inch (305 mm) shells from the the battleship SMS Markgraf and had her ‘X’ turret disabled. Two other rounds penetrated her side armour, causing flooding. At 18:35, Beatty was behind the 3rd BCS but later lost sight of Scheer. When Jellicoe managed to cross the “T”, Princess Royal fired at the lead German battlecruiser without result, three minutes of continuous volleys. Contact was lost again, and regained, when Inflexible opened fire at 20:20, followed by her. Franz Mauve’s II Battle Squadron was spotted but exchange was brief before the obscurity set in. She had been hit 9 times by Derfflinger, two from Markgraf and one from Posen for a total of 22 killed and 81 injured, spending 230 main-gun shells with very little to show for.
Princess Royal reached Rosyth on 2 June for temporary repairs during eight days, enough to reach Plymouth for drydock repairs, completed on 15 July. She was back to Rosyth on 21 July. She took part in the 18 August 1916 sortie to try to ambush the High Seas Fleet, marred by miscommunications from Jellicoe’s part, while two of the screening force light cruisers were sunk by German U-boats. The Admiralty later concluded not to move out the fleet unless a German invasion was planned.
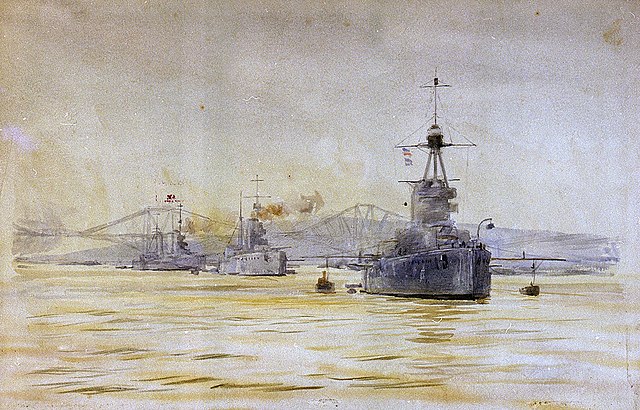
Princess Royal, Lion and Tiger moored below the Forth Bridge (painting)
HMS Princess Royal was in distant support at the Second Battle of Heligoland Bight (17 November 1917) and sortied too late on 12 December after a German raid rampaging a Norway-bound convoy. She shortied for the same reason on 23 April 1918 after radio transmissions, but missed the Germans again. From July 1918 the Grand Fleet was struck by the 1918 flu pandemic so much that Princess Royal lacked crewmen for operations. She took part in the guard force at Scapa Flow, then joined the Atlantic Fleet in April 1919. In reserve by 1920 she was proposed to Chile but declined. Flagship of the Scottish Coast on 22 February 1922 she was sold on 22 January 1923 and was BU by Rosyth Shipbreaking Co. in 1924-25.
Stern view, 1918
HMS Queen Mary
Queen Mary’s stern
HMS Quen Mary was commissioned on 4 September and assigned to the 1st Battlecruiser Squadron under command of Rear Admiral David Beatty. Like the others she visited to Brest and Kronstandt before the war, and participated in the Battle of Heligoland Bight: On 28 August 1914 in distant support of British cruisers, likez the rest she fired on SMS Strassburg and SMS Cöln before the two sides disengaged and Strassburg managed to escape.
QueenMary-1916-drawing
Next, during the Raid on Scarborough, Hartlepool and Whitby, HMS Queen Mary under command of Captain C. I. Prowse was underway to intercept the German battlecruiser squadron on 15 December 1914 and later the 1st BCS split and went to the Southwest Dogger Bank area to ambush the Germans back to the Jade, then going north and Warrender south, blocking the entries through minefields. The German advance was spotted by HMS Southampton but between miscommunications, Hipper learned where British battlecruisers awaited him and managed to wheeled northeast made good his escape.
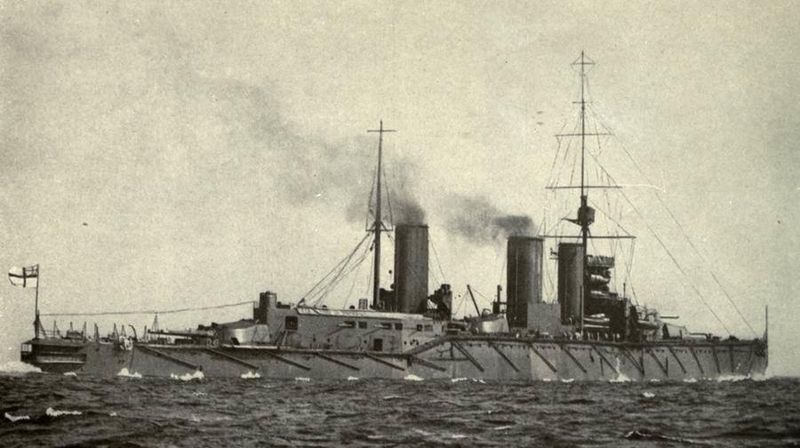
Queen Mary leaving the Tyne, 1913
Queen Mary was refitting in January-February 1915, so missing the Battle of Dogger Bank, but she received her main battery director in December 1915. In 1916, her only serious (and last) test came with the Battle of Jutland: On 31 May 1916, she was underway in the North Sea with the rest of the 1st BCS and started her artillery duel in the infamous “Run to the South”, Beatty changing course regularly to keep his range with Hipper’s course, and Queen Mary, was behind Lion and Princess Royal when the German opened fire, accurately from the start. Queen Mary started at 15:50 on SMS Seydlitz with just her her forward turrets. By 15:54 her fire was more accurate as the range fell to 12,900 yards (11,800 m), making two hits on Seydlitz (15:55 and 15:57) ma,aging to start a propellant fire in the aft superfiring turret.
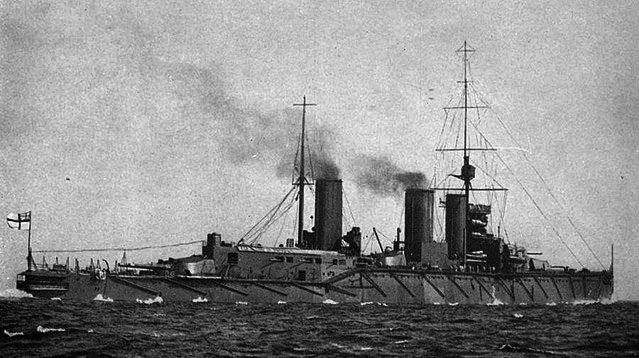
Queen Mary Underway
The range was opened, then closed again at 16:12-16:15 and while Lion was soon in dire straits, SMS Derfflinger lost sight of her and concentrated on HMS Queen Mary, now visible in the mist and haze, but believed by the gunnery officer to be Princess Royal; Derrflinger fired at 16:16 on Queen Mary without result as the latter still engaged and hit Seydlitz again at 16:17, knocking out one secondary gun but hit twice by Seydlitz at 16:21 (unknown effects) having the turret face of ‘Q’ turret badly shocked and right-hand gun jammed.
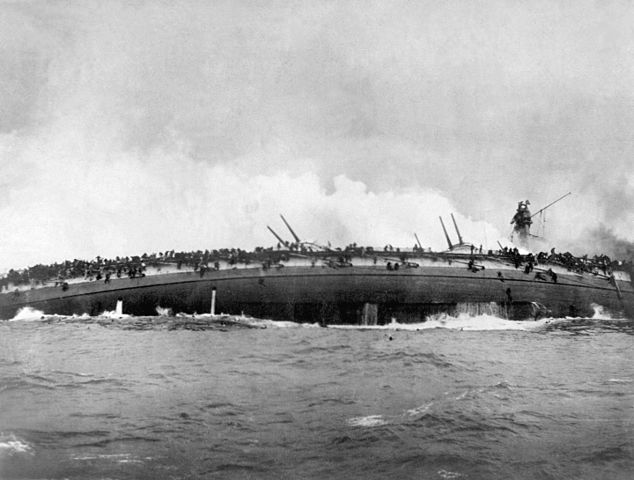
At 16:25, the range fell to 14,400 yards (13,200 m) and the range opened again, but too late for Queen Mary as Derfflinger’s precise fire framed her until she was hit twice before 16:26. One detonated one or both of the forward magazines. The explosion broke the ship in two, near the foremast. Amazingly, one of the rare suvivors, locked in ‘Q’ turret, Midshipman Jocelyn Storey, reported his impressions: A large explosion forward rocked his turret and broke the left gun in half with the breech falling into the working chamber while the right one keft its trunnions and Cordite inside caught fire. Poisonous fumes asphyxiated some of the crew. It’s likely this was caused by the hit of a second shell.
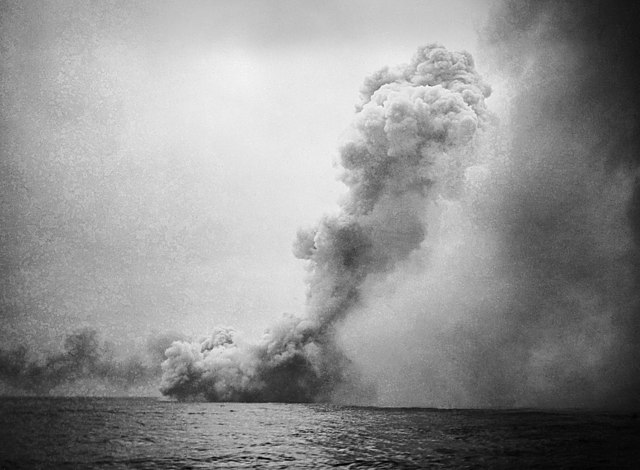
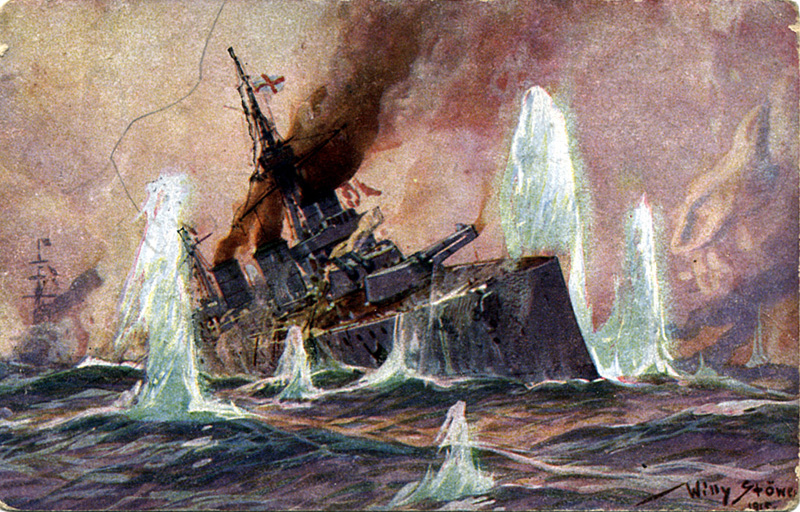
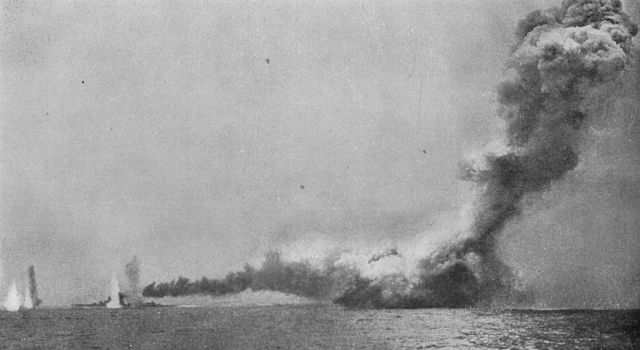
Destruction of the Queen Mary
The aft end was also badly shocked and started to roll over and sink. HMS Tiger behind her was showered with debris, steering hard to port to avoid her sinking wreck. 1,266 crewmen were lost in all, but there were eighteen survivors, picked up by the destroyers HMS Laurel, Petard, and Tipperary, and later two by the Germans, ending as POWs.
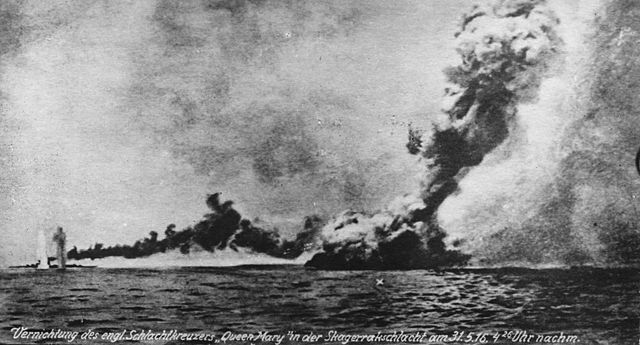
Queen Mary’s explosion seen from the German side
HMS Queen Mary is now part of the Jutland wrecks, a protected place Protected by the Military Remains Act of 1986. Surveys were conducted by nautical archaeologist Innes McCartney in 2001–03. This work debunked some old myths and close some debates, showing the three sections, with two forward heavily damaged, in pieces. The aft one was upside down and relatively complete. A propeller was salvaged. Closer examination suggested the initial explosion took place in the magazine of the forward 4-inch battery. The cordite in the main magazine also ignite ‘Q’ magazine and was followed by explosion in a smaller magazine, the blast spreading to the forward magazine.
 Latest Facebook Entry -
  X(Tweeter) Naval Encyclopedia's deck archive
 Instagram (@navalencyc)


 French Navy
 Royal Navy
 Russian Navy
 Armada Espanola
 Austrian Navy
 K.u.K. Kriegsmarine
 Dansk Marine
 Nautiko Hellenon
 Koninklije Marine 1870
 Marinha do Brasil
 Osmanlı Donanması
 Marina Do Peru
 Marinha do Portugal
 Regia Marina 1870
 Nihhon Kaigun 1870
 Preußische Marine 1870
 Russkiy Flot 1870
 Svenska marinen
 Søværnet
 Union Navy
 Confederate Navy
 Armada de Argentina
 Imperial Chinese Navy
 Marinha do Portugal
 Mexico
 Kaiserliche Marine
 1898 US Navy
 Sovietskiy Flot
 Royal Canadian Navy
 Royal Australian Navy
 RNZN Fleet
 Chinese Navy 1937
 Kriegsmarine
 Chilean Navy
 Danish Navy
 Finnish Navy
 Hellenic Navy
 Polish Navy
 Romanian Navy
 Turkish Navy
 Royal Yugoslav Navy
 Royal Thai Navy
 Minor Navies
 Albania
 Austria
 Belgium
 Columbia
 Costa Rica
 Cuba
Cuba Czechoslovakia
 Dominican Republic
 Haiti
Haiti Hungary
 Honduras
 Estonia
 Iceland
 Eire
Eire Equador
 Iran
Iran Iraq
Iraq Latvia
 Liberia
 Lithuania
 Mandchukuo
 Morocco
 Nicaragua
 Persia
 San Salvador
 Sarawak
 Uruguay
 Venezuela
 Zanzibar
 Warsaw Pact Navies
 Bulgaria
 Hungary

 Bundesmarine
 Dutch Navy
 Hellenic Navy
 Marina Militare
 Yugoslav Navy
 Chinese Navy
 Indian Navy
 Indonesian Navy
 JMSDF
JMSDF North Korean Navy
 Pakistani Navy
 Philippines Navy
 ROKN
ROKN Rep. of Singapore Navy
 Taiwanese Navy
 IDF Navy
 Saudi Navy
 Royal New Zealand Navy
 Egyptian Navy
 South African Navy


 Ukrainian Navy