
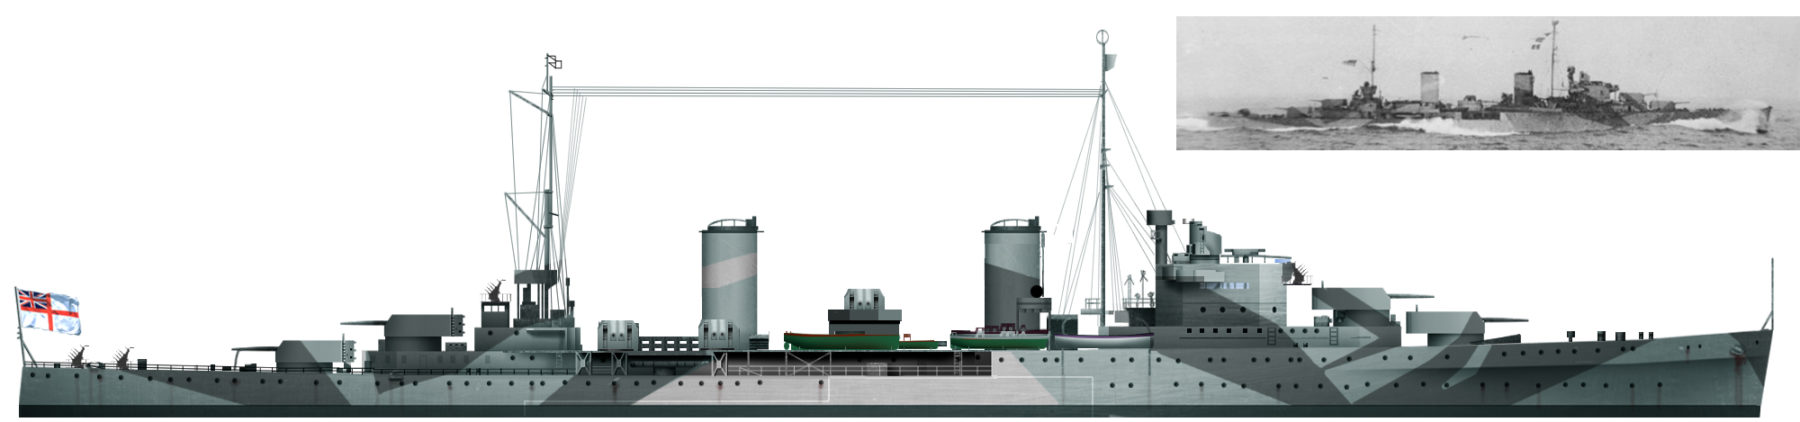
 United Kingdom (1931-35)
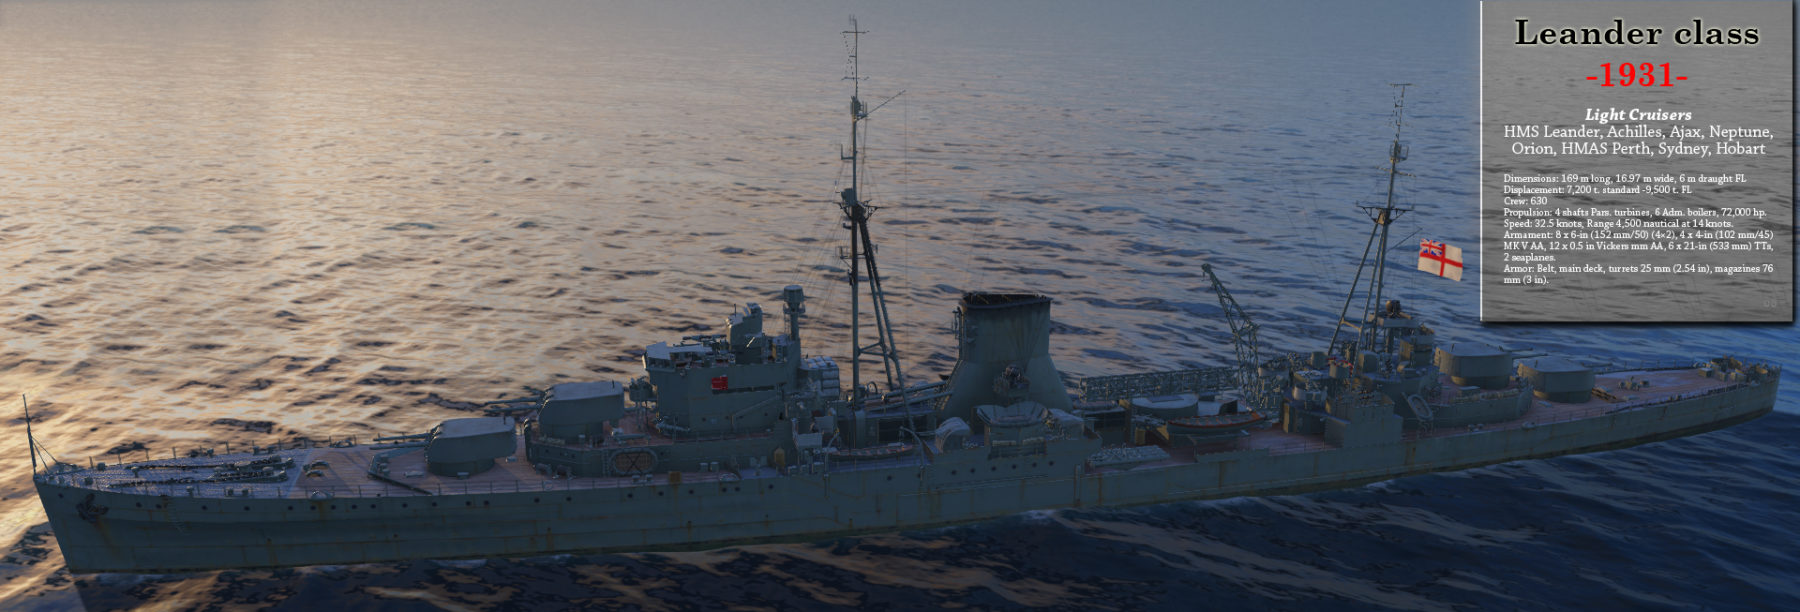
HMS Leander, Achilles, Ajax, Neptune, Orion, HMAS Perth, Sydney, Hobart
The ANZAC light cruisers
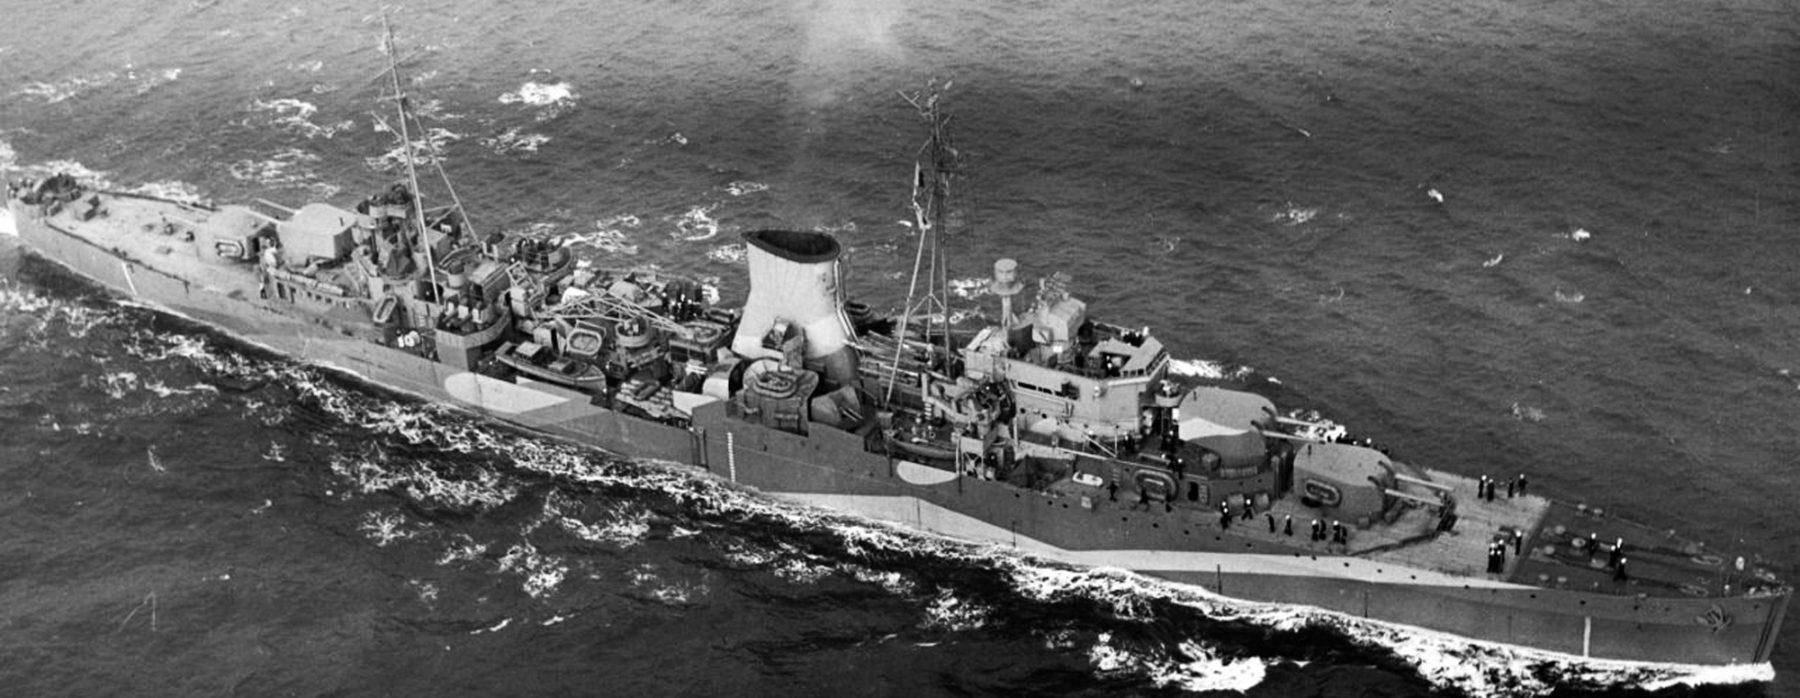
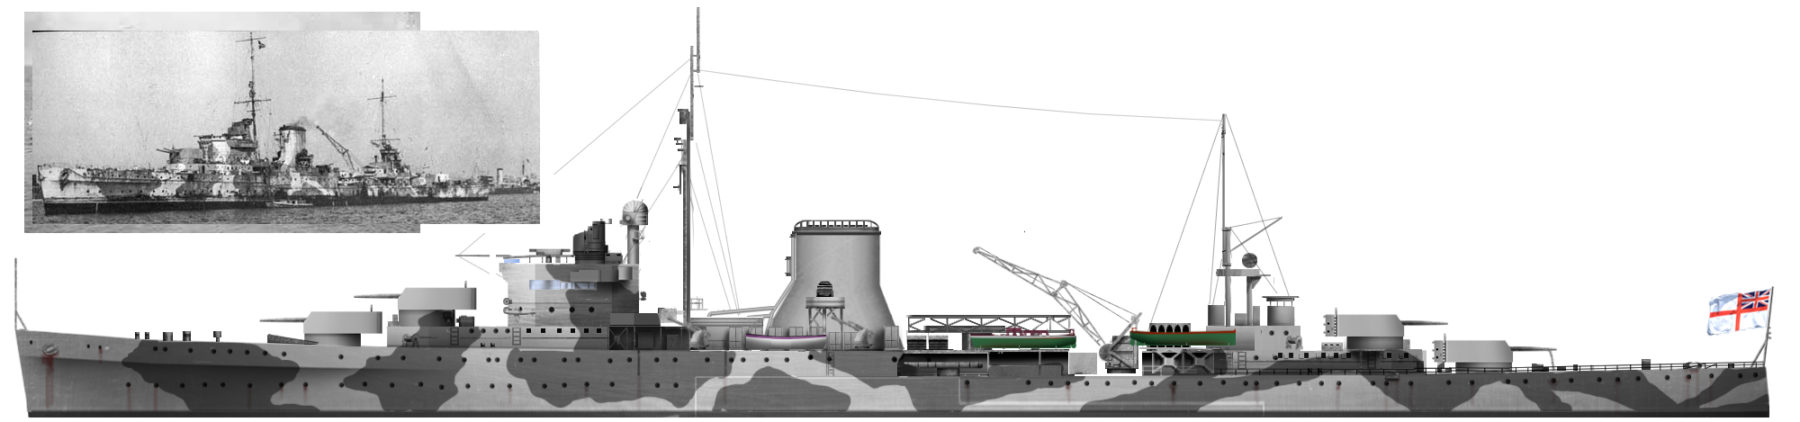
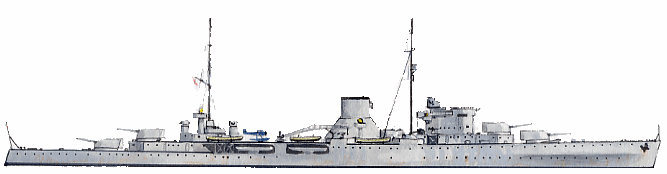
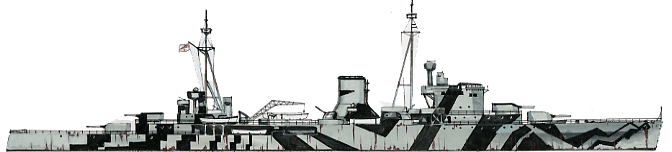
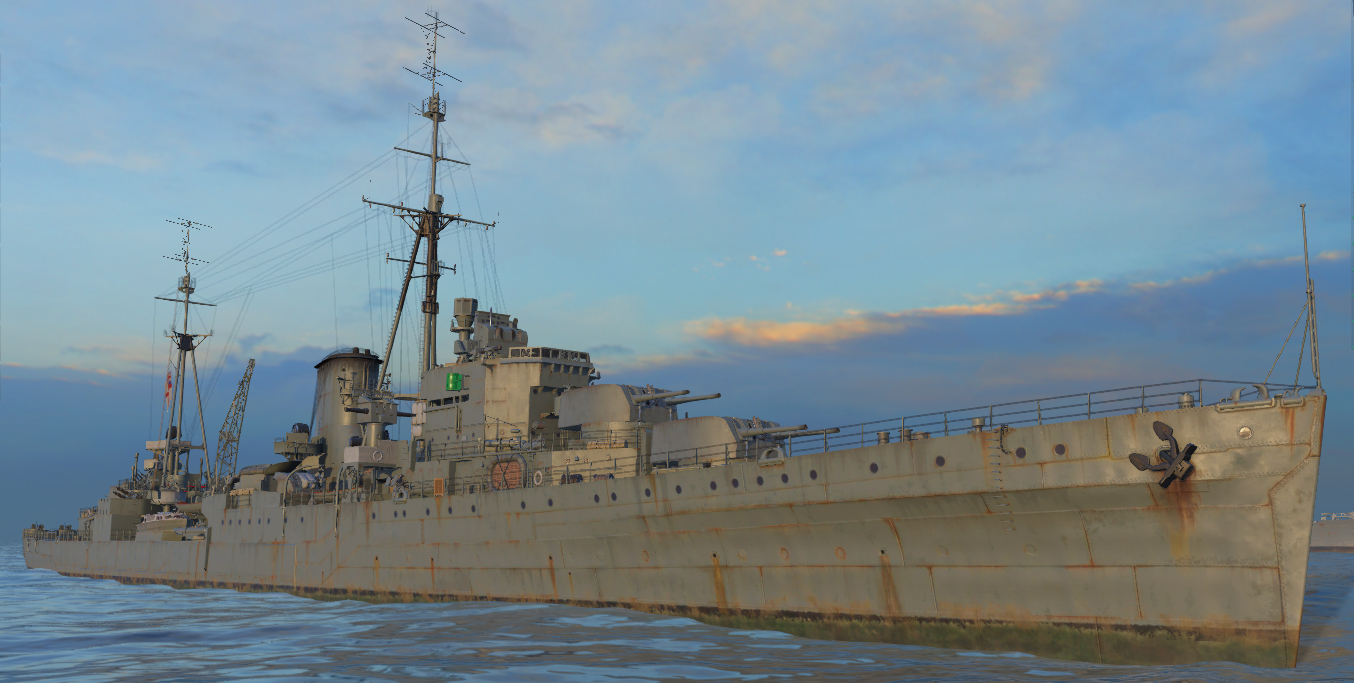
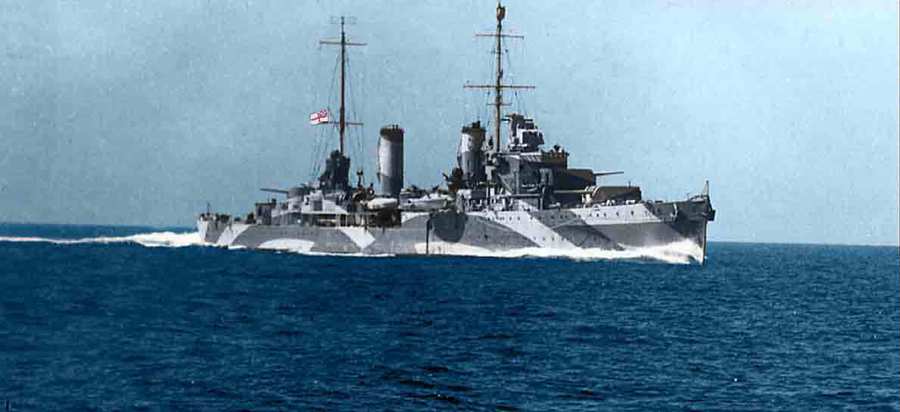
The 5 Leanders (completed in 1933-34) and the 3 Australian Perth (1934-35) were the first light cruisers built since the Enterprise class of 1920. With their twin 6-in turrets, they were more of an adaptation of the previous design of the York class rather than a new creation. They were immediately recognizable by their unique truncated funnel (whereas the second group had two), and fought on four oceans, seeing heavy action from the Mediterranean to Guadalcanal. Some became legendary such as the Ajax or the Sydney with its epic duel with the Kormoran.
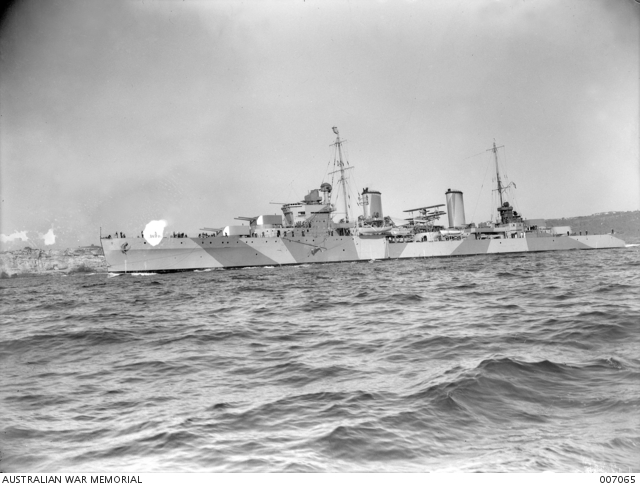
HMAS Sydney in her war paint in 1941 (AWM)
Design of the Leander group
The Washington treaty did not fixed rules for light cruisers but artillery (6-in), therefore in terms of tonnage, the ship could reach the heavy cruiser limit of 10,000 tons*, which left margin for range and speed. They were first and foremost intended for commerce protection, escort vessels. They displaced 9740 tons fully loaded, 9000 for the following group Amphion, and 7,270 tons standard for a hull largely similar to the York class, with a long forecastle ending mid-way with a roof above the superstucture, and htier hull had a 1/10 ratio or 550 ft by 56 ft, with a 19.1 ft draught.
*There was actually a British proposal at the three Power Geneva Naval Conference of 1927 to limit tonnage for light cruisers to 7000 tons, but it was never adopted.
Propulsion
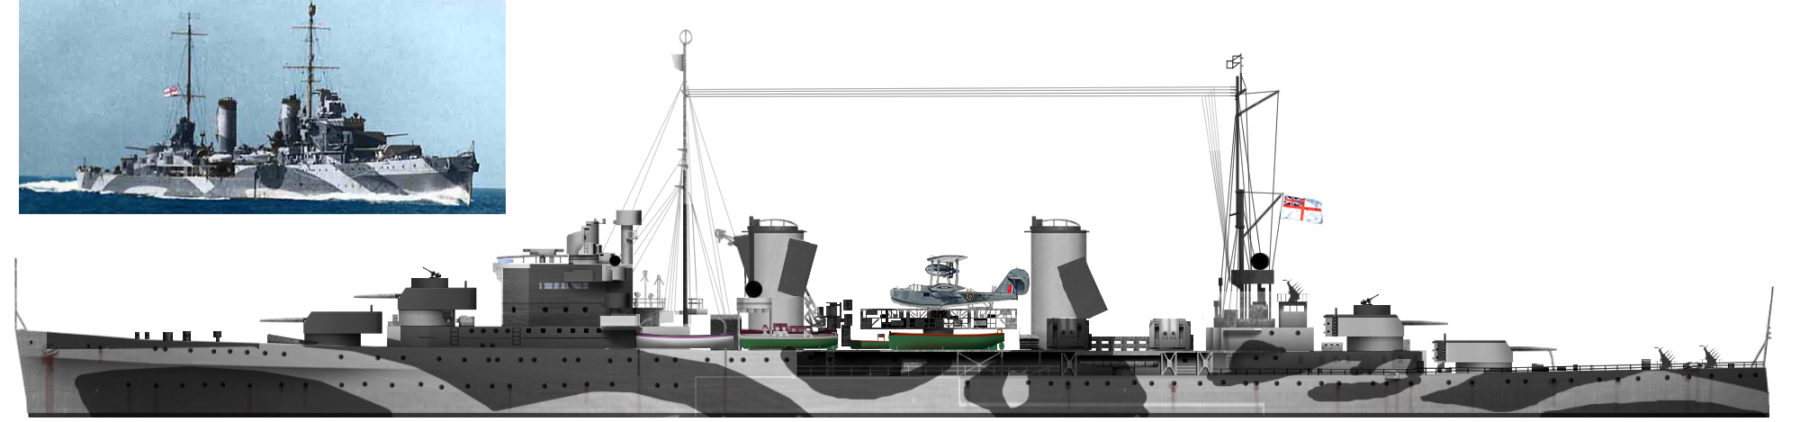
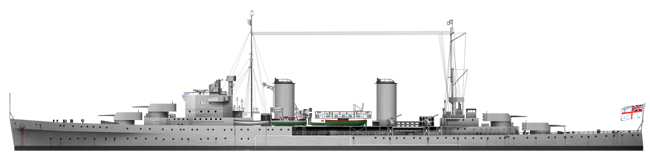
Although the compartimentation was copied from the York class, the ships had four shafts, connected to Parsons single-reduction geared steam turbines, fed by four to six boilers, depending on the group. The first group or Leander class had six, and the Amphion four, of the 3-drum water-tube model. The first group was unique as the boiler rooms were arranged together and the exhausts truncated into a single funnel, whereas in the second group they were separated leading to a two funnels far apart look. The ensemble was rated for 72,000 shp (53,700 kW). Thanks to this, standard top speed was 32.5 knots (60 km/h). On trials, 32.45 knots were reached by HMS Leander. She still made 73,140 shp (54,500 kW) for 31 knots at full load of 9240 tons. Their range was sufficient to cross the Atlantic and back, about 5,730 nmi (10,610 km) at 13 knots (24 km/h).
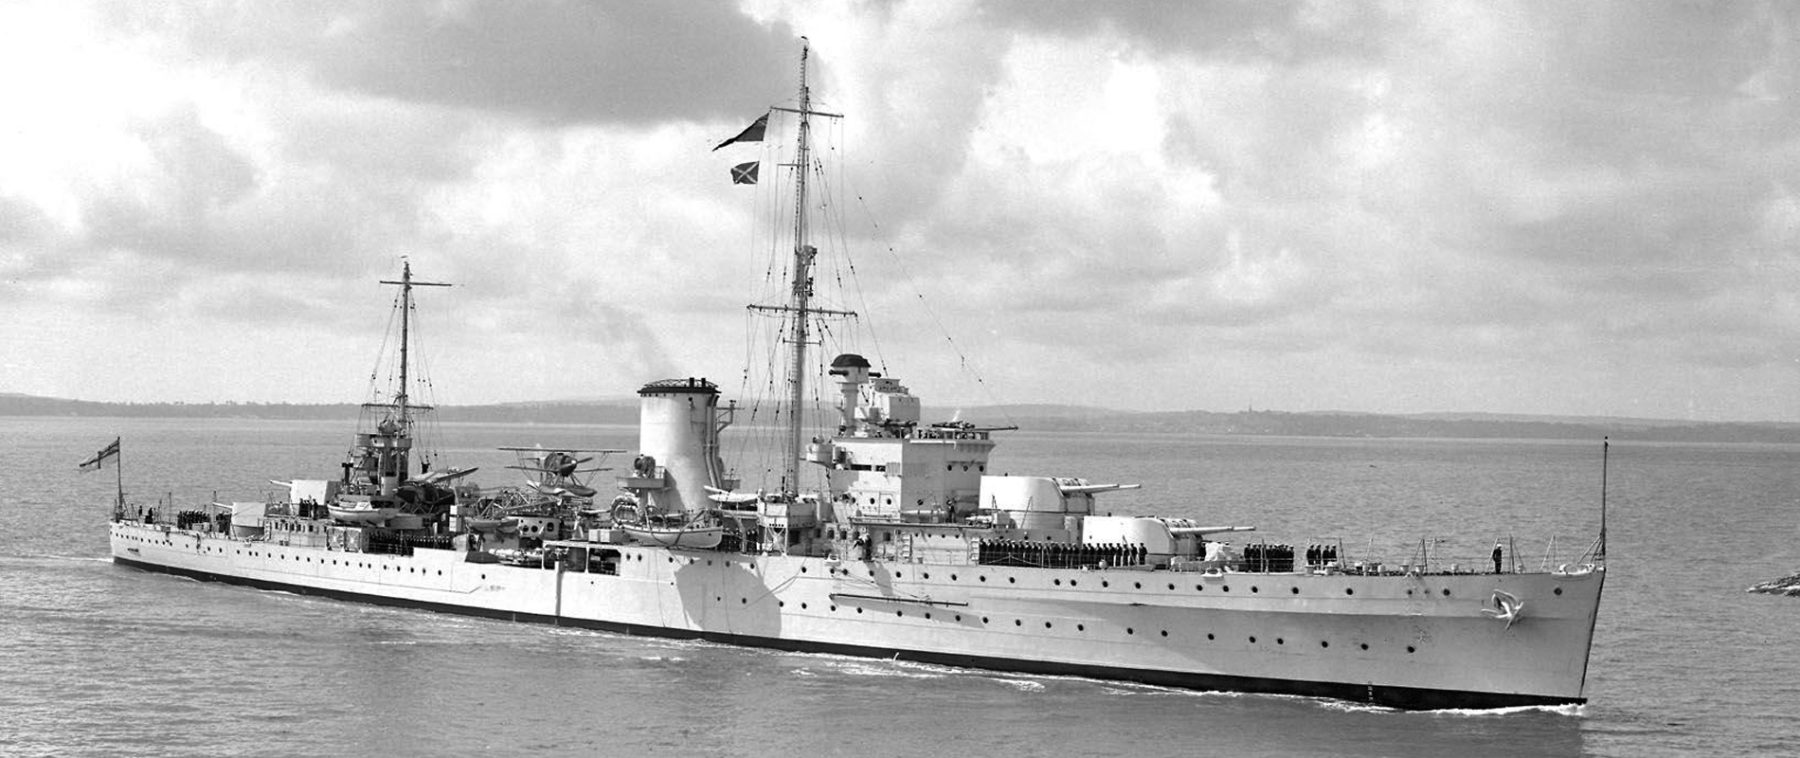
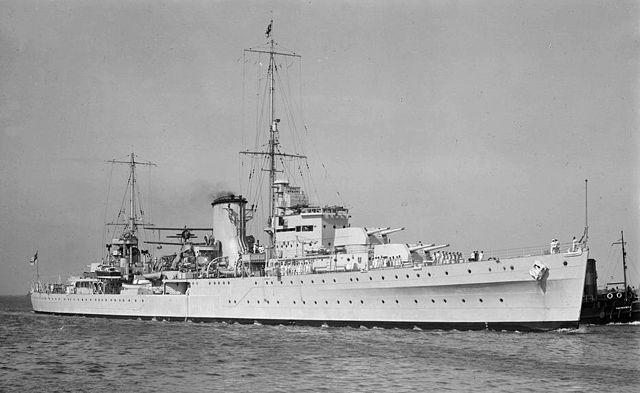
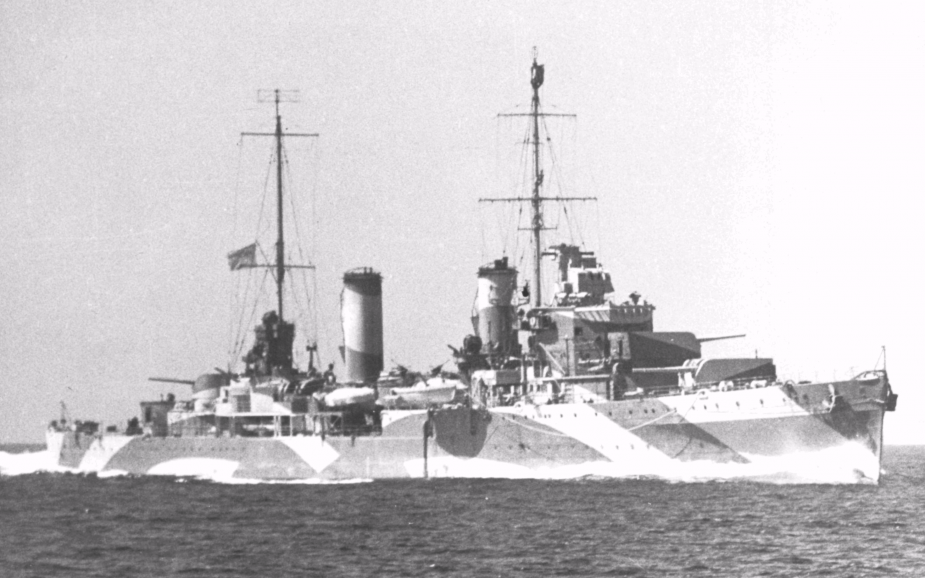
HMS Ajax before the war, circa 1936, HD picture, IMW.
Protection
Even in light cruiser standards, it was light and only kept in strategic areas:
The magazine box was protected by 3 in (76 mm) walls, the main deck 1 in (25.4 mm) and the turrets were protected by 1 in (25.4 mm) overall, whih was fairly unsufficient against anything else than destroyers, their main prey. Neither the rudder or machinery was protected and the belt armor was fairly light as well and the total represented 845 tons of armour.
Armament
Compared to the York, their smaller turrets allowed four to be placed in superfiring pairs fore and aft. The main gun models would evolve from the Mark V to VI later, with a greater angle mounting.
Developed in 1928-29, these breech-loading rifled 6-inch Mk XXIII 50 caliber naval guns became the staple of British Naval artillery up to the very last cruisers completed postwar. These guns were used by the Leander, Amphion, Arethusa, ‘Town’ superclass, Crown Colony, Minotaur, while the postwar Neptune (cancelled) and Tiger (Converted) embarked on the fully automated QF Mark N5.
The Mark XXIII was a traditional model with an hand-operated Welin breech block and Cloth bags for cordite, also hand-held. The guns used flashless (NQFP) powder, and fired a 51-kg (112-pound) projectile at 2760 feet per second (840 m/s) up to 25,480 yd (23,300 m) at 45°. The entire gun barrel was 300-in (7.6 meters) and weighted 7,000 kgs. Life expectancy was great, between 1200 and 2200 rounds according to the charge, classic cordite or NQFP. RPM with a trained crew was a shot every 4-5 seconds, only three when the range did not changed. It was more than three times faster than the classic 8-inches and therefore a reflection of the new tactical views of gunnery at that time, more about saturating the superstructures than piercing hulls and destroying turrets or trying to hit vitals.
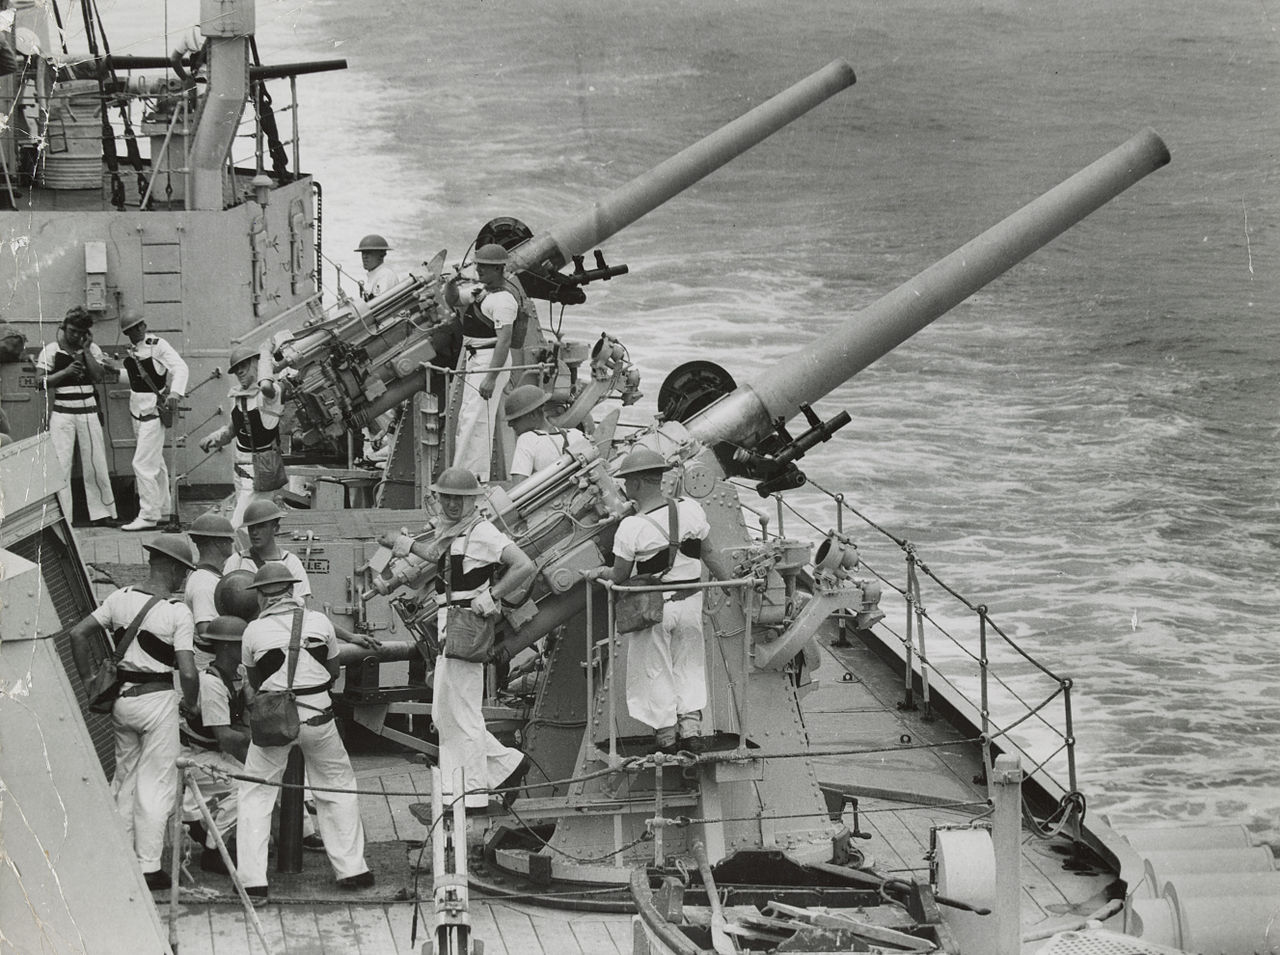
HMAS 4-inch guns HA closeup
Their secondary artillery comprised four QF 4 in Mk.V (102 mm L/45) guns, in single mounts HA (High Angle) Mk.IV. They were heavy, unprotected ww1-1 era naval guns, weighting with barrel & breech: 4,890 lb (2,220 kg). They used an horizontal sliding-block with a recoil hydro-pneumatic/hydro-spring 15-in (380 mm) system and mounting dependent traverse and elevation. Their muzzle velocity however seen sufficient at 2,350 ft/s (716 m/s) up to 16,300 yd (15,000 m) in horiztontal, anti-ship fire and 28,750 ft (8,800 m) in AA mode and max elevation.
Their 5 pounds (2.27 kg) shell was filled with Lyddite-amatol. The rate of fire was slow as the mount only allowed a 60° elevation, and then the gun has to return to its max elevation of 80°. This was solved when QF 4 inch Mk XVI naval gun were provided and replaced them. The later were developed from 1936 and allowed a much greater rpm at 15-20 rounds. They fired a 35 pounds (15.88 kg) HE shell or 38.25 pounds (17.35 kg) S.A.P. projectile.
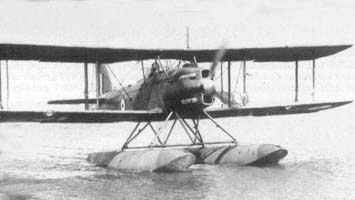
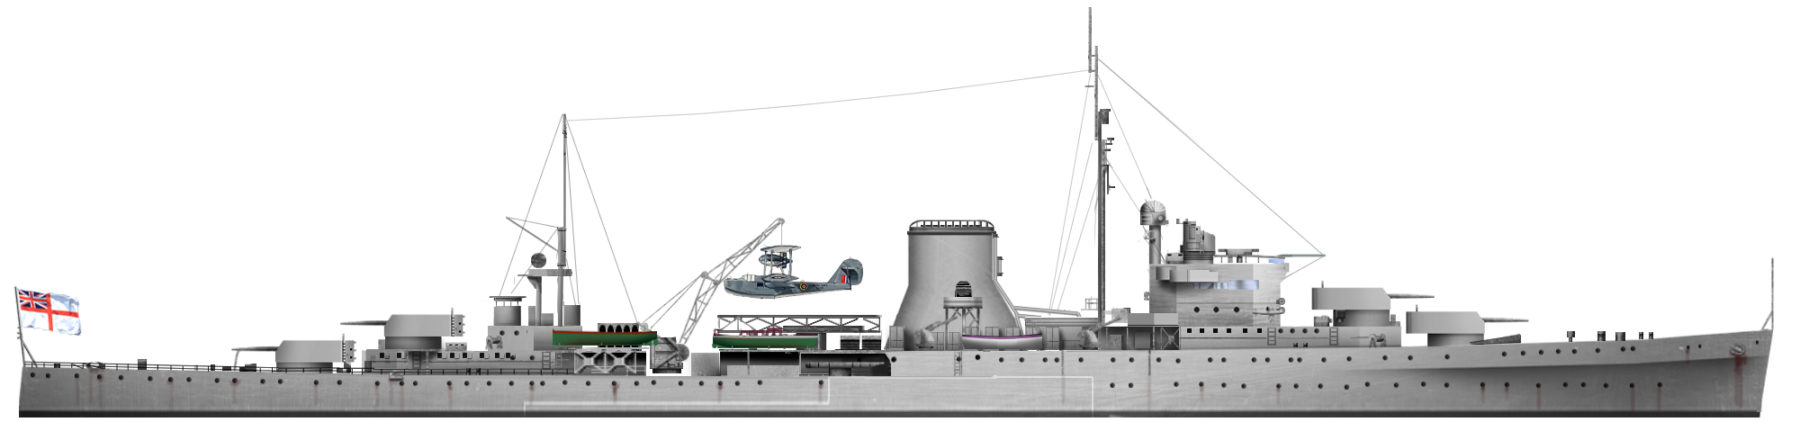
Their initial AA artillery was a reflection of the aviation of the time and comprised twelve 0.5-inch (13 mm) Vickers machine guns in three quadruple mounts. Also they carried two quadruple banks each side of standard 21-in TTs. Provision to mount catapults for Fairey Seafox reconnaissance aircraft was also done, some having them in operation.
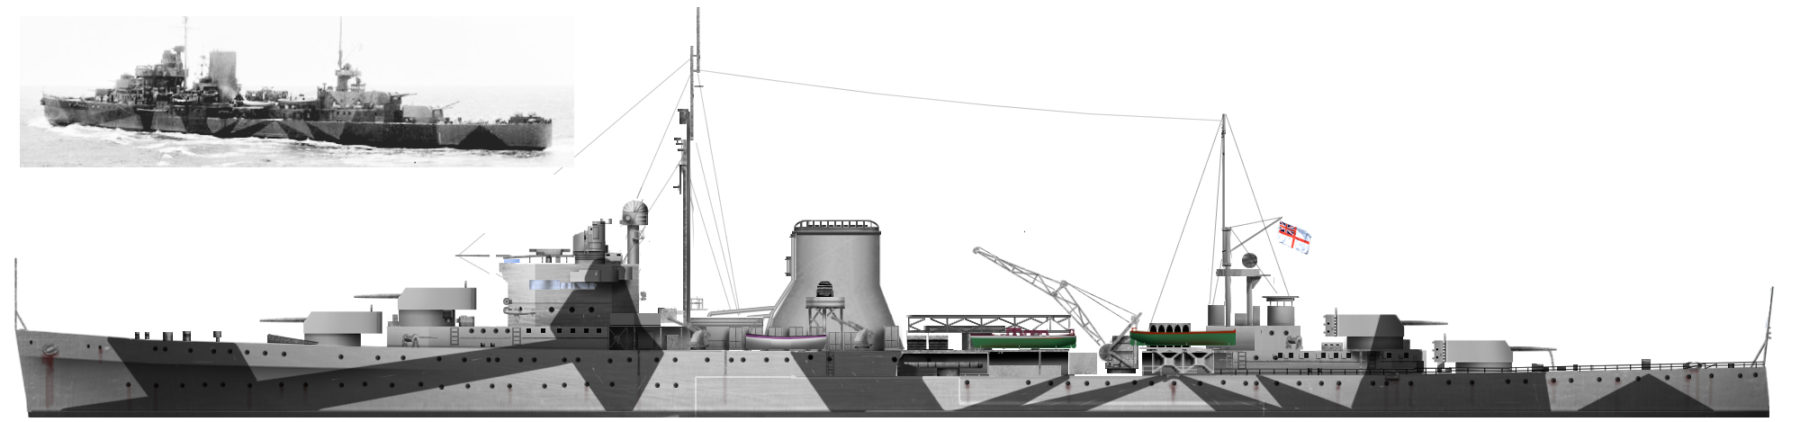
In 1937 their four single 102 mm guns were replaced by four modern 102 mm Mark XVI in twin mounts. They also had parade guns, quickly removed at the beginning of the conflict. They also lost catapult and crane in 1941 (Ajax-Orion) and 1943 (Leander, Achilles). They also received from 1941 2 quadruple bofors 40 mm carriages. Finally, in 1941, they received new tripod masts with radar.
The Leander and Amphion in action
Such a great chapter is a bit too much for a single post, but following are the individual detailed career of these ships. But in great lines: Ajax and Achilles were famously the sailors of the Exeter at the Battle of Rio de la Plata against the German pocket battleship Graf Spee. They were badly hit by heavy shells impact of Spee’s secondary 6-in battery (reserving its 280 against the Exeter). Ajax lost two of its paper-protected turrets. But both ships escaped in a smoke cloud.
In 1941, Ajax and Leander were allotted to the RNZN (New Zealand Navy). Against the Japanese, they suffered significant damage, the Leander being almost destroyed, put of action for more than a year at the Battle of Kolombangara after gunfire and a torpedo hit. In December 1941, HMS Neptune hit four mines, but sank slowly enough for her crew to escape.
Ajax and Orion served in the Pacific extensively again until badly hit by by Japanese air attacks, and bot were out of the game for 9 months. In 1945-46, they were reduced to subsidiary roles and broken up in 1949, except for HMS Achilles who was later sold to a newly independent India with the constitution of the RIN (Royal Indian Navy) and served many more years of the cold war.
HMS Leander
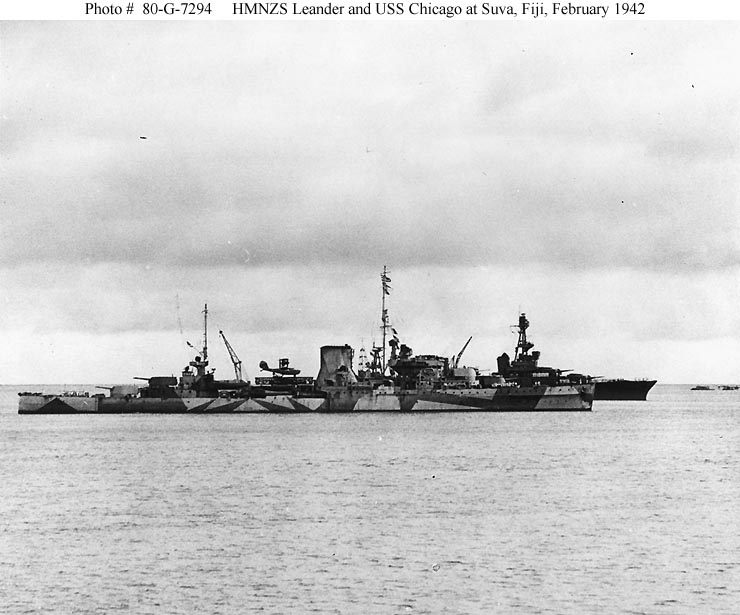
HMNZS Leander and uss chicago off Suva, Fidji, Feb. 1942 (USNA).
HMS Leander (Devonport 1931) was commissioned first with the the Royal Navy, as HMS Leander in march 1933 but joined Achilles in the New Zealand Division. However in 1941 this division became the Royal New Zealand Navy (RNZN) so she became the HMNZS Leander in September 1941 and served in the Pacific and Indian Ocean. On 27 February 1941, she sank an Italian armed freighter near the Maldives and on 23 March 1941, she captured the Vichy French freighter Charles L.D. between Mauritius and Madagascar.
In April, she operated in the Persian Gulf and teamed with HMS Hermes and Emerald, returning to the Maldives to search for the German raider Pinguin. In June 1941 however she was sent to the Mediterranean, against the Vichy French during the Syria-Lebanon Campaign. She was back in the pacific in September 1941.
On July 1943, she was part of Task Group 36.1 with USS Honolulu and St. Louis. when radar-spotting the IJN cruiser Jintsu and escort off Kolombangara (Solomon) and in the Battle that followed all four cruisers were met by a torpedo storm and badly hit. On leander it was abaft ‘A’ boiler room, with it and No.1 4-inch gun disabled, and the cruiser barely made it to Auckland, repaired enough to reach Boston and only return into service by August 1945. She was scrapped in 1950.
HMS leander in 1942 – Author’s HD illustration
HMS Orion
HMS Orion circa 1943; notice the tripod masts and lower ports welded shut.
The light cruiser Orion ws in commission on 18 January 1934 with the Home Fleet before moving to serve with the North American and West Indies Station (8th Cruiser Squadron) and back home in February 1940.
In June she joined the Mediterranean 7th Cruiser Squadron and acted as John Tovey’s flagship. After Bardia and the Battle of Calabriashe sank the cargo Ermioni bound to the Dodecanese and escorted Malta or Greece convoys. She also served in Crete, the Aegean islands and took part in the Battle of Cape Matapan.
On 22 May, she attacked an axis convoy bound to Crete and duelled with the the Italian torpedo boat Lupo. The rest of the month shel helped evacuating troops when attacked by the luftwaffe and badly hit. She limped back to Alexandria for provisional repairs, completed later in South Africa via Aden and Mare Island Naval Shipyard. She was back in action in March 1942, refitted in Plymouth (AA and radar), patrolling in home waters escorting convoys to Africa and the Indian Ocean. Back in the Mediterranean 15th Cruiser Squadron she coverred the invasion of Sicily and later returned in the home waters to take part in the Normandy Landings. She was apparently the first British cruiser to fire at dawn. She was in reserve after the war and scrapped in 1949.
HMS Orion in Crete, 1941 – Author’s HD Illustration
HMS Neptune

HMS neptune in 1937 (AWM)
Neptune was operational on 12 February 1934 with a mixed crew mostly from the New Zealand Division and South African personnel. She started patrolling the South Atlantic in search for the Graf Spee, later sailed to station off Uruguayans waters, waiting for the damage German ship to exit, but the latter scuttled before she arrived.
Back in the Mediterranean, Neptune spotted first the Italian fleet at the battle of Calabria (9 July 1940) and was hit during the exchange by the Giuseppe Garibaldi. The 6-inch shell damaged her floatplane but in return she registered three hits on the Bolzano. Later in 1941, she led Force K to intercept axis convoys bound to Libya and the Afrika Korps.
She met her fate during one of these missions: On 18 December 1941, she took part of a brief fleet engagement, the First Battle of Sirte. This happened at sunset, and during the following night, Neptune struck two Italian mines laid earlier in June. The bow hull was breached and after reversing out she struck a third mine, blewing her propellers. HMS Aurora nearby could not assist her, as the area was too dangerous and she was herself too damaged, as other cruisers, like HMS Penelope.
The destroyers Kandahar and Lively attempted to tow her, but the first struck a mine and the second was signalled by Neptune to leave. The tragedy went on as the derving, powerless cruiser hit afourth mine, which was devastating. She quickly capsized, with mosy of the crew but about 30 survivors which apparently drawn too. In the end only one survivor was picked-up out of a total crew of 737 sailors and officers.
Author’s HD illustration of HMS neptune in 1944
HMS Ajax
Probably the best known of all the Leander class cruisers, Ajax (named after the Trojan war Greek hero), was completed on 12 April 1935. At first she served with the North America and West Indies Station but instead joined the Mediterranean, to patrol during the Abyssinian crisis, returning later to her initial station. In early 1939 she was deployed in the Pacific, off South America, and back South Atlantic Division, in March.
Her first wartime action was to patrol down south to the Falklands, capturing or sinking the Olinda, German merchantman Carl Fritzen and Ussukuma. Later she returned north to hunt for the Graf Spee. This led to the famous battle of the River plate, together with HMS Exeter and Achilles. During the battle she acted as flaghsip of Force G (Commodore Henry Harwood). She located and engaged Graf Spee on 13 December, taking damage by the German 150 mm calibers, seven hits, disabling the first two turrets, whereas the Exeter was more badly damaged.
The latter was save in part due to the smoke screen dressed by both cruisers. Despite her damage she only deplored 12 casualties, and was still able to station off Uruguay with Achilles, soon joined by Cumberland (from the Falklands), until the conclusion. She was instrumental in the radio bluff that scared Wilhelm Langsdorff up to scuttle his ship and later commit suicide.
Achilles seen from Ajax, en route for the River Plate, 1939.
The next part of her career was Mediterranean, as appriopriate for a Greek hero, after a refit at Chatham where she received among others a Type 279 Radar. With the 7th Cruiser Squadron, teaming with HMS York, she escorting convoys bound to Alexandria and back. In late 1940 to 1941 she took part in the escort of British convoys to Malta while trying to intercept axis ones. She was part of the fleet covering convoy MF3 (Operation MB6) when during the night of 11-12 October she intercepted a small Italian force. The engagement is a minor ones but often referred to Battle of Cape Passero, which saw the sinking of two Italian TBs, and the destroyer Artigliere.
She was hit by seven shells, lost a whaler, took bridge damage and on radars, with 37 casualties. Afterwards she covered convoys to Suda Bay, in Crete, and later participated in Operation Coat with Force X. Her diversion helped the air attack on Taranto later.

In November she attacked an Italian convoy of four Italian merchant ships protected by an auxiliary vessel, and the old TB Nicola Fabrizi she badly damaged. This action saw the entire convoy destroyed, as part of the Battle of the Strait of Otranto. She later shelled Durazzo and joined Force B to cover the Greek evacuations. She took part in the Battle of Cape Matapan and was repeatedly by the Lufwaffe, but evacuated British troops from Crete while York was lost there. She departed in 1941 for a refit home via the long road, via Suez and South Africa.
Ajax in her fight against Graf Spee, December 13, 1939, at the Rio de la Plat – Old author’s illustration
Her refit at Chatham Dockyard lasted until September 1942. She was back in the Mediterranean to take part in the latter part of Operation Torch, part of Force Q at Bône, Algeria. After being hit by an aviation bomb 1,000 lb (450 kg) on her “B” boiler room on 1 January 1943 she was repaired at Gibraltar and Norfolk, and returned in action after a long refit at Portsmouth, completed on 25 December 1943.
After her damage in Crete she was nearly two years out of action either in repairs or refit. She was back in the Mediterranean in February 1944, and later took part in June to D-Day artillery barrage and cover, as part of Force K, off Gold Beach. She returned in the Mediterranean to cover the landings in southern France and later policed Greek waters. Ironically after the war, she carried Graf Spee’s crew from Uruguay back to Germany. She was later policing Palestinian waters, taking part in the 1947 Exodus affair. Placed in reserve she was decommissioned in February 1948, once proposed fo India and broken up.
The same HMS Ajax after refit in the Mediterranean, Operation Torch. She would display two other liveries until 1945 – old author’s illustrations.

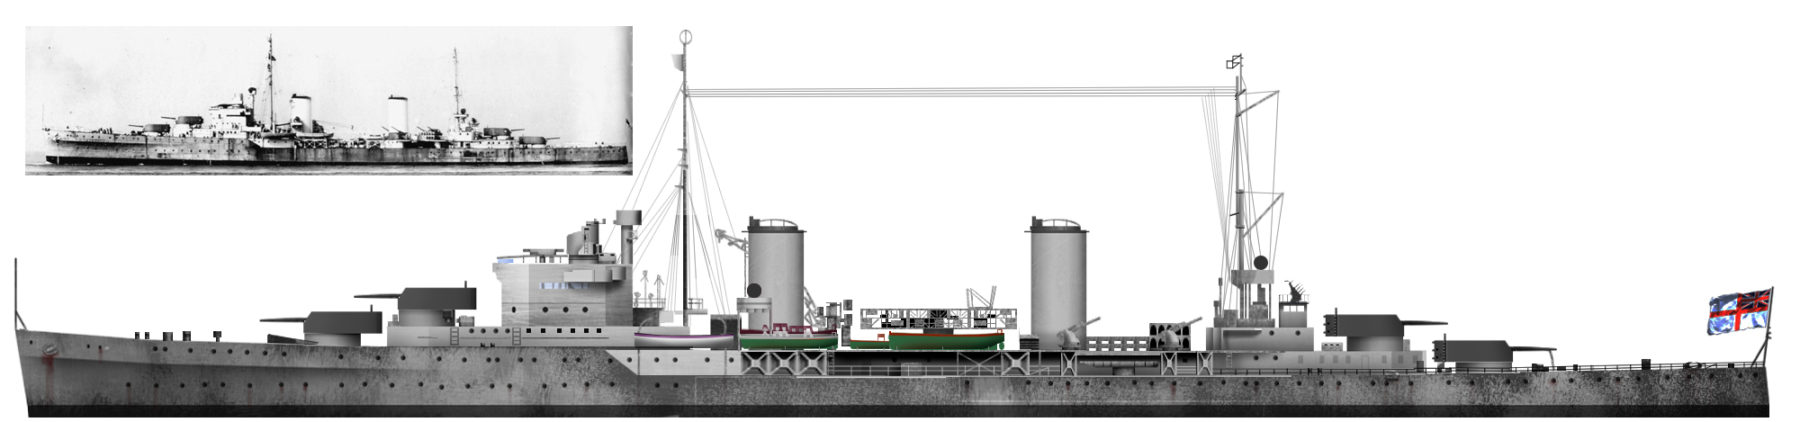
Cutaway by Ross Walton Src
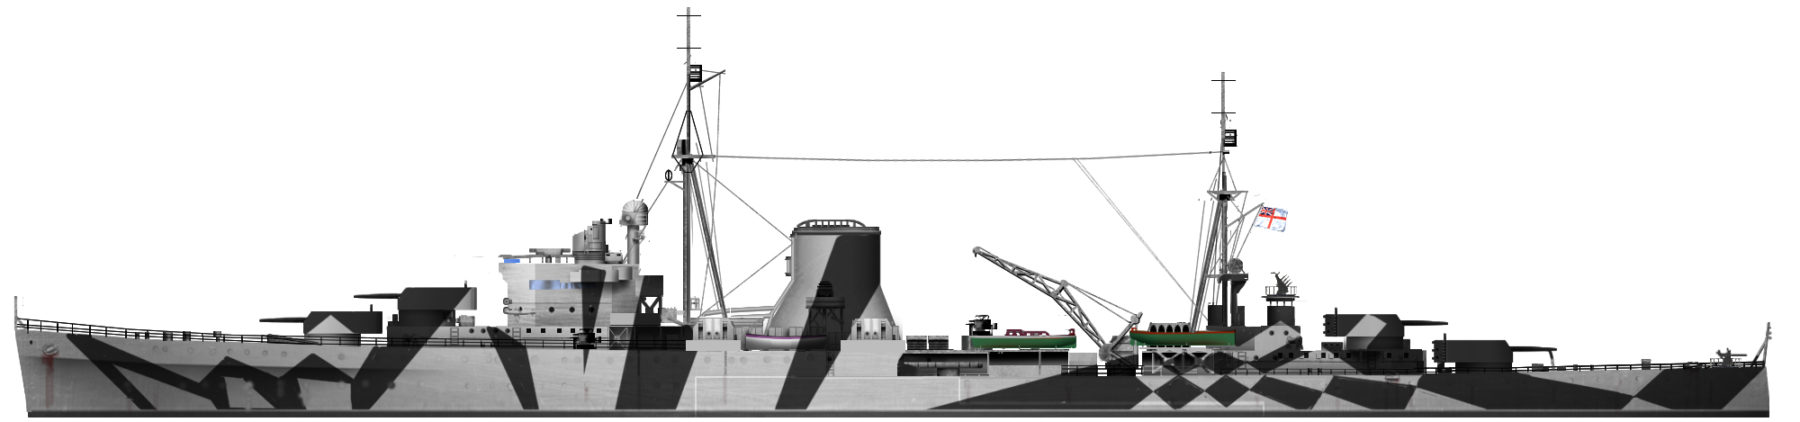
HMS Ajax after refit in January 1943, with a classic example of Mediterranean razzle dazzle
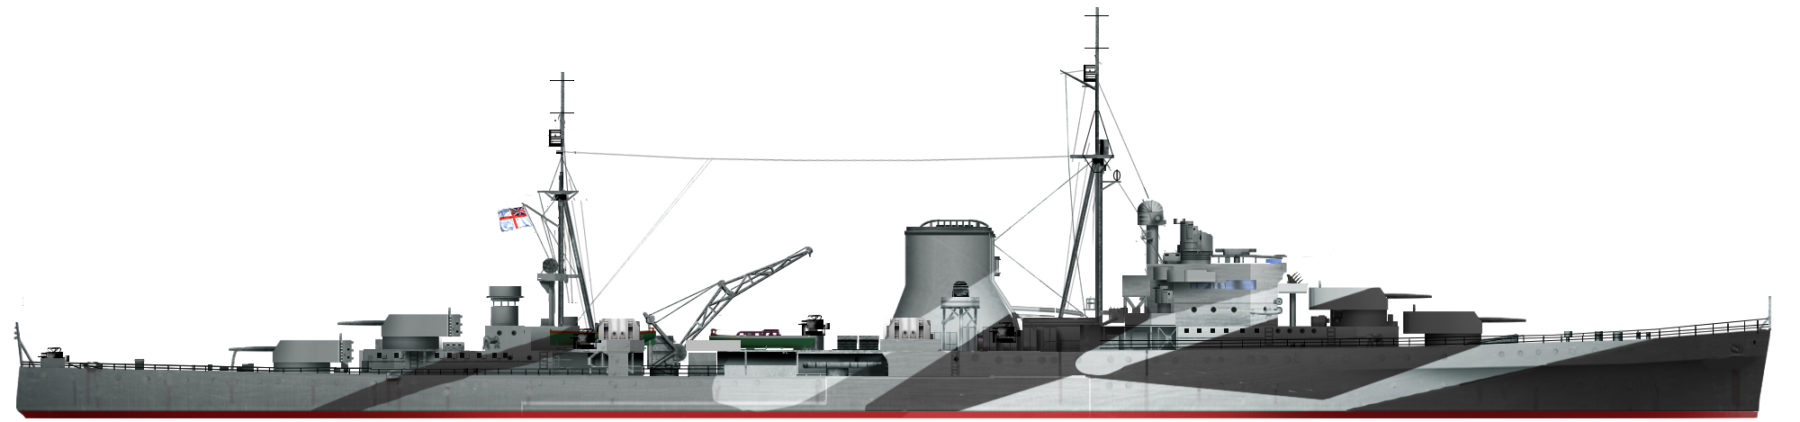
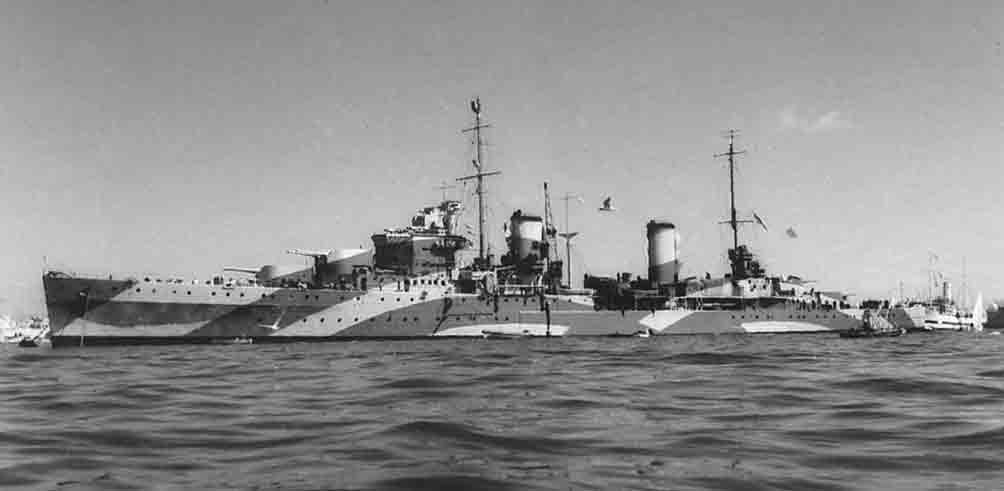
HMS Ajax in 1945, with an “atlantic approaches” three tone wavy camouflage
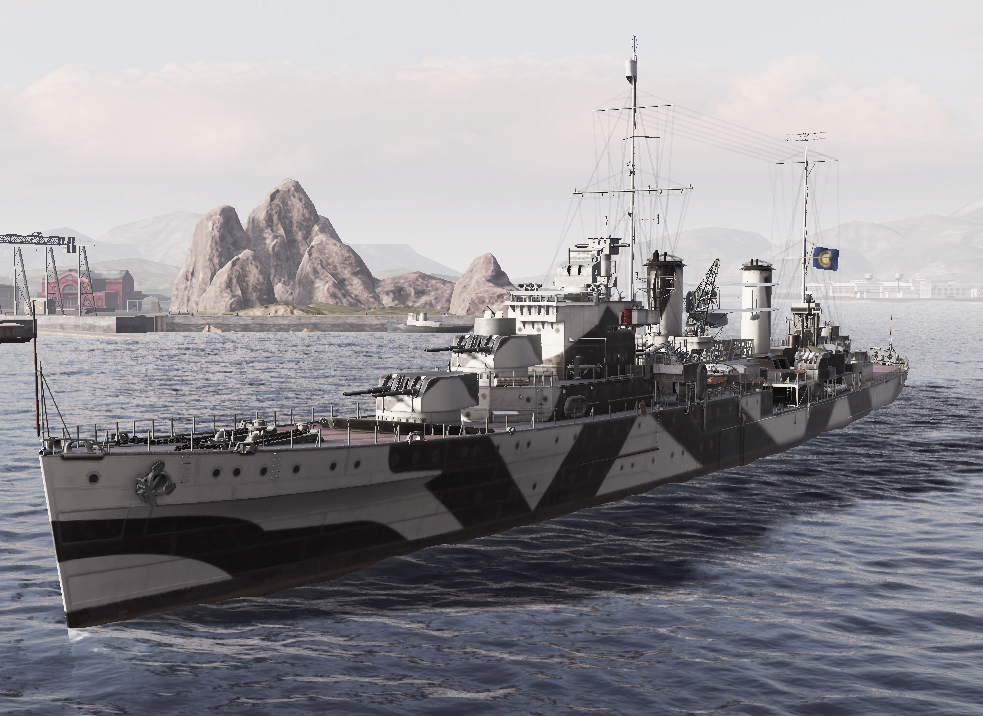
3D rendition of the Perth (World of Warhips)


HMS Achilles
HMNZS Achilles circa 1941 – Allan C. Green coll.
Commissioned on 10 October 1933 she was the first of the improved Leander group to carry a floatplane, the medium range Supermarine Walrus. After service with the Royal Navy NZ division she joined in 1937, and in September 1941 was transferred to the newly-formed Royal New Zealand Navy. Her crew at that stage was composed of 60% New Zealanders.
Before that, she patrolled the south atlantic, searching for German privateers and later the Graf Spee, which saw her joining the Force G together with her sister ship Ajax and HMS Exeter (and the Cumberland which was still in the Falklands when the day came out). What followed was the clash between this truncated South American Division under Commodore Henry Harwood and the Graf Spee. In this duel, which started at 20 kilometres (11 nmi) at dawn, and she was hit, four crew killed, and captain, W. E. Parry wounded; But she went on firing until 07:15 when, while the distance fell to only 4 km, Graf Spee, hit too, broke off the engagement.
The next year, HMNZS Achilles was back in Auckland, New Zealand for a refit. After seaching for German raiders in the South Pacific and some escort missions between NZ and Australian she joined the ANZAC Squadron in the south-west Pacific, under orders of Rear-Admiral John G. Crace as flasghip. Together with HMAS Perth, she protected the Pensacola convoy.
She actively served in that role until 1943 and joined the US Navy Task Force 67 to operate at Guadalcanal. However on 5 January 1943 she was attacked by IJN planes X turret was hit and blown up. She stayed in Portsmouth for repairs and modernizations until May 1944, receiving notably dual-purpose twin QF 4 inch Mk XVI guns and new radars and added AA like a quad QF 2 pom poms installed in place of the former X turret.

INS Delhi in 1953 Credits: dennilfloss.blogspot.com
However work was cut short by a dockyard explosion and she was repaired until March 1945. She joined the British Pacific Fleet in May 1945, participating in the last operations until September. Back in home waters she was placed in reserve, put on disposal list then resold to India and recommissioned on 5 July 1948 as INS Delhi. She served proudly until 1978, but instead of being scrapped she was offered to the NZ government and is now on display at the Devonport Naval Base in Auckland.
Author’s HD Illustration of HMS Achilles in 1939
Design of the Amphion group
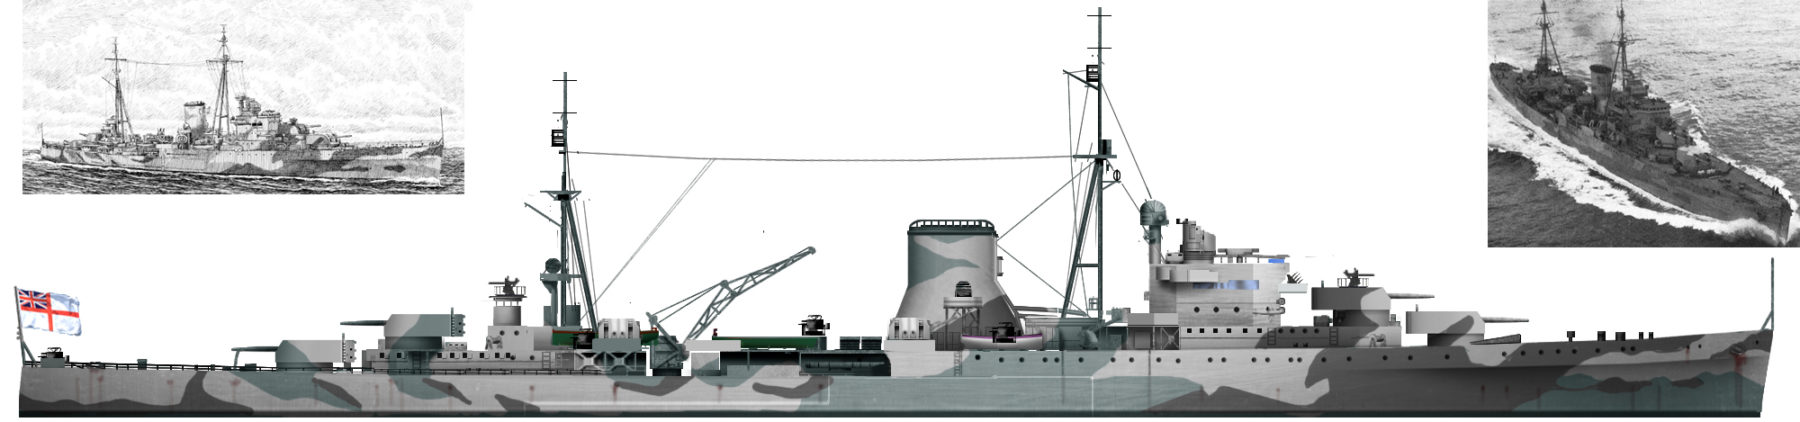
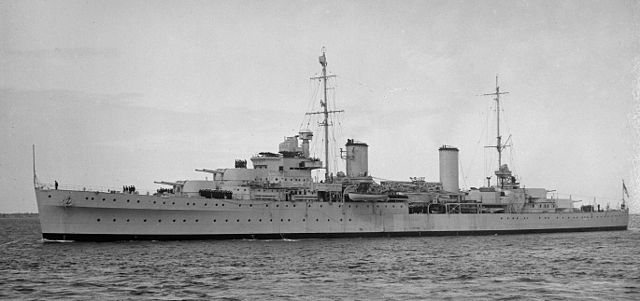
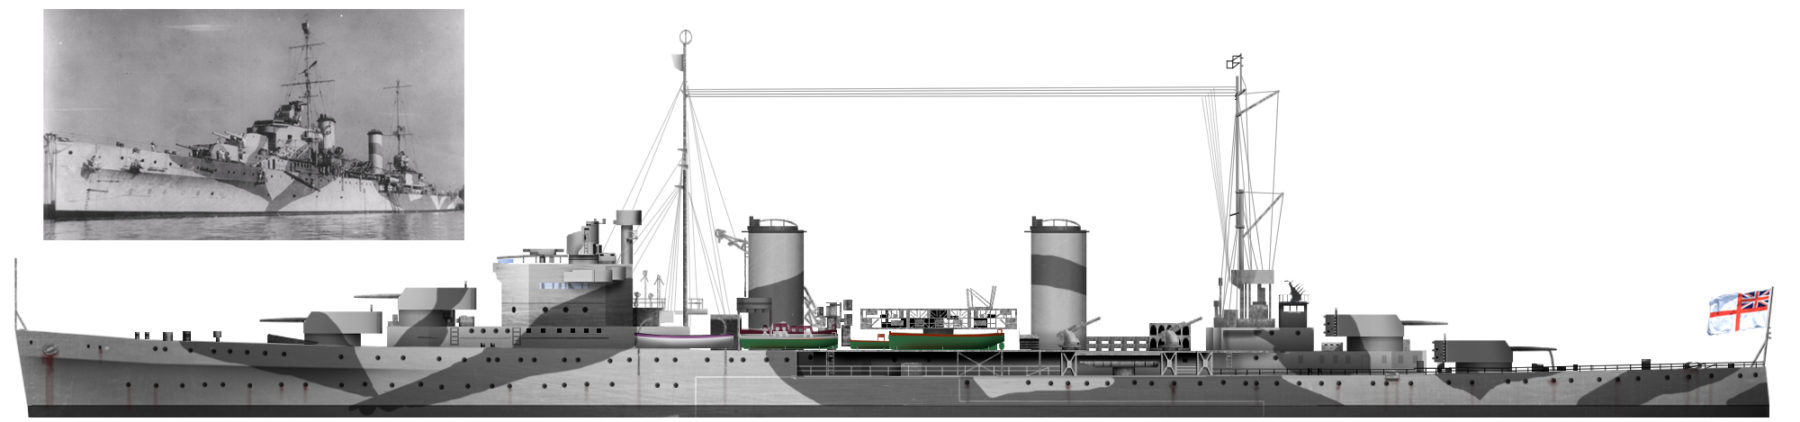
The last three ships of the Leander class varied among authors, between “Amphion” and “Perth” (second name) class. Apart many superstructure details, the biggest difference was their machinery and propulsion. It was organised in two self-contained units well separated fore and aft. This system was done to prevent the ship to be dead on the water in case of a hit, as one compartment would have been still able to propel the ship.
Therefore this new arrangement called for the two exhaust funnels far apart, and instantly more recoignisable look. Machinery spaces had the side armour extended from to 141 feet (43 m) almost double the original design. But this negated the weight reduction. However this sytem was copied on the next class Arethusa.
When the blueprints were still on drawing stage, both deck-level turrets were to be fitted with three guns (ten guns total) but new calculations cancelled the prospect as it would have impacted the top speed and complexified fire control. Other than that, modifications included the placement of the windows on the bridge walls, alteration in the higher up fire control telemeter, masts, ventilation shafts, boats, crane, catapult, AA guns and even the secondary DP guns, previously forward abaft the main bridge, and relocated aft, as well as the forecastle.
The Australian cruisers in action
All three ships were sold to the RAN (Royal Australian Navy), Phaeton was renamed Sydney in 1939, Amphion was renamed Perth and Apollo Hobart after a few years of British service under their launch names. They fought in the pacific and the Mediterranean: Perth participated in the Battle of Cape Matapan in March 1941, joined the pacific and was lost in action at the Battle of Sunda Strait in early 1942 (Guadalcanal).
HMAS Hobart took part in the East African Campaign, Battle of the Coral Sea and Guadalcanal, Philippines campaign in 1944 and the Borneo/Aitape-Wewak campaigns. HMAS Sydney fought with distinction at the Battle of Cape Spada, Battle of Cape Matapan and Battle of Calabria. In 1941 famously she ended her days fighting off Western Australia the German auxiliary cruiser Kormoran and destroyer her while sinking herself in one of the most epic duels of ww2.
HMS Amphion/HMAS Perth
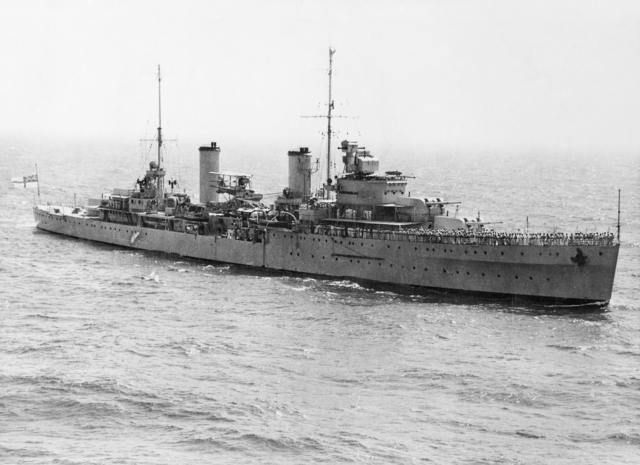
Perth underway in 1942
First cruiser of the second serie, HMS Amphion (D29) diverged extensively by several details. she was commissioned as HMS Amphion in 1936. She was posted the last years of the interwar in the North America and West Indies Station. In July 1939 before the war broke out, she was transferred to the newly created RAN, recommissioned as HMAS Perth. Her crew travelled already from May 1939 to join the ship in pitiful conditions among livestock, and during the 1939 New York World’s Fair where they represented Australia a mutiny erupted over discipline, wearing new uniform to get on shore. The situation was serious enough and tense with officers that the NY police Dept sent a heavy force on the wharf in case.
HMAS Perth (Amphion) after battle damage, before refit, author’s HD illustration.
When the war broke out, Perth was sailing off the coast of Venezuela. She searched for German shipping ans auxiliary cruisers and raiders, and then was sent to Alexandria to relieve Sydney. She covered several convoys to Malta with the 7th Cruiser Squadron and was air attacked several times. She also operated in Crete and off Greece for last ditch reinforcements in 1941 (and later their evacuation). She took part actively in the Battle of Cape Matapan, during the night og 28-29 March 1941, battle of Crete, and was badly hit by a Stuka, hitting the ‘A’ boiler room. Thanks to her new engine compartimentation, she was able to sail ou of harm, with 1200 “Tommies” on board. She later took part in the Australian campaign against Vichy French forces in Syria, and closely avoided a friendly bombardment by allied aviation.
Two views of HMAS Perth in 1942
She was later sent to the Pacific to join the ANZAC squadron after a short refit in Brisbane, with AA and other alterations. With HMNZS Achilles she covered the Pensacola convoy. However fatefully she was sent to the American-British-Dutch-Australian (ABDA) force. After missions back and forth from Singapore to Australia, she arrived at Tanjong Priok on 24 February 1942 in the midst of a Japanese air attack. She joined Surabaya with Exeter and the destroyers Jupiter, Electra and Encounter, to place herself under command of Dutch Rear-Admiral Karel Doorman.
ABDA then sailed to intercept a convoy guarded by eight cruisers. In the following engagement, Perth badly damaged an IJN destroyer, but the duels eventually split forces. The Dutch cruisers De Ruyter and Java were sunk, Exeter was separated and Perth was found assisting the USS Houston in what became the Battle of the Java Sea.
Rare color photo of HMAS Perth, date unknown.
However, low on fuel and ammunitions, Perth, Houston, and the Dutch destroyer Evertsen sailed at sunset for Tjilatjap via the Sunda Strait. Here, a large Japanese force had assembled at Bantam Bay fell on them. The IJN was expert in night fighting and known for agressive torpedo attacks. The cruiser changed course to escape but took four Japanese torpedoes in the space of a few minutes. Evacuated, she sank at 25 min. past midnight with 353 lost.
The survivors were picked up by the Japanese and ended in POWs, only 218 surviving the war internment. The wreck of HMAS Perth sparkled controversy when she was allegedly pillages by Indonesian divers in 2013. The ship was not protected as a war grave and was broke up with dynamite for scrap metal value and it soured Indonesian-Australian relations for years;
Author’s HD profile of HMS Perth in 1942.
HMS Apollo/HMAS Hobart

HMS Apollo before transfer to the RAN in Miami, 1938
HMS Apollo entered service in 1936, and until 1938 was posted to the American and West Indies station (The carribean), and she was purchased by the Australian Government in 1938, as well as the aviation tender HMAS Albatross, but this was postponed to September because of the Munich crisis. HMAS Hobart started her wartime career by escort duties patrolling Bass Strait, and up from Colombo to the Indian ocean and Arabian gulf. She later joined the East Indies Station and red sea squadron with HMS Liverpool. On 12 June 1940 she fired on Italian aviation off Aden while her Walrus bombed the Peak Island Italian wireless station.
She escorted a reinforcement convoy bound to East Africa after the Italian invasion of British Somaliland, and later the evacuation. Fighting rearguard actions with a 3-pdr AA converted into an had oc AT gun and the Walrus bombing the Italian headquarters at Zeila, HMAS Hobart crew successfully helped the British evacuation. In total the Australian vessel would cover 7,000 soldiers and civilians aboard a heterogenous flotilla of vessels.
HMAS Hobart – src SLV Allan Green
In the end of 1941, the cruiser saild back to Colombo and then Australia, becoming the flagship of Rear Admiral John Gregory Crace. Her seaplane catapult and crane were removed, and she was sent back to the Mediterranean, fighting off air attacks at Port Tewfik. She covered actions of the Western Desert Campaign until December 1941. Throughout 1942 she was in constant convoy escort duties in the Far East Station. She was attacked by Japanese aviation while refuelling from a tanker at Tanjong Priok, took damage and was not able to join the ABDA squadron.
HMAS Hobart joined the composite force deployed to prevent an invasion of Port Moresby, composed of the Australia, Hobart, USS Chicago, and Perkins, Walke, and Farragut at Jomard Passage. They were exposed to three IJN air attacks and later were redeployed off Port Moresby. However nothing happened, and Hobart was sent to cover landings at Guadalcanal and Tulagi. However on 20 July 1943 while en route from Espiritu Santo to join TF 74 she was torpedoed by a Japanese submarine, destroying an entire section of the port quarter. She had to limp back to Espiritu Santo escorted by two US destroyers.
She later sailed back for more extensive repairs at Cockatoo, being out of service until 1944. Back in service she covered the landing at Tarakan (25 April 1944), Wewak (11 May) Brunei (June 1944), and Balikpapan (July). She was present at V-day in Tokyo bay. She would serve as a training vessel postwar, ironically sold for scrap to a Japanese shipbreaker on 22 February 1962.
Author’s HD illustrations of the two known camouflage pattern used in 1941 and 1942 by HMAS Hobart.
HMS Phaeton/HMAS Sydney
HD Rendition of the HMAS Sydney in 1935
In 1934, the Australian government seeked a replacement for the old HMAS Brisbane, and negotiations for the purchase of HMS Phaeton while she still under construction took place. She was commissioned with the RAN on 24 September 1935. She sailed with RN captain J.U.P. Fitzgerald from Portsmouth on 29 October 1935 and joined the Mediterranean Fleet at Gibraltar to assist the 2nd Cruiser Squadron during the Abyssinian crisis. She spent her last interwar years off Australia in fleet exercises and training cruises.
Under John Collins she joined Australia and Canberra to try to catch the KMS Admiral Graf Spee when she was operating in the Indian Ocean. She then joined the escort force bound to the middle east with Canberra, Leander and Ramillies. She was posted in March-April in the Cocos islands when replaced by French cruiser Suffren, then was back to Fremantle, and the East Indies Station and after a while she was attached to the British 7th Cruiser squadron of British Mediterranean Fleet under Admiral Andrew Cunningham.
After a westbound sweep, she joined Orion, Neptune, and the French battleship Lorraine shelling Bardia. During the operation she lost her Walrus, shot by Italian CR42 fighters. She was present at Alxandria during Operation catapult, where fortunately no gunfight with the new Vichy French fleet took place.
HMAS Sydney in 1940, AWM
On 28 June 1940, while escorting a convoy to Malta she engaged a large Italian destroyer force, badly damaging and later sinking the Espero. During the 9 July engagement she fired on an Italian Zara-class cruiser from 23,000 yards (21,000 m) and so participated in the Battle of Calabria (Or Punta Stilo). En route to Malta she fend off several air attacks and spended all her AA ammunitions; After a stop in Alexandria for resupplying she spotted and engaged on 19 July the Italian cruisers Giovanni dalle Bande Nere and Bartolomeo Colleoni, assisted by destroyers.
In the Battle of Cape Spada she badly hit both cruisers successively, forcing them to escape in smoke. For this action, the cruiser’s crew received two DSO, DSC and five DSM with twelve mentions. In the fall of July both her and HMS Neptune were in the Aegean. They destroyed the Italian tanker Ermioni. During the rest of the summer she stayed at Alexandria for a refit and received her camouflage. She was even modified to look like a Condotierri class cruiser, successfully approaching and shelling the Italian Makri Yalo Airbase at Scarpanto. Congratulated by Cunningham she gained the nickname “stormy petrel”.
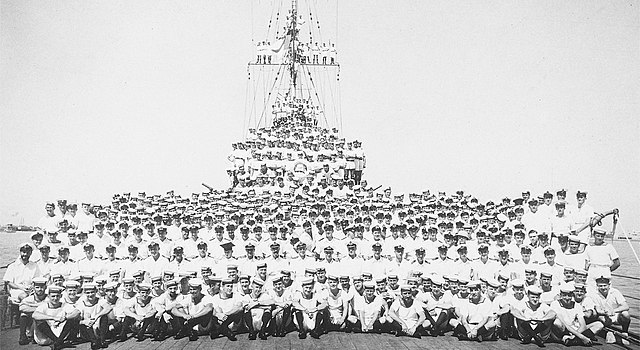
Sydney’s Crew
After Malta convoys, and assisting convoys to and from Greece, HMAS Sydney operated at Souda Bay in Crete, and was attacked and hit by Italian aircraft on 24 November 1940. In January 1941 after a small refit she was back chasing German merchant raiders on the road to Australia from the red sea. She nearly missed the merchant raider Atlantis. Until November 1941 she multiplied escort missions of ANZAC troops to Africa. She received a distress signal on 19 November 1941 from Straat Malakka signalling she was chased by an unknown merchant raider. HMAS Sydney scrambled in hot pursuit, and eventually the Australian cruiser catch up what was revealed to be the KMS Kormoran.
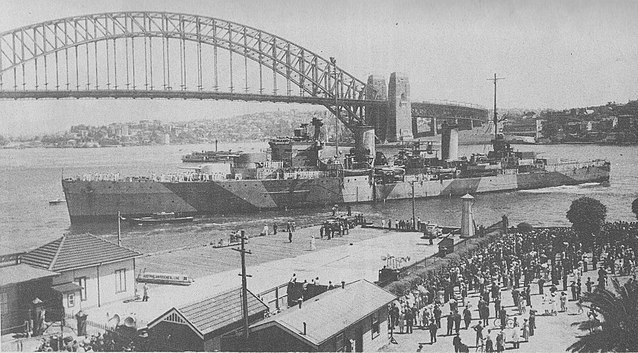
HMAS Sydney at Sydney Cove in 1941
Her last and most fateful duel began at 17:30 when the German ship revealed her true identity and with this surprise advantage, her six 6-in guns rapidly hit the Sydney at short range, hitting the cruiser’s bridge and gun director tower, damage the forward turrets, and set the aircraft on fire. It seemed Sydney was less accurate. After 5 minutes of fierce fighting her main armament was mostly disabled but she was partly masked by the smoke caused by her multiple fires. She tried to open the gap while she was pounded mercilessly, her secondary armament out of range. 10 min.
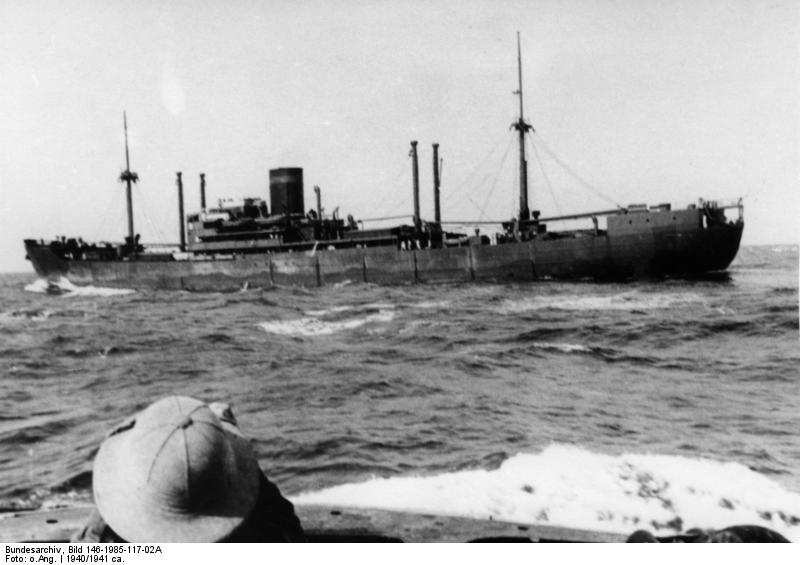
German merchant raider KMS Kormoran.
Later Sydney launched a torpedo volley, which missed as the German ship manoeuvred but broke down her engine in the process. While immobilized she continued to fire on Sydney until 17:50, when the distance closed to at 6,600 yards (6,000 m), and she fired her own torpedoes but missed; Sydney would sink later around 22:00 after burning heavily, with great loss of lives. The news of this loss was morally crippling, as this represented until then 35% of total Australian losses in this war. Kormoran own fires were soon out of control and she was evacuated and scuttled after midnight, the survivors being later interrogated.

HMS Leander 1939 specifications |
|
| Dimensions | 169 m long, 16.97 m wide, 6 m draught (fully loaded). |
| Displacement | 7,200 t. standard -9,500 t. Fully Loaded |
| Crew | 630 |
| Propulsion | 4 shafts Parsons turbines, 6 Admiralty boilers, 72,000 hp. |
| Speed | 32.5 knots, Range 4,500 nautical at 14 knots. |
| Armament | 8 x 6-in (152 mm/50) (4×2), 4 x 4-in (102 mm/45) MK V AA, 12 x 0.5 in Vickers mm AA, 6 x 21-in (533 mm) TTs, 2 seaplane. |
| Armor | Belt, main deck and turrets 25 mm (2.54 in), ammunition magazines 76 mm (3 in). |
Links/sources
Colledge, J. J.; Warlow, Ben (2006) [1969]. Ships of the Royal Navy: The Complete Record of all Fighting Ships of the Royal Navy
Lenton, H.T.; Colledge, J.J (1968). British and Dominion Warships of World War Two.
Jack S. Harker. HMNZS Achilles. William Collins Publishers.
Gill, G. Hermon (1957). “Ch. 14”. Royal Australian Navy 1939-1942
Conway’s all the world’s fighting ships 1921-1947
www.naval-history.net/xGM-Chrono-06CL-Achilles.htm
www.naval-history.net/xGM-Tech-NZRadar.htm
navymuseum.co.nz/hmshmnzs-achilles-leander-class-cruiser/
uboat.net/allies/warships/class/67.html
www.hmsajax.org/the-battle-of-the-river-plate/4559373096
en.wikipedia.org/wiki/Leander-class_cruiser_(1931)
rapidttp.co.za/waratsea/neptune.html
ericcolbourne.com/remembrance/
i.ytimg.com/vi/xzyo_xSnUas/maxresdefault.jpg
blueprints-depot/ships/cruisers-uk/hms-ajax-1942-light-cruiser.png
Model of the Ajax
 Latest Facebook Entry -
  X(Tweeter) Naval Encyclopedia's deck archive
 Instagram (@navalencyc)


 French Navy
 Royal Navy
 Russian Navy
 Armada Espanola
 Austrian Navy
 K.u.K. Kriegsmarine
 Dansk Marine
 Nautiko Hellenon
 Koninklije Marine 1870
 Marinha do Brasil
 Osmanlı Donanması
 Marina Do Peru
 Marinha do Portugal
 Regia Marina 1870
 Nihhon Kaigun 1870
 Preußische Marine 1870
 Russkiy Flot 1870
 Svenska marinen
 Søværnet
 Union Navy
 Confederate Navy
 Armada de Argentina
 Imperial Chinese Navy
 Marinha do Portugal
 Mexico
 Kaiserliche Marine
 1898 US Navy
 Sovietskiy Flot
 Royal Canadian Navy
 Royal Australian Navy
 RNZN Fleet
 Chinese Navy 1937
 Kriegsmarine
 Chilean Navy
 Danish Navy
 Finnish Navy
 Hellenic Navy
 Polish Navy
 Romanian Navy
 Turkish Navy
 Royal Yugoslav Navy
 Royal Thai Navy
 Minor Navies
 Albania
 Austria
 Belgium
 Columbia
 Costa Rica
 Cuba
Cuba Czechoslovakia
 Dominican Republic
 Haiti
Haiti Hungary
 Honduras
 Estonia
 Iceland
 Eire
Eire Equador
 Iran
Iran Iraq
Iraq Latvia
 Liberia
 Lithuania
 Mandchukuo
 Morocco
 Nicaragua
 Persia
 San Salvador
 Sarawak
 Uruguay
 Venezuela
 Zanzibar
 Warsaw Pact Navies
 Bulgaria
 Hungary

 Bundesmarine
 Dutch Navy
 Hellenic Navy
 Marina Militare
 Yugoslav Navy
 Chinese Navy
 Indian Navy
 Indonesian Navy
 JMSDF
JMSDF North Korean Navy
 Pakistani Navy
 Philippines Navy
 ROKN
ROKN Rep. of Singapore Navy
 Taiwanese Navy
 IDF Navy
 Saudi Navy
 Royal New Zealand Navy
 Egyptian Navy
 South African Navy


 Ukrainian Navy
Dear Ladies and Gentlemen,
your website is very interesting and maybe you can help me.
I would like to build the Fairey Seafox in 1/72nd scale from Matchbox/Revell. What were the markings of the Ajax when it flew to the Graf Spee in the battle of the Rio de la Plat? And what livery did the Seafox have at that time.
If you can point me in the right direction, I would be very grateful.
I’ll try to find it. The ship’s emblem was https://i.pinimg.com/originals/01/42/b8/0142b8356f0ecf8de6f246b5805f6554.png
And here is a reference: http://i145.photobucket.com/albums/r214/Paul_Bradley/Matchbox/seafox-ajax_zps1tariypb.jpg~original
The seafox is part of the upcoming naval aircraft planned by Naval Encyclopedia
Cheers !