
The Royal Australian Navy in 1939-45
With interwar and wartime provision of Royal Navy ships and some built in situ, the RAN (Royal Australian Navy) was one of the most powerful in the Pacific at the end world war two, and one of the most active as well, with many battle honors on the Pacific and Mediterranean as well.
From the Federal colonial navies to the RAN
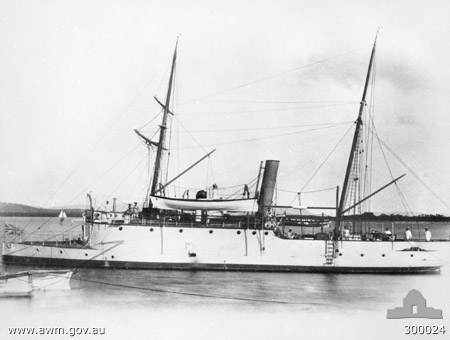
HMQS Paluma – Australian War Museum
The history of the Royal Australian Navy started really from the colonisation of Australia by the British in 1788 as the latter left a few Royal Navy ships in place. Until 1859, the Royal Navy assumed indeed the protection of its colonies and Australia the same year was protected by the newly created Australia Squadron. It was formed as a separate squadron as first, with a collection of ships, but stayed all-year round in Australia. Its presence was certain until 1913.
However before that a reorganisation saw the colony transformed into a Federation. Five of the six Australian colonies had their own colonial naval force. On 1 March 1901, they formed the basis for the Australian Navy’s Commonwealth Naval Force, two months after the federation of Australia. This required the naval forces of the separate Australian colonies to be amalgamated. It received Royal patronage by July 1911, but was referred to, from this moment, as the Royal Australian Navy (RAN).

HMAS Encounter
Articles
In 1908–09, the government choosed a compromise with a force setup for local defence but capable to form a fleet capable to be inserted within the imperial naval strategy, but not under her central control. It was structured around a single battlecruiser, three light cruisers, six destroyers and three submarines. On 10 July 1911, King George V granted it the title of “Royal Australian Navy”.
Soon the fleet received the first of ther new vessels, the destroyer Yarra, just completed in September 1910. The initial plan would be realized in majority as the war broke out. By October 1913 the new Australian fleet, which was made of new ships from the UK, paraded for the first Australian naval review in Sydney harbour.
The RAN in WW1
The Royal Australian Navy was engaged overseas very soon. The Australian Squadron was soon placed under control of the British Admiralty, receiving a pressing request of transfer. The first task was capture many of Germany’s South Pacific colonies. Her secondary task was to cover Australian shipping from possible German East Asia Squadron attacks. Both of course were complementary.
By capturing German assets in the area, this pushed out their naval assets out of harm. However as soon as the German threat was eliminated, the RAN started to operate as part of Royal Navy forces in the Mediterranean and Northern Sea. Some ships also ventured in the Adriatic and then the Black Sea after the Ottoman Empire surrendered. There will be a dedicated page on the topic of the RAN in the great war, also detailing the origin of the navy (XIXth century). The control, effective from 10 August was still active until 19 August 1919.
In the summer 1919, shortly before demobilization, the RAN counted 3,800 personnel and sixteen ships: Notably the battlecruiser Australia, the cruisers Sydney and Melbourne, destroyers Parramatta, Yarra, and Warrego, submarines AE1 and AE2. The light cruiser Brisbane and three destroyers were still under construction, as well as the HMS Adelaide, plus a small fleet of auxiliary ships, quite a formidable force in the Pacific, although much smaller than the Japanese Imperial Navy.
Rise and fall during the interwar
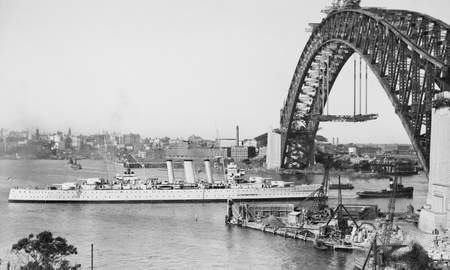
HMAS Camberra under the Sydney bridge in 1930
In 1919, the RAN received a force of six destroyers, three sloops and six submarines from the Royal Navy. The same years, RAN ships still integrated in the grand fleet was hit hard by the flu pandemic. Fortunately the rest of the ships were dispersed at sea and escaped it.
The RAN from 1920 knew a decade of reduction in size due to a political apathy and the economic collapse and its consequences in 1929. The financial crisis make the RAN dwindling to a much smaller smaller size than its WW1 equivalent. Australia’s naval policy has been defined in the 1911 Henderson Recommendations of (by Sir Reginald Henderson).
Jellicoe’s recommendations
Admiral John Jellicoe was invited by the Australian government to make an assessment of it in 1919, and after three month wrote a report on the Naval Mission to the Commonwealth, which detailed the actual policies, possible objectives and recommendations for the whole Commonwealth naval assets in combination with the RN. The position of the RAN in the Indian Ocean was also recalled.
He recommended notably a strict streamlining of the rules used in both navies and that the RAN should stick to the Royal Navy procedures whenever possible and constant officer exchange between the two navies.
Far East Imperial Fleet
Admiral Jellicoe also helped to the Constitution of the Far East Imperial Fleet. The fleet was based in Singapore, including capital ships and aircraft carriers. It was a newly created force, not curtailing the actual assets of the Grand Fleet. Its cost was to be divided between Great Britain, Australia and New Zealand at a respective rate of 75%, 20%, and 5%.
The RAN own contribution was one aircraft carrier, two battlecruisers, eight light cruisers, one flotilla leader and twelve destroyers plus a destroyer depot ship and eight submarines plus a submarine depot ship (to be built in UK), and auxiliary ships. Annual cost and depreciation was estimated to £4,024,600. Unfortunately with the 1929 crisis, this was never carried out. Only the closer ties between the fleets was retained.
The threat of Japan
The Australian Government started to worry about the Japanese expansionist policies right after the Great war. It was feared that the Empire would expand its span passed its recent 3,000 kilometres (1,900 mi) reach to the south. Further extension in possessions around Indonesia and south pacific chain islands would bring it right to Australia’s doorstep.
This expansion came with a serious build up of the naval force, reaching the point it outgunned the Royal Navy in the Pacific, and wen well beyond, even after the Washington treaty ban on capital ships. The government believed in the possibility of a Japanese invasion to some extent.
Admiral Jellicoe’s report this should be feared indeed as long as the White Australia Policy remained in place. The Australian Government supported the continuance of the 1902 Anglo-Japanese Alliance and a stronger alliance with New Zealand. This was however strongley opposed by Canada, which thought it could hinder the British Empire’s relationship with China and the US.
The “four powers pact” and budget cuts
Discussions went on but no decision was made as the Washington Naval Treaty was signed. The treaty allowed the British to retain its naval supremacy in the Pacific Ocean, and therefore bring some security to Australia. This evolved into thee “Four Powers Pact“, replacing the Anglo-Japanese Alliance. This created a sense of security for the Australian government known as the Ten Year Rule, with the downside for the RAN of acute defence budget cuts, which were merely following the international trend. In total this called for a £500,000 reduction. On 22 June 1922 the Governor-General Henry Forster made it clear, stating that with a guaranteed peace in the Pacific, a reduction of the navy and army were necessary, as well as postponing any expansion of the RAAF.
HMAS Albatross (1928), sole seaplane carrier of the RAN, by default of a more costly aircraft carrier. She was built in Australia, at Cockatoo, but only served until 1933, resold to the RN for the partial payment of the cruiser HMAS Hobart. The Albatross was not satisfactory, she only can reach 22 knots and lacked a catapult so operating aircraft was a long and difficult affair. Many inside the RN and the RAN thought that can of ship was no longer relevant in the 1930s as most cruisers already carried their own observation seaplanes.
The battlecruiser HMAS Australia was scrapped with her main armaments, sunk outside Sydney Heads in 1924 as to respect the Washington treaty for capital ships (Commonwealth tonnage was assimilated with RN tonnage). Instead of an aircraft carrier, Australia purchased the HMS Albatross, a seaplane carrier. Brisbane, Melbourne, Sydney, and most of the destroyers were also scrapped, helping in the purchase of two heavy cruisers of the County class, HMAS Camberra and Australia (ii).
In 1923, already the fleet was down to eight ships, five in 1932, with just 3,500 personnel. From 1930, lack of funds urged the relocation and reduction of the Royal Australian Naval College from Jervis Bay to Flinders Naval Depot in Victoria. Also the Albatross was sold in order to fund partially for the acquisition of the light cruisers Perth, Hobart, and Sydney (Leander class) and several, now ageing V and W class destroyers.
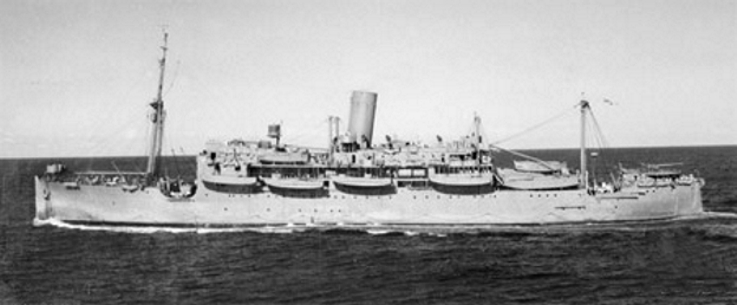
HMS Hobart in the late 1930s
Prelude to war (1938-40)
However in 1938 as international tensions rose, the government obtained credits to modernize and expand the RAN rapidly. In particular the RAN benefited from the priority compared to the two other branches, the air force and army. Although there was little time for extra orders from UK, in September 1939 mobilization started and
> Backbone: Two County-class heavy cruisers: HMAS Australia and Canberra (8×8-in guns, launched 1920s).
> Three modified Leander-class light cruisers: HMAS Hobart, Perth, and Sydney (8×6-in guns)
> The older Town-class cruiser Adelaide, a Town class cruiser completed in Australia in 1923
> Four sloops: HMAS Parramatta, Swan, Warrego, Yarra (Clones of the Grimsby class, 1935)
> Five V-class destroyers: Purchased on the stocks, dating back 1918.
HMAS Waterhen, one of the Australian vintage destroyers (AWM)
This force was not really impressive but it grew rapidly in size, gaining another heavy cruiser in replacement of the Australia (HMS Shropshire) whereas two light cruisers were lost, three large “Tribal” class destroyers, three more (?unknown), so 11 total at the end of the war, but also many more auxiliary ships as seen below:
Anti-submarine auxiliaries: 3
Auxiliary Minesweepers: 6
Minelayers : 1
Replenishment armed oilers: 1
Combat stores ships: 12
Repair ships: 3
Net laying ships: 10
Tugs: 6
Cable repair ships: 2
Survey ships: 9
Motor Launches: 33
Harbour Defence Motor Launched : 28
Air Sea Rescue vessels: 20
Auxiliary patrol boats: 75
Services reconnaissance: 8
Other vessels: 41
HMS Dorsetshire in Sydney
The Royal Australian Navy in WW2
HMAS Sydney in her war paint in 1941 (AWM)
When the second world war broke out, the focus of her naval policy as now limited the defence of trade protection.
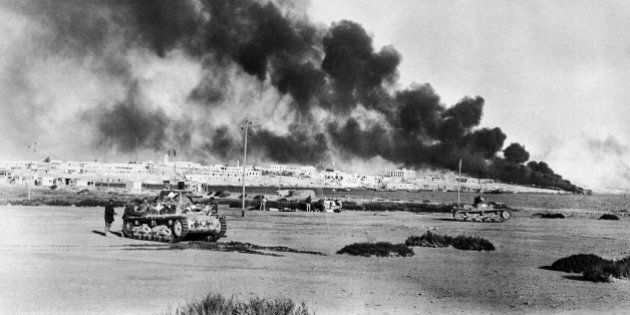
From 1939, Royal Australian Ships operated as part of Royal Navy formations. They served first in the Mediterranean, the Red Sea and the Persian Gulf, in fact on the way to the Indian Ocean, or the West African coast. After Pearl Harbor the IJN successfully eliminated the amalgamated allied forces, centered around the British, adding the Dutch, Australians and Americans. In south-east Asia, RAN afterwards was forced to operate autonomously and later teamed up with USN task forces as circumstances required. Until December 1941, the RAN assumed the liaison between Australia and Singapore and the Mediterranean via the Indian Ocean and red sea. Australian troops took indeed a major role in the North African Campaign, and the Mediterranean was the first major theatre of operation for the RAN.
From December 1941, the RAN was more heavily engaged, and closer to home, which raised the stakes. The Australian Navy was reinforced by either locally built ships or allied vessels. The RAN grew to very high levels, operating like the Canadian Navy at the end of the war some 350 ships of all sizes and type, doing her share in ASW warfare with 53 corvettes and many frigates, backed-up by 600 small auxiliary civilian vessels used to patrol the sea lanes and Australian coast. The RAN may have been then the fourth, fifth or sixth world’s largest navy depending on the mode of counting tonnage by type (including auxiliaries).
The extension of the Nay was considerable, to the point for some authors to consider it at some point as the fourth-largest navy with 39,650 personnel and 337 warships at its peak. Losses were considerable until 1943, and about 34 RAN ships were lost in action, including three cruisers and four destroyers.
Hypothetical Australian battleships ?
Whatif HMAS Australia(i) in 1942. If the Washington treat was not applied to this battlecruiser, this is probably the look of the ship if maintained in service and modernized in 1940-42. Armed with BL 12-inch Mk XII guns (modernized mounts for more elevation), ten twin 4.5 in (114 mm) DP guns, four octuple QF 2-pdr Bofors, 26 Oerlikon 20 mm AA guns.
Indeed the RAN only comprised cruisers during the war, some six of them. This was a considerable force, which did her share of the heavy fighting on all fronts during the war. However no battleship ever served under Australian colors. This was seen unlikely as the Royal Navy, and after the disaster of December 1941 in Singapore and growing engagement of the USN this was largely seen as superfluous. There is no known order for a battleship, which would have been built in UK in any case as as the Washington treaty drew to a close, British yards were busy building the new generation of fast battleships for the Royal Navy and had no capacity to spare.
The leasing of one of the Resolution-class dreadnoughts was not envisioned either. The only capital ship ever possessed by the RAN has been the battlecruiser HMAS Australia, but the disarmament provisions of the Washington Naval Treaty required its destruction, as part of Empire’s commitment, which happened off Sydney in 1924.
The Mediterranean front 1939-41
From September-October to January 1940, the RAN patrolled home waters and started convoy escorts, protecting merchant traffic and trade lanes, although German presence in these waters was nearly non-existent, apart from German auxiliary cruisers, a threat that was very seriously considered. However from September 1939, the British Admiralty and the Australian Commonwealth Naval Board ordered the deployment of the RAN Destroyer Flotilla in the Mediterranean as requested.
This was the beginning of the “Scrap Iron Flotilla”* based on Malta from mid-December.
From mid-1940, the Admiralty requested the remainder of the RAN to be redeployed to the Mediterranean Sea as the RN had to fight both Nazi Germany and Fascist Italy. By June of course the situation was aggravated by the capitulation of France and uncertain fate of its mighty fleet, the Marine Nationale.
HMAS Sydney by May 1940 joined HMAS Hobart and as soon as Italy declared was on 10 June 1940, they protected the Australian destroyer squadron. At that time they came as a relied as the RN had only five cruisers in the Med. The RAN massive redeployment as requested, left open Australia to possible attack. The Japanese threat by then was not taken in consideration.
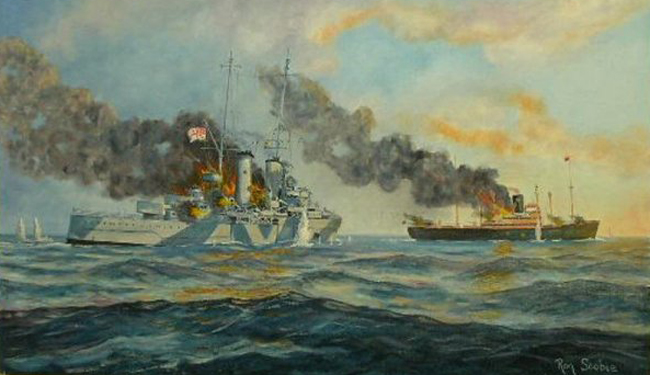
Soon, action of the RAN against Italy bore fruits: On 12 June 1940, the Armed Merchant Cruiser HMAS Manoora chased for hours the Italian freighter Romolo (9,780 tons) and forced it to scuttle south-west of Nauru. On 27 June 1940, Admiral Cunningham ordered the 7th Cruiser Squadron (HMAS Sydney and other ships) to meet a convoy to Egypt, transiting near Cape Matapan. Italian destroyers were spotted the following day in the evening and a battle erupted. The destroyer Espero was badly damaged and sunk by Sydney with ten direct hits at short distances, dodging her torpedoes, and later picking up survivors.
On 27 June 1940, Generale Liuzzi was depth-charged by HMAS Voyager and British destroyers. Two days later it was the turn of submersible Uebi Scebeli, off Crete. On 7 July, an allied fleet departed Alexandria to Malta, spotting an Italian fleet 500 miles away. Interception course led to a mutual discovery at 15.00, 9 July 1940. The Battle of Calabria engaged four RAN vessels, the cruiser HMAS Sydney, and the destroyers Stuart, Vampire, and Voyager, Sydney opening the first shots of the battle.
As the Italian withdrawn, Allied destroyers were ordered forward in hot pursuit. HMAS Stuart, leading the pack, made an unlikely direct hit at 12,600 yards (11,500 m) on one of the Cruiser, which soon poured smoke, and disappeared in the dark, while Italian naval aviation counter-attacked. Sydney was attacked, but dodges bombs and torpedoes and made it back in Alexandria.
On 17 July 1940, HMAS Sydney and the destroyer HMS Havock made their way with British destroyers in the north of Crete and two days later, the Italian cruisers Giovanni dalle Bande Nere and Bartolomeo Colleoni, spotted them and a battle followed. The four British destroyers retreated whereas HMAS Sydney and Havock closed in to engage fire. That was the start of the Battle of Cape Spada at 17,360 metres (56,960 ft). Sydney damaged the Bande Nere, making both cruisers withdrawn, and the allies in hot pursuit.
Bartolomeo Colleoni, was engaged by HMAS Sydney, and disabled, whereas she altered course to chase the fleeing Bande Nere, only to break off out of range and very low on ammunition. A single Italian hit made a hole in the forward funnel, wounding a sailor. On 30 September 1940, HMAS Stuart spotted, surprised and destroyed the Adua class submarine Gondar.
HMAS Australia
In March, 27, 1941, Admiral Cunningham ambushed the Italians off Cape Matapan and unleashed notably the HMAS Perth, Stuart, and Vampire. On 27 November 1941, there was payback for the axis as HMAS Parramatta was sunk by U-559 during an escort bound to Tobruk. On 15 December 1941 HMAS Nestor sank the U-127 off Cape St. Vincent, Portugal, avenging the Parramatta. Attention then shifted to East Africa, from 6 September 1940. HMAS Australia sailed to Freetown, Sierra Leone, for Operation Menace.
The goal was to invade Vichy French-controlled Dakar. HMAS Australia teamed up with the cruiser HMS Cumberland, and both spotted three Vichy cruisers heading south, shadowed them. However Gloire soon had engine trouble and she was escorted by HMAS Australia back to Casablanca. On 23 September, Australia exchanged fire with Dakar shore batteries and her fire drove away two Vichy destroyers exiting the port. She also engaged and sunk the Audacieux, destroying her with eight salvos. Australia was hit twice by shore batteries (and possibly Richelieu’s fire). Her Walrus floatplane was destroyed. The combined fleet (comprising also Free French ships) retired on 25 September.
Meanwhile, the “Crap Iron flotilla” destroyer group was named by Nazi Propaganda Minister Joseph Goebbels, which assimilate it to a “consignment of junk”. The flotilla was led by HMAS Stuart, and four V-class destroyers dating back fro the Great War and indeed not in good shape. They were slow and poorly armed compared to contemporary destroyers, and set sail from Singapore in 1939 for the Mediterranean Sea, covering the allied evacuation after the battle of Greece in April 1941, or resupply the besieged Australian garrison of Tobruk, through the infamous “Bomb Alley” due to Axis air attacks. The flotilla made 138 supply runs to Tobruk which were absolutely vital. Three of these destroyers were lost during the war, Waterhen on 30 June 1941, Vampire in Indian Ocean, Voyager at Betano (Timor).
The siege of Tobruk
RAN ships were also often seen in the Red Sea, starting from August 1940, to support British Somaliland invaded by the Italians. The British garrison was evacuated from Berbera (HMAS Hobart), leaving a wrecked port and facilities. Hobart sent a 3-pdr gun ashore to cover operations, later captured by the Italians. Parramatta and Yarra also operated there, the first firing and driving off two Italian destroyers as she escorted a convoy.
Probably the most famous duel and loss of the RAN in 1941 was on 19 November, the fight between HMAS Sydney and the German auxiliary cruiser KMS Kormoran in the Indian Ocean. The latter was heavily armed, and the duel was an even one. So much so that both ships sank each others. The location of the wrecks remained a mystery until 16–17 March 2008.
Also in the Red sea, from early 1943, eight Australian built Bathurst-class corvettes initially based in the Indian Ocean sailed to Alexandria via the Suez canal for Operation Husky (The landings of Sicily). They formed into the 21st and 22nd Minesweeping Flotillas and survived the war.
The Pacific front 1941-45
The effect of the Pearl Harbor attack was to redeploy major warships to home waters, whereas lighter vessels remained in the Mediterranean (with more sent there later). They served with the newly created British-Australian component of the ABDACOM naval forces (American-British-Dutch-Australian) and the ANZAC Force. The first tried, but failed to prevent the fall of the Dutch East Indies and was crippled in the process. From then, the South West Pacific Area became the new command for major RAN units later attached to the Seventh Fleet formed at Brisbane, 15 March 1943. This became later Task Force 7.
The RAN operated off Timor from February 1942. Resupplying Australian and Dutch commandos there allowed to maintain pressure on the IJA. HMAS Voyager was lost, followed by HMAS Armidale when trying to land Dutch soldiers off Betano. Teddy Sheean, which operated an Oerlikon gun sank with the ship while firing and was awarded posthumously. The ABDA naval force met its fate in the Java Sea, which saw the near-destruction of HMAS Perth and USS Houston. In March 1942, Perth and Houston met important IJN forces whilst trying to sweep into the Sunda Strait bound to Tjilatjap. They engaged three cruisers and several destroyers in a terrible night action (Battle of Sunda Strait) and were lost to “Long lance” torpedoes with high Casualties. Back home, the Australian public became weary of these losses, the Perth right after HMAS Sydney. RAN sailors also participated in the Battle of the Coral Sea on board HMAS Hobart, Task Force 44.
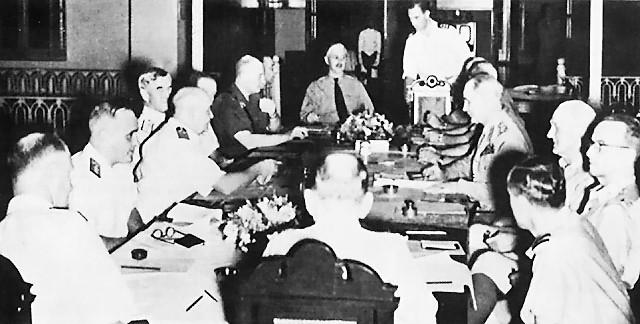
ABDACOM Conference
By June 1942 the great question was the protection of Port Moresby, the last place to defend from the Japanese before Australian shores themselves. Five IJN submarines attacked Sydney and Newcastle, launching three midget submarines and badly damaged HMAS Kuttabul. These subs went as far as shelling Sydney and Newcastle. New convoys regulations were setup between Brisbane and Adelaide, but nevertheless, IJN submersibles sank 17 ships in Australian waters, outside convoys. For the loss of I-124 in January 1942. These attacks ceased in July 1942. Five escort vessels were lost in action, and the convoy system ceased gradually from December 1943 to March 1944. In total 1,100 convoys passed along home waters until 1945. But the souvernir of these attacks left a deep mark into the psyche of the Australian public. Later HMAS Arunta sank the Japanese Kaichu type submarine RO-33, off Port Moresby (August 1942).
At the Battle of Savo Island in August 1942 the RAN lost HMAS Canberra, heavy cruiser, starting off Guadalcanal and the gunfire damage was so bad the ship had to be abandoned and was scutted by torpedoes a day after to avoid capture. The USN honored her by naming a Baltimore-class cruiser in construction, while the British Government approved the transfer of HMS Shropshire as a replacement, by 20 April 1943.
RAN ships played also an important part of operations during the 23–25 October Battle of Leyte. HMAS Australia(ii), Shropshire, Arunta, and Warramunga indeed participated first-hand to the fighting, HMAS Australia even becoming the first allied ship hit by a Kamikaze. HMAS Shropshire and Arunta remained at Leyte with the 7th Fleet and were the support force at the Battle of Surigao Strait. In 14 minutes, HMAS Shropshire fired 38 rounds on the IJN Yamashiro. Later the HMAS Australia returned to the thick of action and was at the Battle of Lingayen Gulf in January 1945. She was attacked agains by Kamizaze and so severely damaged she spent the remainder of the war in repairs.
Starting in 1940–42, five N class and two Q class destroyers were transferred to the RAN to serve with the British Eastern Fleet. HMAS Napier, Nepal, Nestor, Nizam, Norman, Quiberon, and Quickmatch had often British officers and remained closely imbricated within the British Royal Navy. After the fall of Ceylon the Eastern Fleet moved from Trincomalee to Kilindi in Kenya. Their career was spent between shore patrols, convoy escorts and some sweeps into the Mediterranean. Operation Vigorous (Malta convoy) saw HMAS Nestor badly damaged and sunk by axis aviation. By February 1944 the corvettes HMAS Ipswich and Launceston and Indian sloop INS Jumna, sank the Ro-110 in the Bay of Bengal. Late 1944, Nepal, Norman and Quiberon were transferred to the new British Pacific Fleet, taking part in the Battle of Okinawa.
Right after the end of the war, Queenborough, Quality, and Quadrant were added to the destroyer fleet. They saw the reddition of Japan on 2 September 1945. Losses has been heavy with three cruisers, four destroyers and othger ships, 19 total, but inflicted serious blows to the axis, notably 150,000 tons of Axis merchant shipping, and about a hundred aicraft down.
Like for Canada no aircraft carrier, even an escort one, was in RAN service. This will change in post war years, with the transfer of two ships renamed Melbourne and Sydney, retired in 1976 and 1985. Australia would also acquire two Battle class destroyers, which were modernized and serve until 1972-75, four Daring class destroyers, until the 1980s, and like Germany, acquired three Charles F Adams class guided missile destroyers (Perth class) in 1965-67. There will be of course a cold war post.
Sources
Conway’s all the word’s fighting ships 1860-1905, 1906-1921, 1921-1947
//www.navy.gov.au/history/feature-histories/1939-1945-wwii
//www.naa.gov.au/explore-collection/defence-and-war-service-records/royal-australian-navy-service-records
//www.awm.gov.au/research/guide/ww2-ran
//anzacportal.dva.gov.au/
//www.gunplot.net/shiplists/shiplistb.htm
//www.battleforaustralia.asn.au/RANCorvettes.php
//booksonwaraustralia.com/33-ran-world-war-2
//www.navalanalyses.com/2014/09/fleets-3-australian-navy-us-navy-royal.html?m=1
//www.navyhistory.org.au/royal-navy-colours-of-world-war-two-the-pattern-507s-g10-and/
//www.centenaryofanzac.tas.gov.au/history/royal_australian_navy
//www.naval-history.net/xDKCas2500-RAN.htm
//www.globalsecurity.org/military/world/australia/ran-ship-names.htm
//navymuseum.co.nz/hmnzs-kiwi-moa-bird-class-corvettes/
//en.wikipedia.org/wiki/HMAS_Albatross_(1928)
//navymuseum.co.nz/wwii-the-royal-new-zealand-navy-and-the-pacific-campaign-1941-1945/
//en.wikipedia.org/wiki/HMAS_Australia_(D84)
//en.wikipedia.org/wiki/Category:World_War_II_naval_ships_of_Australia
S. D. Waters, The Royal New Zealand Navy: Official History of New Zealand in the Second World War 1939-45, Wellington
War History Branch Department of Internal Affairs, 1956, pp. 538.
Baxter & Haberfield reports 1946 – Baxter Personal Collection ref. EZB0018.
HMNZS Monowai Ship’s log for Friday 16 January 1942
John Winton, The Forgotten Fleet, London: Michael Joseph, 1969, pp. 98-99.
S. D. Waters, The Royal New Zealand Navy: Official History of New Zealand in the Second World War 1939-45,
Book: The Royal Australian Navy in World War II, Edited by David Stevens
Nomenclature of Australian Ships
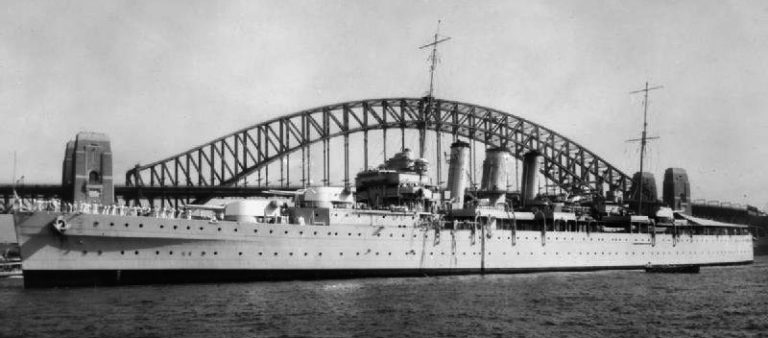
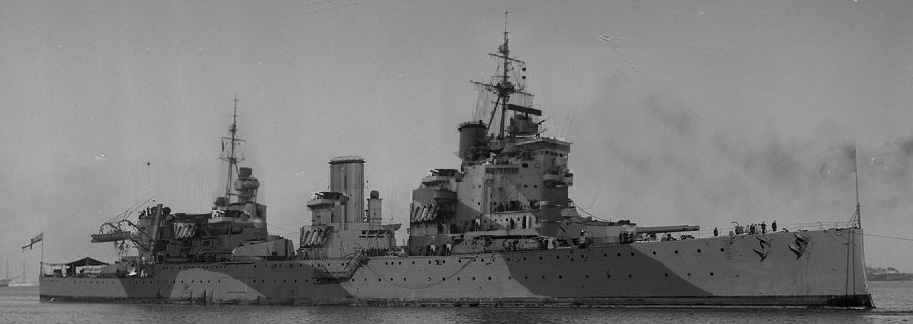
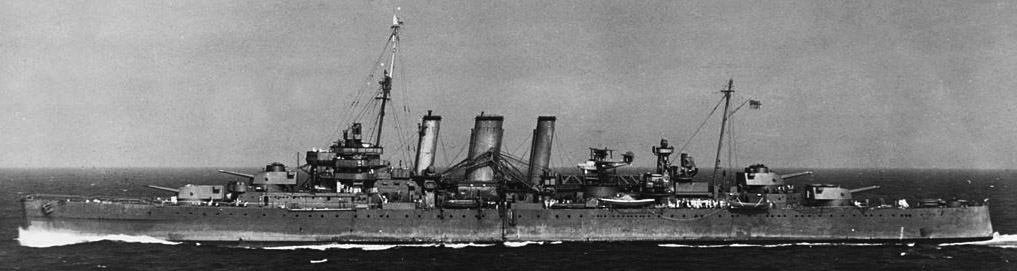
Australia class heavy cruisers
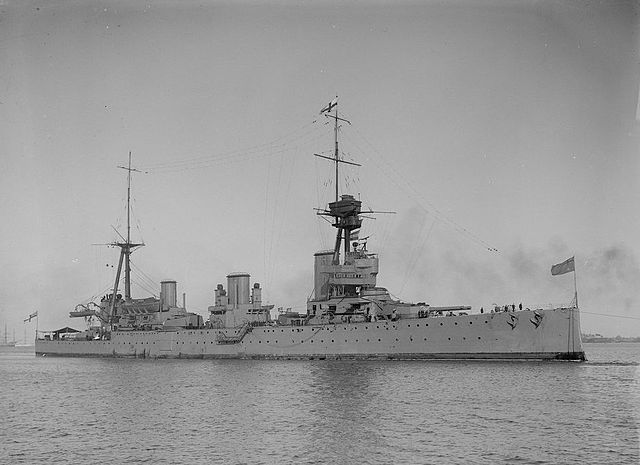
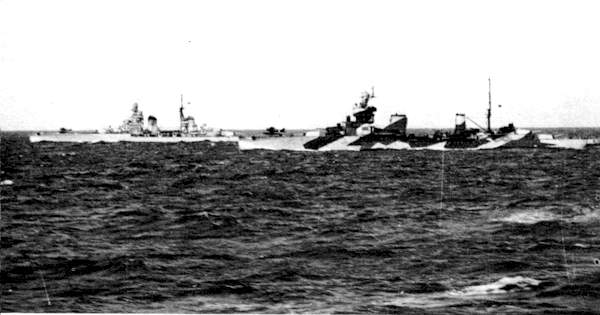
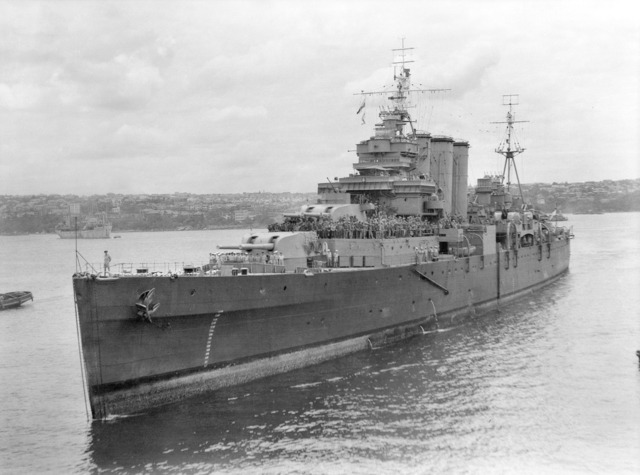
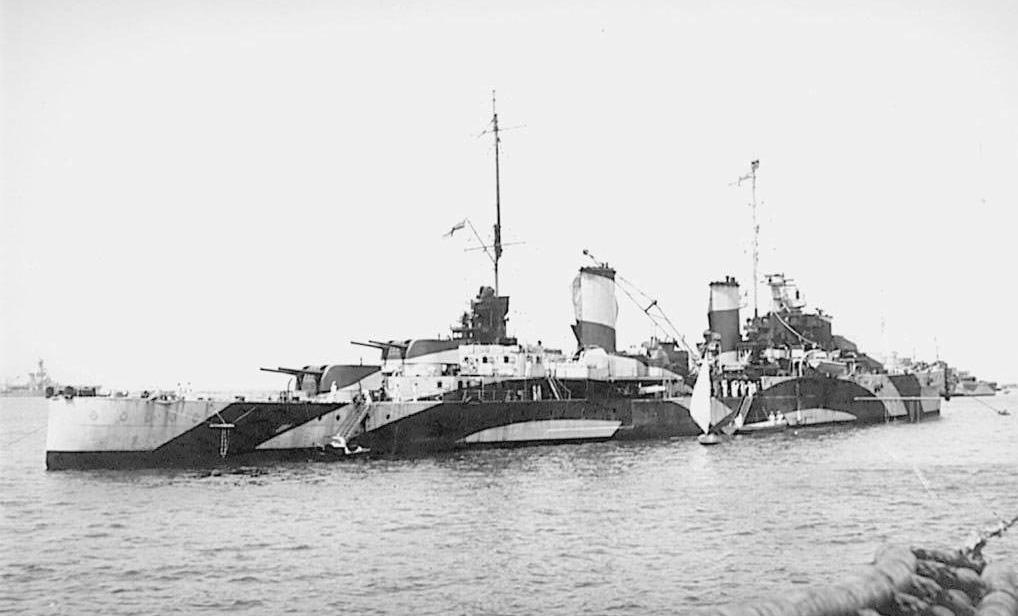
HMAS Australia and Canberra of the County-class formed the backbone of the RAN from 1928 to 1943 (HMAS Canberra was sunk in action). Both carried eight 8-inch (203 mm) guns in four twin turrets, and were roomy ships which which entered service in the 1920s. In 1940 they were already well-used and the crews well-experienced.
HMAS Australia
These heavy cruisers has been laid down at John Brown & Company, Clydebank in 1925. HMAS Australia entered service in 1928, and after training in home waters and some cruises in the Pacific she was deployed the Mediterranean station 1934-1936, during the Abyssinia Crisis. Back to South-West Pacific she remained in home waters as war broke out and until mid-1940.
She was sent to the eastern Atlantic searching for German ships and for Operation Menace (the battle of Dakar). She operated from January 1942 from home waters to the Indian Ocean. As the flagship of the ANZAC Squadron in she later joined Task Force 44 and later TF 74, covering amphibious landings until 1945.
HMS Australia through the Panama Canal in March 1935
HMAS Australia took part in the battle of the Coral Sea, Savo Island, Guadalcanal and Leyte Gulf, and New Guinea. She was badly hit by kamikaze in the Lingayen Gulf, survived but was not repaired in Australia because of other priorities. Instead she limped back with summary repairs to the UK, and stayed there until the end of the war.
HMAS Australia took part in the British Commonwealth Occupation Force in Japan and was a training ship in 1950, decommissioned in 1954, sold in 1955.
HMAS Australia in 1953
HMAS Camberra
HMAS Camberra was commissioned in 1928, alternating between deployments in home waters and China Station. From June 1940 she started escort convoys bound to Sri Lanka and South Africa. From mid-1941, she started hunting patrols, tracking down auxiliary cruisers and commerce raiders. She later patrolled around New Guinea, and later Malaysia and Java. She joined TF 44, and participated to the Guadalcanal Campaign, taking part in the battle of Tulagi.

HMAS Camberra at King’s warf in Australia before the war
In August 1942, she took part in the Battle of Savo Island, was badly damaged, and finally sunk in the infamous “Ironbottom Sound” by fellow American destroyers to avoid capture. British Rear Admiral Victor Crutchley, raised hi mark on HMAS Australia. A Baltimore-class cruiser was renamed USS Canberra to pay homage to the the brave cruiser’s crew.
HMAS Camberra at Sydney in 1936
HMAS Shropshire arriving in Sydney by 1945
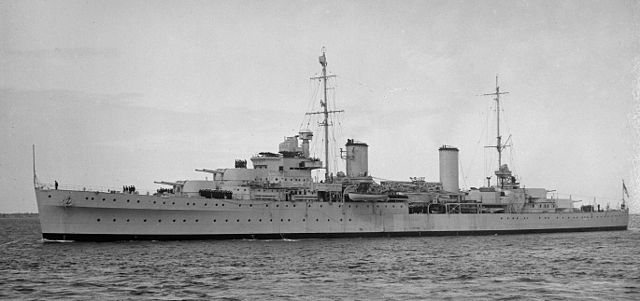
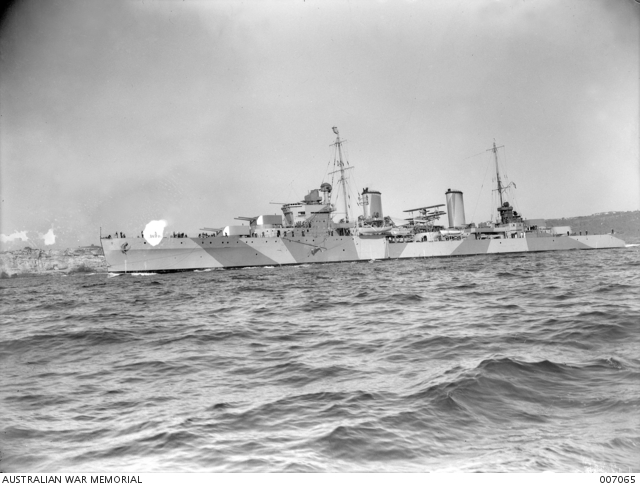
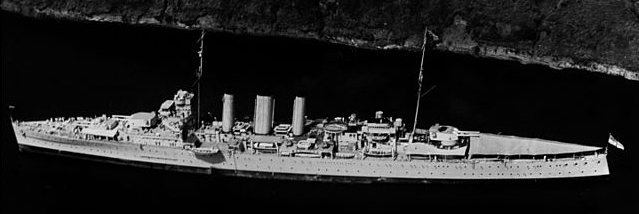
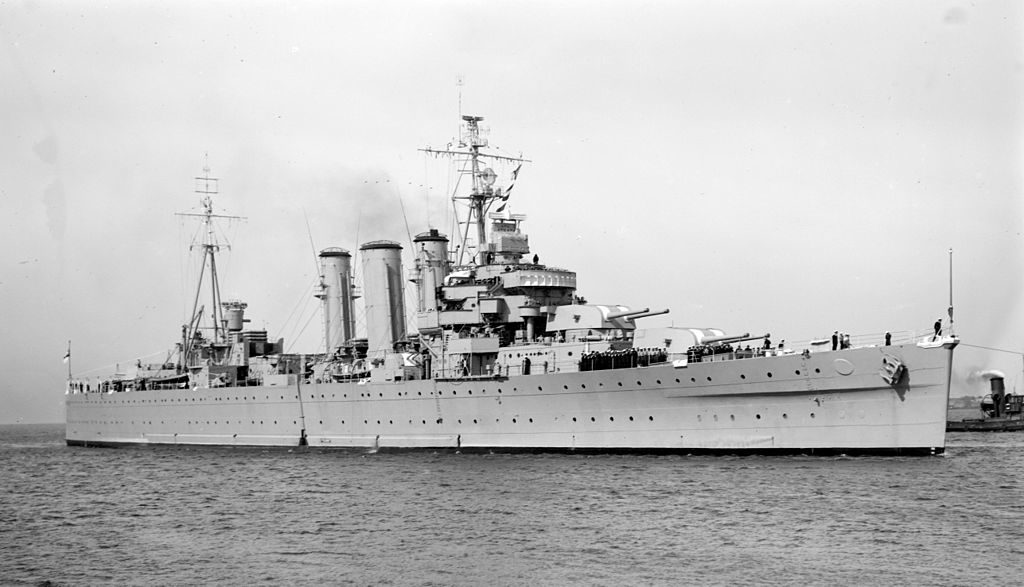
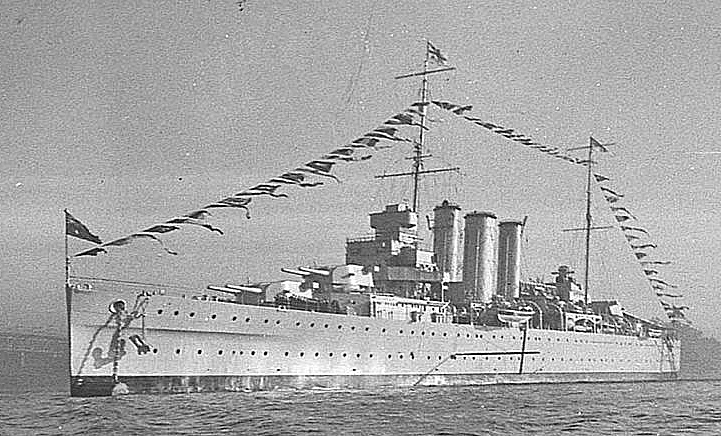
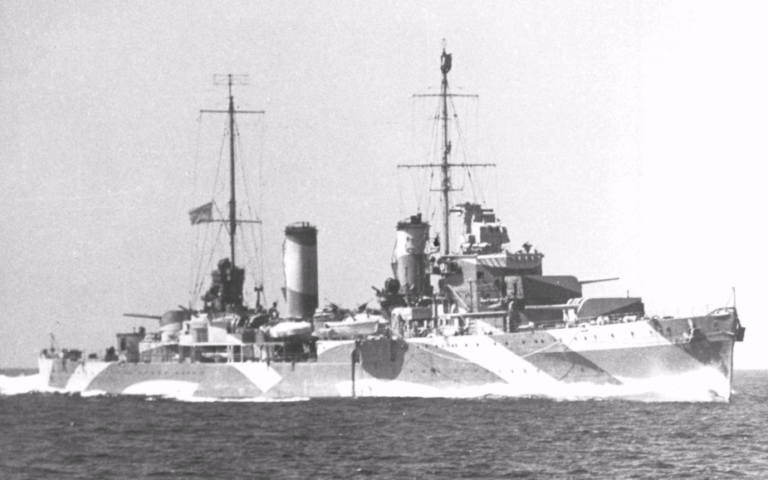
Leander class light cruisers
HMS Perth
Three modern Modified Leander-class light cruisers; Hobart, Perth, and Sydney, which mounted 6-inch (152 mm) guns became the staple of the RAN cruiser force. They were part of the large Leander class cruisers, also built for the Royal Navy and the RNZN. Australia had the Lion share. They were brand new ships with four twin turrets, Washington standard. The design was influenced by the York class heavy cruisers, and intended to better protect the British Empire extensive trade network. Secondary armament was four 4-inch guns, later eight in twin mounts, and 12 Vickers 0.5 inch machine guns in quadruple mounts, later replaced. The original four 21-inch torpedo tubes were also later removed, and for a time, two Fairey Seafox seaplanes were carried on board.
Their overall armor was limited to 845 tonnes, so they can reach 32 knots. Their machines were not located in separated accommodations, so that damage in this area was likely to shut down all boiler rooms. This was corrected on the next Arethusa class light cruisers. Achilles and Leander went to the RNZN, HMS Ajax, HMS Neptune and HMS Orion went to the RN and the remainder three, Apollo, Amphion and Phaeton were renamed Perth, Hobart and Sydney. They saw heavy action in the Mediterranean and afterward in the Pacific. See the leander class profiles for more informations.
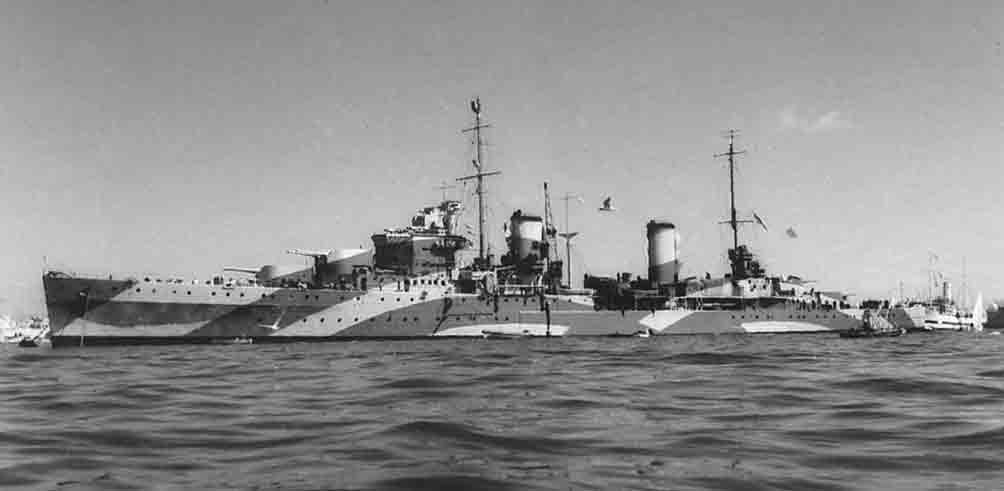
HMS Perth in 1941
Light cruiser HMAS Adelaide
The Town-class cruiser Adelaide was built in Australia, the last of the large “Town” class light cruisers of the Royal Navy. She was built in Australia and therefore due to considerable delays (hence her nickname “HMAS Longdelayed”) she missed the great war. Completion depended of parts shipped from Vickers and WW1 wartime shortages, machinery and everything that could not be done in Australia.
Her final cost was 1,271,782 pounds, and her armament profited from wartime experience. She had nine BL 6 inch Mk XII naval guns and a QF 3-inch AA gun, QF 12-pounder 8 cwt field gun and four QF 3-pounder Hotchkiss saluting guns. Moreover she carried two 21-in torpedo tubes banks and depth charge racks. Until 1939 she served with the RAN, and visited New Zealand, Fiji, Hawaii, Canada and the USA. Via the Panama Canal she also visited the Caribbean, eastern Canada and Portsmouth. By January 1925, she also visited the Mediterranean and returned home, transiting by Ceylon and Singapore.
In 1927, she sailed to the Solomon Islands after the Kwaio insurrection on Malaita, landing a party. in what was called the “the Malaita massacre”. Budget cuts had her placed into reserve in June 1928. Recommissioned in emergency in 1938 she was modernized with oil boilers and truncated funnels. removed. A 6-inch gun was removed as well as the field gun and old AA gun, plus the obsolete torpedo tubes and 4-in AA guns were installed alongside a new Fire-control system. Although she waited replacement by HMAS Perth, she found back in service at home on 1st September.
Wartime carrer:
HMAS Adelaide started with escort missions, later carrying a Free French governor to take possession of New Caledonia. She collided on her way back with the merchant ship SS Coptic and later deterred the Vichy sloop Dumont d’Urville to intervene. She also patrolled around New Guinea and sailed to Garden Island in May-June 1942. Refitted, she received new anti-aircraft guns, six American 20 mm Oerlikon. In June-September 1943 she would receive but four depth charge throwers while one 6-inch gun removed, and two 4-in guns were kept.
In Sydney during a Japanese midget submarine attack she escaped any damage. Later she started escorts from Fremantle, to the Indian Ocean. In November 1942 she teamed up with HNLMS Jacob van Heemskerk and two Australian corvettes as escorts and spotted the German blockade runner Ramses, which scuttled.
She was back in action after a refit in October 1944. Se went on escorting vessels from Fremantle until the fall of 1944, was decommissioned on 26 February 1945 and became naval base tender until May 1946, sold for BU three years later.
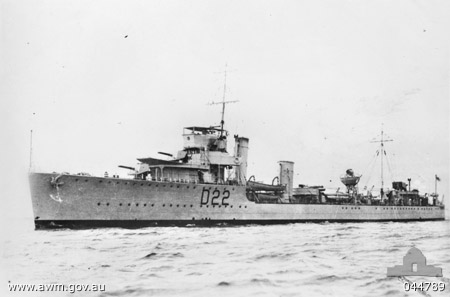
V class destroyers
Five V-class destroyers, HMAS Vampire, Vendetta, Voyager, Waterhen arrived in 1933, remaining in service in WW2 had their aft torpedo tubes bank removed and replaced by a 12pdr AA gun plus 2-4 x 20mm Oerlikon guns plus four 0.5in AA heavy machine guns. The destroyer leader HMS Stuart was transferred to led the pack in October 1933. Three would being sunk or scuttled in 1941-1942. They served in the Mediterranean where the became the infamous “Scrap Iron Flotilla”.
Arunta class destroyers
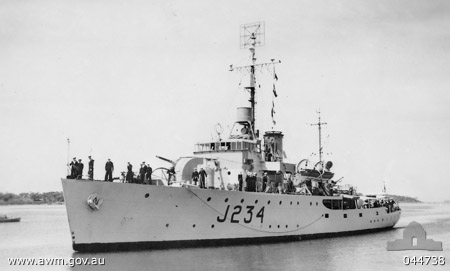
Three Tribal-class ships built in cockatoo NyD an used by the RAN. HMAS Arunta was launched in november 1940, Warramunga in February 1942 and Bataan in January 1944. At launch they had the usual three twin mounts with 4.7-inch (120 mm) guns, a twin 4-inch (100 mm) mount, six single 20 mm Oerlikon AA and a single quadruple 2-pdr Bofors plus a single 21-inch (530 mm) quadruple torpedo tubes bank and two DCT with 46 depht charges in reserve. Their radar suite comprised the SG1, SG4, 285P4 and 253P. In the fall of 1945, the Oerlikons were retired, replaced by another single Bofors gun. They were modernized in 1949-50 and served until the late 1960s. None was lost in combat. They were quite active. HMAS Arunta for example soldiered in the Pacific, taking part in the New Guinea 1942–44 campaign, the battle of Leyte Gulf in 1944, Lingayen Gulf in 1945 and the campaign of Borneo in 1945.
Specifications
Displacement: 1,990 tons/2,122 tons (1945)
Dimensions: As Tribal class
Powerplant: Two Parsons geared turbines 44,000 hp, 36.5 knots.
Crew: 13 officers, 247 sailors in 1945.
Nizam class destroyers
HMAS Nizam, Napier, Nestor, Norman were “J” class ships transferred to Australia in 1941. Specs as “J” class ships. Apart HMAS Nestor, sunk by a Stuka in the Mediterranean in June 1942, the others were returned to UK in 1945. By that time they were fitted with a type 286/P radar; two 2 DCT and one DCR (plus 45 DCs), the type 271 or type 293, type 291 radars. Nizam in addition had an extra 40/56 Bofors Mk III in place of a TT bank.
Quillian class destroyers
“Q” class destroyers transferred in 1943-45 to the RAN. Data identical to the class and “R” class. Comprised the HMAS Quiberon, Quality, Queenborough, Quickmatch, and Quadrant. The transfer became permanent from 1950. Apart HMAS Quality which was BU in 1958 the three others were modernized as Type 15 ASW Frigates and served until the 1970s.
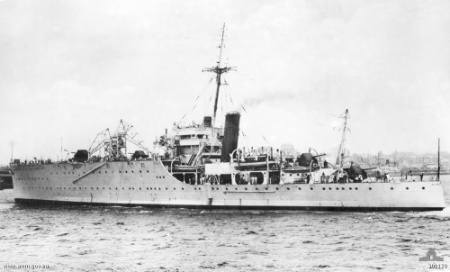
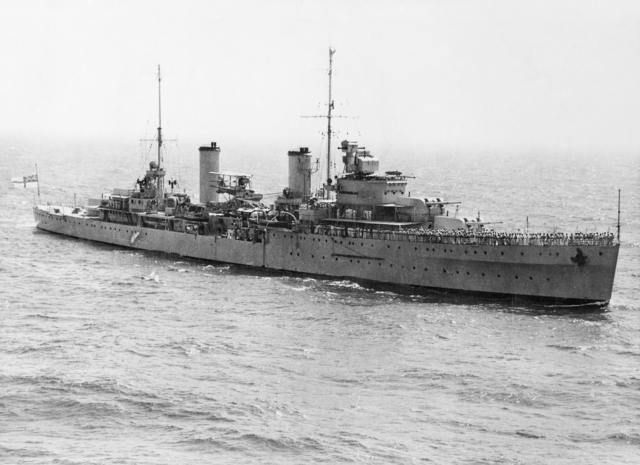
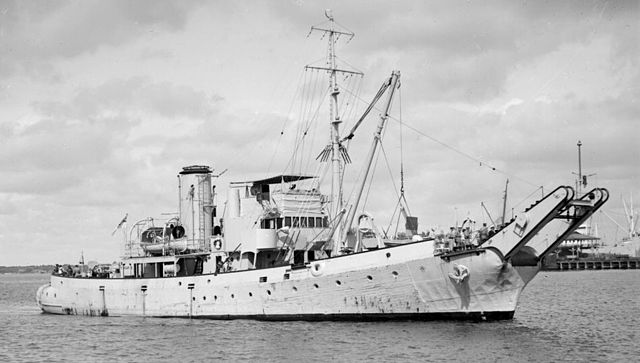
Yarra class Sloops
Four sloops, Parramatta, Swan, Warrego, and Yarra. It seems however that only Swan and Yarra were in commission. These were Grismby class first laid down in 1933. In 1935-36, HMAS Yarra and Swan, and in 1939-40 HMAS Parramatta and Warrego followed.
Barcoo class Frigates (1943)
HMAS Barcoo – credits https://www.navy.gov.au/
These were River class Frigates were built in Australia, at Cockatoo (Barcoo, Barwon), Walker (Burdekin, Diamantina), Marts Dock (Gascoyne, Lachlan, Hawkesbury, Macquarie). The last was launched in March 1945 and completed in 1946. Armament differed a bit from usual River class ships with two 4-in/45 QF Mk XVI HA (or Mark XIX on Burkedin), and six to eight 20 mm and at the end of the war one to three additional 40 mm Bofors.
BAR-class Boom defence vessels (1939)
HMAS Koala, Kangaroo and Karangi were built at the Cockatoo Docks and Engineering Company, launched between November 1939 and August 1941. They were basically copies of the 71 British net tender vessels built at the start of the war. They displaced 533 long tons, measured 41.14 m (135 ft 0 in) by 7.77 m (25 ft 6 in) in beam and a draught of 3.81 m (12 ft 6 in), for a top speed of 9.5 knots (17.6 km/h; 10.9 mph), a complement of 30 and armed with a single 12-pounder gun. When not used to tend and lay nets, they were used as coastal patrol ship.
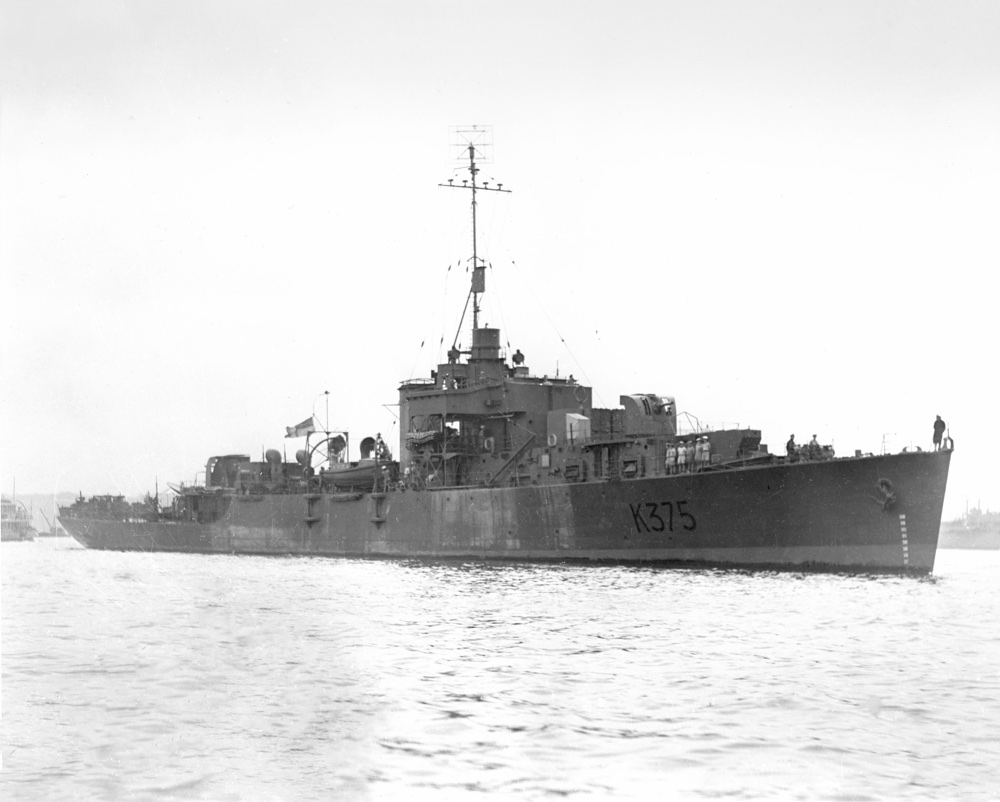
Bathurst class Corvettes (1940)
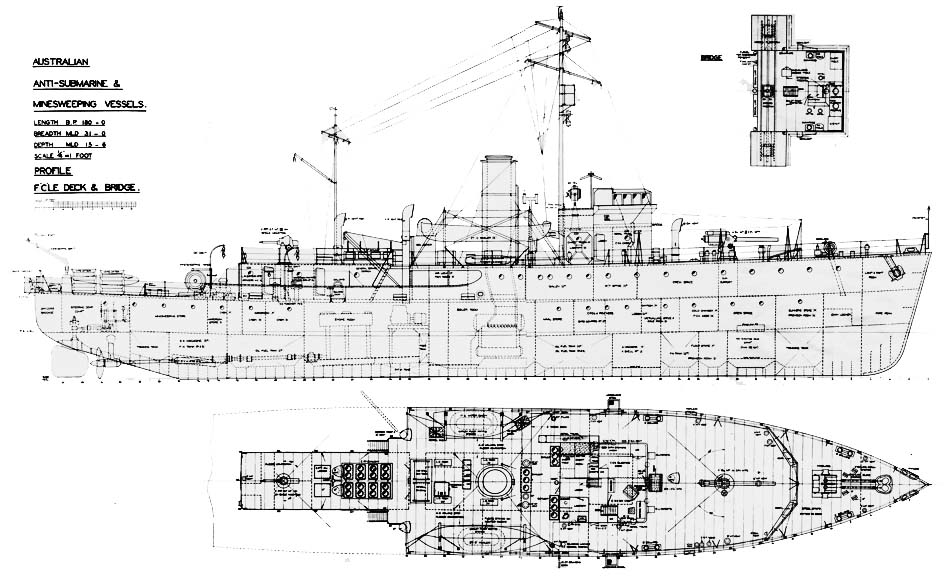
60 corvettes in all, including four cancelled and derived from the British Bangor class minesweepers (commonly known as corvettes), and ASW Corvettes manned by Australian crews and built in Australian shipyards. They were part of the Commonwealth Government’s wartime shipbuilding programme. 20 more were built on Admiralty order, manned and commissioned by the RAN. Thirty six were built for the RAN and four for the RIN (Royal Indian Navy). They were soon known in the RAN as ‘maids of all work’ but also infamously ‘rolling on wet grass’ by their crews. Mutinies erupted because of poor accomodations, living conditions, heavy and difficult workloads. They achieved 6,700,000 nautical miles (12,400,000 km; 7,700,000 mi) during these missions of ASW escort between the Atlantic, Pacific and Mediterranean.
At a cost of A£250,000 per vessel, they were quite versatile, equipped with an asdic, and able to fitted with depth charges or minesweeping gear. They were originally ordered to replace the three 1937 Bar-class boom defence vessels and designed by the Rear Admiral P. E. McNeil McNeil in February 1939. Construction took place between 1940 and 1942. The first were built at Cockatoo shipyards, followed by many others: Broken Hill Pty Co Ltd, Walkers Limited, Evans Deakin & Company, HMA Naval Dockyard, Morts Dock & Engineering Co, Poole & Steeland State Dockyard. Five were lost in operations and two preserved as museum ships as for today. The RAN had them decommissioned in 1960 but they served for most of the cold war in the Indian Navy, RNZN, Dutch Navy, and Indonesia after the independence, Turkey, Pakistan and even the Chinese PLAN.
A standalone post will be done on the topic.
Specifications:
Displacement: 599 tonnes (standard)/944 tonnes (full war load)
Dimensions: 56.69 x 9.45 x 2.59 metres
Powerplant: Triple expansion, 2 shafts, 2,000 hp 15 knots
Armament (variable): 1 × 12-pdr/4 in Mk XIX gun, 1 × 40 mm Bofors, 2–3 × 20 mm Oerlikon, 40 depth charges
Crew: 85
Support ancillary craft
The list is not limitative. Lots of hole and difficulty to pinpoint single ships.
HMAS Abraham Crijnssen: An ex-Dutch Minesweeper, refugee in Sydney when Java fell.
HMAS Adele (ex-HMAS Franklin): A yacht, requisitioned in 1939 and used as patrol ship and later stores carrier.
63 Ft USN standard rescue boat (ASR) – A serie was built
Landing ship infantry
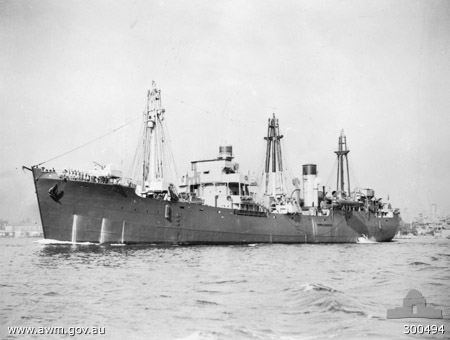
HMAS Westralia in 1944 (AWM)
Three LSIs were operated in 1945 by the RAN. These Landing Ships Infantry were the HMAS Kanimbla, HMAS Manoora, and HMAS Westralia. They had been built as civilian steamers, requisitioned converted first as armed merchant cruisers in 1939. But due to the developments in amphibious operations, order was given to take them in hands for a conversion as LSIs, in 1943. After conversion, they took part in joint allied amphibious assaults in the South West Pacific Area. On average each could carry 1,200 troops. As customary for other USN amphibious ships, landing crafts were hoisted down and the troops embarked in these along rope ladders. Theyr remained in service as transports until 1949 and later converted back to civilian use and returned to their owners. To replace them, the RAN would borrowed six Landing Ships Tank (LSTs) from the Royal Navy. Thsy will stay in service until 1955. In practice they were used as versatile base vessels and not amphibious operations.
Australian auxiliary ships (1943-45)
HMAS Bungaree
Taken as an example of the many auxiliaries of the fleet. The RAN lacked the time and facilities to built military ships for many purposes, so the natural way was to requisition civilian vessels. Many were therefore available in September 1939, soon converted as merchant armed cruisers, with extra guns and military crews. However from September 1940 the government prepared a plan for the defence of the Australian shores including mines. Ford Australia was already contacted in October 1939 to produce mine units and their shells and sinkers at Geelong. To operate them, a 3,000 tonne merchant vessel was to be requisitioned and converted as a minelayer.
The coastal freighter Bungaree was seized and set for conversion from 10 October 1940 in Sydney. HMAS Bungaree as renamed after an indigenous guide, and Aboriginal community leader playing a considerable role during the cartographic exploration of the Australian coastline in 1801-03. The ship’s cargo holds now were set to serve as mine magazines and a minelaying control post was placed with communications on the bridge and a mining deck plus cranes and two sets of rails. These were contact mines launched from the stern of the ship. Commissioned at Garden Island, Sydney, under Norman Calder on 9 June 1941 her first trip started ten days later, and she was posted to Geelong. She first trained with dummy mines in Port Phillip Bay with HMAS Toorie. For her first mission she departed with 254 mined on 30 July with HMAS Sydney, to the city of the same name to be fitted with 12 pdr HA/LA guns and a 28 foot survey motor boat. For the rest of her carrer see the complete article on navy.gov.au.
https://www.navy.gov.au/fleet/ships-boats-craft/available-ship-histories

HMS Australia in 1942
The story of HMAS K9, the sole Australian submarine of WW2
K.IX was ordered in the Netherlands, on 27 June 1917, was launched on 23 December 1922 and commissioned into the Royal Netherlands Navy on 21 June 1923. Like most Dutch submersibles she was affected to the Netherlands East Indies from 13 May 1924. In 1941 the IJA launched its offensive and the K IX was by then out of commission but was reactivated in emergency in March 1942. After the fall of the Netherlands East Indies the submersible escaped to Fremantle in Western Australia, by 13 March 1942.
By then, in May 1942 the Dutch government choose to offer K IX to the Royal Australian Navy and repatriate the crew. The Australians used it for ASW training. The submersible was refitted in Sydney from 12 May and in June she was damaged by a torpedo explosion during the Attack on Sydney Harbour.. Officially she became HMAS K9 by after long repairs 22 June 1943.
She saw little service however due to her poor condition, and was in partial commission, further immobilized by a battery explosion on 22 January 1944. There were no spare parts so she was decommissioned on 31 March 1944 and stayed only 31 days at sea, recommissioned later as an oil lighter, washed ashore near Seal Rocks, on New South Wales in June 1945 while under tow and latter scrapped in situ. Her remnants were located in 1999 and the site is now known as Submarine Beach. Previously, the RAN once operated during WW1 the AE1 lost off Bismarck Archipelago and AE2 in torpedoed in the sea of Marmara by a Turkish TB in 1915. Next, six J1 class submarines were transferred in 1919 and served until BU in 1924-26.
 Latest Facebook Entry -
  X(Tweeter) Naval Encyclopedia's deck archive
 Instagram (@navalencyc)


 French Navy
 Royal Navy
 Russian Navy
 Armada Espanola
 Austrian Navy
 K.u.K. Kriegsmarine
 Dansk Marine
 Nautiko Hellenon
 Koninklije Marine 1870
 Marinha do Brasil
 Osmanlı Donanması
 Marina Do Peru
 Marinha do Portugal
 Regia Marina 1870
 Nihhon Kaigun 1870
 Preußische Marine 1870
 Russkiy Flot 1870
 Svenska marinen
 Søværnet
 Union Navy
 Confederate Navy
 Armada de Argentina
 Imperial Chinese Navy
 Marinha do Portugal
 Mexico
 Kaiserliche Marine
 1898 US Navy
 Sovietskiy Flot
 Royal Canadian Navy
 Royal Australian Navy
 RNZN Fleet
 Chinese Navy 1937
 Kriegsmarine
 Chilean Navy
 Danish Navy
 Finnish Navy
 Hellenic Navy
 Polish Navy
 Romanian Navy
 Turkish Navy
 Royal Yugoslav Navy
 Royal Thai Navy
 Minor Navies
 Albania
 Austria
 Belgium
 Columbia
 Costa Rica
 Cuba
Cuba Czechoslovakia
 Dominican Republic
 Haiti
Haiti Hungary
 Honduras
 Estonia
 Iceland
 Eire
Eire Equador
 Iran
Iran Iraq
Iraq Latvia
 Liberia
 Lithuania
 Mandchukuo
 Morocco
 Nicaragua
 Persia
 San Salvador
 Sarawak
 Uruguay
 Venezuela
 Zanzibar
 Warsaw Pact Navies
 Bulgaria
 Hungary

 Bundesmarine
 Dutch Navy
 Hellenic Navy
 Marina Militare
 Yugoslav Navy
 Chinese Navy
 Indian Navy
 Indonesian Navy
 JMSDF
JMSDF North Korean Navy
 Pakistani Navy
 Philippines Navy
 ROKN
ROKN Rep. of Singapore Navy
 Taiwanese Navy
 IDF Navy
 Saudi Navy
 Royal New Zealand Navy
 Egyptian Navy
 South African Navy


 Ukrainian Navy