
SMS Seydlitz, Battlecruisers
 German Empire (1912)
Battlecruiser
The “shell magnet”
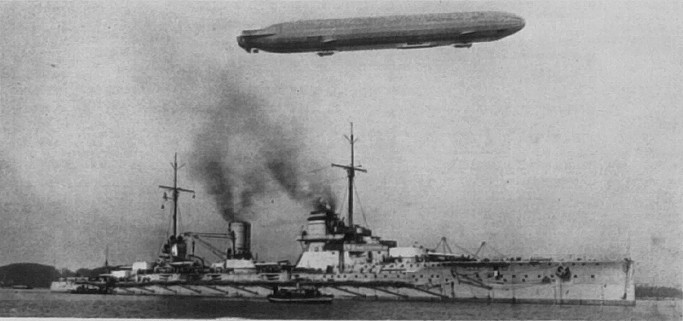
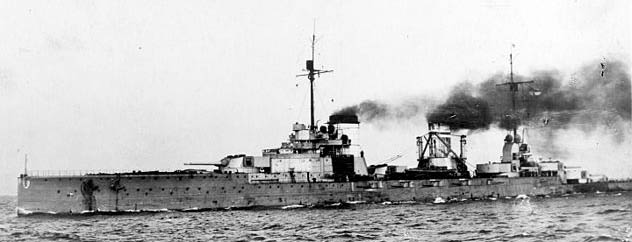
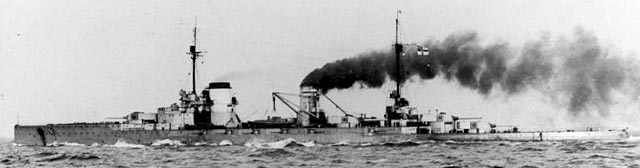
Derived from battlecruisers of the Moltke class, Seydlitz differed in many respects, with a three-stepped revised hull but same artillery arrangement and revised protection compared to the Moltke class, traduced in three thousand tons more in displacement. Still, she was more powerful and faster. Probably the most modern battlecruiser in service by 1914, SMS Seydlitz proved the excellence of its fire control system at the battle of Jutland, taking torpedo hits and perhaps 25 heavy rounds hits and survived. Her baptism of fire at the Battle of Dogger Bank in 1914 saw her duelling with HMS Lion, taking three hits. Repaired, hit a mine in 1916 and was repaired again. At Jutland, she was torpedoed by HMS Petard and Turbulent, also taking sixteen 15-in shells, so much so she was soon nicknamed the “shell magnet”. Managing to survive, she limped back with 5,330 tons of seawater in her bulkheads, beached to avoid sinking. Long repairs and following inaction saw her scuttled in Scapa Flow like the rest of the Hochseeflotte in 1919. She was BU in 1928.
Development
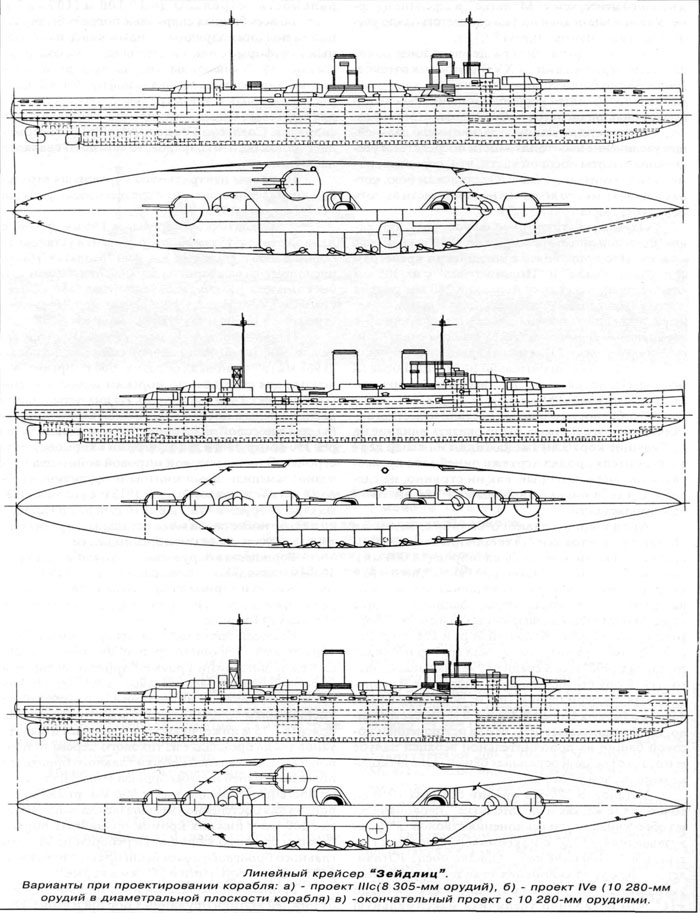 Alternative designs considered for the Seydlitz (src): On top, 4×2 12-in guns, center, one amidship axial 28 cm turret, and bottom, current configuration.
Detailed Design
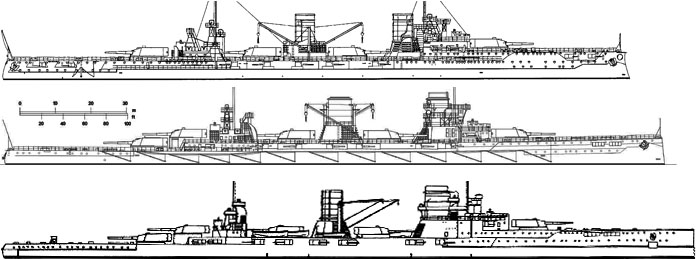 Seydlitz compared to Moltke and Von der Tann
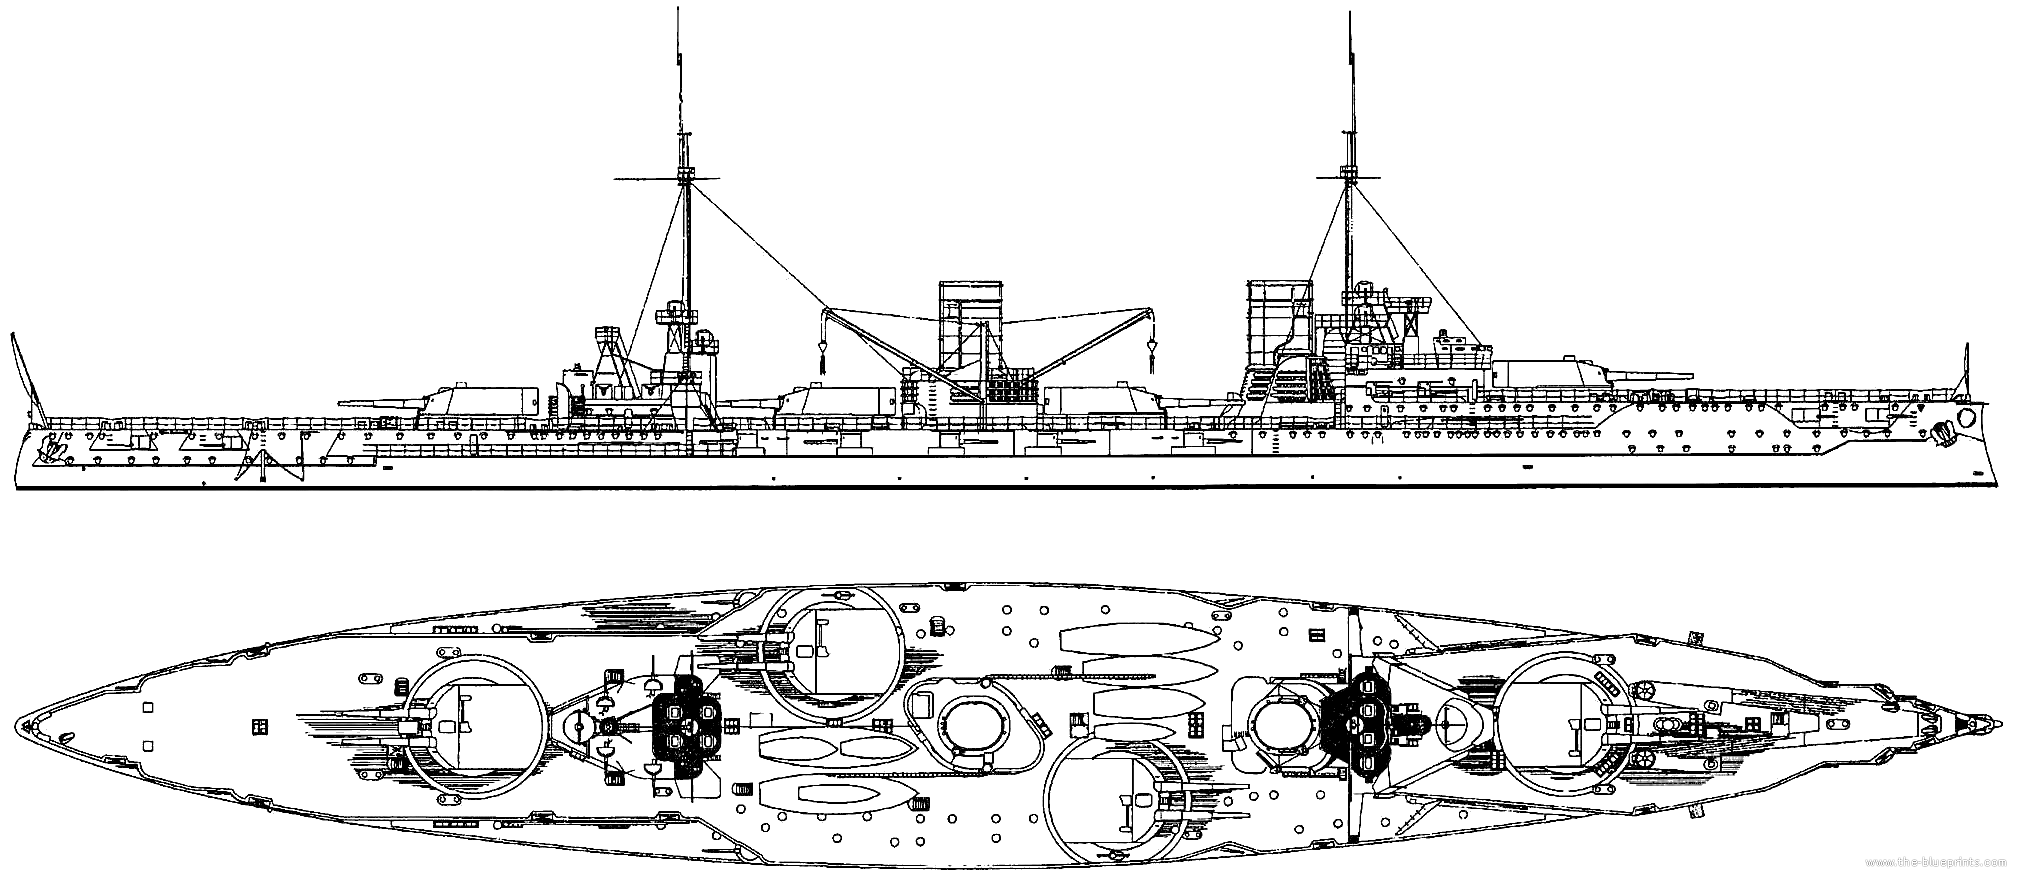
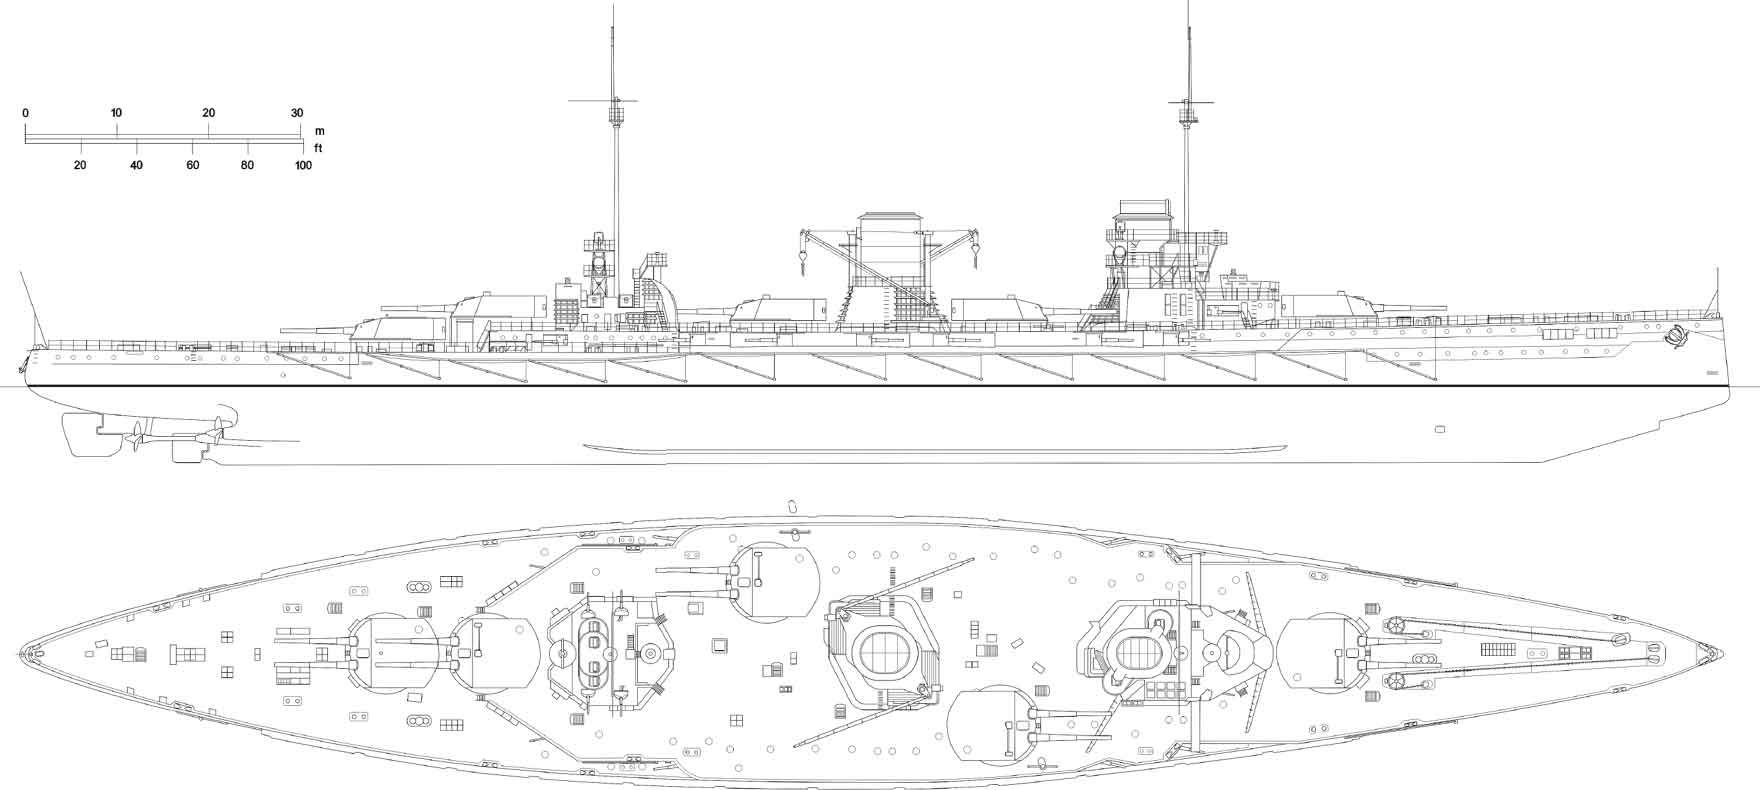
Seydlitz was substantially larger than prevoious battlecruisers, with 200 meters (656 ft 2 in) long (waterline) and just 60 cm longer at 658 ft 2 inches overall. Her beam was 28.5 m (93 ft 6 in), but increased to 28.8 m (94 ft 6 in) when anti-torpedo nets are stored alongside. Her draft was important at 9.29 m (30 ft 6 in), larger forward than aft at 9.09 m (29 ft 10 in). Normal displacement was 24,988 metric tons (24,593 long tons) (design figures), and 28,550 t (28,100 long tons) fully loaded. Her double bottom ran for 76% of her hull, with heavy compartimentation on either side of the machinery spaces.
As usual, Seydlitz carried a small fleet of service boats stored on the deck in between her échelon turrets amidship. She carried a picket boat, three barges, two launches, two yawls, two dinghies. Her standard complement comprised 43 officers plus 1025 men and as flagship of I Scouting Group, carried an extra 13 officers and 62 men.
Her general shape was the same as Moltke at a particular point, which was the second funnel. The hull was longer, slightly beamier, so as to increase the powerplant and top speed, the general outline of the second funnel, bridge and CT locations, but the biggest difference was the forecaste and elongated forward section of the hull. There was an extra deck, making for a three-tiered deck style which was unique. Not other battlecruiser, not even capital ship ever built had this particular appearance. The whole silhouette stayed very low, while seakeeping qualities were even better. Metacentric height was good, notably due to the choice, like for the Moltke class, of two superfiring turrets aft, and not forward.
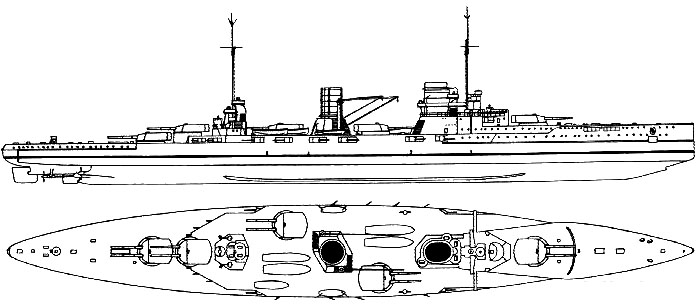 Appearance in 1914
Armour Protection
A partial view of her armour scheme – click to see the full design scheme in color on dreadnoughtproject.org
Seydlitz, just like the Moltke class and Von de Tann used Krupp cemented armor, and nickel steel for the whole protective scheme. Here are the details:
The 300mm main belt between barbettes was tapered to 150mm at the lower edge, 1.7m below the waterline and above it, tapered to 230mm at the upper deck. It was 200mm thick at the battery port sills. Forward it was 120 down to 100mm and 100mm aft all the way after the furtheraft barbette. The barbettes were 230 above the upper deck, 200 mm below, but the wing barbettes were just 100mm as they were located behind the battery, which provided an extra protection. This decreased down to 30mm for all, at the level of main armored belt. The repartition of the main armored deck was as followed: 30mm amidships, 50mm forward, 80mm after, but with 50mm slopes over the citadel. The forecastle deck was 55-25mm over the battery. The upper deck 25mm thick. The torpedo bulkhead for ASW protection located below the citadel extended between the last barbettes and was located 4m (13 feets) inboard amidships, 50-30mm thick there and continued as a 30mm splinter bulkhead at the level of the upper deck.
Armour scheme
In brief:
- Main Armored belt 300 mm (11.8 in) citadel, 1.4m above, 0.4m below wl.
- Tapering bow and stern 100mm (3.9 in).
- Torpedo bulkhead 50mm (2 in).
- Forward conning tower 350mm (13.8 in) walls, 200 mm (7.9 in) roof.
- Main turrets 250mm (9.8 in) faces, 200mm sides, 210mm back, 70–100 mm (2.8–3.9 in) roofs.
- Turret barbettes 230mm (9.1 in) above deck.
- Turret barbettes below decks 200mm.
- Casemates 150mm (5.9 in) sides, 35mm (1.4 in) roofs.
- Deck armor, main (citadel roof) 80mm (3.1 in).
- Deck armor, citadel bottom 30mm (1.2 in).
- 50 mm slope connecting the belt and deck.

Powerplant
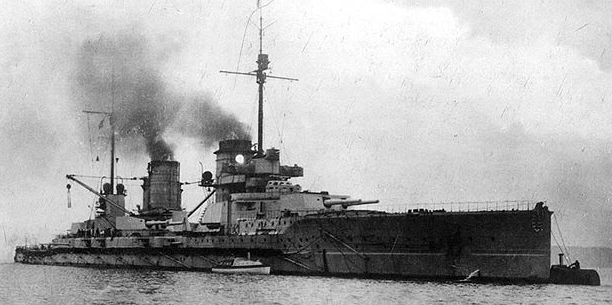
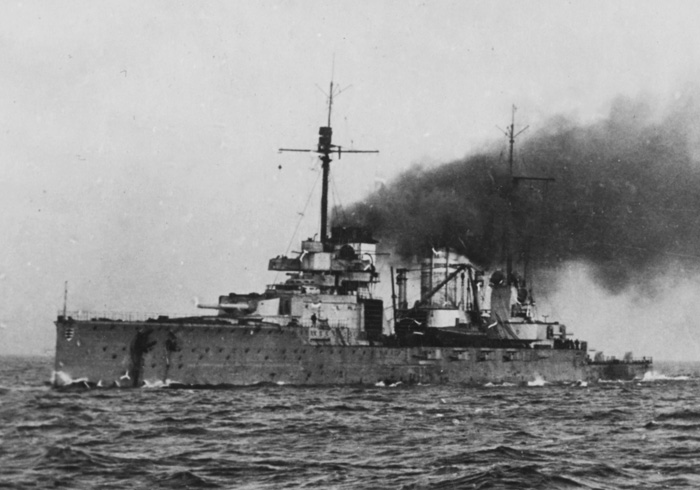
 Seydlitz underway at high speed, circa 1918
Configuration:
Seydlitz had about the same powerplant as the previous ships, with four Parsons direct-drive steam turbines (at that stage, still no German turbines were ready and reliable, but the process was ongoing for battleships). These were arranged in two sets, which consisted each of a high-pressure outboard turbine exhausting into a low-pressure inboard turbine. Each drove a 3-bladed screw propeller 3.88 m (12.7 ft) in diameter. Twenty-seven small-tube Schulz-Thornycroft boilers comprising each two fire boxes provided the steam. They were divided into three boiler rooms, ducted into two funnels. Electrical power was provided by six Siemens turbo generators producing 1,800 kW at 220 V. This was the same configuration as for the Moltke class, but with the difference of two boilers (25).
Performances:
The powerplant was rated as designed for a 63,000 metric horsepower (62,000 shp) output. The resulting top speed, also as designed, was 26.5 knots (49.1 km/h; 30.5 mph). To compare, the Moltke class powerplant produced 51,289 horsepower, procuring 25.5 knots (47.2 km/h; 29.3 mph) as designed. But this was of course as often exceeded on sea trials, while forced draft. Total uoput reached 89,738 metric horsepower (88,510 shp) for a top speed, still unheard of for a battlecruiser, of 28.1 knots (52.0 km/h; 32.3 mph). This made SMS Seydlitz in 1913 the world’s fastest capital ship.
There was enough compartimentation to carry a normal load of 3,600 tonnes (3,500 long tons) of coal in peacetime, twice as much in wartime. Seydlitz when cruising at 14 knots (26 km/h; 16 mph) was able to cross 4,200 nautical miles (7,800 km; 4,800 mi), a bit more than the Moltke class. Steering was the same as before, relying on two side-by-side rudders. In general, SMS Seydlitz was described as a good steamer and sea boat, stable and with gentle, predictable motion making her a reliable gun platform. Of course her shape was not the best fit for agility, and she bleeded out 60% speed at hard rudder, heeling at least to 9°.
Armament
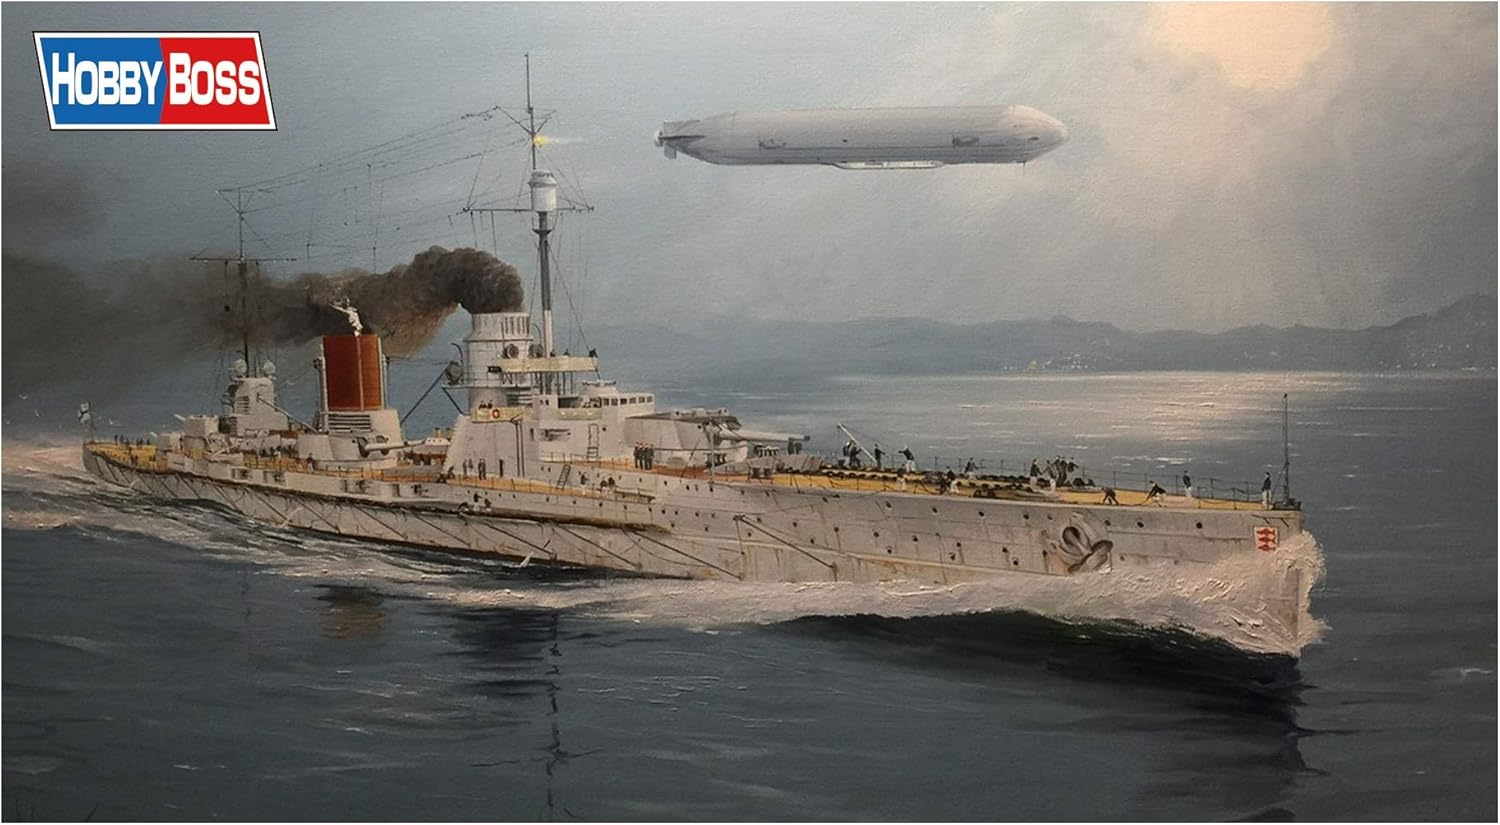
 Main guns in action at Jutland, painting by Carl Becker. Notice the ejector ports at the turrets back.
Main: Ten SKL /50 28 cm (11 in)
SMS used extactly the same main battery scheme as before: Ten 28 cm (11 in) SK L/50 guns, in five twin-gun turrets, with one forward, two amidship in echelon and two sueprfiring aft, axial.
They used however the new Drh. L C/1910 mounting. It enabled to depress the guns down to −8°, or elevate them to 13.5° like the previous Drh. L C/1908. Te latter angle provided a range of 18,100 m (59,400 ft). By 1916, a new mount was available and modufications were made on the existing one to upgrade it and allowing a 16° elevation. The range went to 19,100 m (62,700 ft). The guns however sre still hand-rammed, requiring the barrels to be horizontal during the reloading phase. Training and elevation however was of course controlled hydraulically. Still, the guns had an excellent 3 rpm average rate of fire, the main reasons to maintain these whereas the British, which until then used the slower 12-in, already went to a 13.5-in caliber on their “splendid cats” serie. The shells were almost twice as heavier.
Each gun was supplied with 87 armor-piercing (AP) rounds exlusively, for a total of 870 total. Of course the ammunition storage rooms were provided by anti-flash vents and doors, sprinklers and a valve for quick flooding, for safety. Each 305 kg (672 lb) shell was accompanied by a 24.0 kg (52.9 lb) fore propellant charge, in a silk bag plus a 75.0 kg (165.3 lb) brass case main charge. Muzzle velocity was 880 m/s (2,900 ft/s).
For fire control, the main fire director was a 3 m rangefinder located atop the gunnery control tower located aft of the conning tower. The turrets were also each provided a 3 m (9.8 ft) rangefinder located on the roof.
Von der Tann
Moltke

Seydlitz (1918)
Secondary: Twelve SKL 150 mm
SMS Seydlitz had exactly the same secondary battery as the preceding Moltke-class, with twelve 15 cm (5.9 in) SK L/45 quick-firing guns, all in single casemates amidship. They fired armor-piercing (AP) shells only at at 4-5 rpm. Their pivot mounts allowed for a −7° +20° elevation traduced into a range of 13,500 m (14,800 yd). After the same 1916 refit, elevation was increased (although still manual), for a range of 16,800 m (18,400 yd). This was close to the main guns range, and in the bad weather, low visbility of the north sea, this means ideal range was about 15,000 m, so both the main and secondary battery could fire in concert. Each AP shell weighed 51 kgs (112 lb). Muzzle velocity was 735 m/s (2,410 ft/s).
Light Armament: Twelve SKL 8,8 cm mm
The torpedo boats defence was entrusted to twelve 8.8 cm (3.5 in) SK L/45 quick-firing guns. This was the same as the previous class, and location was identical. Eight were mounted in casemates fore and aft, the rest on superstructures, and they fired a 7.04 kg (15.5 lb) HE shell at 590 mps (1,936 fps), with an average rate of fire of 15 shells a minute. Maximum range was 6,890 m (7,530 yd), usueful range half that. They were manually operated for range and traverse. Two were removed in 1916, replaced by high-angle 8.8 cm Flak L/45 anti-aircraft guns, place on the aft superstructure roof under shieds.
Torpedo armament: Four 50 cm tubes.
SMS Seydlitz received four submerged torpedo tubes, like her predecessor. One tube was underwater, located in the bow, mid-way in the cutting portion of the icebreaker slope, one in the stern, one either side. These were still the same caliber of 50 cm (19.7 in) and eleven of them were stored in reserve. In 1912, they operated the G6 torpedoes: 140 kg (310 lb) warhead, 27 kts/5,000 m (16,000 ft) or 35 kts/2,200 m (7,200 ft) settings. In 1913 they were replaced by the famous G7 type, with a 200 kg (440 lb) warhead and 27 kts/17,200 m or 37 kts/7,400 m settings.
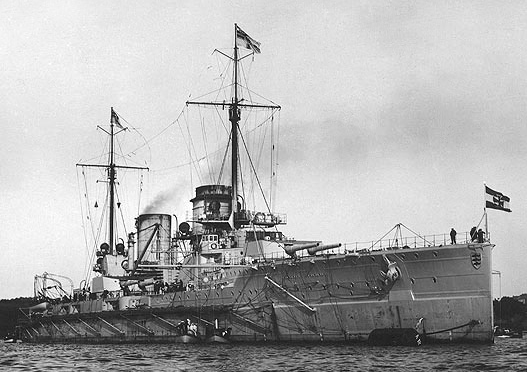
SMS Seydlitz in Kiel prior to ww1

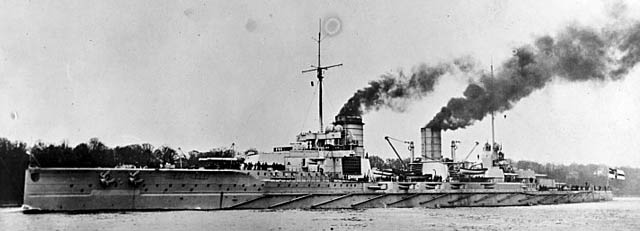
Steaming to Scapa Flow, 1919
Old author’s iIllustration of SMS Seydlitz in 1914
Seydlitz class specifications |
|
| Displacement | 24,600t, 28,100t FL |
| Dimensions | 200 x 28,5 x 9,2 m |
| Propulsion | 4 shafts Parsons turbines, 27 Schultze-Thornycroft boilers, 88,500 shp |
| Speed | 26.5 knots (49.1 km/h; 30.5 mph) |
| Range | 4,200 nmi (7,800 km; 4,800 mi) at 14 knots (26 km/h; 16 mph) |
| Armament | 10 x 280 (5×2), 12 x 150, 12 x 88 |
| Armor | Battery 200mm, citadel 220mm, turrets 251mm, Main belt 300mm, CT 350mm, barbettes 230mm |
| Crew | 1068 () |
Resources
Links
on sms-navy.com
weaponsandwarfare.com
On wrecksite.eu
german-navy.de
www.navypedia.org
Battle damage photos
On militaer-wissen.de
HD plans
On steelnavy.com
worldwar1.co.uk
On laststandonzombieisland.com
www.navweaps.com, 8,8 cm
maritimequest.com
Drachinfels video
Battle damage footage
Books
J. Gardiner Conway’s all the world fighting ships 1921-1947.
Koop, Gerhard; Schmolke, Klaus-Peter (1998). Die Groẞen Kreuzer Von der Tann bis Hindenburg. Bonn: Bernard & Graefe Verlag.
Battle of Jutland 30th May to 1st June 1916: Official Despatches with Appendices.
Bennett, Geoffrey (2005). Naval Battles of the First World War. Barnsley: Pen & Sword Military Classics.
Campbell, N. J. M. & Sieche, Erwin (1986). “Germany”, Conway 1906–1921.
Fine, John Christopher (2004). Lost on the Ocean Floor: Diving the World’s Ghost Ships.
Frame, Tom (1993). HMAS Sydney: Loss and Controversy. Hodder & Stoughton.
Friedman, Norman (2011). Naval Weapons of World War One: Guns, Torpedoes, Mines and ASW Weapons of All Nations; An Illustrated Directory.
Grießmer, Axel (1999). Die Linienschiffe der Kaiserlichen Marine: 1906–1918; Konstruktionen zwischen Rüstungskonkurrenz und Flottengesetz, Bernard & Graefe Verlag.
Gröner, Erich (1990). German Warships: 1815–1945. I: Major Surface Vessels.
Halpern, Paul G. (1995). A Naval History of World War I.
Herwig, Holger (1998) [1980]. “Luxury” Fleet: The Imperial German Navy 1888–1918. Amherst
Massie, Robert K. (2003). Castles of Steel. New York: Ballantine Books.
Scheer, Reinhard (1920). Germany’s High Seas Fleet in the World War. London: Cassell and Company
Staff, Gary (2006). German Battlecruisers: 1914–1918. Oxford: Osprey Books.
Strachan, Hew (2001). The First World War: Volume 1: To Arms. Oxford: Oxford University Press.
Tarrant, V. E. (2001) [1995]. Jutland: The German Perspective. London: Cassell Military Paperbacks.
Breyer, Siegfried (1997). Die Kaiserliche Marine und ihre Großen Kreuzer, Podzun-Pallas Verlag.
Campbell, N. J. M. (1978). Battle Cruisers. Warship Special. 1. Conway Maritime Press.
Dodson, Aidan; Cant, Serena (2020). Spoils of War: The Fate of Enemy Fleets after the Two World Wars. Seaforth Publishing
Staff, Gary (2014). German Battlecruisers of World War One: Their Design, Construction and Operations. Seaforth Publishing
The model kit corner
The hoby Boss kit
Full query on scalemates
Timos Model World 1:200, Combrig 1:350, HobbyBoss 1:350, Iron Shipwrights 1:350, Combrig 1:700, WSW Modellbau 1:700 and many accessories.
SMS Seydlitz in action
On 22 May 1913 SMS Seydlitz was commissioned with the provisional, but skilled crew of the old armored cruiser SMS Yorck transferred to the reserve fleet. She was under orders of Kapitän zur See Moritz von Egidy until 29 November, 1917, so during the most active part of her career. She made her sea trials and won a speed record for a capital ship one knot faster than the Lion class; She joined the Hocheeflotte (High Seas Fleet) during squadron exercises off Helgoland. Konteradmiral Franz von Hipper (I Scouting Group) made her his flagship on 23 June 1914, until 26 October 1917. Nothing much happened than fleet exercises, alternating between the baltic and the Jade and north sea, traniting via the Kiel canal. In August 1914, she as in the Jade like most of the Hochseeflotte, made ready for a strategy Hipper thought out in agreement with F. Von Ingenohl, the Hochseeflotte’s C-in-C, to draw a portion of the RN to the Hochseeflotte or an ambush on minefields and pre-positioned U-boats.
Battle of Heligoland Bight (Aug. 1914)
The first large naval engagement of this war happened when light cruisers met a sweep of British cruisers and battlecruisers on 28 August 1914. The cruisers were from the Harwich Force, a rapid reaction force able to intercept incoming German threats in the north sea, and they fell on German destroyers spotted patrolling the Heligoland Bight. However not far from here, six German light cruisers were in distant cover, SMS Cöln, Strassburg, Stettin, Frauenlob, Stralsund, and Ariadne. They soon entered the fray and repelled the British cruisers with heavy damage. However after communication of this the following battlecruisers from David Beatty arrived in turn at 13:37 and completely returned the situation again. The chasing light cruisers became preys.
The next logical step was to scramble the I Scouting Group battlecruisers in response. As flagship, SMS Seydlitz was stationed in the Wilhelmshaven Roads when all this happened and at 08:50, Hipper requested from Admiral Von Ingenohl to rescue the fleeing German cruisers. Thetefore, Von der Tann Moltke and Seydlitz set sail together at 12:10, slowed down by the low tide and sand bar in the Jade Estuary. At 14:10 at last, both Moltke and Von der Tann crossed the bar and Hipper communicated to the light cruisers hi plan to fall back on him to draw Beatty to battle.
Hipper himself was an hour behind SMS Seydlitz, still with a draft too deep to pass the bar at that stage and waiting. At 14:25, Strassburg, Stettin, Frauenlob, and Stralsund met the German battlecruisers, while the flagship, Seydlitz arrived at last at 15:10. However it was too late for Ariadne that was caught up and sank. Hipper search for the two missing light cruisers also, Mainz and Cöln not knowing they had been sunk too and at 16:00, decided to fold up. The British were already back home.
Raid on Yarmouth (Nov. 1914)

On 2 November 1914, SMS Seydlitz, Moltke, Von der Tann, and Blücher, reinforced four light cruisers left the Jade for a new mission, a raid on the English coast, destined to draw out the 1st battlecruiser squadron onto the Hochseeflotte, which was to depart soon. The 1st Scouting Group, still headed by Seydlitz and Hipper on board, arrived off Great Yarmouth the following morning. They opened fire for the operational phase, destroying port installations and ships. Meanwhile SMS Stralsund laid a minefield to sink merchant vessels in the vicinity.
The first victim was the British submarine D5, which struck one mine.
After a battering, Hipper estimated it was time to sail back. When returning, a heavy fog blanketed the Heligoland Bight so they slowed down and lost each other’s sight. Due to the very poor visibility, one ship, the armored cruiser Yorck, lost its mark and veered off the known path, entering a German minefield, stricking two mines and sinking.
Raid of Scarborough, Hartlepool, and Whitby (Dec. 1914)
Fleet admiral F. Von Ingenohl decided this English coast raids were a sound policy, and as the first one was apparently too short to draw out the British as expected, he hoped that a longest raid, one more objectives would also draw out the Grand Fleet. At 03:20, 15 December, Seydlitz, Moltke, Von der Tann, and the brand new SMS Derfflinger, still with Blücher, and screened by the cruisers SMS Kolberg, Strassburg, Stralsund, and Graudenz, plus two squadrons of torpedo boats left the Jade, headed north past Heligoland, and reached Horns Reef lighthouse before heading for Scarborough. Hipper left the Jade with the High Seas Fleet only 12h behind: 14 dreadnoughts, 8 pre-dreadnoughts, 2 armored cruisers, 7 light cruisers, 54 torpedo boats.
Since the captured of SMS Magdeburg’s codebook, the British were aware of this operations and setup their own ambush. The plan was so send the Grand Fleet behind the German raiding force to ambush and destroy it. Beatty’s force (4 battlecruisers, 3rd, 1st Cruiser Squadrons) was to create a pincer with the 2nd Battle Squadron (six modern dreadnoughts). The the night of 15-16 saw a first encounter with British destroyers. Ingenohl ordered a retreat while Hipper went on with the bombardment, splitting to shell the two remaining ports. Seydlitz teamed with Moltke and Blücher to Hartlepool. Seydlitz was hit three times by coastal batteries but suffered little damage with no casualties. At 09:45 the 1st scouting Sqn. was reassembled, mission accomplished and prepared to sail for home.
They soon ran into Beatty’s battlecruisers, at first at 12:25, light cruisers (II Scouting Group) crossed the British forces and the latter spotted Stralsund and signaled this to Beatty. However signals confusion allowed the German light cruisers to escape while Hipper was now aware of the location of the British battlecruisers. Both forces withdrawn, but Ingenohl was wildly criticized.
Battle of Dogger Bank

Battle of the Dogger Bank
In January 1915, the Royal Navy was probing the Germans and setup a reconnaissance in force, in the Dogger Bank area. A timid Von Ingenohl did not sent the scouting group, weakened by the drydocking of SMS Von der Tann but he was pressed on by Konteradmiral Richard Eckermann, new Chief of Staff. Hipper depated therefore for the Dogger Bank with Seydlitz as lead ship, followed by Moltke, Derfflinger, and Blücher. They were assigned a screening force, Graudenz, Rostock, Stralsund, and Kolberg, plus 19 torpedo boats. German wireless signals decoded by Room 40 prompted another sorties of both Beatty and the Grend Fleet.
The 1st Battlecruiser Squadron was added to the 2nd Battlecruiser Squadron, 2nd Light Cruiser Squadron, to meet with Harwich Force on 24 January, circa 30 nmi (56 km) north of the Dogger Bank. SMS Kolberg spotted HMS Aurora of the Harwich Force and the fight conducted Hipper to turn his battlecruisers towards it, just when Stralsund spotted the northwest smoke plumes of a large fleet.
Hipper decided to head back for hoe, slowed down by Blücher until Beatty caught up. Lion fired on Blücher, Queen Mary and Tiger joined in and eventually crippled the armored cruiser, but the other ones turned to engaged them. However in signals confusion from flagship HMS Tiger, bith fired on SMS Seydlitz while Moltke was left unscaved.
SMS Seydlitz received her first hit in her forecastle (10:25) by Lion, with little damage but at 10:40, another penetrated the rear barbette. The explosion flashed into the working chamber and the propellant charges were set ablaze. The explosion killed 159, destroying both aft turrets in one go. Both magazines were flooded, preventing more explosions. Pumpenmeister Wilhelm Heidkamp was severely injured when ordeed to turn the valves, now red-hot. At 11:01, Seydlitz however hit Lion, knocking out two of her engines (half of those). Derfflinger struck Lion also, at the waterline, flooding and cripplling her. At 11:25 Seydlitz was hit by a third round on her armored belt amidships, which absorbed the blast.
Blücher was left alone after reports of U-boats prompting Beatty to start evasive maneuvers. This left the other German battlecruisers to retreat, but the armored cruiser was doomes and will sank later. Seydlitz was back in the Jade and soon entered the Kaiserliche Werft drydock in Wilhelmshaven for repairs lasting until 31 March 1915.
Battle of the gulf or Riga (August 1915)
On 3 August 1915, Seydlitz, Moltke, and Von der Tann were sent to the Baltic, forming I Reconnaissance Group for a raid in the Riga Gulf. The Russian naval forces there were targeted. The Slava was the main target. The minelayer Deutschland blocked the entrance to Moon Sound and Hipper added to his force the four Nassau and four Helgoland clas battleships. Seydlitz was back to the North Sea after the operation, faling to destroy Slava. On 11–12 September, she covered a minelaying operation off Terschelling. On 24 November, she ran aground in the Kaiser Wilhelm Canal, but was able t wit for the tide and freed herself. On 4 December 1915 as she exited the Kaiser Wilhelm Canal, she was entangled in one of the net barriers, which had to be removed by Divers.
Raid on Yarmouth & Lowestoft (April 1916)
I Scouting Group targeted the English coast again, sailing to attack Yarmouth and Lowestoft in the same plan. Hipper, sick, was replaced by Konteradmiral Friedrich Boedicker for his operation onboard his flagship, SMS Seydlitz. Derfflinger, her sister ship, but also Lützow, Moltke and Von der Tann left the Jade at 10:55, 24 April, supported by 6 light cruisers and two torpedo boat flotillas. Again, room 40 warned the British Admiralty which deployed the Grand Fleet at 15:50. After leaving the area off Terschelling, at 15:38, Seydlitz struck a British mine. The blast created a 15 m (50 ft) gaping hole at the waterline, abaft of the starboard broadside torpedo tube. The explosion killed 11, drawned, by the 1,400 tons of seawater that flooded her.
Her bow plunged from 1.4 metres (4.6 ft) below the waterline, and the crippled battlecruiser was ordered to turn back, escorted by the light cruisers at 15 knots (28 km/h) for the Jade. The four remaining battlecruisers changed course after this, but continued their trip. At 16:00 onboard Seydlitz, Boedicker left on the torpedo boat V28 to head back and join SMS Lützow for the operation to proceed as planned. Seydlitz, escorted by two torpedo boats, reached the Jade and was later sent to a drydock for remairs, keeping her out of action for months. She was just ready in late May, just in time for Jutland, a crucial moment in her career.
SMS Seydlitz at Jutland
Of all the actions of WWI, SMS Seydlitz perhaps gave the best performance of all German capital ship that day. It’s here she gained her reputation of “uninskable ship”, baffled the British by the amount of punishment she took (21 heavy shells, a torpedo) while also claiming HMS Queen Mary. But between Lowestoft and this, her crew had barely time to rest. As soon as the ship left the drydock, she was planned for action. Vizeadmiral Reinhard Scheer indeed, under pressure by the Emperor for results, planned a foray into the North Sea with the same tactic, to draw out either Beatty’s battlecruiser squadron or Jellicoe’s Grand fleet into a trap.
The operation was planned already in mid-May, but the absence of Seydlitz, arguably at that time, one of the finest German capital ships, prevented it. Reinhardt Scheer wanted his battlecruiser force at full strength. Seydlitz was to be thrown into action as soon as repaired.
On 22 May, Wilhelmshaven dockyard reported she was ready, but post-repair sea trials showed still ongoing watertight problems, massive leaks in the fore and aft transverse bulkheads. As a week of extra repairs was needed, Scheer postponed his operation again. The entire fleet was waiting for Seydlitz. Wilhelmshaven dockyard at last assured Scheer the ship was ready at noon, on 28 May, when she exited the drydock and sailed to join the I Scouting Group.
On the night of 30 May 1916, she was anchored in the Jade roadstead and at 02:00 CET, the I. scouting group proceeded with caution to Skagerrak (at 16 knots). Hipper however had his flag transferred to SMS Lützow, the very last German battlecruiser at that point, of a new generation. SMS Hindenburg meanwhile was still fitting out. SMS Seydlitz was in the center of the battle line, after Derfflinger and ahead of Moltke. This force was screened as usual by the II. Scouting Group: Light cruisers SMS Frankfurt, Boedicker’s flagship, Wiesbaden, Pillau, and Elbing plus 30 torpedo boats (II, VI, and IX Flotillas). They took their position in a “cloud” around the battlecruiser line, ready to spot anything on the horizon.
Scheer left the Jade with the Hochseeflotte to act as distant cover as usual, 1h30 later and by then comprised the maximum strenght of sixteen dreadnoughts, notably the brand new König class. By that point, the Bayern class was also fitting out and were sorely missed for the battle, as the first German dreadnoughts with 38 cm guns, able to compete with the Queen Elisabeth and Revenge classes. The High Seas Fleet also comprised a screening force, IV. Scouting Group (light cruisers Rostock (flagship) Stettin, München, Hamburg, Frauenlob, Stuttgart, 31 torpedo boats). And the six pre-dreadnoughts of II Battle Squadron, which departed sooner, rendezvoused with the main battle fleet at 5:00. To read more about the battle’s details:
.
We will concentrate her on Seydlitz. At 16:00, Hipper encountered Beatty’s battlecruiser squadron and the Germans were the first to open fire at around 15,000 yards (14,000 m), including Seydlitz. Seydlitz engaged herself HMS Queen Mary. At 16:54, range fell to 12,900 yards (11,800 m) so that she could train her secondary battery. Her 15 cm guns started to bark in turn, targeting Queen Mary’s superstructures, but soon as to engage the dangerously closer British 9th and 10th Destroyer Flotillas.
At circa 16:55-16:57, SMS Seydlitz was hit twive by Queen Mary, one penetrating her flank 5 ft above the main battery deck. A fire started. The second went into the aft superfiring turret’s barbette, igniting propellant charges in the working chamber. The fire flash went down down to the magazine but nlike the British, German anti-flash precautions were very strict and saved the ship. Extra measures has been taken after the closely aboided explosion at the Dogger Bank. That turret was out of action for the rest if the battle, and she lost its gun crew and loaders in the process.
At 17:25, Indefatigable was destroyed by Von der Tann, causing some commotion on the Britush side, and Beatty regrouped and sailed towards the fast incoming 5th Battle Squadron (Queen Elizabeth-class battleships). Their heavy guns started to bark while Seydlitz and Derfflinger concentrated on HMS Queen Mary. Two salvoes eventually caused perhaps five hits, and a massive explosion followed. The battlecruiser was ripped in half, sinking rapidly. The shockwave of the blast was enough to rock sailors on the deck of the British ships around.
At that point opposing side destroyers multiplied torpedo attacks, and soon one British torpedo struck Seydlitz. It was 17:57 when she was hit directly below the fore turret. This was not far, just aft of where she received her mine damage and she was “patched” sooner. The 40 x 13 ft (12 × 4 m) opening caused flooding and started a list. Despite this, Seydlitz maintained her top speed and position.
At around 18:00, SMS Lützow came in range of both the British battlecruisers and Queen Elizabeth-class battleships. This was quite an overwhelming opposition, but duels engaged neverthless at between 18:09 and 18:19, SMS Seydlitz was hit by a -first- 15 in shell from H%S Barham or Valiant (it’s unclear at that point as confusion reigned when silalling duels, and both super-dreadnoughts concentrated on the battlecruiser. This shell struck the face of the port wing turret. It did not penetrate but the blast rocked the turret and disabled both guns. A second struck the aft superfiring turret again. This time it detonated cordite charges not burned, just relaunching a fierce fire. Two 150 mm guns were also while the deck aft turret lost its right-hand gun.
By that point, Capitain von Egidy recalled the appealing visibility with a dense mist, and targeting being done by aiming at flashes of the enemy’s guns in the distance, which now fell to just 13,000 yards, so the allow the secondaries firing too.
Circa 19:00, Beatty’s forces now closer to the Grand Fleet turned his ships towards Scheer again in order to indicate their position, and both lines closed for a new engagement, down this time to 11,000 m. Visibility however was better for the British due to the sun’s position silhouetting the Germans battlecruisers, which took a beating.
Seydlitz was hit six times: The forward section was pounded, and the section under the forecastle became a raging inferno. Hipper was forced soon to temporarily withdraw southwest. Seydlitz had by that point her list increasing badly to starboard, slowing down. Her fore middle deck was entirely flooded, she lost almost all buoyancy to the point her prow was now regularly submerged by incoming waves. At 19:30 the High Seas Fleet was still unaware of the Grand Fleet’s position, Scheer considering a full withdrawal before darkness, when the Grand Fleet was at last spotted. Her ordered al his ships a turn 16 points to starboard, followed by Seydlitz, so she was found astern of SMS König.
Hipper’s battlecruiser had some respite, while Admiral Jellicoe turned eastward on a perceived German path of the retreat. Soon another 16-point turn in reverse was ordered and soon Scheer ordered Seydlitz, Von der Tann, Moltke, and Derfflinger to make the infamous “death run” at full speed towards the British fleet, hoping to disrupt their formation. At around 20:17, Seydlitz was just 7,700 yards (7,000 m) of Colossus, and she managed to hit the British battleship, causing minor damage to her superstructure, before turning in retreat behind a screen of torpedo boats and smoke.
The battle went on at dusk, but there was a new respite allowing some urgent repairs to be done Seydlitz and other bettered German battlecruisers. It was ordered notably to cut away wreckage interfering with the turret and mastered fires, fixing the fire control and signal gears dmaged by shrapnel, stopping flooding, and man and prepare searchlights. The German fleet was reorganized and ready when the British were spotted again at 21:00. Beatty turned his battlecruisers westward to the fray and after nine minutes sighted the German battlecruisers. He closed to 8,500 yards and opened fire at 20:20. Seydlitz was hit again: One struck the aftermost gun turret, jammed for good, another landed on bridge, killing nearly all officers present, even some in the conning tower.
Seydlitz at 21:32 hit Lion and Princess Royal. Manoeuvers had the pre-dreadnoughts of II Battle Squadron covering the retreat of the German battlecruisers, and soon the entire line turned southwest to broadside Beatty. At 22:15, Hipper transferred his flag to the still undamaged Moltke, and ordered to moved towards the head of the German line. Seydlitz and Moltke were the least damaged, while Derfflinger and Von der Tann were too battered and slow to comply to the 20 knots run. They nearly collided with Stettin while underway and caused the following Frauenlob, Stuttgart, and München a hard turn to port, so they fell on the British 2nd Light Cruiser Squadron, duelling at 800 yards.
Von Reuter then decided to lure them towards Moltke and Seydlit but they broke off and fled. After Frauenlob exploded, Seydlitz lost sight of Moltke and could no longer keep up. The latter was speeding away towards Horns Reef.

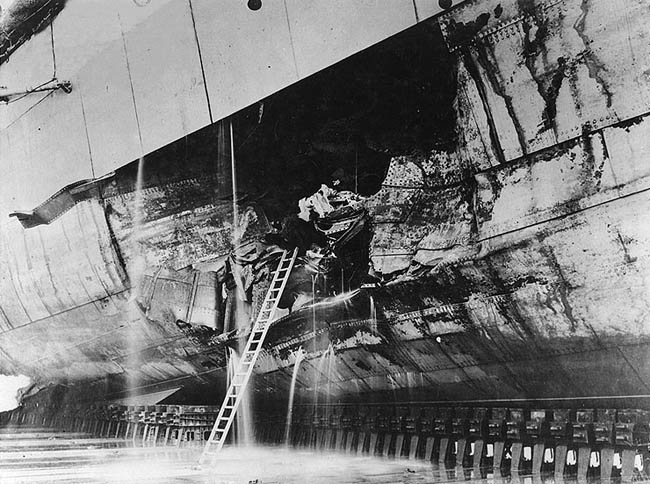
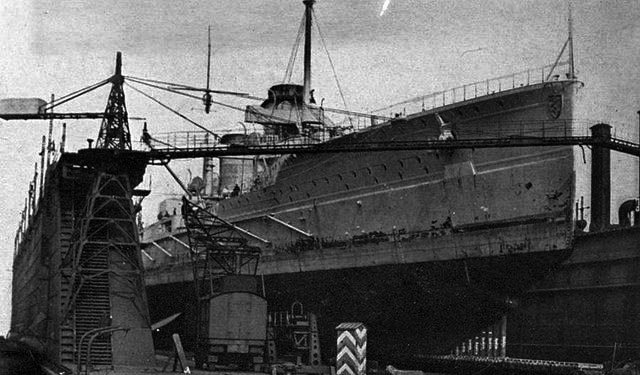
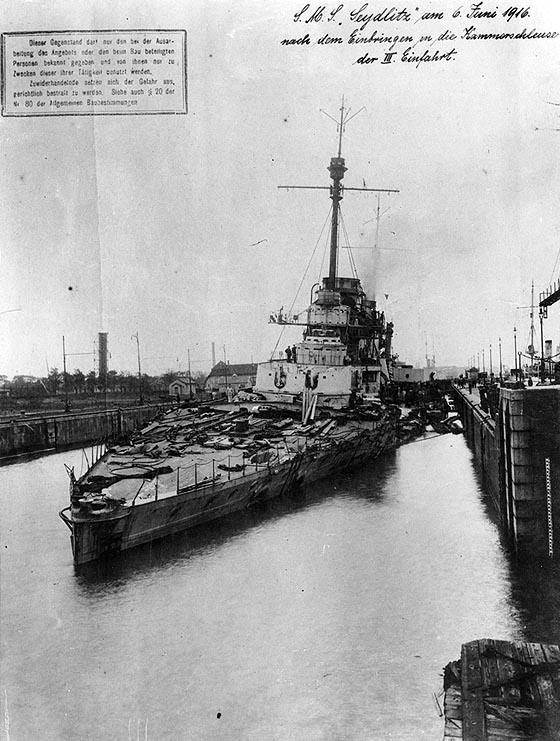
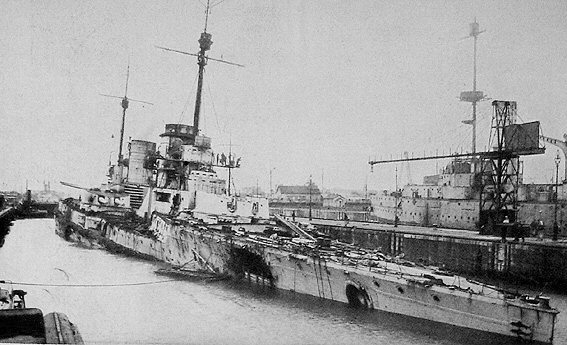
The ship in drydock in Wilhelmshaven and her torpedo damage being patched up.
At 00:45, Seydlitz was now caught between the Grand Fleet and the Jade, trying to find a path in the dark. She was sighted by HMS Agincourt, the latter indentifying her as a small ship, possibly destroyer. But the captan declined to fire not to betray his position. At 01:12, Seydlitz went through and was now heading to Horns Reef, reached around 03:40. Her gyro-compasses disabled, she was to trust the light cruiser Pillau to guide her home. She arrived at 15:30, 1 June.
It was time for damage assessment: The bow practically submerged and the only unflooded compartment left was the broadside torpedo room. The wounded crew was evacuated and two pump steamers were dispatched to help the ship. They stabilized flooding, so she was able to steam back to port, reaching the outer Jade river on 1st June. Its only on 3 June, at very low speed, that she entered the Wilhelmshaven Lock. A first assessemtn stated she had been flooded by 5,308 tonnes of seawater. At 03:55, Hipper reported the damage his ships took. Fortunately none was sunk, a miracle considering what they went through. Derfflinger and Von der Tann each had only two guns in operation, Moltke was also flooded with 1,000 tons, Seydlitz far more, plus her starboard wing turret left operational and one gun for the forward turret, plus more of her secondary 15 cm guns. Seydlitz has been struck by 21 high-caliber shells, with two secondary battery shells, and a torpedo, deploring 98 killed and 55 wounded. But she also fire fired 376 main shells, claiming a probable 10 hits. The destrouction of Queen Mary was not exclusive, but is largely considered she was the main contributor.
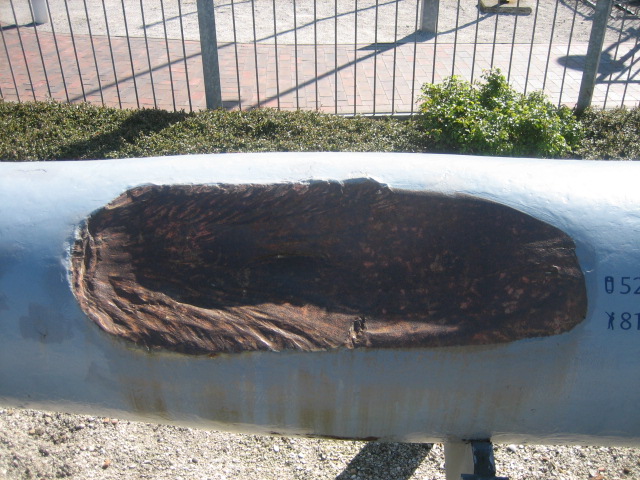 Hit on her gun barrel
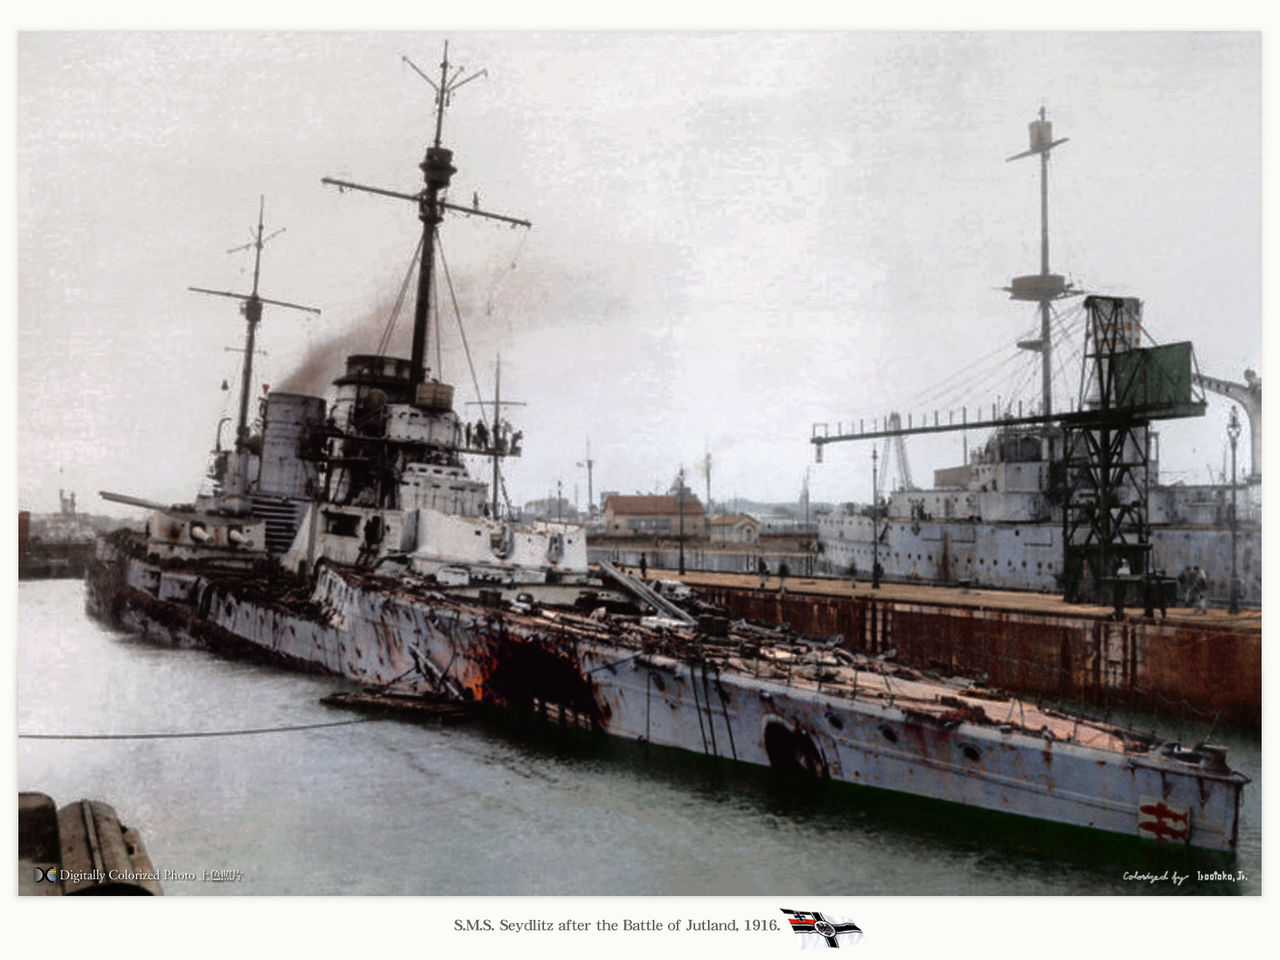
sms seydlitz after Jutland in Wilhelmshaven on 3 June 1916, showing the extent of her battle damage. Colorized by irootoko JR. Battlecruiser normally don’t have the resilience she showed. The British were presuaded she took at least 30 hits from main battery shells, something even a battleship would have a hard time coming with. When room 40 later analyzed reports, the admiralty was stunned to know that all German capital ships but the old Pommern, survived. This, and the equally amazing survivability of Lützow and Derrflinger prompted an enquiry after the ships were interned in Scapa Flow and scuttled. Hindenburg in particular, the last and best of the lineage sinking upright, was toroughly examined by Royal engineers.
Last Operations
Repairs started on 15 June 1916 in drydock 3, in the Imperial Dockyard, until 1 October 1916. After post-fix trials and training, she was back with her unit in November. The former flagship Lützow has been sunk previously so Seydlitz became the new flagship. On 4 November, Seydlitz and Moltke headed with the II Division, I Battle Squadron, III Battle Squadron (notably the brand new SMS Bayern), sailed to Bovbjerg, Danish coast, to try to recuperate the stranded U-20 and U-30 before the British arrived. The mission was a success.
Scheer committed his ships ahain, this time to intercept a British convoy to Norway, by late 1917. The Royal Navy indeed had battleships attached to the convoys, so Scheer saw an opportunity to detach and destroy it. Strict wireless silence was ordered, to to prevent room 40 to warn the British admiralty, though the Germans at this point still were doubtful their code has been broken. The operation was planned on 23 April and the High Seas Fleet was as usual in distant support. On 24 April 1918, 05:20 Hipper reched a point 60 nmi (110 km; 69 mi) west of Egerö in Norway and laid an ambush. Faulty intelligence however doomed the operation as U-boats falsely reorted a west-bound convoy leaving Bergen on Tuesday, 22, and another bound to Norway departing from Methil in Scotland on the 24th. Moltke lost her propelled and was forced to break radio silence, alerting the Royal Navy and promting Beatty to make a sortie with the grand fleet, too late to intercept them. On 25 April, the Hochseeflotte and battlecruiser were withdrawn behind minefields, 40 nmi (74 km; 46 mi) off Helgoland. Moltke was torpedoed by E42 en route but like Seydlitz, survived.
Kapitän zur See William Taegert took command on 30 November 1917 and until 4 December 1918. Kapitänleutnant Otto Brauer was her last captain, from 5 December 1918 to her scuttling on 21 June 1919.
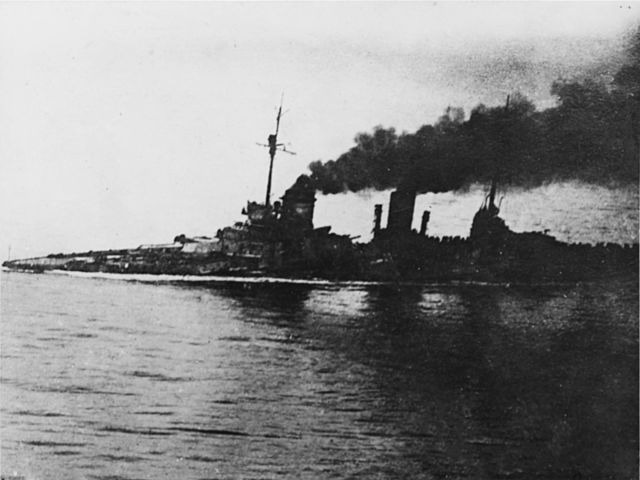
Seydlitz en route to Scapa Flow
The battlecruiser was mobilized for her last mission, the “death ride” planned for the High Seas Fleet in October 1918. Scheer (Großadmiral) wanted to obtain a better bargaining position for Germany’s peace negociations; However in Wilhelmshaven, war-weary sailors aware of the unrest in the capital and in part receiptive to bolshevism deserted en masse. Von der Tann and Derfflinger lost 300 men while in transit, and 29 October, sailors mutinied, ships refused to weigh anchors, acts of sabotage multiplied in SMS Thüringen and Helgoland. Nothing serious happened on Seydlitz, but Hipper and Scheer cancelled the operation. The mutiny soon spread to Kiel, fuelling the German Revolution and civil war that followed.
After the capitulation was signed in November, while the armistice terms were discussed, the entente powers ordered the German fleet to be interned in Scapa Flow. Seydlitz departed with the rest of the fleet, under a watchful escort of some 370 entente warships. When on site, their guns were disabled (breech blocks evacuated, under lock and keys) and they only had small crew, for Seydlitz about 200 officers and men to service the ship at minima.
As the Treaty of Versailles was concluding with very harsh conditions for Germany, admiral Reuter believed the British were about to seize the German fleet on 21 June 1919, the deadline to a signature, and when the Grend fleet departed for manoeuvers, he ordered a general scuttling, starting at 11:20. Seydlitz had her valves opened and explosive charges detonated whle the crew evacuated. She listed rapidly and eventually capsized at 13:50, burying her superstructures in the mud, under twelve fathoms. She was sold for scrap to Cox and Danks. Her salvaging proved difficult, she sank again but the second attempt was made in front of cameras. But she refused to comply again, being accidentally refloated while Cox was absent and no cameras were turning. She was sunk again and raised on 2 November 1928, then towed to Rosyth on 1930. Her bell was carried by SMS Kormoran during WW2.

Seydlitz capsized after scuttling
 Latest Facebook Entry -
  X(Tweeter) Naval Encyclopedia's deck archive
 Instagram (@navalencyc)


 French Navy
 Royal Navy
 Russian Navy
 Armada Espanola
 Austrian Navy
 K.u.K. Kriegsmarine
 Dansk Marine
 Nautiko Hellenon
 Koninklije Marine 1870
 Marinha do Brasil
 Osmanlı Donanması
 Marina Do Peru
 Marinha do Portugal
 Regia Marina 1870
 Nihhon Kaigun 1870
 Preußische Marine 1870
 Russkiy Flot 1870
 Svenska marinen
 Søværnet
 Union Navy
 Confederate Navy
 Armada de Argentina
 Imperial Chinese Navy
 Marinha do Portugal
 Mexico
 Kaiserliche Marine
 1898 US Navy
 Sovietskiy Flot
 Royal Canadian Navy
 Royal Australian Navy
 RNZN Fleet
 Chinese Navy 1937
 Kriegsmarine
 Chilean Navy
 Danish Navy
 Finnish Navy
 Hellenic Navy
 Polish Navy
 Romanian Navy
 Turkish Navy
 Royal Yugoslav Navy
 Royal Thai Navy
 Minor Navies
 Albania
 Austria
 Belgium
 Columbia
 Costa Rica
 Cuba
Cuba Czechoslovakia
 Dominican Republic
 Haiti
Haiti Hungary
 Honduras
 Estonia
 Iceland
 Eire
Eire Equador
 Iran
Iran Iraq
Iraq Latvia
 Liberia
 Lithuania
 Mandchukuo
 Morocco
 Nicaragua
 Persia
 San Salvador
 Sarawak
 Uruguay
 Venezuela
 Zanzibar
 Warsaw Pact Navies
 Bulgaria
 Hungary

 Bundesmarine
 Dutch Navy
 Hellenic Navy
 Marina Militare
 Yugoslav Navy
 Chinese Navy
 Indian Navy
 Indonesian Navy
 JMSDF
JMSDF North Korean Navy
 Pakistani Navy
 Philippines Navy
 ROKN
ROKN Rep. of Singapore Navy
 Taiwanese Navy
 IDF Navy
 Saudi Navy
 Royal New Zealand Navy
 Egyptian Navy
 South African Navy


 Ukrainian Navy