

 Royal Navy (built 1936-39)
British Tribals: Afridi, Ashanti, Bedouin, Cossack, Eskimo, Gurkha, Maori, Mashona, Matabele, Mohawk, Nubian, Sikh, Somali, Tartar, Zulu
Canadian Tribals: Iroquois, Athabaskan, Huron, Haida, Micmac, Nootka, Cayuga, Athabaskan (II)
Australian Tribals: Arunta, Warramunga, Bataan
WW2 British Destroyers:
V class | W class | W mod class | Shakespeare class (1917) | Scott class (1818) | A/B class (1926) | C/D class (1931) | E/F class (1933) | G/H class (1935) | I class (1936) | Tribal class (1937) | J/K/N class (1938) | L/M class (1940) | Hunt class DE (1939) | O/P class (1942) | Q/R class (1942) | S/T/U/V/W class (1942) | Z/ca class (1943) | Ch/Co/Cr class (1944) | Battle class (1945) | Weapon class (1945)Hunt Type I class DE (1939) | Hunt Type I class DE (1939) | Hunt Type I class DE (1939) | Hunt Type I class DE (1939) | Captain class DE (1941)
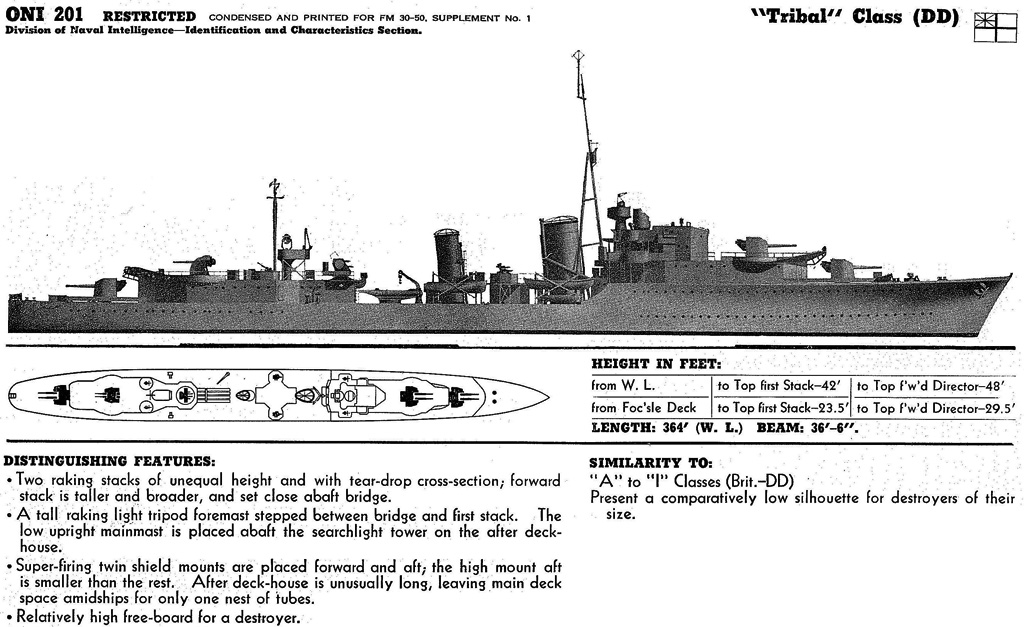
Before and during WW2, the ‘Tribals’ (named after peoples of the British Empire and beyond) were one of most important destroyer class for the Commonwealth. They were the most powerful destroyers planned for the RN, to deal originally with the Japanese “special types” (Fubuki and follow-up). They were heavily armed, with four twin guns but a quadruple torpedo launcher, plus far more AA than usual. Fantastic A/S escorts, they were pressed for all to the frontline and with the most dangerous assignations beyond escorts on the European theatre. Their design was later declined as an “austere” variant for the new J-K-L class, the basis for RN wartime destroyers.
They were also adopted for construction by the commonwealth as the best thing next to cruisers, in Canada and Australia, albeit this dragged on for some, until after the war. Large and adaptable, they also proved valuable for the cold war. The British Tribals were nearly all lost in WW2, reflecting their dangerous assignations. They were really the tip of the spear, and the most powerful British destroyer until 1945.
Design of the class
Development
From 1926 onwards, Royal Navy destroyers came for two expert yard’s prototypes, HMS Amazon and Ambuscade. They were themselves a modern extrapolation of the 1918 V-W class standard destroyers, but interwar advances in armament and machinery changed gradually the game. In the mid-1930s, these “interwar standard” destroyers, once a gold standard internationally, reflected on licensed and exports across the globe, were now contested. Foreign designs from Japan (with the Fubuki), Italy (with the Navigatori), and Germany (Type 1934) now were considerably larger and better armed than these classic standards the RN relied on. So, to counteract this new trend, the Admiralty decided to started a completely new destroyer design, putting an emphasis on gunnery over torpedo warfare.
In fact, for a destroyer design, it was based on ‘Design V’, a design study for a small fleet cruiser, a preliminary variant which later evolved into the Dido-class cruiser. This design was very small for cruiser standard at 1,850-ton standard, but with a speed of no less than 36.25 knots (67.14 km/h; 41.72 mph), and an endurance of 5,500 nautical miles (10,200 km; 6,300 mi). But the cheery on the cake was a combination of no less five twin 4.7 inch guns as main armament. These were destroyer calibre, so these “cruisers” were more of a reinvention of WWI scouts than proper basis as AA cruisers.
The design at the time was rejected for cruiser role but kept in a locker nevertheless. So by August 1935, it was exhumed and compared to eight other design proposals for a new destroyer design, and some ideas from various yards, before any official specification tender. The one chosen by the admiralty in late 1935 evolved as a mix of the former scout and 2-3 competitive proposals, to present a destroyer armed with eight 4.7 inch Quick Firing Mark XII guns, all in twin mountings and surperfiring to keep the length and thus overall displacement in check, with all these turrets having a maximum elevation of 40° and controlled by a low-angle (LA) director and high-angle/low-angle (HA/LA) rangefinder director on the bridge to act as “semi-dual purpose” guns.
This way, these new destroyers would be able to provide close range anti-aircraft protection. To continue in that direction it was also given a quadruple Mark VII QF 2 pdr “pom pom” mounting, and two quadruple Vickers .50-inch machine guns in complement for shorter range. This made these destroyers a good complement to the new Dido class, in the destroyer range. These also were to introduce the brand new Fuse Keeping Clock High Angle Fire Control Computer, later used on all British wartime destroyers. So this class was a game changer in many ways and was considered more than a new “special type”, than a new standard. It was indeed very costly compared to previous designs, and with post-1929 crisis budget cut concerns, it was yet to be approved.
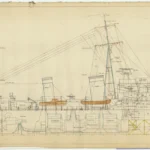
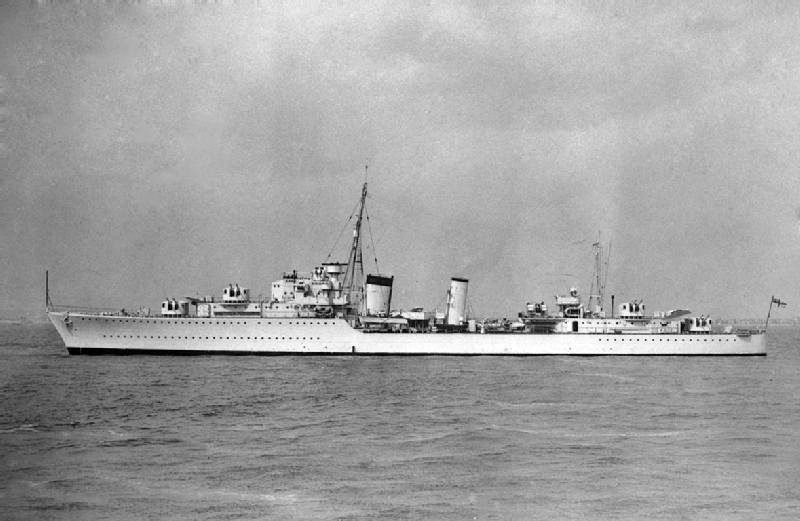
The admiralty also agreed to put in a quadruple bank of torpedo tubes, squeezed between massive superstructures, almost as an afterthought. One striking aspect of the new design compared to previous destroyers which had a near-straight, slightly sloped stem, the new destroyers had clipper bows, and had a well-balanced design with two raked funnels of the same size, superfiring guns fore and aft. They were considered to be not only impressive, but also handsome ships, and their long forecastle in addition of their bow, gave them excellent sea keeping.

ONI 1950 pages on the Tribals.
Naming and Construction
The final design was approved in January 1936 and the Royal Navy placed an order for seven Tribal class ships on 10 March 1936, with a second group of nine ordered later on 9 June in order to equip two flotillas. The class names were a recall of another marking class of the dreadnought age, the large, costly but might “Tribals” of 1905-1908. They were criticized at the time for their cost, but clearly were superior in size and speed to those built prior, notably the smaller River class. “Tribals” referred to the indigenous populations within the British Empire (and beyond like Eskimo), a similar choice was done for the “Crown Colony” class, but recalling instead the countries themselves.
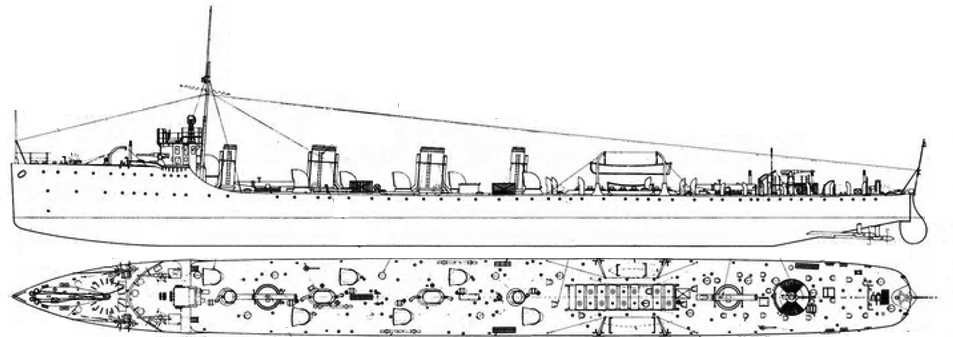
The WWI tribal plans, HMS Mohawk
Destroyer with colonial tribal names was also practiced by the French in WW1. However the core idea was not to name each and every “tribe” but rather referring to the auxiliary warriors and in general to the peoples with the most martial traditions. The Gurkhas for example. “Bedouin” was a reference to Lawrence of Arabia and there were many African tribes, all used as Royal fusiliers in Africa in WWI such as the Afridi, Ashanti, Mashona and Matabele. Other honoured former foe, such as the Mohawk (French-Indian wars), the Nubian and Somali, eastern nomad peoples such as the Tatar and Cossack, or from India like the Punjabi and Sikh, and of course the Zulu. The Australian chose battle names and the Canadians chose the same path as the British and named their destroyer afters Canadian-Indian tribes.
Yards:
Vickers-Armstrong, Tyne: Afridi, Cossack, Eskimo, Mashona, Haida*, Huron*, Iroquois*
Denny, Dumbarton: Ashanti, Bedouin
Fairfield, Govan: Gurkha, Maori
Scotts, Greenock: Matabele, Punjabi
Thornycroft, Woolston: Mohawk, Nubian
A. Stephens, Linthouse: Sikh, Zulu
Swan Hunter, Wallsend: Somali, Tartar
Cockatoo DYd, Australia: Arunta, Bataan, Warramunga
Halifax NyD, Canada: Athabaskan, Cayuga, Micmac, Nootka.
The Royal Australian Navy and Royal Canadian Navy, which had observers and naval attachés in the RN, were also impressed and both ordered a flotilla of Tribals. However, British yards were already at full capacity, so in both cases it was soon decided that they would be built locally. The eight Australian ships were to be later ordered to Australian shipyards, notably Cockatoo, but this would require considerable infrastructure investments, recruiting and training a new generation of skilled workers and engineers, plus the inevitable delays to deliver parts from the UK.
This explains why later only three were completed, two in 1942 and one in 1945, and the rest were cancelled. The Canadian order initially was for four ships from British yards in 1940 and they were indeed completed in 1942 and 1943, but the other four were also to be built from Canadian yards, at Halifax, starting in 1942 but not completed until after the war.
From 1937 and 1945, no less than twenty-seven Tribals were built, the largest destroyer class since WWI, with an estimated cost per ship of around £340,000, excluding weaponry, £520,000 overall. To compare, an H-class, classic destroyer, cost £278,482 without equipments. That was a hard pill to swallow. But the “value” of these new destroyers was seen as twice as much in value compared to a classic G-H-I class vessel.
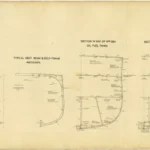
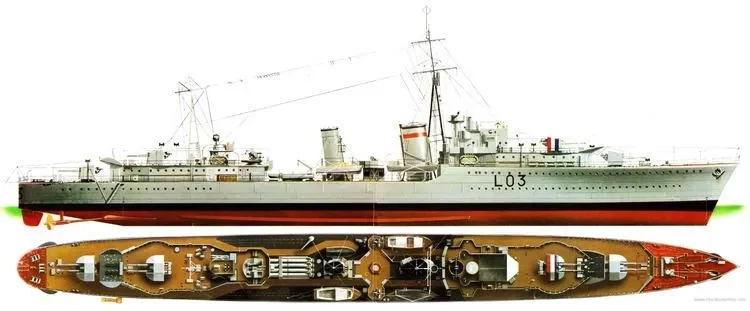
Hull and general design
The Tribals were enormous compared to previous designs, in displacement they rose to 1,854 long tons (1,884 t) standard and 2,520 long tons (2,560 t) deep load, compared to 1,370 long tons (1,390 t) standard, 1,888 long tons (1,918 t) deep load for the last I class built in parallel, so the “Tribals” standard load was the same as a fully loaded destroyer of the previous generation. This was reflected more into the beam increase, rather than the length. Indeed, engineers face the daunting challenge of having tall superfiring turrets fore and aft, which was a big no-no in destroyer design given how slender their hulls were.
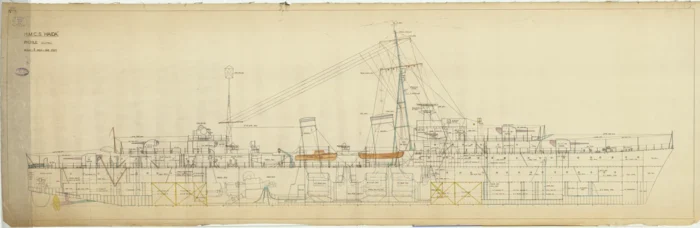
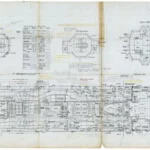
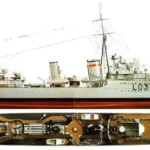
Inboard profile, HCMS Haida 1940 (greenwich coll.)
The best example of this the large contemporary “flotilla leaders” of the Porter class back in the US (a design developed after the same conclusions), armed similarly, and so unstable they needed to be severely cut down.
So for an overall length of 377 ft (115 m) (o/a), compared to 323 feet of 98.5m for a G/H/I design, an increase mostly due to the longer clipper bow, they had a beam increased to 36 ft 6 in (11.13 m) compared to 33 feet or 10.1 meters, so more than a meter more. Buoyancy was needed also to keep the centre of gravity low, but it was estimated it would compromise top speed, and the beam was to provide it, thus, the Tribal class had a draught of 11 ft 3 in (3.43 m) light, compared to 12 ft 5 in or 3.8 meters (mean).
It was also suggested to use aluminium for the superstructures, but eventually a new type of thin soft steel was used instead as the danger of fire was already well understood at the time, and fear this move will enter in conflict with a rapid rearmament of the RAF. Instead, great efforts were made to keep the weight down, with low fuel tanks with a seawater filling compensation system, extra compartmentation, a double bottom that could be accessible and filled as well, and lower ammunition magazines as well. Still, the metacentric height offered little in terms of future additions, as the ships were already at this limit.
The bridge sported the new shape adopted for the late H class and I class, and it had a raised wheelhouse for the helmsman, to see over the top and placed in front of the bridge, no longer underneath, with angled sides for a wedge shape with sloping roof. The developed wings cold be used to install additional AA, which was done in wartime. More AA was also later added on the superstructure aft.
Now, for the overall design, the Tribals presented some striking aspects, such as much longer forecastle, due to the location of the bridge, pushed aft due to the longer forward superfiring structure for the “B” gun. Of course where was the prominent clipper bow, an elegant new feature unused for destroyers so far, but practiced by competitors. This pushed the two unequal raked funnels to slightly aft amidships with a “C” turret on a bandstand between them like a flotilla leader in the preliminary design, which was not retained. Instead, mostly for weight reasons, the two quad Vickers HMGs were installed on both sides of the platform to keep a better fire arc.
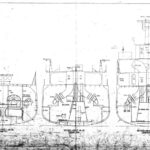
The torpedo tube bank, still quadruple, instead of a quintuple one, once planned, was located aft of the aft funnel, followed not by an intermediary structure that would have supported a searchlight, but instead the main aft quarterdeck structure supporting in order, the main pompom mount, the searchlight platform, the aft mast and “Y” turret. In general the freeboard was also a but taller compared to previous designs as well, but electric light still used sparingly so the hull’s forecastle and aft section on both sides of the engines compartments, were dotted with portholes.
Seen from above, the hull had a short 1/3 length full beam section aft amidship, with the forward lines starting at the end of the bridge, with a gradual curve all the way to the pointy prow. Seen from the waterline, the entry angle was even greater than for previous G-H-I designs. The hull then inflected to the poop from “Y” gun position and ended with a rounded poop with flat walls. There was no adoption of a transom stern as this design was not seemed justified here, notably it was believed not optimal to drop depth charges.
The Tribals were barely roomier than previous destroyers and not particularly popular, with their crew of 190 (219 as flotilla leaders) versus 137 (peacetime), 145 (wartime) on an I-class.
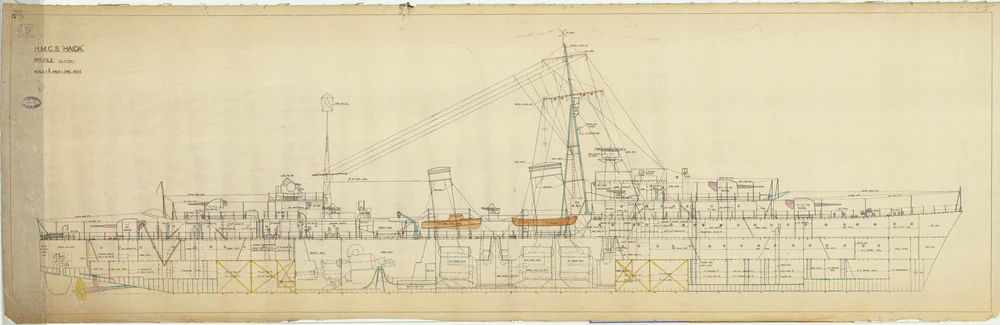
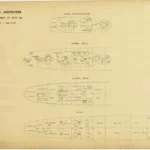
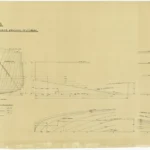
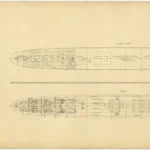
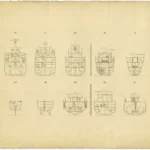
HMCS Haida plans
Powerplant
To power these very special ships, it was decided to give them a largest set of steam turbines. On their two shafts, with propellers slightly larger compared to other classes (but with the same 3-leaf shaped blades, were mated Parsons geared steam turbines. The were fed by three Admiralty 3-drum boilers of a large size for a total output of 44,000 shp (33,000 kW), versus 34,000 shp (25,000 kW) for the G-H-I classes. That was a jump of no less 10,000 hp, in order to compensate for a tonnage that was considerably higher. As a result, combined with the new clipper hull and refined lines, the Tribals were able of reaching a top speed of 36 knots (67 km/h; 41 mph) at full battle load (unlike other nations that often published light load figures). The range, thanks to an oil capacity raised between 505 and 516 tonnes (versus 443-461t for the G-H-I), making for a range of 5,700 nmi (10,600 km; 6,600 mi) at 15 knots (28 km/h; 17 mph). This was substantially better than the usual 5,500 nmi of previous classes, although never enough for the admiralty. With wartime addition, of course, displacement rose, and these performances were degraded.
Armament
BL 4.7 inches/45 Mark XII

The Mark XII was closely related, apart its twin mounting to the now venerable Mark IX. The latter was used on many destroyers, from A through I class, O and Q through W destroyer classes as well as the ex-Brazilian (H class) and ex-Turkish (I class) destroyers, sloops and even submarines. It was a well proven design, for which tens of thousands of rounds had been manufactured and sent to depots across the Empire. So the Mark XII was only new because of its mounting, which prototype test destroyer was HMS Hereward. It was pioneered by the Tribals but also reused on the, J, K and N destroyer classes and the Abdiel class minelayers.
The Mark XII was generally similar to Mark IX except for its removable breech ring and that they had no register on the rear of A tube, and breech rings were machined to match. The later wartime sub-variant Mark XIIB had a loose barrel construction. They could be operated in either Quick Firing (QF) or Semi-Automatic (SA) mode. In the first, the breech was manually opened after firing, by moving a lever ejecting the spent casing, but in SA mode, it opened automatically and ejected the spent casing. When loading, the breech mechanism partially closed when the cartridge case rim hit the ejectors, fully close as the loading tray was raised. 372 Mark XII guns were manufactured. These guns used power ramming and power training and elevation, but no RPC gear.
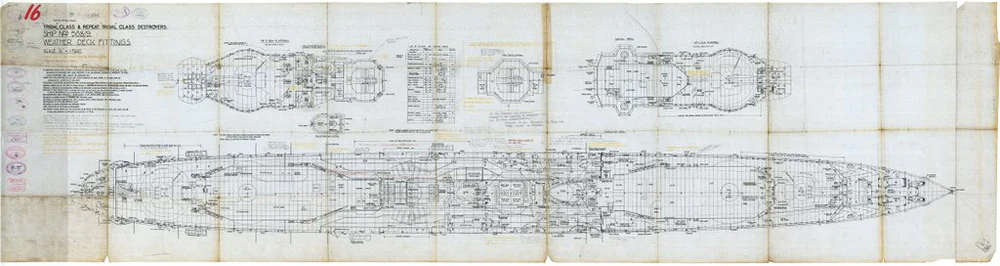
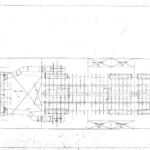
Weather decks
The “turrets” were just an enlargement of the original gun shield to simplify production, the CPXIX mount itself weighted 25.09 tons (25.50 mt), to compare to 8.64 tons (8.79 lt) for an CPXIV single mount, so the superstructures and decks needed considerable bracing and strengthening unlike previous designs. It was powered elevated at 10 degrees per second, trained at the same speed, and had a shorter recoil of 18 in (45.7 cm). The CPXIX twin mounting were the first powered mounting specifically designed for destroyers, with a trunnion height 13″ (33 cm) higher than single mountings, which caused in turn to raise the wheelhouse even further with the same new bridge shape for the helmsman to see over the gun shields.
Loading at low elevations proved more difficult. The guns were solidary (same cradle) albeit still 38 in (96.5 cm) apart and firing with slight delay to reduce interference. But accuracy was poorer than the single mounts, albeit this was compensated by a better fire control. There were two dredger projectile hoists bringing shells from the shell rooms to the deck below the guns. “Y” mounting aft was a deck lower, and thus, the hoists terminated on the upper deck. Shells were transferred via hand-operated sliding chutes, running diagonally between decks, and propellant cartridges passed up from the magazines to the guns by hand. To power these mounts, both groups A-B, X-Y received energy from a common 140 HP steam turbine and oil hydraulic pump setup. Elevation used an hydraulic motor driving pinions on a common shaft.
The Tribals carried 200 rounds SAP and 50 rounds HE as well as 50 star shell per ship. Barrel life was approx. 1400 rounds. The Canadian Tribals completed postwar received the new 4″/45 (10.2 cm) HA/LA mountings. One was already installed in wartime, in place of the X” mounting. Read more on navweaps
Specifications Mark XII
Mass: 3.238 – 3.245 tons (3,290 – 3,297 kg)
Length: 224.08 in (5.692 m), Bore 212.6 in (5.400 m)
Shell: HE/SAP 50 lbs. (22.68 kg), 15 in (38 cm) long
Cartridge: Brass 4.724 x 30.922 in (120 x 785.42 mm)
Charge: 11.58 lbs. (5.25 kg) SC 109 or 13.13 lbs. (5.96 kg) NF/S 164-048
Full round with charge: 30.5 lbs. (13.8 kg) with propellant
Perfs CPXIX Mounting:2,650 fps (808 mps), RA 40° 17,000 yards (15,545 m), 10-12 rpm
Armour penetration wa 2.5″ (63 mm) of 90° stell armour from 6,500 yards (5,950 m) with the AP round.
40mm/39 2pdr QF Mk VIII
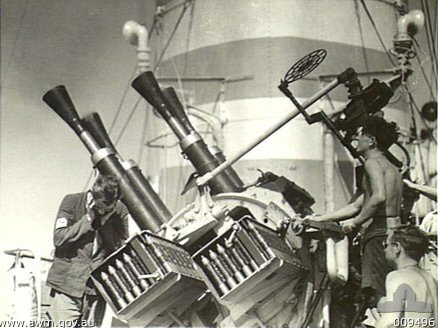
These ubiquitous AA gun was long derived from a Vickers WWI scaled-up 0.5 inches machine gun and eventually culminated with the Mark II in 1915. In 1923 was introduced the Mark VIII which became the new standard, characterized by its peculiar muzzle flash suppressor. This mount was located on the aft superstructure, in front of the aft mast, for a good arc of fire short of the obstruction of the funnels and bridge when firing at lower angles forward. When facing aft, it had to clear the projector platform and mast, reducing its usefulness mostly to port and starboard. It was also mounted on a powered bandstand.
Specifications pompom Mark VII
Calibre: 40 mm L/39
Shell Weight: 2 lb. (980 g) or 1.8 lb. (820 g) for High-Velocity (HV) round
Rate of Fire: 115 rpm fully automatic
Effective Range: 3,800 yards (3,475 m) or 5,000 yards (4,572 m) HV
Effective Ceiling (HV): 13,300 feet (3,960 m)
Muzzle Velocity: 2,040 ft/s (622 m/s) or 2400 ft/s (732 m/s) for HV
QF 0.5-inch/62 Vickers Mk III
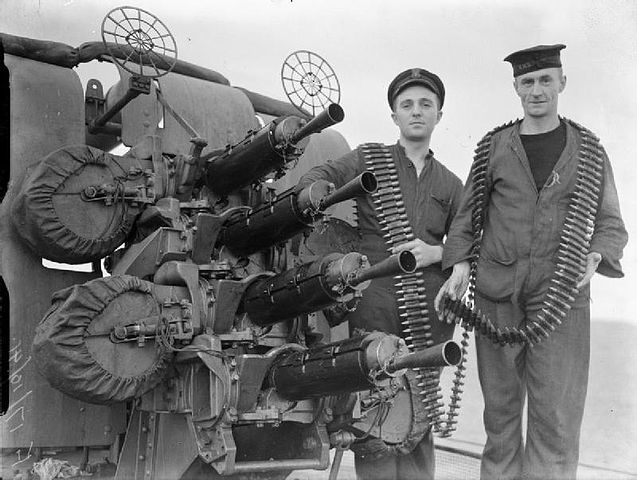
Two quadruple mounts for the QF 0.5-inch Vickers Mk III machine gun were installed on platforms between the funnels, one mount either side, like on the G-H-I class destroyers. They were poorly protected against strafing fire and of limited range, only having to offer a good volume of fire at close range. Between these and the limitations of the main guns, there was a critical inter-range gap remained uncovered, and this was paid dearly in WW2 albeit additions were made (see below).
The Mark III was a navalized land version in mountings of four tandem guns here, installed on the wings from 1931. This mount proved insufficiently powerful at short-range but from 1940-41 they were replaced on a per-mount basis by Oerlikon 20 mm cannon. This mount used a 200-round magazine per barrel, wrapping the ammunition belt around the magazine drum. 700 rpm (cyclic) or 450 for longer periods. The barrels could be setup for a spread 60 ft (18 m) wide, 50 ft (15 m) high at 1,000 yd (910 m). Vickers claimed 800 rounds in 20 seconds, reload in 30 seconds.
QF 0.5-inch specs
63 pounds (29 kg), excluding 10 pounds (4.5 kg) cooling water, 52.4 in (1.33 m) long, barrel 31 in (0.79 m)
Cartridge 12.7×81mm 0.5 inches (12.7 mm) mv 2,540 feet per second (770 m/s) ceiling 9,500 feet (2,900 m range 4,265 yards (3,900 m)
21-inches torpedo tubes
The greater change made by the previous G-H-I was to go from triple (A-B, C-D), to quadruple (E-F class) quintuple torpedo tubes banks. The same types were installed on the Tribal class, a single mount which was reloadable thanks to cranes. The torpedo models depicted below are the ones most likely to be assigned:
Mark IX** (1935)
This standard model was designed from 1928, first appeared in 1930, and was considerably improved by 1939. Its best speed was 41 knots but at 35 knots, less than a Tribal at full speed.
Weight: 3,732 lbs. (1,693 kg). Neg. buoy. 732 lbs. (332 kg)
Length: 23 ft 10.5 in (7.277 m)
Explosive Charge: 805 lbs. (365 kg) Torpex
Range and Speed settings: 11,000 yards (10,050 m)/41 kts, 15,000 yards (13,700 m)/35 kts
Power: Burner-cycle, 264 hp @ 41 knots
The Mark X was introduced in late 1940 and perhaps installed, it was capable of 47 knots thanks to a wet-heater.
Mark XI(1944)
A British electric torpedo developed from 1942 and introduced from 1944. It was an attempt to copy the german G8e-T2 (captured) as a trackless topedo for submarines in the Mediterranean. None was delivered before the war ended, when the Tribals were scheduled to join the BPF, so they were never deplyoed but postwar for trials. More
Specs:
Weight 3,632 lbs. (1,647 kg), lenght 22 ft 5 in (6.833 m)
Negative Buoyancy: 734 lbs. (333 kg)
Explosive Charge; 710 lbs. (322 kg) TNT
Range and Speed, unique setting, 5,500 yards (5,000 m) at 28 knots, powered by Electric batteries.
Depth Charges
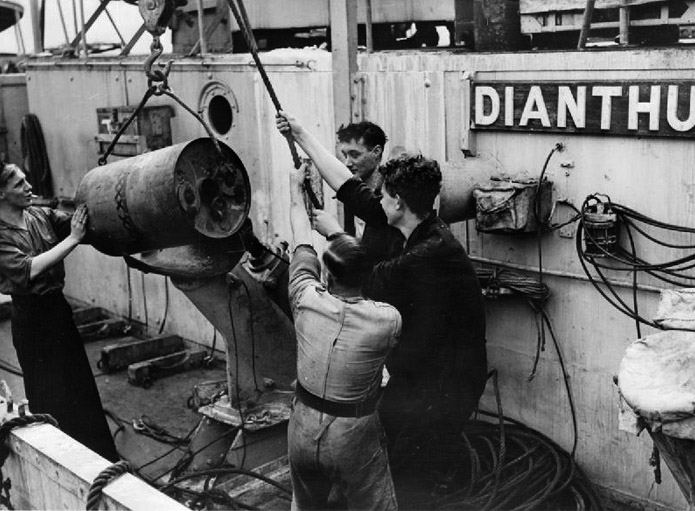
Mark VII depth charge thrower being reloaded.
The usual set comprised two Mark II Depth Charges Throwers (DCT) aft on the poop deck, facing either side, and a single Depth Charge Rack (DCR) with 20 DCs at the stern. There were railings to the aft superstructure for a total storage of 40 more DCs. Reload was made by hand, using winches, always a dangerous task with a rolling deck washed by waves. These depth charges were of the standard British type, meaning it was the Mark VII: In entered service in 1939, weighted 420 lbs. (191 kg) and carried 290 lbs. (132 kg) TNT with a sink Rate or Terminal Velocity of 9.9 fps (3.0 mps) with a max setting at 300 feet (91 m) later 500 feet (182 m).
It’s possible they were later upgraded to the Mark X (1944) and the Mark X*. The X** was not introduced in service in 1945 despite its great depth (down to 1,500 feet (457 m)). Squid and Hedgehog made them obsolete. There are doubts also if the Mark VII Heavy studied from 1940 and proper to depth charge launchers were used aboard, outside experimentally. Weighting 420 lbs. (191 kg) with 290 lbs. (130 kg) TNT charge, they had a sink rate/terminal velocity of 16.8 fps (5.1 mps) and 300 feet (91 m) max setting, helped with 150 lbs. (68 kg) cast-iron weight attached. The idea was to reach the U-Boat faster, and it was claimed it could split open a 0.875 inch (22 mm) hull at 20 feet (6.1 m), or force to surface at 12 m or more. The game changer was a minol charge (1942) for better results, with a 30% increase.
Mines
Only four I class destroyers were converted. At their stern, they received a pair of sponsons housing part of a mechanical chain-conveyor system to ensure smooth delivery of the mines, stored on rails on the weather deck. To compensate for the weight of these Mark XIV mines, the two aft 4.7-inch guns and associated ammunition and even the two sets of torpedo tubes plus the whalers and davits were removed. This modification was the same of the E-F, G-H classes.
Mark XIV mines:
These were a 1920s design with either 320 lbs. (145 kg) or 500 lbs. (227 kg) charge, and Hertz horns. Switch horns were installed and they became the Mark XVII.
HMS Eskimo
Sensors
Sonars
Type 124: From 1937, improved Type 121, range 2500 yards, 1st with chemical range recorder.
Type 144: From 1943, range 2500 yards (2300 meters) to 3000 yards (2700 meters), integrated into the fire control and coupled with Hedgehog. 1st with bearing recorder, automatic scanning, turning 5 degrees after each ping, often coupled with the Type 147 “Sword” depth finding sonar with a beam steerable vertically. Also coupled with the Q attachment reducing the under hull blind spot. 60° deep vertical beam, trained with the main Type 144 transducer.
When purchased by Canada, the four C-class destroyers were refitted on Canadian specifications and saw the Type 124 ASDIC installed, and steam heating probably fitted.
Fire Control
These Tribals were the first installed with a Fuze Keeping Clock High Angle Fire Control Computer.
The Fuze Keeping Clock (FKC) was a simplified version of the High Angle Control System analogue fire control computer. The first model for destroyers was the FKC Mk.II in destroyers of the Tribal class. It was a non-tachymetric anti-aircraft fire control computer, capable of engaging targets at up to 250 knots (460 km/h; 290 mph).
It received vertical reference information from a Gyro Level Corrector, giving the aircraft’s altitude, range, direction, speed from the Rangefinder-Director. The guns received in turn on an indicator, their own correct elevation and deflection data relative to their position on the ship, and correct fuse timing to explode as close to the target as possible. A similar system was developed in the US for the 5-in/38 which later swapped only a more effective magnetic-proximity fuse. The Tribals had their Fuse Setting Pedestals or Fuse Setting Trays set on a clockwork mechanism within the AA shell warhead itself.
In time, it was coupled with the Type 285 radar.
Radars
Type 286:
Naval air search radar, first destroyer set, very crude, not rotating. Full data 286P: rotating antenna, better bearing accuracy of 3-5 degrees.
This was a metric target indication set, based upon RAF ASV Mark II set. The Type 286M had fixed antennas (central Tx and sides Rx) to indicate contact bearing. Fixed antenna so the entire ship needed to be aimed in the right scanning angle. The Type 286PQ had a steerable combined Tx/Rx antenna from the Type 291 set at least.
Type 271:
Small surface search radar using a standard microwave-frequency system with improved resolution to spot surfaced U-boat 3 miles (4.8 km) around, or a periscope at 900 yards (820 m). Full data
Type 285:
Anti-aircraft gunnery radar available from late 1940, Frq 600 MHz, power 25 kw, range 18,000 yd (16,000 m), ceiling 15,000 ft (4,600 m) accuracy 150 yd (140 m).
Complement Informations on the Tribal class
Wartime Modifications
British Tribals
The Tribal class already started with a good, heavy anti-aircraft armament as all eight 4.7in guns could engage aircraft with predicted fire and the close range quad 2pdr pompom and two quad Vickers were still a valid proposition in 1940, but less so from 1943. It was still heavier than most destroyers in 1939. These destroyers were designed as escorts for the battle-fleet and for the main artillery a 40-degree elevation seemed sufficient. But war experience showed destroyers often acted independently and in the face of Luftwaffe attack, notably Stukas, ther AA armament was woefully inadequate.
The loss of Afridi and Gurkha were a harsh reminder of this, and th admiralty devised a rapid increase in AA firepower, in a radical way, buy removing on each ship ‘X’ turret aft, which was removed and replaced a far lighter twin QF 4-inch (102 mm) Mark XVI on HA/LA Mark XIX mounting. To regain a better arc of fire, the mainmast was cut down, the rear funnel was lowered. And when they became available, 20 mm Oerlikon guns were added wherever possible, starting to replace the amidship quad Vickers HMGs. Typically, the 1944-45 AA array comprised up to four single and twin 20 mm AA guns. Single mounts were placed on the decks as well, twins on the aft structure, in addition to the twin mounts amidship. In some ships in 1945, Bofors started to replace pompoms in prevision to their service in the BPF. But depth charge storage was also increased, from 30 to 46 charges. On the engineering side, these destroyers had leaks in feed water tanks due to the turbine blades, causing structural stress at high speed in rough weather. This was gradually corrected by several measures, but a full relocation of the tanks was impossible.
By 1944, the last four Tribals received the typical late war lattice foremast, carrying the new Type 293 radar target indication and Type 291 air warning radars, while the Type 285 radar was already added to the rangefinder-director. The Canadian Tribals, HCMS Micmac and Nootka, received the new 4.7-inch twin mountings, combined with the late war twin 4-inch mount on “X” position and the improved A.A. fuse setters. The last two had eight Mark XVI guns with R.P.C., 4-6 Bofors 40 mm and the Mk VI Director (see below).
From the summer of 1940 already, HMS Ashanti, Bedouin, Cossack, Eskimo, Maori, Mashona, Matabele, Mohawk, Nubian, Punjabi, Sikh, Somali, Tartar, Zulu saw the installation of this twin 102mm or 4-in/45 QF Mk XVI and in 1941, all but Sikh and Zulu received two single 20mm/70 Oerlikon Mk II/IV, the latter instead received two single 40mm/39 2pdr QF Mk VIII. Until 1942, they received a type 271 type 285, and type 286/M/P radars. But in 1942, Ashanti, Bedouin, Eskimo, Nubian, Punjabi, Sikh, Somali, Tartar and Zulu lost their Vickers HMG for two extra single 20mm/70 Oerlikon Mk II/IV, with a depth charge stowage ported to 46. In 1943-1944, Ashanti, Eskimo and Tartar saw the removal of two single and addition of four twin 20mm/70 Oerlikon Mk II/IV. Iroquois sa the same upgrade, swapping all its single for twin 20mm/70 Oerlikon Mk II/IV mounts and in 1944 the radar suite comprised a type 291 to replace the 286/M/P.
In 1944 HMS Nubian was the first fitted with two single 40mm/56 Bofors Mk I/III. She also had two twin Oerlikon Mk II/IV. In 1945, the survivors were fitted when available with a type 271 radar and type 293 radar.
Canadian and Australian variants
Cayuga and Athabaskan as completed had four twin 4 in DP guns, a twin and four single 40 mm (1.6 in) AA guns, the same usual quadruple 21 in torpedo tubes as well as a single rack, and two throwers for DCs. Under the Canadian DDE modernisation they kept their twin 4 in DP guns but had a single twin 3 in (76 mm) guns, four single 40mm/56 Bofors guns, same TT banks but two sets of Squid anti-submarine mortars added. Note: There will be a dedicated article on the Canadian and Australian Tribals in 2026.
Postwar Modifications
Post war, the last Royal Navy Tribals were retired by the 1950s, but those in the Australian and Canadian navies soldiered on, refitted as ASW destroyers. The British-built Canadian Tribals had A6B position with twin 4-inch Mark XVI guns and two Squid mortars aft, plus a twin 3 inch/50 Mark 33 gun aft and new upgraded sensors to remain active until the 1960s.
The Australian HMAS Arunta and Warramunga were modernised in the early 1950s with a Squid installed aft instead of X mount, New sonar and radar, lattice mast. But it two years of refit and they already became obsolete. Financial restrictions left Bataan unmodernised, and all were decommissioned in the late 1950s. It’s thus no wonder why the best and only Tribal still afloat today is Canadian, HMCS Haida. She could be visited today.
Appearance
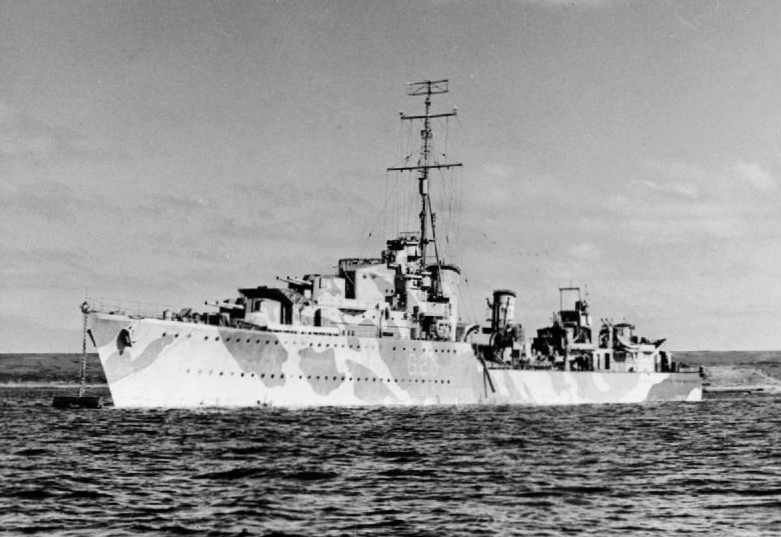
The Tribals were rarely camouflaged according to photos of the time. Some Canadian ships were, however, such as HMS Huron. HMS Eskimo had a very light North Atlantic livery combining white and light gray, but Sikh in 1942 had a dark grey livery with an aft section painted black. Nubian was all-dark grey. Zulu and many other ships in 1941 generally had a simple graded camouflage, with the hull in dark gray and structures in light grey. Funnels sometimes sported markings. Canadian destroyers had a red maple leaf on the main turret, and the Australian ships a red kangaroo.
HMS Cossack, from a J.Lambert profile, in color.
PROFILES AWAITED
⚙ Tribal specs 1939. |
|
| Displacement | 1,854 long tons (1,884 t) standard, 2,520 long tons (2,560 t) deep load |
| Dimensions | 377 x 36 ft 6 in x 11 ft 3 in (115 x 11.13 x 3.43 m) |
| Powerplant | 2 shafts, geared steam turbines, 3 Adm. 3-drum boilers: 44,000 shp (33,000 kW) |
| Top speed | 36 knots (67 km/h; 41 mph) |
| Range | 5,700 nmi (10,600 km; 6,600 mi) at 15 knots (28 km/h; 17 mph) |
| Armament | 4×2 4.7 in, 1×4 2-pdr pompom, 2×4 0.5 in AA, 1×4 21 in TTs, 1× DCR, 2× TCT, 20 DCs |
| Sensors | ASDIC, see notes |
| Crew | 190 (219 in flotilla leaders) |
Tribal class Destroyers career
 HMS Afridi (1937)
 HMS Afridi was laid down at Vickers Armstrongs, Walker on 9 June 1936, launched on 8 June 1937 and completed on 3 May 1938, commissioned at a cost of £341,462, excluding weapons and comm. Outfits from the Admiralty. She was assigned to the 1st “Tribal Destroyer Flotilla” based in the Mediterranean at Malta from 3 June. In July, she was on the Spanish coast to enforce the arms embargo and in August, hosted Rear-Admiral John Tovey, commanding Med Fleet destroyers for exercises in the Ionian Sea. On 18 September she met with Cossack, and Devonshire in the Aegean before an official visit to Istanbul, before a visit to the Black Sea was cancelled with the Munich Crisis and they were recalled on 21 September for Alexandria. She was refitted from 9 November to 17 December and returned to Malta and the flotilla now under Captain G. H. Creswell. On 23 February 1939 she was based in Gibraltar for combined exercises from 28 February to 18 March. She was damaged when she collided with the light cruiser Penelope off Palma de Mallorca during a mail transfer on the night of 21/22 March. She was repaired at Malta. During the invasion of Albania on 7 April, she remained on war footing in May. Her unit became the 4th Destroyer Flotilla and by July tensions decreased. With Gurkha, Mohawk, and Sikh she escorted HMS Glorious on a visit to Athens. In August, she trained between Crete and Cyprus. But she was later mobilised for a possible war with Italy. The Mediterranean was then closed to British shipping, Afridi escorted a group collected at Suez through the Red Sea.
On 3 September, Afridi was underway in the Red Sea, and she returned to Alexandria and started escorting convoys with contraband inspections but was soon ordered back home in October. Based at Immingham, Humber, she escorted convoys up and down the eastern coast, was transferred to Rosyth for the UK-Norway route in December and Cresswell was replaced by then captain Philip Vian.
By January 1940 she needed correction of her defects (leaks and turbine blades) she she was refitted at a commercial shipyard in West Hartlepool from the 17th, while Captain Robert Sherbrooke took command for the duration of the refit until 19 March. She was then ordered Plan R 4, a preemptive occupation of western Norway after the German invasion, and escorted the troopships of the 1st Cruiser Squadron to Bergen and Stavanger. But Operation Weserübung on 9 April was quicker.
She departed then with the 2nd Cruiser Squadron from Rosyth (2 light cruisers and the 4th DF) bound for the North Sea before and meeting the Home Fleet. On 9 April the 4th DF (less Tartar) was ordered to retake Bergen, with the 18th Cruiser Squadron, but this was cancelled when it was knew German light cruisers were in port. While back they were attacked by 88 bombers of Kampfgeschwader 26 and Kampfgeschwader 30. Gurkha was sank.
After refuelling at Scapa, Afridi, 5 sisters and the two light cruisers left on 11 April for Stadlandet, and the DD formation was split up to search the area. An inaccurate report of a German battlecruiser and cruiser saw this search recalled. On 13 April she was in the Romsdalsfjord, spotting four merchant ships and when leaving Ålesund attacked by 12 bombers from Lehrgeschwader 1. Next day they were sent to Namsos for a possible later Allied landing and coordinate with local Norwegian forces. Afridi was later used as flagship by (legendary) Major General Adrian Carton de Wiart at the head of the 148th Infantry Brigade and Namsos-area forces, from Somali. 12 Luftwaffe bombers disrupted the troop transfer. Her bow received some shrapnel, and she unloaded troops that night, the retired on 19 April while she transferred Carton de Wiart to HMS Cairo before departing.
Afridi and four others then escorted a small supply convoy to Åndalsnes and Molde, aggain attacked by the Luftwaffe on 27 April, so much so they aborted their mission before completing the unloading. She took again splinter damage and took another attack as she was withdrawing.
The Allied defeat at Namsos forced an evacuation, Afridi escorting troopships to Namsenfjorden on 1 May in thick fog. She escorted HMS York and three French troopships to Namsos and they departed at 02:30, but she waited until 03:15 for the rearguard. But Luftwaffe attacks started around 08:45. At 10:00 a Ju 87 “Stuka” of Sturzkampfgeschwader 1 hit the French destroyer Bison (forward magazine exploded). Afridi, Imperial and Grenade came to assist her while fighting off two more air attacks, and she scuttled Bison by gunfire, taking 69 survivors on board. Back to the convoy at 14:00 more Stukas attacked with greater skills and evasive manoeuvres were not successful. She took two direct hits (1 through the wireless telegraphy offic, detonated below the forward boiler room, second hitting forward of the bridge, starting a severe fire at the mess decks). Imperial to port to assist, as well as Griffin to starboard, rescuing survivors. But at 14:45 she capsized and sank bow-first, 52 went down with her plus 30 soldiers and 69 Frenchmen from Bison.
HMS Ashanti (1937)
 HMS Ashanti was laid down at William Denny & Brothers, Dumbarton on 23 November 1936, launched on 5 November 1937 and completed on 21 December 1938 with a completion delayed by the late delivery of her gun mounts. She sailed to Takoradi on 27 February 1939, Gold Coast, to visit her namesake people, as all Tribals should do once in their career. There, she presented with a silver bell and gold shield by the Asantehene, ceremonial leader of the Ashanti, Chief Osei Tutu Agyeman Prempeh II. She also accepted visitors who presented good-luck charms and symbols of valour and survival to the crew.
In May 1939 she was in France on a good-will visit with the 6th DF, all-Tribal Home Fleet unit. She later tried to rescue HMS Thetis, found still intact but salvage attempts failed (4 saved).
On 3 September 1939 she was escorting an Anglo-French squadron of battlecruisers but needed her turbine blades repaired. She was in combined operations with the Home Fleet in convoy escort duties and escorting Convoy HX 1 with the troopships Aquitania, Empress of Britain, Empress of Australia, Duchess of Richmond, Monarch of Bermuda and troops of the 1st Canadian Division to Britain but needed repairs on March 1940 (seawater contamination of her boiler). In April, she was in North Sea, in support of operations in Norway, targeted by German planes and loosing her main turbogenerator and power, despite zigzagging out of the fjord. In June, she was in escort again and on 10 August, helped tp rescue more than 300 survivors from HMS Transylvania, sank by U-56 north of the Ulster coast. She was called to escort the brand new HMS King George V to Scapa Flow. Next she was deployed in a suicidal attempt to detonate any mines in the area in the darkness. HMS Fame ran aground while in a murky drizzle and Ashanti was right behind her and struck her at 6 kts, damaging fuel lines, and Fame caught fire. Maori also ran aground. With high-tide they were swung round onto rocks, badly damaged. Vickers-Armstrongs sent out a repair crew to Ashanti, but it took two weeks to refloat her for full repairs at Newcastle, plus hull stiffening.
Next major deployment was Operation Archery, Lofoten Islands, December 1941, chasing the Germans in Vågsøy and creating an advanced base to attack German shipping, hit Shore targets and damage small German boats. The operation was recalled on 28 December, due to intense German air attacks. This convinced Hitler however of an impending invasion of Norway, divering forces here.
Ashanti was then assigned to Arctic convoys to Murmansk and the relief effort to Malta. She was later re-equipped with better insulation around vital areas for cold weather damage and devices to melt the ice accumulating on deck, warmer clothes, etc. She took part in the Arctic convoy PQ 18, attacked notably by 48 Heinkel He 111 TBs and 35 Jun 88 dive bombers. Survivors had to face a screen of U-boats, many already shadowing the convoy. U-88 was however sunk by HMS Faulknor, U-457 by HMS Impulsive, U-589 by HMS Onslow and aircraft from HMS Avenger. In all, 13 merchant ships were lost. She was part of the return convoy QP-14, and when U-703 attacked, she was hunted down by Ashanti and Somali, plagued by the lack of fuel. Somali was torpedoed by her and severely damaged. She eventually sank after evacuation. 5 other ships were lost, inc. 4 by U-435. Next, Ashanti was back to warmer waters for Operation Torch, escorting capital ships for the bombardment phase of the invasion of North Africa on 8 November. She patrolled to prevent interference from the Axis and remained in the Mediterranean until June 1943. She had a refit of her feedwater tanks at a Thames commercial shipyard back home.
Next she returned to Scapa Flow for more Arctic convoys in late 1943-1944, and patrolled the English Channel before the summer for the planned Normandy Landings. She worked with her near-sisters HMCS Haida and Huron. She guarded the Southwest Approaches and Bay of Biscay. On 9 June she battled a German destroyer group off Brittany with the trio and Eskimo, Javelin, Piorun and Błyskawica, the Battle of Ushant. The Kriegsmarine was gutted. Her last action was to prevent evacuation of German personnel from France by sea. On 5 August 1944, she engaged a German convoy off the Île d’Yeu, sank two escort minesweepers, a Patrol Vessel. She was next in re-fit, but eventually it was found she was worn out, and she was paid-off into reserve after VJ Day. In 1947, she was on disposal and a target trials, BU on 12 April 1948 in Scotland.
HMS Bedouin (1937)
Bedouin was laid down at William Denny & Bros. on 13 January 1937, launched on 21 December 1937 and commissioned on 15 March 1939. She was part of the Second Battle of Narvik, where she was damaged. On 1941, she also took part in the commando raid on the Lofoten islands. Sent to the Mediterranean, she took part in Operation Harpoon to resupply Malta. That day she was found in sub-battle with the Regia Marina: She was sunk in an unequal duel, by the combined action of cruisers Raimondo Montecuccoli and Eugenio di Savoia as well (twelve rounds hit her machinery ad she lost all power). An SM.79 torpedo bomber finished her off on 15 June 1942 with a well-placed aerial torpedo. She capsized and sank rapidly with most of her crew, albeit before she did, gunners still manning a Vickers quad .5-inch (12.7 mm) machine gun managed to shoot down the SM.79. 28 men went down, but as the abandon ship ordered had been given before the Sparviero attack, 213 men managed to escape. They were rescued by the Italians and ended as POWs.
HMS Cossack (1937)

HMS Cossack (F03) was probably the best known of these destroyers. She was laid down at Vickers Armstrongs, Walker NyD, on 9 June 1936, launched on 8 June 1937 and completed on 7 June 1938.
On 7 November 1939 she collided with SS Borthwick in the Firth of Forth while exiting from Scapa Flow, to Leith Docks. She had many injured and five killed, later buried in Seafield Cemetery, north Edinburgh. She also needed long repairs. She was back to Leith on 17 February 1940, after her most famous action, in short rescuing British POWs from the “pocket battleship” Graf Spee, transferred to the supply ship Altmark. This happened the previous day when she was under command of Philip Vian, something that brought him promotion (he was knighted and ended admiral). The “Altmark Incident” happened in neutral Norway (at the time), in Jøssingfjord, after knowledge was gained by a recce along the shores.
It was a risky mission as the fjord was narrow. Cossack attacked by Altmark by surprise, but she was not anchored. She was able to move and in the difficult narrows, managed even to turn and ram Cossack with her stern at 30° at the level of her bridge, at low speed, and push Cossack to the fjord wall. Norwegian officers present later reported it’s only the presence of ice piled up which prevented the destroyer to be crushed onto the rocky shore. Her powerful engines enabled her to extract here from this position and escape from the squeeze. She made a legendary boarding action, at gunpoint, which cost the Germans eight men and freed 299 prisoners. The action was criticized by the Norwegians as it violated their neutrality, but this became a medias coup in Britain. While back at Leith, Cossack was docked for her propeller and A-brackets and needed stern plating repaired.
Cossack also participated in the Second Battle of Narvik in April 1940. She entered Narvik at 14.15 hrs and engaged a stationary German destroyer Z17, a ship of the same class (the Tribals were built to precisely engage these). The Z17 belonged to the 1936 class, “only” had five single 5-in guns, and was to be quickly overwhelmed. But instead she waited to the best moment to broadside Cossack, unexpectedly hit her first and placed 7 hits in 2 minutes, causing serious damage. In fact Cossack lost her steering gear and out of control, ran aground on the shore. Z17 Diether von Roeder was however already out of ammunition and fuel from the previous battle and ended scuttled. Cossack received temporary repairs, was refloated during the night tide, and managed to extract herself stern-first to Skelfjord in the Lofotens, to be was patched up and limp home. The precise German fire cost her 9 killed and 21 wounded.
Next, she was sent as part of an interception force against a German surface raider reported breaking out into the North Atlantic, escorting HMS Hood, Edinburgh, and the DDs Electra, Echo, Escapade. This was a false report and she was back for Xmas. In May 1941, she took part in the hunt for Bismarck. She was ordered and detached from escorting Convoy WS-8B to the Middle East on 26 May. She and other destroyers arrived to find Bismarck underway with a damaged rudder in this evening, made several torpedo attacks as well as into the next morning to keep the crew from getting any sleep. Later, she was finished off by British battleships. Still Bismarck’s shells managed to shear off Cossack’s antenna.
On 23 October 1941, Cossack was escorting a convoy from Gibraltar when struck by a single torpedo from U-563 (Klaus Bargsten). She lost all power and was taken in tow by a tug from Gibraltar on 25 October. But as the weather worsened, the tow was slipped on the following day. She was not evacuated and eventually sank west of Gibraltar on 27 October with 159 of her crew.
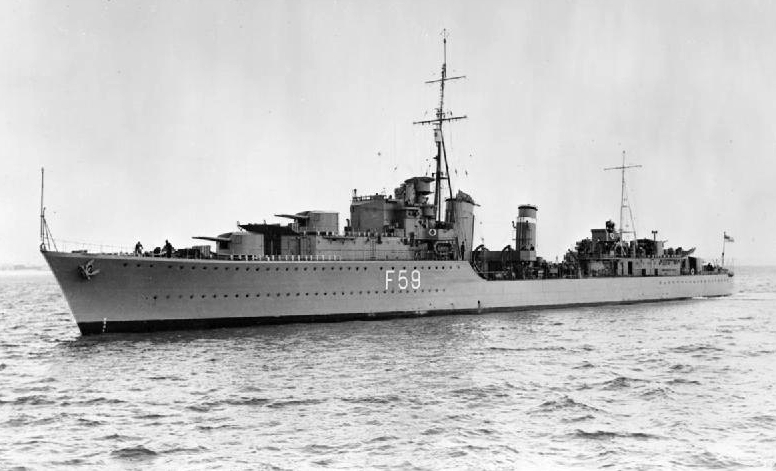
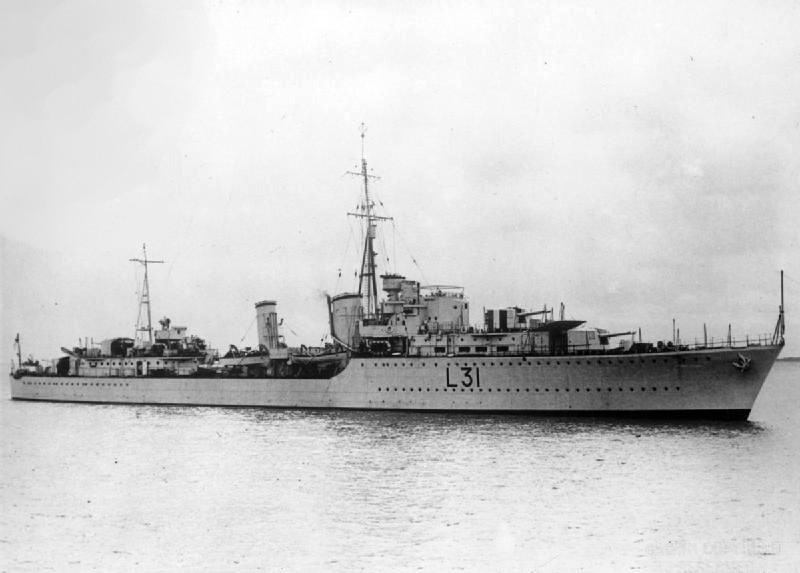
HMS Eskimo (1937)
HMS Eskimo (F37) was laid down at Vickers on 5 August 1936, launched on 3 September 1937 and commissioned on 30 December 1938. Eskimo took part in the Second Battle of Narvik in April 1940. On 12 April she was hit by a torpedo from Z2 Georg Thiele, causing severe damage, blowing off her bow. Her bulkhead held and after temporary repairs by shipwrights of the fleet repair ship HMS Vindictive at Skjelfjorden she was able to return to Vickers-Armstrong, Newcastle for rebuilding until September.
She was later sent for convo escort, notably in the Mediterranean. She supported the Allied landings in North Africa (November 1942) and was later sent to the 10th Destroyer Flotilla at Plymouth. Late when taking part in Operation Husky (The Sicily invasion) she was attacked by two Stukas, but only had splinter damage from near-misses. She was involved in the preparations for D-Day, escort the convoys in and out of the Normandy beached, and later 24 June 1944 hunted down and sank U-971 with HMCS Haida and a Liberator from No. 311 Squadron RAF in the Channel, north of Brest. On 13 July 1944 with HMCS Huron she engaged and sank the vorpostenboote V 203 Carl Röver, V 213 Claus Bolten and the minesweeper M 4611 in the Channel. She was herself however severely damaged by gunfire from V 203. After repairs, she continued to be in convoy escorts and ASW patrols until sent for operations in the Far East in 1945.
Back home after the war, she was reduced to an accommodation and headquarters ship for minesweepers operating in the Thames and Medway estuaries then as a target ship in the Gareloch, and sold for scrap on 27 June 1949, BU at Troon. Some memorabilia ended in the collection of the National Maritime Museum.
HMS Gurka (1937)
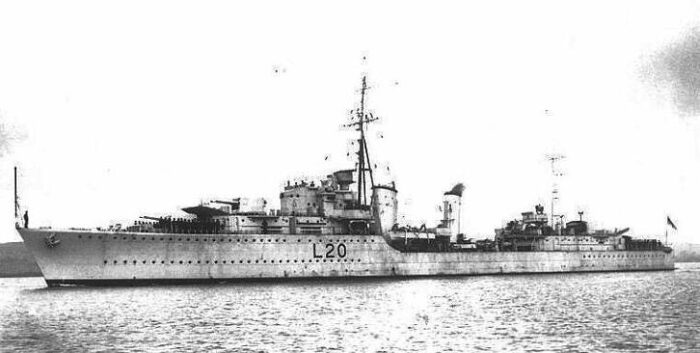
Gurkha (F20) was laid down at Fairfield Shipbuilding & Engineering Company in Govan on 6 July 1936, launched on 7 July 1937 and commissioned on 21 October 1938. She joined the First Tribal Destroyer Flotilla (later 4th DF April 1939), Mediterranean Fleet, with exercises and port visits until Sept.1939, and damage repairs after a collision with HMS Sikh. She was assigned to monitor Italian activity in the Red Sea and in October, reassigned to the Home Fleet, Portland. Furthermore, she needed fixes to mechanical defects at Thornycroft until January 1940, and joined the others at Scapa Flow. On 23/24 February, she spotted U-53 surfaced between the Faroe and Orkney Islands. She attacked and sank her on 23 February after she dived but was wrecked by her depth charge attacks. On 9 April 1940 Gurkha took part of a force sent to Norway with HMS Southampton, Manchester, Glasgow, Sheffield and Aurora, her sisters Afridi, Sikh, Mohawk, Somali, Matabele and Mashona on Bergen where a German cruiser was reported. This was cancelled and while underway home they were attacked by a massive force of 47 German Ju 88 and 41 He 111 bombers from Kampfgeschwader 30 and Kampfgeschwader 26. Gurkha moved away from the mutual protection to avoid collisions, but she became an easy target and ended with a single bomb hit. She lost all power and started sinking, but was abandoned, and the crew rescued by HMS Aurora and the destroyer Mashona. She went down with 16 of her crew, mostly killed in the initial attack.
HMS Maori (1937)
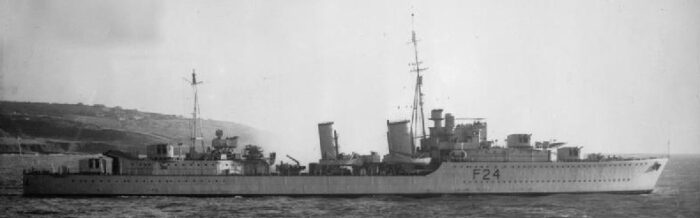
Maori (F24) was laid down at Fairfield on 6 July 1936, launched on 2 September 1937 and commissioned on 2 January 1939. Maori joined HMS Cossack’s division in January 1939 in the Mediterranean Fleet. She was in convoy escort duties but she returned to Britain in October and from April 1940 patrolled the North Sea and was in the Norwegian Campaign. In June, she sailed to Iceland and the Faroe Islands. In May 1941, she took part in the hunt for Bismarck. With Convoy WS-8B to the Middle East she sailed with Cossack, Sikh and Zulu on 26 May where Bismarck was last reported and made a series of evening and early morning torpedo attacks. Maori rescued some of her survivors after she sank.
She served with the 14th Destroyer Flotilla during the Battle of Cape Bon in December 1941 under command of the aptly named Commander R. E. Courage when attacked by German aircraft. She sank at her moorings in the Malta Grand Harbour, on 12 February 1942, with a man on watch killed. Likewise, she was later raised and scuttled off Fort Saint Elmo on 15 July 1945. Now she still lays there as a protected war grave a few hundred meters off the shore from Valletta, and a popular dive site.
HMS Mashona (1937)
Mashona was laid down at Vickers Armstrong on 5 August 1936, launched on 3 September 1937 and completed on 28 March 1939. Initially assigned to the 6th DF Home Fleet, under command of Cdr. Patrick McLaughlin, she escorted the ocean liner Empress of Australia through the Channel in May with King George VI and Queen Elizabeth aboard for their tour of Canada. Later, she searched for the sunken submarine Thetis. On 3 September 1939, Mashona patrolled between Iceland, Norway and Scotland for German blockade runners, but never spotted one. The 2nd Cruiser Squadron with Mashona ad HMS Spearfish where on patrol in the Heligoland Bight, when the latter was badly damaged by German depth charges on 24 September. She requested assistance, inc. from Mashona while the remainder of the destroyers remained on distant support. But the Germans spotted the squadron and came wit nine bombers from I/Kampfgeschwader 26 and missed.
Mashona was present in Scapa Flow when U-47 sank Royal Oak on 13/14 October and she was amonf the first to search for the submarine two hours later.
She was refitted from 25 October to 10 November 1939 at South Shields and after the loss of Rawalpindi on 23 November by Scharnhorst and Gneisenau off Iceland, Mashona hunted theme until they escaped in heavy weather. The next months were spent on convoy escort and patrol duties until Commander William Selby took command on 23 January 1940 and she was refitted at Chatham until March.
She later sailed with the 2nd Cruiser Squadron from Scotland, to sweep through the North Sea and meet the Home Fleet. The 6th DF (Somali, Matabele, and Tartar) met them the following morning and on 9 April the 4th Destroyer Flotilla with Mashona, was tasked on attacking Bergen, Norway and covered by the 18th CS, until cancelled after new intel. There was a massive German air attack, but she was unscaved.
After refuelling at Scapa Flow she departed for Norway on 11 April, off Stadlandet, split up to search the area and met again at dusk, but an inaccurate spot report of a German battlecruiser saw them recalled. On 13 April she searched for the Romsdalsfjord, found four merchant ships and when leaving Ålesund were attacked by a dozen bombers from Lehrgeschwader 1. Next she was in the Namsos area to coordinate with local Norwegian forces and assess the local Harbour facilities, advising Namsos to land the 148th Infantry Brigade to Lillesjona on 16 April. On 19 April, Mashona and Sikh escorted the troopship MS Chrobry. Next was the evacuation of Namsos and Mashona picked up troops at Veblungsnes on 30 April and ferried troops from the small wharf at Åndalsnes to the cruisers anchored in the harbour the next night. On 6 May she escorted HMS Ark Royal to the Narvik area. Next month Mashona she escorted HMS Valiant covering the evacuation from Narvik in June. She also looked for survivors from Glorious on 8 June.
Mashona, Tartar, Maori were ordered on 19 June 1940 to seize four Swedish destroyers purchased from Fascist Italy, now on their delivery voyage, citing the right of angary without protestations from the Swedish government which in fact informed the British and Germans of this purchase and route. British destroyers wanted to intercept them first at Skálafjørður, Faeroe Islands the following morning. Swedish crews were transferred under protest to SS Patricia and the oil tanker SS Castor, and British crews came on board Puke and Remus. They sailed for Scapa Flow escorted by Tartar on 21 June. The commander of the Swedish force informed his government about this seizure and ordered the ships to be seized and returned to Tórshavn, but Mashona sailed to Tórshavn recapture. Puke broke down on 22 June and was towed to Scapa. Mashona escorted the other two to Scapa to the 26th. The British returned the ships to the Swedes on 2 July after strong protests.
She escorted the Home Fleet on 27 June in the North Sea when she was damaged by a freak wave, breaking her hatches and flooding her deep trough. She also rode the wave and crashed, damaging her bottom plating with 240 rivets sprung out. Furthermore, she was repaired in Rosyth and resumed escort duties, before a new refit at Liverpool in August, inspected by King George VI and Queen Elizabeth. On 5 October she was sent to the Western Approaches, rescuing survivors from SS Rotorua on 11 December. While departing Scapa at night on 6 January 1941 she accidentally rammed Sikh and was under repairs at West Hartlepool from 16 January to 3 March. She then escorted the Home Fleet.
On 22 May 1941 she escorted Rodney and the ocean liner MV Britannic for Halifax when news came out that Bismarck sank Hood at the Battle of Denmark Strait so Rodney was ordered to return and take part in the hunt, with Mashona, Tartar and Somali. On 26 May, Bismarck was located by a Catalina, and Mashona was sent to find Admiral Sir John Tovey in his flagship King George V for a conference. She was tasked to relay Rodney’s location with a signal lamp to avoid alerting the Germans via wireless intercepts. Tovey was also informed of Rodney’s fuel shortage and of her escorts. Mashona, Tartar and Somali turned back for lack of fuel.
On 28 May 1941, Mashona and Tartar were attacked by the Luftwaffe while back home at 15 knots (28 km/h; 17 mph). One He 111 from I/Kampfgeschwader 28 hit Mashona with a single bomb in the forward boiler room, killing 46 men. Dead in the water and listing, order was soon given to abandon ship and she capsized. Tartar rescued 184 survivors, but 10 later died of hypothermia. Her hulk continued to float and was finally sunk off the coast of Galway in Ireland, by Canadian destroyers.
HMS Matabele (1937)
 HMS Matabele was laid down at Scotts Shipbuilding & Engineering Company, Greenock on 1 October 1936, launched on 6 October 1937 and commissioned 25 January 1939. She was assigned to the 2nd Tribal Destroyer Flotilla, Home Fleet, renamed the 6th Destroyer Flotilla in April. She undertook port visits and exercises and on 12 May she escorted the RMS Empress of Australia for a Royal Tour to Canada. In June, she took part in the search and rescue of HMS Thetis. In August, she was deployed in ASW patrols in Home waters. From September, this was in interception of German shipping returning home and commerce raiders as well as U-boats. On 25 September with Somali and Mashona she looked for HMS Spearfish damaged in Heligoland Bight, found on 26 September, and escorted her back home. In October-December 1939, patrols went on, notably now against submarine minelayers when not detached for screening duties for capital ships. In January-February 1940 she had a refit at HMNB Devonport (turbine blades replaced after high speed steaming in heavy weather, de-gaussing equipment). By March she was in convoy escorts to and from Norway. She was attacked by the Luftwaffe on 13 and 16 April, but undamaged. On the 17th she escorted HMS Effingham and Coventry to Bodø. On 18 April she ran aground on Foksen shoal but soon as refloated. Effingham also ran aground and Matabele took off her troops and equipment, then scuttled her with torpedoes and gunfire.
She was back late May for refit at Falmouth until July (notably AA upgrades). She made her post refit trials and was back in action on 19 August in Home waters and off Norway. On 22 October with Somali she attacked a German convoy off Åndalsnes and a day later with Punjabi she sank the German weather ship WBS 5 Adolf Vinnen, off Stadlandet, and later a coaster. November and December saw her in and out Scapa Flow, screening a search for Admiral Scheer.
In January 1941 she screened minelaying operations off Norway. On 16 January, she escorted King George V with Lord Halifax through the North Western Approaches and to the US. She screened other minelaying operations and in March after escorts she was in refit at Vickers-Armstrong, Barrow from 11 April to late May. On 5 June she grounded (major damage, shaft brackets and propellers). She was back in Barrow for repairs until mid-August. On the 30th she escorted HMS Argus, Shropshire with Punjabi and Somali to deliver RAF equipment and personnel to North Russia and back to Scapa on 15 November. Later she was in operations off Norway.
She was later on 11 January screening HMS Trinidad on Convoy PQ 8 Iceland-Murmansk (8 merchant ships). On 17 January, a day short of their destination they were attacked by U-454 (Kapitänleutnant Burkhard Hackländer) which sank the Russian trawler RT-68 Enisej and later the merchant ship Harmatis, towed by HMS Speedwell under close guard of Matabele, which was torpedoed at 10.21 pm, hit in the stern. This detonated a magazine, cut her stern section, flooding was soon uncontrollable, and she sank in less than two minutes in freezing waters. Carley life stayed stuck by the ice so the surviving crew jumped overboard, and those which did died from hypothermia were killed when the destroyer’s depth charges exploded. Out of 238, 2 survived (4 rescued by HMS Harrier, 2 more died from hypothermia).
HMS Mohawk (1937)
 Mohawk was laid down at John I. Thornycroft & Co. in Woolston on 16 July 1936, launched on 15 October 1937 and commissioned on 7 September 1938 under command of Commander Richard Frank Jolly, joining the 1st Tribal Destroyer Flotilla, Mediterranean Fleet based in Malta from 13 October 1938. She patrolled on the Malta-Egypt leg of the RAF Long-Range Development Flight (3 Vickers Wellesley bombers trying to break the world flight distance record to Australia non-stop). She carried the British Ambassador to Turkey back to Istanbul and cruised in the Aegean Sea, then back to Malta and later to Gibraltar for combined exercises from 28 February to 18 March 1939. She then patrolled the Spanish coast (arms embargo, Non-Intervention Committee). On 23 March, she rescued the crew of a damaged German float plane off Barcelona. With the invasion of Albania on 7 April, she mobilised until May while her unit became the 4th Destroyer Flotilla. By July 7, tensions decreased and with Gurkha, Afridi, and Sikh she escorted Glorious on a visit to Athens. She later trained around Crete and Cyprus. In August, she prepared for war with Italy and the Med. was closed to British shipping. Mohawk escorted a group collected at Suez.
On 3 September she was transiting the Red Sea and entered Alexandria to start escorting convoys and contraband inspections, then back home in October, Portland, 13th and escorting a convoy on 15–16 October. While off Rosyth she was found attacked by the first major Luftwaffe raid. Only two of her AA guns could fire. One Kampfgeschwader 30 bomber made two near-hits straddling HMS Mohawk, spraying splinters on her upper deck, killing 15, wounding 30. Commander Jolly was also mortally wounded but remained at the conn until he passed out, being posthumously awarded the Empire Gallantry Medal, later George Cross. Mohawk was repaired at Rosyth before, then Hawthorn Leslie. After the oil tanker SS Inverland was believed to have been torpedoed, she was sent with HMS Kelly to search for the U-boat responsible but blundered into the minefield that actually hit the tanker. Kelly struck a dud mine but it derived abaft the ship’s stern, detonating so Mohawk took her in tow until a tugboat arrived and returned to Hawthorn Leslie.
Back to escort duties, notably RMS Queen Elizabeth on 3 March 1940, she was slightly damaged after a collision with the cargo ship SS Gartbrattan, repaired until 19 March. Her unit then took part in Plan R 4 (preemptive occupation of western Norway), cancelled as the Germans launched already Operation Weserübung on 9 April.
The Home Fleet departed with her screening in interception of 7 April, notably the 2nd Cruiser Squadron from Rosyth. On 9 April, Tartar had engine issues and was forced back, so the 4th DF went on to attack Bergen, covered by the 18th CS, until cancelled. They were attacked by the Luftwaffe on their way back (Gurkha sunk, Rodney damaged).
After refuelling at Scapa she returned on 12 April off Stadlandet, split up to search for German ships but while off Ålesund they were attacked by Lehrgeschwader 1. Next they were off Namsos to study an Allied landing and coordinate with Norwegian forces. She later helped the 148th Infantry Brigade despite Luftwaffe attacks and was back on 19 April.
She returned with a supply convoy to Åndalsnes and Molde, under Luftwaffe attacks on 27 April, aborting their mission. On 1–4 May she escorted HMS Royal Ulsterman with the 1st Independent Company to Mo i Rana. She ferried British diplomats in The Hague on the 11th. As tensions with Italy rose, she was recalled by the Admiralty (17 destroyers total) to the Mediterranean on 14 May after a brief refit.
While underway to Alexandria, Mohawk had steering problems and was repaired at Gibraltar. On 29 May she joined the 14th DF. On 27–30 June she escorted convoys from the Dardanelles and Greece to Port Said. War was declared on 10 June, and she was sent 120 nmi (220 km; 140 mi) of the Italian coast when the cruise they escorted was sank by an Italian submarine, back to Alexandria on the 14th. Mohawk took part in the Battle of Calabria on 8 July by escorting Warspite. Mohawk and Nubian, Hero and Hostile were ordered to Gibraltar on 22 August to join join Force H and escort reinforcements for the Mediterranean Fleet (Operation Hats). Nubian returned to Malta due to engine problems, Hostile hit an Italian mine the following day off Cap Bon. Mohawk took her survivors and she was scuttled. She arrived at Gibraltar on the 29th and met the fleet on 2 September.
Mohawk and Nubian escorted Kent for a bombardment of Bardia on 17 September but was torpedoed by an Italian SM.79. Nubian towed her back to Alexandria, Mohawk in escort until the 19th. On the 22nd her unit, the 14th DF bombarded an airfield at Sidi Barrani, back on the 25th. In September she attacked Italian truck concentrations. While Illustrious attacked Taranto on 11/12 November, Vice-Admiral Henry Pridham-Wippell went a diversionary force of three light cruisers escorted by Mohawk and Nubian on Italian shipping in the southern Adriatic. They met and met a small convoy escorted by the auxiliary cruiser Ramb III and TB Nicola Fabrizi. Mohawk hit Ramb III and the TB but they broke contact. The cruisers sank the merchantmen. On 11/12 December, she escorted the monitor HMS Terror, bombarding Sollum.
She later escorted battleships bombarding Bardia on 3 January 1941. Next she was in Operation Excess‘convoys to resupply Malta. When Gallant struck a mine on 10 January, she tried to tow her stern-first to Malta and arrived the following day. After refuelling, she returned to screen HMS Southampton and Gloucester under heavy attack by Stukas. The latter was badly damaged and scuttled. The 14th DF also escorted the bombardment force of Tobruk on 19/20 January. She later escorted the damaged Illustrious to Alexandria on 23–25 January.
For the Battle of Cape Matapan, her unit escorted the battleships, but were detached at dusk on 28 March to hunt down the damaged Vittorio Veneto, for six hours in vain (erroneous report) and instead found the burning cruiser Zara, picked up survivors and torpedoed the wreck. An hour later they found the drifting Pola which lost all power rescued the survivors crewmen and sank her with three torpedoes.
Her unit then escorted a convoy from Egypt to Greece on 1-6 April, attacked by the Luftwaffe bombers and arrived at Malta on 10/11 April. She sortied to fell on Italian supply convoys between Italy and Libya at night. The first two patrols were uneventful, but she found a small convoy off the Tunisian coast on the 15th by night. The attack proceeded in the early hours of 16 April, five cargo ships escorted by three destroyers. Captain Philip Mack at the head of the 14th DF, manoeuvred to silhouette the convoy against the moon, closed to 2,400 yd (2,200 m) with Jervis and Janus opening fire on the Baleno, at 02:20 and disabled her.
Mohawk and Nubian were in the rear and attacked the freighter SS Sabaudia loaded with ammunition (massive explosion) and she then engaged other targets one by one until at 02:35 they engaged the leading escort, Navigatori class Luca Tarigo, which turned back to engaged them. She was pummelled by all destroyers present and started sinking, but as Mohawk approach, the crew managed to fire two torpedoes manually, the first of which struck Mohawk just after she had turned to avoid being rammed by the freighter SS Arta at 02:45. The torpedo detonated under her ‘Y’ gun mount, blowing off her upper stern. The chief engineer reported her believed that her propellers and shafts were still intact so she could move, but she was hit by another torpedo on the port side on the bulkhead between the middle and aft boiler rooms, with a detonation causing the aft boiler to explode, upper deck to split down the middle, she broke in two and capsized a minute later with 41 crewmen trapped inside. The remainder were rescued and Janus finished her off in what was the only British loss at the battle of the Kerkennah Islands.
HMS Nubian (1937)
Nubian was laid down on 10 August 1936, launched on 21 December 1937 and commissioned on 6 December 1938. She survived the was and was sold for scrap on 11 June 1949. To be completed at a later date.
HMS Punjabi (1937)
Punjabi was laid down at Scotts Shipbuilding & Engineering Co. of Greenock on 1 October 1936, launched on 18 December 1937 and commissioned on 29 March 1939. She was lost 1 May 1942, rammed by error by HMS King George V. To be completed at a later date.
HMS Sikh (1937)
Sikh was laid down at Alexander Stephen & Sons, Linthouse on 24 September 1936, launched on 17 December 1937 and commissioned on 12 October 1938. She was lost 14 September 1942 to coastal artillery. To be completed at a later date.
HMS Somali (1937)
Somali was laid dow at Swan Hunter & Wigham Richardson, Wallsend on 26 August 1936, launched on 24 August 1937 and commissioned on 12 December 1938. She was lost 20 September 1942, torpedoed by U-703, sank while under tow. To be completed at a later date.
HMS Tartar (1937)
Tartar was laid down at Swan Hunter on 26 August 1936, launched on 21 October 1937 and completed on 10 March 1939. She was sold for scrap on 6 January 1948. To be completed at a later date.
HMS Zulu (1937)
Zulu was laid down at Alexander Stephen & Sons, Linthouse on 10 August 1936, launched on 23 September 1937 and commissioned on 7 September 1938. She was lost on 14 September 1942 to aircraft attack. To be completed at a later date.
Read More/Src
Books
Brice, Martin H. (1971). The Tribals. London: Ian Allan.
Unlucky Lady: The Life and Death of HMCS Athabaskan 1940–44, Len Burrow & Emile Beudoin, Canada’s Wings, 1983
Campbell, N. J. M. (1980). “Great Britain”. In Chesneau, Roger (ed.). Conway’s All the World’s Fighting Ships 1922–1946. Mayflower Books.
Cooper, A (2010). HMAS Bataan, 1952: An Australian Warship in the Korean War. Sydney, Australia: University of NSW Press.
English, John (2001). Afridi to Nizam: British Fleet Destroyers 1937–43. Gravesend, UK: World Ship Society.
Friedman, Norman (2006). British Destroyers and Frigates, the Second World War and After. NIP
HMCS Haida: Battle Ensign Flying, Barry M. Gough, Vanwell, 2001
Hodges, Peter (1971). Tribal Class Destroyers: Royal Navy and Commonwealth. London: Almark Publishing.
Hodges, Peter; Friedman, Norman (1979). Destroyer Weapons of World War 2. Greenwich: Conway Maritime Press.
Lenton, H. T. (1998). British & Empire Warships of the Second World War. Annapolis, Maryland: Naval Institute Press.
Rohwer, Jürgen (2005). Chronology of the War at Sea 1939–1945: The Naval History of World War Two (Third Revised ed.) NIP
Whitley, M. J. (1988). Destroyers of World War Two: An International Encyclopedia. NIP
Links
navypedia.org/ tribal.htm
en.wikipedia.org Tribal-class_destroyer
coatneyhistory.com Tribal.htm
parks.canada.ca/ haida
web.archive.org hnsa.org/ Canadian tribals plans sets
on commons.wikimedia.org
rmg.co.uk/collections tribal plans
navyhistory.au/ australian tribal plans 1953
on tynebuiltships.co.uk/
on laststandonzombieisland.com/
on uboat.net/
maritime.org/doc/plans/tribal.pdf
naval-history.net/ Tribal-Afridi.htm
Video
Model Kits
on scalemates.com/ Ex Trumpeter 1:350, 1:700, Airfix 1:1200, Pit-Road 1:700n HMAS Warramunga D123 Tribal Class Destroyer 1955 APS Models 1:72. And parts 1:350.
 Latest Facebook Entry -
  X(Tweeter) Naval Encyclopedia's deck archive
 Instagram (@navalencyc)


 French Navy
 Royal Navy
 Russian Navy
 Armada Espanola
 Austrian Navy
 K.u.K. Kriegsmarine
 Dansk Marine
 Nautiko Hellenon
 Koninklije Marine 1870
 Marinha do Brasil
 Osmanlı Donanması
 Marina Do Peru
 Marinha do Portugal
 Regia Marina 1870
 Nihhon Kaigun 1870
 Preußische Marine 1870
 Russkiy Flot 1870
 Svenska marinen
 Søværnet
 Union Navy
 Confederate Navy
 Armada de Argentina
 Imperial Chinese Navy
 Marinha do Portugal
 Mexico
 Kaiserliche Marine
 1898 US Navy
 Sovietskiy Flot
 Royal Canadian Navy
 Royal Australian Navy
 RNZN Fleet
 Chinese Navy 1937
 Kriegsmarine
 Chilean Navy
 Danish Navy
 Finnish Navy
 Hellenic Navy
 Polish Navy
 Romanian Navy
 Turkish Navy
 Royal Yugoslav Navy
 Royal Thai Navy
 Minor Navies
 Albania
 Austria
 Belgium
 Columbia
 Costa Rica
 Cuba
Cuba Czechoslovakia
 Dominican Republic
 Haiti
Haiti Hungary
 Honduras
 Estonia
 Iceland
 Eire
Eire Equador
 Iran
Iran Iraq
Iraq Latvia
 Liberia
 Lithuania
 Mandchukuo
 Morocco
 Nicaragua
 Persia
 San Salvador
 Sarawak
 Uruguay
 Venezuela
 Zanzibar
 Warsaw Pact Navies
 Bulgaria
 Hungary

 Bundesmarine
 Dutch Navy
 Hellenic Navy
 Marina Militare
 Yugoslav Navy
 Chinese Navy
 Indian Navy
 Indonesian Navy
 JMSDF
JMSDF North Korean Navy
 Pakistani Navy
 Philippines Navy
 ROKN
ROKN Rep. of Singapore Navy
 Taiwanese Navy
 IDF Navy
 Saudi Navy
 Royal New Zealand Navy
 Egyptian Navy
 South African Navy


 Ukrainian Navy