ww1 naval battles Archives - naval encyclopedia

Battle of Tsingtao (August-Nov. 1914)


Japanese Navy vs German Navy

Introduction: The first air-land-sea battle

The battle of Tsingtao was one of these twists of history which seems odd to us today: Both Axis members of WW2, Germany and Japan, were indeed at each other’s throat at Tsingtao, a German-held colony in China twenty years prior. Officially, the attack of the port was a token of the recent alliance of Japan with Great Britain on the side of the entente.

Officiously, this was the perfect opportunity to get rid of another western presence in the Yellow sea, securing nearby Korean peninsula from all foreign influence, by then under firm Japanese control, and taking another hold in the Chinese continent, on a strategic place, and a modern, well-developed and equipped enclave that was further developed.

Tsingato area
Map of Tsingtao in ww1 – source

The modern city of Qingdao, is now one of the richest and most dynamic ports in modern China, why the German colony inheritance resides only in the best known Chinese beer… But the naval battle was the occasion to see an early combined arm operation, a more complex operation than the Japanese planned ten years earlier at Port Arthur, not far from there.

Its consequences were the end of the German Asiatic squadron of Von Spee, obliged to flee and launched in a rampage over the globe, settled for good in the Falklands; but also of any German presence in Asia. After Russia, only France, Britain and the Netherlands remained as imperialist powers in the area, but it confirmed once again to Japanese falcons their superiority over western powers.

The colony of Tsingtao

The very name of Tsingtao is to add to the long list of Chinese humiliations and explains the current will of the government to restore grandeur through naval power, territorial acquisitions and economical means. In 1891 the Qing Empire made Tsingtao (Jiao’ao) a defense base and improved its fortifications.

However at that time, Western powers were still present in force and reported the move to naval officials. They Germans eventually made a complete formal survey of Jiaozhou Bay in May 1897. Meanwhile two German missionaries were killed in the Juye Incident the same year. Protestations backed by military power led the weak Chinese government to agree a 99-years concession of Kiautschou Bay in Shantung.

Quickly German troops were ordered to seize and occupy the fortifications as they could have been a threat to Western (and German) trade in the area. This was not long before the Boxer rebellion. Chinese authorities indeed declined any attack to retake the strongpoint, de facto annexed by Germany.

The concession quickly became a fully-grown German colony which received high priority by the Kaiser given its strategic value. This was the only German presence in Asia. A moderately large territory though, 552 square kilometres (136,000 acres; 213 sq mi) much smaller than Hong Kong (2,755 km2), Singapore (721 km2), but far larger than Macao (30 km2) and Shanghai (6.3 km2). There was still plenty of room for development.

In 1898 though, this territory was poor and remote, the Marktstrasse (Market street) was nothing more than the old main street of the Chinese village, with fishermen and craftsmen shops and houses around, hardly a city like Shanghai. Therefore the Germans took at hart to develop it. The Chinese inhabitants were expropriated and relocated further east.

The former village was razed and rebuilt from scratch with wide paved streets, large stone-built housing areas, and government buildings. Moreover, electrification was installed, as well as drinking water and a modern sewer system. All these were quite new for the time and for China, driving locals back in. Trade flourished once again.

Development went quickly also on the harbor side, with a solid stone jetty and breakwater, safe storage areas, cranes, a harbor administration center, and a drydock. Tsingtao soon showed the highest school density and the highest per capita student enrolment in all of China.

This colony in all but name became the pride and joy of the German Empire, and soon a Brewery was installed, producing a local beer under the same name. Also the inevitable Protestant and Roman Catholic missions also settled. However the concession was unique as it was managed directly by the Imperial Department of the Navy since the arsenal and Asian squadron were the main strategic reasons of this enclave.

Tsingtau, Main gate of former Chinese munitions depot at Kiautschou Bay, Shandong peninsula (Bundesarchiv)

The Far East Squadron was then soon constituted with the best units, mostly cruisers, that can be mustered, and grew in size. On land, the colony was defended by marines of III. Seebataillon. The village became a city, with thousands of German residents, mostly families of officials in China and navy personal, and it was connected to the continent via the recently built Tsingtao-Jinan Railway Line ending in the Tsingtao Railway Station, nearby brand new locomotive works, all German.

Military situation in August 1914

The German naval forces present before 1914 were the Asian squadron commanded from its creation by Admiral Count von Spee. He very much setup this force and ordganized its support from TingTao, but his fleet also had other bases in the pacific to sail to an from, controlling a wide area: Samoa and New Guinea but also German Micronesia, the Marianas, the Carolinas and the Marshall Islands.

Von Spee’s fleet indeed served central Pacific colonies on routine missions. The fleet eventually was out of Tsingato when the war broke out. They joined early on in the Marianas Islands. The plan was to return back to Germany, fearing to be be trapped in the Pacific by much more powerful Allied fleets, especially British and Japanese.

Even before TsingTao, there was a minor British naval attack on the German colony on Shandong in 1914. German presence here was merely symbolic and the attack was swift and decisive; Japanese troops planned to besiege Tsingtao and eventually occupied the city and surrounding province after Japan’s declaration of war on Germany, as part of the Anglo-Japanese Alliance.

Siege and battle of Tsingtao


Japanese lithograph of the battle of Tsingtao

Tsingtao (Western medias)/Tsingtau (Germany)/Qindao (China), is frequently associated with the Japanese attack, but the British also participated. The land siege was relatively short due to the overwhelming disproportion of forces, it lasted from 31 October to 7 November 1914, so eight days in all, but the divesionary attacks in the province, and with the naval blockade, it lasted for two month. It was also the accumulation of many “first”:
-First encounter between Japanese and German forces
-First Anglo-Japanese operation of the war
-First combined operation (naval, land, air)
-First naval air attack
-First night bombing raid
-First and last major operation of the pacific front during the war.

Indeed for the last point, the attack on other pacific islands was quick and decisive affairs that rarely took more than several days. Nothing to do with the protracted campaign in East Africa for example, where Von Lettow-Vorbeck succeeded despite limited forces to maintain large entente forced for very long in a protracted campaign which can only be compared to Rommel’s exploits in North Africa later.


German troops parading en route to the frontline in Tsingtao

The German presence here was also seen as a threat by the British, which leased Weihaiwei, and the French for their southern colony of Indochina, at Kwang-Chou-Wan. In addition Great Britain cemented an alliance with Japan, which included the building of the Japanese Navy, from ships to arsenals and academies. The strong bonds established in 30 January 1902 would play at full during the attack on Tsingtao. On the Japanese perspective they were also a counterbalance to the Russian presence in the region and a blank check to its own imperial ambitions.

The Russian fate was sealed as we know at Tsushima three years after this important alliance. This battle eliminated Russian presence and comforted Great Britain that its Asian ally was reliable and strong, so the bond was maintained when WW1 broke out.

In August 1914 indeed, the British government prompted Japanese assistance in the name of the alliance. Indeed the German Asiatic squadron was a deadly threat for the British Colonial Empire. On the Japanese side, German concessions were tempting targets for its own ambitions. Based on this, on 15 August, Japan issued an ultimatum to the German government to evacuate all their concession from any ships and from Japan while they asked to take control of Tsingtao. On 16 August, Major-General Mitsuomi Kamio, head of the 18th Infantry Division, prepared his troops for a landing at Tsingtao.


The Suwo (ex-Pobeda) that we just see in the previous post, captured in 1905 by the IJN was used as lead ship for the combined fleet off Tsingtao

German Naval forces in Asia in August

On 23 August the ultimatum expired and the declaration of war against Germany became effective. Meanwhile the East Asia Squadron, dispersed at various Pacific colonies was reunited Northern Mariana Islands and did not even tried to join Tsingtao such was the disproportion of forces.

Indeed he decided to head for the Indian ocean, and perhaps trying to reach the Atlantic and head for home waters. This was a dangerous trip to say the least, as to avoid the Suez canal, the only choice left was great cape, Good hope. Trying to reach the Terra de Fuego on the eastern route was out of question given the presence of the Japanese Navy in the pacific, and distances for coaling; However in the end, Emden made a diversion in the Indian ocean while the fleet headed for the west coast of South America.


The seaplane carrier Wakamiya, which played a vital role in the battle, supplying informations about German positions and movements to gunners of the fleet and on land, and even making strafing attacks in some occasions.

On the German side, the boxer rebellion made a possible Chinese assault on their colony a real concern and they began fortifying the surroundings. The port and town were protected by steep hills, a natural line of defense which was fortified from the Kaiserstuhl to Litsuner Heights. Another 17 km (11 mi) defensive line was set in the inner ring of steep hills. The third and last line was only 200 m (660 ft) above the town.


Map of the colony, the pride of the German Empire (From Pinterest).

German preparations

These lines comprised a network of trenches with batteries and bunkers, all built in preparation of a possible siege. Work has been hectic during the ultimatum and from early August. The German administration also bolstered the sea defenses, fearing the Japanese fleet. Mines (which had proved their devastating effectiveness in 1904) were laid in the approaches to the harbour. Also coastal fortifications were raised, four batteries and five redoubts, well equipped but only armed with existing artillery, obsolete Chinese guns, but well manned by trained crew and large supplies of ammunitions inherited from the Chinese garrison.


German front line at Tsingtao 1914; the head cover identifies these men as members of III Seebataillon (III Sea Battalion) of Marines.

German Marines on the frontline, fighting at Tsingtao

In addition to the coastal defences, the Harbor was still protected by some ships. Not all were part of Von Spee squadron: These were one protected cruiser, the Austro-Hungarian Kaiserin Elisabeth, one torpedo boat and four gunboats. The Kaiserin Elisabeth was one of the older cruiser present and mostly used for training in Asian seas. The ship was of dubious value at sea, but could add its own artillery and crew (324) to the already strong 3,650 German infantry present in the concession, manning the very long defensive ring.

Most of them were Marine troops recognisable to their colonial hat and blue uniforms, but other were from the army and shown the classic feldgrau uniform with cap, wearing proudly their pickelhaube in parade in order to bolster the population morale. In addition there were also bout 100 Chinese Police, but their loyalty was dubious at best. Last but not least, the colony had a single plane for reconnaissance.


Japanese landing boats preparing to land at Tsingtao

Japanese Forces

Facing the Germans, the Imperial Japanese Forces seemed overwhelming. In all, 23,000 Japanese infantry were gathered for the assault, with officers which were already battle-hardened and experienced by the recent siege at Port Arthur. Later on the assault would benefit from 1,500 British infantry. The Japanese Infantry could also bring on the shores 142 artillery pieces, not counting the guns of their ships, 4 battleships, 2 battlecruisers and 1 destroyer, representing a large section of the Imperial Navy.

One of the auxiliaries was the Wakamiya, a seaplane carrier, which could bring there four Farman MF.11 seaplanes for observation. The combined fleet’s battleships were pre-dreadnoughts, led by ex-Russian Suwo, carrying Vice-Admiral Sadakichi Kato’s mark.

The British bring from their own China station the battleship HMS Triumph and the destroyer HMS Usk. Knowing the German coastal defences were a potential threat, as well as mines, two lower-value captured pre-dreadnoughts made the bulk of this force, reinforced by the Kawachi and Settsu and battlecruisers Kongō and Hiei which were there in the background to repel any relieving German force at sea. And indeed, HMS Triumph was later claimed to be damaged by German shore batteries.


British troops arrives at Tsingato in November 1914 to occupy part of the city. By then the siege was over and they will soon depart.

Start of the operations

Even before the landings started, the IJN began its deployment on 27 August. Vice-Admiral Sadakichi Kato (battleship Suwo) blockaded the coast of Kiaochow, the peninsula. He was soon reinforced by the British Royal Navy (RN), sending from the China Station’s the pre-dreadnought HMS Triumph and destroyer HMS Usk. German press was present after the siege to report the Triumph’s damaged by German shore batteries. Meanwhile, Wakamyia’s planes prepared for a reconnaissance of the surroundings of the Tsingtao harbor and made a survey of the triple-layered defences.

The 18th Infantry Division was responsible for opening the show, making the the initial landings with some 23,000 soldiers in waves of boats quickly joined by 142 artillery pieces gradually bring to the shores. Landings started on 2 September at Lungkow, amidst heavy floods. To secure any possible reinforcements and flankings, 16 years after on 18 September another landing took place at Lau Schan Bay, about 29 km (18 mi) east of Tsingtao. China’s protestation for this violation of her neutrality did not stop the Japanese.

However because the intentions of the Japanese were not unclear at that stage, the British Government decided to send a small British contingent from Tientsin to take part in the landings commanded by Brigadier-General Nathaniel Walter Barnardiston, comprising men of the 2nd Battalion, South Wales Borderers and later the 36th Sikhs. However after a friendly fire incident the Japanese gave the British troops some kimonos to wear to be identifiable, which probably cause quite a sensation and laughs.


The Austro-Hungarian cruiser Kaiserin Elisabeth

On the German side, east troops and Chinese were sent to reinforce the inner and city defences, and Kaiser Wilhelm II quickly sent a message by telegraph that the colony was not to be lost at any cost, even declaring “… it would shame me more to surrender Tsingtao to the Japanese than Berlin to the Russians”. This put some pressure on the shoulders of naval Captain and Governor Alfred Meyer-Waldeck.

In addition to his crack troops, the III Seebataillon, he had reinforcements from Chinese colonial troops and Austro-Hungarian sailors from the Kaiser Augusta. The great total was around 3,625 men but this was still thin to man all trenches and fortifications, and about half of these were sent to man the cruiser while the other half took positions with artillery batteries and defensive lines.

Naval Operations

The cruiser stayed in harbor in a static position to support the defense, however on 22 August, German S90 took part in repelling a naval reconnaissance made by China Station’s HMS Kennet. The latter was doing a routine monitoring of naval trade routes when she was intercepted off Tsingato by S90 and the gunboat SMS Launting, whereas a coastal battery soon joined the fray. The destroyer retired, damaged, receiving two hits from S90 and was written off for the following week.
On 2 September, the German gunboat SMS Jaguar catch the stranded Japanese destroyer Shirotaye off the coast and sank her.
On 5 September, Japanese reconnaissance floatplanes, of the famous Farman MF.11 model, the “longhorns”, made a complete survey of the harbor, the city and its defenses. This was crucial to help draw landing plans of operations; More importantly he reported the absence of the German East Asia squadron, which reassured the combined fleet. Soon the admiral ordered the most modern ships to retire and avoid any risk in the following coastal operations. A dreadnought, pre-dreadnought and cruiser left the blockade.


Japanese Farman Planes at Tsingtao after the siege. They led the first air-sea battle and first naval air night bombing raid in history.

However a day after, on 6 September, these planes were launched by the Wakamiya with bomblets, in order to try to hit the ships present in Qiaozhou Bay, SMS Kaiserin Elisabeth and Jaguar. But both ships had well trained crews manning AA guns and they repelled the Farmans. This was incidentally the first air-sea battle in history. This did not prevent the two ships to make a bold sortie, trying to attack the Japanese.

But after a while the ship was anchored for good and her 15‑cm and 4.7‑cm guns were removed to create the batterie Elisabeth, manned by her crew. Meanwhile on 28 September, SMS Jaguar made another raid and successfully hit the Japanese cruiser Takachiho. However the same day, all three remaining gunboats, Cormoran, Iltis and Luchs.

Later, the Takachiho would be hit by a single torpedo launched from S90, 10 nautical miles southeast of Jiaozhou Bay, sinking with all hands. The Imperial German Navy honor was saved. However, having failed to lift the blockade S90 Ran out of fuel when making it back to the harbour and she was eventually scuttled in Chinese waters the following day. On 29 October, this fate was shared by SMS Tiger, and on 2 November, SMS Kaiserin Elisabeth.

The siege

Instead of spreading his forces thin on the outer defensive lines, encountering the risk of seeing breakthrough in many points and his forces surrounded by flanking and rear attacks, he choose to concentrate all his troops in the inner defensive circle, close to the city. That way he could better man the perimeter and avoid local gaps and breakthroughs.

On 13 September this was Japanese turn: They landed first a cavalry corp to raid on the German rear-guard at Tsimo. Troops there were second-rates and their officer ordered a withdrawal. This allowed the Japanese to take control of Kiautschou and the Santung railway. General Kamio howener at this point knew he has dangerously overstretched his supply and communication lines and as the weather degraded fast he decided to stop his advance and to fortify in situ. Later he ordered the reinforcements to turn back and later he will re-embark and land his troops at Lau Schan Bay.

On 31 October the Japanese surrounded the city and started to dig parallel lines of trenches, a copycat of what they did already at Port Arthur. After great efforts they bring at range several 11‑inch howitzers to start pounding the fortifications, added to the already devastating and constant barrage from Japanese naval guns. During the line, they advanced their line closer to the city, and their artillery pummelled German positions for seven gruelling days. We talk here of 100 siege guns with about 1,200 shells each on average.

However as customary with sieges, if Germans were able counter-battery fire with the guns of the port fortifications, they eventually ran of ammunitions, and on 6 November, their guns were all shut. In addition, if they could accurately spot enemy position thanks to Lieutenant Gunther Plüschow’s Taube, the second one was short down early in the campaign.

German pilot biographic: Gunther Plüschow
During this time, Plüschow attacked the Japanese blockading ships in several occasion, more as a nuisance than anything else, dropping explosives and all kind of improvized ordance, injuring some but never cause any concern. Apparently however he met and engaged a Japanese Farman and allegedly shot the pilot with his pistol, making it -non officially still- the first aerial kill of the war. When the situation was dire, he was given by the governor in November 1914 the last dispatches to be sent to Berlin out of the city, and never saw it fall.

He was able to make his way home by August 1915, after nine months via Shanghai, San Francisco, New York, Gibraltar (captured, London as a POW ans later an escapee to Netherlands) and back to Germany. He served for the remainder of the war in the German naval air service ranking as Kapitänleutnant in 1918 and became a well known air explorer after the war, crash in Patagonia in 1931.

The proper attack came the same night, 6-7 November, when waves of Japanese infantry baionet-charged the defenders on their third defensive line, demoralized and almost out of ammunitions. They were overwhelmed and were made prisoners. On the morning, both the Germans and Austro-Hungarian, asked for a formal surrender. After much discussions, the terms were signed on 16 November 1914 when the Japanese (and later British) took possession of the colony. When the latter entered the town in turn, the German prisoners turn their back on them.

During this land campaign, the Japanese lost 733 killed and 1,282 wounded, the British 12 killed and 53 wounded and the Germans 199 dead and 504 wounded. The deads were buried at Tsingtao whiled German POWs were shipped to Japanese camp, some 4,700 prisoners, treated well and with respect contrary to WW2 and after the Versailles treaty, repatriated before 1920. 170 Germans however chose to remain in Japan and made a new life there, not surprising after such a long captivity and time to grasp the complex culture and met local women.

Some were part of the III Marinebatallion band orchestra that toured Japan with their own uniforms in 1914-19, where they became quite popular. Their impression and the contrast with the performances of the Russian added its weight to the future interwar relations between Japan and Nazi Germany and the steel pact.

Aftermath

During the Japanese occupation, the city of Tsingtao was further developed: Used as a base for the exploitation of natural resources in the Shandong and northern China it saw further development of industry and commerce. The Japanese made their mark on the city, creating an entire New City District for Japanese colonists and trade companies.

Alongside new living quarters, schools, hospitals and new public buildings mushroomed. The urban plan was extended and highways constructed while the network of the Tsingtao-Jinan Railway Line and the Tsingtao Railway Station was upgraded and further extended, with new quarters built northward and in the eastern bay.


Bundesarchiv – German Prisoners of War bring back to Wilhelmshaven on SS Kofuku Maru in February 1920 after a six years captivity.

Afterwards, the Paris Peace Conference and Versailles Treaty negotiations at first recognised the Japanese presence by not restoring Chinese rule over Tsingtao but also many other concessions after the Great War. This understandably provoked a vivid resentment in the population which erupted into the May Fourth Movement (May 4, 1919), combining all the Chinese anti-imperialist, nationalists and those advocating for the return of cultural identity in China.

Eventually, the concession of Tsingtao would fell once again under Chinese rule in December 1922, by the takeover by the Republic of China (R.O.C.) established after the 1911 Chinese Revolution.

A Japanese company still maintained its control on railways in the whole province, but the city itself was fully controlled municipality by the in July 1929. Of course imperialistic Japan eventually preyed on the strategic city and re-occupied “Qingdao” as renamed, in 1938, right after the start of the the second Sino-Japanese war in 1937.

Kuomintang forces would seize the city after the Japanese surrender in September 1945. Eventually Qindao will fell on October 1, 1949 into the hands of Chairman Mao Zedong and his troops and is now part of China since.

Admiral Von Spee would eventually fail in his attempt to join the fatherland. After roaming the Indian Ocean, and the Western pacific, winning at Coronel, the fleet was destroyed in the Falklands and the remaining ships eventually hunted and sunk, with some amazing stories like the case of the Emden.

Despite the loss of Tsingtao, German propaganda turned it into a valiant defeat, their troops and ships holding two combined, overwhelming forces at bay for two month, sinking enemy ships, downing a plane, and killing four times more Japanese than their own. They bravely maintained their cohesion under an unrelentless barrage which lasted a week, while being outnumbered 6 to 1, fighting literally to the last shell and bullet. This was also praised in Austria-Hungary.


BBC – The siege of Tsingtao – See also: //youtu.be/mfSGqlnvhxc (footage archives and movie extract)

Read More/Src
Österreichs Kriegsmarine in Fernost: Alle Fahrten von Schiffen der k.(u.)k. Kriegsmarine nach Ostasien, Australien und Ozeanien von 1820 bis 1914 (in German). Berlin: epubli. ISBN 978-3844249125.
Edgerton, Robert B. (1999). Warriors of the Rising Sun: A History Of The Japanese Military.
Radó, Antal, ed. (1919). “Csingtao eleste” [The fall of Tsingtao]. A világháború naplója [Diary of the World War
Haupt, Werner (1984). Deutschlands Schutzgebiete in Übersee 1884–1918 [Germany’s Overseas Protectorates 1884–1918].
Veperdi, András. “The protected cruiser SMS Kaiserin Elisabeth in defence of Tsingtao, in 1914”
Schultz-Naumann, Joachim (1985). Unter Kaisers Flagge, Deutschlands Schutzgebiete im Pazifik und in China einst und heute
https://www.nam.ac.uk/explore/siege-tsingtao
https://www.bbc.com/news/av/world-asia-china-29801553/ww1-the-siege-of-tsingtao
https://www.firstworldwar.com/battles/tsingtao.htm
https://en.wikipedia.org/wiki/Siege_of_Tsingtao & Qindao page
https://encyclopedia.1914-1918-online.net/article/pacific_islands

Battle of Elli and Lemnos (1912-13)

Greek Navy vs Turkish Ottoman Navy

The Battles of the Aegean sea, a prelude to the great war at sea

Eight years after Tsushima, and just before the Great war, Mediterranean naval powers clashed upon territorial and sovereignty questions. The Balkans separated from the Turkish Ottoman Empire, already in the XIXth century considered the “sick man of Europe”. There were two wars, one opposing the Greek and Turkish navy, while the other opposed the Regia Marina to the Turkish Navy. In 1912, both the battle of Elli and the battle of Lemnos showed speed was in itself a war-winning recipe.
At Elli, a single armored cruiser, using the relatively new “crossing the T” tactic pummelled the Turkish line and set the fleet packing. At Lemnos, the same story repeated, but this time the main battle line was engaged, showing that an excellent rate of fire (on the Turkish side) was no substitute for a good accuracy (on the Greek side). At the end, it also showed that naval reconnaissance was not superfluous, as shown by the perilous long-range mission of two Greek aviators to locate the Turkish fleet after the battle, and ensure the Greeks they had the mistery of the Aegean.

The Balkan Wars

The Balkan wars in 1912 has been seen by some authors as a template for ww1, at least in some aspects. There were indeed trenches, artillery concentration, air warfare and use of armored cars. The Balkan wars, also called by the Turks Balkan Faciası or “the Balkan Tragedy”, raged on between 8 October 1912 and 18 July 1913 mostly for the control of the Aegean sea, and the coastal areas of Eastern Greece and Western Asia minor, historical a region that has been Hellenized since ancient time. but it mostly happened as Bulgaria, Greece, Montenegro and Serbia took their independence from the Ottoman Empire and formed the Balkan League in 1912. Contrary to the Austro-Hungarian Empire, the “sick man of Europe” never succeed in reforming itself and dealing with the rising ethnic nationalism.
Two Balkan Wars would emerge from this, since the league was certain to beat the Ottomans, provoked the eviction of ethnic Turks from these territories, and in the end delineated present-day Turkey’s western border. Needless to say, this psycho-traumatic event accelerated the fall of the Empire and the 1913 Ottoman coup d’état. It however already had been prepared by the 1908 Young Turk Revolution. This even saw Austria-Hungary annexing the Ottoman province of Bosnia-Herzegovina, raising tensions with Serbia. I any case, the Balkans were seen by major powers as a powder cake just waiting for a spark. It would just wait for one more year to explode. The balkan wars became in any case a traumatic event for the Turks, the great national tragedy.

Naval Operations

While independently from the Greeks, Bulgaria, Serbia and Montenegro attacked Turkish positions in the theater of Sandjak, Macedonia and Thrace, and although the Turkish population was important, the issue of these land battles greatly depended from reinforcements from the homeland. So on the long-run, the fate of operations in the Balkans ultimately depended from the good will of the Greeks to intervene. The latter were too happy to oblige, also seeing an opportunity for some land grabbing in the Aegean. Naval battles between the Turkish and Greek navies in the Aegean would ensure this turn of event. The Ottoman fleet twice exited the Dardanelles to create a reinforcement convoy but was twice defeated by the Greek Navy, in the battles of Elli and Lemnos.
This Greek naval domination of the Aegean Sea prevented therefore any of these crucial reinforcements from the Middle East on any fronts and according to E.J. Erickson the Greek Navy indirect role by neutralizing a significant portion of the Ottoman Army in Thrace at the beginning of the war. Now free-handed, the Greek Navy could liberate Aegean Island. Balkans league officers were also not long to recognize the strategic value of this help to secure victory.

Before the battles: Fleets compared


Diagram by French weekly L’Illustration, depicting the Greek and Ottoman fleets and the warships that participated in the Battle of Lemnos

The Asia minor coast, east of the Aegean and the islands themselves under nominal control by the Turks, lacked any facilities for a large fleet and at best only a few patrol boats were present in this sector. The bulk of the Turkish Ottoman fleet was indeed stationed at Constantinople, which only access to the Aegean was through the Dardanelles strait. This was a blessing and a curse, as its narrows and fortifications along the way protected the fleet from any incursion, but it also was a very ominous way off for the Turkish Navy and could be blockaded. That’s basically what the Greeks did. They just waited for the Turkish Navy to exit and came to them in force, thus preventing them to reach the West coast of Turkey and escort or carry reinforcements.

In 1912, the Turkish Ottoman Navy was still impressive on paper:
The consisted of two battleships, two cruisers, five destroyers (anchored in Beirut) while Izmir has been previously sunk by the Italian Navy.
The “Young Turks” tried in 1909 to change Turkey’s attitude towards its fleet, announcing an ambitious 6 years plan including 6 battleships, 12 destroyers, 12 torpedo boats and 6 submersibles. Its realization was delayed until the war broke out in 1911 with Italy, leaving the “old Turkish fleet” completely unprepared. In emergency, two German battleships and 4 destroyers were ordered from Germany and a host of steamers converted as gunboats. British counter-admirals William and Gamble from the Istanbul naval commission at the head of the fleet in 1910 had been instrumental in this decision.

The Greek fleet on the other hand, was not so confident: In 1911, the admiralty was now also advised by British Royal Navy officers. The small navy was “saved” by the initiative of billionaire Giogios Averoff which purchased a ship in Italy, a powerful armoured cruiser loosely based on the Pisa class. She became de facto the Greek Navy flagship. But aside this, the Greeks were left with the three old Hydra class coast guard ships rearmed, 6 destroyers acquired, 2 submersibles and 6 torpedo boats started, while 9 freighters were converted into auxiliary cruisers. Greece lacked any battleship. Agreed, the two recently acquired from Germany were 1st generation Brandenbug class pre-dreadnoughts.

Start of the Operations

In 1912 the first operations by the Greek Navy was to secure several objectives. The capture of the Turkish-held port of Moudros was the first step. Located on the southern coast of the island of Lemnos, it was assaulted on October 8, 1912. The fleet landed Greek marines which progresses quickly in combination with close naval support. They defeated the unique Turkish garrison and occupation of the port followed suite. Moudros became the cornerstone of the Greek fleet for all naval operations in the sector, blocking the Dardanelles, and a launching pad to secure the Aegean islands of Psara, Imbros, Tenedos, Chios, Lesbos and Samothrace.

The Battle of Elli (1912)

The Royal Hellenic Navy (Rear Admiral Pavlos Kountouriotis) onboard flagship Averof comprised in addition to the armoured cruiser the three coastal defence battleships Hydra, Spetsai and Psara and the four destroyers Aetos, Ierax, Panthir and Leon. Meanwhile, Captain Ramiz Bey commanded the Tukish fleet, the two battleships Barbaros Hayreddin and Turgut Reis, Mesudiye and Âsâr-ı Tevfik, the protected cruiser Mecidiye and four destroyers Muavenet-i Milliye, Yadigâr-i Millet, Taşoz and Basra.

He sailed just outside the entrance to the Dardanelles when spotting the fleet of Kountouriotis. The latter, frustrated by the poor speed of the coastal battleships hoisted the “Z flag” signalling “Independent Action”, raising his speed to 20 knots towards the Ottoman fleet. He soon closed the gap and placed his ship to cross the Ottoman’s “T”. He concentrated the Averoff’s fire against the lead ship, Hayreddin Barbarossa, which was badly hit, with 7 killed and 14 wounded, while soon the Turgut Reis was hit too (8 killed and 20 wounded) as well as the Mesudiye (3 dead and 7 wounded). The captain ordered to retreat, which was done in disorder. The Averoff tried to pursue them, but soon was distanced by the faster destroyers Aetos, Ierax and Panthir. The latter wen on skirmishing with the Ottoman flee rear-guard and stayed close to the formation from December 13 to December 26.


Turkish battleship Messudieh

The result of this victory was that the Ottoman navy retreated beyond the Straits and left the Aegean Sea to the Greeks. Soon the fleet proceeded to capture Lesbos, Chios, Lemnos and Samos. At the same time it allowed to free reinforcements by sea, which was crucial for the upcoming operations on land in the Balkans.

The Battle of Lemnos (1913)

After the losses of many Aegean Islands during the early phase of the 1912 war and defeat at the battle of Elli, the Ottoman Navy was pressured to act decisively and planned to destroy the Greek fleet anchored in the port of Mudros, on the island of Lemnos. They planned to send their fastest cruiser through Greek patrols, to shell islands in the hope hoping to draw a part of Greek ships including the Georgios Averoff in pursuit. Meanwhile the bulk of the fleet would fall on Mudros. The cruiser Hamidiye was chosen and set sail for the area, passing through the Dardanelles.

Greek preparations

At full speed by night on 13/14 January, she successfully evaded the Greek lookouts and sunk a transport ship at Syros at dawn, shelling the garrison and installations of the harbour. As the Turks planned, the Greek admiralty was ordered to depart with the telegraphic message “sail immediately in pursuit”. Rear Admiral Pavlos Kountouriotis however felt this was a possible Turkish rude and refused to obey. He prepared his fleet instead for the following phased against the bulk of the Ottoman Fleet. The Greek fleet’s pride, the 9,960 ton armored cruiser flagship Georgios Averof, already a victorious veteran of the 1912 campaign, was assisted by the three old ironclads Spetsai, Hydra and Psara, with the reinforcement of seven modern destroyers.

Turkish preparations

Meanwhile, behind the safety of the Dardanelles Straits, the Turkish admiralty tried to uplift the morale of the crews. As a symbolic gesture, the old, famous and original banner of the great corsair Hayreddin Barbarossa was raised on the flagship of the same name, greeted with cheers from the whole fleet. The Ottoman flotilla was led by Captain Ramiz Bey, hoisting his mark on the pre-dreadnought Hayreddin Barbarossa, assisted by her sister-ship Turgut Reis and the older Mesûdiye (a modernized ironclad), and the cruiser Mecidiye, plus five destroyers. The ironclad Âsâr-ı Tevfik remained in the Dardanelles as a backup defense in case the Greek would try to sneak in or surge in hot pursuit.

The battle

At 08:20 on January 5, Greek patrols spotted the Ottoman fleet and the signalled was received by the Greek Fleet of Mudros already prepared, all boilers hot and crews on board. Kontouriotis order the fleet to sail at 09:45 from Moudros Bay. The two fleets met off Mudros about 19.3 kilometers (12 miles) outh-east of the istald of Lemnos. Both were sailing southeast in converging columns. Both were led by their respective flagships. On paper, the Turks had the advantage both in firepower and protection. The gunnery exchange started at 11:34, under 8400 meters (9186 yards). The Greek column turned left and further closed the distance to allow its older ironclads to open a broadside fire.

The Mecidiye and destroyers turned northeast, heading back towards the Dardanelles. They were followed by the Mesûdiye which also turned at 11:50. She has been badly hit by both the Hydra and Psara. Five minutes later, the Georgios Averof had some lucky hits on the lead ship Barbaros Hayreddin. The central axial turret was blow off. Her captain decided to withdraw towards the Dardanelles too, quickly followed by the Turgut Reis five minutes later. Soon during the battle the Georgios Averof broke off and signalled “independent action”, and sped up while maneuvering to engage the Turks with her artillery on both sides; Later she chased the retreating Ottoman ships, followed by the rest of the fleet. The chase stopped at 14:30, as the Ottoman Navy closed under the artillery umbrella of the Dardanelles.

Lessons from the battle

After the reports, it was shown the Ottoman ships had an excellent rate of fire, and spent around 800 shells. However accuracy was quite poor. During the whole engagement, Georgios Averof took only two hits for one injury and light damages. She was the only one which suffered. Barbaros Hayreddin on her side was more than twenty times, her artillery and direction was disabled while she suffered 32 dead and 45 wounded. Turgut Reis took a hit in the lower oart of the hull, creating a leaking, and 17 other hits on the superstructure, but suffered less damage. She deplored 9 dead and 49 wounded. Mesûdiye was also hit several times, and a 270mm shell destroyed the central 150mm gun platform which explosed and caused 68 casualties.

The battle forced the Ottoman Navy to retreat beyond the Dardanelles for good, never attempting another sortie, giving free hands to the Greek Navy in the Aegean Sea. To ensure this, 1st Lieutenant Michael Moutoussis and Ensign Aristeidis Moraitinis on January 24, 1913 flew with their Maurice Farman hydroplane over the Nagara naval base. Not only their reported the position of all ships, but also dropped four bombs. Their 40 minutes observation round ended a 140 minutes trip over 180 kilometers (111.8 miles). Both aviators became instant heroes in the Greek and international press.

After the war – epilogue

The Greeks launched an ambitious program, ordering at the Vulkan shipyards a single 20,000-ton dreadnought to be named Salamis, and two 2 other battleships in options which ultimately would be puchased in the US. Also the Averoff left such impression that two sister-ships were started but the armistice of May 1913 put an end to these developments. The head of the British Naval Mission, Sir Mark Kerr, defined a new plan calling for 3 light cruisers, 34 destroyers, 20 submersibles, 2 airships and 12 seaplanes plus support ships. However, new naval Turkish ambitions led to the purchase of the Rio then in constructions for Brazil plus two more 23,000 ton dreadnoughts, 1 cruiser, 4 destroyers and a submarine, which never materialized as the great war broke out.

A Parallel: Italian Naval Operations

Between January and August 1912, the Regia Marina was deployed against the Turks, focusing on the middle east and red sea. Needless to say the Italians enjoyed a clear advantage, with seven times the tonnage of the Ottoman navy and had a better training. The first act was the Battle of Kunfuda Bay where seven Turkish gunboats (Ayintab, Bafra, Gökcedag, Kastamonu, Muha, Ordu and Refahiye) and a yacht (Sipka) were sunk and the Red Sea ports were blockaded in order to support the Emirate of Asir rebellion.


The battle of Beirut

On 24 February in the Battle of Beirut, an Ottoman casemate corvette and six steamers and a torpedo boat were either sunk of force to flee. in both engagements, the Italians suffered no hit nor casualties. The goal was then to secure the Suez Canal. The Ottoman naval presence at Beirut was completely annihilated and casualties on the Ottoman side were heavy.

Complete naval dominance of the southern Mediterranean was achieved and later the Italian fleet shelled ports of the North African coast and gradually secured the 2,000 km of the Libyan coast in April-August 1912. However landings penetrations were limited to the umbrella of the naval artillery. In the summer, the Italians turned to the Aegean Sea in coordination with the Greeks, and occupied twelve islands, including Rhodes, although infuriating Austria-Hungary in the process and the last action was a combined attack of TBs in the Dardanelles in July. Nothing could really be gained of these engagements which were each time one-side, but that training was each time a major advantage.

Read More/ see also:
Conway’s all the world’s fighting ships 1860-1906
On www.usni.org proceedings archives the battle of helles and lemnos
on ageofsteelandcoal
On thomo.coldie.net
The Balkan Wars

Armistice and consequences

The end of the war to end all wars

The arrival of German delegates of the Hochseeflotte on HMS Queen Elisabeth in 1918.

Today, 11 November 2018, we remember the sacrifice of an entire generation throughout Europe, four years of a fratricide war that changed the geopolitical maps of the world, toppling empires but also setting up the conditions, unfortunately, for a second, even worst global conflict. This was 100 years exactly day for day.

At that day exactly, German delegates signed in a Wagon at Rethondes, in a rush, an unconditional surrender for the German Army. This was the tipping point of several armistices already signed the previous days, taking out of the war the Ottoman Empire, Bulgaria and the Austro-Hungarian Empire.

All three countries will experienced internal troubles, seeing a toppling of regime or dissolution as a political entity. Germany was no exception, thrown into a revolution after the abdication of the Kaiser. But oddly, peace was not signed yet. It would take this first act on 11 November, and three prolongations until peace was officially ratified at 4:15 pm on 10 January 1920.

Indeed, Europe was the object of civilian and military turmoil, with new borders drawn, new countries appearing (like Yugoslavia, Czechoslovakia and Poland), and of course the Russian civil war. Allied troops were still fighting the “reds” in 1919. But in this article of course, we will focus on the naval aspects of this armistice.

Painting of the signature of the armistice at Rethondes

Previous armistices: The fate of Ottoman and Austrian navies

Of the three central empires, Imperial Germany was the one with the largest navy and the cause of great concerns for the Entente. Together, the Ottoman Turk navy and Austro-Hungarian fleet accounted for a small fraction of this total. On the Entente side all along the conflict, as we saw the previous month and years, the central Empire were dominated head to toes by the entente navies: Not only the Royal Navy, but also the French, US, Italian, and Japanese navies to name a few. In ww2, the Japanese and Italians, both frustrated by the consequences of the armistice, swapped on the other side, which perhaps explains the duration, global character and ferocity of this conflict.

In 1914, the few German squadrons that were not in the Baltic or safely in north sea ports were chased throughout the globe. This led to Graf Spee’s Pacific squadron flee the Pacific to literally roam the oceans, or Souchon’s Mediterranean squadron taking refuge at Constantinople, and swapping to  the fez…

For most of the war, the Austro-Hungarian navy was trapped into the Adriatic (hence the Otranto barrage and multiple attempts to destroy it) and the Turkish Navy trapped into the black sea, with a de facto blocus of the Dardanelles after 1915. Of course Germany on her side was trapped into the Baltic, and a blocus enforced, leading to submarine warfare in retaliation. The definition of a total war, as populations were severely affected.

Fate of the Austro-Hungarian Navy

Pola in 1918. notice the French armoured cruiser in the bottom left corner, guarding the fleet.

It’s rare and notable when an old empire is dislocated and split between several new countries. Such was the case of the venerable Empire, and naturally, questions were asked about the future of its relatively strong fleet, counting by then three dreadnoughts and most of her high sea capital ships and cruisers still intact, spared for a large scale decisive battle like the Hochseeflotte.

By the end of October 1918, the Austro-Hungarian Army was exhausted and on the verge of mutiny as some minorities rejected the war and commanders sought a ceasefire. The Battle of Vittorio Veneto has been a turning point and triggered a chaotic withdrawal, while discussions started from 28 October onwards. Augmenting pressure, seizing  Udine, Trento, and Trieste the Italians threatened to break the truce and the Austro-Hungarians accepted to sign the surrender on 3 November followed the next day by a cease-fire. This was the Armistice of Villa Giusti.

The armistice forced evacuation of South Tirol, Tarvisio, the Isonzo Valley, Gorizia, Trieste, Istria, or Dalmatia, German forces were ordered out,  while the Italians would occupy Innsbruck and North Tyrol, followed after the war by an annexation of Trentino-Alto Adige (South Tyrol) (Treaty of London), Trieste and the Austrian Littoral. This, importantly, gave Italy a useful maritime facade for the fleet. Trieste, in particular, was of prime importance.

Treaty of St Germain en Laye: The Empire was disbanded and the new Republic of German-Austria signed on 10 September 1919 a formal treaty of peace. This ratified Italy’s acquisitions of the Austrian Littoral  such as Gorizia and Gradisca,  Trieste and the March of Istria plus Dalmatian islands which ensure the control of both sides of the Adriatic.

The Treaty of Trianon signed 4 June 1920 at Versailles, effective on 31 July 1921 was a peace treaty with the new Kingdom of Hungary. The Kingdom of Romania, the Czechoslovak Republic, and the Kingdom of Yugoslavia all benefited from large land acquisitions. The Austro-Hungarian navy was disbanded and the army of Hungary was to be restricted to 35,000 men, no conscription, Heavy artillery, tanks, and air force prohibited. Of course, no mention of a fleet was made as the country was landlocked.

The fleet was mothballed since the 31 October. The Battleship Viribus Unitis, sank by Italian frogmen at anchor, was a freak event while the Empire just gave up the fleet to the newly created State of Slovenes, Croats and Serbs. Renamed Jugoslavija she was sunk indeed on 1st November.

Indeed Raffaele Paolucci and Raffaele Rossetti, penetrated Pula with their Mignatta (“leech”), a manned torpedo during the night and their mission started before this transfer occured, so they were unaware of this and the neutrality of the new state (although there were considerable tension between Italy and the new state).

Since both frogmen had no breathing apparatus they were spotted, captured, revealed to the captain the timing of the explosive charges but not their location, and the ship was evacuated. However since the explosion did not occured as planned but 15 min. later, some sailors believing the frogmen were lying, returned to the ship and became fatalities.

The k.u.k. Kriegsmarine’s ships not given to the new state (later unified as the kingdom of Yugoslavia) were turned over to the Entente, that has them mostly scrapped. However many other ships stayed in service up to WW2. One of the longest in service was the monitor Bodrog, now a museum ship. Outside TBs which served with the Yugoslavian and Romanian navies, a handful of riverine patrol vessels survived until 1932. These were the only Austrian ships authorized through the Treaty of St Germain-en-Laye. In addition, three monitors were allocated to Hungary in 1927. The Stör distinguished herself in by greatly contributing to stopping the advance of the Soviet troops during the siege of Vienna in 1945. She survived until 1966.

War Prizes & post war allocations:

  • Habsburg, Herzherzog classes: UK, BU Italy 1920-21
  • Radetzky class: US Navy control, >Italy BU 1921-26
  • Tegetthoff class: 1 Yugoslavia (V. Unitis sunk 1919), Italy BU 1924 (Tegetthoff), France (Prinz Eugen) sunk as target 1922.
  • Kronprinzessin coastal BBs class > Italy BU 1922-26
  • Monarch class coastal BBs >UK, BU Italy 1920
  • Cruisers Maria Theresa, Karl VI, Skt Georg > UK, BU Italy 1920-21
  • Cruiser Kaiser Fz Joseph >  France, sank 1919
  • Panther class> UK, BU Italy
  • Tiger> Yugoslavia, scrapped Italy
  • Zenta class> UK, BU Italy
  • Zara class and other Torpedo Cruisers: Italy, BU 1920
  • Blitz class DDs> France BU Italy 1920
  • High seas TBs Python class> France BU Italy 1920
  • Admiral Spaun class cruisers> UK (BU), Italian Venezia, Brindidi (BU 1937), French Thionville (BU 1941)
  • Huszar class DDs > 1 Greece, 7 Italy, 2 France, BU 1920
  • Warasdiner> Italy
  • Tatra/Ersatz Tatra class DDs> Italy BU 1920
  • Kaiman class TBs> UK (BU 1920), Yugoslavia (4)
  • Tb 74 T> 4 Romania, Italy, Yugoslavia post-ww2
  • Tb 82 F> 3 Romania, 6 Portugal (sold), 3 Greece, 4 Yugoslavia (last BU 1963)
  • Tb 98 M> 3 Greece
  • Tb I> Italy BU 1920
  • Tb VII> Italy 1925-26 (customs)
  • Austro-Hungarian submarines: Italy, BU 1920 with exception of Curie (captured, renamed U 14 then ceded back to its original owners)

Fate of the Ottoman Navy

The fate of the Golden Horn Empire was fixed by the Treaty of Sèvres, signed 10 August 1920 by France and the entente countries on one side and Turly on the other. While the Ottoman Army was restricted to 50,700 men, the Ottoman Navy was authorized a force of seven sloops/gunboats and six torpedo boats  whose armament was precisely limited. The treaty included an inter-allied commission of control and organisation to supervise the execution of the military clauses.

Turkish signatories at Sevres.

The new Turkish navy flagship, ex-Goeben, Yavuz Sultan Selim, was interned in Izmir under British control.  The Yavuz, like the rest of the heavy ships, which were supposed to be given to Great Britain or Japan.  But events had the wheel spinning an odd way:

In 1922, Mustafa Kemal (Ataturk) made a coup that ousted Sultan Mohammed VI, starting a revolution and a civil war. Kemal’s own two gunboats took refuge in the Black Sea, then in the hands of “Reds” to avoid capture. While Greek victory was recognized by the Treaty of Lausanne on July 24, 1923, this allowed the release of the Turkish fleet interned in Izmir and saved the battleship Yavuz.

The Yavuz was modernized twice in the interwar at the the Gölcük Naval Shipyard, in 1927 and refitted in 1938. Turkey remaining neutral during WW2, Yavuz was still in service during the cold war and not scrapped until 1973. Indeed, short of the budget to keep her as a museum ship she has been offered to the Federal Republic of Germany in 1963, but the latter declined her. So in short, the Republican Turkish fleet inherited from the prewar Ottoman Navy, but most of the ships were scrapped due to their age and worn-out conditions, not because of any transfer, war prize or obligation. Soon after Turkey started to purchase destroyers and submarines from Italy and Germany and in 1939 it emerged in a generally better shape than in 1914.

Fate of the German Navy

Of course the greatest concern for the Entente was the fate of the largest and most modern fleet within the central powers. This formidable Navy had been quite inactive after the battle of Jutland and maintained idle, but ready, amidst growing discontent and spread of communism.

Last acquisitions of the Hochseeflotte

The Hochseeflotte before the end of 1918 had received many new ships, mostly destroyers and submarines:

-The battlecruiser SMS Hindenburg, completed in October 1917, and considered as one of the best, if not the best battlecruiser ever built and a prototype fast battleship. In addition, work was ongoing on new classes, the Mackensen (launched April and September 1917) and Ersatz Yorck class (four battlecruisers) laid down mid-1916 in Vulkan, Hamburg and other yards, which had their construction halted.

-The new battleships of the Bayern class has been accepted already in June 1916 and February 1917, but the next Sachsen class (31,000 tons, 22 knots, 8 x15-in guns) construction was suspended in 1918. Both ships indeed have been launched in November 1916 and June 1917. But because of manpower issues and material shortages, work had stalled and stopped completely in 1918 and both were later scrapped at Kiel and Hamburg, respectively. No doubt they had been formidable battleships if completed and authorized by the treaty of Versailles. In some way, they were the only reference for engineers that started the Bismarck class design twenty years after.

-Unlike capital ships, cruisers suffered less from late war shortages: The last class was the Cöln (Cologne), 10 ships ordered to various yards and laid down from 1915 to 1916. However if seven were launched, the last, SMS Frauenlöb II in October 1918, only two were completed, Cöln II and Dresden II, in January and March 1918. They saw little service. This new model of cruiser, 7500 tons fully loaded and capable of 28 knots served as an interwar model for the new KMS Emden, with few improvements.

-The bulk of the efforts were seen in light ships, destroyers or “Hochseetorpedoboote“. The large and innovative S113/V116 class, B122, V125, G148, V158, H166, V170, S178 and H186 classes were either never completed, or cancelled.

-The last classes of German WWI submarines were the U-115, 127, 142, 151, 213 and 229 cruiser submarines, or the large-scale UB 48 (which inspired clandestine interwar designs in Holland), of which 130 were planned and 92 delivered before the war ended, like the UC 80 minelaying type (25 out of 115 completed).

The first mutiny: Scheer’s aborted last offensive

Hochseeflotte’s last battle

History retains Jutland as the last major naval battle for the Royal Navy and German Navies, but after month of inaction and idleness, sensing the crew’s morale were quite low after the bad news of the front, and under pressure of the general staff and the Kaiser planned an all-out, last-ditch offensive with all the Hochseeflotte. The plan was elaborated a bit like than for Jutland. This was still about drawing a part of the Royal Navy on an ambush laid by submarines, but seeking direct confrontation this time with the bulk of the fleet and not a single battlecruiser squadron for a decisive victory without waiting for capital ships to arrive. Confidence indeed has been restored after Jutland over German ships’ resilience and exposing also British deficiencies. It should be noted the Hochseeflotte performed three sorties since Jutland: one on 18–19 August 1916 (The RN lost two cruisers), 18-19 October 1916 (SMS Munchen shelling of Sunderland), and 22–25 April 1918 (SMS Baden failed convoy interception)

The battle has been for obvious propaganda reasons presented as a German victory. Yet, the head of staff preferred not to risk the bulk of the fleet in another large battle. But by late 1918, desperation grew while morale sank, sailors, knowing about the suffering of the civilian population because of their inaction with the naval blockade and resenting their absence of commitment compared to the Infantry. Sensing this, and gradual consequences of the Soviet revolution and spread of communism in the Navy, added to a general discontent over the regime, Scheer planned the naval order of 24 October 1918.

Preparations

It happened just when notes were exchanged with the US Government about a cessation of hostilities, one conditions being the cessation of submarine warfare. Therefore all U-boats at sea were recalled on 21 October. However the day after, Scheer ordered Admiral Hipper to prepare for an attack on the British fleet, with the main battle fleet and using the available U-boats. Details and final plans were approved by Scheer on 27 October and the Hochseeflotte concentrated at Schillig Roads off Wilhelmshaven in preparation. In addition, the Germans had now fine-turned their intelligence and their communications were much harder to break. They had been in April 1918 able to launch massive surprise sorties against convoys off Norway.

The order implied the Hochseeflotte was to sail to Hoofden, due south, attacking combat forces and mercantile traffic on the Flanders coast and Thames estuary. This was supposed to draw the British Fleet toward the line Hoofden/German Bight. On day II of the operation, local forces were supposed to be engaged by torpedo-boats during the night of Day II or III while the northern grand fleet approach routes (from Scotland) up to the area of Terschelling were infested by mines and ambushing positions by submarines.

In total, 25 U-boats were to be deployed in six lines in the southern North Sea. However the days of their deployment four U-Boats were sunk. The British Admiralty was soon informed of the concentration and prepared for a possible emergency sortie.

Mutiny and Cancellation

On the afternoon of 29 October the fleet was busy preparing for sailing the following day, 30 October. Official communications used in deception mentioned a training sortie. The raid on the Thames and the Flanders Coast were scheduled for 31 October. A large scale battle was expected in the afternoon to evening. However in the evening of 29 October unrest and serious acts of indiscipline multiplied: The men became convinced their commanders were intent on sacrificing them, to sabotage the Armistice negotiations.

Battleship SMS Bayern, the most formidable German battleship

Stokers failed to return from shore leave on two battlecruisers, while mass insubordination happened on four dreadnoughts and outright mutiny erupted in König, Kronprinz Wilhelm and Markgraf. On Baden also, officers were on their guard as the crew was restless and agressive. Mutiny indeed affected mostly large ships, whereas the crews remained quiet on smaller ships. Because of the fear of an all-out uprizing and the safety of officers,  Admiral Hipper decided to cancel the operation on 30 October. He also ordered the fleet to disperse. On 3 November there was another large scale mutiny in Kiel, and ships of the 3rd battle squadron pointed their guns on the rebellious vessels. But this unrest was not over. The last act occured in 1919, in Scotland…

The end of the Hochseeflotte

Consequences of the Treaty of Versailles for the German Navy were not fixed when negotiations commenced on 18 January 1919 at the Quai d’Orsay, the diplomatic quarter in Paris. 70 delegates from 27 nations participated minus Russia, which had a separate peace signed at Brest-Litovsk on 3 March 1918. In addition to the loss of German colonies, Lloyd George wanted to neutralize the German navy, in order that the Royal Navy could keep her advantage.

Soon however the new country was allowed to keep a glorified coastal naval force: Six pre-dreadnought battleships (of the 1904 Deutschland vintage) and six light cruisers (capped to 6,000 long tons (6,100 t)) plus twelve destroyers (capped to 800 tons) plus twelve torpedo boats (200 tons). Of course, strict interdiction to study and built submarines.

Manpower was reduced accordingly to 15,000 men, which comprised not only the crews, but coastal defenses, signal stations, and administration with no less than 1500 officers. In addition, the remainder of the fleet was to be surrendered: Eight modern battleships, eight cruisers, forty-two destroyers, and fifty torpedo boats while thirty-two auxiliary ships were converted back as merchant vessels.

On 12 November 1918, instructions were sent to the German HQ to ready the Hochseeflotte for a departure on 18 November to an indicated place where she could be on guard, pending her fate. The threat was for the British to occupy Heligoland. Three days after, Rear-Admiral Hugo Meurer (Hipper’s representative) went on board HMS Queen Elizabeth to see Admiral David Beatty and receive instructions. U-boats were to sail at Harwich, the closest convenient place for short-range subs, placed under supervision of Rear-Admiral Reginald Tyrwhitt’s Harwich Force. The surface fleet, the Hochseeflotte, was to sail with a reduced crew to the Firth of Forth at the Grand Fleet’s naval base of Scapa Flow north of Scotland.

HMS Cardiff leading the Hochseeflotte main battle squadron to Scotland

Hugo Meurer temporized, knowing the mood of the sailors. He did not want a refusal and outright mutiny. In the following days from 20 November until the next year, 176 U-Boats sailed and were interned to Harwich. The 21, the 70 most significant ships of the fleet destined to be handed over were led by light cruiser Cardiff to Scotland. That was an exceptional sight. However the battleship König and light cruiser Dresden were left behind because of engines problems; The last Hochseeflotte ship sank by a mine, yet in peacetime, was the V30, during the dangerous crossing. When the fleet eventually arrived at Scapa, they were guarded by an armada of about 270 British and allied ships. David Beatty signaled the Hochseeflotte to then anchor in respective sites along the bay and the German flag be hauled down. Battleships and cruisers were placed north and west of the island of Cava and later the König and Dresden joined in.

Captivity was grim for the crews: The lack of discipline, poor morale, idleness, the terrible weather, poor food from seldom arriving Germany, lack of news from home, led to the ships to be in a state of “indescribable filth for some of the ships” according to British officers. At the head of this jailed fleet, Rear-Admiral von Reuter soon requested his flagship to the be the SMS Emden on 25 March 1919 as he was regularly prevented to sleep by the “red guard” sailors night rambling and stomping. To avoid further disturbances, crews were conducted back to Germany (only more loyal crews remained), at a rate of about 100/month. In total, only 4,815 men were left to take care of the ships.

This was a skeleton crew in charge, pending the fate of the Hochseeflotte at the Paris Peace Conference. Crucially Article XXXI of the Armistice precised that the Germans were not permitted to destroy their own ships, that were to be either destroyed by the British or sent as war reparations. However Von Reuter started to prepare the scuttling o his ships, and effort in this sense redoubled after May 1919. Further instructions in this way came later from Admiral Erich Raeder.

In June, when it was clear to Admiral Madden that the German intentions were precisely to scuttle the ships, he devised a plan to seize them. The date of the operation was planned to be midnight of 21/22 June, corresponding to the treaty of Versailles signed and entering the application. However, the first battle squadron departed for an exercise, planned to returned on 23 June in order to carry out the order, later than planned.

It was precisely at this moment that Von Reuter gave the famous order to scuttle the fleet at 10:00 a.m. on 21 June 1919, when there were only a few destroyers left at Scapa Flow. This was immediately carried out. It was not performed by explosive charges but simply by opening seacocks and flood valves and let water flow in unrestricted by watertight compartment or doors. In addition, the crews bored holes through bulkheads to speed things up. British crews were not aware of this until seeing the Friedrich der Grosse starting to list heavily to starboard. Soon also, flags were hoisted to the masts, the old Imperial German Ensign. Crews were also ordered to abandon ships.

Fremantle receiving news of the scuttling at 12:20 and immediately ordered the fleet to turn back. He arrived just when major ships were still afloat and immediately ordered the ships to be boarded and beached if possible. The last capital ship to sink was the battlecruiser Hindenburg at 17:00, which gently sat straight underwater, while Baden also sank in shallow waters and remained largely unaffected by the scuttling. A British crew was able to beach her soon after. Other ships sank in deeper waters and capsized, preventing any recuperation.

Since this was in violation of orders and almost an act of war, German crews rowing to land were shot on sight by British ships. In all, nine Germans sailors were killed, sixteen wounded, the last “wartime” casualties of the Hochseeflotte which cased to exist as a fighting force. This would remain the largest fleet scuttling in history, and the largest fleet Germany ever had, the dream of grandeur of Kaiser Wilhelm II.

SMS Baden in refloating operations. The battleship has been beached and was used afterward as a target practice, sank in 1921.

Reactions to the scuttling were mixed. The French were disappointed, counting on some recent ships acquisition, while some British officers saw it as a “blessing”, not willing to have long and painful negotiations for redistributions. Admiral Reinhard Scheer, of course, rejoiced about the regained honor. Not all the fleet was lost, however. 15 of the 16 capital ships were, 5 of the 8 cruisers and 32 of the 50 destroyers effectively sank, but the others were at least partially afloat and did not need a lot to be towed to safety and sailing again under a short notice.

All these hulls did not hamper navigation that much since Scapa flow bight was quite large and the ships were relegated in a specific corner. But it would take time to recover these ships of possible and have them towed to breakers or broken in situ. Refloating them, even for the value of scrap metal, was not seen as interesting since so many ships already obsolete or useless war reparations were already sold for scrap.

The only motivated endeavor was from entrepreneur Ernest Cox which managed to purchase and refloat 26 destroyers, two battlecruisers, and five battleships. The remainder of the hulls rested there until the 1980s, classed as archeological remains. They are laying in depths up to 47 meters (154 ft) and can be still visited today by divers if that was not for the poor weather and cold. Probably the most interesting remain had been the battlecruiser Hindenburg, which was visited by Royal Engineers and studied carefully. They discovered the quality of internal compartmentation and armor scheme. It is said that reports helped to design some details on following “super-dreadnoughts” or fast battleships after the Nelson.

The SMS Hindenburg was later partially refloated and carefully studied by British Royal Engineers, in particular the internal compartmentation and armored bulkheads.

War reparations:

Since not all ships have been lost, war reparations were possible but concerned mostly cruisers, destroyers and submarines left home. Only the Baden survived only to be used by the UK as a target ship. However, France acquired the Emden, but she was in such poor state she was not repaired and broken up in 1926, as well as the destroyer V26 and V100. most surviving ships given to UK, USA, and Japan were soon broken up. However, there was still a flurry of intact U-Boats at Harwich, that ended in the French and Italian navies, including some U-Boats to the USA. The U-boats, in particular, had considerable design influences. The interdiction to built new ones was not respected very long: From 1926 onwards, Germans engineers installed a design bureau in the Hague in the Netherland, and planned export to finance their research. They secretly designed submarines for Sweden, Norway, the Soviet Union, Spain, Finland, and Turkey gaining valuable experience in the process, helping to design new models from 1937.

Read More

  • https://en.wikipedia.org/wiki/Armistice_of_11_November_1918
  • https://en.wikipedia.org/wiki/Kiel_mutiny
  • https://www.historytoday.com/richard-cavendish/german-battle-fleet-scuttled-scapa-flow
  • https://en.wikipedia.org/wiki/Naval_order_of_24_October_1918
  • https://www.bbc.com/news/magazine-30128199
  • https://royalarmouries.org/stories/our-collection/der-tag-the-day-the-german-high-seas-fleet-surrendered/
  • https://en.wikipedia.org/wiki/Scuttling_of_the_German_fleet_at_Scapa_Flow
  • https://en.wikipedia.org/wiki/Armistice_of_Villa_Giusti

Battle of Imbros (20 January 1918)


Turkish Ottoman Navy vs Royal Navy

The end of the Ottoman fleet

Before the Autro-Hungarian Navy was condemned to inaction a few monthes afterwards in june with the sinking of the Szent Istvan, the fate of the Turkish Ottoman fleet was decided in January 1918, not by the Russians, but by the British Navy. As a reminder, the old Ottoman Navy was unexpectedly reinforced in August 1914 by two fleeing state-of-the-art German warships: The Goeben, a Moltke-class battlecruiser (1912) and the Breslau, an equally modern light cruiser of the 1912 Magdeburg class. They were renamed Yavuz Sultan Selim and Midilli repectively and remained a constant threat for the Russian Navy in the black sea, as well. However, the Russian revolution changed the situation, and now the Ottoman Navy had free hands to intervene against allied assets in the eastern Mediterranean at any moment.


Battleship Yavuz in the Bosporus. Colorized photo by hirootoko jr. By far the most serious asset of the Turkish Ottoman navy since 1914

Strategic situation in the Aegean

At that time, the Balkan war pitted the allied armies, included the Greeks, against a coalition of Bulgarians and German troops while the Turks Ottoman Army in Palestine was in disarray, with British troops advancing steadily. The British Navy stationed in the Aegean Islands covered shipping and reinforcements to the whole area, and provided naval support with the heavy guns of monitors and other ships, close to the coast. The German commander of the Ottoman Black Sea fleet, Rebeur Paschwitz, which had these two precious ships manned by compatriots at his disposal, was thinking to relieve the pressure by taking on the Royal Navy assets there, not able to counter the German ships.

The Ottoman naval raid would include an attack on the british ships anchored at Kusu Bay off the islands of Imbros. Paschwitz would then turn the squadron against shipping and the local British naval base. Another decisive factor was at that time, that the allied squadron guarding the Dardanelles was weakened by the absence of the pre-dreadnough battleship HMS Lord Nelson, leaving just the HMS Agamemnon and a few destroyer to cover the sector.


Mudros Camp

Respective Forces

Outside the HMS Agamenon anchored off Mudros, which had only four 305 mm guns versus ten faster 280 mm for the Yavuz (and was much slower), the British squadron also comprised the monitors HMS Raglan and M28, and the Acheron-class destroyers HMS Tigress and HMS Lizard which could be dealt with by the Midilli, flanking the Yavuz in the operation. Perhaps the Raglan, an Abercrombie-class monitor, was more seriously taken by the German head of staff, bearing with two 14-inch guns. However its fire controls were optimized for coastal bombardment, and she was slow and not well protected.


Monitor HMS Raglan, Abercrombie class (top: in 1915, bottom, leaving Malta for Brindisi – Imperial War Museum coll.

Attack on Imbros

On 20 January 1918 en route to Imbros, Yavûz Sultân Selîm struck a mine, but the damage was light. It was decided both ship would resume their advance and complete their mission. When in sight, Yavûz shelled the British signal station at Kephalo Point to cut out transmissions and prevent reinforcements. Midilli sailed to the entrance of Kusu Bay. Both ships then joined to approach Kusu Bay at 5:30 am. They spotted the destroyer HMS Lizard first. The latter spotted them in turn and attempted to close for torpedo attacks but was prevented to do so because of a barrage of heavy fire. The Turkish battlecruiser then spotted two British monitors just arriving in the bay.

The ship then broke to engage them, leaving the British destroyer to Midilli. Soon Yavûz shelled both monitors while Midilli had now to face the destroyer HMS Tigress arrived as a renforcement to Lizard. Both destroyers attempted to shield the monitors by deploying a smoke screen just in front of the Turkish battlecruiser with no effect.


Destroyer HMS Tigress, similar to Lizard, Acheron class

Both monitors also tried to evade fire but in vain. Raglan was soon squared and badly hit, her foretop and range finder destroyed, officers killed. The monitor tried to return fire with but missed and eventually her main armament was knocked out of action by a well-placed shell in the casemate, setting the ammunition on fire (soon drawned by a safety valve). The monitor was hit several more times in her magazines and through the hull, causing the ship to sink. HMS M28 was hit in turn amidships, set ablaze and later sunk after a magazine explosion. It was 6:00 a.m. The battle had lasted for 30 minutes. Meanwhile both destroyers were fast enough to escape the Midilli. With their mission accomplished both ships headed south to raid the allied naval base at Mudros.

Raid attempt at Mudros

Just leaving Kusu Bay, the two ships crossed a minefield, with the two British destroyers on their heals while several British and Greek aircraft had taken off Mudros and tried to strafe the ships. One of the pilots was famous Greek ace Aristeidis Moraitinis, which downed several Turkish aircrafts this day, but the naval aviation had to deal with the rock-solid heavy anti-aircraft armament of the Midilli. The latter however struck a mine near her aft funnel, followed by Yavûz Sultân Selîm. trying to escape, Midilli struck four more mines and sank. The battleships moved to rescue her crew but struck another mine en route and was forced to withdraw to the Dardanelles, closely followed by the Lizard and Tigress at a safe distance.

Soon informed of the situation, the Turkish Ottoman admiralty dispatched four destroyers and a cruiser to repel the British destroyers, hitting the leading ship badly, and forcing thel to retreat. The destroyers then came back to the Dardanelles at Cape Helles only to be greeted by heavy Ottoman shore battery fire. Both ships decided to withdrew back to Imbros. But the battle was not over yet.


Coastal Monitor HMS M28

HMS Ark Royal deployed its aircraft in an attempt to destoy the Yavuz, still not in safety. A dozen British seaplanes scored two hits on the battlecruiser near the coast. But they were eventually repelled by a resolute attack from ten Ottoman seaplanes combined with heavy anti-aircraft fire. One Sopwith Baby was lost and another damaged. The four Ottoman destroyers also now provided an additionan escort. However the Yavuz at this point was badly damaged and she she ran aground on a sandbar off Nagara Point.

Six days would follow with more allied air attacks, registering six more hits. However these 65-pound (29 kg) bombs were just a pinprick for her heavily armored decks. A submarine was planned to depart to finish her off, but only the HMS E12 which could have been available on paper was stuck by mechanical problems.

Aftermath

On paper, the Turkish attack was an easy win. Only because on unregistered minefield the operation could have seen Imbros and Mudros eliminated with relative impunity. Success was paid by the loss of the most modern ottoman cruiser, Midilli, and the Yavuz was out of action until the end of the war. The ship was left stranded in the sandbar until 26 January when the battleship Turgut Reis towed her back into the Black Sea.

At last, HMS E14 entered the Dardanelles on 27 January, just missing the Ottoman battecruiser. The submersible had to retreat, and en route met but near-missed an Ottoman freighter on her way back with her first torpedo. Her second torpedo exploded prematurely, badly damaging the submarine. She tried to escape, only to met heavy fire from Ottoman shore batteries, and was beached and the whole crew captured. Captain White died in the action but was posthumously awarded the VC.


HMS E14 crew posing in 1915 – AWM

Ater the battle, on the strategic level, the threat posed by the Ottoman Navy no longer existed. Nevertheless in the press, the loss of the two monitors and absence of battleship nearby was wildly criticized by the commanders of the British Aegean Squadron. Two pre-dreanought battleships, not useful in the home fleet anyway, could have not only dissuaded the Turkish ships, but also sink them. No praise was given however to the team responsible for the minefield…

RNAS Sopwith Baby similar to those operated by HMS Ark Royal

Read More

historynet.com attack over the dardanelles and the role played by naval aviation
timesmachine.nytimes.com the loss of the raglan, press release (pdf)
The Battle of Imbros
Conway’s all the world’s fighting ships 1906-1921

Second Battle of Heligoland (17 November 1917)

Kaiserlichesmarine vs Royal Navy

A missed second Jutland

The island of Heligoland, at the outposts of the German coast, was the object of another minor engagement after Jutland. This was an attempt to lure out the German fleet by attacking lighter ships, but the germans being too cautious, it ended as an inconclusive action, unsatisfactory for both Germans and British.

In short: German minesweepers who used to clear british minefields in the bay were intercepted by light cruisers HMS Calypso and HMS Caledon. At the sight of their smoke on the horizon the minesweepers fell back on the two battleships on duty, the SMS Kaiser and SMS Kaiserin, under Rear Admiral Ludwig von Reuter. Both cruisers requested by wireless telegraphy the support of the first battle cruiser squadron (HMS Glorious, HMS Courageous, HMS Tiger, HMS Renown, HMS Repulse), commanded by Admiral Sir Charles Napier. Both cruisers briefly engaged the battleships, before Calypso received a 280 mm hit on the forecastle, razing the bridge and killing all officers present. The second cruiser wisely sailed off of the engagement while the German squadron, at first chasing, retreated cautiously themselves at the sight of the black plumes of Napier’s own squadron, through its own minefields losing an escorting TB in the process.


The island of helgoland prior to its tranformation into a military base

Motivations

One of the trigger for the operaton was Admiral Sir David Beatty (then Commander-in-Chief of the British Grand Fleet) own will to revenge the recent German Navy’s successful raid on the Scandinavian convoy on 17 October 1917 (exaclty one month ago). Therefore he decided to send a strong force of cruisers under Vice Admiral Trevylyan Napier to attack German minesweepers and their escort, in the hope to lure out reinforcements, while his other backup fast battlecruisers were ready for action. British Naval Intelligence was made aware indeed of the wide effort made by the germans to clear British minefield in their backyard, under orders by Ludwig von Reuter.


British mine in the north sea – Imperial War Museum archives (AMW)

british minefields

The rocky island of Heligoland, before the war a popular touristic destination, later transformed into a military outpost, advanced naval base with fortifications and long range artillery, was the most obvious target in the vicinity of the German west coast (North sea coast). Once already, in 28 August 1914 admiral Roger Keyes tried to lure out German light force in the area and do battle. What followed was called the first battle of Heligoland bight, which saw an engagement of cruisers, TBs, destroyers, and two battle cruisers.
The British hoped to repeat the feat of 1914 although the past action was somewhat inconclusive. In 1917, the British finally started an effective minelaying of the Heligoland Bight, a very long endeavour (and risky, so close to the enemy) because of the neglect British minesweepers were in (not favoured like the “big cats”), and after many delays, the first reliable British mine was itself copied from a captured deriving German model. Mining the Heligoland Bight hampered greatly German coastal defence, 150 nautical miles off their coast, an area denial that they had a hard time to accept. These minefields indeed effectively cut off the Hochseeflotte from the North Sea, even the U-boats until then engaged in the battle of the Atlantic, as a response to the blocus. Therefore the German navy made minesweeping in the area an abosolute priority, straining on ships and crews.


German M15 class minesweeper


SMS Königsberg, damaged during the engagement.


Drawing of the SMS Kaiser

Creating Opportunities

The British Admiralty intelligence new that these minefields had another advantage: German minesweepers needed to be protected by larger units, potentially with quick reinforcements. With always the overall duty to bleed the german Navy, the Royal Navy had there an opportunity that could not be missed. The Germans deployed 14 minesweepers in the area, two mine destroyers, with an escort by of eight torpedo boats and four light cruisers. This fleet was commanded by Rear-Admiral von Reuter , which placed his mark in the SMS Königsberg. The battleships Kaiserin and Kaiser provided backup at 60 miles southeast of the site. Beign dreadnought, they were relatively fast, still. The British approached at the first daylights on the 17 of November 1917, two cruisers covered from the west by the First Battle Cruiser Squadron. In backup the First and Sixth Light Cruiser Squadrons and attached destroyer flotillas, and behind the latest, fast “light battlecruisers” Courageous and Glorious under Vice-Admiral Napier orders. However the danger was, only a selected few had a complete knowledge of the position of all minefields: The Grand Fleet’s commander-in-chief and the battle cruisers commander, Vice-Admiral Pakenham. Napier’s knowlegde was about the older “Line A” but what he knew about “Line B” of minefields was sketchy at best, as thoese were the most recent British minefields. “Line C” was effectively a no-go zone and he had strict orders to avoid it. The light cruisers own charts did not included the Line C that related to to older, ineffective British mines which had been laid long ago.


Rear-admiral Ludwig Von Reuter

The battle – first phase

Contact was made with the rising sun, revealing the German’s ships silhouettes over the horizon, far away as the weather was fine. Battlecruisers Courageous and Glorious quickly spotted the enemy light cruisers while the Sixth Light Cruiser Squadron went for the minesweepers. However Napier, perhaps too cautious, restrained his speed to 25 knots whereas his battlecruisers coukd reach 30, the only capital ships worldwide capable ot achieving this. But his ships started to pummel the German anyway, and the latter quicky were surrounded by impressive 15-inch shells falling around in the crisp morning light, and all German units were ordered to make smoke and were hidden within 15 minutes. Von Reuter capitalized on this to delay his withdrawal, ensuring his light fleet to steam cautiously between British minefields back home. The British were effectively stopped by thick smoke, which could conceal any possible threat, including U-boats or TBs in ambush. Napier reached Line B just before 08:40, but turned northeast to go around the smoke, and resume the chase, leaving the Germans escaping cwith a gain of four miles.


Light battlecruiser HMS Glorious

Meanwhile, HMS Repulse (Rear-Admiral Phillimore) took the lead as well as the light cruisers, both being warned by Pakenham about Line B. At 09:08 Pakenham eventually issued a general recall but Napier went on until HMS Cardiff, Caledon and Royalist were hit by Von Reuter. The latter hoped to cripple them just enough to allow his nearby battleship to catch up and finish them off. Battle cruisers Hindenburg and Moltke finally were scrambled at 08:40, followed by two battleships. This approaching force gave some advanced clues by the flyby of a reconnaissance floatplane that tried to strafe and bomb the British ships in the process. HMS Galatea was struck by a torpedo that failed to explode, but the British assumed it was from an U-boat and some ships thought they spotted submarines, a reccurent fear since the sinking of three armoured cruisers at the beginning of the war.


Rear admiral Richard Fortescue Phillimore

The battle – second phase

At last, at 9h30, the “Royal couple” as they were dubbed, SMS Kaiserin and Kaiser arrived in sight of von Reuter, reassured. Captain Grasshof (SMS Kaiserin) however had orders only to cover the retreat and not engage despite opportunities to destroy several British cruisers. Von Reuter however was not that cautious and attempted to order Grasshof to advance northwest. His signals were not received correctly and the German battleships turned east instead, at the frustration of von Reuter which resumed his retreat instead of turning to face off the British advance. The British light cruisers maintained contact throughout, and soon the battleships were able to engage them. Calypso’s bridge had been wiped out, technically “cutting the head” of the cruiser. Meanwhile, by 09:32 Napier reached Line C, turned south, ordered the HMS Repulse to stop but ingnoring the position of light cruisers of Line C, he resumed the chase, protecting them and dissuading the Germans to “finish the job”, now joined by four destroyers. HMS Repulse in the process scored a hit on SMS Königsberg, starting a serious fire, reducing her speed. Von Reuter went on southeast but the action was over, as British cruisers seeing the battleship’s salvoes, turned away, compounded by a sudden fog that compromise any further exchange. Battlecruisers Hindenburg and Moltke eventually found Von Reuter retreating and did not ventured farther. The whole German fleet turned northwest after being catch up by two extra battleships in the afternoon. The British fleet was back home.


Vice-admiral Trevylyan-Napier

Conclusion

In all, the battle had mobilized 1 battlecruiser, 2 light battlecruisers, 8 light cruisers, 10 destroyers on the british side and on the german side, 2 battleships, 4 light cruisers and 8 destroyers, protecting 14 minesweepers. As a result, 1 british light cruiser was badly damaged (but survived) while on the opposite side, 1 minesweeper was sunk and 1 light cruiser damaged. These were meagre in view of what forces were engaged, fuelling some resentment from the general staff and the public as a whole, in particular in the British opinion.


HMS Calypso, badly hit during the engagement. Her entire bridge was destroyed by a 6 inches hit.

The battle appear nowadays as a lost opportunity from both sides in fact, perhaps overly cautious. The Germans for their part wasted the opportunity created by the arrival of the Kaiserin and Kaiser. They could have destroy all three British cruisers, and successfully engage even the Glorious, Courageous or Repulse that were not armoured for the fight. On their side, the British widly critized Napier for his lack of boldness, although many understood the risk of hitting a non-charted minefield and loosing recent, state-of-the art battleships. The most bitter critics despite his failings to used properly the Courageous and Glorious speed. On the other hand, Pakenham critized the risks taken by Phillimore in Repulse, whereas Admiral Beatty supported him. The press would later expose the deficiencies revealed during this actions, perhps incorrectly directed at the Admiralty rather than the Grand Fleet. In the end the most obvious result of this was the dismissal of First Sea Lord, Admiral Jellicoe only six weeks later.


Drawing of the second battle of Helgoland – British cruisers under fire, made by Wyllie, William Lionel in 1917 Source

Battle of Moon Island (October 1917)


Russian Navy vs German Navy

This action took place in the Baltic Sea between Russian and German units as part of Operation Albion, an amphibious German operation. It is also called “battle of moon island” by the Anglo-Saxons. Most of the engagement was held on the 17th in the narrow passage of Muhu Island (“The Moon”) indeed. The German fleet was headed by Vizeadmiral Ehrhard Schmidt under orders of Admiral Behncke. Opposing Russian forces were commanded by Admiral Mikhail Bakhirev, dominated about at a 1/4 ratio, but compensated by the presence of British submarines.


A modern map of the area and Operation showing the Estonian archipelago Saaremaa and Hiiumaa

The idea of ​​the Germans, landing at the islands of Vormi (Worms), Hiiumaa (Dago), Muhu (Moon) and Saarema (Osel), was to install batteries threatening the exit of Russian ships present in Riga. But the Russians themselves had installed coastal batteries to prevent entry into the Gulf, including Ozel, on the southern tip of Zerel. For this operation, the German navy gathered its largest force ever deployed for an operation in the Baltic: 10 dreadnought battleships taken from the Hochseeflotte, cruisers, destroyers, mine layers and several squadrons of seaplanes for reconnaissance. In Riga, Russian forces included two pre-dreadnoughts (Slava and Grazdanin, ex-Tsessarevich – renamed with the recent revolution), assisted by cruisers, destroyers, and three British submersibles.


Battleship Slava

On the 12th of October, the German squadron arrived off the island of Osel, then entered the Straits of Irben, German battleships pounding batteries of the point of Zerel. The second objective was to enter the gulf and landing troops in order to take the city and port of Arensburg. But very soon, battleships SMS Grosser Kurfurst and Bayern hit mines, but survived, while German light forces skirmished with opposite Russian light forces in the narrow passage between the islands of Dago and Osel. On the 14th, troops that had landed in the south had overtaken Russian Infantry stationed at the tip of Zerel and effectively seized the island. But to the north, on moon island, the fleet sent reinforcements of several battleships to support its light forces. During the confrontation, the Russian destroyer Grom was sent from the bottom, but Russian troops remained masters of the Island.


Battleship SMS Nassau

On the 15th, Zerel’s batteries, which controlled the strait, were taken by German troops, allowing the minesweepers to clear the fields protecting the passage to the gulf. On the 16th, the cleaning work had been done and the German fleet was entering the gulf in full strenght, including 31 TBs. The same day, Lt. Sealy’s submarine fired two torpedoes at two German ships but missed but two further torpedoes struck their targets. Other attempts failed however. This same day the German minesweeper T46 was sunk, as was the destroyer V99. On the 17th, they arrived in sight of the south of Muhu island and a battle started with the bulk of the Russian forces withdrawing from the Gulf, massing by the strait between the continent and Moon island.


Russian battleship Slava was only hit three times, but one provoked a water surge, enough to give the ship such a draught that she was unable to manage to get back to safety and was scuttled. This was the only major loss of the battle.

An uneven artillery duel took place in which Slava and Grazhdanin were severely damaged by König and Kronprinz, as well as the armoured cruiser Bayan, knocked out by König. The Slava iwas hit three times, and this prompted her withdrawal after three days. But due to the added water her draught made her scrap the bottom, and shallow channel made it impossible to escape back. She was in the end, scuttled by her own crew to avoid capture between the Moon Sound Strait between the island of Muhu and the mainland, and had the coup de grâce delivered by torpedoes of a destroyer. The remaining Russian forces retreated to the north, evacuating also the troops still present at moon island, not without laying minefields in the process, on which the Hochseetorpedoboote S64 will be blown up shortly after midnight the 17/18th. On the following daylight, a landing at Dago quickly won the decision, then the Russian forces retreated to Worms on the 19th, and then headed back for the Gulf of Finland. Russian minefields were ultimtely cleared, the flotilla entering the gulf the same day. But reports of Allied submarines in the area prompted a German withdrawal on the 20th. The three British submarines had a desired dissuasion effect. The battle saw losses on both sides: 2 torpedo boats, many ships damaged by mines on the German side and 1 pre-dreadnought, 1 destroyer, 1 submarine on the Russian one. It was a blow for the Russian Navy, not able to prevent the fall of the City of Riga. Strategically the Operation Albion ended on 20 October 1917 as a success for the Germans, as they captured 20,130 men, 141 Guns (47 heavy) and 130 Machine guns, hampered the Russian navy there, shot down 40 aircrafts with relatively light losses.


Map of the defenses in the gulf of Finland at the time of the first battle of Riga gulf (August 1915).

Notes:
-The British submarines there, C 27 (Lt. Sealy) and C 32 (Lt. Satow) were present since a while, as part of the allied efforts in the Baltic: E-class submarines arrived in August 1915, but HMS E13 was stranded in The Sound near Saltholm and destroyed in the process of going through the Denmark strait. But HMS E18 and E19 arrived at Reval and soon started operations. HMS E1 E8, E9, and E19 would be scuttled outside Helsinki in 1918 to prevent capture. Four C-class submarines were alsp sent in 1915 but this time through the North Cape to Archangelsk and taken by barge to Kronstadt. One was stranded in October 1917; the three others scuttled outside Helsinki in 1918. The crews of these had a quite adventurous fate, being evacuated by Soviet ships to Petrograd and by rail to Murmansk, joining the Allied intervention forces in North Russia. They fought here as part of a sizeable international expeditionary force but withdrawn from April 1919.
-There has been three “battles of Riga”. The first ocurred in 1915, and another in 1919, during the Latvian War of Independence.
-The main naval battle during these operations ocurred the 17th and is known as the “Battle of Moon Sound”.
-The Russian battle strategy was changed on 17 October due to a mistake made in the transfer of an order.
-German battlecruisers remained in the Baltic in the previous operation in August 1915, providing cover until SMS Moltke was torpedoed by HMS E1 but had luck, as the impact did not detonated its bow torpedo room and she was repaired at Blohm and Voss in about a month, between 23 August and 20 September 1915.


German battleship Grosser Kurfürst during Operation Albion off the Osel island, in October 1917 watch over by Schütte-Lanz S.L.20, a Type ‘f’ airship. Not all were buit by Zeppelin.

Read More/See also:
British submarine flotilla in the Baltic
The Battle of Moon Sound
Operation Albion

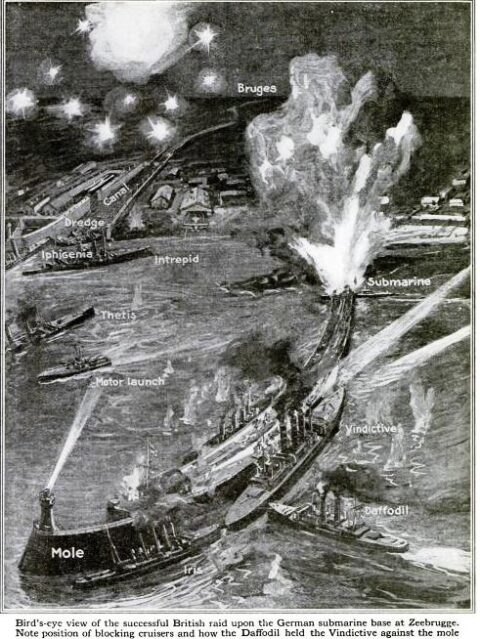
Zeebruge Raid (April, 23, 1918)


United Kingdom vs. Germany, 23 April 1918

The Zeebrugge Raid on the northern, Flemish coast remains one of the most spectacular and controversial feats of arms of the Great War. It was, as these words are written, about 100 years from now, and it still remembered vividly whereas four generations had passed. This is the equivalent of dixit Jeremy Clarkson’s “the greatest raid of all” for WW2. This event, which teethered with disaster and was heavily paid, finds indeed a certain resonance with the Saint Nazaire raid on 27-28 March 1942. In the specific case of Zeebruge, it was to permanently neutralize one of the main German naval bases on the Belgian coast, which then owned two important ones, Ostend (Oostend) and Zeebrugge. The first farther south being more difficult to access and locked by a serie of many coastal batteries, but Zeebruge, which also served as a seaplanes base, signaling the least acts of allied ships in the whole area, was well protected thanks to the massive curved pier of the harbor, and had very potent coastal batteries of its own too.


Bruges docks and approaches from Ostend and Zeebrugge

In Flemish, Zeebrugge literally means “Bruges on sea”: This is historically a canal linking Bruges to the sea, and the first tourist fishing port of the coast, became a seaside resort in the nineteenth century. That of Ostend was built later and was much longer and tortuous. The naval base of Zeebrugge was not well protected (if not naturally) and had a dozen submarines and torpedo boats passing through it and torpedo boats constantly threatening the traffic coming from the North Sea. But above all, its channel made the first outlet for the many submersibles based in Bruges. During the British Ypres salient ground offensive in the summer of 1917, a localized offensive was attempted to take Bruges. But the battle of Ypres which was to allow to create this breakthrough ended with the massacre of 200,000 men without the slightest significant advance (Bruges remained 40 km from the front). The coastal bombardments carried out by monitors being risky because of the German batteries, a “commando” type operation (the term did not exist at the time) was mounted to block the port and the canal in situ.

The idea of ​​the raid came from Sir John Jellicoe, then Lord of the Sea, shortly before his sudden resignation in late 1917, then in constant conflict with the first Lord of the Admiralty and his convoy policy, Sir Eric Gedde. His idea, relayed by Sir Roger Keyes, commander of the port of Dover, was accepted in principle and prepared in the greatest secrecy. The obstruction of the access road from Bruges to the sea was issued in 1915 by Admiral Bacon, who has since been sacked. The latter did not envision a commando operation but a raid of monitors on the locks. The plan was rejected by the admiralty. Redefined by Keyes, the operation implemented three old reformed cruisers, used as obstruction plugs and filled with concrete (HMS Thetis, Iphigenia and Intrepid), a “newer” cruiser, the Vindictive, destined to disembark and support for diversionary navy troops, and two strong ferries from Dover, Iris and Daffodil.


More detailed map of Zeebruge

The three units were completely re-equipped for the assault, on a moonless night, supported by the fire of a few monitors. They were equipped with armored towers, with machine guns, sandbags and additional sheet metal plates protecting the firing positions and the bridge. A crew reduced to a few men embarked on the three old cruisers, prepared for their rapid scuttling, the Vindictive to assault on the pier. Finally, the viaduct and its railway linking the pier (nearly two kilometers long and 73 meters wide, protected by a huge parapet on the sea side), was to be destroyed by two reformed submersibles, the C1 and C3, which were to come ‘recess under its batteries. This was to add to the confusion and prevent reinforcements. All this diversion of the Mole was in principle to allow the three cruisers to win under fire enemy their respective positions of scuttling, men being evacuated by stars. Opposite, the German garrison of Zeebruge counted nearly 1000 men, including the servants of the big coastal pieces.

Particular attention was paid to the Vindictive. Because of the height of the parapet to be stormed (9 meters) there was no question of using his normal artillery. It reinforced its armored hune, equipped with fast parts and the bridge was equipped with 14 bridges. In total he embarked an arsenal of three Howitzer, 16 mortars, 10 grenade launchers, and grapple-launcher, the latter to grip the pier while the Royal Marines climb it with bridges, ropes and ladders , the Daffodil to press the cruiser against the pier for safety. Perils are innumerable, but enthusiasm for the audacity of the operation raises more than one objection. The operation is postponed twice due to bad weather. Finally, on the morning of 22 April, a motley flotilla of no less than 157 ships and boats left the port of Swin. This included, in addition to the assault ships escorted by many stars (74), 8 monitors, 8 light cruisers and no less than 45 destroyers and torpedo boats. The Royal Marines strength then consisted of 690 men divided among the three mole assault ships. Two other blockers were planned for Ostend.


Zeebruge raid illustration, giving the position of most ships

After 7 hours of crossing, the commander Keyes sent to the fleet the signa of the beginning of operations (“saint georges for England”). At about 11 am, the stars began to unfold a smokescreen to protect the tempting targets of the six detached ships, but the wind suddenly became contrary. And while the three assault ships (Le Vindictive and the two Ferries) were only 300 meters from the pier, German flares, following the bombardment of the monitors (inefficiently) at the alleged positions of the batteries, were drawn, illuminating beautifully the three English ships approaching at a pace. At once they were met by a fire of hell, and their bridges swept under a hail of shells. Despite this, they continued their approach to their supposed positions (because they found themselves in confusion and smoke, more than 160 meters from their intended positions, towards the middle of the pier.). Devastated, its footbridges torn off, the Vindictive managed to dock and the Royal Marines to deploy under the fire of the machine guns, throwing their grapples and ladders on the high concrete parapet.


Aerial photo of the Zeebruge entrance, blocked by the sacrificed cruiser

The assault, lack of the support of the arms of the cruisers, destroyed by the German fire, turns short; The men who arrive at the top of the ladders and gangways are systematically shot down by machine gun nests and shooters posted on the roofs of the pier hangars. The rolling fire of small arms will last nearly an hour. Meanwhile, the Iris failed to dock the pier, and his commander decided to moor behind the Vindictive to transfer his men when at about 1 am, the order of withdrawal was decided. The 4th battalion had tried to take the batteries at the foot of the lighthouse, at the end of the pier, never reached it: The men were mowed either at the top of the parapet, or while going down under enemy fire, or running against the a real trench erected by the Germans and under the rolling fire of a destroyer at the dock, slowed down by crates and barbed wire.

On the other hand, the viaduct, at the other end, was effectively destroyed by the C3. The C1, too late, turned around. Without neutralizing the pieces, after the withdrawal of the cruiser, the three blockers were in turn taken under a deadly fire and the first, the Thetis, prematurely scuttled, without reaching their desired position. He had indeed been caught in the nets antitorpilles he had carried with him but twisted his propellers. He drifted on a sandbank before being temporarily immobilized. His commander managed to scuttle him at the entrance of the channel to the lock.

If the bloody assault of the big dyke was above all a diversion, the imperfect blockage of the three old cruisers was not a long time an embarrassment for the exit of the German light units. The operation was therefore mostly a failure disguised as a victory for reasons of propaganda…

The other two passed through the breach created by the Thetis and were relatively spared by the German fire, entertained by the many stars who were running at full speed in the harbor and evacuated the men. Arrived at their positions previously planned, they obstructed the passage between the harbor and the lock, narrower, but still far from them, and in a position that made them bypassable by light units. For their part, the Iris, then the Vindictive and the Daffodil left the pier under a curtain of thick smoke that saved them from certain destruction.


Aerial photograph after Zeebrugge Raid (IWM)

In the end, the three assault ships, riddled with shrapnells, completely devastated and covered with corpses and agonising wounded men, the decks soaking wet of blood, returned to Dover under the cheers of the crowd. The blocking cruisers had failed to stop the exits from Bruges, causing only a few days’ inconvenience, and the Ostend operation had been a bitter failure: The Germans had simply moved the buoy of Ostend, all lights out, 2400 meters further, and blocking ships had come aground in the dunes… May 10 will a new operation against Ostend was planned and eventually launched with the Vindictive as a blockship. But the operation was also a bloody failure.


Photos of the Vindictive and damage after the raid

In the end, three days after the Zeebrugge operation, the dredging around the scuttled cruisers allowed the torpedo boats to cross the channel and reach the open sea. When the coastal submersibles, they were forced only a few maneuvers to cross the channel on the first day of the English attack. However, the British press made this raid a success, cleverly exploited by propaganda. No less than eight Victoria Cross were awarded to commandos, never seen before for an hour-long operation. In the end, it was the Germans themselves who, by evacuating the area, blocked the canal for two and a half years.

Read More:
https://en.wikipedia.org/wiki/Zeebrugge_Raid
http://www.greatwar.co.uk/battles/yser/zeebrugge-ostend-raid.htm
http://www.firstworldwar.com/battles/zeebrugge.htm
Model of the Vindictive – IMW
http://www.fr.naval-encyclopedia.com/batailles-premiere-guerre-mondiale.php

Otranto Strait Battle (May, 15, 1917)

Forcing the Barrage


The famous Barrage of Otranto (Authors’ map)

The strait of Otranto, between Corfu and Brindisi, which is the passage from the Adriatic to the Mediterranean, was about 100 km wide and “closed” during the war by the famous “Otranto dam”. In reality the latter, designed by the British Navy with reduced resources, was not very effective, especially against submersibles. It included about 50 armed trawlers with Wireless radio that were to warn nearby bases, sending on-site ships from Brindisi in the matter of minutes. Austria-Hungary, for its part, never stopped raiding the “dam”. The few trawlers available on such a large area made monitoring difficult, leaving large gaps open in the area. The defense was also helped by channeling ships via minefields laid near the coast, most of them anchored at 20 meters deep. Also trawlers laying large steel nets supposed to warn them of the passage of the submersibles were placed in several nevralgic points. It is estimated, however, that in bad weather and at night the entire Austro-Hungarian fleet could have passed quietly through and seriously threatened the convoys, especially to the Dardanelles. Fortunately for the allies this situation never took place, and only submersibles passed from time to time (the U6 was the only captured).


A Cruiser of the Admiral Spaun class, which resembled Tatra class destroyers, and were maskeraded to look even closer

Austro-Hungarian May sortie

In fact, the few really active Austro-Hungarian units were squadrons usually consisting of a light Admiral Spaun class cruiser and several destroyers or torpedo boats. More than 30 sorties were made in four years of war, most of them without results. They degenerated very rarely, into more than skirmishes with one exception: The battle of May 15, 1917.
On the 14th, the Austro-Hungarian flotilla commanded by Captain Miklos Horty, future chief admiral of the fleet and later Hungarian famous statesman, sailed from Cattaro for yet another raid on the dam, in order to attack the lines of surveillance. This flotilla consisted this time of three light cruisers of the Spaun class, repainted and maskeraded as destroyers helped by a silhouette recalling the the Tatra, and expected to play on this resemblance to the full. They were accompanied by two modern destroyers (Czepel and Balaton) and three U-Bootes.


SMS Novara photo when steaming towards Otranto

The two fleets met

In the middle of the night, the squadron was covering out an ammunition transport escorted by an Italian destroyer, and both were sent to the bottom. From then on, they rampaged as planned the line for two hours, from 3:30 to 5:30, destroying or bdly damaging all monitoring trawlers, two of 14 sinking on site, the other being reduced to burning wrecks. The warning was given, and the Anglo-Italian-French Combined Squadron at Brindisi under the command of the Italian Admiral Alfredo Acton, sailed immediately to intercept Horty’s ships before their retreat. The meeting took place under the watchful eye of allied surveillance seaplanes in the area. At the head of the allied squadron were the cruisers HMS Dartmouth and Bristol, and four Italian destroyers led by the Aquila. At about 7.45, they were able to see the Austro-Hungarian ships heading north, but the interception of Horty’s squadron proved a failure because of the lack of coordination between allied ships. Only Aquila was badly hit by gunfire, while the rest of fleet escaped. A chase began, full spead ahead and engines overheating. For the British this proved was too intense and two destroyers eventually had to break and reduce speed while the HMS Bristol later also broke off, until only the Dartmouth and two destroyers were still in.


Two of the numerous drifters that became sheeps in the wolf’s den with the arrival of the Austro-Hungarian fleet

Eventually they catched SMS Novara, which deck was hit, and eventually her bridge too, one hit destroying it and thal the officers including Horty hismelf died or were wounded. The SMS Saida, also hit, approached to take her in tow, and the Dartmouth could have sank them both if a “miracle” never happened: An Italian plane detected at the same time smoke on the horizon coming from Cattaro. Fearing the reinforcement of heavy units, HMS Dartmouth and her escort stopped the pursuit and turned back. The damaged cruisers joined Cattaro soon after. The Dartmouth was torpedoed on her return by the UC25 (a mine-laying type) but survived, while the French destroyer Boutefeu was blown off by one of the mines layed at the entrance of Brindisi by the very same submersible.


Captain Horty, badly wounded after the battle.


SMS Novara, showing her damage after the battle

Aftermath of the action

Horty, although badly wounded, gained from the action a prestige such that when the mutiny of Cattaro broke out and a change of mind prevailed, he was promoted to the rank of rear-admiral and commander-in-chief of the mutineer’s fleet until the armistice. Miklós Horthy de Nagybánya will then raised to new heights in the interwar and became regent and statesman of Hungary up to the end of WW2. When the Otranto defense staff were blamed for their inefficiency, no one could claim to be able to reinforce this line without the appropriate means, which did never met the requirements until the end of 1917 with the US entry into the war and Australian reinforcements. This otranto Barrage needed the contribution of 35 destroyers and 52 trawlers almost continuously. Therefore the record of this naval action was mixed. HMS Dartmouth and Aquila were out of service for months in dry dock, a transport, an Italian destroyer, and two trawlers were sunk while most of the surveillance trawlers had been put out of action, also for very long, while SMS Helgoland had only been slightly affected, the other two more seriously. Despite this, no new sorties were planned immediately by the Austro-Hungarian admiralty. For the records, there has been another battle of Otranto, this time in November 1940, a minor naval action between Italian and Australian ships.

Read More/Sources
http://www.gwpda.org/naval/j0300001.htm
Map: http://www.gwpda.org/naval/otrantol.gif
https://en.wikipedia.org/wiki/Battle_of_the_Strait_of_Otranto_(1917)
https://en.wikipedia.org/wiki/Mikl%C3%B3s_Horthy

Dover Strait Actions – October 1916 to April 1917

For the Control of the Channel

Dover strait, which commands the southern Atlantic passage for the German Navy.

The first battle (26–27 October 1916)

The Channel was a very tempting passage, especially in Winter, for the nearby German Navy after the capture of the coast of Belgium and the Netherlands. Behind the strait were the bulk of allied traffic, thousands of British, American and French ships bound to the new continent. A very tempting hunting area for any submarine, as surface ships were far more conspicuous and had few chances to even get close.
Indeed after the epic battle of Jutland in May which ended as a draw, the Hochseeflotte was stuck un harbour for the duration of the war. However smaller ships, closer to the action and faster could still operate, not counting coastal submarines, like those based in Zeebrugge.


German A1 class coastal TBs

The channel was a perilous passage by any standard in peace time already, riddled permanently with shifting sandbanks and strong currents, with the wartime addition of coastal batteries, and sea and air patrols. It does not prevented two forces to clash rather violently in the night of 26 to 27 October and part of the day, between 7 destroyers, 1 armed yacht, 1 naval trawler, 1 troopship and 28 naval drifters on one side and 23 torpedo boats on the German side. The naval battle was a frank German success, which returned with only one Torpedoboote damaged, but having sank one destroyer, 6 naval drifters, a troopship, and damaged more or less severely 3 destroyers, 1 naval trawler and 3 naval drifters.

German reinforcement

The start of this battle was a shifting of local power previously held by the British, by the transfer of the 3rd and 9th German Torpedo Boat Flotillas to Flanders. Previously the flotilla had only three large torpedo boats and other coastal A-class torpedo boats, but now 23 large torpedo boats were available and ready to take on the Dover Patrol in force. At that time, as most destroyers and TBs were stationed elsewhere, the British defences were quite lax in the area, relying mostly on converted trawlers and drifters. Quite soon, Flanders Flotilla′s commander Admiral Ludwig von Schröder goal became to attack the Dover Barrage, break it and then roam the area beyond in search of allied merchant traffic, like a wolf in a sheeps den.


HMS Nubian, as damaged after her first battle of Dover in October 1916

British Deployment on the Dover barrage

By that time the barrage was not ready for such an attack and has not been upgraded since the arrival of the German flotillas: One old destroyer (HMS Flirt), the yacht HMS Ombra, an armed trawler and a bunch of drifters was in charge of maintaining a close protection of minelayers, their only means to defeat an incursion. However upon alert, six Tribal-class destroyers based at Dover could be quickly deployed. Also units of the Harwich Force could be raised as reinforcement if needs be.

German attack

These German TB flotillas were split into five groups, each in charge of a different section of the channel’s shipping areas. Soon the 5th Half-Flotilla sailed into the Dover Barrage and made visual contact with five drifters (10th Drifter Division) tending the anti-submarine nets. Soon the HMS Flirt was despatched in recoignition, spotted the ships closer but was confused by deceiptive German signals, making her staff think an U-boat attack just happened and the ships were allied and chasing the boat. Just when a boat was sent to rescue the Drifters’s crews, the German TBs suddenly appeared on the scene and attacked by torpedo and gunfire at short range, crippling the destroyer after she tried to manoeuver to ram one of these. Then the ships resumed their attack and sank six drifter and the sole trawler.


Badly Damaged drifter

The “Tribals” at the rescue

At last informed, Admiral Reginald Bacon (commander of the Dover Patrol) sent the six Tribal-class destroyers soon split into two loose groups, of which the HMS Nubian soon spotted the enemy just after they sank the empty British transport Queen off Goodwin Sands, returning from France. The Nubian at first also confused the 17th Half Flotilla boats for allied ships, but was greeted by a hail of gunfire and later struck by a torpedo that blew off her bow and made her a stationary hulk.
The ship was latter towed to safety and fused with another crippled destroyer (which loosed the rear) of the same class, the Zulu, earning back in service the official name “Zubian”.


HMS “Zubian”

Meanwhile HMS Amazon and Cossack arrived at the scene and engaged the Germans. The Amazon was soon forced to retire, badly damaged. Later on, the HMS Viking’s division clashed with the German coastal TBs returning to Zeebruge. In the short engagement, HMS Mohawk suffered several hits. Last attempt to intercept them was to dispatch the Dunkirk Division, but they failed to made contact. This first battle arbruptly placed Zeebruge in the top of the hit list for the Royal Navy. The flotilla there would later intervene in another large action and minor raids, until the Royal Navy sold all accounts in the famous raid on Zeebruge in 1918, shutting it for good in 1918.


April 1917 Dover action

The now threatened Dover strait commanded the southern Atlantic passage for the German Navy, which had few other alternatives: Going through the Arctic Circle, only in the summer, or between Iceland and Scotland, under the nose of the Grand Fleet anchored at Scapa Flow. The particular scheme was repeated again wit the KMS Bismarck raid in 1941. A rather close barrage of minefields comprised a few passages known only to the allies closed the strait. In order to clear it, the Hochseeflotte could have sent minesweepers on the spot, but under heavy cover by destroyers. The Flemish and Belgian coasts being under German occupation, the naval base of Zeebruge was turned into a major military asset, a lair of submersibles and torpedo boats bound to harass allied traffic. Numerous skirmishes took place between Franco-British and German units in the Channel, and in particular in the Dover Strait, which was to undergo a serie of increasingly severe skirmishes and a fully fledged naval battle in April 1917.


HMS Broke, destroyer leader

Night Action compared forces

The most important of all these actions took place during the night of 20 to 21 April, 1917. The day before, two groups of six Hochseeflotte destroyers were sailing from the fortifications of Dover to catch British patrollers. Shortly before midnight, the two groups split, one of them shelling Calais and the other Dover. The Admiralty, quickly notified, contacted two destroyers leaders on patrol nearby, HMS Broke and HMS Swift. At dawn, they spotted the 6 German destroyers near the infamous Goodwin’s banks and opened fire. On paper the Germans had the advantage with 6 destroyers against 2 on the Royal Navy, but the HMS Broke was a recent destroyer leader, among the most powerful in the world and the HMS Swift, a famous pet project of Jackie Fisher, whiwh held the title of the largest destroyer worldwide, having almost the rank of a light cruiser. On the other side, German destroyers were only glorified torpedo boats with wet bridges, small profile and armament. The German Admiralty’s most powerful destroyers were initially requisitionned Russian orders and of the large “Novik” superclass ships, and a couple of large destroyers only appeared at the end of the war (like the S113). See the German destroyers WW1 page for more.


HMS Swift (1907)

The action

During the gunfire that was conducted at very short range because of the lack of visibility, and rather confused, two British ships concentrated their fire on the G85, and the HMS Swift finally gave the coup de grace by torpedo, while the HMS Broke rammed the G42, already damaged by the British heavy fire, the schock being so violent that her bow remained stuck in the hull of the German destroyer. A feat reminiscent of the ancient triremes. What followed only happened during the sailing era of Nelson: Sailors of both sides recovered all the weapons on board and a general shootout began. The Broke had the advantage of her more important crew (197 vs 87), whereas trimmers were busy to force the power of the machines so that the ship could disengage. This was finally done around 2 o’clock in the morning, but releasing it revealed the massive gap in the hull of the G42 which sank quickly. The other four German destroyers fled, slightly damaged, joining the 6 others, and taking the direction of the coast.


The general shootout between the two destroyers


G85 at sea

Epilogue

HMS Broke sailed back with a twisted bow which let tons of water gushing in the front compartments and so she was ploughing heavily. She was towed by the more powerful HMS Swift to port. She would serve until 1920 but her career lasted in the Chilean fleet for many more years. This naval battle had however no serious consequences on the continuation of operations: The Germans raided the coast again, to which a large array of brand new monitors were built, shelling relentlessely Belgian ports. Only the daring and famous Zeebrugge raid decided to finish once and for all this large German base far too close for comfort. A raid which equal St Nazaire (1942) in its scope with its cortege of drama and heroism (Will be treated soon).


HMS Broke bow after the battle of Jutland


Illustration of HMS Swift

Read More, sources

Destroyer Battles: Epics of Naval Close Combat
http://www.wartimememoriesproject.com/greatwar/battles/view.php?pid=4894
en.wikipedia.org/wiki/Battle_of_Dover_Strait_(1916)
en.wikipedia.org/wiki/Battle_of_Dover_Strait_(1917)
http://www.naval-history.net/WW1Battle1704Dover.htm

27 OCTOBER, 1916: Net Loss


Conway’s all the world’s fighting ships 1906-1921

The torpedoing of Lusitania – May 7, 1915

Above: The position of Lusitania during its sinking

After the famous Titanic, sunk in peacetime, the sinking of the Lusitania remains one of the greatest maritime tragedies in history, whose consequences have been decisive as a triggering factor of the entry into the United States in the first world war war alongside the entente powers. Ten years ago, it was Europe’s golden age, “La Belle Epoque”. Large transatlantic companies competed with prestige and luxury ships, technical prowesses, and millions of pounds sterling in luxury items and accomodations worthy of a the most pretigious hotels, all under the incredulous gaze of the press. Of these, two giant shines in passenger transport, the Cunard and the White Star Line. If the latter remains famous for having commissioned in 1911-12 three huge ships, the Britannic, the Olympic, and the Titanic, whose history is no longer told, its great historical rival had eclipsed these in the newspapers by the triumph of a new challenger, the Mauretania, from 1907. The latter came out three months after the Lusitania, taking the title of the world’s largest ship, and adding the title of the fastest liner in the world, taking the legendary Blue ribbon and retaining it for 20 years, not a small feat. The Cunard wishing to keep three ships on its Atlantic line, like the White Star line, later launched the Aquitania.

In 1914, the three giants were not requisitioned for future tasks (troop transport and auxiliary cruisers) but kept in their original role on the transatlantic line. On the other hand, later, the Mauretania was converted indeed as a troop transport. For economical and safety reasons, the ship saw her scheduling going from one trip per week to one per month and two boilers closed, her speed falling to 21 knots. From February 15, 1915, the Kaiser authorized unrestricted submarine warfare: His U-Bootes could now roam freely along the English islands, and off the coast of Ireland in the North Atlantic. The new models of oceanic submersibles built also allowed such range. On 18 February, this decision came into force and from then on all neutral ships likely to supply Great Britain would be torpedoed without warning. However, German commanders had two restrictions, concerning certain neutral ships, and concerning ships not carrying arms or ammunition.


Lusitania 1907

From February 17 to 24, 1915, from Liverpool, the Lusitania made her 101st crossing to New York, which was celebrated as it should be. She stayed a week at the dock before leaving. In doing so, passengers with dual nationality (German and American) who were to board her consulted the German Embassy which advised against them to make the trip. The Embassy also made a note in English explaining that taking place on board could be done only at his/her own “risk and peril”:

“NOTICE: TRAVELERS intending to embark on the Atlantic voyage are reminded that a state of war exists between the United Kingdom and the United States of America. Official notices given by the Imperial German Government, vessels flying the flag of Great Britain, or any of its allies, are bound to be destroyed in those waters and up to the United States of America, at their own risk.
IMPERIAL GERMAN EMBASSY, Washington, DC April 22, 1915.”

The press got wind of this note and the agitation began to cause some cancellations. Confident however, Captain William “Bower Bill” Turner, continued to say that his ship was too fast for U-Bootes and “safer than a New York trolley”. At noon, the ship cast off the moorings and retrieved SS Cameronia passengers and crew. Three German spies were discovered shortly after departure and sent to the bottom of the hold. 1257 passengers had taken their seats aboard, including – as was customary on the big transatlantic – celebrities and businessmen of the time like the millionaire Alfred G. Vanderbilt, the genealogist Whitington, the engineer Frederick Stark Pearson, the pianist Charles H. Knight, theater actors Julius Miles Forman and Charles Klein, impresario Charles Frohman, writer Ian Holbourn, architect T. Pope, a wealthy art collector…

During her return voyage, far from the golden comfort of the lounges, the Admiralty offices received a dispatch from the coast stations intercepting a UFO radio message from Commander Walter Schwieger’s U-20 who was operating west of Ireland and headed south. On the 5th and 6th of May, the latter was sinking three ships in the vicinity of the Fastnet, the final point of the line followed by the Lusitania. As a result, on the 6th, the Royal Navy issued a warning to all ships present that a U-Boote was prowling on the south-west coast of Ireland. The Lusitania received the message twice and Commander Turner decided to proceed with security measures: Closing the watertight doors, unlocking the canoes on the davits to launch them more quickly, partial extinction of the lights, and doubling the watchers.

On May 7 at 11 am he caught a new message from the Admiralty, and then decided to get closer to the coast rather than stay in the open sea, where he hoped to be safer. Commander Schwieger was running out of oil fast, but he still had three torpedoes left. He finally decided to return, and was sailing at full speed on the surface. The weather was clear. Suddenly, around 13:00, one of the watchmen reported a smoke on the horizon. The Lusitania was 70 km off the village of Old Head of Kinsale on the coast when it crossed the submarine path. Schwieger could not believe how lucky he was to be able to cross the liner, which was coming to the west, facing him. He could very well intercept her, but not pursue the ship as he would have been quickly out of reach. Around 14:10, at a good distance, he dives to avoid being seen, and orders the tube 1 to fire. The torpedo goes straight to the side, at the front of the huge black mass…

As a result of the opening immediately to port in the hull, a second explosion tore the latter over a great length. Testimonies spoke later of two torpedoes, but the official reports and the number of torpedoes remaining on board pleaded the opposite. Be that as it may, the giant offered a gaping wound at the bow, gushing tens of tons of seawater, sailing at full speed. Turner immediately knew what he was doing and launched an SOS while steps were being taken to have the passengers board the rowboats asap. But the list increased at high speed, including the pitch, because quickly, as the bow played a “plow share” effect, she still sank further as the ship plunged. Unfortunately her compartmentation technology dated before the Titanic, and she could not claim to be unsinkable. From then on, her fate was sealed much faster than the former (18 minutes). Turner, however, decided to try to go down the nearby coast to beach her giant ship. But the steamer was now too heavily loaded, and no longer answered. He ordered the speed to be reduced, and the trimmers began to evacuate the flooded rooms.

On the deck Turner and his crew could not stop the panic that had taken hold of the passengers, as the launching of the boats, though this time in sufficient numbers, was a nightmare: The Lusitania had been assembled with salient rivets, and with the important list, most of the lifeboats heavily loaded, scraped the hull down and consequently, arrived at the water with leaks provoked by these rivets. The handling of the davits proved difficult for the crew members, many of whom came from the Cameronia (an ironic timewarp wink at James Cameron?). By feverishness and lack of coordination, turned, either downhill, either with the water, still others fell brutally and crashed on passengers, were broken… In the end, out of 48 boats, only 6 managed to stay afloat, laden with women and children. The end of the giant was terrible and reminiscent of the Titanic, her bow twisted, the rear lifted, then the hull broke from the front. One of the chimneys exploded, and fell on the swimming survivors, followed by the other three. Finally, she capsized and sank, belly in the air at 2:28 pm, just 8 miles off the coast of Ireland.

In total there were 1198 victims, including 128 Americans. The shock was considerable, but it was only the first trigger that led the United States into the war. The question of whether the Lusitania carried arms and ammunition (the British fiercely denied this fact, and described Schwieger as a war criminal) remains controversial. Some believe that “cheese” stamped ammunition was on board, smuggled, and caused the second explosion on the torpedo impact. It remains that the famous undersea explorator Robert Ballard visited the wreckage during a campaign and found nothing convincing. For him, the “ammunition” was stored too far from the impact, but it was the coal dust residue of the affected compartment that would have detonated.

In any case, faced with the scandal provoked by this affair, the Kaiser ordered a “truce” for the big steamers, until September. A satirical medal was melted in Munich commemorating the sinking of the ship and the propaganda seized the case, reinforcing the hatred of the British against the “barbarians”, and cultivating some deep resentment in the Americans press, which was added to German secret operations on US soil (like a fifth column trying to blew up ammo depots) and a secret cable to the Mexicans promising rewards if they attacked the border, intercepted by the British. For all what was wrote about it, books, movies, documentaries anc conspiracy theories which followed for 100 years, the sinking of the Lusitania was an historical event of first magnitude, staying well above the mass of unnamed freighters, coasters, ferries and tall ships that disappeared in this war in similar circumstances.

Sources, read more:
en.wikipedia.org/wiki/Sinking_of_the_RMS_Lusitania
en.wikipedia.org/wiki/RMS_Lusitania

Documentaries:

The Lusitania (World War 1 Documentary) | Timeline


Terror At Sea Sinking Of The Lusitania Documentary


Dark Secrets of the Lusitania – Documentary movie


The Sinking of the Lusitania

Exit mobile version